1
Version 1.6 / 5. June 2012 / 22:00 Copyright 2012 - PB-Soft PBlicense - User Manual Content 1 Introduction................................................................................................. 8 2 System Requirements ................................................................................ 8 2.1 Hardware .............................................................................................. 9 2.2 Software - Host ..................................................................................... 9 2.3 Software - Client ................................................................................... 9 2.4 Installation............................................................................................. 9 3 Installation Types ..................................................................................... 10 3.1 Type 1 - Localhost .............................................................................. 10 3.2 Type 2 - External Webhost ................................................................. 10 4 Software Download .................................................................................. 10 4.1 Download the PBlicense Trial-Version................................................ 10 4.2 Buy and download the PBlicense Full-Version ................................... 10 5 Software Installation................................................................................. 11 5.1 Type 1 - Localhost .............................................................................. 11 5.2 Type 2 - External Webhost ................................................................. 14 5.3 Check Directory Permissions.............................................................. 20 6 Installation Problems ............................................................................... 22 6.1 System Requirement Problems .......................................................... 22 6.2 Zend Optimizer not installed ............................................................... 24 6.3 Wrong Zend Optimizer Version........................................................... 26 6.4 Other Zend Optimizer Problems ......................................................... 27 6.5 Wrong File Transfer Mode .................................................................. 29 7 Control Panel Configuration .................................................................... 30 7.1 ServerPort........................................................................................... 31 7.2 TextApplication ................................................................................... 32 7.3 SaveWinPos ....................................................................................... 32 8 Control Panel Usage................................................................................. 33 8.1 Start / Restart...................................................................................... 33 8.2 Stop .................................................................................................... 33 8.3 Menu................................................................................................... 33 8.4 Exit...................................................................................................... 33 8.5 Shortcuts............................................................................................. 34 Page 3 of 113 PBlicense - User Manual 9 Start PBlicense ......................................................................................... 37 9.1 Installation Type 1............................................................................... 37 9.2 Installation Type 2............................................................................... 37 10 Login to PBlicense ................................................................................. 38 11 Create a new User................................................................................... 40 12 Logout from PBlicense .......................................................................... 42 13 PBlicense Main Menu ............................................................................. 43 13.1 PBlicense - Main Application ............................................................ 44 13.2 PBlicense - Frontend ........................................................................ 45 13.3 PBlicense - User Manual .................................................................. 45 13.4 PBlicense - Footprint Generator ....................................................... 46 13.5 License Analysis Tool ....................................................................... 47 13.6 PHPview Tool ................................................................................... 48 13.7 Requirement Check Script ................................................................ 49 14 PBlicense Configuration ........................................................................ 50 14.1 Edit the main Configuration File........................................................ 50 14.2 Edit the License Generator Configuration File .................................. 51 14.3 Create new Product Keys ................................................................. 53 15 Unlock the Software ............................................................................... 54 15.1 Generate and send the Footprint ...................................................... 54 15.2 Install the License File ...................................................................... 58 16 Unlock Problems .................................................................................... 60 16.1 Check if there is a License File available.......................................... 60 16.2 Check the Number of Licenses......................................................... 60 16.3 Check the Username and Organization............................................ 61 16.4 Check the Product Name and Software Version .............................. 62 16.5 Check the License Start- and Expiration Date .................................. 63 17 PBlicense Navigation ............................................................................. 64 18 PBlicense - Home ................................................................................... 65 18.1 Information........................................................................................ 65 19 Configuration Editor............................................................................... 68 19.1 Create a new Product Configuration................................................. 68 Page 4 of 113 PBlicense - User Manual 19.2 Edit a Product Configuration ............................................................. 78 19.3 Delete a Product Configuration......................................................... 79 20 License Generator .................................................................................. 80 20.1 Create a license file .......................................................................... 81 20.2 Send a License File .......................................................................... 87 21 License Manager..................................................................................... 88 21.1 License information........................................................................... 88 21.2 View a License File........................................................................... 89 22 File Integration ........................................................................................ 90 22.1 Project Files ...................................................................................... 91 22.2 MD5 Hashes ..................................................................................... 94 22.3 Product Files..................................................................................... 95 23 Code Integration ..................................................................................... 96 23.1 Display the PHP code....................................................................... 96 23.2 Customize your Configuration File.................................................... 98 23.3 Customize your Application File........................................................ 98 23.4 License Information Array ............................................................... 102 24 Tools ...................................................................................................... 103 24.1 PBlicense Frontend ........................................................................ 103 24.2 License Analysis Tool ..................................................................... 105 1.1.1 Overview .......................................................................................... 105 1.1.2 Edit the Configuration....................................................................... 105 1.1.3 Analyze a License File ..................................................................... 108 25 Backup................................................................................................... 109 26 Buying PBlicense ................................................................................. 110 27 Licenses ................................................................................................ 111 27.1 Apache Webserver ......................................................................... 111 27.2 PclZip Library.................................................................................. 111 27.3 PHP-Package ................................................................................. 112 27.4 Zend Optimizer ............................................................................... 112 28 Support .................................................................................................. 113 29 Feedback ............................................................................................... 114 Page 5 of 113 PBlicense - User Manual Dear customer Thank you for using PBlicense! We are sure that this software will be very useful to you and that you really will like it! This manual will show you how to get started with PBlicense. It provides detailed step by step instructions so that it will be easy for you to learn how to use the application. First it will describe the system requirements, installation steps and also detailed problem solutions in case that there are troubles during the setup. Later it will explain how to unlock the software and you can see how the licensing procedure of PBlicense works. Then it will explain how to use the PBlicense software: create product configurations, create and send license files, and how to integrate PBlicense into your projects. At the end it will provide some important information about buying a software license, support contacts and customer feedback. One of our objectives is to provide a superior support so that we have happy customers. Therefore if you have questions or problems while installing or using our software, please do not hesitate to contact us! Sincerely Patrick Biegel Page 6 of 113 PBlicense - User Manual 1 Introduction PBlicense is a PHP Software Licensing System which helps developers to protect their applications against unlicensed use. The software user needs a valid license to run an application. To get a license he needs to create a footprint and send it to the developer. The developer then creates a license file and sends it back to the customer. With the license file the application will run a limited or unlimited time depending on the license file. 2 System Requirements PBlicense has some specific hard- and software requirements. If you just want to check if your Webserver meets the specific software needs you can use the PBlicense software requirement check script. If there are no errors found while executing the script it should be no problem to use PBlicense on your server. Please download the script from our website at www.pb-soft.com. Page 7 of 113 PBlicense - User Manual You can also use the little checklist below and see if your hard- and software meets the specific needs. 2.1 Hardware Host computer Client Computer Network which connects them 2.2 Software - Host Linux, Unix or Windows based webserver PHP version >= 5.2 installed Zend Optimizer >= 3.0 installed Mcrypt data encryption package >= 2.4 Mcrypt blowfish algorithm support Mcrypt CBC encryption mode support 2.3 Software - Client New webbrowser (like Internet Explorer, Firefox, Opera ...) Javascript enabled in your browser PHP Encoder for your projects (like Zend Guard, IonCube ...) 2.4 Installation Text editor to edit the configuration files (like PS-Pad ...) FTP access to your webserver. FTP client application (like Filezilla …) Possibility to change directory permissions. Page 8 of 113 PBlicense - User Manual 3 Installation Types There are two different types of installations. For each of them there is a trial version available which you should test before you buy the software. If you buy the PBlicense software you will get a license for both installation types. The PBlicense software for both installation types is exactly the same, there are only two installation types available (localhost or external webhost) to make it easier for you to install the software. Choose between the following two installation types: 3.1 Type 1 - Localhost The localhost package is a complete package for Windows which includes a very small webserver and PBlicense is working right from the start. This package needs no real installation, just unpacking the archive and edit the configuration files. 3.2 Type 2 - External Webhost The external webhost package contains all the files which are necessary to install PBlicense on a webhost running Windows or Linux. This package needs a normal installation (uploading and unpacking the archive and then edit the configuration files). 4 Software Download Please choose between the two available installation types (see above) and then try the PBlicense trial version first before you buy the full version! You also can try both installation types. The trial versions are fully functional and only have a time limit of minimum one month. 4.1 Download the PBlicense Trial-Version First you have to download and try PBlicense so that you can be sure that everything works on your webhost. You can download both installation types from the PB-Soft Website. 4.2 Buy and download the PBlicense Full-Version If you have tried the trial version of PBlicense and everything works fine, you can buy the full version of PBlicense from the PBSoft Website. If you have the trial version of PBlicense installed, you only have to get a new license file. You don’t have to install another version of PBlicense! Page 9 of 113 PBlicense - User Manual 5 Software Installation 5.1 Type 1 - Localhost If you have downloaded the PBlicense archive from the PB-Soft Website you will get the archive "PBlicense1.zip" in your download folder: Now you have to unpack the archive with an unzip utility like 7-Zip. You can download the free 7-Zip archiver from the 7-Zip Website. After unzipping the archive you will get the folder "PBlicense" with the following content: To start the control panel for the webserver, please start the executable "PBcontrol.exe". Page 10 of 113 PBlicense - User Manual If you start the control panel the first time, a message will tell you that the path of the webserver does not match the configuration and that the configuration has to be updated: After some seconds the application will continue to update the configuration and a message will display the new configuration settings: Press the button "OK" to continue. Page 11 of 113 PBlicense - User Manual If the control panel is started the first time maybe the Windows Firewall or an other security application will ask you if you want to allow the communication of the Apache Webserver like in the following image: Please choose "Allow Access" to continue and let the webserver communicate through the security application. The control Panel will be displayed and the webserver is still deactivated which is indicated by the red status panel: The installation is completed. Please check the other chapters in this manual to see how to configure and use the control panel and the PBlicense application! Page 12 of 113 PBlicense - User Manual 5.2 Type 2 - External Webhost If you have downloaded the PBlicense archive from the PB-Soft Website you will get the archive "PBlicense2.zip" in your download folder: Now you have to unpack the archive with an unzip utility like 7-Zip. You can download the free 7-Zip archiver from the 7-Zip Website. After unzipping the archive you will get the folder "PBlicense" with the following content: To install PBlicense on your webhost, please upload the two files "install.php" and "pblicense.zip" with an FTP-Client like Filezilla to your web-account. The file "install.php" is the PBlicense installation script and the file "pblicense.zip" contains all the files of the PBlicense application in a compressed archive. Page 13 of 113 PBlicense - User Manual If you upload the files to your webroot directory the installation script will create a new directory called "pblicense" in the webroot which contains all the files of the PBlicense application. Here is an example: The webroot directory is: home/www/ File upload "install.php" to: home/www/install.php You upload "pblicense.zip" to: home/www/pblicense.zip The installation directory will be: home/www/pblicense/ Please check that you upload both files in binary mode! It is very important that you upload the two files in binary mode because otherwise the files could be damaged during the transfer. In the Filezilla application you can set the transfer if you select the menu "Transfer", the item "Transfer type" and then select "Binary" like you can see on the following image: In other FTP applications you also can specify the transfer mode but maybe the menu looks a little bit different. Please make sure that you do not select the transfer mode "Auto" because normally the automatic mode will transfer PHP files as text files (ASCII) and that is bad in our case. It has to be the binary transfer mode! After uploading the file to the webserver, make sure that the installation script "install.php" has the permissions to write to the actual directory. You can set the folder permissions to 777 to be sure that the script has write access to install the PBlicense application. After the installation you can set the permissions back to what they were before. Page 14 of 113 PBlicense - User Manual With the Filezilla FTP-Client you can set permissions in a really easy way. You can right-click on the desired directory and choose "File permissions..." from the context menu like on the image below: A new window will show all the permission settings. Please choose 777 and click on the button "OK": Page 15 of 113 PBlicense - User Manual Please be sure that the checkbox "Recurse into subdirectories" is NOT selected: Then open a webbrowser and enter the path to the PBlicense installation file "install.php": The installation script will backup an existing installation, unpack the new PBlicense application and if there are no errors a Link to the PBlicense Main Menu will be displayed: Page 16 of 113 PBlicense - User Manual If there are errors during the installation the screen will display the error messages like on the example below. If that happens, please first check the write permissions of the directory: If there is an existing installation of PBlicense at the same location the installation script will make a backup and save the whole installation to the file "pblicense_01.zip" (the number can vary). Page 17 of 113 PBlicense - User Manual If you click on the link to the PBlicense Main Menu, the installation script "install.php" and the installation archive "pblicense.zip" will be removed and a message will inform you about the success of this operation: After 10 seconds you will be forwarded to the PBlicense Main Menu like on the following image: Page 18 of 113 PBlicense - User Manual 5.3 Check Directory Permissions Just to be sure, check the directory permissions for the following two directories. This directories need to have the permissions set to 777 to have write access for the configuration and export files: pblicense/configuration pblicense/export Make sure that here you apply the permissions recursively! That means that all subdirectories also will have the permissions set to 777. With the Filezilla FTP client you can set the permissions in a special window: Page 19 of 113 PBlicense - User Manual After setting the permissions, the directory structure on your webserver should look similar to the following example (Filezilla screen): First try to set the permissions not to restrictive and after the script works ok you can successively put them more restrictive. Page 20 of 113 PBlicense - User Manual 6 Installation Problems If you have problems while installing or running PBlicense please check the following sections: 6.1 System Requirement Problems If the system requirements are not adequate, it is possible that there are problems which are difficult to detect. You can run our PBlicense software requirement check script to see if there are no errors and the webserver meets the specific needs of PBlicense. Please download the script from our website at www.pb-soft.com. If the script finds a problem (in the following example an old PHP version) a message will show the details: Page 21 of 113 PBlicense - User Manual After upgrading to a newer PHP version the error disappears: If all the status indicators are green, there should be no problem to run the PBlicense software on your host. Please make sure that you use a trial license first to check if the PBlicense application works on your host! Page 22 of 113 PBlicense - User Manual 6.2 Zend Optimizer not installed Check if the Zend Optimizer or the Zend Guard Loader is installed on your server. A Zend decoder is necessary to run files encoded by one of the Zend encoders and it also can increase the runtime performance of the PHP scripts. If no Zend decoder is installed on the host or if it is not running correct, a message window will indicate the problem. Depending on the running script the information window can provide more or less information on solving the problem. The following image shows a screen with only few information: The next screen shows detailed information about the problem: Page 23 of 113 PBlicense - User Manual You can also check the phpinfo() output to check if the Zend Optimizer is installed and enabled or you can ask your hosting provider. If you check the phpinfo() output you should search for a text similar to the following (important text marked red): This program makes use of the Zend Scripting Language Engine: Zend Engine v2.2.0, Copyright (c) 1998-2010 Zend Technologies with Zend Extension Manager v1.2.0, Copyright (c) 2003-2007, by Zend Technologies with Zend Optimizer v3.3.3, Copyright (c) 1998-2007, by Zend Technologies The following image shows this part from the phpinfo() output and how it should look on your host: If there is no Zend decoder like Zend Optimizer or Zend Guard Loader installed on your host, please download a free copy from the Zend Website (http://www.zend.com) and install it. Page 24 of 113 PBlicense - User Manual 6.3 Wrong Zend Optimizer Version Check if the correct Zend Optimizer or Zend Guard Loader is installed on your server. If your version of the Zend Optimizer is too old you will get an error message like: Fatal error: Incompatible file format: The encoded file has format ID 2003120701, whereas the Optimizer can read up to 2002062301. or something like: Fatal error: Unable to read X bytes in /path/to/script/encoded_ script.php on line 0. or something like: Fatal error: Maximum execution time in /path/to/script/encoded_ script.php on line 1. If you have an old version of Zend Optimizer or Zend Guard Loader installed on your host, please download a new version from the Zend Website (http://www.zend.com) and install it. Page 25 of 113 PBlicense - User Manual 6.4 Other Zend Optimizer Problems The following output from the phpinfo() function displays three important settings which will be explained below. If one of these settings is wrong, the Zend Optimizer will not run on your host. Normally these settings are correct if you are using a third-party webhosting service. Please verify that the following settings are correct on your host: Debug Mode If the debug mode is enabled in PHP the Zend Optimizer will not work. You can check this setting if you display the phpinfo() output. The setting "Debug Build" should be set to "no" for Windows, Unix and Linux hosts. Page 26 of 113 PBlicense - User Manual Thread Safety If you are running the Zend Optimizer on a Windows host, the PHP should be compiled in the ZTS mode (multi-threaded environment). You can check this setting if you display the phpinfo() output. The setting "Thread Safety" should be set to "enabled" for Windows hosts. If you are running the Zend Optimizer on a Linux/Unix host, the PHP should be compiled in the Non-ZTS mode (no multi-threaded environment). You can check this setting if you display the phpinfo() output. The setting "Thread Safety" should be set to "disabled" for Unix and Linux hosts. Enable Versioning If the enable versioning is enabled in PHP the Zend Optimizer will not work. You can check this setting if you display the phpinfo() output. The setting "--enable-versioning" should NOT be found in the "Configure Command" section on Windows, Unix and Linux hosts. Page 27 of 113 PBlicense - User Manual 6.5 Wrong File Transfer Mode If you upload all the files manually (without the PBlicense installer script) to your webserver you have to be sure that you upload nearly all php files in Binary Mode (please see the exceptions in the list below). That does not mean that you upload all files in binary mode because there are different kinds of files like pictures, text files or CSS files. Not all the files have to be uploaded in the same mode! Normally you can choose the file types which are uploaded in binary mode and which are uploaded in ASCII mode. Please check the settings of your FTP-Client. If you upload the encoded files in ASCII mode you will get errors like: Fatal error: Unable to read #### bytes in /path/to/script/encoded_ script.php on line 0. or something like: Fatal error: Corrupted encoded data detected in /path/to/script/ encoded_script.php on line 0. Then please delete the encoded php files on the server and upload them again in binary mode. Normally you can specify the transfer modes ASCII or Binary in your FTP client application. Attention: If you choose the mode "Auto" in your FTP-Client the php files normally will be uploaded in ASCII mode! If you still have a problem, please contact our support (see support section at the end of this document). We are always glad to help you! PHP Files which have to be uploaded in ASCII Mode: There are some exceptions for php files (7 files) which have to be uploaded in ASCII mode because they are not encoded. First you can upload all the php files in binary mode and then delete the following files and upload them but now in ASCII mode: pblicense/test/application.php pblicense/test/configuration.php pblicense/test/product_1.php pblicense/test/appl_long/application.php pblicense/test/appl_short/application.php pblicense/export/config/product_1.php pblicense/export/config/product_2.php Page 28 of 113 PBlicense - User Manual 7 Control Panel Configuration The PBlicense control panel is only needed to manage the webserver of the installation type 1 (localhost). Therefore the control panel is not available and needed for the installation type 2 (external webserver). Normally you do not have to edit the control panel configuration file "PBcontrol.ini" but sometimes it is necessary. If the control panel is running and you press the shortcut CTRL + SHIFT + C the configuration file will be opened: The control panel configuration file "PBcontrol.ini" is located in the directory "PBlicense/conf/PBcontrol.ini". Page 29 of 113 PBlicense - User Manual 7.1 ServerPort You can change the default port of the webserver (default: 8800) to another port like 80. Therefore you have to edit the following line in the control panel configuration file (changes marked red): ; =================================================== ; ; Specify the http port of the webserver. ; ; Example: ServerPort = 8800 ; ; =================================================== ServerPort = 8800 and change it to: ServerPort = 80 After this change you have to delete the application path so that the control panel application will update the whole configuration at the next start. Therefore you have to edit the following line in control panel configuration file (changes marked red): ; =================================================== ; ; Specifies the path of the control panel ; application. If the path does not match the real ; path, the tool will try to update the webserver ; configuration and insert the actual path. This ; setting does not have to be changed manually ! ; ; Example: ApplPath = C:/PBlicense ; ; =================================================== ApplPath = C:\Downloads\PBlicense and change it to: ApplPath = Now you have to close the control panel (button "Exit") and start it again (run "PBcontrol.exe"). At the next start of the control panel, the tool will check the application path and realizes that the path is not correct. Then it will update the whole configuration including the changed port of the webserver. Page 30 of 113 PBlicense - User Manual 7.2 TextApplication You can also specify your favorite text editor which will be used to display the configuration files. Therefore you have to edit the following line in control panel configuration file (changes marked red): ; =================================================== ; ; Specify the path to the application which will be ; used to display the actual configuration. Normally ; this should be a text editor like notepad from ; windows or your favorite text editor. ; ; Example: TextApplication = C:\Windows\Notepad.exe ; ; =================================================== TextApplication = C:\Windows\Notepad.exe and change it (as an example) to: TextApplication = C:\Programs\PSPad\PSPad.exe After this change you only have to restart the control panel. You do NOT have to delete the application path and update the whole configuration! 7.3 SaveWinPos You can also specify if the window position of the control panel should be saved automatically if you exit the control panel application. Therefore you have to edit the following line in control panel configuration file (changes marked red): ; =================================================== ; ; Specify if the position of the control panel window ; has to be saved when the control panel is closed ; with the button 'Exit'. ; ; Example: SaveWinPos = 0 ; ; =================================================== SaveWinPos = 0 and change it to: SaveWinPos = 1 After this change you only have to restart the control panel. You do NOT have to delete the application path and update the whole configuration! Page 31 of 113 PBlicense - User Manual 8 Control Panel Usage The PBlicense control panel is only needed to manage the webserver of the installation type 1 (localhost). Therefore the control panel is not available and needed for the installation type 2 (external webserver). To start the webserver press the button "Start". Then the webserver will be started and the status panel changes to green, indicating that the webserver is ready. Per default the PBlicense webserver will listen on the IP address 127.0.0.1 (localhost) and port 8800: 8.1 Start / Restart If the webserver is running, the button "Start" will change to "Restart" and therefore you can restart the webserver if needed if you press this button. 8.2 Stop The button "Stop" will stop the webserver but the control panel will still be available. You can use this button if you want to stop the webserver and edit a configuration file. 8.3 Menu The button "Menu" will open the PBlicense "User Login" in the default webbrowser. After you login, the PBlicense "Main Menu" will be displayed. 8.4 Exit The button "Exit" will stop the webserver (if the webserver is running) and then exit the control panel. Page 32 of 113 PBlicense - User Manual 8.5 Shortcuts There are different keyboard shortcuts available. If you press the keys CTRL + SHIFT + S all available shortcuts will be displayed in a window: The first three shortcuts will open the configuration files: CTRL + SHIFT + A: Apache configuration "httpd.conf" CTRL + SHIFT + C: Control panel configuration "PBcontrol.ini" CTRL + SHIFT + P: PHP configuration "php.ini" Normally it should not be necessary to change these configuration files but sometimes it can be necessary especially if you want to use a specialized configuration to fit your needs. Page 33 of 113 PBlicense - User Manual The shortcut CTRL + SHIFT + Z will test the webserver configuration "httpd.conf" and will display error messages if the syntax in the configuration file is not correct: If the black command window just opens and closes again, the webserver configuration is correct. Normally the webserver configuration should not contain syntax errors but if you edit the webserver configuration file "httpd.conf" this is a good way to check the functionality before starting the webserver. The next five shortcuts open different directories with the windows explorer: CTRL + SHIFT + E opens the PBlicense export directory. All files generated by PBlicense (like the code, configurations, licenses and logs) and also the necessary files to include in your own projects (like the footprint generator and the validation engine) will be stored there. CTRL + SHIFT + M opens the PBlicense main directory. This is the place where you have to copy your valid license file. CTRL + SHIFT + T opens the PBlicense test directory. Here you will find some small test applications which can be used to test and understand the way the PBlicense application works. CTRL + SHIFT + W opens the webroot directory. This directory contains all data provided to the clients, in our case the "pblicense" directory. CTRL + SHIFT + T opens the PBlicense analysis directory. This directory contains the License Analysis Tool which can be used to analyze a license file and check if the license is valid. Page 34 of 113 PBlicense - User Manual The shortcut CTRL + SHIFT + T displays some information about the PBlicense control panel like the application version and the build date and time: The shortcut CTRL + SHIFT + X will save the actual window position of the PBlicense control panel. If you save the position, the window will open at the same position at the next start of the control panel. Page 35 of 113 PBlicense - User Manual 9 Start PBlicense 9.1 Installation Type 1 If you use the installation type 1 (local webhost), the easiest way to start PBlicense, is to cklick on the button "Menu" on the webserver control panel like indicated on the picture below: The "User Login" screen will be displayed in your default webbrowser. 9.2 Installation Type 2 If you are using the installation type 2 (external webhost), please enter the following direction in your browser an replace the green part with the path to your webhost (domain) and then the path to your PBlicense directory: http://www.mydomain.com/pblicense_dir/main/menu.php As an example the direction to the PBlicense directory entered in the Firefox browser: The "User Login" screen will be displayed in your webbrowser. Page 36 of 113 PBlicense - User Manual 10 Login to PBlicense If the "User Login" screen is displayed, you can login with the default username and password: The default login data is only displayed on the login screen if you did not already create a new user. You can login with the default login data: Username: Admin Password: test12 Please be sure that you enter the password exactly like showed above. The passwords are always case-sensitive! Page 37 of 113 PBlicense - User Manual If the login is incorrect you will be warned with the following message: If both, the username and password is correct, the PBlicense "Main Menu" will be displayed: Page 38 of 113 PBlicense - User Manual 11 Create a new User Below the last button on the "Main Menu" you will see the links "Create New User". To create a new user account press this link: The "Add New User" form will be displayed and you can insert a new username and a corresponding password: The password has to contain characters and numbers and has to be at least 6 characters long. Passwords like "j3yS94j", "12Tau$ab" or "Re35tOol" are valid. Passwords like "peter", "12042012" or "rolf$" are not valid! Page 39 of 113 PBlicense - User Manual You have to enter the new password twice (Field "Password 1" and field "Password 2") to be sure that there are no typing errors. If the password is not valid an error message will be displayed: If the new username and password are correct, the new user account will be created. If you have created the first new user, the default user "Admin" will be deleted automatically for security reasons. The default user is the same on all PBlicense installations and therefore has to be eliminated. An information screen will be displayed: If you press the button "Login with the new user !" you wil be transfered to the login screen where you have to login with the new username and password. Page 40 of 113 PBlicense - User Manual If you later add some other users, the following screen will be displayed: If you press the button "Go Back ..." you will get to the "Add New User" form. Then you can add another new user or press the button "Go Back ..." to go to the main menu. 12 Logout from PBlicense To logout from the PBlicense application press the link "Login" on the main menu: You will get to the "User Login" screen and you can login with another username and password. Page 41 of 113 PBlicense - User Manual 13 PBlicense Main Menu The PBlicense Main Menu provides access to different tools which will be explained on the next few pages: Per default all the links and therefore tools will be opened in the same browser tab. If you want to open them in a new browser tab, please first click on the link "Same Window". The link will change to "New Window" and all links will open in a new browser tab. ... will change to: Page 42 of 113 PBlicense - User Manual 13.1 PBlicense - Main Application The PBlicense main application is used to create new product configurations using the "Configuration Editor", generate license files using the "License Generator", display information about existing licenses using the "License Manager" and include the PBlicense components into your own projects using the "File Integration" area. Please check the special chapter about using the PBlicense main application! Page 43 of 113 PBlicense - User Manual 13.2 PBlicense - Frontend The PBlicense frontend can be used to let the visitors create their own trial licenses. It can be configured that every user can create as many licenses as he wants or you can limit the license creation and the users have to enter an access code to create a license: 13.3 PBlicense - User Manual This link will display this user manual in your favorite PDF viewer: Page 44 of 113 PBlicense - User Manual 13.4 PBlicense - Footprint Generator The footprint generator is needed to create a PBlicense footprint code which is necessary to create a customized license file for the PBlicense application: The usage will be explained in the chapter which explains how to unlock the PBlicense application. Page 45 of 113 PBlicense - User Manual 13.5 License Analysis Tool The license analysis tool is used to analyze an existing license file. You have to copy the license to be checked into the directory of the analyzing script "pblicense/analysis/" and then also edit the configuration file "application.cfg" and enter all the user - and system-information needed. After running the analysis script the result will be displayed: If you want to remove the license analysis tool from the system and from the main menu, you only have to delete the directory "pblicense/analysis". The button "License Analysis Tool" then will be removed from the main menu. Page 46 of 113 PBlicense - User Manual 13.6 PHPview Tool The "PHPview Tool" will display information about the files inside the directory "pblicense": If you want to remove this tool from the system and from the main menu, you only have to delete the file "phpview.php" in the directory "pblicense". The button "PHPview Tool" then will be removed from the main menu. Page 47 of 113 PBlicense - User Manual 13.7 Requirement Check Script The "Requirement Check Script" will display information about the actual webhost and check if the installation meet the requirements to run PBlicense without problems: If all status indicators are green, there should be no problems to run PBlicense. If an indicator is red you can get some information about the failing component. Please try to install/update this component or contact your webmaster. Page 48 of 113 PBlicense - User Manual 14 PBlicense Configuration 14.1 Edit the main Configuration File Attention: If you use the PBlicense software in trial mode don't change the username and organization data in the configuration file, just use the existing example username and organization! Please open the file "pblicense/configuration/pblicense.cfg" in your favorite text editor: Please insert your username (line 7) and organization (line 8): // ================================================== // Specify the username / organization. // ================================================== $pblicense_username = "Peter Example"; $pblicense_organization = "Example Inc."; Please specify the preferred default language (line 14). English (en) and German (ge) is available: // ================================================== // Specify the default language. // ================================================== $language = "en"; Those were the most important settings. This name and organization settings are necessary to activate a personalized license file. Maybe you want to change some other settings later like the default time zone, the screen size or the log file settings … Page 49 of 113 PBlicense - User Manual 14.2 Edit the License Generator Configuration File Please open the file "pblicense/configuration/license.cfg" in your favorite text editor: Please specify which clients have access to the license generator (line 43). Here you have to specify an IP-Address or range like the following examples: www.xxx.yyy.zzz www.xxx.yyy www.xxx www => => => => 212.56.123.45 212.56.123 212.56 212 You can specify different addresses / ranges. If you specify some addresses / ranges you should delete the entry "all". With the entry "all" everyone has access to the license generator: // ================================================== // Specify from which IP addresses the application // can be used. // ================================================== $access_ip[] = "all"; Please insert a string for the e-mail message-id (line 66): // ================================================== // Specify which name will appear in the message ID. // The message-ID will look something like this: // "[email protected]". It's made with a // random number but you can choose the part after // the "@" sign. // ================================================== $message_id = "example.com"; Please specify the sender name (line 92) and address (line 93) for the e-mails which will be sent: // ================================================== // Specify the sender name and e-mail address. // ================================================== $sender_name = "Example Inc."; $sender_address = "[email protected]"; Page 50 of 113 PBlicense - User Manual Please specify the address for e-mail replies (line 99): // ================================================== // Specify the e-mail address for replies. // ================================================== $reply_address = "[email protected]"; Please specify the address for errors (line 105): // ================================================== // Specify the e-mail address for errors. // ================================================== $error_address = "[email protected]"; Please specify the address for returning e-mails (line 111): // ================================================== // Specify the e-mail address for returning e-mails. // ================================================== $return_address = "[email protected]"; Please specify the x-mailer content (line 117): // ================================================== // Specify the x-mailer content of your e-mails. // ================================================== $xmailer = "PBlicense 1.6 - www.example.com"; Page 51 of 113 PBlicense - User Manual 14.3 Create new Product Keys Each product (script / application) needs a unique product key. This is necessary that someone else who uses PBlicense can’t make license files for your products and it also is used as the encryption key for the license file. So the product keys have to be at least 20 characters long and please keep them secret! Please open the file "pblicense/key/key.cfg" in your favorite text editor and enter some new product keys into the key file: // ================================================== // Product encryption keys (minimum length 20 // characters). // ================================================== // 12345678901234567890123456789 $product_key[1] = 93jd75jhg83ytfj49fuj439tj49"; $product_key[2] = 0gkt9058743jew8723hd874jre8"; You can enter all the 10 keys or just one or two. But remember: You need product keys to create new product configurations! For each of your product you need to have a product key. Attention: Please be sure that nobody can access your key file via Internet or another network! You also have the possibility to store this important file outside the document root and then specify the path in the path configuration file "pblicense/configuration/path.cfg". Please search for the following entry (line 90): // ================================================== // Define the path to the product encryption key file // ================================================== define("KEY_DIR", "key"); define("KEY_PATH_ABS",SITE_PATH_ABS."/".KEY_DIR); That’s it! Now you can save and upload the configuration files to your webserver! Page 52 of 113 PBlicense - User Manual 15 Unlock the Software Now the PBlicense installation should be OK and the PBlicense software is running with the trial license. With the trial license you can test the PBlicense application for at least one month before you have to decide if you want to buy the software. If you need more time to evaluate our product please contact us. Please make sure that you use a trial license first to check if the PBlicense application works on your host! If you have tested PBlicense with the trial license and decided to buy a license you have to get a valid license file to unlock the software. Please first make a system footprint with the help of the footprint generator. The following steps will explain this process: 15.1 Generate and send the Footprint Please click on the link "PBlicense - Footprint Generator" on the PBlicense Main Menu: Page 53 of 113 PBlicense - User Manual The "Footprint Generator" window will be displayed. Please insert the necessary information (your username, organization and e-mail address) into the form fields like on the image below: Attention: Please be sure that the username and organization is correct and check twice that your e-mail address is valid so that we can send you a license file! Then press the Button "Create Footprint" to continue and create the footprint code. Page 54 of 113 PBlicense - User Manual The generated footprint code will be displayed like on the following image below: If you think something went wrong (maybe you misspelled the organization name) you just can go back to the input form by pressing the link "Back to the input form ..." and create a new footprint. You can create as much footprints as you want. If you think your input data is correct you can send us the created footprint so that we can create a personalized license file for you. If your webhost supports the sending of e-mails through the integrated php mail function you can send us the footprint by pressing the button "Send now !". Page 55 of 113 PBlicense - User Manual A message window will tell you if the e-mail with the footprint was sent successfully: If your webhost does NOT support the sending of e-mails through the integrated php mail function or there was an error during the sending process you can also send us the footprint code by email. Just copy the footprint code into an new e-mail and send it to the following e-mail address: [email protected]. After we got your footprint code (sent from the footprint form or sent by normal e-mail) we will create and then send you your personalized license file per e-mail. If you don't get the license file please check your spam folder. Maybe the e-mail with the attached license file was categorized as spam. If you can't find the e-mail with the license file there please contact us! Page 56 of 113 PBlicense - User Manual 15.2 Install the License File Please check on the PBlicense "Home" page which is the path to the license file. The following line will show you the correct path: Please copy the license file to that directory and make sure that it is the only license file in that directory. If there is another license file, copy it to another directory or delete it. To make the license work you also have to enter your name and organization into the PBlicense configuration file. Please check the chapter about editing the main configuration file! To check if the registration process was successful, Please click on the link "License Generator" from the link panel. If the license is valid, you should see the "License Generator" like on the following image: Page 57 of 113 PBlicense - User Manual If there is a problem and therefore the license is not valid, the following screen is displayed: If you would like to try PBlicense, you can get a free trial license for PBlicense and test the software at least one month. You only have to create a system footprint with the "Footprint Generator" and send it to us. We then will create and send you a free trial license. If you already have tested PBlicense with a trial license and it worked on your host, you can buy PBlicense at the PB-Soft Website. After buying the software you also have to create a system footprint with the "Footprint Generator" and send it to us. We then will create and send you your personalized and unlimited license. Page 58 of 113 PBlicense - User Manual 16 Unlock Problems If you don’t see the "License Generator" you probably will see the following window with an error message: The displayed message will inform why the license verification has failed. Please check the following steps to ensure that the installation is correct: 16.1 Check if there is a License File available Check if there is a license file available in the directory which is displayed on the "Home" page. If there exist no license file, copy the license file to that directory and try again. 16.2 Check the Number of Licenses Check if there is only one license file available and that the file has the format xxxxxxxxxxxx.pbl whereby the x's are numbers. As an example the license filename could be 061205180528.pbl. If there is another license file, move it to another location or delete it. Page 59 of 113 PBlicense - User Manual 16.3 Check the Username and Organization Check if the username and organization on the PBlicense "Home" page is the same like the one specified in the license file. First look on the "Home" page of the PBlicense application. There you can see the licensee name and organization: Then on the same page but a little bit below you can see a link to the active license file: Please click on this link and the content of the license file will be displayed: Now check if the username and organization is the same as displayed on the "Home" page. If the username and/or the organization is/are different, change the data in the configuration file! Page 60 of 113 PBlicense - User Manual 16.4 Check the Product Name and Software Version Check if the product name and the software version in the license file match with the software you want to run (in our case it is the PBlicense software). First look on the "Home" page of the PBlicense application. There you can see the software name and also the software version: Then on the same page but a little bit below you can see a link to the active license file: Please click on this link and the content of the license file will be displayed: Now check if the product name and the software version match the data displayed on the "Home" page. If the product name and/or the software version is/are different, you have to get another license file! Page 61 of 113 PBlicense - User Manual 16.5 Check the License Start- and Expiration Date Check if the actual license is not expired. You can see that on the "Home" page of the PBlicense application. There you will find the start- and end-date: If the actual date is not between the start and end-date displayed this license file will not work. The license is expired or will be valid in the future, you have to get another license file! If you still have a problems to activate the PBlicense software, please contact us (see the support section at the end of this document). We are always glad to help you! Page 62 of 113 PBlicense - User Manual 17 PBlicense Navigation On the top of each window you will find the following header with different links: Main Menu Link to the PBlicense Main Menu. Home Overview with information about the licensee, current installation and with links to the logfile and to the footprint generator. Configuration Editor The configuration editor is used to create, edit or delete product configurations. You can use the configuration editor to create a new configuration for one of your new products, if you want to change some settings of an existing product or also if you want to delete an old configuration which you don't need anymore. License Generator The license generator is used to create license files. You can use it if someone requests a license file and sends you a system footprint of his installation. Then you can create a new license file and send it directly back to your customer. License Manager The license manager shows you an overview of all created license files. You can view or download each of the license files. File Integration The file integration page shows you all files which are necessary for your projects. There are project files and product files. You can download the files you need and also get the php code to integrate the PBlicense software into your application or projects. Page 63 of 113 PBlicense - User Manual 18 PBlicense - Home If you start the application you will see the PBlicense "Home": 18.1 Information On the "Home" page you can find the name of the licensee ant the organization: Page 64 of 113 PBlicense - User Manual There is also some information about the installed software and their versions (PBlicense, PHP, Zend Engine, Zend Optimizer, Zend Guard Loader and Mcrypt): The IP address of the host and also of the client computer are displayed: There is a link to the phpinfo() script which shows information about the actual host: Page 65 of 113 PBlicense - User Manual There is a link to the license logfile to display the history of license creation: There is also some information about the actual license and a link to the "Footprint Generator": Also a link to the PBlicense user manual is available: The active language is displayed and with the help of a link the language can be switched between English and German: Page 66 of 113 PBlicense - User Manual 19 Configuration Editor The configuration editor is used to create, edit or delete new product configurations. If you have created a new project which you want to protect, you have to create a new configuration for that product. In the configuration you will specify the product specific details which are necessary to create the php code, license files and protect your script. 19.1 Create a new Product Configuration To create a new product configuration please click on the link "Configuration Editor" on the link panel. The following window will be displayed: There is a filename displayed for your new configuration. Normally you should use this name. To create a new configuration click on the button "New": Page 67 of 113 PBlicense - User Manual The default product configuration will be displayed: First you can enter a name for your product: Then you can specify the product version: Then you can specify the name of the protected script. This is the name of the script where you will insert the generated php code which protects your whole project: Page 68 of 113 PBlicense - User Manual Then you can specify the IP address range. Here you have the following possibilities: Range 1: The 1. number of the IP address will be checked. Example: 243 Range 2: The 1. and 2. number of the IP address will be checked. Example: 243.125 Range 3: The 1., 2. and 3. number of the IP address will be checked. Example: 243.125.38 Range 4: All numbers of the IP address will be checked. Example: 243.125.38.15 If your application runs on a server cluster the IP address will maybe change a lot and you can specify just a part of the IP address to be sure that your application will run without any problems. Then you can specify the product version range. This will define how many decimals after the coma will be checked. Here are some examples: Example 1: If you specify 0, your customer can upgrade from version 1.0 up to version 1.9999999. Only if the number 1 changes the license will not be valid anymore. Example 2: If you specify 1, your customer can upgrade from version 1.0 up to version 1.099999. But 1.1 will not work anymore. Example 3: If you specify 2, your customer can upgrade from version 1.0 up to version 1.009999. But 1.01 will not work anymore. Page 69 of 113 PBlicense - User Manual Then you can specify which options are used to protect your project: If you select "Username" then the username will be checked. If you select "Organization" then the organization will be checked. If you select "Product name" then the product name will be checked. With that option selected the customer can’t use the same license file for different products. If you select "Product version" then the product version will be checked. With that option selected the customer can’t upgrade all the time to the newest version. If you select "Script name" then the script name will be checked. With that option selected the customer can’t rename the script. If you select "Script path" then the script path will be checked. With that option selected the customer can’t move the script to another directory. If you select "Server name" then the server name will be checked. With that option selected the customer can’t move the script to another server if the server name changes. If you select "Server address" then the server address (IP address) will be checked. With that option selected the customer can’t move the script to another server if the server IP address changes. If you select "Document root" then the server document root directory will be checked. With that option selected the customer can’t move the script to another document root. If you select "Server environment" then the server environment (Windows, Linux, Freebsd…) will be checked. With that option selected the customer can’t move the script from a Linux server to a Windows server (as an example…). Page 70 of 113 PBlicense - User Manual If you have specified all the parameters you can press the button "Save configuration" to save the configuration and show the generated php code: The first link shows the configuration for the actual product: The product configuration is necessary to create a footprint with the footprint generator. This configuration indicates what data the footprint generator has to collect and include in the footprint code. This file should be encoded before it is distributed with your application. Page 71 of 113 PBlicense - User Manual An example of a product configuration is shown here: The first part specifies the product details like the product name, product version, script name, product ID, address range and version range. The second part specifies which of the options are enabled for checking a license and are necessary to generate a new license file with the "License Generator. Page 72 of 113 PBlicense - User Manual The second link shows the php code for the actual product. This code is necessary to include the license verification into your own php script: The product code can be generated in two different versions. The long version includes a lot of information about the code and indicates how to include it into your own projects. The same code is also displayed in the big edit field. An example is shown below: This code continues on the next page ... Page 73 of 113 PBlicense - User Manual The short version includes no information and contains only the absolute minimum of code. An example is shown below: Page 74 of 113 PBlicense - User Manual The last link shows the product code in color (highlighted): An example of the highlighted product code is shown below: The big text area also contains the product code which can be copied and pasted to your script. The product configuration and also the product code will be saved and can be accessed anytime from the page "File Integration". Page 75 of 113 PBlicense - User Manual The different links can also be used to download the product configuration or product code as a text file. You only have to click with the right mouse button on the link and choose "Save Link As..." and save the file to a new location: Attention: If you create a new product configuration but you have not specified a product key you will get a warning! Then you have to create a new product key like described in the installation section of this manual and try again. Page 76 of 113 PBlicense - User Manual 19.2 Edit a Product Configuration To edit an existing product configuration please click on the link "Configuration Editor" on the link panel. The following window will be displayed: First you have to choose an existing product configuration from the existing configurations. Please select one from the drop-down menu: After selecting the configuration press the button "Edit": The configuration screen will be displayed and you can edit the configuration like described in the section "Create a new Product Configuration". Page 77 of 113 PBlicense - User Manual 19.3 Delete a Product Configuration To delete an existing product configuration please click on the link "Configuration Editor" on the link panel. The following window will be displayed: Now you have to choose which configuration you want to delete. Please use the drop-down menu to select an existing product configuration: After selecting the configuration press the button "Delete": The configuration will be deleted... Page 78 of 113 PBlicense - User Manual 20 License Generator The license generator is very easy to use and you can create all the licenses for your products in a very efficient and fast way. To create a new license file please click on the link "License Generator" on the link panel. The following window will be displayed: The footprint screen is divided into two areas: The first area is a text input area for the footprint generated by the "Footprint Generator". You only have to paste a valid footprint from the clipboard into this text area. The second area is an input section to specify the different license options like the start-date, end date and software grade. Further you can select if you want to see debug information about the license creating process. Page 79 of 113 PBlicense - User Manual 20.1 Create a license file To create a new license file you only need to copy a valid footprint into the input field like on the following picture: Then you can specify some license options like on the following image: Start-Date As the first option you can specify the license start-date. You have to use the following format: DD.MM.YYYY The actual day is selected so if you want the license to be valid from today you don’t have to change anything. If you want to change it, be sure to specify a date in the future. As an example: you could create a license which is only valid during the Christmas days from December 24th until December 26th. Just enter 24.12.2011 as the start-date and 26.12.2011 as the end-date. This license then would be valid for 3 days. Page 80 of 113 PBlicense - User Manual End-Date As second option you have to specify the license duration or enddate. You can use the following format: DD.MM.YYYY (end-date) or DD (license duration in days) If you use the first format the license will be valid until this date. If you use the second format the license will be valid for the number of days you enter. If today is January 6th and you enter 11 then the license will be valid until January 17th. If you enter a + character the license duration will be unlimited! Software Grade As the third option you can specify the software grade. With that parameter you can specify different editions of the same software product. Here is an example: With the Software grade Standard the user can add a maximum of 20 rooms for his hotel in your software "Hotel Manager". With the software grade Deluxe the user can add a maximum of 100 rooms for his hotel in your software "Hotel Manager" and has the possibility to make online reservations. Page 81 of 113 PBlicense - User Manual You can specify your own names and you can later check the actual software grade from your application. Debug Information As the fourth and last option you can select the checkbox to see debug information. Normally that is not necessary and you can leave the checkbox unchecked (default): If you enable the "Debug Information" checkbox you will get a lot of debug information when creating the license file: Page 82 of 113 PBlicense - User Manual To create the license file you just have to press the button "Create License": The license will be created and you will see the following screen: If you see the green banner the license was created successfully: Page 83 of 113 PBlicense - User Manual If there was an error while creating the license you will see a red banner: In case of an error additional information will be displayed like an error message and a lot of debug information (configurable): Page 84 of 113 PBlicense - User Manual If everything worked fine you can see the most important client and software data. All the data was sent through the footprint so you don’t have to enter absolutely nothing! If you want you can check the license file by clicking on the link. The license file which is a plain text file with an encrypted license key will be displayed in a new browser tab or window: Page 85 of 113 PBlicense - User Manual 20.2 Send a License File Now you can send an e-mail with the attached license file directly to your customer with just one mouse click! Please press the button "Send now !" to send the license file. The e-mail will be sent without the need of specifying the e-mail address of the customer. You will be informed if the e-mail could be sent successfully: The license creation is also logged to the license logfile. To view the logfile please click on the link "Home" on the link panel. There you will find the link to the license logfile: To view the logfile please click on the link and the logfile will be displayed in a new browser tab or window: Page 86 of 113 PBlicense - User Manual 21 License Manager The license manager shows all created licenses and the most important client data. To view information about the existing license files please click on the link "License Manager" on the link panel. The following window will be displayed: 21.1 License information The license information for each license will be showed on one line. The following is an example (divided into two lines because of the limited space): Page 87 of 113 PBlicense - User Manual 21.2 View a License File If you want to see an existing license file you just have to click with the mouse on the link with the name of the license file: The license file then will be opened in a new browser tab or window: There are also e-mail links which open your default e-mail application and insert the customers e-mail address into the recipients field. Page 88 of 113 PBlicense - User Manual 22 File Integration To integrate the necessary files into your project please click on the link "File Integration" on the link panel. The following window will be displayed: The "File Integration" page is divided into three areas. The first area displays the project specific files. Those files are needed for all the projects and all the products. This files include the "Footprint Generator" which is used with all products to generate a system footprint and the "Validation Engine" which is also used by all products to validate an existing license file. Page 89 of 113 PBlicense - User Manual 22.1 Project Files The project files are listed in a table like the one in on the image below: Normally these files are exactly the same for all of your protected applications. A click on one of the download links on the left side will download the specified file even if it is a text file which normally would be displayed in the browser. A click on one of the normal links will show configuration files (text), CSS files (text) and images in the browser but will download zip files. Here is a small description for each of the project files and the reason why you need or don’t need them for your project: footprint.zip (contains the file footprint.php) This is the footprint main application and absolutely necessary. You have to unzip the file before you use it. It is compressed so that you can download and send it by e-mail. This file is located in the directory "pblicense/export/footprint". footprint.cfg This is the footprint configuration file and is absolutely necessary and is located in the directory "pblicense/export/footprint".You can open it with a text editor and customize your company data: // ================================================== // Specify the company data. // ================================================== $company_name = "PB-Soft"; $company_website = "www.pb-soft.com"; $company_reg_link = "www.pb-soft.com"; $company_reg_email = "[email protected]"; Page 90 of 113 PBlicense - User Manual The company information is the most important data you have to customize! Attention: Please check that your company data, especially the e-mail address, is correct! If you want you can also change the default language, the screen size and the test patterns for the user input verification. Normally these parameters don’t have to be changed. footprint.css This is an additional cascading style sheet. If you want you can modify this CSS file and change the appearance of the footprint generator. This file is not necessary to run the footprint generator. If the footprint generator does not find this file he will use his builtin CSS style but if this file is available (in the same directory like the footprint generator) it will be used instead of the built-in styles. This file is located in the directory "pblicense/export/footprint". title.gif This is an additional graphic file so that the title of the footprint generator looks nicer. You also can create your own background file for the footprint title. It just has to be a file with the following properties: File format: Height in pixel: Width in pixel: gif 60 1 This file is not absolutely necessary. If the footprint generator does not find the file he will show the title without the title graphic. Here you can see the difference: Title without the graphic file: Title with the graphic file: Page 91 of 113 PBlicense - User Manual This file is located in the directory "pblicense/export/footprint". table.gif This is an additional graphic file so that the table headers of the footprint generator look better. You also can create your own background file for the table header. It just has to be a file with the following properties: File format: Height in pixel: Width in pixel: gif 35 1 This file is not absolutely necessary. If the footprint generator does not find the file he will show the table headers without the table graphic. Here you can see the difference: Table header without the graphic file: Table header with the graphic file: This file is located in the directory "pblicense/export/footprint". footprint.ge This is an additional language file for the German language. If you don't need the German language this file is not absolutely necessary. If the footprint generator does not find this language file he will display only the English version. If the file is present the links for the available languages will be displayed: This file is located in the directory "pblicense/export/footprint". Page 92 of 113 PBlicense - User Manual validate.zip (contains the file validate.php) This is the validation engine and absolutely necessary. You have to unzip the file before you use it. It is compressed so that you can download and send it by e-mail. This file is located in the directory "pblicense/export/validate". To integrate the project files into your own project just download them to your local computer, unzip the two compressed files and copy all the files together to the same directory like your script which you want to protect. That’s all! 22.2 MD5 Hashes The second area displays the MD5 hashes of the validation engines. It is very important that this information is always correct because the application will check the MD5 hash of the validation engine before the function to check the license is included into the application. Without the correct validation engine (correct MD5 hash) the application will never run! The table displays the different validation engine hashes available: If the banner is green everything is ok. If the banner is red there is something wrong with the MD5 hashes, maybe the specified MD5 hash in the configuration file is wrong or a validation engine file is corrupt. Page 93 of 113 PBlicense - User Manual 22.3 Product Files The third area displays all the product files which are necessary to configure the product specific part. Normally these files are unique for each of your protected applications. Here is a small description for each of the files and the reason why you need them for your project: product_x.php This file contains all the product specific information (product x) for the footprint generator to create a product specific footprint. All the configuration settings you made with the configuration editor are saved to this file. It would be the best if you encode this file but it’s not absolutely necessary. If you do not encode this configuration file, your customer can change the settings before creating a footprint. The only thing which will happen is that his application never will work because the created footprint will be invalid - But it could be a problem if you have to support this case and you don't know that the configuration file was altered by the customer! Please download the product file and copy the file to the same directory like your script which you want to protect. product_x.code This file contains the product specific php code which you have to copy into your application which you want to protect. Please see the chapter "Code Integration" for information about how to integrate the product code into your own project. Page 94 of 113 PBlicense - User Manual 23 Code Integration To integrate the necessary files into your project please click on the link "File Integration" on the link panel. The following window will display all the necessary files for the integration of the PBlicense software into your own project. 23.1 Display the PHP code The table "PBlicense Product Files" list all the product codes: To download the product code file to your local computer please click on the download link "DL" on the left side: You will be asked where you want to store the file and you can choose a local folder on your computer: Page 95 of 113 PBlicense - User Manual To display the necessary php code for one of your products, please click on the product code link "product_x.code" on the right side: The product code for the specified product will be displayed and you can copy the php code into your application: Page 96 of 113 PBlicense - User Manual 23.2 Customize your Configuration File You can copy the definition of the username and organization to your configuration file. Your customer later has to specify his name and organization (red part). So that part has to be in a file which is NOT encoded. This is normally the configuration file of the application. // ============================================= // Specify the username and organization // ============================================= $username = "Peter Example"; $organization = "Example Inc."; Attention: Please be sure that the configuration file which contains the username and organization specification is NOT encoded! The user later needs to edit this file and insert his name and organization! 23.3 Customize your Application File Next we will explain the created php code which you can use in your own script (without the blue line numbers!): 1 2 3 4 5 6 7 8 9 10 11 12 13 14 15 16 17 18 19 20 21 22 <?php include_once("configuration.php"); $check[0] = $username; $check[1] = $organization; $check[2] = "Calculator"; $check[3] = "2.0"; $check[4] = 2; $check[5] = 0; $check[6] = "1111100000"; $check[7] = "9dui48t7ezh4e7fz3gh773u478rff7"; $md5_hash = "cbc11318f741416a56b53d2e75c6e1e4"; if (md5_file("validate.php") == $md5_hash) { include_once("validate.php"); $data['status'] = 0; $data = license_check($check); } if ($data['status'] == 1) { // Your PHP code ... } ?> Page 97 of 113 PBlicense - User Manual Code line 1 Begin of the PHP script. Code line 2 The configuration file "configuration.php" of your application is included into the protected script. Inside the configuration file the username and organization of the customer should be specified (The customer can later edit the file and insert his name and organization). Code line 3 The name of the user which was obtained from the configuration file is added to the array "$check" on position 0. Code line 4 The name of the organization which was obtained from the configuration file is added to the array "$check" on position 1. Code line 5 The name of the application which is hardcoded is added to the array "$check" on position 2. If the application name option was selected the validation engine will check this name against the name specified in the encrypted license string. Code line 6 The application version which is hardcoded is added to the array "$check" on position 3. If the application version option was selected the validation engine will check this version against the version specified in the encrypted license string. Code line 7 The IP address range which is hardcoded is added to the array "$check" on position 4. If the server address option was selected the validation engine will check the server IP address with this range against the IP address specified in the encrypted license string. Code line 8 The version range which is hardcoded is added to the array "$check" on position 5. If the application version option was selected the validation engine will check the application version with this range against the version specified in the encrypted license string. Page 98 of 113 PBlicense - User Manual Code line 9 The option flags which are hardcoded are added to the array "$check" on position 6. Specifies which configuration options will be checked by the validation engine. 1 means enabled and 0 means disabled. Code line 10 The product key which is hardcoded is added to the array "$check" on position 6. The product key is used as the encryption key for the license file and always has to be encoded! Code line 11 The MD5 hash which is hardcoded is stored into the variable "$md5_hash". Before the script checks the license file it checks if the validation engine was not modified and the MD5 hash is correct. If the validation engine hash does not match, the application will not run. Code line 12 Check if the MD5 hash of the validation engine "validate.php" match the MD5 hash stored in the variable $md5_hash". Code line 13 Begin of the code block which is executed if the MD5 hashes match. Code line 14 Include the validation engine "validate.php" into the application. Code line 15 Set the license status to zero. For security reasons the license status is set to NOT VALID before the license will be validated. Code line 16 Call the validate function to check the license file and store the result into the array "$data". Code line 17 End of the code block which is executed if the MD5 hashes match. Code line 18 Check if the license status in valid. Page 99 of 113 PBlicense - User Manual Code line 19 Begin of the code block which is executed if the license status is valid. Code line 20 Execute the code of your PHP application. Code line 21 End of the code block which is executed if the license status is valid. Code line 22 End of the PHP script. Attention: Be sure that your php application which contains this or a similar code is ALWAYS ENCODED! Page 100 of 113 PBlicense - User Manual 23.4 License Information Array The validation engine always returns an array which contains the following license information which can be used in every script: $data['software_grade'] Software grade which was specified before the license file was created, like Standard. $data['start_date'] Contains the start-date which was specified before the license file was created, like 20.11.2005. $data['end_date'] Contains the end-date which was specified before the license file was created, like 20.12.2005. $data['creation_date'] Contains the creation date of the license file, like 25.10.2005. $data['duration'] Contains the license duration in days, like 30. $data['status'] Contains the license status: 0 = license invalid, 1 = license valid. $data[‘message’] Contains a message about the validation result, like License is not valid! $data[‘filename’] Contains the filename of the license file, like 301105193352.pbl. After checking the license file you can use these array values in your script but check first if the value is set. Example: If the license file could not be read there is no start- or end-date available but the status or the message is available! The most important array value is $data['status'], because it depends on the status if your script will run (license valid) or stop (license not valid). Page 101 of 113 PBlicense - User Manual 24 Tools 24.1 PBlicense Frontend The PBlicense frontend can be used to give your website visitors access to trial licenses for your products. You can specify the different application settings for the frontend in the configuration file "pblicense/configuration/weblicense.cfg". You can open the frontend with a click on the button "PBlicense - Frontend" on the PBlicense Main Menu, through a link on the "License Generator" page or also directly by entering the URL (Example: http://example.com/pblicense/front/frontend.php) in your browser: The frontend works similar to the license generator of the main application, but the visitor can only insert the footprint and if enabled the access code to create a license file. All the options are disabled. The license duration is specified in the configuration file. The user has to go through the following three steps to create a new license file: Copy a valid footprint into the text area. Enter his access code into the form field. Click on the button "Create License". Page 102 of 113 PBlicense - User Manual If all the input data is correct a new license will be created and the user can save the license file to his local computer or display it in a new browser tab/window: Page 103 of 113 PBlicense - User Manual 24.2 License Analysis Tool Overview The License Analysis Tool can be used to check an existing license file, get information about the validation process and see what is the problem if an error occurs during validation. This tool consists of the following files: analysis.php application.cfg validate.php xxxxxxxxxxxx.pbl (main script to analyze license files) (emulates the customer computer) (validation engine for testing MD5 hash) (license file which has to be checked) Because normally we can not analyze the customers license on the customers computer, we have to emulate (or override) the settings the customer computer provides for creating a system footprint. The configuration file "application.cfg" allows us to specify exactly the same settings like the customer computer would provide and therefore the license (created for the customer computer) will also work locally. This method would also work for every script you distribute to your customers and they would not have to buy a license from you, but the only difference is that your script which contains the php code to protect your product has to be ENCODED and therefore can not be altered by your customers! Edit the Configuration To check a license file you first have to edit and customize the configuration file "pblicense/analysis/application.cfg" and make some changes. Please check the example configuration file on the next page: Page 104 of 113 PBlicense - User Manual Page 105 of 113 PBlicense - User Manual Line 15 -19 specifies the server variables which have to match the settings of the webhost where the application normally is running. If you are testing on another host you have to edit these values: Line 25 - 26 specify the name and organization of the licensee. Normally those values are provided by the configuration file of the application. Please edit the settings so that they match the data of the license file (you can open the license file with a text editor and copy the username and organization): Line 33 - 38 specify the product specific settings. You can get the exact settings by opening the configuration of your product on the "File Integration" page: Line 45 specifies the script path. Please edit this variable and enter the path to the script file on the customers host. Line 50 specifies the MD5 hash of the validation engine. Page 106 of 113 PBlicense - User Manual Analyze a License File If you have customized the configuration file you can run the analyzing script from the PBlicense Main Menu. The license will be analyzed ad a detailed report will be displayed. The analysis consists of 37 steps and for every step there will be a success message displayed. If the message banner is green the step has completed successfully, if the banner is red an error has occurred. On the following image you can see the step 1 which was completed successfully: If there is an error, you can see where it has occurred. In the following example the error occurred in step 34 and the message indicates that the two footprint does not match: Page 107 of 113 PBlicense - User Manual 25 Backup Attention: Please make backups frequently! If you have a backup and don’t need it it’s much better that if you need a backup but don’t have it! It's very easy to backup PBlicense! You just can backup the whole PBlicense directory! There is no database to backup, just backup the whole directory "pblicense" with all subdirectories included and copy the backup to a save place! It’s not a lot of data, normally it will be less than 10 MB (including this user manual)! Attention: Please make backups frequently! Page 108 of 113 PBlicense - User Manual 26 Buying PBlicense PBlicense was made to help developers to protect their applications against unlicensed use. Unlike other applications you don’t have to worry about the number of licenses you will create. With PBlicense you can create as many licenses as you want. There is no extra fee for license packages or yearly fees to use PBlicense! If you buy PBlicense you can use it as long as you want. The purchase price includes all new versions during one year and also a superior customer support. We offer trial versions for all of our software products so that you can test them and check if they run on your server without any problems and of course if you like the software. We believe that you should only pay for a product that you like and only for software you can test before you have to buy it! Please test the trial version before you buy a license! If you like the PBlicense application you can buy an unlimited license from the PB-Soft Website. If you have registered PBlicense you should send us a new footprint (see section "Unlock the Software") and we will send you the license file for the full version of PBlicense. Page 109 of 113 PBlicense - User Manual 27 Licenses PBlicense also uses some external software which is listed below. We would like to thank the creators for letting us use their software! You can find all the following license files in the subdirectory "licenses": licence_apache.txt (Apache License) license_pblicense.txt (PBlicense License) license_pclzip.txt (PCLzip License) license_php.txt (PHP License) license_zend.txt (Zend License) 27.1 Apache Webserver For the localhost installation package the Apache Webserver is used. The Apache Webserver uses the "Apache License", Version 2.0, from January 2004. Apache Website: ... http://www.apache.org License Link: ......... http://www.apache.org/licenses/ Local License: ....... license_apache.txt 27.2 PclZip Library For the PBlicense Installer Script the PHPConcept PclZip Library is used. With this library the installer can compress and decompress files and folders during the installation. The PHPConcept PclZip Library uses the "GNU Lesser General Public License", Version 2.1, from February 1999. Application Author: ........ Vincent Blavet PHPConcept Website: .. http://www.phpconcept.net License Link: ................. http://www.gnu.org Local License: ............... license_pclzip.txt Page 110 of 113 PBlicense - User Manual 27.3 PHP-Package For the localhost installation package the PHP package is used. The PHP-Package uses "The PHP License", Version 3.01, 1999 2010. PHP Website:................ http://www.php.net License Link: ................. http://www.php.net/license/ Local License: ............... license_php.txt 27.4 Zend Optimizer For the localhost installation package the Zend Optimizer is used. The Zend Optimizer uses the "Zend License Agreement". PHP Website:................ http://www.zend.com Local License: ............... license_zend.txt Page 111 of 113 PBlicense - User Manual 28 Support If you have a question or a problem while installing or using PBlicense, please contact us - we are always glad to help you! You can contact us using the following methods: Website: http://www.pb-soft.com Webstore: http://www.pb-soft.com E-Mail Address: [email protected] Page 112 of 113 PBlicense - User Manual 29 Feedback We always like feedback from you so that we can improve our products. We don’t want only positive feedback; we also like constructive criticism so we can change for the better. If you think there is something missing or there is an error in this manual, please contact our support so we can add the missing information or fix the error in the manual! Thank you a lot for your attention and have a nice day! Patrick Biegel Page 113 of 113

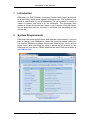
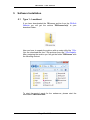
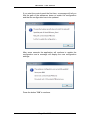
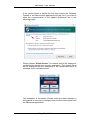
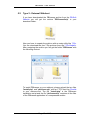
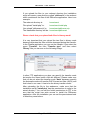
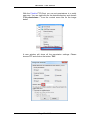
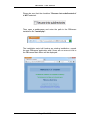
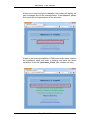
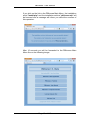
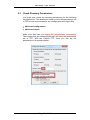
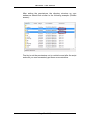
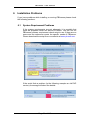

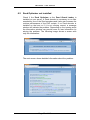
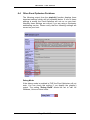
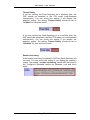
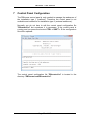
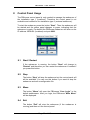
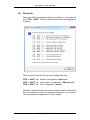
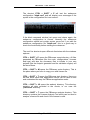
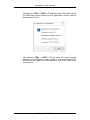
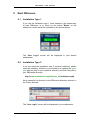
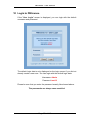
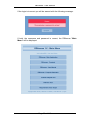
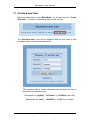
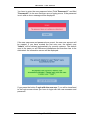
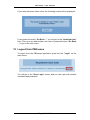
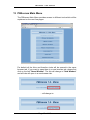
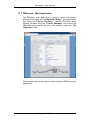
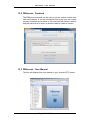
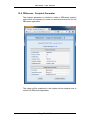
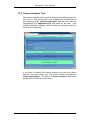
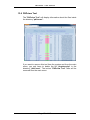
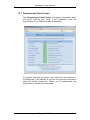
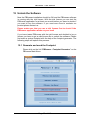
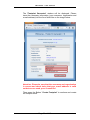
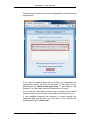

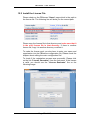
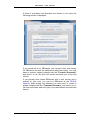
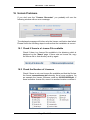
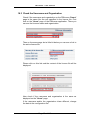
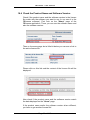
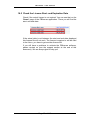

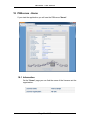
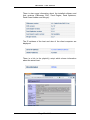
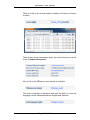
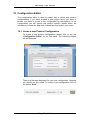
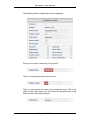

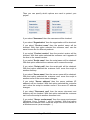
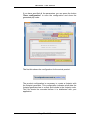
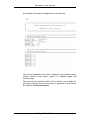
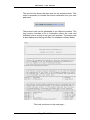

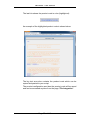
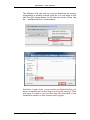
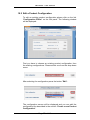
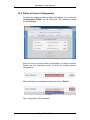
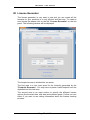
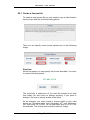
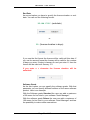
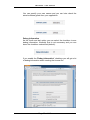
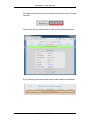
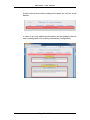
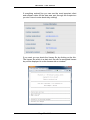
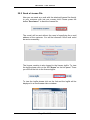
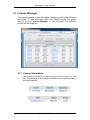
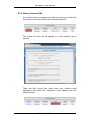
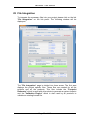
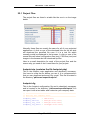

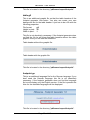


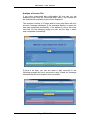


![[GLPI & OCS Inventory]](http://vs1.manualzilla.com/store/data/006327452_1-4f96a94df8ab4a789ff4fc22a306587e-150x150.png)