1
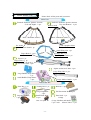
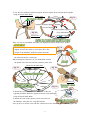
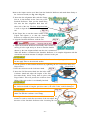
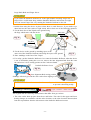
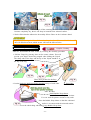
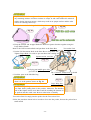
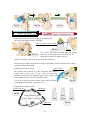
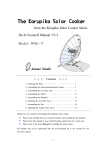
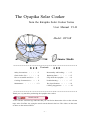
The Oyapika Solar Cooker from the Kirapika Solar Cooker Series User Manual V1-II Model: OP13B Amane Studio ○ ○ ○ Contents ○ ○ ○ Safety Precautions・・・・・・2 Disassembly and Packing・・・・13 Check before Use・ ・ ・ ・ ・ ・ 4 Replacing Parts・・・・・・・・15 How to Assemble and Use・・・5 FAQ about the Oyapika・・・・・ 16 Cooking Characteristics・・・・ 11 Troubleshooting ・・・・・・・17 Maintenance・ ・ ・ ・ ・・・ 12 Key Specifications ・・・・・・18 Cooking Suggestions・・・・・・20 Thank you very much for purchasing the Oyapika solar cooker. (Search words) A box with the YouTube logo indicates that you can find an instruction video on the relevant topic at the YouTube site, using the search words shown in the box. The videos are the same as those on the enclosed DVD. -1- Safety Precautions This manual explains instructions that must be followed in order for you and the people around you to avoid injury and prevent property damage, using the categories shown below. ■ The following categories indicate the severity of injury or property damage that can be caused by failing to follow the instructions and thereby misusing the device. This indicates that failure to follow the instructions could cause death or serious injury. This indicates that failure to follow the instructions could cause an injury or property damage. This indicates important instructions concerning the handling of the product or accessories. We accept no liability for any injury or damage caused by misuse of the device. 1. Do not place any part of your body or any combustible materials near the center of the Parabolic Reflector during use, because it will get very hot. Fig. 1 Fig. 2 2. Make sure that you put the cover on the Parabolic Reflector when it is not in use. Fig. 3 Fig. 4 ! ! Sunlight will not be focused on the cooking area if it enters the Parabolic Reflector at an angle, however the concentrated sunlight will cover and heat up an elliptical area outside the reflector. -2- As a precaution, do not place any combustible materials near the Parabolic Reflector. Fallen leaves and dry grass are particularly combustible and dangerous. It is wrong to assume that leaving the Parabolic Reflector facing north will prevent it from heating up an area near the device. The afternoon sunlight could still enter a north-facing Parabolic Reflector at an angle and the reflected sunlight could heat up an area near the device. Fig. 5 ! Fig. 6 Fig. 7 3. When there is the possibility of a lightning strike, stop using the solar cooker immediately and store it indoors. 4. Do not use the solar cooker in such a way that it could tip over. Do not use the solar cooker in a strong wind. The solar cooker is light and susceptible to wind particularly when it does not have a pan on it. ‚ Do not use the solar cooker on an unstable surface or a steep slope. Pegging the Tripod to the ground does not completely remove the risk of the solar cooker tipping over. 5. The handles and knobs on some types of cookware could become very hot. Please take precautionary measures such as wearing oven gloves or use a thick cloth when holding the cookware. ✔ 6. The Oyapika is designed exclusively for cooking. Do not use it for other purposes such as igniting things. Fig. 8 Fig. 9 1. Directly watching the focal point will damage your eyes. Ultraviolet light increases the incidence of cataracts. Fig. 10 Be sure to wear sunglasses when using the solar cooker. 2. Watch your fingers when folding the Tripod, or you may trap your fingers between the braces and the center column or the legs. -3- × Check before Use Please check all the parts and accessories. Main Unit Parabolic Reflector Quarter Sections (Left and Right): 2 pcs. Parabolic Reflector Quarter Sections (Top and Bottom): 2 pcs. Rubber mold Back (aluminum surface) Back (aluminum surface) No sticker The Oyapika sticker Cookware Stand: 1 pc. Small Wing Nut: 1 pc. Finger Bolts J: 3 pcs. Flange Nut: 1 pc. Sun Alignment Bolt: 1 pc. Tripod: 1 pc. Finger Nut A: 1 pc. Two-socket Unit: 1 pc. Square-section Axis Bars: 2 pcs. Large Wing Nuts: 2 pcs. Large Bubble Wrap Sheet: 1 pc. Small Bubble Wrap Sheets: 3 pcs. Large Rubber Bands: 2 pcs. Parts in the Box Parts Box: 1 pc. Large Knob Bolts: 2 pcs. Turning Rod: 1 pc. Long Wing Bolts: 2 pcs. Small Knob Bolts: 13 pcs. One is a spare. -4- Brackets: 2 pcs. Fall Prevention Rods: 3 pcs. Parts Pack: 1 pc. O-rings (Large, Medium and Small): 2 pcs. each Silicon Tubes: 6 pcs. Standard Accessories Shoulder Bag: 1 pc. Parabolic Reflector Cover: 1 pc. OP 20 cm Frying Pan: 1 pc. Please attach your own string. Medium Pan Bag: 1 pc. Pegs: 3 pcs Tripod Bag: 1 pc. Enclosed Documents The User Guide DVD and the User Manual: 1 of each Optional Products OP 20 cm Black Sauce Pan 3.7 L Black Kettle Extra Large Pan Bag Medium Pan Bag How to Assemble and Use Oyapika 1. Installing the Tripod Fig. 11 Assembly Knob Bolt H Open the Tripod legs completely, and then tighten Knob Bolt H. Fig. 13 Make sure the center column is in an upright position. Knob Bolt G Extend the leg which points down the slope. Fig. 12 Spread the legs as wide as possible. -5- ‚ When installing the solar cooker on a slope, extend the leg which points Finger Nut A down the slope so that the center column is in an upright position. ƒ Remove Finger Nut A from the top of the center column. 2. Assembling the Cookware Stand Fig. 14 Attach the Two-socket Unit to the Cookware Stand. Long Wing Bolt Sun Alignment Bolt (in the storing position) Cookware Stand Rod (there are three) Two-socket Unit Threaded hole for mounting the Square-section Axis Bar Fig. 15 Insufficient tightening of the Long Wing Bolts will cause the Cookware Stand to lean forward during use. Tighten them firmly. ‚ Screw the threaded ends of the two Square-section Axis Bars into the threaded holes of the Cookware Stand and tighten them using the Turning Rod. Fig. 18 Fig. 16 Large Wing Nut Fig. 19 Fig. 17 ƒ Put the Large Wing Nuts onto the threaded ends of the Square-section Axis Bars sticking out from the Cookware Stand and tighten the nuts firmly, in order to prevent loosening. Insufficient tightening of the Square-section Axis Bars or the Large Wing Nuts will cause the solar cooker to rattle during use. Tighten them firmly. 3. Assembling the Parabolic Reflector -6- Lay the four Parabolic Reflector Quarter Sections upside down and put them together using the Small Knob Bolts. White rims Fig. 21 Parabolic Reflector Quarter Sections (Left and Right) Parabolic Reflector Quarter Sections Fig. 20 (Top and Bottom) Brown rims Small Knob Bolt They can only be assembled when they are arranged as shown in the above picture. When screwing in the Small Knob Bolts, pull up the joints Fig. 22 slightly because they tend to come apart due to the weight of the Parabolic Reflector Quarter Sections. ‚ Turn over the Parabolic Reflector so that the mirrored surface is facing up. When turning the reflector over, use both hands to hold the points where the rims and the parabolic joints meet. Mount the Brackets here. Fig. 23 Fig. 24 Bracket Fig. 25 ƒ Mount the two Brackets on the outer rims of the two opposing Parabolic Reflector Quarter Sections (Left and Right), using the Small Knob Bolts. „ Mount the ends of the Square-section Axis Bars on the Brackets, using the two Large Knob Bolts. Line up the Two-socket Unit with the central hole of the Parabolic Reflector and tighten the -7- Large Knob Bolts in order to temporarily attach the Square-section Axis Bars. … Hold the Cookware Stand and shake it back and forth.If it rattles, the Square-section Axis Bars were not attached to the Cookware Stand firmly enough. Remove the Square-section Axis Bars from the Parabolic Reflector and follow procedure 2-‚ to attach the Fig. 26 Square-section Axis Bars firmly to the Cookware Stand. † Place the center column of the Tripod into one of the sockets on the Two-socket Unit. To easily attach or remove the Parabolic Reflector from the Tripod, keep the Two-socket Unit and Fig. 27 the center column of the Tripod aligned. It is easier to put the Two-socket Unit onto the Tripod, if you first push down on the Cookware Stand a little because it tends to lean forward. If the Two-socket Unit is leaning to one side while it is being attached to the Tripod, the center column could get stuck in the socket before it is seated correctly. When this happens, rotate the Parabolic Reflector to the left and right in small motions in order to release the center column. It takes one large person or two smaller people to attach or remove the Parabolic Reflector. Fig. 28 When you attach or remove the Parabolic Reflector from the Tripod, turn the Parabolic Reflector so the back of the reflector faces the sun, in order to prevent your hands getting burnt. Use the summer socket on the Two-socket Unit in the summer and use the winter socket in the winter (see Fig. 30). Oyapika "Summer and Winter" The summer socket will enable you to align the Parabolic Reflector with the higher solar elevation angles seen in the summer. The winter socket will enable you to align the Parabolic Reflector with the lower solar elevation angles seen in the winter. Using the summer socket 30° 80° 71° Using the winter socket 25° Fig. 29 The device is optimized for regions at 33 °N.In areas at lower latitudes than 33 °N, you may not be able to align the solar cooker with the sun around solar noon, depending on the season. -8- In areas at latitude 43 °N or more and areas at latitude 43 °S or more, the solar cooker cannot be aligned with the sun for the whole day on the winter solstice. Finger Nut A Sun Alignment Bolt Fig. 30 Flange Nut Outer rim Winter socket Summer socket Cookware Stand Frying pan handle space Square-section Axis Bar Large Knob Bolt Knob Bolt H Knob Bolt G Tripod × Insufficient tightening here could cause deformation! Fig. 31 If the sides of the Parabolic Reflector hang down, the Square-section Axis Bars have not been attached to the Cookware Stand firmly enough. In this condition, the Parabolic Reflector will not stay in the correct position when you are adjusting the Parabolic Reflector by vertically rotating it even if you tighten the Large Knob Bolts, because the Square-section Axis Bars will rotate along with the Parabolic Reflector. -9- Remove the Square-section Axis Bars from the Parabolic Reflector and attach them firmly to the Cookware Stand (see Fig. 16 to Fig. 19). ‡ Insert the Sun Alignment Bolt (with the Flange Nut on it) into thehole on the outer rim of the Parabolic Reflector. Then, put the Small Wing Nut onto the Sun Alignment Bolt from the other side of the rim. The Sun Alignment Bolt is used to align the Parabolic Reflector with the sun. Fig. 32 ˆ Put Finger Nut A onto the center column of the Tripod and tighten it so that the Parabolic Reflector is temporarily fixed to the Tripod. 4. Align the Parabolic Reflector with the sun. Fig. 33 Oyapika “Aligning with the Sun” Adjust the Parabolic Reflector horizontally and vertically by moving it left or right and up or down so that the shadow thrown by the Sun Alignment Bolt onto the rim is minimized. When the shadow is minimized, the Parabolic Reflector is in complete alignment with the sun and the maximum amount of sunlight is directed to the pan. Hold the rims, joints and bars of the Parabolic Reflector when adjusting its direction. Do not apply force to the mirrored surface. ‚ Fix the position of the Parabolic Reflector by tightening the two Large Knob Bolts and Finger Nut A. Finger Bolt J 5. Place the cookware on the Cookware Stand. Fig. 34 Insert the Fall Prevention Rods into the holes onthe Cookware Stand and adjust the lengths of the Fall Prevention Rods, before fixing them in place with Finger Bolts J.This will prevent the cookware from falling if the solar cooker is accidentally knocked. The maximum load for the Cookware Stand is 8 kg. If you place more than 8 kg onto the Cookware Stand or bang the pan down onto it, the solar cooker could be damaged. Fig. 35 Heating empty cookware will damage the cookware. Make sure that the cookware is not empty. 6. Re-align the Parabolic Reflector with the sun every 15 minutes in order to track the movement of the sun.Adjust the direction of the Parabolic Reflector after loosening the two - 10 - Large Knob Bolts and Finger Nut A. If you rotate the Parabolic Reflector far to the right without loosening Finger Nut A, Finger Nut A could rotate along with the Parabolic Reflector and become too tight. You can loosen Finger Nut A by rotating the Parabolic Reflector to the left. 7. Refrain from using the device in places where there is wind. However, if you decide to go ahead and use the solar cooker in light winds, take at least one of the following measures. Fix the three feet of the Tripod to the ground using the Pegs which come with the device. Outer rim Rope hole Fig. 36 Peg hole ‚ Fix the device to the ground by attaching ropes to the outer rim of the Parabolic Reflector and fixing the ropes to the ground. ƒ Place sandbags on the feet of the Tripod. Fig. 37 8. For safety, put the Parabolic Reflector Cover onto the Parabolic Reflector when the device is not in use.Before putting the cover on, remove the Sun Alignment Bolt from the outer rim and screw it in its storing position on the Cookware Stand. Parabolic Reflector Cover Fig. 39 Fig. 38 Sun Alignment Bolt storing position Sandbags effectively prevent the solar cooker from tipping over. The Parabolic Reflector Cover is made of canvas. Dry it well before storing it in order to prevent it becoming moldy. Cooking Characteristics Oyapika “Performance”“Suitable Cookware” The Oyapika has the following characteristics that differ from gas cookers. 1. The solar cooker heats up pans from above and below. The ratio for the upper and lower heating changes in accordance with the solar elevation, as the solar elevation decreases,heat from the top and heat from the side nearest to the Parabolic Reflector increase. - 11 - Fig. 40 Fig. 41 Please turn the pan occasionally in order to prevent burning at the side of the pan nearest to the Parabolic Reflector, especially when cooking sticky food. The solar cooker also heats up the sides and the top of the pan. Do not use pans with dark plastic handles or dark plastic knobs.For the pan which comes with the device as a standard accessory, measures have been taken to prevent the handle and knob getting too hot, but please use oven gloves as a safety precaution. 2. Due to the characteristics of parabolic reflectors, the heat becomes more intense, the nearer it gets to the focal point. While the circumferential flames of a gas cooker heat up the bottoms of pans evenly, the Oyapika heats up pans unevenly: the hottest part will be the center-bottom of the pan. Therefore, using a pan with a thin bottom tends to burn food at the center of the pan. 3. When grilling food directly on the solar cooker (i.e. with infrared rays), food can be cooked through before the surface is burnt. White food such as mochi (rice cake) takes longer to cook because it reflects light back. Once food has been burnt and is blackened, it absorbs heat better, which accelerates the burning process. 4. As you will be cooking outdoors, the wind can cause significant heat loss, so select a place with as little wind as possible. 5. The weather is the largest factor which influences solar cooking power. Cooking power is high on dry, clear days with blue skies. Cooking power is low on humid days with hazy skies. When you cook food that takes a long time, it is recommended that you have a backup cooking system in case it becomes cloudy in the middle of cooking. Maintenance Oyapika Maintenance 1. Although the parabolic mirrored surface is treated with an anticorrosive coating, exposure to sea breezes and acids tends to cause aluminum corrosion. If the Parabolic Reflector becomes dirty especially with seasoning, spilled cooking liquids or seawater during use, wash it with water, a neutral detergent and a soft cloth or a sponge after you have finished using it, on the same day you use it. Do not wipe off the dirt with a dry cloth, or you could scratch the mirrored surface.Do not use thinner, benzine or abrasive cleansers, as they will damage the hard coating layer of the mirrored surface. Damaged surfaces cannot be restored by polishing them. - 12 - Fig. 42 Fig. 43 2. Rinse it with running water and wipe off the remaining moisture with a towel just before it becomes completely dry, then it will keep its beautiful clear mirrored surface. 3. Wash off dirt that has adhered to the nonslip Silicon Tubes on the Cookware Stand. If you carry on using the Silicon Tubes when dirty, the dirt will burn and the blackened dirt will absorb more heat, which in turn will burn the Silicon Tubes. Disassembly and Packing Oyapika Packing After use, disassemble the solar cooker by reversing the assembly procedure. 1. Fold the Tripod by pressing down on the center column. This will prevent your fingers from being trapped when folding the Tripod. The sharp ends of the Pegs and the top of the Tripod should be at the top of the bag. ✔ Fig. 44 × Fig. 45 Three inner pockets for the Pegs 2. Put the Parabolic Reflector Quarter Sections on top of each other. Fig. 46 Tripod Bag Place the three Small Bubble Wrap Sheets in between the quarter sections. You can stack the quarter sections in any order. Place the Bubble Wrap Sheets so that the cushioned Fig. 47 surface is in contact with the mirrored surface. Cover the whole thing with the Large Bubble Wrap Sheet. - 13 - Dry the Parabolic Reflector Quarter Sections completely before wrapping them, otherwise any remaining moisture will have nowhere to escape to and could oxidize the mirrored surface during long-term storage, which may result in an opaque surface and the solar cooker not working effectively. 3. Tuck in the ends of the Large Bubble Wrap Sheet. Fig. 48 Fig. 49 4. Keep the stacked and wrapped Parabolic Reflector Quarter Sections together using the Large Rubber Bands. Remove the Fall Prevention Rods and put them in the Parts Box. Two-socket Unit 5. Put the Fall Prevention Rods in the Parts Box to keep them safe. Tighten Finger Bolts J in order to prevent them from coming off. Square-section Axis Bar Fig. 51 Fig. 50 The frying pan handle space side goes into the pocket first. 6. Pack the parts in the Shoulder Bag. The Cookware Stand only fits in the pocket when it is in the position shown in Fig. 51. The Cookware Stand Rods should face the outside of the pocket. Fig. 52 Large Wing Nut Attach the Large Wing Nuts to the threaded ends of the Square-section Axis Bars before putting them in the pockets. Otherwise, the threaded ends of the Square-section Axis Bars would be touching the bottoms of the pockets and this could cause them to make holes eventually. Two-socket Unit fits snugly into the pocket for the Two-socket Unit. Follow the procedure shown below in order to fit it into the pocket, because the pocket has a small mouth. - 14 - Fig. 53 Fig. 54 Fig. 55 Replacing Parts Oyapika“Replacing Parts” 1. Replacing O-rings on the top of the center column and the ends of the Square-section Axis Bars The top of the center column Fig. 56 Fig. 57 Awl The O-rings may stop producing sufficient friction when they wear out after several years of use or when they crack due to ultraviolet rays. Replace worn parts with the new ones from the Parts Pack. Ultraviolet rays tend to degrade the O-rings on the Square-section Axis Bars due to them sticking out from the pockets. 2. Replacing the Silicon Tubes Silicon Tube The Silicon Tubes placed over the Cookware Stand Rods harden after several years of use and stop producing sufficient friction.Cut the hardened parts with a knife and replace them with new ones from the Parts Pack. It is easier to slide on the new Silicon Tubes if the Cookware Stand Rods are moistened with water first. Fig. 58 3. Replacing the reflector plates Parabolic joint Inner rim Fig. 59 Back (aluminum surface) (A) (B) (C) Back (A) (C) Outer rim - 15 - (A) (B) Fig. 60 The reflector plates on the Parabolic Reflector become scratched and less reflective over time. When this happens, we recommend that you replace the reflector plates. There are 16 fan-shaped reflector plates mounted on the Parabolic Reflector. When you order replacements, please tell our dealers the letter (A, B or C) and the quantity of reflector plates you need. When replacing the reflector plates, please see Video No. 9 on the DVD which comes with the product. FAQ about the Oyapika Q1. How hot does it get in the light focal point? A. The solar cooker creates a 15 cm diameter spherical light focal point when it is aligned with the sun. The temperature reaches 653 °F( 345 °C) if an empty 16 cm diameter black cooking pot is heated on a sunny day. The heating power is equivalent to medium heat on a gas cooker. Q2. Should I stay by the solar cooker all the time during cooking? A. No, you don’t have to stay by the solar cooker all the time, but please re-align the Parabolic Reflector with the sun every 15 minutes in order to track the movement of the sun, by moving it left or right and up or down so that the shadow thrown by the Sun Alignment Bolt is minimized (see Fig. 12). Q3. What will happen if I leave a pan on the solar cooker and forget about it? A. The solar cooker will become unfocused as the sun moves away and this will result in less light being directed onto the pan. Light which enters the Parabolic Reflector at an angle could be concentrated on combustible materials outside the Parabolic Reflector and could lead to a serious accident (see Fig. 3 to Fig. 6). Make sure that you put the cover which comes with the product onto the Parabolic Reflector when the device is not in use. Watch out for strong winds because it could move the solar cooker. Q4. What kind of cooking is the solar cooker capable of? A. It is capable of boiling, simmering and frying food. As a rough guide, you can cook 540 mL of rice in 21 minutes on a clear day. It is not suitable for cooking which requires high heat such as deep-frying. Fig. 61 Q5. Can I use my own pans? A. White pans are not suitable. You can use black pans. If the pan has a black plastic handle and knob, protect them from light by covering them with aluminum foil.The maximum size of the pan that can be used is 29 cm in diameter. Glass lids can also be used. Q6. Can I use the solar cooker both in the summer and the winter? A. Yes, you can. The solar cooker tends to perform better in the drier and clearer atmosphere of the winter*. High humidity reduces the amount of infrared rays reaching the ground, which results in poor performance.As a rough indication, blue skies give high heating power and hazy skies reduce the capability of the solar cooker. * This is the case in Japan. Please check the dry season and the humid season in your region. - 16 - Fig. 62 Fig. 63 Q7. What about on cloudy days? A. The performance is impaired considerably. Please also remember that the morning and evening sunlight is affected by dust in the atmosphere, and gives poorer results than at midday. Q8. Is it OK if I spill cooking liquids onto the reflector plates? A. Although the reflector plates are treated with an anticorrosive coating, continuous exposure to acids will cause aluminum corrosion. Rinse the cooking liquids off the reflector plates using water and a soft sponge (see Fig. 42 and 43). If you wipe off the remaining moisture with a towel just before the reflector plates become completely dry, they will keep their beautiful mirrored surfaces with no water stains. Use a neutral detergent or soapy water in order to remove greasy patches.Do not use thinner, benzine or abrasive cleansers.When you expect especially greasy spillages or splashes, you could protect the reflector plates by lining them with plastic wrap before use. Q9. Does the entire reflector get hot? A. No, it does not. Only the area in and around the light focal point gets hot. Q10. The Parabolic Reflector moves in strong winds. What can I do? A. The Parabolic Reflector is designed to rotate with the wind rather than it being firmly fixed to the Tripod and resisting the wind, which increases the risk of the wind knocking over the solar cooker.Avoid using the solar cooker in strong winds. It is not safe even if the Tripod is pegged to the ground.The solar cooker is light and susceptible to wind particularly when it does not have cookware on it. Q11. Does the performance of the solar cooker vary in different areas? A. It performs well in dry areas because the smaller amount of vapor in the air reduces light loss.The performance is impaired in urban areas which have more polluted air.In high altitude areas, the lower boiling point effectively results in the solar cooker performing better. Troubleshooting Q1. Cooking performance has diminished. A1. Check if the reflector plates are dirty. If this is the case, try again after washing the dirt - 17 - off. A2. Many scratches on the reflector plates will reduce the reflectivity of the plates. If this is the case, the reflector plates need to be replaced in order to restore the performance. à See Video No. 9 on the DVD. A3. Is the Parabolic Reflector properly aligned with the sun (see Fig. 33)? If the Sun Alignment Bolt is bent, straighten it or replace the bolt with a new one.A4. Performance decreases relative to the strength of the wind. Select a place with as little wind as possible. Long Wing Bolt Q2. The pan leans to one side. A1. If the solar cooker is installed on a slope, extend the leg which points down the slope so that the center column is in an upright position (see Fig. 12). Fig. 64 A2. If the pan leans forward despite the center column of the Tripod being in an upright position, the Long Wing Bolts have not been tightened sufficiently. Remove the Parabolic Reflector from the Tripod and tighten the Long Wing Bolts firmly. Q3. The Parabolic Reflector will not stay at the correct elevation angle. Fig. 65 A1. Check if the Square-section Axis Bars are firmly screwed into the Cookware Stand.If not, the Parabolic Reflector may look like Fig. 31 and it will not stay in the correct position even if you tighten the Large Knob Bolts.Remove the Square-section Axis Bars from the Parabolic Reflector and attach them firmly to the Cookware Stand by following procedures Fig. 16 to Fig. 19. Crack A2. If the device is used repeatedly with the sides of the Parabolic Reflector hanging down as shown in Fig. 31, the ends of the Square-section Axis Bars may crack. This will require repair or replacement. Please contact our dealers. 2 mm Allen key (across flat distance) Q4. The Tripod legs will not fix into position when they are opened. A1. The slider may have worn out as a result of long-term use. Slightly tighten the hollow set screw which goes through the arch bar so that the slider presses hard against the center column. Fig. 66 Arch bar Key Specifications Model O P 13 B The total weight of the device 9.04kg Product number Diameter - 18 - of the Printed on the underside of the Cookware Stand. 130 c m Parabolic Reflector Focal point distance 34 cm from the deepest point of the Parabolic Reflector (the center of the hole) Reflector plate material Hard coated, highly reflective aluminum deposited aluminum plates The height of the Cookware Stand from the ground 72 c m Elevation angle W i t h the adjusting range summer socket 80 to 30 degrees Standard accessories The With socket size of footprint the the 1 .9 8 ㎡ winter 71 to 25 degrees A Parabolic Reflector Cover, an OP 20 cm Frying Pan, a Medium Pan Bag, a Tripod Bag, a Shoulder Bag, the User Guide DVD, 3 Pegs for fixing the Tripod Specifications for the Accessory Pan (OP 20 cm Frying Pan) Materials Body: Aluminum alloy Lid: Tempered glass Handle: Bakelite Knob: Ceramic Dimensions (diameter x depth) 21.1cm × 5.1cm Surface treatment Outside: Heat-resistant matte black coating ************** Inside: Fluororesin coating A Fact Statement about Performance *************** We calculate our products’ outputs based on our water boiling test data, however, we do not provide the resulting figures as the nominal outputs. Currently, each manufacturer uses their own method to calculate and label their products’ wattage because there are no international industry standards for this type of device. However, it is impossible to make straight comparisons between the products of different manufacturers, due to the vast variety in measuring conditions such as the solar elevation used, the atmospheric conditions, the type of cookware tested, and also in methods for calculating the amount of heat loss. For this reason, we refrain from labeling our products with nominal wattage at this time.As a rough indication, 3 liters of water in our optional 3.7 L black kettle reaches boiling point in 46 minutes on a sunny day under the conditions shown below. Location: Nagano Prefecture, Japan Altitude: 650 meters Boiling Point: 208.6° F (98.1° C) Initial water temperature: 45.5° F (7.5° C) Air temperature: 49.1° F (9.5° C) Wind: Breeze Date: February 18, 2007 Start time: 14:36 Please note that the product’s specifications and appearance are subject to partial changes without notice due to continual improvements. Manufacturer-and-Seller Information Amane Studio 1138-1, Shionada, Saku City, Nagano, 384-2102, Japan Phone: +81 267 51 5430 (Japanese only) e-mail [email protected] Fax: +81 267 51 5431 http://amane-studio.jp/ - 19 - Cooking Suggestions Oyapika Turn the pan occasionally after you have added the thickening ingredients because the side of the pan nearest to the reflector tends to burn. Cooking Infrared rays cook the salmon steaks from top and bottom. Move the wire grill with the salmon steaks on it around occasionally, otherwise the salmon will tend to burn at the center and be underdone at the edges. Line the reflector plates with plastic wrap directly below the wire grill if you want to prevent them from getting dirty. Put the glass lid on in order to prevent fat from splashing on the Parabolic Reflector. It takes 21 minutes to cook 540 mL of rice in the OP 20 cm Black Sauce Pan. Turn the pan three minutes before the rice is done in order to prevent it from burning at the side nearest to the reflector. You can cook more than 540 mL of rice, but the pan may boil over. The OP 20 cm Frying Pan can cook fried noodles for up to two people. - 20 -