1
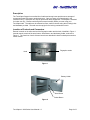
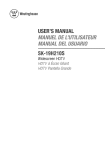
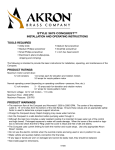
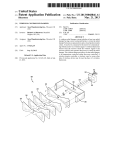
Security Safes and Strong Boxe User Manual Version 1.2 DMI – fingerprint dist. Description The TouchOpen fingerprint controlled line of safes and strong boxes provide secure storage of contents with ease of access to authorized users. Once you store your fingerprint(s) in the internal memory, TouchOpen can only be opened with those fingerprints. TouchOpen is intended for indoor use only. Please read through this manual carefully before you start using your TouchOpen safe. The safes can be mounted to floors, walls or shelves using the mounting holes and hardware provided. The safe must be upright for the locking mechanism to work. Location of Controls and Connectors External controls on the safe consist of the fingerprint reader and the knob, identified in Figure 1. Internal controls consist of the store button, delete button, and the battery holder, as shown in Figure 2. The functions of each of these controls are described in detail in subsequent sections of this manual. Fingerprint reader Knob Figure 1 Battery Holder Store Button Figure 2 TouchOpen 1000 Series User Manual 1.2 Delete Button Page 2 of 2 DMI – fingerprint dist. PERSONAKEY Indicator Light PERSONAKEY Scan area Verify Button Finger joint locater Figure 3 – Fingerprint Reader Description Figure 4 – Proper Finger Placement How to place a finger on the fingerprint reader Proper placement of your finger on the fingerprint reader is extremely important for proper operation of the unit, and this section is referred to throughout this manual. Please review this section carefully. Figure 3 shows the elements of the fingerprint reader. As shown in figure 4, when a finger is placed for fingerprint reading, the pad of the finger must be centered and completely covering the scan area, and the verify button must be located under the finger joint. The finger joint locater helps properly locate the finger on the reader. The finger must be pressed firmly enough to activate the verify button and make good contact with the scan area. Pressing too lightly will not activate the verify button and may not provide a good fingerprint. Pressing too hard will blur the fingerprint in the scan area. Initially it may take several practice tries during fingerprint registration and verification to learn how to properly place a finger on the fingerprint reader. In addition to proper placement, the finger must be clean and dry. However if you have extremely dry skin some moisturizer may need to be applied to your fingers in order to store a good fingerprint on the scan area. Opening the Safe when there are no fingerprints stored When the safe is shipped from the factory, or any time you delete the fingerprints that have been stored in the internal memory, pressing the verify button on the fingerprint reader as described in the section “How to place a finger on the fingerprint reader” will open the safe. After the Indicator light turns green you will have approximately 5 seconds to turn the knob clockwise and open the safe before the locking mechanism is reactivated. TouchOpen 1000 Series User Manual 1.2 Page 3 of 3 DMI – fingerprint dist. Storing a fingerprint in the Internal Memory If this is the first time you are storing a fingerprint, it is strongly recommended that you leave the door open and test the lock mechanism after storing your fingerprints until you are sure your fingerprints are properly stored and that you can successfully unlock the unit. 1. Make sure the indicator light is off and open the safe by placing a finger on the fingerprint reader as described in the section “How to place a finger on the fingerprint reader”, or if there are not any fingerprints already stored, by simply pressing the verify button, and turning the knob clockwise. 2. Find the black store button located inside the door near the hinges. Be sure to distinguish between the black store and the red delete button. Hold the store button down for about 2 seconds. Once the store button has been pressed, the indicator light will turn yellow/orange and you have 10 seconds to store a fingerprint. 3. Place a finger on the fingerprint reader as described in the section “How to place a finger on the fingerprint reader”. 4. As soon as the indicator light turns either red or green remove the finger from the fingerprint reader. 5. If the indicator light turned red in step 4, the fingerprint was not stored. This could be due to improper placement or not placing a finger on the fingerprint reader within 10 seconds of pressing the store button. It may take a few tries to properly store a fingerprint. Repeat steps 1 through 4 until the indicator light turns green during step 4. 6. When the indicator light turns green during step 4, the fingerprint was properly stored and will be stored in the fingerprint reader even when the batteries are completely drained. You can store up to 1000 fingerprints in the internal memory. It is recommend that you store prints from several of your own fingers to prevent being locked out of the safe should any of your fingers become unusable. It is also recommended that you store each finger more than once as this will make verification easier if your finger is not always placed on the fingerprint reader in the exact same manner. Note that the number of different people that can be authorized to use the unit is dependent on the number of fingerprints stored for each user. For example, if you store 20 fingerprints per person, you can have up to 50 users. Since fingerprints change overtime, it is strongly recommended that fingerprints to be recognized are re-stored every few months to ensure optimal operation. If the fingerprint storage limit is reached the safe will continue to function normally with the following exceptions; the safe will not store any new fingerprints and the indicator light will flash yellow/orange until the delete button is pressed. Opening the Safe when fingerprints are stored Once fingerprints have been stored in the safe, the safe can be opened by verification of a stored fingerprint on the fingerprint reader. 1. Make sure the indicator light is off and place a finger on the fingerprint reader as described in the section “How to place a finger on the fingerprint reader”. The indicator light will turn yellow/orange when the finger is properly placed on the fingerprint reader. When the indicator light turns green or red remove the finger from the reader. 2. If the indicator light turned green the safe will be unlocked for 5 seconds, giving you time to turn the knob clockwise and open the door. The safe will automatically lock when the door is closed and the knob is turned counterclockwise back to the locked position. 3. If the indicator light turns red, the unit will not unlock because the fingerprint was not recognized. This is either because of improper finger placement or the fingerprint has not been stored. After a few seconds the indicator light will turn off and the unit is ready for additional verifications. TouchOpen 1000 Series User Manual 1.2 Page 4 of 4 DMI – fingerprint dist. Deleting Fingerprints from the Internal Memory Using the delete function of the unit will erase all fingerprints stored in the internal memory. When there aren’t any fingerprints stored, the safe can be opened by placing any finger on the fingerprint reader as described in the section “How to place a finger on the fingerprint reader” of this manual, or by simply pressing the verify button. To delete fingerprints open the safe and press the red delete button, located on the inside of the door near the hinges, for about 3 seconds. The indicator light will flash orange for approximately 10 seconds while all the prints are deleted. Override Key A set of override keys has been provided in case you have difficulty with your fingerprints or the battery power becomes low. To use the override key unsnap the small cover located in the front center of the door. Completely insert the key and turn it counter clockwise, then turn the knob clockwise. Store your override keys in a secure location away from the safe. Never store the override keys inside the safe. Battery Replacement The TouchOpen safes use 4 AA batteries. Under normal use batteries will last about 9 months to 1 year. It is strongly recommended that you replace the batteries as soon as you receive your new safe and every 6 - 9 months thereafter. Use only 1.5 volt rated batteries, such as alkaline batteries. Note that most Ni-CAD and Lithium battery cells are only rated at 1.2 volts, and will not work in the TouchOpen safe. To replace the batteries, open the safe door with either your fingerprint or the override key, and remove the battery cover from the battery holder. The batteries must be installed properly as indicated on the battery holder or permanent damage will occur to the safe’s electronics. Once batteries are properly installed in the holder reinstall the battery cover. Resetting the Safe electronics Like all electronic equipment, the TouchOpen safe may need to be reset if the power is interrupted or the safe is subjected to improper use. If the safe does not function properly, reset the device by removing the batteries for 15 seconds. Care and Maintenance The TouchOpen safe is for indoor use only and should not be exposed to excessive humidity or temperature variations. It contains sensitive electronic circuitry that can be damaged by slamming the door or other physical shock. The safe can be wiped clean with a soft cloth. Dust, skin oil, and other contaminates can build up on the fingerprint sensor causing its performance to degrade. If this occurs, gently wipe the sensor clean with a soft non-abrasive cloth. Should the safe door become misaligned, it can be adjusted by loosening the setscrews and using an allen wrench to adjust the hinges. Be sure to tighten the setscrews after adjustment. TouchOpen 1000 Series User Manual 1.2 Page 5 of 5 DMI – fingerprint dist. Contacting DMI: Phone: 513-336-9292 Email: [email protected] ; [email protected] Website: www.4dmi.com US mail: Data Management Inc 7207 Wooster Pike ste#256 Cincinnati, OH. 45227 TouchOpen 1000 Series User Manual 1.2 Page 6 of 6