1
Operating manual
Gebrauchsanweisung
Tripod, wall- and ceiling device
Stativ
and- und Deck
engerät
Stativ,, W
WandDeckengerät
Ondal Medical Systems GmbH
Wellastraße 6 • D-36088 Hünfeld • Germany
Phone:
+49 / (0)6652 / 81-600
Fax:
+49 / (0)6652 / 81-392
© Ondal Medical Systems GmbH, 2012
38630, Edition 2012-05, Version 8
38630, Ausgabe/Edition 2012-05, Version 8
Ondal Medical Systems GmbH
Wellastraße 6 • 36088 Hünfeld • Deutschland
Telefon:
+49 / (0)6652 / 81-600
Fax:
+49 / (0)6652 / 81-392
© Ondal Medical Systems GmbH, 2012
38630, Ausgabe 2012-05, Version 8
2
Content
Page Inhaltsverzeichnis
1
Instructions for safe usage ................................. 4
1.1
Explanation of symbols ..................................... 6
1.1.1
Symbols in the operating instructions .......... 6
1.1.2
Marking on the equipment ........................... 6
1.1.3
Information on the rating plate (Fig.1) ............... 8
1.2
1.2.1
1.2.2
1.2.3
1.2.4
1.2.5
1.2.6
Seite
1
Hinweise zum sicheren Gebrauch ...................... 4
1.1
Bildzeichenerklärung ......................................... 6
1.1.1
Zeichen in der Gebrauchsanweisung .......... 6
1.1.2
Bildzeichen am Gerät und/oder auf der .........
Verpackung .................................................. 6
1.1.3
Angaben auf dem Typenschild (Abb.1) ............. 8
1.2
Allgemeine Sicherheitshinweise ....................... 9
1.2.1
Normen und Richtlinien ............................... 9
1.2.2
Zweckbestimmung ....................................... 9
1.2.3
Bestimmungswidriger Gebrauch.................. 9
1.2.4
Kontraindikation ........................................... 9
1.2.5
Umgebungsbedingungen für Betrieb und ......
Lagerung ................................................... 10
1.2.6
Reinigung und Desinfektion ....................... 10
General Safety indications ................................ 9
Standards and guidelines ............................ 9
Intended purpose......................................... 9
Incorrect use ................................................ 9
Contraindications ......................................... 9
Ambient conditions for operation and
storage....................................................... 10
Cleaning and Disinfection .......................... 10
2
2.1
2.2
2.3
Using the ACROBAT Swing Equipment ........... 11
Components of the equipment (Fig. 2) ........... 11
Usage (Fig. 2) ................................................ 11
Disposal .......................................................... 14
2
2.1
2.2
2.3
Gebrauch der ACROBAT Swing Geräte ........... 11
Komponenten der Geräte (Abb. 2) ................. 11
Gebrauch (Abb. 2) .......................................... 11
Entsorgung ..................................................... 14
3
3.1
3.1
3.2
Cleaning and Disinfection ................................. 15
General Safety indications .............................. 15
Cleaning .......................................................... 15
Disinfection ..................................................... 15
3
3.1
3.2
3.3
Reinigung und Desinfektion ............................. 15
Allgemeine Sicherheitshinweise ..................... 15
Reinigung........................................................ 15
Desinfektion .................................................... 15
4
4.1
4.2
Tests and Maintenance ...................................... 16
Tests ............................................................... 16
Maintenance ................................................... 16
4
4.1
4.2
Prüfungen und Wartung .................................... 16
Prüfungen ....................................................... 16
Wartung .......................................................... 16
5
5.1
5.2
Maintenance ....................................................... 17
Adjusting the spring force (Fig. 3) ................... 17
Greasing the securing segment ...................... 19
5
5.1
5.2
Instandhaltung ................................................... 17
Federkraft nachstellen (Abb. 3) ...................... 17
Sicherungssegment fetten .............................. 19
6
6.1
6.2
6.3
Dismantling and mounting for service ............. 20
Dismantling for end-device (Fig. 4) ................. 20
Mounting the end-device (Fig. 5) ................... 21
Change the fuses (Fig. 6) ............................... 23
6
6.1
6.2
6.3
Demontage und Montage im Servicefall .......... 20
Endgerät demontieren (Abb. 4) ...................... 20
Endgerät montieren (Abb. 5) ......................... 21
Austausch der Sicherungen (Abb. 6) .............. 23
7
Technical Data .................................................... 25
7
Technische Daten............................................... 25
8
Inspection Plan .................................................. 26
8
Inspektionsplan .................................................. 26
3
38630, Ausgabe/Edition 2012-05, Version 8
1
1
Instructions for
safe usage
Hinweise zum
sicheren Gebrauch
Dear operator,
Sehr geehrter Anwender,
Please note that certain operations must only be carried out
by personnel with the required qualifications:
beachten Sie, daß bestimmte Arbeiten nur von Personal mit
entsprechender Qualifikation ausgeführt werden darf:
• The device may only be operated by persons with
medical knowledge,
• The device may only be cleaned by trained cleaning
personnel.
• die Bedienung des Gerätes soll von medizinischem
Fachpersonal erfolgen,
• die Reinigung des Gerätes darf nur von eingewiesenem Reinigungspersonal ausgeführt werden.
• These operating instructions describe the ACROBAT
Swing tripod-mounted, wall-mounted and ceiling-mounted device.
The end devices (e.g. luminaires for medical diagnosis,
lamps etc) are supplied by other manufacturers. For using
such equipment, please refer to the operating instructions of those manufacturers.
• Please read these operating instructions carefully before using the equipment. You will then be able to exploit
all the advantages that the equipment offers, and at the
same time, protect yourself and others from injury.
• The device is only intended for use for the purposes described in the operating instructions. Any other application can cause injury or death and jeopardize the equipment and other material assets of the user.
• If problems occur that are not adequately described in
these operating instructions, please do contact your supplier for your own safety.
• Diese Gebrauchsanweisung beschreibt das ACROBAT
Swing Stativ, Wand- und Deckengerät.
Die Endgeräte (z.B. Untersuchungs-Leuchten, Lampen,
etc.) werden von anderen Herstellern geliefert. Bitte entnehmen Sie die zur Bedienung notwendigen Informationen den Gebrauchsanweisungen dieser Hersteller.
• Bitte lesen Sie diese Gebrauchsanweisung sorgfältig vor
dem Gebrauch des Gerätes. Damit nutzen Sie alle Vorteile, die das Gerät bietet, und bewahren sich und andere vor Schaden.
• Das Gerät ist nur für die in der Gebrauchsanweisung
genannten Einsatzzwecke bestimmt und geeignet.
Jede andere Anwendung kann Gefahren für Leib und
Leben und / oder Gefahren für das Produkt und weitere
Vermögenswerte des Betreibers beinhalten.
• Beim Auftreten besonderer Probleme, die in dieser Gebrauchsanweisung nicht ausführlich genug behandelt
werden, wenden Sie sich zur Ihrer eigenen Sicherheit
bitte an Ihren Lieferanten.
Hand-over declaration for the user:
I have read and understood the operating instructions. I am
conversant with the safety instructions. I have been adequately instructed in preventive measures for avoiding the
dangers and am following these operating rules when using
the machine.
Übergabeerklärung an den Anwender:
Ich habe die Gebrauchsanweisung gelesen und verstanden.
Mir sind die Sicherheitshinweise bekannt. Ich wurde in vorbeugende Maßnahmen zur Abwehr von Gefährdungen unterwiesen und befolge diese Arbeitsregeln am Gerät.
Please keep these operating instructions carefully in the
vicinity of the equipment so that you can later refer to
safety instructions and important information at any
time.
Bewahren Sie diese Gebrauchsanweisung sorgfältig in
der Nähe des Gerätes auf, um später Sicherheitshinweise und wichtige Informationen nachschlagen zu können.
38630, Ausgabe/Edition 2012-05, Version 8
4
1
1
Instructions for
safe usage
Hinweise zum
sicheren Gebrauch
Dear user:
Sehr geehrter Betreiber:
Please note that certain work may only be carried out by
suitably qualified personnel.
beachten Sie, daß bestimmte Arbeiten nur von Personal mit
entsprechender Qualifikation ausgeführt werden darf:
• The work in chapters 5 and 6 may only be carried out
by a hospital technician or a person with comparable qualifications.
• Die Arbeiten im Kapitel 5 und 6 dürfen nur von einem
Krankenhaustechniker oder einer Person mit vergleichbarer Qualifikation ausgeführt werden.
• This equipment is state-of-the-art and is operationally
safe. Nonetheless, it may present some dangers, especially if it is operated by inadequately trained personnel
or if it is used improperly or not used for its intended purpose.
• With the help of these operating instructions, please instruct the persons responsible for operating and cleaning
in the working, operation and maintenance and care of
this machine.
• The contents of these operating instructions can be changed at any time without prior notice.
• In case of translations in other languages, ONLY the
German version of these instructions is legal and binding.
• Unauthorized changes made by the user or modifications to the equipment are not permitted for reasons of
safety.
• Dieses Gerät ist nach dem aktuellen Stand der Technik
gebaut und ist betriebssicher. Dennoch können von diesem Gerät Gefahren ausgehen. Insbesonders dann,
wenn es von nicht ausreichend ausgebildetem Personal
bedient wird oder wenn es unsachgemäß und nicht entsprechend seinem bestimmungsgemäßen Gebrauch
verwendet wird.
• Weisen Sie das Bedienungs- und Reinigungspersonal
anhand dieser Anweisung in die Funktion, Bedienung und
Pflege des Gerätes ein.
• Der Inhalt der Gebrauchsanweisung kann jederzeit und
ohne Ankündigung geändert werden.
• Für Übersetzungen in Fremdsprachen ist die deutsche
Fassung dieser Gebrauchsanweisung verbindlich.
• Eigenmächtige Änderungen oder Umbauten am Gerät
sind aus Sicherheitsgründen nicht gestattet.
Please keep these operating instructions carefully in the
vicinity of the equipment so that you can later refer to safety instructions and important information at any time.
Bewahren Sie diese Gebrauchsanweisung sorgfältig in der
Nähe des Gerätes auf, um später Sicherheitshinweise und
wichtige Informationen nachschlagen zu können.
The Acrobat Swing appliances must be installed prior to use.
Installation instructions are included in the scope of delivery
of the product.
Die Acrobat Swing-Geräte müssen vor der Benutzung erst
montiert werden. Die Anleitung zur Montage liegt dem Produkt bei.
Trademarks:
• ACROBAT Swing® is a registered trademark of Ondal.
• All other trademarks mentioned in these operating instructions are the exclusive property of their respective owners and are acknowledged as such.
Marken:
• ACROBAT Swing® ist eine eingetragene Marke der
Ondal.
• Alle anderen in dieser Gebrauchsanweisung genannten
Marken sind ausschließliches Eigentum der betreffenden
Hersteller.
5
38630, Ausgabe/Edition 2012-05, Version 8
1
1
Instructions for
safe usage
Hinweise zum
sicheren Gebrauch
1.1 Explanation of symbols
1.1 Bildzeichenerklärung
In the operating instructions, important instructions have been
marked with symbols. The pictograms have the following
meanings:
In der Gebrauchsanweisung sind wichtige Hinweise durch
Bildzeichen gekennzeichnet. Die Piktogramme haben folgende Bedeutung:
1.1.1 Symbols used in the operating instructions:
1.1.1 Zeichen in der Gebrauchsanweisung:
DANGER!
GEFAHR!
Non-observance of these will result in serious or even fatal injuries.
Bei Nichtbeachtung kommt es mit Sicherheit zu schweren
oder sogar tödlichen Verletzungen.
WARNING!
WARNUNG!
Non-observance of these may cause serious or fatal injuries.
Bei Nichtbeachtung besteht die Möglichkeit einer schweren
oder sogar tödlichen Verletzung.
CAUTION!
VORSICHT!
Non-observance of these may cause medium to light injuries or material damage.
Bei Nichtbeachtung besteht die Möglichkeit von mittleren bis
leichten Verletzungen oder Sachschäden.
IMPORTANT!
HINWEIS!
Provides usage tips and useful information.
Gibt Anwendungstips und nützliche Informationen.
CE-Conformance mark
CE-Konformitätskennzeichnung
1.1.2 Bildzeichen am Gerät und / oder auf der Verpackung:
1.1.2 Graphic symbols on the appliance and/or on the
packaging:
Gebrauchsanweisung befolgen:
Observe the Operating Instructions:
Lesen Sie diese Gebrauchsanweisung sorgfältig vor dem
ersten Gebrauch des Tragarmsystemes. Dadurch nutzen Sie
alle Vorteile, die das Tragarmsystem bietet und vermeiden
mögliche Verletzungen und Sachschäden.
Read these Operating Instructions carefully prior to initial
operation of the pendant system. This ensures that you benefit from all the advantages of the pendant system and
prevents any risk of injury or damage.
Maximale Nutzlast beachten:
Observe the maximum loading capacity:
Warnt vor dem Überschreiten der zugelassenen maximalen
Nutzlast (Zuladung) am Tragarmsystem, der Adaption oder
dem Endgerät (z.B. Flachbildschirm, Untersuchungs-Leuchten, etc.).
Warns of exceeding the maximum loading capacity (payload)
on the pendant system of the adaption or the end device (e.g.
flat screen, OR lamp, etc.).
38630, Ausgabe/Edition 2012-05, Version 8
6
1
1
Instructions for
safe usage
1.1 Explanation of symbols
Hinweise zum
sicheren Gebrauch
1.1 Bildzeichenerklärung
CE mark:
CE-Kennzeichnung:
Ondal declares that the products comply with the relevant
regulations set forth in the applicable European Directives.
Ondal erklärt, dass die Produkte den einschlägigen Bestimmungen der anwendbaren europäischen Richtlinien entsprechen.
Recognised cUL component:
Anerkannte cUL Komponente:
This component has been recognised by Underwriters Laboratories Inc. Representative samples of this product have
been reviewed by UL and comply with the applicable requirements.
Diese Komponente ist von Underwriters Laboratories Inc.
anerkannt. Repräsentative Muster dieses Produkts wurden
von UL bewertet und erfüllen die anwendbaren Anforderungen.
Atmospheric pressure:
Luftdruck:
indicates the permissible atmospheric pressure values in a
range from 500 hPa to 1060 hPa for transport and storage.
zeigt die zugelassenen Luftdruckwerte von 500 hPa bis 1060
hPa für den Transport und die Lagerung.
Relative humidity:
Luftfeuchte:
indicates the permissible humidity values in a range from 10%
to 75% for transport and storage.
zeigt die zugelassenen Luftfeuchtewerte von 10 % bis 75 %
für den Transport und die Lagerung.
Ambient temperature:
Umgebungstemperatur:
indicates the permissible ambient temperature values in
a range from -25 °C to 70 °C for transport and storage.
zeigt die zugelassenen Umgebungstemperaturen von
-25 °C bis 70 °C für den Transport und die Lagerung.
Risk of tilting:
Kippgefahr:
The appliance has a maximum loading capacity of 39 Nm (48
Nm special variant). If the maximum loading capacity is exceeded, there is a risk of the appliance tilting, hitting persons
and causing severe injury.
Das Gerät kann eine maximale Nutzlast von 39 Nm (Sondervariante 48 Nm) tragen. Wird die maximale Nutzlast überschritten kann das Gerät kippen, Personen treffen und schwere Verletzungen verursachen.
- The maximum loading capacity of 39 Nm (48 Nm specialvariant) must not be exceeded.
- Do not climb on the tripod and do not lean against it.
- Do not attach any additional loads to the top and side
panels of the appliance.
- Die maximale Nutzlast von 39 Nm (Sondervariante 48Nm)
nicht überschreiten.
- Nicht auf das Stativ steigen oder sich daran anlehnen.
- Keine weiteren Lasten auf oder am Gerät anbringen.
7
38630, Ausgabe/Edition 2012-05, Version 8
1
1
Instructions for
safe usage
Hinweise zum
sicheren Gebrauch
1.1 Explanation of symbols
1.1 Bildzeichenerklärung
Moving the appliance to a different location
Standortwechsel
Be aware that the spring arm must be placed to its lowermost position (arrow 1) before moving the tripod version to
a different location.
Beachten Sie, dass vor einem Standortwechsel (Pfeil 2) des
Stativgerätes, der Federarm in die unterste Position (Pfeil
1) gestellt wird.
- Makes sure that the lockable rollers are unlocked.
- Do not pass over uneven flooring, thresholds, landings on lift
doors and other obstacles.
- Make sure that you move the appliance at a reasonable speed
in order to be able to stop it or move it around obstacles at any
time.
- Be aware of sloping ground.
- Achten Sie darauf, dass die feststellbaren Rollen entriegelt
sind.
- Achten Sie auf Unebenheiten, Schwellen, Absätze an Fahrstuhleingängen oder anderen Hindernissen.
- Achten Sie auf eine angemessene Fahrgeschwindigkeit, so
dass ein Anhalten und Abweichen jederzeit möglich ist.
- Achten Sie auf schiefe Ebenen.
38630, Ausgabe/Edition 2012-05, Version 8
8
1
1
Instructions for
safe usage
Hinweise zum
sicheren Gebrauch
1.1.3 Information on the rating plate Fig. 1
1.1.3 Angaben auf dem Typenschild Abb. 1
The rating plate is attached to the following parts:
At the bottom of the tripod base. Under the tripod handle or
at the top near the connection to the spring arm. At the top
of the spring arm near the joint. At the top of the wall panel.
On the extension arm near the connection to the wall bearing or ceiling mount fixture. On the flange plate under the
canopy and/or on the ceiling tube near the connection to
the extension arm.
Das Typenschild befindet sich an folgenden Teilen:
Beim Stativfuß an der Unterseite. Beim Stativ unterhalb vom
Griff oder oben nahe der Anbindung an den Federarm. Beim
Federarm oben in der Nähe des Gelenkes. Bei der Wandverkleidung oben. Beim Ausleger nahe der Anbindung zum
Wandlager bzw. Deckenbefestigung. Bei der Flanschplatte
unter dem Baldachin und/oder am Deckenrohr nahe der Anbindung zum Ausleger.
Serial number
• The rating plate indicates the serial number (SN) and
the reference number (REF).
Seriennnummer
• Das Typenschild zeigt die Seriennummer (SN), und Referenznummer (REF).
Power supply
• The rating plate indicates voltage and current data (see
also Technical Data).
Spannungsversorgung
• Das Typenschild zeigt Spannungs- und Stromangaben
(siehe auch Technische Daten).
Load bearing capacity / weight
• For example, 30 Nm indicates the maximum permissible
carrying load on the tripod. 12 kg indicates the weight of
the tripod base (see also Technical Data).
Tragfähigkeit / Gewicht
• Die Angabe von z.B. 30 Nm zeigt die maximal zugelassene Tragfähigkeit am Stativ. Die Angabe von 12kg zeigt
das Gewicht des Stativfußes (siehe auch Technische
Daten).
Date of manufacture
• The digits 1 to 4 of the serial number (SN) indicate the
date of manufacture of the pendant system.
- The first two digits indicate the week of manufacture, e.g.
14 = calendar week 14.
- The following two digits indicate the year of manufacture,
e.g. 11 = 2011.
- The letter in the 5th position indicates the factory, e.g. H =
Hünfeld.
- The digits following the letter indicate the serial number.
The information and illustrations serve as examples.
Herstellungsdatum
• Das Herstellungsdatum des Tragarmsystemes können
Sie den Ziffern 1-4 der Seriennummer (SN) entnehmen.
- Die ersten beiden Ziffern kennzeichnen die Herstellungswoche z.B. 14 = Kalenderwoche 14,
- Die beiden darauffolgenden Ziffern kennzeichnen das
Herstellungsjahr z.B. 11 = 2011.
- Der Buchstabe an der 5. Stelle steht für das Werk z.B. H
= Hünfeld.
- Die Ziffern nach dem Buchstaben kennzeichnen die Seriennummer.
Die Angaben und Darstellungen sind beispielhaft.
Figure / Abildung 1
9
38630, Ausgabe/Edition 2012-05, Version 8
1
Instructions for
safe usage
1
Hinweise zum
sicheren Gebrauch
1.2 General safety instructions
1.2 Allgemeine Sicherheitshinweise
The specific safety instructions in the following chapters must
be adhered to.
Bitte beachten Sie auch die speziellen Sicherheitshinweise
in den folgenden Kapiteln.
1.2.1 Standards and guidelines
1.2.1 Normen und Richtlinien
The appliance complies with the safety requirements of the
following standards and directives:
• Medical Devices Act (Medizinproduktegesetz - MPG);
• MDD 93/42/EEC, 2007 – Medical Device Directive;
• EN 60601-1: 2006 - Medical Electrical Equipment - Part
1: General Requirements for Basic Safety and Essential
Performance.
Das Gerät entspricht den Sicherheitsanforderungen folgender Normen, Gesetze und Richtlinien:
• Medizinproduktegesetz (MPG);
• MDD 93/42/EWG, 2007 – Medizin-Produkte-Richtlinie;
• EN 60601-1: 2006 - Medizinische elektrische Geräte Teil1: Allgemeine Festlegungen für die Sicherheit einschließlich der wesentlichen Leistungsmerkmale.
1.2.2 Intended purpose:
1.2.2 Zweckbestimmung:
• The Acrobat appliances have been designed for the car- • Die Acrobat-Geräte dienen zum Tragen und Positionierying and positioning of medical examination lamps and
ren von medizinischen Untersuchungsleuchten und
flat screens and also for the power supply of the devices.
Flachbildschirmen sowie der Versorgung der Geräte mit
Depending on the transformer version, e.g. 13,2V, 13,5V,
Strom. Je nach Transformatorversion stehen z.B. 13,2V,
14V, 24V (without transformer, 230V), 50/60Hz are avai13,5V, 14V, 24V (ohne Transformator, 230V); 50/60Hz
lable (not optionally adjustable).
zur Verfügung (nicht wahlweise einstellbar).
• The appliance is suitable for continuous operation.
• Die Geräte sind für Dauerbetrieb geeignet.
• The maximum load indicated on the rating plate of the • Die Geräte dürfen - je nach Ausführung - nicht über ihre
individual appliance version must not be exceeded (see
auf dem Typenschild angegebene Maximallast hinaus
Chapter 6.2 "Mounting the end device").
belastet werden (siehe Kapitel 6.2 „Endgeräte montieren“).
1.2.3 Incorrect use
1.2.3 Bestimmungswidriger Gebrauch
• The maximum loading capacity of the appliance and its • Das Gerät und dessen Komponenten dürfen nicht über
components as specified in “Chapter 7, Technical Data”
die maximale Nutzlast gemäß den Angaben im “Kapitel
must not be exceeded.
7, Technische Daten” belastet werden.
1.2.4 Contraindications
1.2.4 Kontraindikation
• The ACROBAT Swing pendant system must not be used • Das Tragarmsystem Acrobat Swing darf nicht in der Nähe
close to strong magnetic fields.
von starken Magnetfeldern eingesetzt werden.
• No BF or CF application parts in accordance with IEC • An das Tragarmsystem dürfen keine Anwendungsteile
60601-1 may be directly connected to the pendant sysdes Typs BF bzw. CF gemäß IEC 60601-1 unmittelbar
tem.
angeschlossen werden.
38630, Ausgabe/Edition 2012-05, Version 8
10
1
Instructions for
safe usage
1.2.5 Ambient conditions for operation and storage
1
Hinweise zum
sicheren Gebrauch
1.2.5 Umgebungsbedingungen für Betrieb und
Lagerung
Different conditions are required for the operation and inte- Für den Betrieb und die Zwischenlagerung des Gerätes
rim storage of the appliance
gelten unterschiedliche Umgebungsbedingungen.
Ambient conditions for storage and transport
The following storage conditions apply for storage times of
up to 15 weeks:
- Ambient temperature: -25 °C to 70 °C;
- Relative humidity:
10 % to 75 %;
- Atmospheric pressure: 500 hPa to 1060 hPa.
Store only in indoor rooms; after this time, the values specified for the ambient conditions for operation apply.
Umgebungsbedingungen für die Lagerung und den
Transport
Bis 15 Wochen gelten folgende Lagerbedingungen:
- Umgebungstemperatur: -25 °C bis 70 °C;
- Relative Feuchte:
10 % bis 75 %;
- Luftdruck:
500 hPa bis 1060 hPa.
Lagerung nur in geschlossenen Räumen, danach gelten
die Wer te der Umgebungsbedigungen für den Betrieb.
Ambient conditions for operation
Umgebungsbedingungen für den Betrieb
- Ambient temperature: 10 °C to 40 °C;
- Relative humidity:
30 % to 75 %;
- Atmospheric pressure: 700 hPa to 1060 hPa.
- Umgebungstemperatur: 10 °C bis 40 °C;
- Relative Feuchte:
30 % bis 75 %;
- Luftdruck:
700 hPa bis 1060 hPa.
1.2.6 Cleaning and disinfection
1.2.6 Reinigung und Desinfektion
Cleaning
Reinigung
WARNING - Risk of contamination and infection of
WARNUNG - Kontamination und Infektionsgefahr
the patient
für Patienten
Parts of the pendant system and the adaptions are made of
plastic; solvents can dissolve plastic materials. Strong acids,
bases and agents with an alcoholic strength of more than 60%
can lead to the plastic materials becoming brittle.
Damaged parts can fall into open wounds. Liquid cleaning
agents penetrating the pendant system and the adaptions can
drip into open wounds.
Disinfection
WARNING - Health hazard
Disinfectants can contain substances hazardous to health
which, when in contact with the skin and eyes, can cause
injuries or affect the respiratory organs when inhaled. Observe the protective measures:
• Observe the hygiene regulations.
• Adhere to the disinfectant manufacturer's instructions.
• Perform surface disinfection every working day and in case
of contamination.
Teile des Tragarmsystemes und der Adaptionen sind aus
Kunststoff gefertigt. Lösungsmittel können Kunststoffe anlösen. Starke Säuren, Laugen und Mittel mit mehr als 60%
Alkohol können eine Versprödung der Kunststoffe verursachen.
Beschädigte Teile können in offene Wunden fallen.
Dringt Reinigungsflüssigkeit in das Tragarmsystem und die
Adaptionen ein, kann überschüssiges Reinigungsmittel in
offene Wunden gelangen.
Desinfektion
WARNUNG - Gesundheitsgefährdung
Desinfektionsmittel können gesundheitsschädliche Stoffe
enthalten, die bei Berührung mit Haut und Augen Verletzungen
hervorrufen oder beim Einatmen die Atmungsorgane
schädigen können. Schutzmaßnahmen einhalten:
• Hygienerichtlinien beachten.
• Hinweise des Desinfektionsmittelherstellers beachten.
• Flächendesinfektion arbeitstäglich und bei Kontamination
durchführen.
11
38630, Ausgabe/Edition 2012-05, Version 8
2
Using the ACROBAT
Swing devices
2
Gebrauch der ACROBAT
Swing Geräte
NOTE: Qualifications of the personal:
The device must be operated by medically qualified expert technicians in hospitals and in physician’s clinics.
Die Bedienung des Gerätes soll von medizinischem Fachpersonal im Krankenhaus und in der Arztpraxis erfolgen.
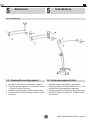
2.1 Components of the devices Fig. 2
2.1 Komponenten der Geräte Abb. 2
Ceiling
device:
• Cealing bearing(1)
• Space tube (2)
• Extension arm(3)
• Spring arm (4)
Tripod device
Deckengerät:
Wandgerät:
Stativgerät
• Spring arm (9)
• Tripod tube (10)
• Tripod bse (11)
• Rollers (12)
• Power plug (13)
• Deckenlager (1)
• Distanzrohr (2)
• Ausleger (3)
• Federarm (4)
• Netzstecker (5)
• Wandlager (6)
• Ausleger (7)
• Federarm (8)
• Federarm (9)
• Stativrohr (10)
• Stativfuß (11)
• Rollen (12)
• Netzstecker (13)
Wall-mounted
device:
• Power Plug (5)
• Wall bearing (6)
• Extension arm (7)
• Spring arm(8)
2.2 Usage Fig. 2
HINWEIS - Qualifikation des Personals:
2.2 Gebrauch Abb. 2
HINWEIS:
NOTE:
Because of the danger of the tripod mounting tipping over, Wegen der Kippgefahr des Stativgerätes darauf achten, daß
care must be taken that it should not roll over any objects on keine am Boden liegenden Gegenstände oder das Anschlußkabel überfahren werden.
the floor or the connecting cable.
1. Move the tripod device to the location of usage and se- 1. Stativgerät zum Einsatzort fahren und die vorhandenen,
feststellbaren Rollen (12) arretieren.
cure the two fastenable rollers (12).
Mounting / dismantling:
CAUTION - Electrical shock:
Montage / Demontage:
VORSICHT - Stromschlag:
To prevent the risk of electric shock, the appliance must be
connected to a supply network with a protective conductor.
• The appliance must be connected in such a way that it can be
disconnected from the mains at all poles and at the same
time.
Um das Risiko eines elektrischen Schlages zu vermeiden,
darf das Gerät nur an ein Versorgungsnetz mit Schutzleiter
angeschlossen werden.
• Das Gerät muss so angeschlossen werden, dass es allpolig
und gleichzeitig vom Netz getrennt werden kann.
WARNUNG - Stromschlag:
WARNING - Electrical shock:
In case of contact with damaged electrical parts, there is a
danger of an electrical shock. In case of any damage to the
power supply cable or plug, do not connect the equipment
to the power supply and immediately inform the service
department.
Bei Kontakt mit beschädigten elektrischen Teilen besteht die
Gefahr eines Stromschlages. Bei beschädigter Netzleitung
oder Netzstecker, das Gerät nicht an das Netz anschließen
und sofort den Service verständigen.
2. Netzstecker und Anschlußleitung (5 / 13) auf Beschä2. Check the power plug and the connection cable (5 /
digung kontrollieren.
13) for damage.
3. Um die Gefahr eines elektrischen Schlages zu vermei3. To prevent the risk of electric shock, the mains plug may
den, den Netzstecker nur in eine vorschriftsmäßig instalonly be plugged into a socket outlet with grounding conlierte und geerdete Schutzkontaktsteckdose einstecken.
tact (Schuko socket) which has been correctly installed
Kombination mit anderen Medizinprodukten:
and earthed.
Der Federarm ist mit Endgeräten anderer Hersteller bestückt.
Combination with other medical products:
Bitte entnehmen Sie die zur Bedienung notwendigen InforThe spring arm is combined with end devices of third-party mationen der Gebrauchsanweisung des Herstellers.
38630, Ausgabe/Edition 2012-05, Version 8
12
2
2
Using the ACROBAT
Swing Equipmente
manufacturers. Read the Operating Instructions provided
by the third-party manufacturer and in particular the relevant pages with information on the operation of the end device.
The spring arm is only intended for use with Ondal extension arms, wall bearings and ceiling mount fixtures. If thirdparty products are combined with Ondal products, the manufacturer/marketer of the ME system must provide a declaration in accordance with Article 12 of 93/42/EEC (Medical Device Directive, MDD).
For technical assistance for creating a medical-electrical (ME)
system refer to DIN EN 60601-1:2006, Part 16.
Gebrauch der ACROBAT
Swing Geräte
Der Federarm ist nur für die Verwendung mit Auslegern,
Wandlagern und Deckenbefestigungen von Ondal vorgesehen. Werden Fremdprodukte mit Ondal-Produkten kombiniert, so muß der Hersteller/Inverkehrbringer des ME Systems eine Erklärung nach Artikel 12 der Richtlinie 93/42/
EWG (Medizinprodukterichtlinie) abgeben.
Technische Hilfestellung zur Herstellung eines medizinischelektrischen (ME) Systems findet sich im Abschnitt
16 der EN 60601-1:2006.
Netzteile, die zur Versorgung von Endgeräten vorgesehen sind, müssen eine galvanische Trennung gewährleisten und 2 Schutzmaßnahmen nach EN 60601-1 aufweisen.
Power packs intended for the supply of end devices
must ensure electrical isolation and provide 2 protective measures in accordance with EN 60601-1.
Figure / Abildung 2
13
38630, Ausgabe/Edition 2012-05, Version 8
2
Using the ACROBAT
Swing Equipmente
2
Gebrauch der ACROBAT
Swing Geräte
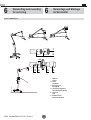
Patient Environment
Patientenumgebung
Medical electrical devices which contain tangible parts and are
attached to the tripod and positioned within the patient environment must provide two Means of Patient Protection (MOPP) in
accordance with EN 60601-1.
If tangible parts are positioned outside the patient environment,
two Means Of Operator Protection (MOOP) in accordance with
EN 60601-1 must be provided.
The dimensions in the figure show minimum extent of the patient environment in a free surrounding.
Falls medizinisch-elektrische Geräte mit berührbaren Teilen am
Stativgerät angebracht werden und diese innerhalb der Patientenumgebung positioniert werden, so müssen sie zwei Patientenschutzmaßnahmen (MOPP) nach EN 60601-1 aufweisen.
Falls die berührbaren Teile außerhalb der Patientenumgebung
positioniert sind, so müssen sie zwei Schutzmaßnahmen zum
Bedienerschutz (MOOP) nach EN 60601-1 aufweisen.
Die Abmessungen im Bild zeigen die Mindestausdehnung der
Pateintenumgebung in einem uneingeschränkten Umfeld.
Figure A.9 from IEC 60601-1:2005
Bild A.9 aus IEC 60601-1:2005
Figure / Abildung 3
38630, Ausgabe/Edition 2012-05, Version 8
14
2
2
Using the ACROBAT
Swing Equipment
Gebrauch der ACROBAT
Swing Geräte
NOTE: Qualifications of the personal:
The equipment must be operated by medically qualified expert
technicians in hospitals and in physician’s clinics.
Die Bedienung des Gerätes soll von medizinischem Fachpersonal im Krankenhaus und in der Arztpraxis erfolgen.
2.3 Disposal
2.3 Entsorgung
HINWEIS - Qualifikation des Personals:
WARNING - Sudden release of spring tension
WARNUNG - Schlagartiges Freisetzen der Federspannung
The spring arm is equipped with a compression spring. When
dismantling the spring arm, the compression spring suddenly
releases its tension and can lead to severe injury:
Im Federarm ist eine vorgespannte Druckfeder montiert, die
beim Demontieren des Federarmes ihre Energie schlagartig freisetzt und zu schweren Verletzungen führen kann:
• Do not dismantle the spring arm for disposal.
• Den Federarm zum Entsorgen nicht demontieren.
RoHS conformity
• The appliance complies with the requirements of the EU
Directive 2002/95/EC ("RoHS Directive" on the restricted use of certain hazardous substances in electrical and
electronic appliances).
• To prevent environmental damage and personal injury,
we therefore request you to contact us or your authorised service partner if you intend to take the appliance
out of operation for the purpose of disposal.
• The appliance must be disposed of at a suitable collection point for the recycling of electrical and electronic devices in accordance with country-specific regulations.
RoHS-Konformität
• Das Gerät erfüllt die Forderungen der Richtlinie 2002/
95/EG RoHS (zur Beschränkung der Verwendung bestimmter gefährlicher Stoffe in Elektro- und Elektronikgeräten).
• Zur Vermeidung von Umwelt- und Personenschäden bitten wir Sie daher, uns oder Ihren autorisierten Servicepartner anzusprechen, wenn Sie das Gerät mit dem Ziel
der Entsorgung endgültig außer Betrieb nehmen.
• Das Gerät muss gemäß Ihren länderspezifischen Vorschriften an einem geeigneten Entsorgungspunkt zum
Recyceln von Elektro- und Elektronikgeräten entsorgt
werden.
15
38630, Ausgabe/Edition 2012-05, Version 8
3
3
Cleaning and disinfection
3.1 General safety instructions
Reinigung und Desinfektion
3.1 Allgemeine Sicherheitshinweise
WARNING - Electrical shock:
WARNUNG - Stromschlag:
The appliances can carry an electric current and must be
treated with the utmost care during cleaning and disinfection.
• If a mains plug exists, pull the mains plug.
• Do not apply spray cleaning and/or spray disinfection.
• Do not spray liquid into power sockets, gas sockets or appliance openings and prevent the penetration of liquids.
Die Geräte können Strom führen und sind bei Reinigung und
Desinfektion vorsichtig zu behandeln.
• Wenn ein Netzstecker vorhanden ist, bitte diesen ziehen.
• Keine Sprühreinigung und/oder Sprühdesinfektion anwenden.
• Nicht mit Flüssigkeit in Steckdosen, Gasdosen oder Geräte
öffnungen sprühen bzw. Flüssigkeit eindringen lassen.
3.2 Cleaning
3.2 Reinigung
Follow the safety instructions
1. Follow the general safety instructions prescribed
in“Chapter 4.1.
Sicherheitshinweise beachten
1. Beachten Sie die allgemeinen Sicherheitshinweise gemäß “Kapitel 4.1”.
Recommended cleaning agents
Use a mild soap solution or a regular dishwashing product..
2. Wipe the surfaces of the appliances with a moderately
moist cloth; add a mild soap solution (dishwashing product) if required.
3. Afterwards, carefully wipe the surfaces dry with a clean
cloth.
Empfohlene Reinigungsmittel
Verwenden Sie als Reinigungsmittel eine milde Seifenlösung
oder handelsübliche Spülmittel.
2. Oberflächen der Geräte mit einem leicht angefeuchteten
Tuch wischen, gegebenenfalls etwas milde Seifenlösung
(Spülmittel) zugeben.
3. Abschließend die Außenflächen mit einem weichen, sauberen Tuch gut trocken wischen.
3.3 Disinfection
3.3 Desinfektion
Follow the safety instructions
Follow the general safety instructions prescribed in “Chapter 4.1.
Sicherheitshinweise beachten
Beachten Sie die allgemeinen Sicherheitshinweise gemäß
“Kapitel 4.1”.
Disinfection method
Wiping disinfection is the standardised disinfection method
prescribed for the pendant system. Hygiene regulations and
related safety instructions for the disinfection methods to be
applied must be defined by the operator.
• In case of contamination with potentially infectious material (e.g. blood, body secretion or excrement) the surfaces must be immediately and specifically disinfected.
• Make sure that you apply the disinfectant in the correct
concentration.
• For surface disinfection do not spray, but wipe, the surfaces.
• Wiped surfaced may only be used after the disinfectant
has dried.
Desinfektionsverfahren
Als standardisiertes Desinfektionsverfahren für das Tragarmsystem ist die Wischdesinfektion vorgesehen. Vom Betreiber müssen Hygienerichtlinien und entsprechende Sicherheitsmaßnahmen für die anzuwendenden Desinfektionsverfahren festgelegt werden.
• Nach der Kontamination durch potentiell infektiöses Material (z.B. Blut, Sekret oder Exkremente) Flächen sofort
gezielt desinfizieren.
• Anwendungskonzentration beachten.
• Zur Flächendesinfektion nicht sprühen sondern wischen.
• Abgewischte Flächen erst benutzen, nachdem das Desinfektionsmittel trocken ist.
38630, Ausgabe/Edition 2012-05, Version 8
16
4
4
Tests and Maintenance
4.1 Tests
Prüfungen und Wartung
4.1 Prüfungen
NOTES - Tests:
HINWEIS - Prüfungen:
The user must check all ACROBAT Swing products with regard to the following points:
Alle ACROBAT Swing Produkte sind vom Betreiber auf die folgenden Punkte zu prüfen:
WARNING - Electrical shock:
For all testing work, power off the equipment, pull out
the plug and secure the equipment from being switched on again accidentally.
WARNUNG - Stromschlag:
Bei allen Prüfungsarbeiten Gerät spannungslos schalten / Netzstecker ziehen und gegen Wiedereinschalten sichern.
Repeated inspections:
Repeated inspections must be carried out in accordance with DIN EN 62353.
Wiederkehrende Prüfungen:
Die DIN EN 62353 ist bei der Durchführung von wiederkehrenden Prüfungen zu beachten.
Twice a year:
Halbjährlich:
• Damage to paint
• Cracks in plastic parts
• Deformation of the support system
•
•
•
Annually:
Jährlich:
• Check the fastening bolt on the lower side of the tri
pod base and if required, tighten it.
• Check the securing segment according to chapter
5.2, „Greasing the securing segment“, and grease it.
•
In case of any damage or faults, please inform your
supplier.
Bei eventuell auftretenden Störungen oder Schäden
verständigen Sie bitte Ihren Lieferanten.
4.2 Maintenance
4.2 Wartung
•
Lackschäden
Risse an Kunststoffteilen
Verformung des Tragsystems
Befestigungsschraube an Unterseite Stativfuß kontrollieren und gegebenfalls nachziehen.
Sicherungssegment nach Kapitel 5.2, "Sicherungssegment fetten" kontrollieren und fetten.
HINWEIS - jährliche Wartung:
NOTE - annual maintenance:
Alle ACROBAT Swing Produkte sind einmal jährlich auf die
folgenden Punkte zu prüfen/warten:
All ACROBAT Swing products should be checked once a year
with regard to the following, and maintenance carried out
accordingly:
• Funktionsprüfung
• Elektrische Sicherheitsprüfung
• Überprüfung des Tragsystems
• Function test
• Electrical safety test
• Checking the support system
Ihr Lieferant ist über den Umfang und Inhalt der Wartungsarbeiten informiert und geschult.
Your supplier is informed and trained as regards the
scope of the maintenance work.
17
38630, Ausgabe/Edition 2012-05, Version 8
5
5
Maintenance
Instandhaltung
HINWEIS - Qualifikation des Personals:
NOTE - Qualification of the personnel:
The maintenance and care work must be carried out by a hospital
technician (or a comparably qualified person) only.
Die Instandhaltung muß von einem Krankenhaustechniker (oder
vergleichsweise qualifiziertem Personal) ausgeführt werden.
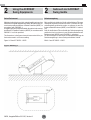
5.1 Adjusting the spring force Fig. 4
5.1 Federkraft nachstellen Abb. 4
Like every technical component, springs are subjected to
natural wear. Thus, the spring force may give way and reduce after long operation, and has to be re-adjusted.
Adjust the spring force in such a way that, the spring
arm with end device comes to a standstill in every desired position.
Wie jedes technisches Bauteil unterliegen Federn einem
natürlichen Verschleiß. So kann die Federkraft nach längerem Betrieb nachlassen und muß nachgestellt werden.
Federkraft so einstellen, daß der Federarm mit Endgerät in jeder gewünschten Position stehen bleibt.
VORSICHT - Zerstörung des Federarmes:
CAUTION - Destruction of the spring arm:
Die Einstellung der Federkraft erfolgt in der oberen Endstellung.
The spring tension is adjusted in the upper end position.
1. Remove the left-hand joint cover half (2) from the spring
arm (when looking from the end device). To do this, gently
push the joint cover half out of the groove in the spring
arm joint using a small slotted screwdriver.
2. Move the end device to the upper end position.
3. Insert the slotted screwdriver into the drill hole (1) and
adjust the spring tension.
4. Mount the joint cover and make sure that it snaps into
place.
1. Die aus Richtung des Endgerätes linke Gelenkverkleidung (2) am Federarm abnehmen. Dazu die Gelenkverkleidung mit einem schmalen Schlitzschraubendreher
vorsichtig aus der Nut im Federarmgelenk heraushebeln.
2. Endgerät in die obere Endstellung bringen.
3. Schlitzschraubendreher in die Bohrung (1) stecken und
Federkraft einstellen.
4. Gelenkverkleidung montieren und einrasten.
CAUTION - Destruction of the spring arm:
Beim zu tiefen Eindrehen der Bremsschraube wird der Federarm zerstört. Bremsschraube nur vorsichtig unter wiederholter Kontrolle der Bremskraft eindrehen.
VORSICHT - Zerstörung des Federarmes:
Driving in the brake screw too deeply destroys the spring arm.
Tighten the brake screw with care while continually checking
the braking force.
Sinkt der Federarm ab - ist die Federkraft zu gering:
- die Einstellschraube muß nach links ( gegen den Uhrzeigersinn) gedreht werden.
Steigt der Federarm nach oben- ist die Federkraft zu hoch:
- die Einstellschraube muß nach rechts (im Uhrzeigersinn)
gedreht werden.
If the spring arm drops - the spring force is too low.
- The adjusting screw must be rotated to the left (in the
counter-clockwise direction).
If the spring arm goes upward - the spring force is too
high:
- the adjusting screw must be rotated to the right (in the
clockwise direction).
38630, Ausgabe/Edition 2012-05, Version 8
18
5
Maintenance
5
Instandhaltung
Figure / Abildung 4
5.2 Greasing the securing segment
5.2 Sicherungssegment fetten
1. Dismantle the end-device as described in chapter 6.1.
2. Check the securing segment for a minimum thickness of
1.5 mm and if required, replace it.
3. Grease the securing segment and the pin of the end-device.
4. Mount the end-device as described in chapter 6.2, „Mount
end-device“.
1. Endgerät entsprechend Kapitel 6.1 demontieren.
2. Sicherungssegment auf eine Mindestdicke von 1,5 mm
kontrollieren und gegebenenfalls austauschen.
3. Sicherungssegment und Zapfen des Endgerätes fetten.
4. Endgerät entsprechend Kapitel 6.2, "Endgerät montieren" montieren.
19
38630, Ausgabe/Edition 2012-05, Version 8
6
6
Dismantling and mounting
for servicing
Demontage und Montage
im Servicefall
HINWEIS - Qualifikation des Personals:
NOTE: Qualifications of the personnel
The assembly / dismantling must be carried out by a hospital
technician (or a comparably qualified person).
Die Demontage / Montage muß von einem Krankenhaustechniker (oder vergleichsweise qualifiziertem Personal) ausgeführt
werden.
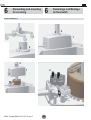
6.1 Dismantling the end-device Fig. 5
6.1 Endgerät demontieren Abb. 5
WARNING - danger of injury
WARNUNG - Verletzungsgefahr:
The spring arm is under a high spring tension. If the end
device is not dismounted in the uppermost position of the
spring arm, it rocks upwards and can result in serious injury.
Dismount the end device only when the spring arm is in the
uppermost position.
Der Federarm steht unter einer hohen Federkraft. Wird das
Endgerät nicht in der obersten Federarmposition abgenommen, schnellt der Federarm nach oben und kann zu schweren
Verletzungen führen.
Das Endgerät nur demontieren wenn der Federarm in der
obersten Position steht.
1. Power off the equipment/ pull out the power plug and
secure it from being switched on.
2. Bring the spring arm in the uppermost position.
3. Rotate the brake screw (1) so that the sleeve (2) can be
rotated.
4. Rotate the sleeve (2) through 180 degrees, till the securing segment (3 ) appears in the slot (4).
5. Hold the end device (5) firmly and take out the securing
segment (3) with a narrow slotted-screw screwdriver.
Disconnect the end device (5).
6. Put on the protective cap.
1. Gerät spannungslos schalten / Netzstecker ziehen und
gegen Wiedereinschalten sichern.
2. Federarm in die oberste Position stellen.
3. Bremsschraube (1) herausdrehen, so daß die Hülse
(2) gedreht werden kann.
4. Hülse (2) um 180 Grad drehen, bis das Sicherungssegment (3) im Schlitz (4) erscheint.
5. Endgerät (5) festhalten und Sicherungssegment (3) mit
einem schmalen Schlitzschraubendreher entnehmen.
Endgerät (5) aus der Anbindung nehmen.
6. Schutzkappe aufsetzen.
Figure / Abildung 4
180°
5
38630, Ausgabe/Edition 2012-05, Version 8
1 Brake screw
Bremsschraube
2 Sleeve
Hülse
3 Securing segment
Sicherungssegment
4 Slot
Schlitz
5 End device
Endgerät
20
5
2
1
4
3
6
6
Dismantling and mounting
for servicing
NOTE - Qualifications of the personnel:
Demontage und Montage
im Servicefall
HINWEIS - Qualifikation des Personals:
The dismantling / assembly must be carried out by a hospital
technician (or a comparably qualified person).
Die Demontage / Montage muß von einem Krankenhaustechniker (oder vergleichsweise qualifiziertem Personal) ausgeführt
werden.
6.2 Mounting the end-device Fig. 6
6.2 Endgerät montieren Abb. 6
NOTE:
HINWEIS:
For the tripod version, the load torque on the spring arm must
not exceed 39 Nm (48 Nm special variant); for the wall-mounted
and ceiling-mounted versions, it must not exceed 30 Nm (57
Nm special variant).
Das Lastmoment am Federarm darf beim Stativgerät nicht mehr
als 39 Nm (Sondervariante 48 Nm) und beim Wand- bzw.
Deckengerät nicht mehr als 30 Nm (Sondervariante 57 Nm) betragen.
1. Power off the equipment / pull out the power plug and
secure it from being switched on again.
1. Gerät spannungslos schalten / Netzstecker ziehen und
gegen Wiedereinschalten sichern.
WARNING - Danger of injury:
WARNUNG - Verletzungsgefahr:
The spring arm, when it is pressed downward, can jump up
suddenly and cause injury.
Nobody should be present in the swiveling range of the spring arm during the installation of the end-device.
Der nach unten gedrückte Federarm kann hochschnellen und
zu Verletzungen führen.
Während der Montage des Endgerätes dürfen sich keine Personen im Schwenkbereich des Federarmes aufhalten.
CAUTION - Damage to the device:
VORSICHT - Schäden am Gerät:
The spring arm will be damaged if it is pulled beyond the lower / upper stop. Grab the spring arm at the front end (not
at the rear end) and slowly pull it downward until it reaches
the stop.
Wird der Federarm über den unteren / oberen Anschlag gezogen, wird der Federarm beschädigt. Federarm am vorderen
Ende (nicht am hinteren Ende) fassen und langsam bis zum
Anschlag nach unten ziehen.
2. Grab the spring arm at the front end and slowly pull it
downward until it reaches the stop. Take out the protective cap from the spring arm opening.
3. Push on the sleeve (1) onto the spring arm in such a
way that the slots (2) are covered.
4. Push in the end-device (3) and the securing segment
(4) completely in the slot (2), so that the securing segment is guided in the groove (5).
5. Rotate the plastic sleeve (1) through 180 degrees, and
tighten the braking screw (6) till the end-device (3) is
braked.
6. Check the secure seating of the end-device (3).
2. Federarm am vorderen Ende fassen und langsam bis
zum Anschlag nach unten ziehen.
Schutzkappe aus der Federarmöffnung nehmen.
3. Hülse (1) so auf den Federarm schieben, daß die Schlitze (2) zur Deckung kommen.
4. Endgerät (3) einschieben und Sicherungssegment (4)
vollständig in den Schlitz (2) einstecken, so daß das Sicherungssegment in der Nut (5) geführt wird.
5. Hülse (1) um 180- Grad drehen und Bremsschraube
(6) solange eindrehen bis das Endgerät (3) gebremst
wird.
6. Sicheren Sitz des Endgerätes (3) prüfen.
21
38630, Ausgabe/Edition 2012-05, Version 8
6
Dismantling and mounting
for servicing
6
Demontage und Montage
im Servicefall
Figure / Abildung 6
1
2
180°
4 6
5
> 10
38630, Ausgabe/Edition 2012-05, Version 8
3
1 Sleeve
Hülse
2 Slot
Schlitze
3 End device
Endgerät
4 Securing segment
Sicherungssegment
5 Groove
Nut
6 Brake screw
Bremsschraube
°
m
22
6
Dismantling and mounting
for servicing
6
Demontage und Montage
im Servicefall
Acrobat Swing appliances are only intended for the connection of medical examination lamps, OR lamps and
flat screens bearing the CE mark and - depending on
the individual version - for the load torque indicated on
the rating plate.
Die Acrobat Swing Geräte sind nur für den Anschluß
medizinischer Untersuchungsleuchten, Operationsleuchten und Flachbildschirme mit CE-Kennzeichung
sowie - je nach Ausführung - für das auf dem Typenschild angegebene Lastmoment vorgesehen.
For technical assistance for creating a medical-electrical (ME) system refer to DIN EN 60601-1:2006, Part 16.
Technische Hilfestellung zur Herstellung eines medizinisch-elektrischen (ME) Systems findet sich im Abschnitt 16 der DIN EN 60601-1:2006.
The manufacturer / marketer of the ME system must
provide a declaration in accordance with Article 12 of
93/42/EEC (Medical Device Directive, MDD).
Der Hersteller / Inverkehrbringer des ME Systems muß
eine Erklärung nach Artikel 12 der Richtlinie 93/42/EWG
(Medizinprodukterichtlinie) abgeben.
NOTE - Built-in overload protection for versions
with toroidal transformer:
HINWEIS - Eingebauter Überlastungsschutz bei
Ausführungen mit Ringkerntransformator:
To protect the transformer and the end device, the
fuses are installed.
Zum Schutz des Transformators und des Endgerätes
sind Sicherungen eingebaut.
6.3 Change the fuses Fig. 7
6.3 Austausch der Sicherungen Abb. 7
Warning - Electrical shock:
WARNUNG - Stromschlag:
For all maintenance work, switch off the equipment, pull out
the main plug and secure it form being switched on again.
Bei allen Wartungsarbeiten Gerät spannungslos schalten,
Netzstecker ziehen und gegen Wiedereinschalten sichern.
The technical specification for the fuses can be found on page
26 of this document and on the label inside the cover.
Die technischen Daten der Sicherungen sind der Tabelle auf
Seite 26 und dem Kennzeichnungsschild im Gehäuse zu entnehmen.
Caution - Damage to the Equipment
VORSICHT - Schäden am Gerät:
Apply only the specified fuses.
Es dürfen nur die vorgeschriebenen Sicherungen
verwendet werden!
Change the fuses corresponding to the following steps:
Austausch der Sicherungen gemäß folgender
Arbeitsschritte:
Open the cover
1. Loosening the screw (3), don’t unscrew completely.
2. Push up clamp ring (2) and cover (1) and secure them.
Change fuse
3. Change broken fuse (4).
Gehäuse öffnen
1. Schraube (3) lösen, aber nicht ganz herausdrehen.
2. Klemmring (2) und Gehäuse (1) hochschieben und
sichern.
Close the cover
4. Push down clamp ring (2) and cover (1).
5. Tighten screw (3).
Sicherung austauschen
3. Defekte Sicherung (4) austauschen.
Gehäuse schließen
4. Klemmring (2) und Gehäuse (1) nach unten schieben.
5. Schraube (3) anziehen.
23
38630, Ausgabe/Edition 2012-05, Version 8
6
Dismantling and mounting
for servicing
6
Demontage und Montage
im Servicefall
Figure / Abildung 7
3
2
1
2
3
3
2
4
1
38630, Ausgabe/Edition 2012-05, Version 8
24
7
Technical Data
7
25
Technische Daten
38630, Ausgabe/Edition 2012-05, Version 8
8
Inspection Plan
Acrobat Swing
Acrobat 77
Inspection Plan for
Acrobat 2000
Acrobat LCH
Acrobat 3000
OndaSpace
System Data
Supplier:
Date of installation:
Ondal serial number:
Operator serial number:
Device location:
Important Information
• Inspections must be performed by trained service personnel.
• The inspection intervals must be observed.
• This inspection plan is only valid when combined with the Ondal Installation and Operating Instructions which must be complied
with complementary to the inspections.
• After 10 years, the functional inspection must be performed once a year.
At the specified intervals, the pendant system must be inspected for the following points by Ondal, a company
authorised by Ondal, or by personnel with the corresponding qualification:
Period of use in years
Visual inspection (once a year)
1
2
OK NOK
OK NOK
3
OK NOK
4
OK NOK
5
6
OK NOK
OK NOK
7
OK NOK
8
OK NOK
9
OK NOK
10
OK NOK
• The parts of the pendant system are not deformed*
• The system is free from defects in paint wor
• The plastic parts are available and in position*
• The plastic parts are free from cracks*
• All rating plates are in position and legible
Functional inspection (every 2 years)
2
OK NOK
4
6
OK NOK
OK NOK
8
OK NOK
10
OK NOK
• Free rotatability/limit stops (depending on the version)**
• horiz. a. vert. joints smooth running, grease if required
• Vertical lift correct, readjust if required**
• Check and grease securing segment*
• Securing ring in position and shape (extension/spring arm
• Load comp./spring tension correct, readjust if required
• Collision damage
- all welding points free from cracks**
• Inspection of protective conductor transition resistance** (only
applicable if current conducting cables are integrated)
• After 10 years, the cables and hoses (if existing) must be inspected and replaced if required**
Confirmation of the inspection performed
The inspection tasks mentioned above were executed incl. the necessary adjustments and safety inspection:
1st year
Signature/stamp
2nd year
Date
Signature/stamp
3rd year
Date
Signature/stamp
1540866, Edition 2012-02, Version 2
Date
Signature/stamp
Date
Signature/stamp
9th year
Signature/stamp
5th year
Date
Signature/stamp
8th year
4th year
Date
Date
7th year
Date
Signature/stamp
10th year
Signature/stamp
Date
Signature/stamp
* Damaged or deformed components should be replaced as a precaution. Plase contact the spring arm supplier.
** If one of these problems is detected during the inspection, the spring arm must be taken out of service immediately as a precaution in order to prevent any
further damage to persons or equipment. Inform the system suppliers immediately.
The medical device handbook which belongs to each medical device and is prescribed in accordance with the German Medical Product User Regulations
(MPBetreibV) must be available on site. Service and maintenance work and also safety inspections shall be documented in this medical device handbook.
Inspection reports, including the present report, must be filed in the corresponding medical device handbook.
Ondal Medical Systems GmbH • Wellastraße 6 • D-36088 Hünfeld • Germany • Phone +49 6652 / 81600 • Fax +49 6652 / 81392
38630, Ausgabe/Edition 2012-05, Version 8
26
Subject to change and errors. Edition 2012-02
Date
6th year
8
Inspektionsplan
Acrobat Swing
Acrobat 77
Inspektionsplan für
Acrobat 3000
OndaSpace
Acrobat 2000
Acrobat LCH
Systemdaten
Datum der Installation:
Seriennummer Ondal:
Seriennummer Betreiber:
Gerätestandort:
Lieferant:
Wichtige Informationen
• Die Inspektionsarbeiten müssen von ausgebildeten Servicepersonal ausgeführt werden.
• Die Prüfintervalle sind einzuhalten.
• Dieser Inspektionsplan ist nur gültig in Verbindung mit der Ondal Montage- und Gebrauchsanweisung, die ergänzend zu
den Inspektionen hinzuzuziehen sind.
• Nach 10 Jahren muss die Funktionskontrolle jährlich durchgeführt werden.
Das Tragarmsystem ist nach den unten vorgegebenen Intervallen auf folgende Punkte durch Ondal, durch ein von
Ondal autorisiertes Unternehmen oder von Personal mit entsprechender Qualifikation zu prüfen:
Einsatzdauer in Jahren
Sichtkontrolle (ist jährlich durchzuführen)
1
2
i.O. n.i.O.
i.O. n.i.O.
3
i.O. n.i.O.
4
i.O. n.i.O.
5
6
i.O. n.i.O.
i.O. n.i.O.
7
i.O. n.i.O.
8
i.O. n.i.O.
9
i.O. n.i.O.
10
i.O. n.i.O.
• Die Teile des Tragsystems sind ohne Verformung*
• Das System ist frei von Lackschäden*
• Die Kunststoffteile sind vorhanden und in Position*
• Die Kunststoffteile sind frei von Rissen*
• Alle Typenschilder sind vorhanden und gut lesbar
Funktionskontrolle (ist alle 2 Jahre durchzuführen)
2
i.O. n.i.O.
4
i.O. n.i.O.
6
i.O. n.i.O.
8
i.O. n.i.O.
10
i.O. n.i.O.
• Durchdrehbarkeit/Anschläge (je nach Version) gegeben**
• horiz. u. vert. Gelenke leichtgängig, ggf. nachfetten
• Höhenanschlag korrekt, ggf. nachstellen**
• Sicherungssegment prüfen und fetten*
• Sicherungsring in Position und Form (Ausleger/FA)*
• Lastausgleich / Federkraft korrekt, ggf. nachstellen
• Kollisionsschäden
- sämtliche Schweißstellen sind frei von Rissen**
• Prüfung Schutzleiterübergangswiderstand** (trifft nur zu, wenn
stromführende Leitungen verbaut sind)
• Nach 10 Jahren sind die Leitungen und evt. verbaute Schläuche zu überprüfen und ggf. auszutauschen**
Bestätigung der durchgeführten Inspektion
Die oben aufgeführten Arbeiten wurden durchgeführt incl. der notwendigen Einstellarbeiten und Sicherheitsprüfung:
1. Jahr
Unterschrift/Stempel
2. Jahr
Datum
Unterschrift/Stempel
3. Jahr
Datum
Unterschrift/Stempel
1540866, Ausgabe 2012-02, Version 2
Datum
Unterschrift/Stempel
Datum
Unterschrift/Stempel
9. Jahr
Unterschrift/Stempel
5. Jahr
Datum
Unterschrift/Stempel
8. Jahr
4. Jahr
Datum
Datum
7. Jahr
Datum
Unterschrift/Stempel
10. Jahr
Unterschrift/Stempel
Datum
Unterschrift/Stempel
* Beschädigte oder verformte Bauteile sollten vorsorglich ausgetauscht werden. Bitte wenden sie sich hierzu an den Lieferanten des Federarms.
** Sollte einer der gekennzeichneten Punkte während der Prüfung beanstandet werden, ist der Federarm höchst vorsorglich und sofort stillzulegen, um weitere
Schäden an Personen und Austattung auszuschliessen. Informieren Sie unverzüglich den Lieferanten der Systeme.
Das zu jedem Medizinprodukt gehörende und laut MPBetreibV vorgeschriebene Medizinproduktebuch ist vor Ort vorzuhalten. Service und Wartungsarbeiten
sowie Sicherheitsüberprüfungen sind in diesem Medizinproduktebuch zu dokumentieren. Prüfberichte wie dieser sind in dem jeweiligen Medizinproduktebuch
abzuheften.
Technische Änderungen und Irrtümer vorbehalten. Stand 2012-02
Datum
6. Jahr
Ondal Medical Systems GmbH • Wellastraße 6 • 36088 Hünfeld • Germany • Fon +49 6652 / 81600 • Fax +49 6652 / 81392
27
38630, Ausgabe/Edition 2012-05, Version 8
No. 38630


![2000 (12 [v]) 4000 (230 [v])](http://vs1.manualzilla.com/store/data/006158180_1-df84fe4abb84c2df0c391c81a20b336f-150x150.png)