1
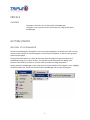
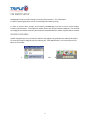
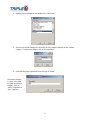
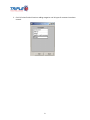
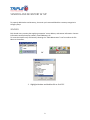
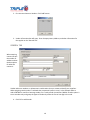
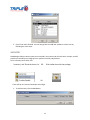
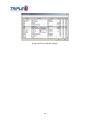
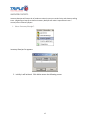
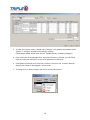
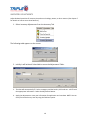
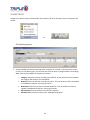
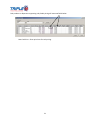
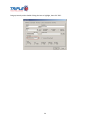
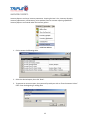
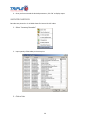
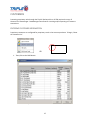
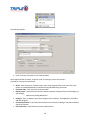
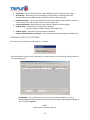
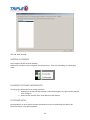
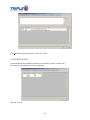
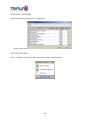
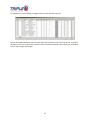
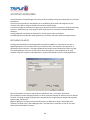
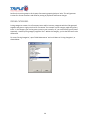
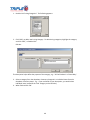
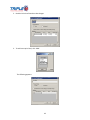
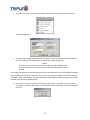
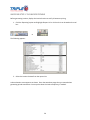
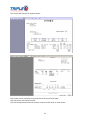
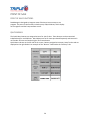
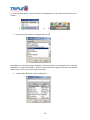
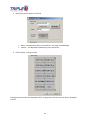
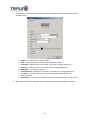
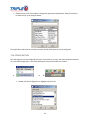
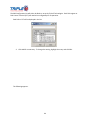
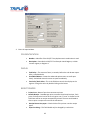
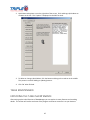
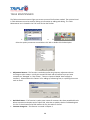
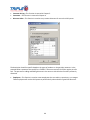
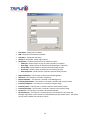
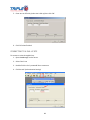
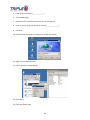
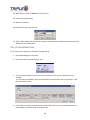
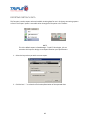
DATAMANAGER USER’S MANUAL DATAMANAGER USER’S MANUAL All rights reserved. No part of the contents of this document may be reproduced or transmitted in any form without the written permission of Triple E Technologies, LLC. The information contained in this document is subject to change without notice. Although Triple E Technologies, LLC. has attempted to ensure the accuracy of the contents of this document, this document may include errors or omissions. The examples and sample programs are for illustration only and may not be suited for your purpose. You should verify the applicability of any example or sample program before placing the software into productive use. This document, including without limitation the examples and software programs, is supplied “As-Is.” The Triple E Technologies, LLC logo, and OneTouch DataManager are registered trademarks of Triple E Technologies, LLC. Other brand names or trademarks associated with Triple E Technologies’ products and services are trademarks of Triple E Technologies, LLC. All other brand names and trademarks appearing in this manual are the property of their respective holders. Comments? Please e-mail all comments in this document to [email protected] Triple E Technologies P.O. Box 2677 Post Falls, ID 83877 Phone 208.777.9300 • Fax 208.777.9304 ii PREFACE AUDIENCE This guide is useful for users of the OneTouch DataManager This guide is your primary source of information for using the OneTouch DataManager GETTING STARTED WELCOME TO DATAMANAGER OneTouch® DataManager is designed for ease of use and compatibility. It provides users with a simple and consistent interface for maintaining data in the OneTouch® Databases, as well as printing reports and/or exporting data. The purpose of this chapter is to describe the steps required to begin using the CP720 unit and DataManager program at a given location. This manual includes instructions for adding Users, Customers and Cards to the system; as well as other functions to manage receivables. Getting started in DataManager is easy! Click the start button and select the ‘Programs’ menu. Highlight the OneTouch® menu, and click on the OneTouch® DataManager icon to open the program. 1 CATEGORY SETUP DataManager keeps records of Vendors, Inventory and Customers. This information is used for reporting purposes as well as restocking and inventory pricing. In order to process sales, receipts, and inventory, DataManager must be set up to accept vendors, inventory and customers. This chapter will explain how to set–up the individual categories. It is vital that the categories for Vendors, Inventory and Customers be established first, before any other data is entered. VENDOR CATEGORIES Vendor Categories are set up to monitor and track the suppliers of goods that are resold at the facility. To access the Vendor Categories start by selecting the “Table Maintenance” icon from either the File Menu or the Toolbar: A. OR: 2 B. 1. Highlight Vendor Categories and double click or select ‘OK’. 2. The first time Vendor Categories is accessed, the only category setup will be the “Default Category.” To add a new category, click on the Add button. 3. A box will open with a blank field. Enter the type of vendor. The Vendor Category is a type, not a name. To avoid misnaming a category, think of “what” is supplied not “who” supplies it. 3 4. When all Vendor Categories have been entered the list should look like this: 4 INVENTORY CATEGORIES Inventory Categories are set up to classify the types of goods that are sold and are synonymous with inventory departments. To access the Inventory Categories, start by selecting the “Table Maintenance” icon from either the File Menu or the toolbar: A. or B. 1. Highlight Inventory Categories and double click or select ‘OK’. Initial box shows blank Inventory Categories. 5 2. Click Add button to enter new inventory type. GENERAL Min Age to Buy For items like beer and cigarettes, enter minimum age for customer to purchase. POS will prompt cashier for age verification. SITE SPECIFIC VALUES 3. Enter tax rates 4. Click ‘OK’ when finished. Continue adding until all inventory types are entered. 6 CUSTOMER CATEGORIES Customer Categories are set up to keep track of the types of customers that are making specific purchases at your store and assist in product trends analysis. To access the Customer Categories start by selecting the “Table Maintenance” icon from either the File Menu or the toolbar 1. Highlight and double click Customer Categories, or click ‘OK’. The first time you log into Customer Categories it will be blank. 2. Click on the Add button to enter a type of customer. The Customer Category is a type not a name. This should be labeled according to how you will want to sort your customers (by type.) 7 3. Click ‘OK’ when finished. Continue adding categories until all types of customers have been entered. 8 VENDORS AND INVENTORY SETUP To properly add Vendors and Inventory, be certain you have established the necessary categories in Category Setup. VENDORS Each Vendor entry contains the supplying companies’ name, address, and contact information. Contact information can be phone/fax numbers, email addresses, etc. To access the Vendor entry field start by selecting the “Table Maintenance” icon from either the File Menu or the toolbar. or 1. Highlight Vendors and double click or click ‘OK’. 9 2. First instance shows no Vendors. Click ‘Add’ button. 3. Vendor information box will open. Enter Company Name, Address, and other information for the supplier on the ‘General Tab’. GENERAL TAB When entering contact info put the number or address and use the description for what the contact is. Vendor codes are numbers or alphanumeric combinations that you create to identify your suppliers. When assigning vendor codes it is advised that a sequential system is used. In the example above a code of BEV001 is used for a beverage vendor, for a candy vendor it would be CAN001. Another option is to use numbers only and group the types of vendors by either the first or last digit in the code. 4. Click ‘OK’ to add Vendor. 10 5. Click ‘Close’ when finished. You can also go back and add new vendors at a later time by following the same steps. INVENTORY DataManager allows Inventory items to be entered in the system and will track sales, receipts, and will provide you the ability to manage prices or perform inventory adjustments. To list inventory items either click: ‘Inventory’ and ‘Show the Items List’ OR Click toolbar box with the package. OR There will be no inventory listed upon initial login. 1. To add inventory click the Add Button. 11 GENERAL TAB 2. Enter the information requested for each field. UPC Code – This 8 or 12 digit number is found on the item generally below the barcode. If the item you are entering does not have a barcode, contact the vendor for this information. Stock # – can be any numeric or alphanumeric combination you chose. Description – Describe the item for sales purposes. Category – Used to group products by department. Use Category Tax Values – Check this box to use the taxes setup in the category. Requires Permit – Check this box to require Customers purchasing this product to have a permit on file. Is This Item a Gift Card – Check this box if this item will be sold as a ‘Gift Card’. Receive in Cases - If you receive this item in cases, make sure the box next to ‘Receive in cases’ is checked. Enter the quantity of individual units per case. Default Vendor – Normal Supplier for this product. On Hand Amount – use the proper unit of measure which best applies. This may be by gallon, by case, or by each item. Cost – Current cost of item at time of entry. Retail Price – Current Retail Price at time of entry. 12 Tax Information Tab is where site specific tax rates are entered for items not taxed at the category level. ‘XRef Values’ tab is where cross-reference inventory values are configured. 13 1. 2. 3. 4. 5. 6. 7. Numbers in figure above: 1. FuelLink Product Code – Used to export FuelLink Network transactions. 2. CFN Product Code – Used to export CFN Network transactions 3. cp POS Product Code – 3rd party(i.e. Passport, Saphire, Radiant, etc) POS product code. 4. ccToolkit enum Value – Product specific value used for enforcing restrictions. NOTE: Select a ccToolkit value that accurately resembles the item. 5. es Fuel Product Code - used for Site Controller configuration (ANDI/NeXGeN) 6. and 7. Three letter identifiers -(ex. DYE for Dyed Diesel, UNL for Unleaded gas, etc.). 14 Combos and Dependencies tab is where items are combined into a group to be sold as 1 item at the POS. Below is an example of an inventory list. Each item listed will have a Category, Description, Stock #, Current OnHand quantity, Current Cost, and Current Retail prices. To edit existing items, either double click the item, Or highlight and click ‘edit’ 15 Or right click item and click ‘change’ 16 INVENTORY RECEIPTS Inventory Receipts will keep track of products received, report on reorder limits, and show top selling items. Neglecting to keep up to date on Inventory Receipts will make it impossible to have a current/correct Inventory Report. 1. Select “Inventory Receipts”. Inventory Receipts list appears: 2. Initially it will be blank. Click Add to access the following screen: 17 3. To show a list of items, select a ‘Vendor’ OR a ‘Category’. Only products associated with the ‘Vendor’ or ‘Category’ selected will be listed for receiving. (The example above shows items for the ‘Taxable Grocery’ inventory category’) 4. Enter information in all applicable fields. Once the information is entered, you can choose either to receive the information or Save it for application at a later date. 5. Clicking Receive prompts you to print items received. Click Yes or No. Inventory Receipts displays your receipt in chronological / numeric order. 6. To change, print, or delete receipts, right click to access these options: 18 INVENTORY ADJUSTMENTS Adjust OnHand quantities of Inventory Items due to shrinkage, waste, or other reasons. (See chapter 7 for details on how to enter these Reasons). 1. Select Inventory Adjustments from the Inventory Tab. The following table appears on the screen: 2. Initially it will be blank. Select Add to access the Adjustments Table: 3. The date will automatically fill. Select a category and the Stock #, UPC code etc… will fill with the appropriate information. Select the Adjustment Reason. 4. Apply the adjustment or save your information for application at a later date. NOTE: You can easily find and select any item by using the Find Item option. 19 CHANGE PRICES Change Prices option can be accessed under the Inventory Tab or by clicking on the icon located on the toolbar: Or The following appears: 1. Access the different Items by selecting either a category or a Vendor. Once they show on the screen as in the above figure, you can select the price you wish to change and do so accordingly. When finished, click Update to complete the process. Category- Select the Inventory Category to be edited. All the Inventory items related to this category will display in the rows below. New Cost- Enter current cost in the New Cost box. This can be done as often as needed or backdated to allow for re-pricing of invoices. New Retail- Enter current retail in the New Retail box. This can be done as often as needed or backdated to allow for re-pricing of invoices Effective Date- Enter the date this cost was first effective. Effective Time- Entered in military time. Midnight being 00:00. 20 Fuel products on dispensers supporting cash/credit pricing will note new fields below New Cash Price – Enter price here for cash pricing. 21 SETTING FET AND SET RATES FET and SET rates are generally set at the category level. (see Category Setup). 1. Show list and click ‘edit’ to change category. 2. Change FET rate for fuel categories on general tab. 22 3. Change SET rate by clicking the ‘Site Specific Values’ tab. The following appears: 4. Change SET rates for sites in different states here. Click ‘OK’ when done. Some taxes are specific to single items such as Dyed Diesel. Select item to edit: NOTE FET and SET rates can only be changed to items belonging to a fuel category. If rates aren’t visible – check inventory category to ensure the ‘Is Fuel Category’ box is checked. 23 Bring up items by either double clicking the item or highlight, then click ‘Edit’. 24 INVENTORY REPORTS Inventory Reports are key to inventory awareness. Keeping the Item’s List, Inventory Receipts, Inventory adjustments, and Inventory prices updated, assures accurate reporting capabilities. Inventory Reports are located under the Inventory option. 1. Click to access the following table: 2. Select the desired report, then click ‘Show’. 3. To generate an accurate report, the system will provide you with an “Enter Parameter Values” field. Enter the beginning or ending date. 25 4. Once you have entered the desired parameters, click ‘OK’ to display report. INVENTORY BARCODES Barcodes are printed on 3 x 10 label sheets for items with UPC codes. 1. Select “Inventory Barcodes”. 2. Input quantity of barcodes per item to print. 3. Click to Print. 26 CUSTOMERS Processing proprietary sales through the Triple E SiteController or CP720 requires the entry of Customers in Datamanager. DataManager then allows for invoicing and/or exporting of Customers transactions. ENTERING CUSTOMER INFORMATION Proprietary customers are configured for proprietary cards or On Account purchases. To begin, ‘Show the Customer List’. OR 1. Then, Click on the ‘ADD’ button. You may also choose ‘Add a Customer’ from the ‘Customers’ menu. 27 The following appears: 2. Enter Customer information in the fields provided. Note: Required fields are Name, Customer Code, and Category. More information is required for invoicing and statements. Name - Enter Company or Customer name. Enter names using this format: last name, first name. Names are sorted alphabetically so consider entering individuals using this format. Customer Code - Enter Customers account number. Default Terms - Set the payment terms for customer payment (if using the Triple E Technologies, LLC A/R package). o Add terms by clicking ADD button. Category - Enter a category if you want to categorize your customers. Click ADD next to the field to add new categories. Contact Information - Enter information relevant to the customer, including e-mail, phone numbers, and point of contact. Has Credit Limit - Check this box to use the credit limit field. 28 Credit Limit - Enter the amount of initial credit available if using the “Has Credit Limit” option. Allow Charge - When using Triple E Technologies, LLC POS system, un-checking this box will deactivate the account and will not allow any of the customer’s cards to be used. IsGiftCardCustomer - This is only relevant for our point of sale system. It will mark the customer as a Gift Card customer and will allow cards to be used as gift cards. Finance Chg Exempt - Check this box to make customer exempt from finance charges. Validate Driver – Check this box to require Driver ‘Validation’ o Used in multiple pin number validation with a single card. Validate Vehicle - Check this if you require Vehicle ‘Validation’. Require PO/Job Number for Customer – This is used in the Triple E Technologies, LLC POS System. ASSIGNING CARDS TO CUSTOMERS Click the ‘Private Cards’ tab to assign cards to a customer. Click this tab after entering ‘Primary Information’ for new customers or while editing existing customers. The following appears: Card Number – This is a unique numeric value. The system ignores leading 0’s, so a card numbered 00504 would be entered as 504. When card is not unique, Datamanager will display an alert. This field is required. NOTE Maximum card number length is 9 29 Description – This field is used when printing reports or exporting data to associate a card with a driver or vehicle. Pin Required/Pin Number – To prompt customers requires that their cardholders enter a pin check this box and assign a pin to the card. If the ‘Pin Required’ field is checked, a Pin Number must be entered. Odometer, Driver #, Vehicle # Required – If a customer requires that their card holders enter and track Odometer, Driver, or Vehicle values, check these fields. Fill/Tran Limits - Cards can be restricted by setting gallon or dollar limits based on specific intervals. Only one type of limitation may be used in conjunction with an interval selection. Fill Limit – This field determines the maximum amount for a single transaction in gallons. If this field is used, select an Interval for this limit. OR Tran Limit – This field determines the maximum amount for a single transaction in dollars. If this field is used, select an Interval for this limit. Interval – This field determines the period set for Transaction or Product Limits. This field is required to enforce fill or tran limits. Set limits – This field allows you to select inventory items that this customer will be allowed to purchase. They will only be allowed to purchase the items selected. If this field is blank, the customer has no restrictions. Product Restrictions – This will list the “allowed” items. To clear the list of restrictions, right click the field, then click ‘Clear Limits’. Active – This field determines if the card can be used. The field must be checked for the card to be used. Declining Balance/Gift Cards – the following two fields are used to set a balance that declines as the card is used. This balance or amount is the maximum amount the card can purchase. These purchases can be billed for after the fact (declining balance card) or pre-paid (gift cards). Each transaction is subtracted from the balance. When the balance reaches 0.00 the card is turned off. Balance – If ‘Use Balance’ is checked, the amount shown needs to be a positive (+) dollar amount. To reset a card with a zero(0) balance, put a positive dollar amount. Use Balance – This field should be checked to use the dollar amount in the ‘Balance’ field. Uncheck this box to set cards to normal status. Is Loyalty – This field is used in the Triple E Technologies, LLC POS system and is used to give discounts at the pump when using a credit card. Card Type – This field is used to determine if the card being used will be a StandAlone card, or a Driver or Vehicle card (if using a dual-card system). The default is blank, and this option works just as Stand-Alone if nothing is selected. In Use – This system field keeps Gift Cards from being used at more than one pump at a time. Users of the application should never update this value without assistance from Triple E Technologies, LLC Customer Support. To make cards inactive in the system – Uncheck the ‘Active’ box and enter INACTIVE in the ‘Description’ field. This will make the card un-useable. 30 Click the ‘OK’ button to apply the changes or additions to the database. TAX INFORMATION The ‘Tax Information’ (or Excise Tax Exemption Information) tab is used to set Federal (FET) or State (SET) Excise Tax or State Sales Tax exemptions for each customer. Select the Inventory Item that will include the exemptions, and click the FET/SET/Sales Tax Exempt box necessary. 31 CUSTOMER DRIVERS The ‘Customer Drivers’ tab is used to allow multiple drivers for a single card or multiple cards. Enter the Driver Number(similar to the Cards’ Pin #), Last Name and First Name of each driver for this customer. CUSTOMER VEHICLES The ‘Customer Vehicles’ tab is used when there are multiple vehicles with one or more cards. Enter the Vehicle # and Description of each vehicle for this customer. 32 USER FIELDS The ‘User Fields’ tab is used for information related to invoicing and other miscellaneous items. See field explanations below. Factor Account # - This field is for third party accounting software account numbers. Invoice Frequency – gives the option to setup individual customers on an invoice frequency. (options - Daily, Weekly, BiWeekly, 1st and 15th, Monthly) Invoice Sort – gives the option to organize the transactions by card number or vehicle number. POSCashierPrompt – displays prompts for on account users. Statement Run Date – allows customer to choose date for statements to run. ITEM PERMITS To restrict products for specific customers such as farmers, government entities, or other groups, use the ‘Requires Permit’ feature in inventory. Click the ‘Item Permits’ tab, then select the restricted product to allow here. 33 Click ‘OK’ when finished. SORTING CUSTOMERS Sort Customers by one of these methods; Double Click a column to sort or Right Click a column to sort. Then click ‘Ascending’ or ‘Descending’ order. CHANGING CUSTOMER INFORMATION To change the information for an existing customer: 1. Double click the row that the customer’s information appears on, right click the row and click ‘Change’ or 2. Select the row and click ‘Edit’ at the bottom of the window. CUSTOMER NOTES Correspondence or other types of contact with customers can be tracked using the ‘Notes’ tab. Enter information in the space provided. 34 Click ‘Add’ when done with the note. Click ‘OK’ to close. CUSTOMER INVOICES To find the paid or unpaid status of invoices for a customer, click the ‘Invoices’ tab. All invoices in the customers account are displayed. Click ‘OK’ to close. 35 SEARCHING CUSTOMERS Search Customers by entering text in the search box. The List ‘jumps’ to the Customer if found. EDIT PRIVATE CARDS Click on ‘Customers’ then ‘Edit Private Cards’ to show cards in numerical order. 36 Find customers by card number or change cards for many customers at once. You can also add private cards in this window. Place the information in the areas as normal, and select the button “Get Cust” to select the customer that the card will be placed under. When you are finished, click on ‘OK’ to apply the changes. 37 ACCOUNTS RECEIVABLE The A/R functions of DataManager are used to produce Cardlock invoices and statements for customers’ transactions. The A/R system provides you the flexibility to set up differing price levels and categories for the customers who will be using the Cardlock or Customer charge system. Price Levels enable you to extend tiered pricing to customers at either a cost plus or retail minus pricing structure. Additionally, you may set gallon level requirements for customers to obtain additional discounts. Pricing Categories are used to set discounts for similar types of items or products. The following sections describe opening balances, price levels, and other initial setup requirements. BEGINNING BALANCES Existing customers with an outstanding balance should be handled first. Two ways exist to enter beginning balances; the first allows the entry of a balance that is the total due, post payments, or adjustments for this amount. This opening balance amount will not be subjected to finance charges. This opening balance amount is carried as part of the total balance. Enter adjustments for each customer using the ‘Payments and Adjustments’ option of Receivables to set this ‘Opening Balance’. Enter a Description, an amount, and check the ‘Adjustment’ box. Click ‘Apply’ when done. The second way to enter opening balances is to enter a manual sale with an inventory item of ‘Balance Forward’. Entering the beginning balance this way allows you to apply finance charges and payments against these ‘transactions’ Begin by adding an inventory item with the description of ‘Balance Forward’. (see Vendors and Inventory for these steps). After adding the item, use ‘Sales Entry’ to perform a ‘sale’ for this item. Sales can be back dated if necessary. 38 Perform the invoicing steps in this chapter after entering opening balance ‘sales’. This will generate invoices for all new customers and allow for posting of payments and finance charges. PRICING CATEGORIES Pricing categories creates a list of inventory items and/or inventory categories which will be grouped together and given a single price level for a customer. For example: a price category might be ‘grocery items’. In this category you list the grocery items in your inventory. Or, you could list the grocery items separately. Another pricing category might be ‘fuel’. Within this category, you list the fuel items to be discounted. To access ‘Pricing Categories’, open ‘Table Maintenance’ and scroll down to ‘Pricing Categories’, as shown below: 39 1. Double click ‘Pricing Categories’. The following appears: 2. Click ‘ADD’, to add a new Pricing Category. To edit existing categories, highlight the category and click ‘EDIT’, or Double Click. Edit Box The description helps define the purpose of the category, e.g.: ‘All Fuel Products’ or ‘Diesel Only’. 3. Select a category from the dropdown ‘Inventory Categories’ or individual items from the dropdown ‘Inventory Items’. e.g. - if you use Diesel as your description, you would select individual items instead of the ‘Fuel’ category on the left side). 4. When finished click ‘OK’. 40 PRICING LEVELS Pricing Levels are used to create discounts for customers based on quantities purchased and dollar figure based on cost or price. Select ‘Pricing Levels’ in ‘Table Maintenance’. 1. Click ‘OK’ to open. The following appears: 41 2. Double click a level listed to make changes. 3. To add a new price level, click ‘ADD’. The following appears: 42 The description helps explain the purpose of the discount. e.g. “Four Cent” or “.04”. PRICING METHOD: Basic – for basic entry, recommended method for all users. Advanced – advanced method that includes creating formulas to separate pricing through simple algebra structures.(e.g. (x+.04), where x is the reatail price). Quantity Required – The minimum quantity a customer must purchase to receive the discount. This field is optional. If quantity is 0(zero) or ‘blank’, discounts will be given on all purchases. (see ‘Customer Pricing’ to set this up). Cost + – Use this field if price level discounts are added to the inventory cost. e.g.: An item costs $2.899 per gallon and the ‘Cost +’ amount is $0.1000(10 cents); the price for customer transactions with this price level will be $2.999 per gallon. Price - – Use this field if price level discounts are subtracted from the retail price. e.g.: An items retail price is $3.599 and the ‘Price -’ amount is $0.1000(10 cents); the price for the customer transactions with this price level will be $3.499. A negative amount can be entered to add different types of taxes or fees to a customer’s purchase. NOTE If using as a discount, do not place a negative sign in the value; it is hard-coded as a negative by default. Percent Off – Use this field if a percentage of the extended amount of an item is calculated for the discount. e.g.: The quantity is 10.000 gallons, the price is 2.569, and the extended amount is $25.69. If the price level discount is 10%, the discount for the sale would be $2.57, making the amount due $23.12. 43 CUSTOMER PRICING Customer pricing is where entries from Price Levels and Pricing Categories are combined to create specific pricing for each customers. Locate ‘Customer Pricing’ in ‘Table Maintenance’. 1. Double Click ‘Customer Pricing’, the following appears: 2. If the purpose is to set pricing for a new customer, click the ADD button. 44 3. In the ADD mode, click the down arrow to select a Customer. 4. Select a pricing category, then select a price level. Each category must have a price level. 5. Enter all discounts for this customer. If a customer has one price level for fuel and another price level for groceries, select the first pricing category and price level, then the second. NOTE: It is possible to give multiple price levels for the same pricing category. Doing so will result in larger discounts given during the re-pricing of transactions. If pricing for a customer changes, the same screen is used to edit customer pricing. e.g.: if a customer is no longer eligible for a discount highlight the category to be deleted and use the DELETE button on the keyboard. If all categories for a customer are deleted, that customer will no longer be listed under ‘Customer Pricing’. To EDIT an existing Customer’s pricing, highlight the customer and click EDIT or double click the customer. 45 SALES ENTRY The Sales Entry screen permits users of the DataManager system to manually enter sales into the system for a manual ticket from a point of sale or a manual ticket from a fuel transaction. It allows the user to manually key in the details of a transaction so that it can be added to a particular customer’s invoice. If your customers have a prior relationship with your business, it may be necessary to input a current balance on their account. Click on ‘Sales Entry’ under the Sales Tab: The following appears: 46 Fill in all appropriate fields as seen below and then click ‘Apply’. Site – Select an existing site to reference when posting the sale.. Date - Month, day, and year (00/00/0000) of sale. This is automatically populated with today’s date. Time – This is automatically populated with today’s date. Enter the time of sale (Optional). Customer - Select the customer from drop down list. Discount - Select the discount.(Optional) Card Number – Select a card number.(Optional) Odometer – Enter an odometer reading.(Optional) Driver Identifier – Select an entry from the drop-down box.(Optional) Vehicle Identifier - Select an entry from the drop-down box. (Optional) Items - The ‘Find’ button displays a list of inventory items. Click one or more items by holding down the ‘CTRL’ key, then click ‘Select’. These items are added to the sale. Change the quantity and/or the unit price if needed. When all items, quantities, and prices are entered, click the ‘Apply’ button. The sale is posted to the customers account and another sale can be entered. Click ‘Close’ when finished. 47 REBUILDING THE SALES SUMMARY Several reports in the system depend upon sales summary data stored in the OneTouch database. The sales summary data itself is updated when sales occur. Although uncommon, it is possible that sales data becomes corrupted. Running this menu option should be done at the direction of a technical support representative. It is safe to run this option at any time. It rebuilds the sale summary data from existing sale transactions. NO OTHER SALES SHOULD OCCUR WHILE THE REBUILD IS IN PROGRESS. NOTE This process can take more than an hour, depending on the size of the database. INVOICES AND STATEMENTS DataManager creates and stores transaction until the end of a given billing cycle, at which time customer invoices can be printed and mailed. In order to generate the correct information a number of steps must be completed before invoices can be printed. The steps for customer invoicing are described in this section. Since you will generate invoices regularly, the examples shown here are based on an example of a bimonthly invoicing schedule. Invoices are generated twice a month on the 1st and again on the 15th. Finance charges may be applied to customers who have not made payments during the current billing cycle. Statements, in this example, should be run on the first, after generating invoices. INVOICING STEP 1: GENERATE PRICED TRANSACTIONS Transactions are priced at the retail price on the date the sale occurred. To apply discounts to these transactions, you must ‘Generate Priced Transactions’. 48 1. To perform this step, click on the Receivables Tab and click ‘Generate Priced Transactions’. The following appears: 2. The beginning and ending dates indicate the range of transaction dates in the sales database that are to be priced. The date fields can include an optional ending time. NOTE Since time is an optional entry in both the beginning and ending date, the pricing transactions routine will only price transactions between the values entered. If an ending date includes 11/13/2005 with no time then all transactions up to 11/12/2005 at midnight will be included. To include all transactions for the 13th, the ending date needs to include the time. Eg.: 11/13/2005 23:59. Sales between the dates entered are used to determine the quantity purchased for customers with quantity based discounts. 3. Click ‘Process’ to price transactions for the given date range. It may take several minutes for transactions to process. When finished, a box appears that notifies the process has completed. Click ‘OK’. 49 INVOICING STEP 2: THE INVOICE PREVIEW Before generating invoices, display the Invoice Preview to verify all customer pricing. 1. Click the ‘Reporting’ option and highlight ‘Report List’ or click on the icon located on the tool bar: or The following appears: 2. Select the Invoice Preview from the reports list. A date selection screen appears as shown. Enter the same date range that you entered when generating priced transactions. You may also select the invoice frequency, if needed: 50 . This report is a summary of all customer transactions that have been priced between the beginning and ending dates selected for each customer. The invoice preview is intended to be used as a review tool. You should review the transactions, especially those that should receive discounted prices, to ensure that the proper discounts are given. At this point since the transactions are not permanent, if a customer’s pricing is not correct you can correct the pricing and regenerate priced transactions. This can be done as many times as necessary until the report displays the information correctly. 51 INVOICING STEP 3: CUSTOMER INVOICING Invoices provide customers with an accurate explanation of charges against their account. The next step in invoicing is to select ‘Generate Invoices’ from the Receivables Tab: NOTE: This should be done immediately following generating priced transactions and the final review of the invoice preview. The following appears: By Customer – gives you the option to select an individual customer to invoice. NOTE: Hold control key to pick multiple customers. By Frequency – gives you the option to select a frequency. Example: weekly, monthly, etc. After filling out the selection screen, click the generate button. Once the invoices have been generated correctly, the following appears: 52 INVOICING STEP 4: PRINTING INVOICES Once the invoices have been generated, print them by clicking on the ‘Reporting’ tab and highlight ‘Reports List’ or click on the icon located on the toolbar. A list of available reports will be displayed. Two invoice styles are available: Invoice and Invoice – Vehicle Format. Double click on either version. Select the ‘Invoice Run Date’ that corresponds to the date used to generate invoices. The invoices that were generated in the previous step will be printed to the computers’ screen to be reviewed. 53 The invoices will look like the example below: Each invoice can be viewed by using the arrows at the top of the window. Click the printer icon to print Invoices. Click the envelope with arrow icon to export Invoices to PDF, Excel, or other format. 54 PREPARING STATEMENTS Each time statements are prepared, finance charges can to be applied or excluded from those customers’ accounts that have unpaid invoices. To exclude invoices from being subject to finance charges perform the following steps. INVOICE LIST The list shows invoices for customers, the paid status, and other information. To suspend finance charges prior to the generation of statements, do the following: 1. Select the ‘Invoice List’ from the Receivables Menu. The following appears: 2. Select an invoice from the list and click ‘Edit’. 3. Click the ‘Suspend Finance Charge’ box to prevent the selected invoice from being included when generating finance Charges. 55 GENERATING FINANCE CHARGES To apply finance charges: 1. Select ‘Generate Finance Charges’ from the Receivables menu: The following appears: 56 DataManager only applies finance charges to unpaid invoices older than the dates specified in the ‘Balances older than?’ field. Finance charges are NOT applied to adjustments, or previously charged finance charges. The system default finance charge (setup in system options) can be changed for this instance if needed. The system will delete any finance charges generated within (up to and including) the value entered in the ‘Days to Delete’ field. 2. Once you have entered the information in the applicable fields click ‘Process’. To preview the finance charges generated, you can select the ‘Finance Charge Report’ from the reports list. GENERATING STATEMENTS 3. Next, select ‘Generate Statements’ from the Receivables Tab: Beginning Date – is Customer Specific. See User Fields tab for more information Ending Date – is the last day of the statement period. By Customers – Used to select specific customers. 57 By Frequency – Used to group customers. See Ch.4, User Fields tab for more information Show Generated Statements – Displays statements when generation is completed. Print statements through ‘Reporting’ or click ‘Reports List’ icon after generating: 4. Double click on the Report titled ‘Statements’. The statements can be viewed prior to printing by clicking the arrows at the top of the statement window. Statements look like the example below: 5. Click the printer icon to print Statements. 6. Click the envelope with arrow icon to export Statements to PDF, Excel, or other format. 58 POINT OF SALE POINT OF SALE FUNCTIONS DataManager is designed to integrate areas of business into one easy-to-use program. The point of sale functions include set-up of Quick Menus, which display on the registers and the Pump toolbars as well. QUICK MENUS The Quick Menu buttons are assigned to items for ‘quick’ sales. These buttons can be customized independently for each POS unit. Quick Menus are set for items purchased frequently and items with no barcode. All items are listed using the ‘find’ items button. Quick Menu tabs are on the left side of the screen. Buttons assigned to Inventory Items for that tab are displayed to the right. Below is an example of the “Buttons” listed under the “Hot Keys” tab. 59 To access the Quick Menus, start by selecting “Table Maintenance” from either the File Menu or the Toolbar : A. or B. 1. Double click ‘Quick Menus’ or highlight and click ‘OK’ Quick Menus list will display options available for tabs on each POS. In the example below, ‘Fountain and Coffee’ are listed under ‘DRINKS’. Buttons provide rapid sales of high volume items such as drinks and deli items or items and services without barcodes. 2. To Add a Quick Menu tab, click the Add button: 60 3. Name the group of items for each Tab. Name – Extended description of the POS Tab. Only used in DataManager. Caption – Text displayed at POS during normal operations. 4. Click a ‘Button’ to assign an item. Existing buttons show the text displayed at POS. Empty buttons will have the text ‘Button’ displayed instead. 61 5. Fill in all fields. Change the buttons appearance by selecting different font names/sizes and the fore/back colors. Caption – Text displayed on button at POS. Item – Click arrow to select inventory item sold when touched. Font Name – Default system font is used. Click arrow to change appearance. Font Size – Default font size is used. Click arrow to change appearance. Bold/Italic – Text enhancing options. Fore/Back Color – Default colors are used. Click each box to change appearance. Is a Return – Check this box to have item selected appear automatically as a return/overring. Qty Prompt – Check this box to prompt cashier for multiple quantities at time of sale. 6. When finished, click ‘OK’ and repeat with the other buttons until the category is complete. 62 7. Repeat process until merchandise is assigned to appropriate tabs/buttons. When finished, the list looks similar to the example below: The Quick Menu tabs must be set before the Point Of Sale (POS) features can be configured. POS CONFIGURATION Each POS register must be configured with quick menu buttons, printers, and other hardware selections. To access POS Configuration, select Table Maintenance from the File Menu or Toolbar: A. or B. 1. Double click POS Configuration or Highlight and click ‘OK’ 63 The POS Configuration list will either be blank or set up by Triple E Technologies. Each POS register or Fuel Control Terminal (FCT) will need to be configured prior to operation. Each POS or FCT will be displayed in the list: 2. Click Add for a new entry. To change the setting, highlight the entry and click Edit. The following appears: 64 3. Enter the required data: POS IDENTIFICATION Number – Identifier of the POS/FCT. Any alphanumeric combination is used. Description – Describe the POS/FCT. For Example: North Register, or Main counter register, or Register 1. DISPLAY Final Delay – The amount of time, in seconds, before the cash drawer opens after a completed sale. Scroll More Menus – Causes the advanced options menu to scroll open slowly. Unchecked causes the menu to open immediately. Fore Color / Back Color – This is the field that controls the display on the register. Change the colors by double clicking on the boxes. RECEIPT PRINTER Printer Port – Name of port that connects to printer. Default Receipt - DataManager prints commercial and retail receipts. Each point of sale terminal can be set to only print one. If “none” is chosen for this field there will be no receipt automatically printed. The user would need to elect to print a receipt at the end of the transaction. Receipt Printer Cuts paper – Check this box if the printer cuts the receipt paper. Paper Cut String – This field should only be changed by a technician. 65 Allow Commercial Receipt – Check this box for customers requesting commercial receipts. SCANNER Port – Port number for UPC scanner connection. CREDIT CARD SWIPER Port – Port number for the credit card swiper connection. CASH DRAWER Port – Port number for the cash drawer connection. Open For…different payment methods. Check all that apply. On Account Payments - Drawer opens for customer charges. Check Payments – Drawer opens for Check payments. Credit Card Payments – Drawer opens for CC payments.. Other Payments – Drawer opens for coupons or other methods of payment. (See Table Maintenance for more on this topic) POLE DISPLAY Pole Display Port – Port number for Pole Display connection. ASSIGNING QUICK MENUS TO THE REGISTER Quick Menus can now be assigned to each POS terminal. 1. In the POS Configuration option, click the tab labeled ‘Quick Menus’. 66 2. Quick Menu tab options are on the right side of the screen. Click and drag a Quick Menu to a button on the left. This ‘Caption’ is displayed on the POS Terminal. 3. To delete or change a Quick Menu, click the button and drag to the trashcan in the middle. This process is used for adding or updating buttons. 4. Click ‘OK’ when finished. TABLE MAINTENANCE EXPLORING THE TABLE MAINTENANCE After setting up the initial functions of DataManager you can explore its many features and recording details. This section will outline each area of the program and how to customize it to your business. 67 TABLE MAINTENANCE The Table maintenance menu will give you access to most of the functions needed. The activities listed in Table Maintenance can be used for looking up information or adding and editing. The Table Maintenance icon is located in the ‘File’ menu and on the Toolbar: A. or B. Select the option you want to see and either click ‘OK’ or double click the description. Adjustment Reasons – This function is used when performing inventory adjustments due to shrinkage or other reasons. Initially this area will be blank and will need to be set up. Some examples are “Damaged” or “Out of Date.” There are 3 options labeled ‘How To Apply to Inventory’. Select whether this ‘Reason’ is for adding to, subtracting from, or replacing the current stock on hand. Bad Check Names – This function is used to enter names of customers who have passed bad checks. When transactions take place at the Triple E POS, sales that are paid by check are validated against this list. If a check name at the POS matches the list, the cashier is alerted. Customer Categories – This function is covered in Chapter 2. 68 Customer Pricing – This function is covered in Chapter 5. Customers – This function is covered in Chapter 4. Discount Codes – This function is used to set up various discounts for use at the POS system. The description should be specific based on the types of products or the particular amounts. In the example below: customers who qualify for a “DIESEL 5” discount receive $.05 off the regular price for fuel. The process for adding and editing discounts is the same as with the other functions previously discussed. Employees – This function is used to create employees who are cashiers, supervisors, or managers. These employees will use the POS system to perform daily sales and other typical POS functions. 69 First Name – Employees First Name. SSN – Employees Social Security Number Last Name – Employees Last Name Cashier # – Employees’ cashier login number Permissions – Cashier permissions at the POS are set here: o Paid Outs – Allows Cashier to pay out cash to vendors or suppliers. o Over Rings – Allows Cashier to refund items/sales without a supervisor. o End of Shift – Allows Cashier to perform the End Of Shift function. o End of Day – Allows Cashier to perform the End Of Day function. o Other Payments – Allows Cashier to perform the End Of Day function. Export Definitions – This function is covered in Site Management. Gift Cards – This function is covered in Customers. Import Definition – This function is covered in Site Management. Inventory Adjustments – This function is covered in Vendors and Inventory Setup. Inventory Categories – This function is covered in Category Setup. Inventory Items – This function is covered in Vendors and Inventory Setup. Inventory Receipts – This function is covered in Vendors and Inventory Setup. Invoice List – This function is covered in Accounts Receivable. No Sale Reasons – This function is used to open the cash drawer for any reason the Manager might deem. These reasons are tracked whenever the drawer opens. The cashier activity report includes this and other activity. 70 Other Payment Types – This function is used to create options at the register that allow the cashier to process a specific amount for a sale. These would be non-standard payment types such as coupons, drive offs, misc., etc. Paidout Reasons – This function is used to create options at the register when cash is ‘Paid Out’ for products, deliveries, etc. Description – Describe the primary reason for the monetary distribution. Require Description – Force cashier to input additional information. Paid In – Allows the ‘Paid Out’ function to be used as a ‘Cash In’ not related to sales. Adds the cash to the drawer total at End of Shift. POS Configuration – This function is covered in Point of Sale. Pricing Categories – This function is covered in Accounts Receivable. Pricing Levels – This function is covered in Accounts Receivable. Sales List – This function is used to show customer sales and their status. 71 Individual sales can be displayed by either a ‘Right Click’ and ‘Change’ or by selecting and then clicking the ‘Edit’ button. Items for the sale will be displayed, but NOT changeable. Sites – This function is covered in Site Management. Term Codes – This field will include all the options for customers who pay invoices on terms such as Net 30 or Net 60. 72 Vendor Categories – This function is covered in Category Setup. Vendors – This function is covered in Vendors and Inventory Setup. 73 PAYMENTS AND ADJUSTMENTS When customers make payments or require adjustments to their account, these functions are done in the Receivables section of DataManager. POSTING CUSTOMER PAYMENTS AND ADJUSTMENTS When a customer is making a payment or needing an adjustment to their account, access the ‘Payments and Adjustments’ screen from the Receivables menu. You can also click the ‘Payments’ icon on the toolbar: Customer- Select customers from the drop down list or type in the customer name. ‘Customer’ field will auto fill as you type. 74 Date – This field uses the current date, but can be changed to post payments or adjustments to a different date. Check/Ref Num – This field is the check number or reference number of the payment or adjustment. NOTE The check/ref num is a numeric field. If a check/reference number includes alphabetical characters, use only the numeric portion. Description – This field is the text that appears on the customer’s statement. Available Credit – This field will not display unless the customer has a credit balance. o If the customer has a credit, any amount up to and including that credit balance can be used towards a payment of any outstanding invoice in the transaction history. Enter the amount of credit to be applied in the ‘Apply Credit Balance’ box. If you have additional payment that needs to be applied to cover the balance, enter that value in the ‘Amount’ box. Amount – This field is the dollar amount of the payment or adjustment. o The Amount entered in this box will automatically apply to the invoice at the top of the list. If the payment amount entered needs to be applied to a specific invoice click the gray ‘Invoice #’ or ‘Amount’ box to rearrange. After entering a payment, before clicking apply TAB over to see what invoices the payment is being applied to. Adjustment – If this payment is an actual adjustment to the customer’s account rather than a payment of invoices, checking this box will allow a simple adjustment to be made. NOTE When entering a payment or adjustment, it needs to be the opposite of what you want it in the account. Example: An adjustment entered as -150.00 would add 150.00 to the account balance. 75 Invoice History o Paid – This column will reflect whether or not this invoice is going to be paid by the payments entered above. A ‘Yes’ indicates that this invoice will be completely paid, a ‘No’ indicates that this invoice will not be paid at all, and ‘Partial’ indicates that some of this invoice will be paid. o Invoice # – Invoice number generated in the generate invoice process. o Type – The type of invoice generated. This could either be blank, indicating a normal invoice, or display ‘Finance Charge’. o Still Due – The amount still due on the invoice after payments are applied. o Total – This is the total of the amount of the invoice or transaction. o Amount – The amount to pay towards this invoice. o Invoice Date – This is the date the invoice was created. If a customer pays more on their account than the total of the invoices, the remaining amount will be posted to the customer’s account as a credit balance. 76 REPORTS DataManager is able to report a variety of information regarding customers’ receivables, and sales figures. This chapter provides a description of each report available. To access the reports list, click the Reporting Tab and highlight ‘Reports List’ or click on the icon located on the Toolbar. A list of reports will be shown. Double click on the report that is to be run: Most reports ask for a set of parameters to base the report on. This varies from a date range to customer codes. For each report, select the appropriate parameters by highlighting the description and entering the correct data at the bottom of the window. If the parameters are date related, select a beginning date and an ending date for the report. 77 AVAILABLE REPORTS Available Gift Card Balances Report – This report displays the gift card balances by customer and card number. Credit Card Reconciliation Report – This report shows individual card purchases by any combination of date, customer number and/or sales detail. Credit Card Transaction Report – This report shows individual card purchases by any combination of date, customer number and/or sales detail. Credit Card Volume & Charges Report – This report allows you to view individual card volume and charges. Credit Limit Report – This report displays the customer, account number, balance, limit, open credit, and percentage of credit limit by customer. Customer Activity Report – This report displays the Sales and Payments/Adjustments done per customer based on the date range you select. Customer Drivers List Report – This report displays the drivers assigned to each customer. Customer Pricing and Discounts – This report displays the pricing that is set per customer. Daily Card Sales Report – This report shows a total daily sales report by card. This report is sorted by date. Daily Journal Report – This report is similar to the Daily Card Sales Report, however it contains less detail. It provides a record of sales, where the sale occurred and how the transaction was paid based on your selected date. Daily Reconciliation Report – This report displays the sale amounts by product based on a date you select. Daily Sales by Shift and Category Report – This report displays the sales quantities and totals by Category based on a date range you select. Daily Shift Report – This report displays the sales totals by location based on a date range you select. Discounted Sales Summary Report – This report displays the discounted sales done per customer based on a date range you select. Discounts Given by Category Report – This report displays the discounted sales done per category based on a date range you select. Enhanced Fuel Sales Report – This report provides fuel transaction detail and totals for multiple sites, according to the specified date range. Employee Charges Report – This report displays the charges done by employee based on a date range you select. Fuel Sales by Date and Point of Sale Report – This report displays the fuel sales done by location for the date range you select. Fuel Sales by Dispenser & Product Report – This report displays the fuel sales done by dispenser and product based on a date range you select. Gallon Summary Report - This report provides a breakdown of fuel types and totals for the specified date range. Hourly Sales Report - This report provides hourly sale totals for the specified date range. Inventory Adjustment Report – This report displays the inventory adjustments done. Inventory Receipt Report – This report displays the inventory receipts done. 78 Inventory Stock On Hand Detail Report – This report displays a detailed account of the inventory on hand per item. Inventory Stock On Hand Summary Report – This report displays a summary of the inventory on hand per item. Loyalty Card Sales by Card # - This report displays the loyalty card purchases by card number. Loyalty Card Usage by Customer – This report displays the loyalty card purchases by customer. Loyalty Card Usage by Customer and Card – This report displays the loyalty card purchases by customer and card number. ‘Other Payment’ Detail Report – This report displays the sales done with an ‘Other’ payment method. Paid-Outs by Date and Category Report – This report displays the paid-outs done by a date range you select. Pending Settlements Report – This report displays payments that were not sent out to Paymentech for one reason or another. This will help you pinpoint issues with payments and allow Triple E Technologies, LLC to assist you with getting your payments. Price Change History Report – This report displays the product prices for the date range you select. Private Card Fuel Sales by Dispenser & Product – This report displays the fuel sales done by dispenser and location based on a date range you select. Private Card Listing – This is where you are able to view your customer’s card assignments. Private Card Sales by Card # – This report provides a list of card activity, which is sorted by date. Private Card Sales by Product – This is a list of each account and card usage, which is sorted by date. Private Card Sales Report by Card and Date – This report provides you a detailed accounting of sales sorted by card and date. Private Card Sales Report by Card Number – This report provides you a detailed accounting of sales sorted by customer and card number. Private Card Sales Report by Customer – This report displays a list of private card sales sorted by customer. Private Card Sales Summary Report by Category – This report displays a summary of the private card sales sorted by category. Private Card Sales Report Summary by Product – This report sorts sales by product and date. Register Shift Report – This report is a duplicate of the register shift report that prints from the register to give you a detailed sales account per register for the date range you provide. Sale Detail by Category Report - This report provides transaction detail according to the specified date range and inventory categories available. Sales by Category and Payment Method - This report displays the sales done by category and payment method for the date range you provide. Sales Cost and Margin by Vendor & Category – This report displays the total cost and margin per vendor based on a date range you provide. Sales Tax Collected Enhanced Report – This report displays the sales tax collected by category for a date range you provide. Sales Tax Summary Report – This report displays a summary of the sales tax collected by category for a date range you provide. 79 Sales with Overridden Prices Report – This report displays a list of the sales done where the price was overridden based on a date range you provide. Synchronization Status Report – This report displays the last sync dates for sites that are on OneTouch synchronization. Top Sellers Report – This report displays the quantity and prices sold by category and item, sorted by greatest amount sold to least amount sold. INCLUDED WITH A/R PACKAGE 8849 FET/SET Volume Report – This report outlines the details associated with tax exempt customers for the date range you select. A/R Customer – GAS/OIL History Report – This report displays the fuel quantity and dollar totals by customer for a date range you select. Aged Trial Balance – This report displays a 30, 60 and 90 day A/R balance by customer. Finance Charge Report – This report provides a list of customers associated with finance charges for the specified date range. On Account Report – This is a record of payments received on each customer’s account, which is then sorted by date. Payment Details Report – This report displays the payments done by customer for a date range you select. Payment History Report – This report provides a list of payment and adjustments for the specified date range. Invoice Preview – After you run ‘priced transactions’ you will be able to ‘preview’ your invoices for accuracy. Invoices – This is where customers invoices are printed each time the invoicing procedure explained in the Point of Sale section is executed. Invoices – Vehicle Format - This report provides an alternative to the standard Triple E Technologies, LLC invoice layout. Specific to the vehicle information. Statements – This is where customers statements are printed each time the statement procedure is executed as mentioned in Accounts Receivable. 80 SITE AND SYSTEM MANAGEMENT DataManager allows you to export Customer Sales data to other applications. ADDING AND EDITING SITES 1. Select ‘sites’ from either file/sites or the sites button: OR 2. A screen similar to the following appears: 3. All sites and/or the ‘Home Office’ site appear. Click ‘ADD’ for a new site. To change existing sites, double click the site name. The following appears: 4. Make changes as needed. Click the ‘Synchronization Settings’ tab. 81 5. Enter zero in all fields; (unless site is dial-up) then click ‘OK’. 6. Click ‘OK’ when finished. CONNECTING TO A DIAL-UP SITE To connect to a site through dial-up. 1. Open DataManager on the server. 2. Select ‘Sites’ icon 3. Double Click the ‘site’ you would like to connect to 4. Click the tab ‘Synchronization Settings’ 82 5. Copy the phone number (______________) 6. Close DataManager 7. Double Click the ‘OneTouch Dial Client’ icon on the desktop 8. Paste or type in the phone number to the site (_______________) 9. Click ‘Dial’ 10. Click No when prompted to “make phone number permanent” 11. Right click on ‘Network Places’ 12. Click ‘Properties’ to view settings. 13. Click ‘Status’ 14. Click the ‘Details’ tab 83 15. Write Down ‘Server IP Address’ (for VNC, etc.) 16. View ‘Dial-up Networking’ 17. Wait for connection. 18. Double Click on the Icon for VNC 19. Type in the IP Address for the dial-up computers. (Obtained from above)You should now see the desktop for the cp720 system. DIAL-UP SYNCHRONIZATION To synchronize site and server information through dial-up. 1. Open Data Manager on the server. 2. Click on the Dial-Up Synchronization icon. 3. You can select the Start Time for your synchronization on this screen to synchronize on a schedule. To synchronize immediately, press and hold CTRL key and click each site to synchronize. Click the ‘Synch Now’ button. 4. Click CLOSE to close the synchronization window. NOTE: For sync to run automatically later in the day/night, you MUST leave the window open. 84 EXPORTING ONETOUCH DATA This function is used to export sales and cardlock invoicing data for use in 3rd party accounting systems or Excel. The ‘Export’ option is accessible either through the File option or the Toolbar: NOTE This is the default export in DataManager. Triple E Technologies, LLC can customize this layout or design a new export based on your specifications. 1. Select the layout that you wish to use to export: 2. Click the box “…” to select the file location/destination of the exported data: 85 3. Make all other necessary adjustments and click ‘SAVE’, then click ‘RUN’. 4. Enter dates using this format ‘MM/DD/YYYY’ for the range of data to export. 5. Once the Export is complete a small screen appears, click ‘OK’. 86 TRIPLE E TECHNOLOGIES STANDARD LAYOUT Triple E Technologies, LLC uses the following as its standard export layout. When exporting data, the file created is a fixed-length layout. NOTE Since this is a fixed length export - it's critical that new or changed fields do not modify the positions of existing fields. New fields need to be added to the end of the layout. Start Position 1 End Position 9 sTranDate 10 17 (MMddYY) sTranTime sHose sPump 18 22 23 21 22 24 (hhmm) sQty sVehicleIdentifier 25 33 32 38 (9999.999) sPrice 39 45 (999.999) sExtPrice sCategoryDesc sCardNumber sStockNumber sDescription sOdometer 46 53 113 122 152 212 52 112 121 151 211 220 (999.999) sDiscountAmount 221 226 (99.999) sDiscountPercent 227 231 (9.999) sTaxRates sCategoryID sSaleDetailID sCardDescription sTrack2Data sCustomerCode5 sDriverIdentifier sVariableData sDriversLicense sSaleDetailStockNumber sPOSSaleIdentifier sInvoiceNumber 232 238 247 256 316 356 361 369 379 389 399 410 237 246 255 315 355 360 368 378 388 398 409 418 (99.999) FieldName sTranNumber 87 Length 9 8 4 1 2 8 6 7 7 60 9 30 60 9 6 5 6 9 9 60 40 5 8 10 10 10 11 9 sSiteNumber sShiftNumber 419 424 423 426 sSaleTotal sCustomerCode sFuelLinkProductCode 427 435 455 434 454 458 (99999.99) sDiscountExtPrice 459 466 (99999.99) 88 5 3 8 20 4 8 CONTACTING TRIPLE E TECHNOLOGIES Contact Triple E Technologies Customer Service at 208-777-9300 or at [email protected]. Customer Service is open Monday – Friday, 7 A.M – 5 PM, PST. After-hours support is available with an extended service package. Describe the problem(s) to Customer Service. Customer Service will assist you in getting the problem resolved. 89 90