1
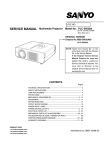
360º
360º Vehicle Surveillance System
4 channel DVR / all in one 4 channel vehicle video recorder
User Manual
Mobile DVR
Camera
Option
360º Surveillance Digital Recording System
User Manual
Safety Precautions
Take and review some testing video initially to make sure the
videos were recorded correctly. Please note that manufacturer,
its subsidiaries and affiliates, and its distributors are not liable for
consequential damages arising from any malfunction of main
device accessory, including memory device that results in the
failure of an image to be recorded or to be recorded in a way that
is machine readable.
Before using the product, please ensure that you read the safety precautions
described below. Always ensure that the product is used correctly.
• Please keep device away from children.
•
•
Use only recommended power sources.
Do not attempt to disassemble, alter or apply heat to the product.
•
•
Avoid dropping or subjecting the product to severe impacts.
•
Stop using the product immediately if it emits smoke, a strange smell, or
•
otherwise behaves abnormally.
Do not use organic solvents such as alcohol, benzene, or thinner to clean
To avoid the risk of injury, do not touch the interior of the product if it has
been dropped or otherwise damaged.
the product.
•
Do not let the product come into contact with water (e.g. sea water) or
other liquids.
•
Do not allow liquids or foreign objects to enter the VVR.
•
•
Do not place the VVR near or in direct flame.
Do not handle the power cord with wet hands.
Do not use the equipment in a manner that exceeds the rated capacity of
•
the electrical outlet or wiring accessories. Do not use if the power cord or
plug are damaged, or not fully plugged into the outlet.
•
Do not allow direct or metal objects (such as pins or keys) to contact the
•
terminals or plug.
Avoid using, placing or storing the product in the humid or dusty areas.
i
360º Surveillance Digital Recording System
User Manual
Table of Contents
A. Features..................................................................................................1
B. Specification .........................................................................................2
C.
Accessories .........................................................................4
D.
Product Dimension ............................................................................5
1.
2.
E.
Installation.............................................................................................8
1.
F.
Mobile DVR
Dimension .........................................................5
2.
DVR Wiring
Diagram ..............................................................8
3.
Camera Installation Diagram............................................ 10
ON/OFF ............................................................................... 12
G. Remote Controller Introduction ................................................ 14
H. Real Time Monitoring Mode....................................................... 16
I.
J.
Playback Instruction ....................................................................... 17
1.
To playback in main engine............................................... 17
2.
To Playback in PC................................................................... 18
Menu Operation On The Mobile DVR..................................... 21
1.
Main Menu ...................................
...................... 21
2.
Menu OperatiOn And Parameter Setup....................... 22
(1).
Video recording setting ......................................... 22
(2).
Parking setting .......................................................... 23
(3).
Color adjustment...................................................... 23
(4).
Time setting................................................................ 24
(5).
Vehicle number setting .......................................... 24
(6).
Format the disk .............................................. 25
(7).
Live screen mode setting ............................ 25
(8).
Power Management................................................ 25
(9).
Alarm setting.............................................................. 26
(10).
Password setting....................................................... 26
ii
360º Surveillance Digital Recording System
User Manual
(11).
G-Sensor setting....................................................... 27
(12).
Restore to Factory setting ..................................... 27
(13).
Language setting...................................................... 28
(14).
Firmware upgrade.................................................... 28
(15).
Firmware version ........................................... 29
K. Player (On the personal computer) .......................................... 30
L.
(1).
Capture......................................................................... 30
(2).
Configuration ............................................................ 31
(3).
Backup .......................................................................... 34
(4).
Playback ....................................................................... 37
(5).
Format .......................................................................... 37
(6).
Footage playback speed ........................ .... 38
(7).
MAP ............................................. ........................... 38
(8).
G-sensor ..................................................... 39
(9).
Footage playback speed ............................. 39
(10).
Volume ......................................................................... 40
(11).
Control panel ............................................. 40
(12).
Direction and Latitude............................................ 41
(13).
Speed ........................................................................... 41
Format the SD card ......................................................................... 42
1.
Format on the recorder....................................................... 42
2.
Format in your computer ................................................... 43
M. Restore the SD card ........................................................................ 46
iii
360º Surveillance Digital Recording System
User Manual
A. Features
All New Parking Surveillance Mode:
- Programmable recording time-reduce vehicle battery
exhausting.
- Programmable fps - prolong recording time.
Mobile DVR with 4CH 360° camera; Leaving no blind spots
of your surroundings.
H.264 Video compression technology with D1& CIF
resolution.
Quick search on event records-Easy and reliable.
Time & date are included in every footage.
Auto recording after power on.
SDHC card storage-free from shock and vibration.
Firmware updatable via USB.
Fully recording video, audio, G-sensor, and GPS inputs.
1
User Manual
360º Surveillance Digital Recording System
B. Specification
Mobile DVR
Item
Description
Signal type
NTSC/PAL
OS
Embedded Linux
Video input
1CH
Video output
1 CH AV
Audio input
1CH input
Audio output
1CH AV
Alarm-in
1 input
Interface
Display FPS
Recording FPS
Playback FPS
Icon、Multi-language(English, Traditional Chinese, Simplified
Chinese)
NTSC
120 fps
PAL
100 fps
NTSC
30fps@D1 (real time recording) per camera
PAL
25fps@D1 (real time recording) per camera
NTSC
30fps@D1 (real time playback)
PAL
25fps@D1 (real time playback)
Display mode
Spherical 360 degree image
Multi-function
Recording/Playback
Display
Resolution
NTSC
720 x 480
PAL
720 x 576
NTSC
360*240@CIF
720*480@D1
PAL
360*288@CIF
720*576@D1
Recording
Compression
Quality
H.264
Storage
SDHC
Back up
With CARBOX software
1(poor) ~ 5(excellent)
2
User Manual
360º Surveillance Digital Recording System
Playback
Mode
time/date, event
Full screen
Yes
LED indicator
3 LED (REC、GPS、POWER)
Brightness
Yes
Contrast
Yes
Signal off
Detection
Yes
Buzzer
Yes
GPS
G-MOUSE (Optional) with Google Map display
G-SENSOR
Yes
IR
Yes
Extending IR
Yes
Monitoring Mode
Auto recording after power on
Power input
(1) DC 8V~32V (2)ACC Auto Power-off Programmable
Dimension
115X90X30(mm)
Camera
Signal type
NTSC
PAL
Sensor
1/4 inch CMOS *4PCS
Video processor
Digital
Pixel
640 (H)×480 (V)
640 (H)×576 (V)
Total pixel
300K
370K
Resolution
420 lines
Input voltage
DC 12 ± 1V
Current
200mA (IR OFF)
Sync . system
Internal Synchronization
Scan system
2:1 crossover
Sensitivity
10 V /(Lux-sec) / 0Lux(IR ON)
Signal to Noise
Ratio
Max. 45 dB
3
360º Surveillance Digital Recording System
Auto-zenith
control
Open automatically
Dynamic range
65 dB
Auto-balance
Automatic
Shutter status
Automatic
Viewing angle
H : 360° V : 70°
Signal output
1 Vp-p standard video output,75 Ω
IR LED
4PCS
IR range
1m
Operation
Temperature
- 10° C ~ +60°C
User Manual
Notes: 1. Storage devices purchase separately.
2. No further notification on product specification changes.
C. Accessories
1. In the box:
(1) Device (2) Camera (3) Power cord (black/blue/red)
(4) Alarm cable (black/yellow) (5) IR extension cord
(6) Remote controller (7) Microphone (8) Velcro strap
(9) Sticker (10) Bracket mount (11) CD
(12) Quick start guide
2. Option:
(1) G-Mouse (2) SD card
4
User Manual
360º Surveillance Digital Recording System
D. Product Dimension
1.
Mobile DVR Dimension
(1). Power Light
(2). Recording Light
GPS Light
(3).
(4).IR receiver
(5).SDcard Slot
(6). GPS Connector:To connect with G-Mouse (GPS sensor)
to start GPS function.
It can record vehicle location,
speed, longitude and latitude.
(7). Audio output: “A”means “audio output”.
(8). Video output: “V”means “video output”
(9). Micphone hole:To connnect with microphone to
5
360º Surveillance Digital Recording System
User Manual
recording audio.
(10). Alarm Input: Alarm input connector.
(11). Camera connector: In pair with AVM-360PV, it can
support 360 degree recording.
(12). IR extension cable connector: Once upon connecting
with the extension cable, the IR receiver will be adjusted
to the end of cable.
(13). PowerConnector: To cooperate with power management
function (in OSD), it can provide 「Delay Shutdown」
function.
Dimension (Unit: mm)
6
User Manual
360º Surveillance Digital Recording System
2.
Appearance of Camera
1.
2.
3.
Lens 1 (Front)
4.
5.
6.
Lens 2 (Right)
Lens 3 (Inner)
Dimension (Unit: mm)
7
Lens 4 (Left)
Cable collect slot
3M tape
360º Surveillance Digital Recording System
User Manual
E. Installation
1.
DVR Wiring Diagram
Power Cable (Black/Blue/Red)
1.
2.
3.
RED:Positive Port (DC8~32 input)
Blue : ACC control
Black: GND
8
360º Surveillance Digital Recording System
User Manual
Alarm Cable
1. Yellow:Positive Alarm Input (12V)
2. Black:GND
Notice
(1).
To protect your vehicle, please have professional technician to
install this mobile DVR.
(2).
Please keep all the connecters clean from dust with temporary
tape during installation. If not, dust gets into connector may
cause connect failure.
(3).
After complete wiring, please tape all connectors firmly to
prevent damaging by water or loosing.
(4).
Power cable need to install behind the ACC (key starter) and
fuse to prevent running out the power of battery.
(5).
Main Engine needs to be installed firmly in flat place to prevent
damaging by shocking.
9
360º Surveillance Digital Recording System
User Manual
2. Camera Installation Diagram
1. Install camera on windshield 2. Pick up a best location for
by adhesive bracket.
installation.
Sticker Adhesive Spot
3. To adjust a best view angle.
4. To connect power cable to
Mini USB hole.
5. To connect the other end with the “Video In” slot in DVR.
Notice
(1).
The best installation location of camera in the windshield
should be under the area that wiper could achieve.
(2).
Before using, please adjust proper time-setting and time zone
setting in OSD directly.
10
360º Surveillance Digital Recording System
3.
User Manual
How to install Memory Card
(1). To loose the screws then move the cover to install
memory card.
(2).
See how to format in another chapter.
Note:SD Card is optional accessory
Notice
(1). Suggest to use Transcend SDHC Card (Class 10/ 4G at least)
(2). When using a new card, please format SD card in main
engine or in player first.
(3). Before using the memory disk, please format the disk first
using the software player in the CD-ROM. If not, device will
automatically erase all data in the memory disk before
recording.
(4). Please do not use Micro SD card adapt to SD card for using, it
may cause connect fail when vehicle moving and shocking.
(5). Memory card has life limit. Please check it regularly and to
playback the footages in your PC will be better for card using.
11
360º Surveillance Digital Recording System
User Manual
F. ON/OFF
ON:
Insert SD card into slot in main engine, connect the power to
start. Waiting for around 30 seconds, it will be booted when
the power light on.
Screenshot of booting
OFF:
Turn off the power supply, it will stop recording automatically. You
can take off the SD card to read footages in PC by card reader.
12
360º Surveillance Digital Recording System
User Manual
Light Signal:
●
Power Light (GREEN):
No light = No power supply.
Light on = Stable power supply.
●
Recording Light (RED):
No light = No recording.
Light Blinked = On recording.
Light Blinked Fast = On force recording.
●
GPS Light (BLUE):
No light = Not position yet.
Light Blinked = Position successfully.
Notice: When you playback in main engine, it will stop
recording at the same time.
13
User Manual
360º Surveillance Digital Recording System
G. Remote Controller Introduction
CH2 display
CH1 display
Force Record
CH3 display
CH4 display
Mute
Quad display
Menu
Up, Down, Left, Right
Enter
Fast Rewind
Fast Forward
Stop
Play
Pause
Button Description
CH 1~4
Choose 1-4 CH to display footages when in
real time monitoring or playback.
Force Record
Event Recording will be saved particularly.
It will save every 3 minutes before and after
the event to make sure it’s not be
overwritten.
Quad display
Show quad display when in real time
monitor mode.
Mute
When in real time monitor mode, do not
record audio.
14
360º Surveillance Digital Recording System
Menu
User Manual
Open main menu or back to front page.
Up, Down,
Left, Right
When enter menu, use these 4 buttons to
Enter
Enter the function you choose or save the
setting you choose.
choose function.
Fast Rewind
Rewind the footage when playback.
Fast Forward
Forward the footage when playback.
Play
To playback footage when in real time
monitor mode.
Pause
To pause the playing when in real time
monitor mode.
Stop
To stop playing and back to front page
when playback.
How to check if the remote
controller is workable?
√ Check the mercury cell is installed in
correct direction. (Check the pole)
√ Check if the cell power is exhaust.
√ Check if the sensor is covered.
√ Check if it nears by Fluorescent
Lamp.
15
360º Surveillance Digital Recording System
User Manual
H. Real Time Monitoring Mode
The screenshot of real time monitoring mode:
Signal
Description
On recording.
GPS sensor position successfully.
Microphone on.
Hand Force Recording on.
1/2/3/4
G-Sensor is triggered, force recording
automatically on.
Display of channel 1/2/3/4
Vehicle speed. It needs to do setting through
player in advance. (Please see detail in part of
“SD card format.”)
Remote Controller Operation Instruction
● To show single 1~4 channel display,press
●
To show quad display, press
●
To open menu, press
●
To playback, press
16
360º Surveillance Digital Recording System
I.
User Manual
Playback Instruction
There are two ways to playback recorded footages: in main
engine and in PC.
1.
To playback in main engine
Press play button ( ) under Real Time
Monitoring Mode, then select “show all
playback list (see picture as below)”and press
enter button(
) to see all list.
Playback list
Select the footage you want to playback, press
enter button(
) to view video.
:This file is recorded by hand force
recording.
17
User Manual
360º Surveillance Digital Recording System
:This file is recorded by automatically force
recording.
Playback operation instruction
(1).When playing, if you want to view single
channel display, select and press
channel button (
).
(2).When playing, if you want to view quad
display, press quad button ( ).
(3). If you want to stop playing, press
pause button (
).
(4).To dissolve pause instruct and continue
to play, press play button ( ).
(5).If you want to leave playback mode,
press stop button (
2.
).
To Playback in PC
(1). Connect the SD card with PC by card reader or
proper device, execute the player
CarBox2.exe (in CD-ROM)
(2). Click playback icon (
18
) to open the list.
User Manual
360º Surveillance Digital Recording System
(3). Select correct memory card drive, then it will show
file list, choose and click the file you want to play.
19
1.
Select correct drive
(memory card).
2.
Select file to play.
360º Surveillance Digital Recording System
(4). The screenshot of playing
20
User Manual
User Manual
360º Surveillance Digital Recording System
J. Menu Operation On The Mobile DVR
1.
Main Menu
Main menu setup:
(1). Press the remote control
icon to start the main
menu in live monitoring mode
(2). Press
icon to move the light bar, then press the
related function,then press
setup.
(3). Press the
to enter the related
icon to return the main menu
Select menu:
(Main menu 1/4)
(Main menu 2/4)
21
User Manual
360º Surveillance Digital Recording System
(Main menu 3/4)
(Main menu 4/4)
2.
Menu OperatiOn And Parameter Setup
(1). Video recording setting
Main menu-Record setup
Record setup setting page
NTSC
fps
PAL
Quality
Normal
22
D1
5-15
CIF
5-30
D1
5-15
CIF
5-25
Better
High
User Manual
360º Surveillance Digital Recording System
(2). Parking setting
Main menu-Set Parking
Mode
Set Parking Mode setting page
This is for the purpose to setup the fps after vehicle
power off.
Fps setting, less then 『Recording setup』 fps
(3). Color adjustment
Main menu-Color
Adjustment
Color Adjustment setting page
Video setting : use
key to select
Video brightness /Contrast/Color: Use
the light bar , choose target and press
setup。
23
to move
to save the
User Manual
360º Surveillance Digital Recording System
(4). Time setting
Main menu-Time setting
Time setting page
:
「yyyy/mm/dd/hh/mm/ss/time zone」
DVR will adjust the time and time zone
automatically
from the GPS.
(5). Vehicle number setting
Vehicle Number Setting page
Main menu-Vehicle Number
Setting
Input range:A~Z, 0~9.
24
360º Surveillance Digital Recording System
User Manual
(6). Format the disk
Delete All Record Data page
Main menu-Delete All
Record Data
★ Note: All footage in SD card will be erased after
format.
(7). Live screen mode setting
Main menu-Live Screen
Mode Setting
Live Screen Mode Setting Page
Multi Channel:Show 4 CH video on display.
Channel 1:Show CH1 video on display.
(8). Power Management
Power Management page
Main menu-Power
Management
25
360º Surveillance Digital Recording System
User Manual
Setup how many times you want to record after
vehicle power off.
Recording period setting:From 00:00、
00:30、
01:00…Etc. It divided into 30 min as a part, the
longest can set as 23:30. If you want to keep always
recording, please choose “Never shut down”.
(9). Alarm setting
Main menu – Alarm Setting
Alarm Setting page
Alarm options:OFF、CH1、CH2、CH3、CH4。
After finish the setting, when the CH1~CH4 be
triggered, The Setting CH will show on the display
with full screen.
(10).
Password setting
Password Setting page
Main menu-Password
Setting
If you have setup the password, system will ask you
enter the password when you want to enter the
setup menu, or when you playback the footage.
During entering procedure, all character just show
『*』
Character accepted:A~Z & 0~9
★ Please remember your password.
26
User Manual
360º Surveillance Digital Recording System
(11).
G-Sensor setting
G_Sensor Setting page
Main menu-G_Sensor
Setting
G_Sensor options:On、OFF.
G_Sensor Mode:Sedan mode、Truck mode.
G_Sensor sensitivity options:Min、Low、medium、
High、Max.
★After setup the sensitivity, when car impact from
outside, DVR will start into 『Force Recording』 mode
to prevent event recording do not be overwritten.
(12).
Restore to Factory setting
Main menu-Default Setting
Default Setting page
★ After Restore to default setting, DVR will reboot
automatically and restore all default setting.
27
User Manual
360º Surveillance Digital Recording System
(13).
Language setting
Language Setting page
Main menu - Language
Setting
(14).
Language:English / Traditional Chinese /
Japanese
/ Korean / Russian /Spanish / German
Firmware upgrade
Firmware upgrade page
Main menu-Firmware
upgrade
Before execute, please save the firmware files to the
SD card, and insert the SD card into DVR
DVR can not interrupt power source when updating
the firmware. After firmware update, the DVR system
will reboot automatically.
28
360º Surveillance Digital Recording System
(15).
User Manual
Firmware version
Main Menu-Version
Version page
You can check the firmware version here to make
sure if you need to update the firmware
29
User Manual
360º Surveillance Digital Recording System
K. Player (On the personal computer)
Execute the program CarBox2.exe
follows:
,the player will open as
★Note:Your PC need install DirectX 9.0 or above.
CH1(Front view)
CH4(Left view)
CH2(Right view)
CH3(Vehicle inside
(1). Capture
Capture:Screen shoot
Click the
icon to capture the footage screen.
The Image will be save as .bmpfile format.
Player will show the backup folder automatically. The
default directory is the Snapshot folder. (Under the
Player installation folder)
30
360º Surveillance Digital Recording System
User Manual
(2). Configuration
Configuration: Setup the general setting.
Before execute this function, please insert the SD card
into your computer. When finish all setting and click
『Save』, all the setting will save to the SD card. When
you insert the SD card into your DVR, the DVR will read
the setting and follow the setting to start recording.
31
360º Surveillance Digital Recording System
User Manual
Image
Quality
Choose the resolution: High /
Normal / Low
2
fps
Set the fps
D1 resolution:5~15
CIF resolution:5~30
3
Image
Format
4
Car
Informati
on
Car License, Driver (For
Company car, Taxi, or fleet)
5
UI Mode
Player Screen size: 1920*1080
/ 1440*810 / 1024*576
1
6
Two format: D1 / CIF
Encrypt the SD card to prevent
others who not permitted to
access the SD card. Streng
length: 15 character. After
setting the password, all
actions, like Playback footage,
setting, format SD, need the
password.
Password
★ Note: Upper character
and lower is different.
7
GMT setting, to adjust the
time zone. ( need GPS signal
to adjust the accurate time
zone automatically)
Time
Zone
If choose 「Time setting」,
you need to set the time by
yourself.
32
User Manual
360º Surveillance Digital Recording System
8
9
10
11
12
Copy
Player to
SD Card
Copy all Player’ related files
to SD card.
Speed
Unit
Set the speed unit
Km/hr
Mile/hr
Knot
G-sensor
Sensitivity
G-sensor mode:
Sedan/ Truck/
Sensitivity setting:
(Min/Low/Normal/High/Max)
You can choose how long the
DVR will auto power off to
stop recording after vehicle
power off. Setting range from
Power
managem
ent
00:00~23:30 and “Never
Power Off”
Fps after
vehicle
power off
fps setting to recording fps
after vehicle power off
33
User Manual
360º Surveillance Digital Recording System
(3). Backup
Backup folder:Choose the folder that backup file
will save.
You can backup the footage on the SD card to your
computer for data backup.
Choose
icon to start
the backup function as the following :
Step1.Choose the SD card Disk Drive or Backup File.
34
User Manual
360º Surveillance Digital Recording System
Step2.Choose the file you want to backup on the SD card.
Step3.Choose backup file audio and format
Backup format:
● SD format
*.sd
● AVI format
.avi
Note:*.sd format file contain image/ speed/
location and G-SENSOR data. *.avi format only
can backup the video and audio. We recommend
you backup as *.sd format.
35
360º Surveillance Digital Recording System
User Manual
Step4.You also can choose a period to backup the
footage during the period.
Step5.Choose the backup folder.
Step6.Start to backup.
Step7. Backup Completed.
36
360º Surveillance Digital Recording System
User Manual
(4). Playback
Playback the footage:Choose the file in SD Card
or in the computer to playback.
1.
Choose the
SD or Backup
File
2. Choose the
file
(5). Format
Format:Format the SD Card、Restore the SD card
format to windows format. Language setting, Firmware
version. For Format and restore SD card, please reference
the next item
37
360º Surveillance Digital Recording System
User Manual
(6). Footage playback speed
Footage playback :Can adjust form 2x~16x, and
1/2x~1/16x
(7). MAP
Map:Show the location on the Google Map, can
show the location and drive path. (GPS is optional)
38
360º Surveillance Digital Recording System
User Manual
(8). G-sensor
G-SENSOR: When G-Sensor be triggered, system will
record the X、Y、Z axis data.
X: horizon change.
Y: Front and rear change.
Z: Vertical change.
(9). Footage playback speed
Playback speed is adjustable from 2x~16x and
1/2X~1/16x.
39
360º Surveillance Digital Recording System
(10).
User Manual
Volume
Volume control bar:Click the +or-to adjust the
volume.
(11). Control panel
1
Previous File
2
Previous Frame
3
Backward Play
4
Pause
5
Stop
6
Play
7
Next Frame
8
Next file
40
User Manual
360º Surveillance Digital Recording System
(12).
Direction and Latitude
Show the direction
Show the Latitude
Show the direction and Latitude and position.
(13).
Speed
Km/h
mile/h
Speedometer:Set the speed unit.
41
knot
360º Surveillance Digital Recording System
User Manual
L. Format the SD card
Before format the SD card, please backup all files in your card,
this procedure will erase all files on the SD card.
Q. When you need to format the SD card?
A. Our vehicle use different format for the SD card, so when
you buy a new card , you need to format the new SD card
There are two ways to format the SD card - 「On the
Recorder」and「On the computer」.
1. Format on the recorder
Step1.Use the remote control. Press the 「Menu」
button to enter the select menu , choose the「Format
SD Card」item.
Step2.Move the light bar to choose the 「Format SD
Card」item, then press 『Yes』 to proceed the SD card
format procedure.
42
User Manual
360º Surveillance Digital Recording System
Step3.When your LCD menu back to the screen as
follows, the format procedure is finish.
2. Format in your computer
Step1.Pulg your SD card into card reader
your computer. Execute the
(bundle in our product CD)
Step2.Click the
or SD slot in
CarBox2.exe software
format tool icon, then you can into
the format function screen。
Choose the SD card, press the 「Format」icon
43
360º Surveillance Digital Recording System
User Manual
Step4. Windows pop up the menu as follows and ask you
to answer 『Start to Format this device?』, Please make
sure the disk drive is right, then press 『Yes』.
Step 5. When the format procedure finish, the following
pop window will show on your screen.
(After finish the SD card format, please remove your
44
360º Surveillance Digital Recording System
User Manual
SD card from the computer and insert into the slot
again. Then you can start to proceed the related setup
on the Player can do. Then insert the SD to your
recorder, your recorder is ready for recording the
footage. )
45
360º Surveillance Digital Recording System
User Manual
M. Restore the SD card
Before restore the SD card, remember to backup your
footage on the SD card, if needed.
Q. When you need to restore the SD card?
A. When you want to use the SD card on other purpose, you
need to proceed the “Restore” function. This procedure
will format the SD card to the normal windows format.
Only proceed this procedure, you can use the SD card as a
normal storage device.
Step1. Remove the SD card from your recorder, insert
into your card reader, then plug into your computer USB
slot, execute the bundle Player
CarBox2.exe (In our
CD)
Step2. Click the
Format icon,choose the SD card,
then press 『Restore』
46
360º Surveillance Digital Recording System
User Manual
Step3.The following window will pop up, Click 『Yes』to
start restore the
Step4.Now system will pop up the window to proceed the
format procedure, please choose 『Quick
format』,then click 『Start』.
47
360º Surveillance Digital Recording System
User Manual
Step5. Click 「Yes」 to start formatting the SD card
Step6. Click "OK" to finish restore SD card.
Step7.After finished, press 『OK』。Then the SD card
format is normal windows format.
48
Contact us:
[email protected]
www.iat101.com
www.peephole-store.com