1
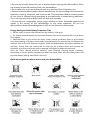
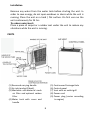
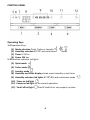
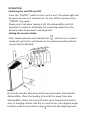
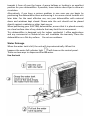
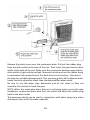
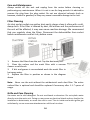
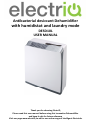
Antibacterial desiccant Dehumidifier
with humidistat and laundry mode
DESD10L
USER MANUAL
Thank you for choosing ElectrIQ
Please read this user manual before using this innovative Dehumidifier
and keep it safe for future reference
Visit our page www.electrIQ.co.uk for our entire range of Intelligent Electricals
Contents
Safety instructions
………………..………………..
2
Features
………………..………………..
4
Parts
………………..………………..
5
Control panel
………………..………………..
6
Quick operation guide
………………..………………..
7
Operation
………………..………………..
9
Positioning
………………..………………..
12
Water Drainage
………………..………………..
13
Care and Maintenance
………………..………………..
16
FAQ
………………..………………..
17
Troubleshooting
………………..………………..
19
Technical Data
………………..………………..
21
1
SAFETY INSTRUCTIONS
Important
• Carefully read the instructions before operating the unit
• This appliance is for indoor use only and intended for use in a domestic environment
only. Any other use is not recommended by the manufacturer and may cause fire,
electrical shocks or other injury to person or property.
• Rating: This unit must be only connected to a 220-240 V / 50 Hz earthed outlet.
• Installation must be in accordance with regulations of the country where the unit is
used.
• If you are in any doubt about the suitability of your electrical supply have it checked
and, if necessary, modified by a qualified electrician.
• This dehumidifier has been tested and is safe to use. However, as with any electrical
appliances - use it with care.
• Disconnect the power plug from socket before dismantling, assembling or cleaning.
• Avoid touching any moving parts of the appliance.
• Never insert fingers, pencils or any other objects though the guard
• This appliance is not intended for use by persons (including children) with reduced
physical, sensory or mental capabilities. It is also not intended for use by those with a
lack of experience and knowledge, unless they have been given supervision or
instruction concerning the use of the appliance by a person responsible for their safety.
• Do not leave children unsupervised with this appliance.
• Do not clean the unit by spraying it or immersing it in water.
• Never connect the unit to an electrical outlet using an extension cord. If a power
outlet is not available, one should be installed by a qualified electrician.
• Never operate this appliance if the cord, power adapter or plug is damaged. Ensure
the power cord is not stretched or exposed to sharp object/edges.
• A damaged power supply cord should be replaced by the manufacturer or a qualified
electrician in order to avoid a hazard.
• Any service other than regular cleaning or filter replacement should be performed by
an authorized service representative. Failure to comply could result in a voided
warranty.
• Do not use the appliance for any other purposes than its intended use.
• Do not tilt the unit while in use. The unit is design to work only in vertical position.
• This dehumidifier must always be stored upright, otherwise irreparable damage may
be caused
• This unit will still operate for approximatively 3-4 minute after pressing the power off
button. This is normal and ensures the desiccant wheel is drained of water. Avoid
restarting the dehumidifier unit unless 5 minutes have passed since being turned off.
• Never use the mains plug as a switch to start and turn off the dehumidifier. Use the
provided ON/OFF switch located on the control panel.
• Always place the unit on a dry and stable surface.
• The appliance should not be installed in laundry or wet rooms where the humidity is
higher than 85% RH. Operate this unit in an ambient temperature between 1°C and
32°C.
2
• Do not dry laundry above the unit to prevent water entering the dehumidifier. Place
the laundry at least 40 cm away from your dehumidifier.
• Do not place the unit next to heat sources (e.g. electrical fires, fireplaces, etc.)
• Desiccant dehumidifiers tend to absorb odours from the surrounding environment like
cigarettes, cooking, cosmetics, new furniture etc. This smell described as a burning smell
or sour smell is released during operation as the zeolite disc is heated during operation.
This is not sign of a fault and the smell will fade with the time.
• Do not store or use gasoline, petrol, paint, solvents or other flammable vapours and
liquids in the vicinity of this dehumidifier or any other appliance. Do not use
dehumidifiers where flammable gases or VOC can be released or accumulate.
Energy Saving and Unit Safety Protection Tips
• Do not cover or restrict the airflow from the outlet or inlet grills.
• For maximum performance the minimum distance from a wall should be 20 cm and 40 cm
from objects
• Keep the filters or grills of the unit clean. Under normal conditions, filters or grills should
only need cleaning once every three weeks (approximately). Do not use the unit without the
mesh air filter as this will allow dirt to gather inside the dehumidifier and could invalidate the
warranty. A dirty filter will restrict the air flow into the machine which will increase the
resistance on the fan and could result in damage and might invalidate the warranty.
Since the filters remove airborne particles, more frequent cleaning maybe necessary,
depending on the air quality. Vacuum and wash the mesh filters with hot soapy water and
dry them before placing them back in the unit.
Quick visual guide on where not to use your dehumidifier
3
Features
Your ElectrIQ dehumidifier is a top of the range desiccant dehumidifier with
features not found in other units
1.
Efficient, easy to use, quiet
2.
Intelligent CPU controlled digital humidistat with 4 humidity settings 40%,
50%, 60%, 70% RH and room humidity display
3.
Easy to use control panel with led indicators
4.
Works very well at low temperatures compared with classic compressor
dehumidifiers
5.
Desiccant Dehumidifiers are very effective at low temperatures and do not
lose their ability to dehumidify effectively
5.
Laundry mode to help clothes drying
6.
Heats the air passing through between 5-10⁰C, making the air dry and warm
reducing the heating bills
7.
Side large water tank with easy to carry handle
8.
Tank full alarm & auto-stop function
9.
Antibacterial filter sterilizes the air
10.
Recessed carry handle for portability
11.
Anti-tilt safe design
ElectrIQ desiccant dehumidifiers use compressor free desiccant
technology to extract water from the environment. The desiccant
dehumidifiers are ideal both at standard and low temperatures
working on ambient range between 1-32⁰C. ElectrIQ desiccant
dehumidifiers are light and easy to move around as they do not have
heavy compressors. They are also intelligent dehumidifiers which will
extract unwanted humidity while saving money due to their
humidistat and advanced power saving logic. They features an
intelligent digital humidistat with variable humidity settings at 40%,
50%, 60%, 70% RH insuring your room is not dried too much and
power is not wasted. The DESD10L also features a powerful laundry
mode. Quiet vs turbo operation ensures the right balance between
quiet operation and maximum dehumidification.
4
Installation
Remove any water from the water tank before starting the unit. In
order to save energy, do not open windows or doors while the unit is
running. Place the unit on a hard / flat surface. On first use run the
unit continuously for 24 hrs.
To reduce noise levels
Place a piece of carpet or a rubber mat under the unit to reduce any
vibrations while the unit is running.
PARTS
(1) Recessed carrying Handle
(2) Air inlet and grill (back)
(3) Washable anti-bacterial mesh
air filter and optional carbon
filter
(4) Water tank with cover and
handle
(5) Continuous Drainage Hole
(6) Control panel
(7) Vent with air outlet grill
(8) Power cord
(9) Power plug (varies according
to region)
5
CONTROL PANEL
Operating Keys
1-4 Operation Keys
(1) Mode selection Quiet, Turbo or Laundry
(2) Humidity selection 40-70% and continuous
(3) Timer 0-24 hrs
(4) Power ON key
5-12 function indicator led lights
mode
(5) Quiet mode
(6) Turbo mode
(7) Laundry mode
(8) Humidity and timer display shows room humidity or set timer
(9) Humidity selection led lights 40-70% RH and continuous mode
(10) Timer on led light
(11) Power on led light on for normal operation
(12) Tank Full led light
red if tank full or not properly in place
6
Quick Operation Guide
Power On / Off Key (4)
Turns the unit ON / OFF. The power on led light (11) will stay on during
operation
Mode Selection (1)
Press mode key (1) and the dehumidifier will cycle between Quiet
and Laundry mode
, Turbo
with led lights showing the respective icon
Quiet mode
unit will work with fan in LOW mode and the humidistat will
turn the heating element on while room humidity is higher than the set
humidity level than will work in low fan mode until humidity increases again
unit will work with fan in HIGH mode and the humidistat
Turbo mode
will turn the heating element on while room humidity is higher than the set
humidity level than will work in low fan mode until humidity increases again
Heater and fan are both on all the time to achieve maximum
Laundry mode
dehumidification and dry the clothes. Humidistat is disable in this mode
Note: If continuous mode
is selected the humidistat will be disabled and
quiet or turbo mode will only select the fan speed
Timer Selection Key (3)
Selects the stopping timer to 1-24 hours by pressing the (3) key. The two digits
led display will show the timer selection instead of the room humidity while
key (3) is used. 8 seconds after timer selection the display will revert to room
humidity display.
The unit will stop after so many hours as selected. This function is great if you
use Laundry mode and want to stop the unit e.g. after 4 / 8 hrs.
(10) led is lighten up while the stopping timer is selected
7
Dehumidification Level Controls Keys (2)
Use the key (2) to select between continuous mode
and 40-70% humidity
If no selection is made the unit will work with pre-set to 50%RH which is the
recommended setting
Continuous mode
humidistat is disabled, unit will dry until set time or tank full
Humidity set to 40% RH; set to achieve room humidity of around 40% good for
quick drying boost on initial run or emergencies, not recommended for long
normal operation in domestic environment
Humidity set to 50% RH; recommended setting, great for domestic operation and
dry storage
Humidity set to 60% RH; great for personal comfort and applications where 50%
RH is considered too dry
Humidity set to 70% RH; ideal for unoccupied properties or where economical run
is needed without the need to go drier than 70% RH
Indicator led lights
(5) Quiet mode
lighten when quiet low fan mode is selected
(6) Turbo mode
lighten when turbo high fan mode is selected
(7) Laundry mode
lighten when laundry mode is selected
(8) Humidity and timer display two digits led display shows room humidity
(35-95%RH) or set timer
(9) Humidity selection shows 40% 50% 60% 70% and continuous mode
according to key (2) selection
(10) Timer on led light
lighten while stopping timer is in operation off if the
timer is not activated
(11) Power on led light
Lighten continuously is unit is operating normally
The led indicator will blink intermittently when the unit is tipped over or
when the unit is turned off but the fan continues to operate for few
minutes to dissipate the heat and empty the desiccant disc
(12) Tank Full led light
red light on if tank full and required to be emptied of
is not pushed in correctly
NOTES: This unit is equipped with tilt protection. When the unit is tilted will stop automatically,
the POWER indicator will turn into RED and the unit will beep 3 times. After repositioning the
unit, press Power key to restart.
DESD10L has intelligent self-diagnosis. If the humidity sensor, heating element or tip-over device
is out of function, the unit will beep 3 times, the POWER indicator would turn RED and the unit
will turn OFF.
8
OPERATION
Switching the unit ON and OFF
Press the “ON/OFF” switch to turn on the unit. The power light will
be green as soon as it switches on. To turn off the unit press the
“ON/OFF” key again.
Please note that when turning it off, the dehumidifier will still
operate for a while to discharge the remaining water from the
desiccant disk and prevent mould growth.
Setting the Laundry Mode
Press mode selection until laundry led
will turn on. Laundry
mode will set the fan and heater on to maximum and humidistat
control will be disabled.
Do not dry laundry above the unit to prevent water entering the
dehumidifier. Place the laundry at least 40 cm away from your
dehumidifier. Direct the unit with front vents towards the clothes
airer or hanging clothes. Hot dry air comes from a 45 degrees angle.
Laundry mode can be used in conjunction with the stopping timer.
9
Setting the Stopping Timer
On selecting stopping timer key (3) the 2 digits LED display will cycle
through 1-24 showing the number hours after which the
dehumidifier will stop. The displayed time will revert to humidity
display 8 seconds after selection was made.
When selecting '4 hours' for example the unit will stop operating
after 4 hours with selected humidity / fan settings. Tank full before
the selected time will stop the unit. This setting is ideal for drying
laundry. No selection made will mean the unit operates
continuously subject to tank full stopping the unit earlier.
Press timer key again at any time to cancel or change the timer
settings
Setting the Dehumidification level
Start the unit and leave it for 5-10 minutes on automatic selection
mode (50%RH) until the humidistat is able to read correctly the
humidity in the room.
Press dehumidify level key (2) to select the desired humidistat
controls from continuous operation to 40% 50% 60% 70%.
While pressing the selection key (2) the corresponding indicator (9)
cycles the humidistat set range for this unit from 40% through 50%
70%, 60% back to continuous mode.
Intelligent dehumidification and power saving
Your ElectrIQ dehumidifier features an intelligent micro CPU that
ensure maximum water extraction with minimum power use for the
selection made.
The unit will try to maintain humidity level selected in the room by
turning off the heating element when the desired humidity is
reached. Note that according to the space where the unit is used,
obstacles in the direct flow, extra humidity being added at any time,
settings selected, as well as other environmental factors the results
may vary.
10
Operational Advice
1. Plug to power, press ON/OFF key to turn-on the machine; press
ON/OFF key again to turn-off the dehumidifier.
2. Make sure water-tank is placed/ fitted correctly. If the water tank
will
is not fitted/placed correctly the 'water full' (12) light
turn on and the machine will not operate.
3. When the dehumidifiers first starts, default humidity setting is set
to 50% RH.
4. When unplugging from the wall socket use one hand to hold the
plug and the other hand against socket to avoid power cord
damage.
Warning: Using poor quality sockets, extensions or overloading
the circuits may cause damage to the machine or may start a fire.
5. When switching OFF the machine, do not simply unplug the unit
from the socket - ensure you turn off the machine properly before
unplugging. After dehumidifiers is OFF, the fan will keep running
for a couple of minutes and heat will be produced to dry the
dehumidifier.
Tilt Protection
Your ElectrIQ dehumidifier was designed with safety in mind. When unit is
tilted it will be shut down to minimize safety risk or damage. Please do not use
if the unit is tilted by mistake for a day or two until the internals are completely
dried. Consult the service centre if in any doubts
11
Positioning the dehumidifier
Badly positioned dehumidifiers will have little effect in effectively drying the
place. In positioning the dehumidifier please ensure circulation of air in not
restricted around the unit. Please observe figure bellow in installing the unit.
Your ELECTRIQ dehumidifier will begin to protect your home from the harmful
effects of excessive moisture as soon as it is turned on.
Excess moisture travels throughout your home, in the same way that cooking
smells spread around the house. For this reason, the dehumidifier should be
positioned in a central and clear location so that it can draw this moist air
12
towards it from all over the home. A warm hallway or landing is an excellent
position for your dehumidifier. If possible, leave interior doors ajar to allow air
circulation.
Alternatively, if you have a serious problem in one area you can begin by
positioning the dehumidifier there and moving it to a more central location at a
later date. For the most effective use, run your dehumidifier with external
doors and windows kept closed. Please note the unit should not be placed
directly against a radiator or other heat source.
When positioning your ELECTRIQ dehumidifier, ensure that it is placed securely
on a level surface clear of any obstacle that may limit the air movement.
This dehumidifier is designed only for indoor residential / office applications
and any commercial or industrial use will invalidate the warranty. Place the
dehumidifier on a flat dry surface. Do not use outdoors.
Water Drainage
When the water tank is full, the unit will stop automatically. When this
happens the water full indicator light
will show on the control panel.
There are two ways to dispense collected water.
Use the tank
13
When the tank is full, the unit will automatically stop running, and the Full
indicator light will flash. Slowly pull out the tank with one hand while keeping
the unit in place with the other hand. Hold the bottom of water-tank to pull it
out by recessed handle. Carry the tank by the pull out handle and remove the
tank cover only before emptying it. Empty the water tank and reinsert it into
the dehumidifier. The tank must be in place and securely seated for the
dehumidifier to operate again. The dehumidifier will re-start when the tank is
restored in its correct position.
Notes:
• Do not remove the water tank immediately after the unit stops. Please
wait a while to avoid the water dripping into the unit and causing damage.
• Only empty the water tank when is full or before moving or storing the
unit.
• Do not rest the tank on the floor because the bottom of the tank maybe
uneven and tank will fall and cause the water to spill.
• When you remove the bucket, do not touch sensors or any parts which are
situated behind tank. Doing so may damage the product. Be sure to push the
tank gently all the way into the unit. Banging the bucket against anything or
failing to push it in securely into place may cause the unit not to operate.
• Do not remove or damage the float switch in water-tank, otherwise the
machine will stop working.
• Please make sure the water tank cover is put back into place correctly
before the water tank is reinserted.
• If the water-tank is inserted incorrectly, the tank full indicator will not turn
off. Reinsert the water tank to turn the indicator off and resume normal use.
• At all times, avoid water entering the unit. It may cause electrical hazard
and damage the unit.
Continuous draining
This dehumidifier has a continuous drain hole that can be connected with an
optional plastic pipe with 12 mm inner diameter. The water in the body will
drain through the drain hole first, so ensure it is secured with the rubber
stopper if using the water tank.
Water can be automatically plumbed in or drained into sink, a larger recipient
or through the wall into an outside drain by attaching a pipe to the unit.
14
Remove the plastic cover over the continuous drain. Pull out the rubber plug
from the drain outlet in the back of the unit. Then insert the pipe into the drain
outlet at the back of the unit. Make sure the connection between pipe and the
drain outlet is tight and do not leak. Remove the tank and use the rubber bung
to seal water hole inside the unit. Put back the tank in the place. Then direct
the pipe to a suitable drainage point. This unit uses gravity fall to dispose water
hence the drain should be lower than the dehumidifier water outlet.
Be sure to run the water pipe downward and let the water to flow out
smoothly. Do not kink or bend the pipe.
NOTE: When the continuous drain feature is not being used, reverse the pipe
installation, remove the drain hose from the outlet and attach the rubber plug
back to the drain outlet
The permanent drain can be used in conjunction with water pump (e.g. when
draining a cellar) to lift the water upwards.
15
Care and Maintenance
Always switch off the unit and unplug from the mains before cleaning or
performing any maintenance. When it is not in use for long periods it is advised to
remove the plug from the plug socket. Do not use chemical solvents (such as
benzene, alcohol or gasoline) as they may cause irreversible damage to the unit.
Filter Cleaning
Air-inlet and air-outlet may gather dust easily, please clean it often with a soft,
damp cloth. If the filter is covered by dust, the airflow and the performance of
the unit will be affected, it may even cause machine damage. We recommend
that you regularly clean the filters. Disconnect the dehumidifier from socket
before maintenance and let it dry before reuse.
1. Remove the filters from the unit. Tap the dust away first.
2. Clean the carbon and the mesh filter with a vacuum
cleaner or soft-brush
3. If dirt and grease is accumulated wash the mesh filter in
hot soapy water
3. Replace the filter in position as shown in the diagram
above
Note: Never use the unit without the antibacterial mesh dust filter. The active
carbon filter is optional and should be replaced if necessary after 1-1 ½ years of
usage.
Grille and Case Cleaning
Use water and a mild detergent. Do not use bleach or abrasives. Do not splash water
directly onto the main unit. Doing so may cause an electrical shock and can lead to the
insulation to deteriorate, or cause the unit to rust. The air intake and outlet grilles get
soiled easily, so use a vacuum attachment or soft brush to clean.
16
Water tank cleaning
Every few weeks, clean the tank to prevent growth of mould, mildew and bacteria.
Partially fill the tank with clean water and add a little mild detergent or light bleach
solution. Swish it around in than empty the tank and rinse.
NOTE: Do not use a dishwasher to clean the tank. After cleaning and drying the tank must
be reinserted securely into dehumidifier in order to restart operation. Only use soft wet
cloth or paper towel. Do not use detergent or very hot water.
Out of season storage
1. Turn off the unit and wait for the drying cycle to finish before unplugging
the power cord.
2. Clean and dry the water-tank.
3. Clean the filter, air-inlet, air-outlet and unit body.
4. Cover the unit to prevent it from gathering dust.
5. Store the dehumidifier in a cool and dry place.
Power Cord Maintenance and Replacement
If the power cord is damaged, it could cause a short circuit or become a fire risk.
Please avoid pulling the cord, twisting or pressing it and keep it away from pets. If
the power cord is damaged, power the unit off and unplug if immediately. Contact
an electrician or service centre for repairs; do not attempt to repair the unit
yourself.
Frequently Asked Questions
Smells and odours
On first use the dehumidifier and periodically afterwards you might
notice a smell coming from the dehumidifier. This is caused by the
Zeolite desiccant material and is not a sign that the dehumidifier is faulty,
nor is it harmful to humans or pets. The smell occurs because the
desiccant disc absorbs odours from ambient like cooking smells,
cigarettes, cosmetics, hair sprays, building materials and new furniture
and then when the desiccant is heated the smell is discharged back
into the room. This smell has been described as being like a burning
smell or acrid smell. It is normal, will not last long and is not a sign of a
fault. You can clear it by running the dehumidifier in a separate
ventilated space like a garage or if it is dry – outside.
17
Amount of water collected and size of the tank
• When you first use your dehumidifier it will work harder to reduce
the room humidity down to 50%RH (default mode or set to continuous
or 40%RH). This is the time when it will produce the most water and
need emptying most frequently even 2-3 times / day. As the room
becomes dryer the dehumidifier collects less water and will takes longer
to fill the tank, this is perfectly normal. When the target relative
humidity has been reached the dehumidifier will stop collecting water
and going longer in fan only mode, this is normal operation. The
intelligent logic of your machine will save you money.
• Unless you dry clothes, we recommend to use the unit in 50-60%RH
• If you find that you still have condensation on your windows or you
need to dry the air further then us the 40%RH or continuous mode with
fan set to turbo mode. This might well be necessary if you have single
glazed windows, house that is poorly insulated or if the outside air
temperature drops towards freezing. Using in Turbo mode will add more
heat to your room and reduce your heating bill as dry air will heat
quicker.
• For unoccupied properties, garages, etc. use 60-70% RH with fan in
Turbo or Quiet mode according to your needs. That will ensure minimum
power consumption while will prevent moisture related issues.
18
Troubleshooting
Problem
Possible Cause
3.Room temperature is too high or
air-outlet is covered
1.Filter is dirty
2.Door & windows are open
3. Air-inlet or out-let is blocked.
1. Contact an electrician to perform a
repair.
2.Check water tank placement or
empty water tank
3. Lower room temperature, clear air
outlet
1.C lean the filter
2. Close door & windows
3. Clean air-inlet & air-outlet
1. Unit is not placed on even
surface.
2. Filter is blocked
1. Place the machine on the flat surface.
Add carpet or rubber mat underneath
2. Clean the filter
The relative humidity in the room
where the dehumidifier is operating
is too low.
The dehumidifier dries down to the
target relative humidity set and then
goes into fan only mode until the
relative humidity goes above the set
point again.
1. We recommend using a dehumidifier
with a greater capacity. Call customer
service line for advice
2. We recommend using a dehumidifier
with a greater capacity.
3. Consider using an alternative heat
sources
1.Power is abnormal
2.Water tank displaced or full
The unit does not work
Poor performance
Too Noisy
The device does not
dehumidify
Solution
The dehumidifier works,
but relative humidity is still
high
1. The place is too large. This
dehumidifier can dry up to about a
small six bedroom house.
2. There are too many sources of
moisture. Bathing, washing, drying
clothes and cooking all puts
moisture into the air.
3. Paraffin or Calor gas heating can
add too much moisture into air
The windows were clear
and now condensation has
returned.
The outside air temperature has
dropped significantly and the
windows are colder.
Set the dehumidifier to 40%RH or
Laundry and run for longer
I cannot remove the
condensation from my
windows, even in
“Continuous” or “Laundry”
mode
The surface temperature of the
windows is too low for a
dehumidifier to prevent
condensation. Common with single
glazed windows or poorly insulated
houses when the outside air
temperature drops below 0⁰C
Keep running the dehumidifier on
“Laundry” 24 hours a day and if the air
temperature outside increases the
condensation on windows may clear
Dehumidifier is blowing out
warm air
Knocking noise coming
from the dehumidifier
This is normal and helpful especially in
The dried air is passes over a heating
the cold weather, a dehumidifier is not
element before it is blown into the
an air cooler. You may be used with a
room as part of the
compressor dehumidifier which may
dehumidification process
blow also cold air.
Run the dehumidifier in Laundry mode
Motor wheel is low on lubrication or
for two days to increase the lubrication,
dirt may have enter the motor ball
if fault persists then call the call the
bearings
service centre
19
Red warning light on
continuously or flashing
Water not draining down
the hose
Dehumidifier leaks water
onto the floor
Machine not switching off
the heater when desired
humidity is reached
On pressing power off fan
still works for about 2-3
minutes and switches off
1. Clean the filter and make sure that the
unit is more than 20 cm from a wall.
Restricted airflow to the
2. If the temperature is below freezing
dehumidifier, overheating or
then use the dehumidifier when the
temperature below freezing
space is warmer
3. if fault persists then call the call the
service centre
1. Negative air pressure in the room is
pulling the water back into the
dehumidifier overflow.
2. Insert a 3 mm hole into the top of the
tube 25 mm down from the spout. This
Hose is fitted for continuous
will introduce air into the tube and
drainage but the water still goes into balance out the air pressure.
the tank
3. Dirt is gather in the internal tray. May
need servicing.
4. Rubber bung not placed in the internal
hole beyond tank
5. if fault persists then call the call the
service centre
1. Check that the water bucket is not
Usually means that the dehumidifier cracked by filling it with water and
is not on a level surface or that the
placing it on kitchen paper on the
filter has not been cleaned often
kitchen side.
enough and dirt has fallen into the
2. Check if filters are clean
internal tray dehumidifier.
3. if fault persists then call the call the
service centre
1. Clean the filter and blow the air
sensor with a hover or hair dryer on
Temperature and relative humidity
COLD setting to clear the sensor of dirt
sensor that reads the room reading
2. Unplug the dehumidifier for 10
is unable to read the correct
minutes to reset PCB and then turn back
readings
on.
3. if fault persists then call the call the
service centre
Unit is drying internally before going
in off mode
Normal operation. DO NOT INTERFERE
Note: when the fault cannot be solved by the solutions above, please contact service centre for help, do not
attempt repairs.
Disposal: Do not dispose this product as unsorted waste. Collection of such waste
must be handled separately as special treatment is necessary.
Recycling facilities are now available for all customers at which you can deposit your old
electrical products. Customers will be able to take any old electrical equipment to
participating sites run by their local councils. Please remember that this equipment will
be further handled during the recycling process, so please be considerate when
depositing your equipment. Please contact the local council for details of your local
household waste recycling centres.
20
TECHNICAL DATA
DESD10L
Dehumidify
Capacity
Power
supply
Current
9-10 litres day depending on relative humidity
extraction unaffected by low temperature
220-240V AC/50HZ
3.7A
Power
780 W max
Max
Airflow
Power in
different
Settings
Timer
200m3 / hr
470-780 W
Low/High Setting
1-24 hours
Working
Temperature
1-32⁰C
Noise
≤ 48 dB
Water tank
Capacity
Net Weight
3.5L
8.5Kg
Body Size
H525 x W200 x D445 mm
DESD10L/V2DS2 2015-2016
All information provided is for reference only. Products specifications may change due
to continuous product development. All measurement are subject to tolerance.
DESD10L/V2DS_230815
21
ELECTRIQ UK SUPPORT
Please, for your own convenience, make these simple checks before calling the service line.
1. Has the unit been standing upright? (for at least 2 hrs)
2. Is the unit plugged into the mains? Is the fuse OK?
3. Switch the unit on and wait three minutes to see if the issue is resolved.
4. Check whether the water tank is full.
5. Have you followed the troubleshooting procedures?
If the unit still fails to operate call: 0871 620 1057 or fill the online form
Office hours: 9AM - 5PM Monday to Friday
www.ElectrIQuk.com
Unit 2, The Nursery, Berristow Lane, South Normanton, Derbyshire, DE55 2FX
22