1
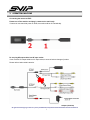
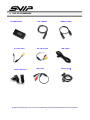
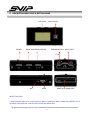
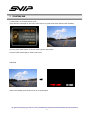
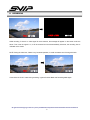
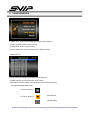
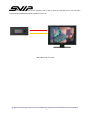
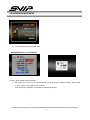
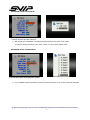
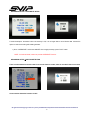
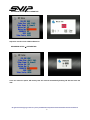
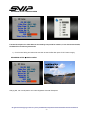
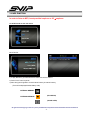
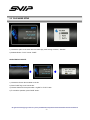
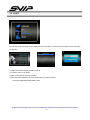
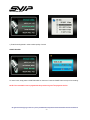
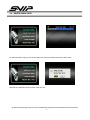
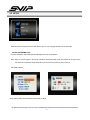
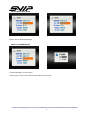
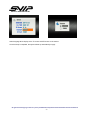
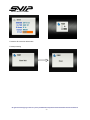
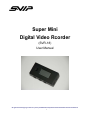
Super Mini
Digital Video Rcorder
(SVR-18)
User Manual
All rights reserved. Copying in whole or in part is prohibited without expressed written authorization from the manufacturer
1
CONTENTS
1
GENERAL INFORMATION ..............................................................................4
2
IMPORTANT SAFETY INSTRUCTION ..............................................................5
3
OPERATIING MACHINE .................................................................................7
4
LIST OF ACCESSORIES .................................................................................8
5
CABLE INSTRUCTION ...................................................................................9
6
DESCRIPTION BODY PART & BUTTON USAGE .............................................10
7
STARTING DVR ...........................................................................................12
8
RECORDING ...............................................................................................13
9
VIDEO RECORDING ....................................................................................14
10
RECORDING MODE SETUP .......................................................................16
11
MP3 FUNCTION .......................................................................................21
12
PLAY MODE SETUP ..................................................................................22
13
VOICE......................................................................................................23
14.
DELETE AUDIO FILES ...............................................................................25
15 SETUP .......................................................................................................26
16
FILE MANAGER INSTALLATION ..................................................................30
17 DVR USB INSTALLATION............................................................................32
18 INSTRUCTION OF SOFTWARE ...................................................................35
All rights reserved. Copying in whole or in part is prohibited without expressed written authorization from the manufacturer
2
19 DVR SPECIFICATION .................................................................................37
All rights reserved. Copying in whole or in part is prohibited without expressed written authorization from the manufacturer
3
IMPORTANT INFORMATION
Before you use the product, please read and retain the instruction. We do not assume any liability
arising out of improper operation.
1
GENERAL INFORMATION
Super-Mini DVR (Digital Video Recorder)
- Portable Media Recorder and Player
- MP3 PLAYER
- VOICE Recorder
- Direct connection to TV via AV cable
DVR contains multimedia features be used in various fields for example creating UCC or industrial areas so
on. It is easy to carry and record real situation anytime.
Main Features
* Support USB. (1.1)
* Recorded data can be transferred into PC to play.
* It can play PC media files and MP3 on TV through DVR.
* Support external memory card - Micro SD card (Up to 1G)
(We do not support Sandisk, please refer to supportable SD card list)
¾
Transcend
¾
Kingston
¾
Digiworks
¾
Pqi
WARNING
5V adapter is acceptable so please do not connect any other adapter it may cause of serious damage.
All rights reserved. Copying in whole or in part is prohibited without expressed written authorization from the manufacturer
4
2
IMPORTANT SAFETY INSTRUCTION
The important safety instruction ought to be read before operating the product.
Electricity sound or smoke comes from AC adapter, it causes of electric shock and fire. In occasion, please
turn off the power and plug out the AC immediately
If AC adapter is broken, the product temperature will increase it cause of damage the product and break
down. Plug out the adapter from wall outlet immediately.
Use provided power source. Do not use other power sources it causes of fire or electric shock.
Do not touch AC adapter with wet hand.
Do not unplug the connection cord; take out main body of Adapter.
Do not bend or twist the cable, it causes of fire or electricity shock
Do not load any things on the power; it damages the cord and cause of electricity shock.
Use 110V or 220V only.
Do not use damaged cable, it causes of fire and electricity shock.
For added protection, if there is lighting or storm, please unplug the AC adapter it may be risk of electric
shock or serious injury
If there is lighting outside, do not touch and reach to adapter.
Do not use either damaged product or malfunction state, it cause of fire or electricity shock. Unplug the
power immediately. Do not try to fix the product yourself.
Please pull out connection cable and unplug when you carry DVR
Do not fall the product and keep children away. It causes of breaking the product.
Do not use the cable inadequate way such rolling neck with cable and do not give to who under 3 years
Do not replace or dismantle the product, it cause of hazard
Do not use in inadequate place or purpose, it causes of damage of product
While carrying the product, please unplug AC adapter.
Do not drop the product
While carrying DVR, be careful with shock. It could be main reason of breaking down
Do not place the product or cable near heat places.
If it is not used for a longer period of time, please unplug the AC adapter for the safety.
Operating Temperature: -5℃ ~ 40 ℃
Preserving Temperature: -20℃ ~ 60℃
All rights reserved. Copying in whole or in part is prohibited without expressed written authorization from the manufacturer
5
If you do not use for a long period, turn off the DVR and unplug the AC adapter.
When using earphone, do not volume up too high
If the memory card is not ejected correctly, contact technical support immediately. Do not force the card
in/out of the slot as this could damage the memory card and or the unit itself.
All rights reserved. Copying in whole or in part is prohibited without expressed written authorization from the manufacturer
6
3
OPERATIING MACHINE
Connecting the camera to DVR:
Please turn off the machine and plug in camera to the main body.
If camera is connected with power on DVR, the machine will be off automatically.
Do not plug AV output cable into AV input socket.
If user connect A/V output cable into A/V input socket, it cause of serious damage of product.
Please refer to below cable instruction.
Adapter (DC5V/1A)
All rights reserved. Copying in whole or in part is prohibited without expressed written authorization from the manufacturer
7
4
LIST OF ACCESSORIES
DVR MAIN BODY
A/V Input Cable
Adapter (DC5V/1A)
DVR CAMERA
CAMERA CABLE
A/V Output Cable
USB CABLE
Multi Cable
Earphone(2.5ø)
All rights reserved. Copying in whole or in part is prohibited without expressed written authorization from the manufacturer
8
5
CABLE INSTRUCTION
Adapter (DC5V/1A)
Do not connect higher volt adapters (5V only) to the product, it causes of serious
damage to the machine.
USAGE
MP3
When user listen to music, please connect earphone (ø 2.5).
All rights reserved. Copying in whole or in part is prohibited without expressed written authorization from the manufacturer
9
6
DESCRIPTION BODY PART & BUTTON USAGE
LCD Screen
POWER
PAGE
RECORD/PLAY/STOP
Stick Controller
EARPHONE PORT MULTI PORT
2.5 ø
MIC
HOLD
RESET & SD CARD PORT
RESET FUNCTION
If there is serious matter occur on the product or status of malfunction status, please press “RESET” key on
the side of DVR with shape. It will turn off the device with default value.
All rights reserved. Copying in whole or in part is prohibited without expressed written authorization from the manufacturer
10
BUTTON USAGE
Button
Name
Function
Turn Off Power
Power
( Press the power button for 2~3 seconds to turn ON/OFF )
- IN VIDEO PREVIEW MODE
Record/Play/Stop
PAGE
¾
Start Recording
¾
Selected file play on the list
¾
VIDEO/MP3/VOICE PLAY MODE
¾
PAUSE <-> PLAY Convert
¾
Select and save on the menu
¾
Move to previous menu (ESC Function)
¾
IN VIDEO/MP3/VOICE PLAY MODE END
¾
Cancel on the menu
HOLD Setup
HOLD Setup
Stick controller
lift/right
(Lock control button)
¾
VIDEO/MP3/VOICE On File List
¾
Internal Memory↔External Memory
(SD Card) Convert
¾
In MP3 Mode rewind and fast forward.
¾
Adjust color value
¾
Move cursor on the menu
Stick Controller
¾
Change the list of song on MP3 mode
up/down
¾
Adjust color value
All rights reserved. Copying in whole or in part is prohibited without expressed written authorization from the manufacturer
11
7
STARTING DVR
1) When DVR is on, it shows preview mode
(Input data will be displayed on the screen and if there is no signal, black screen will be on with Time Bar)
2) If user press “PAGE” button on preview mode, it goes to above menu.
3) Press “PAGE” button again, it leads to main menu.
PREVIEW
VIDEO LOSS!!
06:18:20
VIDEO LOSS!!
06:18:20
Video Loss message will be shown if there is no camera signal.
All rights reserved. Copying in whole or in part is prohibited without expressed written authorization from the manufacturer
12
8
RECORDING
REC
VIDEO LOSS!!
06:18:20
06:18:20
While recording, if there is no video signal for some reasons, the message will appear on the screen as shown
above. Then once the signal is in, it will be restored and record automatically. Moreover, the recording time is
indicated on the screen.
NOTE: During the video loss, if there is any functional operation, it would not restore even if the signal is back.
REC
06:18:20
06:18:20
If user clicks the “PLAY” button during recording, it goes to Preview Mode and Recording Mode again.
All rights reserved. Copying in whole or in part is prohibited without expressed written authorization from the manufacturer
13
9
VIDEO RECORDING
1) Select menu “START RECORDING” with jog dial or stick controller
2) Press “RECORD” button to start recording
3) Press ‘PAGE” button to stop recording.
4) If user press ‘PLAY” button in preview mode, it starts recording.
VIDEO FILE LIST
1) Enter main menu and go to RECORDING FILE DATA LIST.
2) Select a file from on the list and press “PLAY” button.
3) Move Stick controller right/left to choose either internal or external memory.
(It is displayed beside battery level)
INTERNAL MEMORY:
EXTERNAL MEMORY:
SD
(SD CARD IN)
(NO SD CARD)
All rights reserved. Copying in whole or in part is prohibited without expressed written authorization from the manufacturer
14
Moreover, DVR provides TV out function therefore; user is able to check the video files via TV and can watch
movies which compressed by specific format such AVI so on.
Watch Movie with TV screen
All rights reserved. Copying in whole or in part is prohibited without expressed written authorization from the manufacturer
15
10 RECORDING MODE SETUP
1) Go to Recording setup on the main menu
RECORDING SETUP->COL SYS SETUP
Function: Select VIDEO Output NTSC/PAL.
1) With jog dial, go to “COL SYS” and choose VIDEO Output. To apply the setting information, press jog dial
or “PLAY” button. Press “PAGE” button to cancel.
(Once the setup is completed, the machine will restart automatically.)
All rights reserved. Copying in whole or in part is prohibited without expressed written authorization from the manufacturer
16
RECORDING->RESOLUTION SETUP
Function: Choose input video resolution
1) With jog dial, go to “Resolution” and adjust resolution Up/Down then press “PLAY” button
To apply the setting information, press “PALY” button. For cancel, press ‘PAGE” button
RECORDING SETUP->FRAME SETUP.
Function Description: Set input frame number.
1) Go to “FRAME” section and select the number of Frame then press “PLAY” button to save the setup data.
All rights reserved. Copying in whole or in part is prohibited without expressed written authorization from the manufacturer
17
RECORDING SETUP->OVER WRITE SETUP
Function description: Overwrite is when the memory is full, it is no longer able to record further data. Choose the
option to continue recording with deleting old data.
1) Go to “OVERWRITE” and choose ON/OFF then to apply the setup, press ‘PLAY” button.
NOTE: In Continue Mode, it does not provide OVERWRITE function.
RECORDING SETUPÆ MOTION DETECTION
There is motion detection function that if user set the function enable, video is recorded if there is moment.
Choose motion detection function On/ Off.
All rights reserved. Copying in whole or in part is prohibited without expressed written authorization from the manufacturer
18
RECORDING SETUPÆ Motion SENSITIVE
Adjust the sensitive level of Motion Detection.
RECORDING SETUP Æ OVERWRITING
Once user select the option, SD memory card will overwrite automatically deleting old data and save new
data.
All rights reserved. Copying in whole or in part is prohibited without expressed written authorization from the manufacturer
19
RECORDING SETUP->SAVING SCREEN
Function Description: the video data can be saved by time period for instance, if user choose 20 seconds,
the data will be saved every 20 seconds.
1) Go to Screen Saving and select time user wish to save the files then press “PLAY” button to apply.
RECORDING SETUP Æ VIDEO CONFIG
SCREEN SETUP
CONTRAST: 180
With jog dial, user can adjusts the color value Brightness/ Contrast/ Sharpness
All rights reserved. Copying in whole or in part is prohibited without expressed written authorization from the manufacturer
20
11 MP3 FUNCTION
In order to listen to MP3, insert provided earphone or 2.5 ø earphone
Go to MP3 mode on the main menu.
MP3 Files List
1) To play MP3 files, go to MP3 file list and select user wish to listen to.
2) Press “PLAY” button to pause.
3) Move the joystick right/left to choose internal memory & external memory
(There will be displayed beside Battery mark)
INTERNAL MEMORY:
EXTERNAL MEMORY:
SD
(SD CARD IN)
(NO SD CARD)
All rights reserved. Copying in whole or in part is prohibited without expressed written authorization from the manufacturer
21
12 PLAY MODE SETUP
1) Choose the option on the main menu and select play mode among “Continue”, “Random”
2) Selection Button: “PLAY” Cancel: “PAGE”
SELECTED FILE DELETE
1) Choose the file user wish to delete on the list.
2) Press “PAGE” key to out from the list/
3) Choose “Delete File” then press either “Jog Dial” or “PLAY” button
4) To cancel the operation, press “PAGE” button.
All rights reserved. Copying in whole or in part is prohibited without expressed written authorization from the manufacturer
22
13 VOICE
DVR provide Voice Recording which is easily use and convenient to record voice at anywhere. Choose the option
on the menu
1) Select Voice file list and play the files on the list.
2) To pause, press “PLAY” button.
4) Able to move next file with stick controller.
5) Move the joystick right/left to choose internal memory & external memory
(There will be displayed beside Battery mark)
All rights reserved. Copying in whole or in part is prohibited without expressed written authorization from the manufacturer
23
RECORDING MODE
1) Enter Recording Mode in order to select quality of sound.
START RECORD
To record voice, simply select “START RECORD” on the menu. Press the “PAGE” button to stop voice recording.
NOTE: The recorded file can be played with this product only. Can’t be played on the PC.
All rights reserved. Copying in whole or in part is prohibited without expressed written authorization from the manufacturer
24
14. DELETE AUDIO FILES
To delete audio files, firstly go to the list and select one user want to delete then press “PAGE” button
After that go to DELETE FILE and choose “YES” OR “NO”
All rights reserved. Copying in whole or in part is prohibited without expressed written authorization from the manufacturer
25
15 SETUP
User set the PDVR system its time & date, Back Light, TV out, Language and SD card on the Setup.
SETUP->DATE&TIME Setup
Function description: Recorded time and date depend on set up information.
Note: There is no RTC system in the device. Therefore, whenever power on/off user should set the time. When
the power off, the last time will be saved then next time user may set from when it was off.
SET TIME & DATE
Using the keys which are mentioned on the screen to adjust.
All rights reserved. Copying in whole or in part is prohibited without expressed written authorization from the manufacturer
26
SETUP->BACKLIGHT SETUP
Select a time on the list of Back light
SETUP->TV SCREEN SETUP
Function Description: TV out function.
If user choose “TV ON”, able to see the video data on the TV screen.
All rights reserved. Copying in whole or in part is prohibited without expressed written authorization from the manufacturer
27
SETUP->LANGUAGE SETUP
Select language which display on the TV screen and LED screen on the surface.
Once the setup is completed, the system reboots up automatically to apply
All rights reserved. Copying in whole or in part is prohibited without expressed written authorization from the manufacturer
28
SETUP->SD-Card FORMAT
Format the SD card to be default value.
Format processing
All rights reserved. Copying in whole or in part is prohibited without expressed written authorization from the manufacturer
29
16 FILE MANAGER INSTALLATION
In order to install the program, run the SETUP.EXE
Click “NEXT” to continue
To continue the installation, click ”INSTALL”
All rights reserved. Copying in whole or in part is prohibited without expressed written authorization from the manufacturer
30
After installation, there will be operating ICON on the desktop
Click the ICON to implement the DVR software
Main screen of DVR
File Manager
DVR
File
Manager
DVR
System
File
DVR USB Driver
There is above folder in the directory.
All rights reserved. Copying in whole or in part is prohibited without expressed written authorization from the manufacturer
31
17 DVR USB INSTALLATION
To update firmware or connect with PC to transfer information, USB driver install is required.
Connect DVR with PC and turn on the device then below message will appear.
Select second option “Install from a list or specific location” then click NEXT
All rights reserved. Copying in whole or in part is prohibited without expressed written authorization from the manufacturer
32
Check the “Include this location in the search” then browse.
Go to (C:\Program File\PDVR\USB driver)
Then click “NEXT” it will start look for the driver.
Click “Continue Anyway”
All rights reserved. Copying in whole or in part is prohibited without expressed written authorization from the manufacturer
33
The driver installation is completed.
To check whether the installation is completed properly, go to “Device Manager”
There is DVR section on the Universal Serial Bus Controllers.
All rights reserved. Copying in whole or in part is prohibited without expressed written authorization from the manufacturer
34
18 INSTRUCTION OF SOFTWARE
Initialize SD Card
Firmware Update
Connect DVR
My Computer
DVR general Information
Once the installation is finished above DVR window pop up on the screen.
To transfer the files or information from My Computer to DVR
Choose files on the screen then the download key will be activated.
To transfer the files to Computer from DVR to My Computer
Choose folder to save the files and click the files user wish to transfer. Afterward, the key will be enabled
then click it to transfer the information.
Note: Do not disconnect the USB while the data is transferred otherwise this may cause losses of
data.
All rights reserved. Copying in whole or in part is prohibited without expressed written authorization from the manufacturer
35
In case of eliminated all the system files.
If system file is gone, then the device would not work properly so if the happen come up, do not hesitate.
To recover the system, go to DVR Folder and find out System Folder which contain exact same files in
case of accidents. Copy the files and drop it in our file folder.
Simply copy and drop on the PDVR system
When user transfers any information such a Music or Movie, these should be placed on right folders.
All rights reserved. Copying in whole or in part is prohibited without expressed written authorization from the manufacturer
36
19 DVR SPECIFICATION
DVR
TYPE
DEVICE SPECIFICATION
Video Format
VIDEO
VIDEO
RECORD
MODE
Format
MPEG4 SIMPLEX
Frame Rate
1~30fps
Encoding Resolution
320x240, 640x240
Overwrite
YES
Saving Time
10/20/30/60/300 sec and Continuous
Support File Format
ASF FORMAT
Audio Codec
G726, Bit rate(32kbps), sampling rate(8khz)
Recording Time
Approximately 2 hours
VIDEO
PLAY VIDEO
MODE
NTSC/PAL
AUDIO
Decoding Resolution
720x480
Format
MPEG4 Simplex
Codec
MPEG 1/2/2.4 Layer3, G726
Bit Rate
8Kbps ~ 192Kbps
Support File Format
AV Input
ASF, AVI Format
Input voltage : 1Vpp
Video Mode
Supported Type : NTSC / PAL
Audio Mode
Input Voltage: MAX 1Vpp
VOICE
RECORDNG
Sampling rate 8Khz
Record Bit Rate
16Kbps-24-32-40Kbps
G729
POWER
OPERATION
ENVIRONMENT
Electricity
DC 5V 1A
IBM-PC
Window 2000, XP
Interface
USB 1.1
Storage Format
Max 1GB T-Flash Card
All rights reserved. Copying in whole or in part is prohibited without expressed written authorization from the manufacturer
37
CAMERA SPECIFICATION
Model Name
Super Mini DVR
Image Sensor
1/4" SONY SUPER HAD (270K pixels)
H. Resolution
NTSC - 380TVL
PAL - 380TVL
Scanning System
525TVL, 60 Field/Sec(NTSC)
625TVL, 50 Field/Sec(PAL)
Effective Pixels
NTSC : 510 (H) x 492 (V)
PAL : 500 (H) x 582 (V)
Min. Illumination
0.3Lux (IR LED Off)
Video output Level
1.0Vp-p (75ohms, Composite)
S/N Ratio
More than 50dB (AGC Off)
Gamma
r = 0.45
Sutter Speed
Auto 1/60~1/100,000sec
Auto 1/50~1/100,000sec
White Balance
Auto White Balance
Gain Control
4dB - 32dB - Auto
Operating Humidity
- 20℃ - +50℃ (10% - 95% RH)
Lens
STD Lens : f = 3.6mm Lens
Power Source
DC3V 220mA
AUDIO
With AUDIO
Dimensions
18Ø(mm)x74(mm)
Net Weight
100g
All rights reserved. Copying in whole or in part is prohibited without expressed written authorization from the manufacturer
38