1
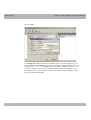
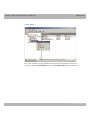
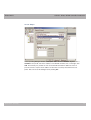
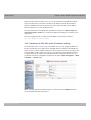
Manual
Teldat GmbH
Manual
Workshops (Excerpt)
WLAN Workshops
Copyright© Version 0.99, 2012 Teldat GmbH
Workshops (Excerpt)
1
Manual
Teldat GmbH
Legal Notice
Aim and purpose
This document is part of the user manual for the installation and configuration of Teldat devices. For
the latest information and notes on the current software release, please also read our release notes,
particularly if you are updating your software to a higher release version. You will find the latest release
notes under www.teldat.de .
Liability
This manual has been put together with the greatest possible care. However, the information contained in this manual is not a guarantee of the properties of your product. Teldat Enterprise Communications GmbH is only liable within the terms of its conditions of sale and supply and accepts no liability
for technical inaccuracies and/or omissions.
The information in this manual can be changed without notice. You will find additional information and
also release notes for Teldat devices under www.teldat.de .
Teldat devices make WAN connections as a possible function of the system configuration. You must
monitor the product in order to avoid unwanted charges. Teldat GmbH accepts no responsibility for
data loss, unwanted connection costs and damage caused by unintended operation of the product.
Trademarks
Teldat trademarks and the Teldat logo, bintec trademarks and the bintec logo, artem trademarks and
the artem logo, elmeg trademarks and the elmeg logo are registered trademarks of Teldat Enterprise
Communications GmbH.
Company and product names mentioned are usually trademarks of the companies or manufacturers
concerned.
Copyright
All rights reserved. No part of this manual may be reproduced or further processed in any way without
the written consent of Teldat GmbH. The documentation may not be processed and, in particular,
translated without the consent of Teldat Enterprise Communications GmbH.
You will find information on guidelines and standards in the declarations of conformity under
www.teldat.de .
How to reach Teldat GmbH
Teldat GmbH, Südwestpark 94, D-90449 Nuremberg, Germany, Phone: +49 911 9673 0, Fax: +49 911
688 07 25
Teldat France S.A.S., 6/8 Avenue de la Grande Lande, F-33174 Gradignan, France, Phone: +33 5 57
35 63 00, Fax: +33 5 56 89 14 05
Internet: www.teldat.de
2
Workshops (Excerpt)
Table of Contents
Teldat GmbH
Table of Contents
Workshops (Excerpt)
Chapter 1
WLAN - Bintec WLAN Controller Introduction . . . . . . . . . 1
1.1
Functional overview . . . . . . . . . . . . . . . . . . . . . . . . .
1
1.2
Project planning . . . . . . . . . . . . . . . . . . . . . . . . . .
2
1.2.1
Determining customer requirements . . . . . . . . . . . . . . . . . .
2
1.2.2
Recommended hardware installation on site . . . . . . . . . . . . . .
2
1.3
System requirements . . . . . . . . . . . . . . . . . . . . . . . .
3
1.3.1
WLAN Controller hardware. . . . . . . . . . . . . . . . . . . . . .
3
1.3.2
Access Point hardware . . . . . . . . . . . . . . . . . . . . . . .
3
1.3.3
WLAN Controller software licences . . . . . . . . . . . . . . . . . .
4
1.4
Network configuration . . . . . . . . . . . . . . . . . . . . . . . .
4
1.4.1
WLAN Controller device network settings . . . . . . . . . . . . . . .
4
1.4.2
DHCP server . . . . . . . . . . . . . . . . . . . . . . . . . . . .
4
1.5
WLAN rollout with the WLAN controller wizard . . . . . . . . . . . . .
5
1.5.1
Wizard Step 1 . . . . . . . . . . . . . . . . . . . . . . . . . . .
6
1.5.2
Wizard Step 2 . . . . . . . . . . . . . . . . . . . . . . . . . . .
7
1.5.3
Wizard Step 3 . . . . . . . . . . . . . . . . . . . . . . . . . . .
7
1.5.4
Wizard Step 4 . . . . . . . . . . . . . . . . . . . . . . . . . . .
9
1.5.5
Start WLAN rollout to access points . . . . . . . . . . . . . . . . . .
9
1.6
Appendix . . . . . . . . . . . . . . . . . . . . . . . . . . . .
11
1.6.1
E-mail alert in case of access point failure . . . . . . . . . . . . . .
11
1.6.2
Configuration of a DHCP server on another Bintec router . . . . . . .
12
1.6.3
Configuration of a DHCP server on Windows Server 2003/2008 . . . .
12
1.6.4
Configuration of a DHCP server under Linux . . . . . . . . . . . . .
18
1.6.5
Operation of APs with static IP address settings . . . . . . . . . . .
19
i
Table of Contents
ii
Teldat GmbH
Workshops (Excerpt)
1 WLAN - Bintec WLAN Controller Introduction
Teldat GmbH
Chapter 1 WLAN - Bintec WLAN Controller Introduction
1.1 Functional overview
The bintec WLAN Controller offers the following advantages for an easier management of
your WLAN infrastructure:
• Wizard-guided quick installation in five steps
• Automatic recognition and installation of new devices
• VLAN and Multi SSID support
• Integrated 802.11abgn support
• Optimised roaming characteristics for VoWLAN
• Centralised management of all Access Points:
• Easy modification of settings for all APs
• Any modification, e.g. of the SSIDs, immediately applies to all APs
• Access Points installed at public locations no longer are a security risk:
• Network keys and passwords are not saved on the AP and hence cannot fall into unauthorised hands through AP theft
• Any direct AP (configuration) access is blocked by the WLAN controller
• Automated frequency management:
• Integrated channel plan, for non-overlapping frequency assignment
• Interference reduction through intelligent frequency assignment
• Consideration of foreign access points (neighbor APs)
• Monitoring:
• Access point operation
• Client activity
• Recognition and display of undesired access points (neighbor access points)
• E-mail Alert in case of failure of a managed access points
• Scheduler based actions (e.g. overnight shutdown of the WLAN)
• Configuration Management: The configuration is centrally saved and automatically reassigned to APs, e.g. after loss of power.
• Centralised firmware updates
Workshops (Excerpt)
1
1 WLAN - Bintec WLAN Controller Introduction
Teldat GmbH
1.2 Project planning
1.2.1 Determining customer requirements
It all starts with the customers - and determining what their needs really are. In most cases
customers want a WLAN network in the 2.4GHz frequency range, allowing employees and
visitors wireless connection to the company network and the Internet throughout offices
and meeting rooms. Next the question arises of whether a radio frequency site survey by a
specialist needs to be performed. Because of the considerable expense involved, the radio
frequency site survey is frequently skipped; instead the APs are positioned at customer discretion and in consideration of the facility's spatial arrangement.
However in case of complex buildings or if the customer requires a high-performance network with continuous coverage and VoWLAN-readiness, a radio frequency site survey is indispensable.
1.2.2 Recommended hardware installation on site
Next an electrician comes into play to install the access points in corridors and offices. If
doing without a radio frequency site survey, APs should be mounted at a distance of 15-20
meters to each other: this rule usually results in a functional setup.
All APs should be connected to a PoE-capable switch over an Ethernet cable. Power supply via the Ethernet cable (PoE) avoids installation of a 230V socket and considerably simplifies setup.
The electrician should document the locations and MAC addresses of the devices so that
names or locations can later be assigned to the devices during configuration.
2
Workshops (Excerpt)
1 WLAN - Bintec WLAN Controller Introduction
Teldat GmbH
1.3 System requirements
1.3.1 WLAN Controller hardware
The following devices with firmware versions 7.9.6 or higher can be used as WLAN controllers (supported devices with firmware versions lower than 7.9.6 need to be updated before
installation):
• bintec W1002n: single radio indoor access point
• bintec WI1040n: single radio indoor industrial access point (IP 40)
• bintec WI2040n: dual radio indoor industrial access point (IP 40)
• bintec WI1065n: single radio outdoor industrial access point (IP 65)
• bintec WI2065n: dual radio outdoor industrial access point (IP 65)
• bintec R1202: medium router, VPN gateway
• bintec R3002: medium router, VPN gateway with ADSL 2+ modem
• bintec R3502: medium router, VPN gateway with VDSL 2 modem (minimum required
firmware version: 7.10.1)
• bintec R3802: medium router, VPN gateway with SHDSL.bis modem
• bintec R4402: medium router, VPN gateway with PRI interface
• bintec RXL12100: central router, high-performance multiplex VPN gateway (minimum
required firmware version: 7.10.1)
• bintec RXL12500: central router, high-performance central site VPN gateway (minimum
required firmware version: 7.10.1)
For small installations up to 6 access points no dedicated WLAN controller hardware is
needed and one of the access points (running as master access point) can take on the
function of the WLAN controller. If a WLAN network with more than 6 access points is desired, at mimimum a R1202 is necessary as WLAN controller hardware.
1.3.2 Access Point hardware
The WLAN controller can manage the following WLAN devices with software version 7.9.6
or higher (devices with firmware versions lower than 7.9.6 need to be updated before installation):
• bintec W1002n: single radio indoor access point
• bintec W1002n: single radio indoor industrial access point (IP 40)
• bintec WI2040n: dual radio indoor industrial access point (IP 40)
Workshops (Excerpt)
3
1 WLAN - Bintec WLAN Controller Introduction
Teldat GmbH
• bintec WI1065n: single radio outdoor industrial access point (IP 65)
• bintec WI2065n: dual radio outdoor industrial access point (IP 65)
1.3.3 WLAN Controller software licences
For testing purposes, the WLAN controller is already activated in the firmware of every supported device; however, only a single access point can be managed. For business operation a WLAN controller licence must be installed on the controller. Six access points can be
managed with each licence. One WLAN controller software licence can be installed on an
access point (e.g. W1002n); this allows the management of 6 access points, including the
access point running as WLAN controller. Up to twelve WLAN controller licences can be installed on a medium router (e.g. R1202), allowing the management of a maximum of 72 access points. On central routers (e.g. RXL12100) up to 25 licenses can be installed, which
allows for at maximum 150 managed access points.
Overview of minimum WLAN controller hardware and licenses required in relation to the intended of number of access points:
Required
up to 6 APs
up to 12 APs up to 18 APs up to 72 APs up to 150
APs
Minimal controller hardware
None, runs
R1202
on the master
AP
R1202
R1202
RXL12100
WLAN Controller licences
1x
3x
6x
25x
2x
1.4 Network configuration
1.4.1 WLAN Controller device network settings
Before connecting the WLAN controller device to the network of the (still unconfigured) access points it needs to have its IP address and network settings (different from factory defaults) configured according to the setup of your local network. Otherwise the next steps
will fail.
1.4.2 DHCP server
4
Workshops (Excerpt)
1 WLAN - Bintec WLAN Controller Introduction
Teldat GmbH
1.4.2.1 Internal DHCP server
If there is no active DHCP server in your network, and if the WLAN controller device will
also act as DHCP server (internal DHCP server) you can directly proceed with WLAN rollout with the WLAN controller wizard on page 5 and start the WLAN rollout. The WLAN
controller wizard includes the setup of all necessary DHCP server settings.
1.4.2.2 External DHCP server
For the access points to be manageable by the WLAN controller they must know the IP address of the WLAN controller. So in addition to the required basic network settings such as
device IP address, default gateway and nameserver, the DHCP server needs to provide
the access point with the IP address of the WLAN controller. This is done via option 138 of
the DHCP protocol. This option (also named CAPWAP Access Controller) must, therefore,
be enabled on the DHCP server, and the IP address of the WLAN controller (which you
configured in chapter 4.1) must be specified. In case:
• Another Bintec router is operating as DHCP server:
The required configuration steps are described in the appendix.
• A Microsoft Server 2003 or Server 2008 is operating as DHCP server:
The required configuration steps are described in the appendix.
• A Linux server is operating as DHCP server:
The required configuration steps are described in the appendix.
• The router of a third-party provider is operating as DHCP server:
Please perform the configuration of DHCP option 138 according to the respective documentation.
1.4.2.3 No DHCP server - APs with static IP address settings
Occasionally, it may be necessary to operate a WLAN-controller-managed network with
static IP address and network settings. Thus each access point requires the manual configuration of IP and network settings. The necessary configuration steps for all access points
is described in Appendix on page 11.
1.5 WLAN rollout with the WLAN controller wizard
The WLAN controller wizard guides you through configuration and rollout of your WLAN
network in five steps.
Workshops (Excerpt)
5
1 WLAN - Bintec WLAN Controller Introduction
Teldat GmbH
1.5.1 Wizard Step 1
Here you define certain basic characteristics of the WLAN controller:
• Region: The region where your WLAN network is located. This setting adapts your
WLAN network to the WLAN regulations of your region (e.g. permitted frequencies).
• Interface: Defines over which interface the controller communicates with the APs (the IP
of this interface is the WLAN Controller IP address configured in option 138 of the DHCP
server).
• DHCP Server: Defines whether the internal or an external DHCP server is used for the
access points. When using the internal DHCP server, all DHCP server settings including
option 138 are made automatically. You'll find information on configuring an external DHCP server in Appendix on page 11.
• IP Address Range: Defines the IP address range available to the internal DHCP server.
Note
Before proceeding, please make sure that any existing external DHCP server is operative and that DHCP option 138 is enabled. If an external or internal DHCP server was
already enabled at the time of AP installation, but DHCP option 138 was only subsequently enabled, the WLAN controller may fail to display the APs within your network. This can happen because the APs have already been assigned an IP address,
but have not yet received the WLAN controller IP address. This can be remedied by
waiting for the expiration of the DHCP lease time or by resetting the APs.
6
Workshops (Excerpt)
1 WLAN - Bintec WLAN Controller Introduction
Teldat GmbH
1.5.2 Wizard Step 2
Here, you define the radio profile with which the WLAN network will operate. A 2.4GHz and
a 5GHz radio profile are available by default. Additional radio profiles can be created outside of the wizard via the Wireless LAN Controller-> Slave AP configuration -> Radio
Profiles menu.
1.5.3 Wizard Step 3
Workshops (Excerpt)
7
1 WLAN - Bintec WLAN Controller Introduction
Teldat GmbH
Here, you define which SSID/VSS shall be present in the network. One VSS is already
available per default; this can be customised via the wrench icon. With Add you can can
create up to seven additional VSS.
In this example, we create an additional VSS for visitor access:
A network name is assigned for the new VSS and "WPA-PSK" is selected as the security
mode. As we do not want access to the company intranet from the guest network, a VLAN
is defined for this VSS (in this example VLAN ID 2): All data from the "Guest" network will
be tagged with that VLAN ID on the Ethernet (LAN).
Note
VLAN ID 0 and 1 are reserved (for management VLAN) and cannot be used for any
VSS.
VLAN tagging gives you the possibility to separate guest data from other data, and you can
setup your network switches and/or Internet access routers in a way ´so that, e.g., all data
from VLAN ID 2 and thus all guests are allowed to access the Internet but not the company
intranet (please see the manual of your switch and/or router for how to configure VLAN
separation there).
We now leave the VSS configuration with OK and return back to the VSS overview page.
Before proceeding to wizard step 4 make sure that all access points that are supposed to
be managed are connected to your LAN and are powered on.
8
Workshops (Excerpt)
1 WLAN - Bintec WLAN Controller Introduction
Teldat GmbH
1.5.4 Wizard Step 4
Now all discovered access points are displayed. By default, all defined wireless network
profiles (VSS) and the previously selected radio profile are assigned to all access points.
With the wench symbol you can customise these standard settings and provide each
device with an individual location description.
In some cases, not all expected APs are displayed. The reason in that case is that not all
APs were discovered by the WLAN controller. In this case Back can be used to update the
display.
1.5.5 Start WLAN rollout to access points
After selecting the check box in the "Manage" field of all access points you want to use, you
can launch the WLAN controller rollout and automatic frequency management with Start.
The display now switches to a status screen indicating the WLAN controller's current activities:
Workshops (Excerpt)
9
1 WLAN - Bintec WLAN Controller Introduction
Teldat GmbH
The configuration now is transfered sequentially to all access points. The configuration of
an access point is finished and indicated with status after the best radio channel
was found for it. When assigning radio channels, the WLAN controller ensures that only
non-overlapping channels (e.g. 1, 6, 11) are assigned and that interference between the individual access points is kept to a minimum.
Managed access points are locked by the WLAN controller and all direct access to them is
prohibited. An access point can only be locally configured after the WLAN controller released the access point.
After all access points are managed, the display changes once again and shows the final
result:
10
Workshops (Excerpt)
1 WLAN - Bintec WLAN Controller Introduction
Teldat GmbH
The configuration now needs to be saved on the WLAN controller device via the Save configuration button in the upper left. The access points themselves keep their current configuration in their volatile memory only and do not save it to their persistent memory. In the
event of power failure, the configuration within the access points is lost and automatically
re-loaded into the access point by the WLAN controller after power is restored. Keeping the
configuration only in the volatile memory of the APs has the additional advantage that no
sensitive access data (such as WLAN keys) can be compromised through theft of an access point installed at a public location.
After a power failure, all access points are re-initalised by the WLAN controller at once and
radio management is not re-started, but the previously used channel is used instead. Thus
recovery of WLAN infrastructure after power failure is much faster than the initial rollout.
1.6 Appendix
1.6.1 E-mail alert in case of access point failure
Starting with Release 7.10.1 the WLAN Controller offers the option to send an E-mail in
case one of the managed access points is no longer reachable. This is especially helpful in
larger and complex WLAN infrastructures where this kind of failure does not become immediately apparent. The necessary configuration is done on the WLAN Controller device in
the menu External Reporting -> E-mail Alert -> E-mail Alert Recipient.
Workshops (Excerpt)
11
1 WLAN - Bintec WLAN Controller Introduction
Teldat GmbH
1.6.2 Configuration of a DHCP server on another Bintec router
The requirement is a Bintec router with software release 7.9.6 or higher. Here the DHCP
option CAPWAP Controller is selected under Lokal Services -> DHCP Server -> DHCP
Pool and the IP address of the WLAN controller device is entered in the Value field:
1.6.3 Configuration of a DHCP server on Windows Server
2003/2008
First, your Windows DHCP server service must receive a basic set up, i.e. the DHCP IP address range needs to be defined,and standard options such as DNS server and standard
gateway/router need to be configured according to your network infrastructure.
12
Workshops (Excerpt)
1 WLAN - Bintec WLAN Controller Introduction
Teldat GmbH
1.6.3.1 Step 1
In the DHCP service window (accessible via Control Panel, there under Administration),
right-click on the existing DHCP service instance (you can identify it through the computer
name and the IP address the DHCP service is linked to), then click on Set Predefined Options in the expanded context menu.
Workshops (Excerpt)
13
1 WLAN - Bintec WLAN Controller Introduction
Teldat GmbH
1.6.3.2 Step 2
In the window now opening, click Add to add the CAPWAP option.
14
Workshops (Excerpt)
1 WLAN - Bintec WLAN Controller Introduction
Teldat GmbH
1.6.3.3 Step 3
In the Option Type dialogue window, the CAPWAP option is now defined (but not yet activated). Name and Description can be freely selected, but should be plausible. Data type
must be set to , and Array checked. In addition, Code must be set to . If
the code is already in use for another, self-defined DHCP option not matching the CAPWAP DHCP option, the pre-existing one must first be deleted. Close the dialogue and the
previous window by clicking OK.
Workshops (Excerpt)
15
1 WLAN - Bintec WLAN Controller Introduction
Teldat GmbH
1.6.3.4 Step 4
Now, in the IP address range of the DHCP service already configured for future slave access points, right-click Range options and select Configure Options in the context menu.
16
Workshops (Excerpt)
1 WLAN - Bintec WLAN Controller Introduction
Teldat GmbH
1.6.3.5 Step 5
In the expanding dialogue window, select option 138 in the list of Available Options. In the
IP Address entry field, enter the IP address of the WLAN controller; then, on the right, click
Add. Theoretically, it is possible to enter several WLAN controller IP addresses here. At
present, however, only the first IP address is taken into account by the Funkwerk access
points. Now, also close this dialogue box by clicking OK.
Workshops (Excerpt)
17
1 WLAN - Bintec WLAN Controller Introduction
Teldat GmbH
1.6.3.6 Step 6
The DHCP service overview window should now also list the CAPWAP option. At this
stage, the access points and the WLAN controller in the network for which the DHCP service ihas been configured, can go into operation.
1.6.4 Configuration of a DHCP server under Linux
In the configuration file /etc/dhcp/dhcpd.conf, add the following:
The lines beginning with option wifi-controller are the most crucial ones. The first line
18
Workshops (Excerpt)
Teldat GmbH
1 WLAN - Bintec WLAN Controller Introduction
defines the data format of option 138, as it is not contained in the standard format definitions of the dhcpd. The second line specifies the IP address of the WLAN controller to
which the individual slave AP's log in after they have received all data (own IP address,
WLAN controller IP, etc.) from the DHCP server.
Any other information is standard for the definition of a DHCP pool: subnet, range, domain-name-servers, routers etc. need to be configured according to the customer's own
requirements.
Once the configuration file is saved, restart the DHCP server with the command .
1.6.5 Operation of APs with static IP address settings
As described in DHCP server on page 4 the DHCP server not only assigns IP addresses
but also provides the access points to be managed with the IP address of the WLAN Controller. In case of static IP address settings for access points it is necessary not only to specify an IP address and a netmask at each access point that is to be managed, but also to
manually specify the IP address of the WLAN controller. Starting with release 7.10.1 you
can find the necessary configuration parameter in the menu System managment -> Global Settings -> System page:
When starting the WLAN controller wizard, it is essential to choose External for DHCP
Server in WLAN controller wizard step 1.
Workshops (Excerpt)
19