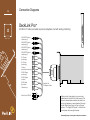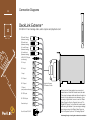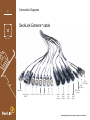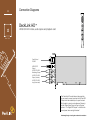
1
Mac OS X™
DeckLink User Manual
Mac OS X™
Second Edition.
July 2004
Leading the creative video revolution™
Mac OS X
™
Blackmagic Design - Leading the creative video revolution™
2
Welcome
Contents
Thank you for purchasing a DeckLink broadcast
video card. We hope you share our dream for
the television industry to become a truly creative
industry by allowing anyone to have access to the
highest quality video.
Mac OS X™
Previously high end television and post production
required investment in millions of dollars of
hardware, however with DeckLink cards, even 10
bit uncompressed is now easily affordable. We hope you get years of use from
your new DeckLink card and have fun working with some of the world’s hottest
television and design software!
This instruction manual should contain all the information you’ll need on
installing your DeckLink capture card, although it’s always a good idea to ask
a technical assistant for help if you have not installed hardware cards into
computers before. As DeckLink uses uncompressed video and the data rates
are quite high, you’ll need fast disk storage and a high-end Power Mac.
We think it should take you approximately 10 minutes to complete installation.
Please check our web site at www.blackmagic-design.com and click the
support page to download the latest updates to this manual and DeckLink
driver software.
Lastly, please email us ([email protected]) with your DeckLink
serial number so we can keep you updated when new software is released.
Perhaps you can even send us your latest show reel of work completed on
your DeckLink!
We are constantly working on new features and improvements, so we would
love to hear from you!
Grant Petty
CEO Blackmagic Design
Welcome
Storage and data rates for
uncompressed video
Standard Definition Mac OS X
system requirements
High Definition Mac OS X
system requirements
Hardware installation
Blackmagic DeckLink software
Pre-installation checks
Installing Blackmagic DeckLink software
Viruses
Getting connected
Processor Amplifier
VANC
Blackmagic Deck Control
Adobe After Effects
Final Cut Pro HD
Trouble Shooting
If things go wrong
Connection diagrams
DeckLink
DeckLink Pro
DeckLink SP
DeckLink Extreme
DeckLink Extreme cables
DeckLink HD
DeckLink HD Plus
DeckLink HD Pro 4:4:4 mode
DeckLink HD Pro 4:2:2 mode
DeckLink HD Pro Single Link
DeckLink HD Pro cables
Blackmagic Design Warranty
2.
3.
4.
5.
6.
7.
9.
10.
12.
13.
15.
15.
17.
19.
20.
23.
26.
27.
28.
29.
30.
31.
32.
33.
34.
35.
36.
37.
38.
Blackmagic Design - Leading the creative video revolution™
3
Storage and data rates for
uncompressed video
The data rates for uncompressed video are quite high, and listed below are
minimum recommended disk requirements for uncompressed standard
definition and high definition video.
Uncompressed 10 bit YUV (4:2:2)
Mac OS X™
Standard Definition
Frame Size
720x486/29.97fps
720x576/25fps
MB per second
27
26
MB per minute
1 600
1 582
GB per hour
94
93
High Definition
Frame Size
1280x720p/60fps
1920x1080/24PsF
1920x1080/50i
1920x1080/60i
MB per second
141
127
132
158
MB per minute
8 438
7 594
7 910
9 482
GB per hour
494
445
463
556
MB per minute
12 656
11 391
11 865
14 238
GB per hour
742
667
695
834
Uncompressed 10 bit RGB (4:4:4)
High Definition
Frame Size
1280x720p/60fps
1920x1080/24PsF
1920x1080/50i
1920x1080/60i
MB per second
211
190
198
237
Due to disk seeks, when calculating the data rates required for your disk
system, it is a good idea to add a safety margin due to fluctuations in disk
speed. The degree of margin can be reduced by adding more disks.
Serial ATA (SATA) disks can reduce to half their speed as they become full, so
in a 2-disk SATA array you should aim for a 100% safety margin. In an 8-disk
SATA array, a 30% safety margin should be adequate. SCSI disk arrays seem
to display less fluctuation and so a 20% safety margin should be adequate for
an 8-disk SCSI array. Generally the more disks in the array, the better.
Note: Although other vendors and third parties may provide different data rates
for uncompressed video, the above recommendations are tested for use with
Decklink cards.
Blackmagic Design - Leading the creative video revolution™
4
Standard Definition on Mac OS X™
Minimum system requirements
Operating System
Mac OS X™ 10.2.3 or newer. QuickTime™ 6.1 or newer.
We currently recommend QuickTime™ 6.5.1 with Mac OS X™ 10.3.4.
[Mac OS X™ Server and Mac OS 9™ are not supported]
Mac OS X™
Processor
• Dual processor PowerMac G4/800 or faster. The G4 must have dual
processors even if a faster G4 processor is used.
• Single or dual processor PowerMac G5 with PCI-X slots. Base-model G5’s
with PCI slots might work but are unsupported.
• The fastest system you can afford is always a good idea.
Note: We advise against using processor upgrade cards as they don’t
improve bus speeds and are of little help with uncompressed video.
PCI slots
• Standard definition DeckLink cards will run at both 5 volts and 3.3 volts and
so are fully compatible with the slots in both G4’s and G5’s. DeckLink SD
cards can be used in any PCI or PCI-X slot in supported Macs. DeckLink SD
cards will run at 33 MHz in G4 and 66 MHz in a G5 with PCI-X.
Note: We advise against using PCI expansion chassis as they are not fast
enough for uncompressed video.
DeckLink™
DeckLink Pro™
DeckLink SP™
DeckLink Extreme™
Memory
• 512 MB of RAM or more. 1 GB would be preferable.
Disk Arrays
• SCSI - Ultra 160 or Ultra 320 SCSI card, especially the ATTO UL3D (PCI)
and UL4D (PCI-X) cards; at least 2 x U160 or U320 SCSI disks, 10 000 rpm,
software striped as RAID [0], OR;
• SATA - SATA RAID card; with at least 2 x SATA disks, 10 000 rpm, software
striped as RAID [0].
Standard Definition Monitoring
For monitoring Standard Definition and High Definition video, check out
Blackmagic Design’s low cost HDLink. HDLink converts your SD and
HD-SDI output to DVI-D, perfect for use with LCD displays such as the
Apple HD Cinema™ 23” display. HDLink features 2 x resize of NTSC and
PAL on 1920x1200 pixel displays and also provides analog RCA audio output.
For more information on HDLink visit www.blackmagic-design.com
Blackmagic Design - Leading the creative video revolution™
5
High Definition on Mac OS X™
Minimum system requirements
Operating System
Mac OS X™ 10.2.7 or newer. QuickTime 6.3 or newer. We currently recommend
QuickTime™ 6.5.1 with Mac OS X™ 10.3.4.
[Mac OS X™ Server and Mac OS 9™ are not supported]
Mac OS X™
Processor
• Dual processor PowerMac G5/1.8 GHz, or faster, with PCI-X slots. The G5
must have dual processors even if a faster processor is used.
• The fastest system you can afford is always a good idea and we highly
recommend the dual processor G5’s which are fantastic for HD work.
DeckLink HD™
DeckLink HD Pro™
PCI slots
High Definition DeckLink cards require PCI-X slots to perform both HD and SD
work. Either the 133 or 100 MHz slots can be used but the 133 MHz slot is
preferable. See page 8 for detailed installation instructions.
Memory
• 1.5 GB of RAM or more.
Disk Arrays
• SCSI - Ultra 320 SCSI card, with at least 8 x U320 SCSI disks, 10 000 rpm,
software striped as RAID [0], OR;
• 2GB Fibre Channel
Note: Check the Blackmagic Design website for updates on hardware
compatibility at www.blackmagic-design.com and “click on the support page.”
High Definition and Standard Definition Monitoring
For monitoring high definition and standard definition video, check out
Blackmagic Design’s low cost HDLink. HDLink converts your HD and
SD-SDI output to DVI-D, perfect for use with LCD displays such as the
Apple HD Cinema™ 23” display. HDLink features 2 x resize of NTSC and
PAL on 1920x1200 pixel displays and also provides analog RCA audio output.
For more information on HDLink visit www.blackmagic-design.com
Blackmagic Design - Leading the creative video revolution™
6
Hardware installation
G5
1. Remove the power plug from the back of your Mac. This is a safety
precaution before opening your computer. Ensure that you are statically
discharged by using a static strap.
2. Remove the side cover of your Mac to gain access to the PCI slots.
3. Remove your DeckLink card from the protective static bag making sure
you don’t touch the gold connectors on the base of the card. These
precautions should be taken when handling any PCI card.
Mac OS X™
4. Find a spare PCI or PCI-X slot (DeckLink HD series cards require a
PCI-X slot). Remove the metal port access cover, and screw, from the
back of your Mac.
Note: If installing a DeckLink, DeckLink HD or DeckLink HD Pro please
refer to the instructions “Which slot should I use in a PowerMac G5?”
on page 7.
G4
5. Insert your DeckLink card and ensure that it clicks firmly into place. G5’s
seem to have tighter slots so make sure the DeckLink card is firmly
seated in to place*.
6. Secure the card by the screw.
7. The procedure for installing a RAID controller card is similar to the
above.
8. Now replace the side cover of your Mac. Reconnect the power and start
up the computer.
Blackmagic Design - Leading the creative video revolution™
7
Which slot should I use in a PowerMac G5?
High Definition DeckLink cards require PCI-X slots to perform both HD and SD
work. Either the 133 or 100 MHz slots can be used but the 133 MHz slot is
preferable. See page 8 for detailed installation instructions.
G5
The high definition DeckLink cards are PCI-X cards and it makes a lot of sense
to place a HD card in the top slot. If you find the job of installing the DeckLink
HD in the top slot to be too tricky, simply install it in to one of the 100 MHz
slots (slots 2 or 3). It is much easier to fit the card in to these slots and we have
verified that the card runs fast enough in the 100 MHz slots. Avoid placing a
slower PCI card in the other 100 MHz slot as both slots will be reduced to the
speed of the slower card.
Mac OS X™
If you decide to install a DeckLink (SD), DeckLink HD or DeckLink HD Pro card
in the top slot of a G5, you will need to carry out the following procedure:
• Lie the G5 on its side to make it easy to insert the DeckLink card.
G5
• Loosely seat the card in position in the top slot.
• Press the back end of the card in to the slot, i.e. the end that does not have
connectors.
• Tilt the top of the card towards the top of the G5, i.e. towards the bay that can
hold the two Serial ATA drives.
• Whilst tilting the card on this angle, you should be able to press down carefully
on the front of the card and it will slide down in to the slot. Whilst doing this,
be careful as the metal connectors on the DeckLink card will press against a
black, plastic plug. The plug will flex slightly as you slide the DeckLink card in
to position.
This procedure does not require much force. If you find yourself having to use
too much force, or feel at all uncomfortable with this procedure, use one of the
100 MHz slots instead and you will find that you can install your card easily.
Blackmagic Design - Leading the creative video revolution™
8
Blackmagic DeckLink Software
The Blackmagic Design software installer supports standard and high definition
video formats and all Blackmagic Design DeckLink PCI cards.
The Blackmagic DeckLink software installer will install the following components.
1. Blackmagic DeckLink drivers.
2. Blackmagic Deck Control application.
3. Blackmagic DeckLink control panel.
Mac OS X™
4. Blackmagic QuickTime™ codecs.
5. Final Cut Pro™ Easy Setups, presets and enablers.
6. Blackmagic LiveKey.
7. Blackmagic Disk Speed Test.
Note: Before installing any software or hardware you will need administrator
privileges.
Blackmagic Design - Leading the creative video revolution™
9
Pre-installation checks
SCSI Devices
Check the web site of your SCSI card vendor for the latest firmware and
drivers. Firmware and drivers for the ATTO UL3D and UL4D can be found at
www.attotech.com. Sometimes firmware updates are also released for SCSI
disk arrays. Firmware for disk arrays from Huge Systems can be found at
www.hugesystems.com.
Mac OS X™
If you intend to run your disk array as a software stripe, you can use Apple’s
Disk Utility which is located in the /Applications/Utilities folder of Mac OS X.
Use RAID tab in Disk Utility to set up your software RAID, or refer to third party
instructions when using pre-configured hardware RAIDs.
QuickTime™
Make sure the latest version of QuickTime™ is installed on your Mac.
QuickTime™ can be found at www.apple.com/quicktime. A QuickTime™ Pro
serial number is included with Final Cut Pro HD as this is required to unlock
many QuickTime™ features.
Software Applications
DeckLink cards work with applications such as Final Cut Pro HD™, Adobe
After Effects™ and Discreet Combustion™. The DeckLink installer will install
components into some of these applications. If you install or update these
applications after installing your DeckLink card, you should reinstall the
DeckLink drivers to ensure these applications will work with your DeckLink card.
Having software applications pre-installed will simplify the installation of your
DeckLink card.
Blackmagic Design - Leading the creative video revolution™
10
Installing Blackmagic DeckLink software
Installing Blackmagic DeckLink software
1. The CD supplied with the DeckLink card contains the Blackmagic
installer. In order to ensure that you have the very latest driver please
visit www.blackmagic-design.com and click on the support page.
Note: Should the installer on the website be a newer version than
the one on your installer CD, download and save the zip file for future
installations.
Mac OS X™
2. If you wish to uninstall existing DeckLink drivers before installing a new
version, open the “Blackmagic Installer” disk and scroll down to folder
named Installer Files. Open this folder and you will find the Uninstall
Blackmagic utility. Run this utility and you will require an Administrator
password before it will allow you to uninstall the old drivers.
3. Go to the location of the downloaded installer and double click the zip
file which will then expand. Double click on the resulting “DeckLink_
Macintosh.dmg” file and the “Blackmagic Installer” disk will mount on
your desktop.
4.
Open the “Blackmagic Installer” disk and double-click on the
“Blackmagic Installer” application. You will require an Administrator
password before it will allow you to install the new drivers. All DeckLink
cards use the same installer.
5. Click “Continue”, “Agree” and “Install” buttons and the drivers will be
installed on your system.
6. Now restart your machine to enable the new software drivers.
Note: Keep the installer available as you may need to reinstall the drivers after
having installed or updated Final Cut Pro™ or QuickTime™.
Blackmagic Design - Leading the creative video revolution™
11
7. To check the installation has been successful, go to the Apple menu and
choose System Preferences. Click on the Displays icon and then on
the Arrangement tab. You should see an extra display which represents
the extended desktop feature of your DeckLink card. The size of the
DeckLink display will appear different to your computer display and may
be a NTSC or HDTV resolution.
8.
Mac OS X™
Select where sound is routed when playing and capturing QuickTime™
movies. To do so, go to the Apple menu and choose System
Preferences. Click on the Sound icon and then on the Output tab.
• Select DeckLink’s “SDI Digital Audio” to output audio channels
1 to 8.
Click on the Input tab and you will see 2 or 3 options related to your
DeckLink card. Due to a current limitation in QuickTime™ in Mac OS
X™, it is currently only possible to input 2 audio channels at any one
time. You will need to specify which audio input you wish to use from
the following options. The settings in Final Cut Pro™ override these
settings and can be set independently to these settings.
• “SDI Digital Audio” will input channels 1+2.
• “SDI Digital Audio (Ch 3+4)” will input channels 3+4.
• “AES/EBU Digital Audio” will input channels 1+2 through the
SPDIF/AES input of the DeckLink HD Pro.
Note: “SDI Digital Audio” should be chosen even when using analog audio with
cards such as the DeckLink SP and DeckLink Extreme. Analog convertors on
the analog DeckLink cards ensure the audio is converted to and from analog or
digital as required.
Blackmagic Design - Leading the creative video revolution™
12
Viruses
Viruses are an ever-increasing problem on computers. Computers will often
slow down if they become infected. This can cause various problems in video,
especially dropped frames and stuttering audio. For this reason, we recommend
you dedicate your Mac to video work and avoid using it for other tasks which
may introduce viruses, e.g. email, web browsing and sharing of ejectable disks
such as USB disks and non-commercial CD’s & DVD’s.
Mac OS X™
It is good practice to run antivirus software and keep it up to date. However,
the memory-resident component of many antivirus products is likely to cause
your video to drop frames. Accordingly, we recommend disabling the memory
resident component of your antivirus software while performing any video or
audio work.
Most antivirus programs show an icon in the System Preferences of Mac OS X™
and clicking on this icon will usually reveal an option to disable automatic virus
protection. Disable the automatic protection (“memory resident protection”) while
working on video or audio.
If you are also going to use your Mac for purposes other than video or audio
work, it would be wise to re-enable the automatic virus protection whenever you
have finished your video and audio work. At the time of writing this manual, there
were no known viruses which could infect Mac OS X™ and cause system slow
downs.
Given that memory resident antivirus software on Mac OS X™ will cause
performance degradation during video and audio editing, many DeckLink users
have chosen to permanently disable automatic virus protection for maximum
performance. Anyone choosing to take the same approach should re-evaluate
this decision on a regular basis, especially if new viruses become a problem on
the Mac OS X™ platform.
Blackmagic Design - Leading the creative video revolution™
13
Getting Connected: Display Settings
1.
Mac OS X™
After completing the software and hardware installation, connect your
DeckLink card to an external device such as a broadcast monitor, tape
deck or Blackmagic HDLink. Connection diagrams, for the DeckLink
family of cards, can be found towards the end of this manual from page
21 onwards.
2. Go to the Apple menu and choose System Preferences. Click on the
Displays icon. Ensure that “Show displays in menu bar” is enabled.
If you are using Mac OS X™ 10.2.x, ensure that “Show modes
recommended by display” is disabled. If you are using Mac OS X™
10.3 (or newer), increase the “Number of recent modes” to 10.
The same dialog box should also be appearing on your broadcast
monitor and you should also increase its “Number of recent modes” to
10 especially if you are using a high definition DeckLink card. Quit out
of System Preferences.
3. Go to the menu bar above your main display and you should find the
Displays menu. Click on it and you will see all of the display resolutions
for your 1 or 2 main computer monitors as well as for your TV monitor.
4.
The standard definition DeckLink cards will list two modes, NTSC
(720 x 486, 29 Hz) and PAL (720 x 576, 25 Hz). The high definition
DeckLink cards will list many more modes in addition to these two
modes. Select the desired mode and your TV monitor should switch
to that mode. If you have a NTSC-only monitor and switch to a PAL
desktop, the video will appear gray in color. The same is true if you
have a PAL-only monitor and switch to NTSC. A multi-format monitor is
required to display the different modes in their correct color.
5. You can switch between TV resolutions by opening the System
Preferences and then selecting Displays. However using the Displays
menu is usually much easier and more convenient.
Blackmagic Design - Leading the creative video revolution™
14
6. The SDI and analog outputs are always active on DeckLink cards. If
you need to switch the analog connections between composite and
component, use the Blackmagic DeckLink PrefPane located in “System
Preferences.” You can adjust your analog settings in the video tab of
the DeckLink control panel.
7. After installing the DeckLink Extreme, you might find that you cannot
capture video. The reason for this is that you first need to specify which
video input you are using, i.e. SDI, component analog or composite
analog. Open the System Preferences and then click on Blackmagic
DeckLink. Look at the settings for Video Connections and set the Input
as desired, i.e:
Mac OS X™
• Digital SDI
• Analog NTSC/PAL (Y In) - also known as composite analog.
• Analog Y, B-Y, R-Y - also known as component analog.
8. If you wish to sync your deck to your Decklink card without using a
signal generator, we have provided the option of sending a stable black
signal to the deck during capture. You can set which output is used for
this function with the Black Video to Deck in Capture drop-down menu.
Please note that the accompanying audio output will be muted as well
when in capture.
9. The video desktop feature enables you to work in applications such
as Adobe Photoshop™ and Microsoft Powerpoint™ and display them
on your broadcast monitor. This will immediately show you how your
project will display on a TV so there will be no surprises when you
output to tape. If you wish to disable this feature, choose to “Disable
After Restart”. You will require an Administrator password to make this
change.
Note: When using the DeckLink HD Pro video output in RGB 4:4:4 Dual Link
mode, the signal from the analog component outputs will be RGB, so switch
your broadcast monitor to RGB. You can still playback 8 and 10 bit YUV files, as
this setting only effects the video output setting. DeckLink HD Pro will translate
these files to RGB on playback in real time.
Blackmagic Design - Leading the creative video revolution™
15
Analog Video Input Processor Amplifier
We now include a Proc Amp tab in the Blackmagic DeckLink PrefPane located
in “System Preferences.”
Proc Amp can be used to adjust gain level controls for any cards with analog
input, i.e. the DeckLink SP and DeckLink Extreme. We have added this control
due to variations in video output from analog tape decks.
This is also a reason why SDI is preferable to analog video, as it does not
suffer from the potential gain variance issues which can be seen with analog
components.
Mac OS X™
Preserving Blanking Data or VANC
To preserve VANC data when capturing, this can be enabled in the Blackmagic
DeckLink PrefPane located in “System Preferences.” Now you can use up to 3
video lines at the top of a captured QuickTime™ movie file to store any 3 lines
from vertical blanking. This allows 3 line timecode, VITC, vertical interval test
signals, subtitle info or any other VANC data to be preserved between capture
and playback. Software applications can also access these lines if required.
This uses standard QuickTime™ files, so applications such as After Effects™
and Final Cut Pro™ will be compatible. This works on all standard or high
definition DeckLink cards. You can select if you want 1, 2 or 3 lines to be used.
Although an extra metadata track to the QuickTime™ file would be desirable, it
would not be compatible with some video applications. We also thought about
making the movie file 3 lines larger in the vertical resolution. So for example,
1080 would become 1083. However these files would be incompatible with
normal files so it is not a good solution. So we thought that most people don’t
miss a line or two from the top of the image and it would be beneficial to include
this feature and use a line or 2 or 3 for that blanking data storage.
The great advantage is we don’t need to know about the data structure of the
VANC data, as we just capture the lines. So if there is some special data that
you want to use, that’s no problem, as we just capture the lines intact, put them
in the top lines of the movie file. We then put the lines back into the vertical
blanking when playing back the files.
Blackmagic Design - Leading the creative video revolution™
16
Because these lines can be passed to the application, a developer could write
software to read the VANC data and use it for various purposes, e.g. 3-line
timecode and audio chasing, or other uses. This feature has unlimited uses!
You can use this feature with software, such as Deck Emulator software, to
create a disk recorder that captures and preserves on playback 3-line timecode
in telecine suites etc.
How the VANC Feature Works
This feature allows you to preserve lines of VANC in the vertical blanking and
store them into lines 1 to 3 of the video file. These lines are then inserted back
into the video blanking when the file is played back.
Mac OS X™
You can select to hide these lines from the application so they don’t look ugly,
or to let them be passed to the application if you are running software that
interprets this data.
An example of VANC data is 3-line timecode, which uses lines 18, 19, and 20
in NTSC or lines 19, 20 and 21 in PAL. 3-line timecode, as used in AATONTM
equipped telecine suites, feature audio timecode and keycode information along
with the normal timecode numbers.
Blackmagic Design - Leading the creative video revolution™
17
Blackmagic Deck Control
Blackmagic Deck Control is a basic utility used for capture from, and recording
to your tape deck. It is controlled via RS-422 and uses the Sony™ RS-422
protocol.
It is designed to be used in conjunction with applications such as Adobe After
Effects™ and Discreet Combustion™, which do not include their own deck
control capabilities.
Mac OS X™
Pixel formats supported by Blackmagic Deck Control are:
Blackmagic QuickTime™ RGB (10 bit uncompressed)
Blackmagic QuickTime™ v210 (10 bit uncompressed)
Blackmagic QuickTime™ (8 bit uncompressed)
Apple QuickTime™ PhotoJPEG (compressed)
Apple QuickTime™ DV - NTSC (compressed)
Apple QuickTime™ DV - PAL (compressed)
This utility can capture or playback one video clip at a time. The application
windows, of which there are two, are used for viewing clips and deck control.
The left window is the clip playback window and the right is the capture/deck
window.
Setting Up
1. Double click the Blackmagic Deck Control icon on your desktop to open
the application.
2. Open edit -> preferences. Select one of the Easy Setups from the drop
down menu.
3. Select your disk array as the capture location.
4. Click “OK.”
Playback
1. Select File-> open, and choose the video file you wish to playback. If
you have added Blackmagic Deck Control to your Dock, you can also
drag a movie file on to the Blackmagic Deck Control icon to open it. The
file will appear in the playback window.
2. Click the “play” triangle below the clip. You can also scrub the clip just
like the QuickTime™ player.
Note: Make sure the files you wish to play back are TV-formatted QuickTime™
files otherwise they will not appear on the DeckLink output.
Blackmagic Design - Leading the creative video revolution™
18
Deck Control features
Loop playback
Loop back and forth
Grab frame (to Photoshop™ file)
Copy and paste (just like QuickTime™ player)
Inserting to Tape
Mac OS X™
1. Open the clip that you require to print to tape.
2. Enter the timecode of the desired in-point.
3. Click “Put Clip.”
Capturing Clips
There are two ways to capture clips.
1. Capture now – captures video and audio instantly.
Shortcut: zK
2. Get clip – captures frame accurate timecode, video, audio to “in” and
“out-points” set by the user. [Timecode will only be available if RS-422
is connected]
Your video deck will respond to the standard keys used for deck control, i.e.
spacebar, “j”, “k” and “l” keys. In and Out points can be set using the “i” and “o”
keys while playing the tape.
AppleScript™
Blackmagic Deck Control supports AppleScript™ commands for starting and
stopping video capture. The status of the capture can also be requested via
AppleScript™ for confirmation that capture has stated or stopped.
Blackmagic Design - Leading the creative video revolution™
19
Adobe After Effects™
Minimal configuration is required for Adobe After Effects™.
Simply, open the application and select the television standard frame size and
frame rate you wish to work with.
Mac OS X™
How to use your DeckLink Card as a Frame Buffer
To allow your Adobe After Effects™ composition to be displayed in real-time
from your DeckLink card, go to edit->preferences->video preview. Select
Blackmagic RGB and the appropriate video standard. Now you can view your
Adobe After Effects™ compositions in YUV colorspace on your broadcast
monitor as well as your desktop. No more nasty surprises when you go to air
or tape - what you see is what you get!
Create a New Composition
Go to the Composition menu and select New Composition.
Shortcut: zN
In the dialogue box, select an appropriate television standard from the pulldown
menu. Click OK.
Rendering
When you have completed your composition, you will need to render to a pixel
format supported by Blackmagic DeckLink.
Below is a list of supported codecs:
Blackmagic QuickTime™ RGB (10 bit uncompressed)
Blackmagic QuickTime™ v210 (10 bit uncompressed)
Blackmagic QuickTime™ (8 bit uncompressed)
Apple QuickTime™ PhotoJPEG (compressed)
Apple QuickTime™ DV - NTSC (compressed)
Apple QuickTime™ DV - PAL (compressed)
For all HD standards, select upper field first. For NTSC 720 x 486, select lower
field first. For PAL 720 x 576, select upper field first.
Blackmagic Design - Leading the creative video revolution™
20
Final Cut Pro HD™
Final Cut Pro HD™ is powerful real-time video and audio non-linear editing
application. In conjunction with your new Decklink card, Final Cut Pro™ will
allow you work in every video standard, from DV up to uncompressed 4:4:4
RGB high definition for film work.
The Blackmagic DeckLink installer will add Easy Setups for Final Cut Pro HD™.
Mac OS X™
Setting Up
Launch Final Cut Pro HD™
1. The Easy Setup window will appear.
2. Click on the popup menu named “Setup for” and select a relevant
Blackmagic Easy Setup. For each TV format (NTSC, PAL and HDTV)
you will find a range of compressed and uncompressed file formats you
can choose. For example, if you are working in NTSC format, you could
choose one of the following Easy Setups:
Blackmagic NTSC - 10 Bit
Blackmagic NTSC - 8 Bit
Blackmagic NTSC - DV
Blackmagic NTSC - DV50
Blackmagic NTSC - JPEG.
Which Easy Setup you choose will be dictated partly by the speed of
your disk array and partly by whether you already have any movie clips
in a particular format. If you have a fast disk array, you can choose a 10
Bit format and the quality will be stunning. If you only have a single disk
for storage, you could choose either DV or JPEG. JPEG often looks
better but unfortunately Apple have not yet implemented RT Effects
with JPEG. If you need to add RT Effects, then DV would be a better
choice.
3. Click on the popup menu named “Primary Scratch Disk” and select
your disk array from the popup menu. Then click OK.
4. Final Cut Pro HD will appear.
Blackmagic Design - Leading the creative video revolution™
21
Mac OS X™
Playback
As a quick test to make sure everything is connected correctly, use the
Blackmagic test media (bars and tone) which can be found on the installer CD.
Find a test clip which matches the format of your project, eg NTSC 8 bit, and
copy it to your disk array. Import this clip into your Final Cut Pro HD™ project
and drop it into the timeline. You should now see the image on both your
computer desktop and your DeckLink output.
If you can’t see any video on your DeckLink output, check the connections
again and ensure you have the correct output settings configured within Final
Cut Pro HD by going to the View menu->Video Devices and, in the same
menu, make sure External Video is set to ‘All Frames’. You might also check in
the Displays menu and also the Blackmagic DeckLink preference pane in the
System Preferences of Mac OS X™.
Note: SDI and analog outputs are always active. If you have a DeckLink card
which supports both component and composite analog, you will need to
choose between component and composite output in the Blackmagic DeckLink
preference pane in the System Preferences of Mac OS X™. It is only on a card
with multiple inputs, such as the DeckLink Extreme, that you need to specify
whether you are capturing via SDI, component analog or composite analog
inputs.
Capture
To capture, go to the File menu and choose Log & Capture.
Shortcut: z8
Your video deck will respond in the same way as a clip in the Timeline, via the
space bar and “j”,“k”,“l” keys.
It is extremely important to set the correct tape number for your clip as this will
allow you to find the same frame off tape at any time in the future.
To immediately capture, click the Capture Now button. If you wish to log the
clip, enter the desired “in” and “outpoints” using either the “i” and “o” keys on
your keyboard or manually, by typing in the timecode and clicking “Log Clip”. If
you have the “Prompt” checkbox selected, Final Cut Pro™ will now ask you to
name the clip. Name it and click OK; the clip will appear in your browser with a
diagonal red line indicating that it is “offline”. Repeat this until you have logged
all of the clips you wish to capture in a batch.
Note that, when logging sequential clips from tape, Final Cut Pro™ will
automatically suggest a name for each clip based on the previous clip. So, if
your first clip is called “Mary, MCU”, Final Cut Pro™ will suggest the next clip be
called “Mary, MCU 01” and so forth. This can make the logging process much
faster.
Blackmagic Design - Leading the creative video revolution™
22
Batch Capture
Select the clips you wish to capture by marque or shift-click. Go to the File
menu and choose Batch Capture or click on the Batch button in the Logging
tab of the Log & Capture window.
Shortcut: ^C (i.e. Control C)
To set handles on the clips, go to the File menu and choose Batch Capture
(^C). Enable the “Add Handles” box to capture additional frames (“handles”)
before and after the In and Out points of a clip.
Mac OS X™
RT Extreme™ (real time effects)
RT Effects are one of the great features of Final Cut Pro HD™ and your
DeckLink card is fully compatible with Apple’s RT Extreme™. Before Apple had
their own RT Effects, we included some Blackmagic RT Effects and they are
also available if you want to use them. Apple added great RT Effects support
to version 4 of Final Cut Pro™ and so it now makes sense to use Apple’s RT
Extreme™ real time effects.
When you install the Blackmagic DeckLink driver software, the “effect handling”
in Final Cut Pro HD™ will default to the “Blackmagic”. To use Apple’s RT
Extreme effects, we recommend you switch this setting from Blackmagic to
Final Cut Pro HD™. To do so, go to the Final Cut Pro HD™ menu, choose
System Settings and click on the Effect Handling tab. Change the settings, for
Uncompressed 10-bit 4:2:2 and Uncompressed 8-bit 4:2:2, from Blackmagic to
Final Cut Pro HD™.
If you are working in high definition, you will not find a “Final Cut Pro HD™”
setting so you need to change the settings for Blackmagic 8 Bit (2Vuy) from
“Blackmagic” to “Blackmagic HD”. This is because Apple do not yet have their
own codec for 8-bit HD so we supply our own. Apple will probably address
this in a future update and we expect Blackmagic Design will adopt the Apple
codec at that time.
Recording to Tape
Once you have captured your clips, edited them and applied any effects, you
will want to record the completed project to tape. One easy method is to go to
the File menu and choose Print to Video. If you want to perform precise insert
and assemble edits onto a timecode striped tape, go to the File menu and
choose Edit to Tape.
Blackmagic Design - Leading the creative video revolution™
23
Trouble Shooting
Q: There is no output from my card when in desktop mode.
A: Go to the Apple menu and choose System Preferences. Click on the
Blackmagic DeckLink icon. Ensure that “Video Desktop” option is set to
“Enabled” and then restart the Mac. You should now see your extended desktop
on your broadcast monitor. If it still does not appear, go to the /Applications/
Utilities folder and launch Disk Utility.
Mac OS X™
Select your startup hard disk and then click on “Repair Disk Permissions.”
A progress bar will draw across your screen and then disappear. This will
usually take 5 or 10 minutes and then you can restart your Mac. Now see
if the desktop displays on your broadcast monitor. If not, please contact
[email protected].
Q: I can’t get machine control of my tape deck.
A: Make sure that the deck you are using supports and is connected via the
Sony RS-422 serial protocol. DeckLink does not directly support older RS-232
serial devices.
Some low-cost decks, such as the Sony UVW1400a still use RS-232. Final Cut
Pro can provide deck control via RS-232 with the addition of a Keyspan “High
Speed” USB Serial Adapter http://www.keyspan.com/products/usb/USA19W.
You will need to configure the RS-232 protocol by going to the Audio/Video
Settings, in Final Cut Pro, and then click on Device Control Presets. Edit each
preset for which you want to use RS-232. This solution works fine if you have to
use RS-232.
If using a Panasonic deck, you may need to use the deck’s USER Menu to
change the “ID SEL” to “other”, to make it compatible with the Sony RS-422
deck control protocol. “ID SEL” is usually USER Menu item number 202.
Q: Can I monitor audio from my Mac’s internal speaker?
A: Yes you probably can, however we do not recommend it. This is because
the Mac system clock and the DeckLink’s clock are different. If you monitor
audio through your Mac’s internal speaker, the audio is likely to be out of sync
with video. Furthermore, audio might stop working for no apparent reason. We
strongly recommend using the SPDIF output connectors from the DeckLink
card, or the audio output from your deck, to monitor your audio.
Blackmagic Design - Leading the creative video revolution™
24
Mac OS X™
Q: When I output video to my deck (or TV monitor), the picture moves or
rolls? What can I do to obtain stable video?
A: DeckLink always has a stable video output so you don’t need genlock,
and this is great as it saves you a lot of money on a black burst generator. We
designed DeckLink to do this, as it makes the entire system cost much lower,
and that’s important for a low cost card. Generally you select the deck to input
video sync, when connected to DeckLink, and then the deck can lock.
However if you are in a big post facility, you might need Genlock, so DeckLink
Pro and DeckLink Extreme include genlock. Some Betacam SP decks (eg Sony
UVW1800 and UVW1400a) don’t always work well without genlock so DeckLink
SP and DeckLink Extreme include genlock. If you have problems with an analog
deck, you can connect the genlock.
If you are using DeckLink SP, DeckLink Pro or DeckLink Extreme, try connecting
the Y output of the DeckLink card to the reference input of the deck, and then
the reference loop out back into the Y input. That should let the deck lock to the
DeckLink. There are a few decks where this doesn’t work and in which case you
might need to use a black burst generator.
Q: I cannot get stable video output out of my Betacam SP UVW1400a.
What can I do?
A: This is a very popular model of deck as it is low cost. We have received a
range of reports regarding the Betacam SP UVW1400a and you might or might
not be able to get genlock working without a black burst generator. However,
you can give it a try and this has worked for a number of our customers,
especially with the latest drivers.
1.
In the Video Input for component, you have the Y, R-Y and B-Y ports.
Remove the “Y in (from deck)” cable from the Component Y port and
connect it to the top-left Ref Video port.
2. Switch the Ref Video termination to Off.
3. Connect a cable from the top-right Ref Video port (labelled “sync”) and
connect it to the Component Y port.
That should let the deck lock to the DeckLink. There are a few UVW1400a
decks where this doesn’t work and in which case you might need to use a black
burst generator.
Most decks can just lock to the DeckLink SP and DeckLink Extreme but
UVW1400a owners have often reported that they had to use a blackburst
generator. The one we use inhouse is a Horita BSG-50 (you have to specify
NTSC or PAL) and you can see it at http://www.horita.com/video.htm#BSG-50.
Blackmagic Design - Leading the creative video revolution™
25
The UVW1400a lacks RS-422 serial control but you can still use RS-232
serial control with Final Cut Pro to obtain full deck control. Please refer to the
troubleshooting note “I can’t get machine control of my tape deck” for more
information.
Q: I am trying to play back a DV clip in Final Cut Pro on my PowerMac
G4 but the video is jerky. What can I do to fix this problem.
A: Go to the top-left corner of your timeline and you will find an RT popup menu.
Pop it open and ensure that it is set to “Safe RT.” Then check the Playback
Video Quality and reduce it to Medium or Low. Make sure that “Record to Tape”
remains on “Full Quality.” This will enable you to monitor smooth video (at a
lower quality) on your TV monitor while recording to tape at full quality.
Mac OS X™
Blackmagic Design - Leading the creative video revolution™
26
If things go wrong
There are three steps to getting help.
Step 1. Check out the Blackmagic Design web site www.blackmagicdesign.com and “click on the support page” for the latest support
information.
Mac OS X™
Step 2. Call your dealer.
Your dealer will have the latest technical updates from Blackmagic
Design, and should be able to give you immediate assistance.
We also recommend you check out the support options your dealer
offers as they can arrange various support plans based on your
workflow requirements.
Step 4. The next option is to email us at [email protected]
with your questions.
Note: Please provide us with as much information as possible regarding your
technical problem and system specifications so that we may try to reproduce
your problem quickly.
Blackmagic Design - Leading the creative video revolution™
27
Connection Diagrams
DeckLink™
SD-SDI 4:2:2 video and audio, capture and playback card
Mac OS X™
Deck Control
RS-422
AES-S/PDIF
Output
SD-SDI 4:2:2
Monitoring Output
SD-SDI 4:2:2
Output (to deck)
SD-SDI 4:2:2
Input (from deck)
This DeckLink model does not have genlock, so
you need to connect your deck to the Deck SDI
Output, which has stable output to sync the deck.
Set the deck to input or auto reference. Be sure to
set the “Black Video Output to Deck in Capture”
option to “On Digital SDI Outputs” in the DeckLink
control panel, when using this feature.
Blackmagic Design - Leading the creative video revolution™
28
Connection Diagrams
DeckLink Pro™
SD-SDI 4:2:2 video and audio capture and playback card with analog monitoring
Mac OS X™
AES-S/PDIF Output
(monitoring A)
AES-S/PDIF Output
(monitoring B)
AES-S/PDIF Output
(monitoring C)
AES-S/PDIF Output
(monitoring D)
R-Y Output
(monitoring)
B-Y Output
(monitoring)
Y Output
(composite monitoring)
SD-SDI Output
(monitoring)
SD-SDI Output
(to deck)
SD-SDI Input
(from deck)
DeckLink Pro
7ft Breakout Cable
Genlock Input
Deck Control RS-422
When you don’t have genlock, you can output
stable black so DeckLink Pro locks the deck. This
output is always stable and allows the deck to be
set to input reference or auto reference. Be sure to
set the “Black Video Output to Deck in Capture”
option to “On Digital SDI Outputs” in the DeckLink
control panel, when using this feature.
Blackmagic Design - Leading the creative video revolution™
29
Connection Diagrams
DeckLink SP™
Analog video and audio capture and playback card with SD-SDI 4:2:2 monitoring
Mac OS X™
(R) Audio Output
(balanced analog)
(R) Audio Input
(balanced analog)
(L) Audio Output
(balanced analog)
(L) Audio Input
(balanced analog)
AES-S/PDIF Output
(monitoring)
SD-SDI Output
(monitoring)
R-Y Input
B-Y Input
Y Input
DeckLink SP
7ft Breakout Cable
R-Y Output
B-Y Output
Y Output
(composite monitoring)
Genlock Input
Deck Control RS-422
When you don’t have genlock, you can output
stable black so DeckLink SP locks the deck. This
output is always stable and allows the deck to be
set to input reference or auto reference. Be sure to
set the “Black Video Output to Deck in Capture”
option to “On Analog Outputs” in the DeckLink
control panel, when using this feature.”
Blackmagic Design - Leading the creative video revolution™
30
Connection Diagrams
DeckLink Extreme™
SD-SDI 4:2:2 and analog video, audio capture and playback card
Mac OS X™
(R) Audio Output
(balanced analog)
(R) Audio Input
(balanced analog)
(L) Audio Output
(balanced analog)
(L) Audio Input
(balanced analog)
AES-S/PDIF Output
(monitoring)
R-Y Input
B-Y Input
Y Input
R-Y Output
B-Y Output
Y Output
(composite monitoring)
SD-SDI Input
SD-SDI Output
Genlock Input
Deck Control RS-422
DeckLink Extreme
7ft Breakout Cable
When you don’t have genlock, you can output
stable black so DeckLink Extreme locks the deck.
This output is always stable and allows the deck to
be set to input reference or auto reference. If you
are using a digital deck, be sure to set the “Black
Video Output to Deck in Capture” option to “On
Digital SDI Outputs” in the DeckLink control panel,
when using this feature. If you are using an analog
deck, be sure to set the “Black Video Output to
Deck in Capture” option to “On Analog Outputs”.
Blackmagic Design - Leading the creative video revolution™
31
Connection Diagrams
DeckLink Extreme™ cable
Mac OS X™
10 bit
SDI Output
10 bit
SDI Input
AES-S/PIDF
Output
Genlock In
Deck Control
RS422
B-Y Out R-Y Out Y Out
Y-B In
R-Y In
Y In
Audio
Left
Output
Audio
Right
Output
Audio
Left
Input
Audio
Right
Input
Blackmagic Design - Leading the creative video revolution™
32
Connection Diagrams
DeckLink HD™
HD/SD-SDI 4:2:2 video, audio capture and playback card
Mac OS X™
Deck Control
RS-422
AES-S/PDIF
Output
HD/SD-SDI 4:2:2
Monitoring Output
HD/SD-SDI 4:2:2
Output (to deck)
HD/SD-SDI 4:2:2
Input (from deck)
This DeckLink HD model does not have genlock,
so you need to connect your deck to the Deck SDI
Output which has stable output to sync the deck.
Set the deck to input or auto reference. Be sure to
set the “Black Video Output to Deck in Capture”
option to “On Digital SDI Outputs” in the DeckLink
control panel, when using this feature.”
Blackmagic Design - Leading the creative video revolution™
33
Connection Diagrams
DeckLink HD Plus™
HD/SD-SDI 4:2:2 video, audio capture and playback card
Mac OS X™
Wordclock
Output
AES-S/PDIF
Output
DeckLink HD Plus
Break-out Cable
AES-S/PDIF
Input
Genlock/
Tri-Sync
REF Input
Deck
Control
RS-422
HD/SD-SDI 4:2:2
Output (to deck)
HD/SD-SDI 4:2:2
Input (from deck)
When you don’t have genlock, you can output
stable black so DeckLink HD Plus locks the deck.
This output is always stable and allows the deck to
be set to input reference or auto reference. Be sure
to set the “Black Video Output to Deck in Capture”
option to “On Digital SDI Outputs” in the DeckLink
control panel, when using this feature.
Blackmagic Design - Leading the creative video revolution™
34
Connection Diagrams
DeckLink HD Pro™
HD/SD-SDI 4:4:4/4:2:2 video, audio capture and playback card with analog monitoring
(Dual Link Mode 4:4:4)
Mac OS X™
Wordclock
Output
AES-S/PDIF
Output
AES-S/PDIF
Input
R-Y/R
Output
B-Y/B
Output
Y/G
Output
Genlock/
Tri-Sync
REF Input
Deck
Control
RS-422
DeckLink HD Pro
Break-out Cable
Dual Link HD-SDI 4:4:4
HD/SD-SDI 4:2:2
Monitoring Output
HD/SD-SDI 4:2:2
Output (to deck)
HD-SDI Input
4:4:4 Ch 2
HD/SD-SDI 4:2:2
Input (from deck)
When you don’t have genlock, you can output
stable black, so DeckLink HD Pro locks the deck.
This output is always stable and allows the deck to
be set to input reference or auto reference. Be sure
to set the “Black Video Output to Deck in Capture”
option to “On Digital SDI Outputs” in the DeckLink
control panel, when using this feature.
Blackmagic Design - Leading the creative video revolution™
35
Connection Diagrams
DeckLink HD Pro™
HD/SD-SDI 4:4:4/4:2:2 video, audio capture and playback card with analog monitoring
(Single Link Mode 4:2:2)
Mac OS X™
Wordclock
Output
AES-S/PDIF
Output
AES-S/PDIF
Input
R-Y/R
Output
B-Y/B
Output
Y/G
Output
Genlock/
Tri-Sync
REF Input
Deck
Control
RS-422
DeckLink HD Pro
Break-out Cable
HD/SD-SDI 4:2:2 Mode
HD/SD-SDI 4:2:2
Monitoring Output
HD/SD-SDI 4:2:2
Output (to deck)
BNC for Dual Link only
HD/SD-SDI 4:2:2
Input (from deck)
When you don’t have genlock, you can output
stable black so DeckLink HD Pro locks the deck.
This output is always stable and allows the deck to
be set to input reference or auto reference. Be sure
to set the “Black Video Output to Deck in Capture”
option to “On Digital SDI Outputs” in the DeckLink
control panel, when using this feature.
Blackmagic Design - Leading the creative video revolution™
36
Connection Diagrams
DeckLink HD Pro™ (Single Link card)
HD/SD-SDI 4:2:2 video, audio capture and playback card with analog monitoring
Mac OS X™
Wordclock
Output
AES-S/PDIF
Output
AES-S/PDIF
Input
R-Y/R
Output
B-Y/B
Output
Y/G
Output
Genlock/
Tri-Sync
REF Input
Deck
Control
RS-422
DeckLink HD Pro
Break-out Cable
HD/SD-SDI 4:2:2 Only
HD/SD-SDI 4:2:2
Output (to deck)
HD/SD-SDI 4:2:2
Input (from deck)
When you don’t have genlock, you can output
stable black so DeckLink HD Pro locks the deck.
This output is always stable and allows the deck to
be set to input reference or auto reference. Be sure
to set the “Black Video Output to Deck in Capture”
option to “On Digital SDI Outputs” in the DeckLink
control panel, when using this feature.
Blackmagic Design - Leading the creative video revolution™
37
Connection Diagrams
DeckLink HD Pro™ cable
Mac OS X™
DeckLink HD Pro
Connection
Wordclock AES-S/PDIF AES-S/PDIF
Input
Output
Output
REF
Input
B-Y/B
Output
Y/G
Output
R-Y/R
Output
Deck Control
Blackmagic Design - Leading the creative video revolution™
38
Blackmagic Design Limited Warranty
Blackmagic Design warrants that this product will be free from defects in materials and workmanship for a period of 12 months from the date
of purchase. If a product proves to be defective during this warranty period, Blackmagic Design, at its option, either will repair the defective
product without charge for parts and labor, or will provide a replacement in exchange for the defective product.
In order to obtain service under this warranty, you the Customer, must notify Blackmagic Design of the defect before the expiration of the warranty period and make suitable arrangements for the performance of service. The Customer shall be responsible for packaging and shipping the
defective product to a designated service center nominated by Blackmagic Design, with shipping charges pre paid. Customer shall be responsible for paying all shipping changes, insurance, duties, taxes, and any other charges for products returned to us for any reason.
Mac OS X™
This warranty shall not apply to any defect, failure or damage caused by improper use or improper or inadequate maintenance and care. Blackmagic Design shall not be obligated to furnish service under this warranty: a) to repair damage resulting from attempts by personal other than
Blackmagic Design representatives to install, repair or service the product, b) to repair damage resulting from improper use or connection to
incompatible equipment, c) to repair any damage or malfunction caused by the use of non Blackmagic Design parts or supplies, or d) to service
a product that has been modified or integrated with other products when the effect of such a modification or integration increases the time or
difficulty of servicing the product. THIS WARRANTY IS GIVEN BY BLACKMAGIC DESIGN IN LIEU OF ANY OTHER WARRANTIES, EXPRESS
OR IMPLIED. BLACKMAGIC DESIGN AND ITS VENDORS DISCLAIM ANY IMPLIED WARRANTIES OF MERCHANTABILITY OR FITNESS FOR
A PARTICULAR PURPOSE. BLACKMAGIC DESIGN’S RESPONSIBILITY TO REPAIR OR REPLACE DEFECTIVE PRODUCTS IS THE WHOLE
AND EXCLUSIVE REMEDY PROVIDED TO THE CUSTOMER FOR ANY INDIRECT, SPECIAL, INCIDENTAL OR CONSEQUENTIAL DAMAGES
IRRESPECTIVE OF WETHER BLACKMAGIC DESIGN OR THE VENDOR HAS ADVANCE NOTICE OF THE POSSIBILITY OF SUCH DAMAGES.
BLACKMAGIC DESIGN IS NOT LIABLE FOR ANY ILLEGAL USE OF EQUIPMENT BY CUSTOMER. BLACKMAGIC IS NOT LIABLE FOR ANY
DAMAGES RESULTING FROM USE OF THIS PRODUCT. USER OPERATES THIS PRODUCT AT OWN RISK.
Copyright 2004 Blackmagic Design. All rights reserved. ‘Blackmagic Design’, ‘DeckLink’, ‘HDLink’ and ‘Leading the creative video revolution’
are registered trademarks in the US and other countries. All other company and product names may be trade marks of their respective
companies with which they are associated.
Blackmagic Design - Leading the creative video revolution™