1
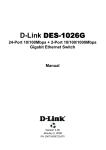
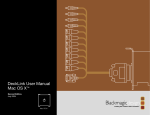
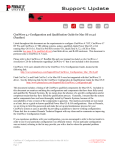
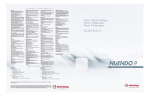
Huge Media Vault - Max
(Single Channel)
User’s Guide
Document number 800001 rev K1.
Copyright © 2003, Huge Systems Inc.
All rights reserved. Printed in the U.S.A.
Huge Media Vault, Huge Media Vault DualMax, Huge MediaVault Max, HDTV RAID, SDTV RAID,
Huge Systems name and logo are registered trademarks of Huge Systems Inc.
All other trademarks are the property of their respective holders.
Specifications and procedures in this document are subject to change without notice.
Published by: Huge Systems Inc.
Page 2 of 26
Huge Media Vault - Max User’s Guide
800001 rev K1
Table of Contents
Thank You ....................................................................................................................................... 4
Model Numbering ........................................................................................................................ 4
Features and benefits.................................................................................................................. 5
Agency Approvals ....................................................................................................................... 5
Specifications .............................................................................................................................. 5
Technical Support............................................................................................................................ 5
Serviceability ............................................................................................................................... 5
Getting Started................................................................................................................................. 6
Unpacking ................................................................................................................................... 6
Check List.................................................................................................................................... 6
Editing System Requirements..................................................................................................... 6
Hardware Installation and configuration .......................................................................................... 7
SCSI Host Adapter ...................................................................................................................... 7
Component Locations ................................................................................................................. 8
SCSI ID ....................................................................................................................................... 9
Mode Select – RAID Level .......................................................................................................... 9
Double Beep.............................................................................................................................. 10
Reset Button.............................................................................................................................. 11
SCSI connections...................................................................................................................... 11
Host connections .................................................................................................................. 11
Terminator............................................................................................................................. 11
Daisy chaining....................................................................................................................... 12
Input Power ............................................................................................................................... 12
AC Power .............................................................................................................................. 12
Power Switch ........................................................................................................................ 12
Indicators................................................................................................................................... 13
Front LED Status Indicators.................................................................................................. 13
Power Up Light Show ........................................................................................................... 13
Diagnostic Port .......................................................................................................................... 13
Audible Alarm ................................................................................................................................ 14
6 Rapid Beeps During Boot Time.............................................................................................. 14
6 Rapid Beeps During Normal Operation.................................................................................. 14
Slow Beeps ............................................................................................................................... 14
Formatting and Partitioning ........................................................................................................... 15
Macintosh G4 / G5 in OS X....................................................................................................... 15
Windows NT Partition / Format ................................................................................................. 20
Preparing a Media Vault Max (single channel) ..................................................................... 20
Preparing a Media Vault DualMax (dual channel) ................................................................ 20
Windows 2000 and XP Partition / Format ................................................................................. 21
Preparing a Media Vault Max (single channel) ..................................................................... 21
Preparing a Media Vault DualMax (dual channel) ................................................................ 21
Application Notes........................................................................................................................... 23
General...................................................................................................................................... 23
Video Resolution Data Rates................................................................................................ 23
Hours per Terabyte Table ..................................................................................................... 23
Macintosh .................................................................................................................................. 24
ATTO Firmware .................................................................................................................... 24
RAID Compatibility................................................................................................................ 24
Windows NT / 2000 / XP ........................................................................................................... 25
RAID Compatibility................................................................................................................ 25
MaximumGSList.................................................................................................................... 25
800001 rev K1
Huge Media Vault - Max User’s Guide
Page 3 of 26
Thank You
Congratulations and thank you for purchasing the Huge Media Vault product from Huge Systems Inc. a
leader in huge performance, huge quality, and huge cost savings storage product for your video editing and
storage requirements.
Your Huge Media Vault storage system utilizes the latest SCSI Ultra160 technology. SCSI Ultra160
affords system operations at blazing speeds, enabling you to maximize valuable system time and the
highest of video quality for HDTV resolutions.
Each Huge Media Vault - DualMax contains two independent RAID controllers and ten disk drives for
HDTV applications. Huge Media Vault uses the latest in high performance disk drives and the latest
transfer mode, huge throughput per disk drive pumping data into our RTR (Real Time RAID) engine for
fault tolerant and maximum transfer rates, coupled with the RTC (Real Time Cache) at an internal data rate
of 400MBytes/sec, this translates to a huge performance at the SCSI interface. Upward of 320MBytes/sec
burst and 200MBytes/sec of sustained data rate with the dual SCSI channel Huge Media Vault.
Data protection are available with the built-in RAID 3@2k and RAID 3 modes. A simple and easy to use
Mode Select switch selects either RAID 0 or RAID 3@2k or RAID 3 operation.
If you have any comments, suggestions or questions, please call, FAX or e-mail us. We value input from
the most important people, you our customer.
Again, we thank you.
Model Numbering
The Huge Media Vault model numbers are in the following pattern:
HMV - (size) - (channels)
Where
HMV is Huge Media Vault
(size) is the capacity of the Media Vault in Gigabytes in RAID 0 mode.
(channels) is either DualMax for 2 SCSI channels or Max for a single SCSI channel.
HMV-2500-DM would represent 2500 Gigabytes (2.5 Terabytes) of Dual SCSI Channel.
Page 4 of 26
Huge Media Vault - Max User’s Guide
800001 rev K1
Features and benefits
•
•
•
•
•
•
•
•
•
•
•
•
•
•
Max Burst Data Rate 160MBytes/sec
Minimum Sustained Data Rate 100MBytes/sec
One Ultra160 SCSI channel
One RAID controller
RAID 0 or RAID 3@2k or RAID 3
RTR - Real Time RAID reconstructs data “on the fly” should a drive “glitch”
RTC - Real Time Cache recognizes small block accesses for perfect audio play back.
Ultra160 SCSI interface. Compatible with Ultra 2/LVD, Single Ended, Ultra Wide, Fast, SCSI-3,
SCSI-2, SCSI interface and protocol.
Daisy chain of multiple SCSI devices with the built-in in and out SCSI connectors.
Five high performance hard disk drives.
Multiple cooling fans.
Easy user selection of functionality via Mode Selection and Mode Enable switches. No complicated
software setup or maintenance.
Serial port for detail level maintenance and support.
Audible Alarm and LED indicators.
Agency Approvals
This device complies with part 15 of the FCC Rules. Operation is subject to the following two conditions:
(1) This device may not cause harmful interference, and (2) This device must accept any interference
received, including interference that may cause undesired operation.
EC Declaration of Conformity:
Conforms to Standards
EN 50081-1:1992
EN 55022: 1998
Specifications
Physical Dimensions:
Weight:
Power:
Current Draw:
Operating temperature:
7 ½” wide x 11” high x 17 ¼” deep
26 lbs
Selectable 100-120 VAC 60 Hz or 200-240 VAC 50 Hz
115VAC Start-up 1.0 A
Read/Write/Seek: 0.4 A
200 W maximum
5-40 degrees Celsius
Technical Support
World Wide Web:
www.hugesystems.com
e-mail:
[email protected]
Telephone:
818-991-1188
M-F: 8AM – 5PM PST.
FAX:
818-991-6893
Serviceability
There are no user serviceable parts in the Huge Media Vault storage subsystem. Designed simply for
maximum reliability with NO requirement for any type of scheduled maintenance.
800001 rev K1
Huge Media Vault - Max User’s Guide
Page 5 of 26
Getting Started
The Huge Media Vault comes pre-assembled and ready to be connected to the SCSI Ultra160 compatible
SCSI interfaces of your video edit computer equipment right out of the box.
Unpacking
•
•
Remove all components from the shipping container. Retain all boxes and packing materials in case
you might need to reuse them later.
Examine the components for shipping damage. Contact the freight carrier immediately if damage
exists.
Check List
•
•
•
•
•
•
Huge Media Vault – Single Controller External Disk Array.
One SCSI Ultra160/LVD/SE dual mode terminator.
SCSI Ultra160 compatible interface cable.
AC power cord.
Diagnostic cable.
This Users Guide.
Editing System Requirements
•
•
•
•
•
Ultra160 or compatible SCSI host adapters
Windows 9x/NT/ME/2000,XP, Mac OS, IRIX, Linux
Video Capture card
Video Editing software
Video player or other source of video input
Page 6 of 26
Huge Media Vault - Max User’s Guide
800001 rev K1
Hardware Installation and configuration
SCSI Host Adapter
Recommended SCSI Host Adapters
Apple G4
Apple G5
Intel & Compatibles
Dual Channel
ATTO UL3D-000
(33 Mhz)
ATTO UL3D-66
(66 Mhz)
ATTO UL3D-000
ATTO UL3D-66
Adaptec 39160
Single Channel
ATTO UL3S-000
(33 Mhz)
ATTO UL3S-66
(66 Mhz)
ATTO UL3S-000
ATTO UL3S-66
Adaptec 29160
The Huge Media Vault communicates with your computer using the industry standard SCSI Ultra160
interface. You must have a compatible SCSI Host Adapter installed in your computer to work with the
Huge Media Vault storage system. Some computers have a built-in native SCSI port, check your computer
for availability.
To maximize the Huge Media Vault Ultra160 interface, the SCSI Host Adapter in your computer should
also be rated for Ultra160. However, the slower Ultra2 and Ultra Wide SCSI rated host adapters will work
but at a lower transfer rate.
Check to make sure the Host Adapter is physically installed correctly and the appropriate Host Adapter
drivers are loaded and functioning properly before connecting the Huge Media Vault to your computer
system.
800001 rev K1
Huge Media Vault - Max User’s Guide
Page 7 of 26
Component Locations
FAN
ID / Mode
Reset
Diag
SCSI IN
SCSI OUT
FAN
Power
Page 8 of 26
Huge Media Vault - Max User’s Guide
800001 rev K1
SCSI ID
The SCSI ID selection switches are located in the rear of the unit.
Not used
SCSI
ID
Mode
Select
0 to 15
Each SCSI device attached to a SCSI channel must have it’s own unique ID setting. Valid ID for Wide
SCSI are from 0 to 15. Most SCSI host adapters inside your computer typically occupies ID 7. If there are
other SCSI devices on the SCSI channel, ensure that there are no SCSI ID conflicts.
If you are unsure which ID to use and the Huge Media Vault is the only device attached to this particular
channel of the host adapter, ID 0 can be used.
The Huge Media Vault must be turned off and back on again to make a new SCSI ID setting take effect.
Mode Select – RAID Level
The Mode Select switch is located in the rear of the unit.
Not used
SCSI
ID
Mode
Select
0 to 7
Mode Select is a unique feature of Huge Systems and it is a convenient way to select the desired operating
mode of the unit. No need of complicated software and serial port configuration procedures.
800001 rev K1
Huge Media Vault - Max User’s Guide
Page 9 of 26
IMPORTANT: Changing the Mode can cause any existing data to be over written. Make sure any data you
want to keep is stored elsewhere before making any changes.
Remove or delete any known partitions before changing the mode, this will keep the OS from getting
confuse due to left over file systems information left on the MediaVault.
Consult the RAID Compatibility table in the Application Notes section to ensure proper operation.
Mode
*Mode
Select
Effect
Additional information
Pro
Con
RAID
0
0
Striped data
Data striped across all five drives of the
RAID controller. Usable storage is the
sum of all five drives.
Maximum
Speed
No Drive
Redundancy
1
2K bytes
sector size
Striped data
with
redundancy.
Block size is based on 2048 bytes. Data
striped across four drives plus one drive
for redundant information. Usable
storage is the sum of four drives.
Drive
Redundancy
Medium
Speed
Drive
Redundancy
Minimum
Speed
RAID
3@2k
RAID
3
Manu
factur
ing
Test
2
7
512 bytes
sector size
Striped data
with
redundancy.
Block size is based on standard 512
bytes. Data striped across four drives
plus one drive for redundant
information. Usable storage is the sum
of four drives. Use this mode if you are
not certain which of the two RAID 3 to
use.
This mode will over write data on the
Huge Media Vault as the diagnostic will
perform read and write tests on every
System
drive and on every block of data. The
verification
unit records vital parameters of each
test
disk drive’s performance, and it can be
retrieved using the Diagnostic Port for
further analysis.
*Make sure to “Double Beep” to set the mode.
Double Beep
As a precautionary measure to protect from un-intentional mode changes. A combination of holding down
the Reset Button and turning the unit on must be performed to cause the change.
1) Determine the Mode desired and note the Mode Select value.
2) Set the value on the Mode Select switch. Use a pointed instrument and press the tiny button above
or below the number window.
3) Turn off the Huge Media Vault unit.
4) Press and hold the Reset Button.
5) Apply power to the unit.
6) Within about 15 seconds you will hear two beeps to confirm the change.
7) Release the Reset Button
Page 10 of 26
Huge Media Vault - Max User’s Guide
800001 rev K1
Reset Button
The Reset Buttons are located below the SCSI ID and Mode Select switch quadrant.
SCSI ID / Mode Select
⊗
⊗
Reset
The Reset Button is used in conjunction with the Mode Select option. See the Mode Select section.
SCSI connections
The Huge Media Vault have a pair of SCSI 68-pin high density connectors. They function as an IN and an
OUT connection with internal loop-through for the SCSI channel. This SCSI channel is compatible with
Ultra160 (LVD – Low Voltage Differential) at 160 MBytes/sec, Ultra2 (LVD) at 80MBytes/sec, and other
SCSI standards. HVD (High Voltage Differential) is not supported.
SCSI IN
SCSI OUT
Host connections
Use a Ultra160 rated SCSI cable to connect the SCSI channel to your host computer. Connect the SCSI IN
of the Huge Media Vault to the SCSI channel in the computer.
Terminator
Use a Ultra160 rated SCSI terminator to terminate the SCSI connection. Connect the terminator to SCSI
OUT.
Host SCSI connections and terminations
Huge Media Vault
Editing Computer
SCSI IN
SCSI OUT
SCSI
Install
Terminator
800001 rev K1
Huge Media Vault - Max User’s Guide
Page 11 of 26
Daisy chaining
If you have multiple SCSI devices to connect up, you can connect (daisy chain) other SCSI devices as
shown. At the back of the Huge Media Vault you will have at the SCSI IN connector a SCSI cable
connected to your host computer, and at the SCSI OUT connector a SCSI cable connected to your other
SCSI device.
Keep in mind that all connected SCSI devices must be rated at and configured to run at Ultra160 for
maximum data transfer, mixing slower devices such as Ultra2, Ultra Wide, narrow SCSI, etc… will reduce
the data transfer rate to the slowest device on the SCSI channel.
Please ensure that 1) the total SCSI cable length are kept as short as possible (Maximum 12 meters); 2)
remember to use a terminator at the end device of each SCSI chain; 3) No duplicated or SCSI ID conflict
on any particular SCSI channel.
Daisy Chain additional Meida Vaults
Editing Computer
SCSI
2nd Huge Media Vault - Max
1st Huge Media Vault - Max
SCSI
ID 11
SCSI
ID 10
SCSI IN
SCSI IN
SCSI OUT
SCSI OUT
Terminator or to
other SCSI
device
Input Power
AC Power
Check the proper voltage input setting for your local AC power source, switch is located at the rear of the
Media Vault. Set it to 115VAC or 230VAC. Attach the supplied AC power cord to the Huge Media Vault
at the rear and to an AC power source.
Power Switch
The power switch for the Huge Media Vault is located at the lower front right of the unit. Turn on the
Huge Media Vault by pressing the front power switch. To turn off the unit, press the power switch again.
Turn on the Hug Media Vault first, then your computer, the unit is ready for operation within a few
seconds.
Page 12 of 26
Huge Media Vault - Max User’s Guide
800001 rev K1
Indicators
Front LED Status Indicators
Huge Media Vault status indicators are located at the lower front of the unit.
☼
☼
☼
☼
☼
OK
On = RAID
is OK.
U160
On=SCSI
running at
U160 speed.
Off=SCSI
less than
U160 speed.
Not used
Not used
Power
On=power
applied.
Off=Busy
Off=No AC
power.
OK is on, indicates that the RAID is functioning normally.
OK is blinking, indicates that the RAID is busy servicing commands.
OK is flashing a steady code. When there is no access to the Media Vault and OK is flashing a steady
code, it indicates that particular drive is down.
U160 is on, indicates that the SCSI channel is operating at full Ultra160 speed.
U160 is off, indicates that the SCSI channel is operating at lower than optimal Ultra160 speed. This
condition are normally associated with terminators, host adapter configurations, or additional attached
SCSI devices on this particular channel.
Power Up Light Show
A quick way to validate normal functional power up sequence of the Huge Media Vault is by a
combination of beep and LED flashes.
1)
2)
3)
4)
5)
Short chirp
OK LEDs slow flash
A short pause
OK LEDs rapid flash
OK LEDs on solid
Immediately after application of power, a quick and short chirp (beep) should be heard. The OK indicators
starts a flashing sequence as outlined above. The unit should be ready for operation within 20 seconds of
power on.
If a beeping (Audible Alarm) code is heard, there is a problem. See the Audible Alarm section.
Diagnostic Port
A serial Diagnostic Port cable is supplied to enable future firmware download and any special diagnostic
requirements. Under normal operating circumstance there is no need to hookup the serial port.
Should you have any need to journey into the Diagnostic Port, please call our Technical Support
Department and they will be happy to assist you.
800001 rev K1
Huge Media Vault - Max User’s Guide
Page 13 of 26
Audible Alarm
The Huge Media Vault will sound an alarm if there is a problem with the RAID operation. Corrective
actions can be applied to rectify the problem.
6 Rapid Beeps During Boot Time
6 rapid beeps during boot time is normally associated with SCSI cabling, SCSI termination, or power up
sequence related. Always turn on the MediaVault on first, then turn on the computer. You might need to
physically remove and re-insert the SCSI connectors along the SCSI path, this includes the connectors at
the SCSI controller, at the MediaVault and the terminators.
Check to ensure there are no other SCSI devices on the bus using the same SCSI ID address.
Try removing any other SCSI devices that shares the same SCSI bus as the Media Vault, leaving just the
Media Vault as the only SCSI device will help to identify if there is a conflict with other devices.
6 Rapid Beeps During Normal Operation
6 rapid beeps during normal operation indicates either there is a SCSI interface issue or a disk drive in the
MediaVault has timed out. Check to ensure all SCSI connections are securely in place, you might need to
physically remove and re-insert the SCSI connectors along the SCSI path, this includes the connectors at
the SCSI controller, at the MediaVault and the terminators.
Slow Beeps
One or more slower beep indicate a bad drive or an intermittent drive, the number of beeps indicates which
drive is having problems. When operating in RAID 3@2K or RAID 3 mode the Huge Media Vault is still
available for normal operation without performance degradation, but the beeps indicate that a drive is down
and you are running without RAID 3 protection. Should another drive fail, your are in danger of loosing
data.
Page 14 of 26
Huge Media Vault - Max User’s Guide
800001 rev K1
Formatting and Partitioning
Formatting and Partitioning of the Media Vault is required to prepare the unit for usage. After the unit is
physically connected to your computer, use the following sections as a guide to locate and execute the
appropriate utility to format and partition the Media Vault.
The Huge Media Vault is seen as two large SCSI disk drives by the SCSI host adapter in your computer.
Install the appropriate driver for your SCSI Host Adapter. No additional software or drivers are necessary
to use the Huge Media Vault. Treat the Huge Media Vault as a pair of normal ordinary hard disk drives
when partitioning and formatting.
Macintosh G4 / G5 in OS X
Use the following configuration to get maximum speed from a MediaVault DualMax with OS 10, ATTO
UL3D, for video capturing/playback and editing.
Check and ensure you are using the latest recommended configuration for your capture card and editing
software, update any software or drivers as necessary.
Following the “Bart Process” described below will provided maximum data rate for your editing system.
1) Use ATTO ExpressStripe to initialize the MediaVault
(Fig. 1 through 6)
Start ExpressStripe > Delete > Initialize > Select the
HUGE drive > Next > Drive(s) Verified > Ok.
2) Use Apple's Disk Utility to stripe. (Fig. 7 through 9)
Start Disk Utility > Partition Tab >Partition Button >
Partition Button (again).
3) Remove ATTO’s ExpressPCI Configuration Tool.
If installed, run the un-install to remove it.
The un-install is normally at Macintosh
HD > Applications > ExpressPCI
Configuration Tool > Uninstaller Data >
Uninstall ExpressStripe.
HMV-600-M RAID 0 performance with Pinnacle’s
Cinewave benchmark on a G4.
Fig. 1 Apple’s OS X Desktop show. Launch the ATTO
ExpressStripe Software. The software is typically
installed on your Macintosh HD > Applications folder.
ExpressStripe is an optional software application from
ATTO Technology, if you don’t have it, you can skip to
Fig. 7 but your performance may not be optimal.
800001 rev K1
Huge Media Vault - Max User’s Guide
Page 15 of 26
Fig. 2 Select the Delete option from
the menu.
Fig. 3 Select the Initialize option
from the menu
Fig. 4 Highlight the Huge disk click
Next.
Page 16 of 26
Huge Media Vault - Max User’s Guide
800001 rev K1
Fig. 5 Select the Drives verified
bubble and click OK.
Fig. 6 After drive initialization,
select Quit to exit out of the
software.
800001 rev K1
Huge Media Vault - Max User’s Guide
Page 17 of 26
Fig. 7 Launch the Apple Disk
Utility software and select the
“Partition” tab. Highlight
your Huge drive on the left. Give
your volume a name, select the
format as Mac OS Extended and
Uncheck the option to install Mac
OS 9 Disk Drivers. Click on
the “Partition” button to
proceed.Disk
Utility is located at Macintosh HD >
Applications > Utilities.
Fig. 8 You will be given a warning.
To proceed click the “Partition”
button.
Page 18 of 26
Huge Media Vault - Max User’s Guide
800001 rev K1
Fig. 9 You should now see your
named volume as show on the left
hand side of the screen.
Congratulations! You have
successfully prepared your disks
utilizing the “Bart Process”.
800001 rev K1
Huge Media Vault - Max User’s Guide
Page 19 of 26
Windows NT Partition / Format
Windows NT provides a utility to partition and format disks. Locate and start the Disk Administration
program by clicking:
Start > Program > Administrative Tools > Disk Administrator.
Each channel of the Media Vault should appear as a disk entry with “Free Space”.
Preparing a Media Vault Max (single channel)
Right click on the “Free Space”, left click on Create, confirm the size of the partition you desire, click OK.
Click Yes to confirm partition creation.
The changes must be committed before going further, right click on the “Unformatted” section of the disk
and click on “Commit Changes Now”. Click Yes to save the changes. Click OK to confirm “Disks were
updated successfully”.
After the partition is created, it must be formatted. Right click on the “Unknown” section of the disk and
click Format. Change the File System to NTFS, change the Volume Label as desire, check the Quick
Format box, and leaving the other selections as they are. Click Start > OK to begin the formatting
operation.
A progress meter will show the progress, at completion a confirmation dialog box will appear, click OK >
Close. Note the newly prepared disk will have a drive letter associated with it. Exit program if done.
Preparing a Media Vault DualMax (dual channel)
Select the disks you which to stripe together by Left click on the first disk with “Free Space”, then press
Control and left click on the second disk with “Free Space”. Right click on either one of the selected “Free
Space”, left click on Create Stripe Set, confirm the size of the partition you desire, click OK.
The changes must be committed before going further, right click on the “Unformatted” section of one of
the disk and click on “Commit Changes Now”. Click Yes to save the changes. Click OK to confirm
“Disks were updated successfully”.
After the partition is created, it must be formatted. Right click on the “Unknown” section of one of the disk
and click Format. Change the File System to NTFS, change the Volume Label as desire, check the Quick
Format box, and leaving the other selections as they are. Click Start > OK to begin the formatting
operation.
A progress meter will show the progress, at completion a confirmation dialog box will appear, click OK >
Close. Note the newly prepared disks will have a drive letter associated with it. Exit program if done.
Page 20 of 26
Huge Media Vault - Max User’s Guide
800001 rev K1
Windows 2000 and XP Partition / Format
Windows 2000 and XP provides a utility to partition and format disks. Locate and start the Disk
Management program by clicking:
Start > Settings > Control Panel >
Administration Tools > Computer
Management > under the Computer
Management tree Storage > Disk
Management.
A Write Signature dialog will open if
fresh disks are detected, click Next,
and check the new disk(s) > Next >
Finish.
Each channel of the Media Vault
should appear as a disk entry with
“unallocated”.
Preparing a Media Vault Max (single channel)
Right click on “Unallocated”, left click on Create Volume > Next > Simple volume > Next > confirm the
desired disk is in the Selected dynamic disks box > Next > confirm the desired Drive Letter > Next > check
the Perform a Quick Format box > Next > Finish.
Formatting starts and will take a minute or so. At the completion of format, note the newly prepared disks
will have a drive letter associated with it. Exit program if done.
Preparing a Media Vault DualMax (dual channel)
Right click on “Unallocated”, left click
on Create Volume > Next.
Select Striped volume > Next.
Highlight the available dynamic disk
you which to add to the stripe click
Add > Next.
Confirm the desired Drive Letter >
Next.
800001 rev K1
Huge Media Vault - Max User’s Guide
Page 21 of 26
Check the Perform a Quick Format
box > Next.
Formatting starts and will take a
minute or so.
At the completion of format, note the
newly prepared disks will have a drive
letter associated with it.
Exit program if done.
Page 22 of 26
Huge Media Vault - Max User’s Guide
800001 rev K1
Application Notes
General
Video Resolution Data Rates
Video Resolution
Data Rate
Megabytes / Sec
DV/DV25
3.7
DV50
7.4
SD 8 bit
20
SD 10 bit
27
HD 1080i 8 bit
120
HD 1080i 10 bit
155
HD 720 8 bit
110
HD 720 10 bit
138
Hours per Terabyte Table
Video Resolution
Hour per
Terabyte
(1000Gigabyte)
DV/DV25
75.1
DV50
37.5
SD 8 bit
13.9
SD 10 bit
10.3
HD 1080i 8 bit
2.3
HD 1080i 10 bit
1.8
HD 720 8 bit
2.5
HD 720 10 bit
2.7
800001 rev K1
Huge Media Vault - Max User’s Guide
Page 23 of 26
Macintosh
ATTO Firmware
The ATTO ExpressPCI Dual Channel Ultra3 is recommended. Firmware version 1.64 or later must be
used to maximize the Ultra160 interface. This can be downloaded from www.attotech.com.
RAID Compatibility
Apple Non-Striped Partition
(Standard)
Apple Striped Partition
(RAID 0)
OS X ATTO ExpressStripe
Okay
Okay
OS X Apple Disk Utility
Okay
Okay
OS X ATTO ExpressStripe
Not Compatible
Not Compatible
OS X Apple Disk Utility
Okay
Okay
OS X ATTO ExpressStripe
Okay
Okay
OS X Apple Disk Utility
Okay
Okay
Media Vault Mode Select
RAID 0 (mode 0)
RAID 3/2k (mode 1)
RAID 3 (mode 2)
Page 24 of 26
Huge Media Vault - Max User’s Guide
800001 rev K1
Windows NT / 2000 / XP
RAID Compatibility
Non-Striped Partition
(Standard)
Striped Partition
(RAID 0)
Okay
Okay
NT
Okay
Okay
Win2K / XP
Basic Disk only, no Dynamic
Not Compatible
Okay
Okay
Media Vault Mode Select
RAID 0 (mode 0)
NT / Win2K / XP
RAID 3/2k (mode 1)
RAID 3 (mode 2)
NT / Win2k / XP
MaximumGSList
NTFS – Enlarge Scatter Gather List value.
NTFS is used in Windows NT and Windows 2000 Operating Systems. Applying
this NT registry change to the Scatter-Gather List when using the Adaptec
controllers will enable maximum data throughput performance.
You may download the automated registry update from our web site, the file to
download is maxsg.zip, in it there is a file called maxsg.reg. Extract and execute
maxsg.reg will update the registry accordingly.
Or you may update the registry manually by following the steps below.
Run REGEDT32 to edit the system register.
Go to \HKEY_LOCAL_MACHINE\SYSTEM\CurrentControlSet\Services\
If U160 Adaptec then continue to \adpu160m
If Ultra2 Adaptec then continue to \aic78u2
If non-Ultra2 Adaptec then continue to \aic78xx
Create a “Parameters” key (without quotations). Edit > New > Key and enter Parameters.
Go to \Parameters
Create a “Device” key (without quotations). Edit > New > Key and enter Devices.
In a multiple host adapters system. Use Device0, Device1, etc… to specify the specific adapter.
Go to \Device
Create a “MaximumSGList” value name (no quotations). Edit > DWORD value and enter
MaximumSGList. Enter FF for Value data, make sure Hexadecimal is set.
Exit Regedit and reboot.
<end of User’s Guide>
800001 rev K1
Huge Media Vault - Max User’s Guide
Page 25 of 26
Page 26 of 26
Huge Media Vault - Max User’s Guide
800001 rev K1