1
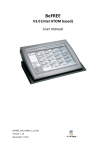
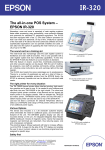
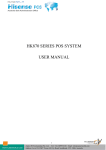
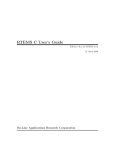
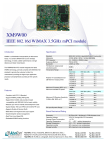
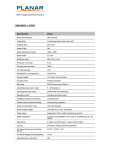
SB 8010A Android POS Terminal User’s Manual Table of Contents 1 Overview 2 2 Standard Package Contents 3 3 Touch Screen Calibration 4 4 System View 5 5 Accessories 6 6 Change your language and Input Keyboard 7 7 How to install an Application 8 8 Motherboard Information 12 9 Specifications 13 1 1 Overview The SB8010A is a cost effective all-in-one POS terminal with compact footprint and fanless design. With the capability to run Android, costly operating systems are not required, keeping cost of the POS solution to a minimum. Integration of VFD customer display, magnetic stripe reader and barcode scanner eliminates issues with device connectivity, mounting, compatibility and cable management. Compact size and cost effective Low power consumption, less than 10 watts Fanless operation Customer display, magnetic stripe reader and barcode scanner integration 9.7" 5-wire resistive touch monitor Android operating system 2 2 Standard Package Contents a. SB8010A POS terminal b. Power adaptor and cable c. Drivers and User manual NOTICE: SB8010A Input Power Voltage is from 19v~24v, only use Included Power Adaptor to avoid any Voltage problem. 3 3 Touch Screen Calibration 1. First time boot up will need to calibrate 9 points. 2. Click Application Icon In Application list; click “Calibration” Follow the steps from there and click 9 points on each corner. And Save the calibration change. 4 4 System View 1. I/O ports 2. Power switch button The button is below I/O ports. 5 5 Accessories 1. Magnetic Card Reader and barcode scanner. 2. Customer Display 6 6 Change your language and Input Keyboard 1. Click Application Icon 2. Click Setting Icon 3. Click Language & Input Choose Language and Select the language you need. 7 7 How to install an Application 1. Save your application program in a USB flash drive and plug into one of SB8010A USB port. In the application list, click “OI File Manager”. 2. Click on the “home” icon. 8 3. Scroll down to search for "udisk" folder and then click on “udisk”. 9 4. Find the application you want to install and click on the application to start. 5. Permissions required by the application will be displayed. Click "Install" to proceed. 10 6. Progress of installation will be shown. 7. Click "Done" when installation has finished. 11 8 Motherboard Information ⑤ ① ② ⑨ ⑥ ③ ⑦ ⑩ ⑧ ④ ⑪ ⑬ ⑭ ⑫ ⑮ ⑯ ⑰ ⑱ ⑲ ① RJ11 for CashDrawer ⑫ Speaker Out ② HDMI ⑬ LVDS for Second LCD ③ USBx2 ⑭ LVDS for Main LCD ④ SATA ⑮ Invertor control ⑤ COM2 ⑯ Internal USB ⑥ COM1 ⑰ 5-W touch controller ⑦ 10/100/1000 Ethernet ⑱ COM3 ⑧ Micro SD ⑲ COM4/5 ⑨ USB OTG ⑳ Front Panel ⑩ 24V power in mPCI-e ⑪ 5V Out 24V Out ⑳ 12 9 Specifications SYSTEM AUDIO CPU Support Cortex A9, dual core Memory 1GB Storage eMMC 8GB Operating System Android 4.2.2 Jelly Bean Output Built-in stereo speakers PERIPHERAL OPTIONS Customer Display VFD, 20 columns x 2 lines RS232, ESC/POS commands DISPLAY Magnetic Stripe Reader 3 track, RS232 LCD Panel 9.7" Scanner Laser, single line Resolution 1024x768 Wireless WiFi 80W.11 b/g/n and Brightness 350 nits Touch Screen 5-wire resistive Bluetooth, integrated ELECTRICAL I/O Ports USB Port USB 2.0 x 2 Power Adapter Input 100-240VAC, 2A max Power Adapter Output 24VDC, 1.7A max OTG x 1 (Micro USB) Serial Ports RS232 (DB9) x2 Ethernet 10/100 BaseT MECHANICAL MicroSD 1 x MicroSD slot Weight 4 Kg (8.8 lb) (support SDXC) Dimension (H x W x D) 285mm x 268mm x 179mm (11.22" x 10.55" x 7.04") 13