Transcript
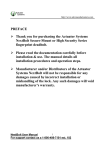
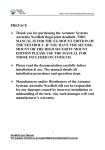
Installation Instructions
Before starting installation plan your steps, place the Front Body, Back Body and Striker in position to work out what needs
to be packed, cut or modified for each customised job. Box contents includes:
Front Body
Back Body
Bracket
Sub Bracket
Striker
Batteries
Packers
Screws
Tools Required: pencil, ruler, square, drill, 32mm hole saw, 1/8 drill bit, phillips head screwdriver, hammer, chisel.
1.
Remove the existing dead lock. Check the Front
Body fits through the existing hole or mark a new centre hole
by positioning the Front Body on the outside of the door with
the door closed.
This lock has an adjustable backset distance between
50-100mm from the door edge. Drill the centre hole 32mm
diameter, from both sides to stop splintering of door.
6.
Connect the wire to the main PCB on the Back
Body. Put four AA batteries in to test the unit. Test the
[open/close] button
on the Back Body and make sure
that the light on the Front Body is working.
Back Body
Template
Inside
Door
Right
Handed
Left
Handed
Outside
Doorframe
2.
According to the RH/LH door swing, fold the
template at 90º and place on the inside panel of the door,
folded around the door edge. Line up with the centerline of
the hole through the door, mark and pilot drill the 5 mounting
points on the door taking care not to drill through door.
7.
Fix the Back Body to the Bracket using the 4
screws, taking care not to squash the wire by tightening too
much. Replace the battery cover.
3.
Align the Bracket and screw it to the door loosely
with five metal or wood screws. Adjust leaving 5mm between
the face of the Bracket to the door edge so that the Back
Body will sit flush with the door edge. Tighten screws.
Bracket
The guideline should be
aligned with the edge of
the Bracket.
Wire of the
Front Body
Sub Bracket
8.
Fit the Striker by using the packing plates or cutting
the door frame as necessary to ensure the dead bolt will
enter the Striker correctly. Line up the centre line on the
Striker with the arrow on the Back Body. If you need to cut
back the door frame trace around Striker body or use the
template provided. Cut out piece and clean up with a chisel.
Door
4.
Remove double-sided tape backing from Front
Body. Put the wire through the door hole and stick the Front
Body in position to the outside of the door.
Door Frame
Striker
Door
Deadbolt
Double-sided
tape backing
Arrow
Mark
5.
Pass the wire through the Bracket and Sub Bracket
as shown in the images above. Fix the Sub Bracket to the
Front Body with the 3 fixing screws.
Centre
Line
9.
Put screws in the very top and bottom positions.
Line up Striker with a 3-5mm gap between it and the Back
Body. Screw it into position and test the unit.
Check points for Installer
1.
2.
The default Security Code is 1234567890
Test the Security Code works by pressing
123467890
Check the Automatic Locking works properly. The door
should automatically lock 5 seconds after closing.
Check points for Owner
1.
Re-register your own Security Code
2.
Read the User Manual before further use
3.
Register your own Card Keys / Fingerprints
4.
Understand the Emergency Power Supply feature
5.
Understand the Forced Lock Modes
Register new Security Code
4
Press
[ I ] button
2
1
2
Enter new
Security Code
Press
[ I ] button
Automatic Lock Mode
0
Press
[M] button
1
Press
[0] , [1] buttons
Press
[M] button
Manual Lock Mode
0
Press
[M] button
3
Press
[0] , [3] buttons
Press
[M] button