1
TNS010i TCP/IP Stack Chip
PRELIMINARY
Data Sheet and User Manual
Rev. 010-04-10-2011
Firmware 4.07
Checkout:
http://www.tcpipchip.com
for details and updates
TNS010i TCP/IP stack Chip
Description
TNS010i TCP/IP stack chip is a complete single turnkey product that enables the Internet connection.
Not only does it reduce development time to market, the TNS010i allows several real-time efficient
transmissions of data and commands between an 8/16/32-bit micro controller (MCU) and the core
TCP/IP software engine. With no priori information about the Internet protocol or networking, this
device allows the MCU to send and receive web pages, data, and commands in a form of scripting
phrases through its built in TCP/IP protocol engine.
Executing only a few simple commands from an MCU through serial pins of TNS010i and you will be able
to transmit and receive data to/from web application program. Each command sent across the TNS010i will
invoke TNS010i to response back to an MCU with a message. This debugging information helps users keep
track of every step during the connection attempt.
This device can connect to the GPRS phone directly with no additional components.
Even the MCU needs to set-up or read out the GPRS parameters, this device automatically bypasses
those AT commands to the phone thus eliminating
• The need for two serial-port hardware on the MCU side. and
• A complex circuit for switching among the three modules: MCU, TNS010i, and GPRS.
Features
• Support basic protocols including TCP/IP, PPP, DNS ,HTTP,SMTP,POP3 and TCP/IP socket.
• Easy interface to GPRS phone or Modem.
• Input commands length as long as 1,000 bytes.
• No need for external RAM or ROM.
• Minimal components. Requires only one 18.432 MHz Xtal, and 3 Capacitors .
• 19,200 BPS Command communicates with micro controller (MCU)
• Information exchanges rate with GPRS is variable from 1,200 BPS to 57,600 BPS
• low power consumption
• 44-pin PLCC and LQFP package
The Connection Diagram
Electrical Characteristics
Symbol
VIL
VIH
VIH_
Icc
Vcc
Description
Input Low Voltage
Input High Voltage
Input High Voltage XTAL1,RST
Power supply current
Power supply voltage
Min
-0.5
1.9
3.5
4.75
Type
Max
0.9
5.5
5.5
60
5.25
Unit
V.
V.
V.
mA
V.
Pin Description
Symbol
PLCC
LQFP
Vcc
44,35 38,29
Gnd
22
16
XTAL1
21
15
XTAL2
20
14
GPRS/modem
18
12
CD
2
40
DTR
3
41
DSR
4
42
RTS
5
43
CTS
6
44
RST
10
4
TxM
13
7
RxM
11
5
Tx
15
9
Rx
14
8
LED-Connect
9
3
LED-Data trans 19
13
In/Out
I
I
I
O
I
I
O
I
O
I
I
O
I
O
I
O
O
Name and Function
Power Supply : power supply voltage for operation
Ground : 0 V. reference
Crystal 1: 18.432 MHz. Input oscillator amplifier.
Crystal 2: 18.432 MHz. Output oscillator amplifier.
GPRS / Land line modem time out select
Carrier detect
Data terminal ready
Data set ready
Request to send
Clear to send
Reset : hold high at least 0.22 mS
Transmit to modem/GPRS phone
Receive from modem/GPRS phone
Transmit to controller
Receive from controller
LED status shows connected to net
LED status shows data transferring
TCP/IP Software Specifications
Maximum at+i command length (include at+i itself)
Maximum TCP segment size
Serial RX buffer length (Ring buffer)
Serial TX buffer length
PAP
CHAP
DNS
HTTP
FTP
SMTP
POP3
TCP/IP socket
Typical testing circuit
1000 bytes
512 bytes
2,500 bytes
1,000 bytes
Support
Not support
Support
Support
Not support
Support
Support
Support
Summary of Commands
• 19,200 BPS command baud rate (MCU (controller) TCP/IP Chip) N-8-1
• 1,200-57,600 BPS GPRS/modem baud rate. ( TCP/IP Chip GPRS/Modem) N-8-1
• Dark color are main commands and the Gray color are Option commands
• <CR> = Carriage Return Code = 13 or in hex format = 0x0d
Chip test
Command:
Response:
at+i<CR>
+I_OK
Open a PPP connection
Command:
at+iopen<CR>
Response:
- Success
+I_OK
- Not success
+I_ERROR
+I_ERROR
+I_ERROR
+I_ERROR
1
3
4
7
PPP_NOT_ESTABLISH(can’t connect to PPP server)
DIAL_NOT_SET
(no dial number set up)
MODEM_NOT_RESPONSE (no modem response)
PASSWORD_NOT_GOOD(invalid password)
Close a PPP connection
Command:
Response:
- Success
at+iclose<CR>
+I_OK
- Not success
+I_ERROR 4 MODEM_NOT_RESPONSE(can’t disconnect modem)
Display a current assigned IP address
Command:
at+iip<CR>
Response:
CLIENT_IP=x.x.x.x
SERVER_IP=x.x.x.x
+I_OK
Set up a dialing number
Command:
at+isetd= <ISP dialing number> <CR>
Response:
+I_OK
Example:
at+isetd=*99***1#<CR>
+I_OK
Display a dialing number
Command:
at+isetd=?<CR>
Response:
<DIAL NUMBER>
+I_OK
Example:
at+isetd=?<CR>
*99***1#
+I_OK
Set up DNS server’s IP address
(in case of ISP does not assign DNS automatically)
Command:
at+isetdns= <ip address><CR>
Response:
+I_OK
Example:
at+isetdns=203.155.33.1<CR>
+I_OK
Display DNS server’s IP address
Command:
at+isetdns=?<CR>
Response:
<DNS SERVER IP ADDRESS>
+I_OK
Example:
at+isetdns=? <CR>
203.155.33.1
+I_OK
Set up PPP user name
Command:
at+isetuser=<username><CR>
Response:
+I_OK
Example:
at+isetuser=David<CR>
+I_OK
Display PPP user name
Command:
at+isetuser=?<CR>
Response:
<USER NAME>
+I_OK
Example:
at+isetuser=? <CR>
David
+I_OK
Set up PPP password
Command:
at+isetpass=<password><CR>
Response:
+I_OK
Example:
at+isetpass=David password<CR>
+I_OK
Display PPP password
Command:
at+isetpass=?<CR>
Response:
<PASSWORD>
+I_OK
Example:
at+isetpass=?<CR>
David password
+I_OK
HTTP Request
Command:at+ihttp://<url>[<path>][:<port>][<space></h></l></d>]<CR>
Response:
- Success
+I_OK
<WEB PAGE CONTENT........
.........................
.........................
........................>
- Not success
+I_ERROR 2 DNS_IP_NOT_SET
(If call url domain name instead of IP address
Have to initial set a DNS IP address by at+isetdns command
+I_ERROR 5 TCP_TIMEOUT ( server is busy )
+I_ERROR 0 PPP_CLOSED
( PPP is not established yet, must open with at+iopen )
Note:
1. /h = display
2. /l = display
3. /d = display
4. default port
all header field.
only length field
only date
field
number is 80
Example:
at+ihttp://www.google.com /l<CR>
+I_OK
Content-Length:2998
<html><head><meta http-equiv="content-type"
content="text/html; charset=windows874"><title>Google</title><style><!-body,td,a,p,.h{font-family:;}
.h{font-size: 20px;}
.q{text-decoration:none; color:#0000cc;}
.....................
.....................
</html>
Example:
at+ihttp://www.myserver.com:123/doc.htm /d/l<CR>
+I_OK
Date: Mon, 29 Dec 2003 12:29:09 GMT
Content-Length: 3203
<HTML>....................
..........................
...................
</HTML>
)
How to request the next HTTP ?
After successfully retrieving the first web page, the successive
request needs no further initial set-up commands.
Just send same command again.
Command:
at+ihttp://<url>[<path>][:<port>][<space></h></l></d>]<CR>
In case a connection is broken
1. Close the existing connection first with
Command:
at+iclose<CR>
2. Then re-open PPP connection with
Command:
at+iopen<CR>
3. Followed by requesting a web page
Command: at+ihttp://<url>[<path>][:<port>][<space></h></l></d>]<CR>
TCP/IP SOCKET
1.OPEN TCP/IP SOCKET
Command:
at+isockopen=<url>:<port><CR>
Response:
+I_OK
<RESPONSE/NONE>
Note: <port> is required , no default value
Example:
at+sockopen=mail.server.com:25<CR>
+I_OK
220 SMTP Service ready
2.SEND DATA ON TCP/IP SOCKET
Command:
Response:
Example:
at+isock=<data><CR>
+I_OK
<RESPONSE/NONE>
at+sock= HELO\r\n<CR>
+I_OK
250 HELLO <CR>
3.CLOSE TCP/IP SOCKET
Command:
at+isockclose<CR>
Response: +I_OK
EMAIL SEND/RECEIVE (SMTP & POP3)
1.OPEN -> SEND -> CLOSE Mail
Command:
at+ismtpsend=<mailserver>[:<port>],<from>,<to>,<subject>,<data><CR>
Response:
+I_OK
or
+I+ERROR 10 MAIL_ERROR
Note:
<port> default value is 25.
Example:
at+ismtpsend=mail.server.com,[email protected],
[email protected],My subject,Hello how are you?<CR>
+I_OK
2.READ EMAIL(POP3)
2.1 OPEN -> List all mails and show mail’s number in Inbox
Command:
at+ipop3open=<mailserver>[:<port>],<user_name>,<password><CR>
Response:
< mail number list >
+I_OK
or
+I+ERROR 10 MAIL_ERROR
Note:
<port> default value is 110.
Example:
at+ipop3open=pop3.server.com,david,1234<CR>
1,2,3,4,5
+I_OK
2.2 READ EMAIL
Command:
at+ipop3read=<mail_number><CR>
Response:
< mail content >
+I_OK
or
+I+ERROR 10 MAIL_ERROR
Example:
at+ipop3read=4<CR>
From: [email protected]
Subject: Test
Hello , How are you?
+I_OK
2.3 CHECK MAIL
Command:
at+ipop3check<CR>
Response:
< mail number list >
+I_OK
or
+I+ERROR 10 MAIL_ERROR
Example:
at+ipop3check<CR>
1,2,3,4,5
+I_OK
2.4 DELETE MAIL
Command:
at+ipop3delete=<mail number><CR>
Response:
< mail number >
+I_OK
or
+I+ERROR 10 MAIL_ERROR
Note:
mail number
"all"
num1, num2, num3
num1-num2
= delete all messages
= delete specific messages
= delete range of messages
Example:
at+ipop3delete=1,2,6<CR>
3,4,5
//display undelete message
+I_OK
at+ipop3delete=all<CR>
+I_OK
at+ipop3delete=4-10<CR>
1,2,3
//display undelete message
+I_OK
2.5 CLOSE READING EMAIL SERVER
Command:
at+ipop3close<CR>
Response:
+I_OK
or
+I+ERROR 10 MAIL_ERROR
Read firmware version of TNS010i
Command:
Response:
Example:
at+iver<CR>
VERx.xx
+I_OK
at+iver <CR>
VER0.07
+I_OK
Bypass to modem’s AT commands mode
1st Step :
type +++ and <cr> to make it is ready for modem’s AT commands mode
Command:
+++<CR>
Response: +I_OK
2nd step :
Case1 : if modem is not connected to internet
Type at<cr> to initiate and enter modem’s commands mode
OK
response from modem
Case2 : if modem is connected to internet
Type +++ and wait for 2-3 sec. and then type
at<cr> to initiate and enter modem’s commands mode
OK
response from modem
From this state you can communicate to modem with it’s AT Commands
To quit from modem’s AT commands mode and enter TNS010i
commands mode
Case1 : if modem is not connected to internet
Type at+i<cr> to enter TNS010i’s commands mode
+I_OK
response from TNS010i
Case2 : if modem is connected to internet
Type ato
to enter modem’s internet connecting state
CONNECT response from modem
and then type
at+i<cr> to enter TNS010i’s commands mode
+I_OK
the response from TNS010i
Turn on DEBUG mode
Debug mode on = print out some more information when chip is in
Processing.
Command:
at+idebug1<CR>
Response: +I_OK
Turn off DEBUG mode
Command:
at+idebug0<CR>
Response: +I_OK
Set up TCP time out
Command:
at+isettcpto=<TCP time out value ><CR>
Response: +I_OK
tcpto=8<CR> ( 1-255 Sec.)
Example:
at+iset
+I_OK
Display TCP time out value
Command:
Response:
Example:
at+isettcpto=?<CR>
<Time-out value>
+I_OK
at+isettcpto=?<CR>
8
+I_OK
Set up DNS time out
Command:
at+isetdnsto=<DNS time out value ><CR>
Response:
+I_OK
Example:
at+isetdnsto=8<CR>
( 1-255 Sec.)
+I_OK
Display DNS time out value
Command:
Response:
Example:
at+isetdnsto=?<CR>
<Time-out value>
+I_OK
at+isetdnsto=?<CR>
8
+I_OK
Set up Modem time out
Command:
Response:
Example:
at+isetmodemto=<time out value ><CR>
+I_OK
at+isetmodemto=8<CR> (1-255 Sec.)
+I_OK
Display Modem time out
Command:
Response:
Example:
at+isetmodemto=?<CR>
<Time-out value>
+I_OK
at+isetmodemto=?<CR>
8
+I_OK
Detect and automatic set modem interfacing baudrate.
Command:
at+idetect<CR>
Response:
xxxx
+I_OK
Example:
at+idetect<CR>
9600
+I_OK
Manual set up GPRS/modem interfacing baud rate
Command:
at+isetbaud=<baud rate><CR>
Response: +I_OK
Available Baud rate list:
57600 BPS.(default)
38400
19200
9600
4800
2400
1200
Example:
at+isetbaud=9600<CR>
+I_OK
Display GPRS/modem interfacing baud rate
Command:
at+isetbaud=?<CR>
Response:
<baud rate value>
+I_OK
Example:
at+isetbaud=?<CR>
9600
+I_OK
Data counter
Check amount of total data transfer
Command:
at+icount=?<CR>
Response:
<data transfer counter> Bytes
+I_OK
Example:
at+icount=?
1371
+I_OK
Reset data transfer counter
Command:
at+icount=0<CR>
Response:
+I_OK
Example:
at+icount=0<CR>
+I_OK
note: the data counter command available only in ver 4.03 up
Modem’s flow Control
Setting Modem’s data flow control
Command:
at+icom1ctrl=hard/none<CR>
Response: +I_OK
Example:
at+icom1ctrl=none<CR>
+I_OK
Read Modem’s flow control status
Command:
at+icom1ctrl=?<CR>
Response:
HARD/NONE
+I_OK
Example:
at+icom1ctrl=?<CR>
NONE
+I_OK
note : default = none
Dev-010i-B‘s modem connection is null modem type
Power Down mode (for energy saving)
Put TNS010i into power down mode
Command:
at+ipwrdwn<CR>
Response: +I_OK
** In power down mode TNS010i will reduce the consume current to 25 uA.
** return to active mode by sending a reset pulse.
GRPS phone / Modem Time Out
When power on reset. TNS010i will load a modem time out default
value according to the logic level below.
GPRS
sel. = high( or no connect)
LAND LINE MODEM sel. = low ( connect to GND.)
Note:
GPRS modem time out default value = 10 Sec.
Land line modem time out default value = 60 Sec.
you can change these default value by issue
at+isetmodemto=xxx
Error message response
+I_ERROR
+I_ERROR
+I_ERROR
+I_ERROR
+I_ERROR
+I_ERROR
+I_ERROR
+I_ERROR
+I_ERROR
0
1
2
3
4
5
6
7
8
PPP_CLOSED
PPP_NOT_ESTABLISH
DNS_IP_NOT_SET
DIAL_NOT_SET
MODEM_NOT_RESPONSE
TCP_TIME_OUT
DNS_TIME_OUT
PASSWORD_NOT_GOOD
CONNECT_LOST
DEV-010i-B schematic
Some old GPRS phone data link details
Siemens S45 connector‟s pin out
1. Gnd
2. –
3. Charge
4. –
5. Tx (out from phone)
6. Rx (into phone )
Siemens C55
2. Gnd.
3. Tx
4. Rx
Ericsson T65/68/200 connector‟s pin out
1. Charge
2. Gnd
3. –
4. Gnd
5. –
6. –
7. TX (out from phone)
8. RX (into phone)
9. Power ON (TRIG LOW ) **** ONLY ERICSSON T65/T68 ****
Quick Start Guide
TNS010i works well with any GPRS phone or GPRS modem module.
Such as
• Ericsson T65/T68/T200
• Siemens S45/ C55
• Wavecom Integra-GPRS (GPRS module)
• Etc.
** Recommendation for Wavecom integra **
1. Set GPRS modem to baudrate = 57600
by send AT+IPR=57600 and
2. Save this setting value in it‟s EEPROM
by send AT&W
3. Send AT+WOPEN=0
Following is the sample how to start TNS010i with Ericsson/Siemens phone
Testing phone parameters
1. Ensure that the GPRS phone have been activated and tested to verify the connection.
In case of Ericsson, and Siemens C55 you need to purchase a data link cable ( built in RS232 IC.)
available from it‟s dealer.
2. Set the phone parameter according to the recommendations from your GPRS service provider. You may
consult a sample web page of how to set at
http://www.mobilelife.co.th/mobilelife/t/customertools/mobilesetting/manual/gprs/index.htm
or from your local GRPS „provider web site
Note that the parameters may be vary from country to another, and from one provider to another.
3. Add “New Hardware” GPRS phone/modem to your PC (you will need GPRS phone driver that
should come with the phone).
4. Add “New Internet Connection”. Choose your GPRS phone as a modem
5. Connect the GPRS phone via its data link cable (built in RS232 IC) and connect to Internet by
choosing a GPRS modem.
6. Try surfing the web page via your GPRS phone
If you are successful in surfing the web page with the GPRS phone then proceed to the next step.
Testing the TNS010i chip on Window’s Hyperterminal program
As an alternative to reduce the overall manufacturing cost and the package size, a data link cable
with no RS232IC in its cable can be used given that there is the same logic voltage level to and from
the MCU and the GPRS phone.
7. Close all the Internet connections in PC including any web browser. Then remove the data link cable.
8. Open Hyper terminal program in the Windows ( N-8-1 19,200 BPS )
9. Connect the GPRS phone to the a new development board „s data link cable(no RS232 IC) and
turn the power on.
10. As soon as the development board is powered up, the “I_READY” sign should appear on the
Hyper terminal screen.
11. Type the following sequence of commands in its order
at+i <ENTER>
+ I_OK
/* TCP/IP chip response testing */
at+idetect<ENTER> /* detect/set modem baudrate */
57600
/* modem‟s baud rate */
+ I_OK
Skip the following gray colour steps if your GPRS modem’s parameter was set correctly
--------------------------------------------------------------------------------------------------------------------+++<ENTER>
+ I_OK
/* quit TNS010‟s commands mode */
wait 0-3 Sec. (depend on brand /model of modem)
at<ENTER>
OK
/* Initiate modem‟s commands mode */
at+cgdcont=xxx
/* xxx = GPRS parameter setting Example = 1,”ip”,”internet”
*/
OK
at+i <ENTER> /* Enter TNS010i‟s commands mode */
+ I_OK
--------------------------------------------------------------------------------------------------------------------
at+isetd=xxx
+ I_OK
/* xxx = ISP dial number Example = *99***1#
at+iopen
+ I_OK
/* connect to ISP and open the TCP/IP socket */
at+ihttp://xxx
/* xxx=url IP / url domain name */
*/
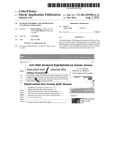
Example
at+ihttp://203.130.155.66/test.php?content1=123&content2=345 </l , /d , /h>
+I_OK
(suffix (/l,/d,/h) is for showing data‟s length / present date / or full header /or nothing (default) )
<html>
…………………………………..<html> /* HTTP response data*/
Products Distributor: http://www.es.co.th
Products Website : http://www.tcpipchip.com
Technical Support and Sales: [email protected]