1
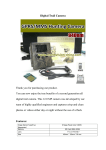
HD Rear Mirror DVR HDDVR225 User Manual Buttons Functions Description (1) <Power>button (2) <Menu>button (3) <Page up> / <Videorecord> (4) <OK>button /<Emergency Lock> (5) <page down> (6) <Mode>button (7) <Display Backlight > (8) TF card slot (9) AV OUT Interface (10) USB Interface (11) <Reset> button (12) <Sensors> Camera Button Function Introduction 1. <Power> Button 1.1 Power on / off In poweroff state, press and hold <Power> button for three seconds to turn power on the DVR. In poweron state, press and hold <Power> for three seconds. Then, the DVR saves the videorecording file automatically and is powered off. 2.<Menu> Button 2.1 Menu setting In standby state, press <Menu> to enter the function setting table of the main menu. Press <Up> or <Down> to select the desired option in a submenu, and press <OK> to confirm the selected option. After completing the setting, press <Menu> to exit the menu setting function. (Menu setting method are the same as in the video mode, camera mode, playback mode) 3.<Up> / <Videorecord> Button 3.1 Start Videorecord function In videorecording mode, press <Videorecord> to enter the videorecording mode and press <Videorecord> again to stop videorecording. 3.2 Page Up In menu setting or playback mode, press <Videorecord> to page up. In normal state, press and hold <Videorecord> for three seconds to reverse the current image. 3.3 take photos In standby state, press <Camera> button to start the camera mode and press <Camera> again to take one photo. 4.<OK> Button 4.1 Locking In videorecording state, press <Emergency Lock> to start emergency lock in case of vehicle collision, saving the video data generated during the period of 10 seconds before occurrence of the accident and 20 seconds after occurrence of the accident as a special file. This special file will not be cyclically overwritten. 4.2 Confirmation In standby mode; short press the <Menu >button to enter the Main Menu mode, press on <up >/ <down >to browse, press <OK> button to determine. 4.3 Motion Detection In standby mode, long press and hold <OK> for three seconds to switch to motion detection; when not recording video,press <OK> button again to exit motion detection. Note: In this mode the recording will not loop and will stop recording once the card is full. 5. <Page Down> 5.1 Close Audiorecord Function In videorecord mode, press <Audiorecord> to close the audiorecording function. Then, the microphone icon in the lower right of the screen is marked with “X”, indicating that audiorecording is disabled. Press <Audiorecord> again to enable audiorecording and the “X” mark disappears. 5.2 <Page Down> In menu setting or playback mode is page down function. 6. <Mode>button 6.1 Playback In poweron state, press and hold <Mode> button to start the file playback mode. Press <Up> or <Down> to select the desired file, and press <OK> to play or suspend the file. Press and hold <Mode> again to exit the playback mode. 6.2 take photo In poweron mode, press <Mode> button, then the screen by the camera icon in the upper left corner converted into a camera, press the video button to take pictures. To switch back to video mode, short press <Mode> button. 7.Screen backlight In poweron state, press and hold <Mode>button to disable the screen backlight; press any button to restore the screen backlight (this function only works on the screen without affecting the videorecording function). 8.<Reset>Button If the DVR is crashed, press the <Reset> button to restart the machine. Operation Guide DVR installation Note: DVR must be charged for 4 hours before installing 1. Power off the automobile engine. 2. Insert the TF card into the TF card slot. 【Note】Please use the highspeed TF card (Clas6 above), capacity should be not less than 512MB, TF card maximum support 32GB. 3. Secure the DVR to the rear mirror of the automobile 4. Put the car charger into the car cigarette lighter 5.Use Charging extension cord,connect the recorder's USB port with car charger 【Note】charge the extension cord laying along the edge of the windshield when the car wiring. 6. The rear camera installed in the rear of the vehicle, pay attention to the direction of the installation. Cabling can be laid along the vehicle roof. After completing the installation ,insert the plug in the DVR rear camera interface 7. Adjust the angle of the DVR, ensuring that the camera lens keeps level with the ground. 8.Start the engine and check whether the machine has been installed correctly 【Note】When the machine is installed correctly, the system working lights;Video light blinks, the machine starts to enter the recording state.Remember to check if the display screen is normal. Function Introduction 1. Automatic Recording Start the car engine, the recorder automatically starts and opens the recording function (automatic recording function open)Turn off your vehicle engine, the recorder automatically saved recordings and shut down.The recording video is stored in segments in TF card.When TF card memory is full , the recorder will overwrite earlier recorded image. (This is called Loop Recording) 【Note】a.You can set the time period of recording in a menu. The time period can be set to 1 minute, 3 minutes, 5 minutes,and 10 minutes. The default time period is 3 minutes. b. the recordingvideo of front camera is stored in the TF “100DSCIM” folder. 2. Manual Recording Short press Up Button to start automatic recording,Video light flashes. To turnoff, press the UP button for 3 seconds again, the recorder will automatically save the record and off. 3. Photographing Function In poweron state,press<Camera> button to enter photographing mode,Upper left corner of the camera screen at this time has been converted into a camera icon,press the camera button again to take pictures.To switch back to video mode, short press video recording button twice. 4. Motion Detection In standby state, press and hold <Emergency Lock> to enter the motion detection mode. When the lens senses a moving object peripherally, the DVR enters the videorecording state.When the lens senses no moving object within five seconds, the DVR stops videorecording. To exit the motion detection mode, press and hold <Down> for three seconds then the videorecording function stops working. 5.Collision sensing 5.1The builtin collision sensor (Gsensor), please set the menu Gsensor sensitivity first.If a serious vehicle collision,when the accident occurred,recorder will lock the front 10 seconds and after 20 seconds of image data.(Such as: the collision occurred after the segment recorded 30 seconds, then the length of time a special file to record 50 seconds)Meanwhile screen lock icon is displayed at the top right; locked image will be saved as a special file, the file will not be overwritten cycle. 【Note】 1.Locked video file named LOCK, ordinary record file for NORMAL 5.2 Collision sensor (Gsensor) supports sensitivity adjustment,You can change the settings according to the actual needs in the Settings menu. 6. A key lock function The machine has a key lock function,will retain need image locking without coverage.In the videorecord mode, short press< lock > button ,the DVR will lock the image ,about the first 10 seconds and later 20 seconds the image . 7. Date and Time Setting In standby state, press and hold <Menu> to enter the “Setting” menu. Press <Up> or <Down> to move the cursor to the <Set the date> option. Press <OK> to confirm the date, and enter the <Setting> menu. 【Note】To effectively record the date and time of obtaining the evidence of traffic accidents, please set a correct date and time before using the DVR. 8.A mute function keys In working condition, press the <down>button, the screen changes the microphone icon indicating it is muted meaning the audio recording feature is turned off. At this time recorder only records the image does not record sound; Short press the <down> button again, the screen icon in the bottom left of the microphone to remove mute. 【Note】Settings are automatically saved,when restart,no need to set mute function. 9.U Disk Mode Connect the DVR to the USB interface of a PC by using a data cable. Screen displays disk / camera / charging three optional modes.Press the <up >/ <down> button to select the disk option, press the<ok> button to enter the U disk mode. 【Note】When using a computer to copy video files, it is recommended to use a card reader to copy the video files TF card to a computer.