1
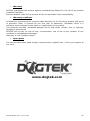
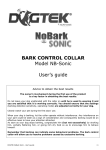
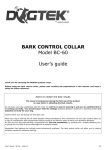
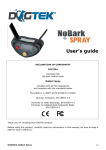
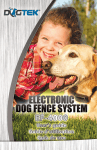
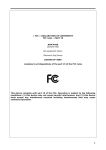
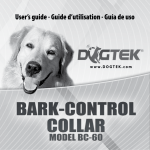
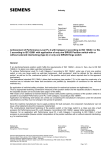
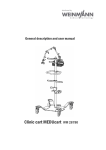
BARK CONTROL COLLAR Model NB-Pulse User’s guide Advice to obtain the best results The owner’s involvement during the first use of the product is a key factor in obtaining the best results. Do not leave your dog unattended with the collar on until he is used to wearing it and you are satisfied that it is working correctly. You should ensure that the settings (barking detection sensitivity, operating mode) are adjusted correctly for your dog. Closely watch your pet during the first days’ use. When your dog is barking, let the collar operate without interference. Any interference on your part could be taken as a sign of consideration and consequently barking would be an effective mean to have your attention attracted. As soon as your dog stops barking, congratulate him (but not excessively) by stroking him, verbally flattering him, or giving him dry food so as to encourage him to behave himself. Remember that barking can indicate some behavioral problems. The bark control collar will allow you to resolve problems caused by excessive barking. DOGTEK NoBark Pulse - User’s guide 1/8 Thank you for choosing the DOGTEK product range. Before using the bark control collar, please read carefully the explanations in this manual, and keep it safely for future reference. Index Page Advice to obtain the best results ............................................................................. 2 Package contents .................................................................................................. 2 Description of the product ...................................................................................... 3 First use ................................................................................................................ 3 Charge of the product ............................................................................................ 3 Switching On the collar .......................................................................................... 4 Switching Off the collar .......................................................................................... 4 Operation ............................................................................................................. 4 Changing operating modes ..................................................................................... 4 Setting the barking detection sensitivity ................................................................... 5 Checking/reloading battery ..................................................................................... 6 Changing the contact points .................................................................................... 6 Fitting the collar .................................................................................................... 6 Checking the device operates correctly ..................................................................... 6 Cautions for use .................................................................................................... 7 Maintenance ......................................................................................................... 7 Troubleshooting .................................................................................................... 7 Technical specifications .......................................................................................... 7 Guarantee ............................................................................................................ 8 Guarantee conditions ............................................................................................. 8 Spare parts............................................................................................................ 8 Collection and recycling of your device at the end of its life ......................................... 8 − − − − − − − Package contents rechargeable collar equipped with a nylon strap and short contact points charger magnetic key (magnet) pair of long contact points screwdriver neon test lamp user’s guide DOGTEK NoBark Pulse - User’s guide 2/8 Description of the product Contact points (short or long) Screwdriver Nylon strap Red indicator light: On/Off indicator + Battery level indicator Diagram. 1 Orange mark: Area where the magnet is located to switch On/Off or change operating mode First use The NoBark Pulse collar comes partially charged from the factory. It is necessary to fully charge the battery of your NoBark Pulse collar before the first use (a full charge takes approximately 16 hours). Charge of the product To charge your product, the collar must be necessarily turned off. To charge your product, proceed in the following way: − Remove the protection tab located at the back of the collar (See Diagram. 2). − Plug the charger to the receptacle at the back of the collar (See Diagram. 2). − Then plug the line cord of the charger on an outlet. − When the battery is charging, the red indicator light stays constantly blinking (the charge of the product is a slow charge and lasts approximately 16 hours). Diagram. 2 protection tab CAUTION: If your product is completely weak, the red LED will not light during the charge. In this case, after approximately 15 minutes of charge, place for one second the magnetic key close to the orange mark located on the front of your collar (See Diagram. 1). Then, the red indicator light will start blinking to indicate you that your battery is charging. − Once the battery is fully charged, the red light indicator goes out to indicate that your product is completely recharged. − Disconnect the collar from the charger. − Disconnect the charger from the socket. − Put the protection tab back in place making sure it is positioned correctly. − Press strongly to ensure it is engaged. DOGTEK NoBark Pulse - User’s guide 3/8 CAUTION: if the protection tab is badly repositioned or badly engaged, the waterproof function of your collar will be compromised and you are likely to damage your product. Switching On the collar Briefly place (for less than 1 second) the magnetic key close to the orange mark located in front of the collar. Beep sounds will be emitted and the red indicator light will flash indicating the collar has been switched on. The number of beep sounds and flashes is dependant on the selected mode (from 1 to 7). In the factory, the collar’s mode is positioned on mode 2 (beep sounds + short stimulations for sensitive dog). Switching Off the collar Briefly place (for less than 1 second) the magnetic key close to the orange mark located in front of the collar. One long sound beep will be emitted and the red indicator light will flash once indicating the collar has been switched off. Operation At the first bark, a series of six beep sounds is emitted. If another bark is detected within 30 seconds, another beep sound of 2 seconds is emitted together with a static stimulation (short, long or progressive stimulation according to the selected operating mode). Inhibition of any further stimulation is dependant on the absence of any barking within the next 30 seconds. The stimulation function can be inhibited selecting operating mode 1. In this case, only beep sounds will be emitted. Changing operating modes In the factory, the collar’s mode is set to mode 2 (beep sounds + short stimulations for sensitive dog). To change the collar’s mode, when switching on the collar you need to approach and keep the magnetic key in contact with the orange mark located in front of the collar. A series of sound beeps is emitted (from 1 to 7) indicating the selected mode. Keep the magnetic key in contact with the orange mark to run through modes. Remove the magnetic key when you have reached the mode you wish. The collar will memorize your selected mode. Next time you will switch on the collar, your collar will be turned on to the last mode you previously selected. DOGTEK NoBark Pulse - User’s guide 4/8 The chart below indicates how your collar operates according to the mode you have selected: Number of beep sounds heard when Mode Operation switching modes 1 1 Beep sounds only 2 2 Beep sound + short stimulation 3 3 Beep sound + long stimulation Sensitive dog Beep sound + progressive stimulation 4 4 (short then long) 5 5 Beep sound + short stimulation 6 6 Beep sound + long stimulation Difficult dog Beep sound + progressive stimulation 7 7 (short then long) Setting the barking detection sensitivity Your dog’s barking is detected by the contact points which sense the vibrations of his vocal cords. Setting the barking detection sensitivity is a very important preliminary operation. In fact, this setting determines the correct operation of the product. It ensures detection of any barking but helps avoid unnecessary detection. The detection must therefore be sufficiently sensitive but not overly sensitive. In the factory, detection sensitivity is set on the medium position (medium sensitivity). To adapt the detection sensitivity to the barking strength of your dog, you should proceed as follows: − Remove the protection tab located at the back of the collar (See Diagram. 3). − Carefully turn the setting screw according to the sensitivity you wish using the supplied screwdriver (See Diagram. 3). CAUTION: the adjustment system has a stop for the minimum sensitivity and a stop for the maximum sensitivity. Turn delicately and without forcing with the supplied screwdriver. − Put the protection tab back in place making sure it is positioned correctly. − Press strongly to ensure that it is engaged. CAUTION: if the protection tab is badly repositioned or badly engaged, the waterproof function of your collar will be compromised and you are likely to damage your product. MINIMUM sensitivity MAXIMUM sensitivity Diagram. 3 Screwdriver MEDIUM sensitivity Protection tab DOGTEK NoBark Pulse - User’s guide 5/8 Checking/reloading battery If the indicator light flashes 5 times and you do not hear any beep sound when switching on or off the collar, it indicates that the battery is too weak for the operation of the product. The product switches to safety mode, it is out of use. It is necessary to recharge the battery following the procedure indicated above, at the beginning of this user’s guide (See § Charge of the product). A full charge takes approximately 16 hours. Changing the contact points Two different series of contact points are included in the package. The length of the contact points must be sufficient to have proper contact with the dog’s skin, enabling the device to operate correctly. If you have a long haired dog and the short contact points fitted to the collar in the factory are inadequate, remove and replace them with the long ones supplied with the kit. When changing the contact points, do not use a key for tightening or untightening them because it could damage some components. A moderate manual screwing is sufficient. Fitting the collar The strap should be adjusted so that the contact points come right into contact with the dog’s skin in order to ensure good barking detection. − If the strap is too loose, the collar will not operate properly. Moreover, it might move around the dog’s neck and repeated rubbing of the contact points on the skin can cause irritation. − If the strap is too tight, the dog will have breathing difficulties. Regularly check your dog’s neck as repeated rubbing of the contact points on the dog’s skin may cause irritation. If this happens, remove the collar until all signs of skin irritation have disappeared. Do not leave the collar more than 8 hours a day around your dog’s neck and take the time to check that there are no signs of irritation when your dog is not wearing it. Checking the device operates correctly − Before doing so, make sure the collar is turned off. − Fix each wire of the neon test lamp under each contact point (unscrewing them lightly and retightening them so as to pinch the test lamp wires). − Switch on the collar (turn the collar on mode 2, 3, 4, 5, 6 or 7 thus you will be able to check the operation of beep sound and stimulation). − Slide a streaked object (eg: knife with teeth and isolated sleeve) on one of the contact points (change the detection sensitivity if necessary). − The collar will emit beep sounds and the test lamp will light (on mode 1, the test lamp will not light). − Before disconnecting the test lamp, make sure the collar is turned off. DOGTEK NoBark Pulse - User’s guide 6/8 Cautions for use − The collar should be used on dogs only over 6 months old. − Before using the collar, it is important to have your dog checked by your vet to ensure it is fit to wear a bark control collar. − The collar is waterproof. − To avoid unintentional triggering, the dog should not wear a medal, metallic collar, or any other kind of collar together with the bark control collar. − Keep the collar out of reach of children. − Under no circumstances should you open the NoBark Pulse collar. You could damage some components and endanger the waterproof function of your product. Moreover, if you do this, your warranty will be cancelled. Maintenance Do not use volatile liquids such as solvents or benzene to clean your bark control collar. Use simply a soft cloth, slightly moistened with water or a neutral detergent. The nylon strap can be washed with soapy water. Troubleshooting Before thinking your collar is broken, read this booklet over and make sure that the problem is not caused by a weak battery or incorrect settings (barking detection sensitivity, operating mode). If the problem persists, contact DOGTEK Customer Care. According to the extent of the malfunction, you may have to return your product for Service and repair. Technical specifications Power Rechargeable battery Ni-MH 3,6 V integrated Battery life 30 days on a basis of 12 hours use and 24 releases by day (mode 5). Tightness waterproof Battery waste indicator Red light indicator Operation modes 7 Setting of bark detection sensitivity By potentiometer Dimensions 2.5 x 1.2 x 1.4 inches Weight (battery included) 3 oz Adjustable collar for necks from 6 to 22 inches Use temperature Between – 4°F and + 122°F DOGTEK NoBark Pulse - User’s guide 7/8 Warranty DOGTEK guarantees the product against manufacturing defects for the life of the product (conditions applies). Return transport costs for the product will be the purchaser’s sole responsibility. Warranty conditions All electronic components are covered under warranty for the life of the product with proof of purchase. Labor is covered for the first year of ownership. Thereafter, there is a minimum service charge for the repair or replacement of the product. This warranty excludes: accidental damage due to dog chews, misuse, loss, or improper handling is not covered. DOGTEK will not pay for loss of time, inconvenience, loss of use of your product, or any incidental or consequential damages. Warranty is void if product resold. Spare parts You can purchase spare parts (straps, contact points, magnetic key…) from your supplier at any time. www.dogtek.com DOGTEK NoBark Pulse - User’s guide 8/8