1
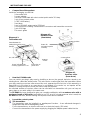
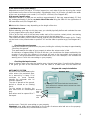
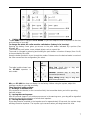
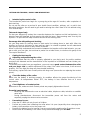
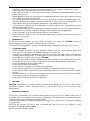
« FCC » DECLARATION OF CONFORMITY FCC rules – PART 15 NUM’AXES declares that the equipment below: Electronic Dog Fence DOGTEK EF-4000 complies to all dispositions of the part 15 of the FCC rules This device complies with part 15 of the FCC. Operation is subject to the following conditions: (1) this device may not cause harmful interference, and (2) this device must accept any interference received including interferences that may cause undesired operation. 2 FREEDOM, SAFETY AND PEACE OF MIND WARNING The device complies with Part 15 of the FCC rules. Any technical changes or modifications on the receiver collar or on the remote control not expressly approved by the manufacturer shall void the user’s authority to operate the equipment. Thank you for choosing an appliance from the DOGTEK range. Before using your EF-4000, please read the instructions in this guide and keep it for future reference. Before using EF-4000, we advise you to have your dog checked by your vet to ensure that it is fit to wear a collar on. Check your dog’s neck regularly, the repeated rubbing of the contact points against the animal’s skin may cause irritation. If this happens, remove the collar until all signs of skin irritation have disappeared. Start with mode 1 and define the level from which the dog by increasing gradually. Table of contents Freedom, safety and peace of mind Foreword Instructions for use Composition of the product How the EF-4000 works Installing the control system Switching On/Off Adjusting the wave range Setting impulse intensity Replacing the battery of the collar Changing the contact points Checking your EF-4000 3 4 4 4 6 6 7 8 8 8 Method and training / advice and information Introducing the control collar Getting the best results Precautions for use Maintenance Troubleshooting Warranty Warranty conditions Technical information Accessories Collection and recycling of your device at the end of its life 9 9 9 10 10 10 10 11 11 12 EF-4000: Foreword The understanding between a dog and his owner has existed since a long time. Nonetheless, a dog is often guided by his natural instincts and breaks the rules his master has taught him, causing complaints about straying and damage such as: damage to flowerbeds, jumping into swimming pools, etc. More seriously, he may be the victim or the cause of road accident. The EF-4000 pet fencing is a modern and highly effective system enabling one or more dogs to run freely within a perimeter, fenced or unfenced, which you define. 3 INSTRUCTIONS FOR USE Composition of the product Inside the packaging you will find: - 1 transmitter unit - 1 power adapter - 1 receiver collar fitted with short contact points and a 30” strap - 1 set of long contact points - 1 CR2 3-Volt battery - 1 test lamp - 1 reel of 18 AWG antenna wire (330 feet) - 1 connection kit including 3 antenna wire connectors and transmitter connector - 1 set of 10 flags - This user’s guide Diagram # 2: Receiver collar (from below) Diagram # 1: Transmitter unit Battery position Potentiometer for setting the warning zone (beeps) button for adjusting impulse intensity On / Off switch contact points Antenna socket Green indicator light showing appliance is “on” Connection to power unit Diagram # 3 Receiver collar (from above) How the EF-4000 works You can restrict your dog’s play area by installing a wire on the ground, buried or raised on an existing fence, called the antenna wire. This wire carries a radio signal from the transmitter. When your dog, wearing a receiver collar around his neck, approaches this limit, he is first warned by a beep that he is too close to an area where is not allowed; if he carries on, an impulse will be emitted. Your dog will have to leave the area to stop the impulses. An unlimited number of receiver collars can be used with one transmitter unit: you can keep as many dogs as you wish safely in the same area. The EF-4000 has been designed to give you complete satisfaction with an antenna wire with a maximum length of 450 yards (equivalent to one 2.5 acre). If a longer antenna wire is used, the EF-4000 will still work, but the warning and impulse zones will be reduced. - Layout the control system The transmitter: The transmitter must be installed in a weatherproof location : it can withstand changes in temperature but will be damaged by water Fix the transmitter on an interior wall near to an electrical supply (120 volts). Connect the transmitter to the power supply by plugging the adapter power cable into the 4 transmitter and connecting to the mains. (See Diagram # 1) The antenna wire For the system to operate, the wire should be connected to the transmitter and form an uninterrupted loop. Both wires must be spaced 6/7 feet apart to avoid cancelling the signal. Either a 18 AWG wire or a 16 AWG can be used, or combined, with no effect to performance. From the transmitter unroll the wire around the perimeter of your property. To run the cable from your garage or garden shed, pass it through a window or a door, or similar. The wire can be placed on the ground, buried (maximum 4 inches deep) or fixed to a non-metallic existing fence or wall (max. height: 20 inches). The wire must not be taut as variations in temperature may cause it to expand or contract. Separate the wire by at least 6 to 7 feet from a metallic gate and 3 to 4 feet from a metallic fencing. The wire must neither be laid perpendicular nor parallel to an electric cable. In order to prevent any interference, the distance between the wire and the electrical cable shall be at least of 10 feet. If you need more than 330 feet of antenna wire, you must connect the different lengths of wire using the connectors provided for the purpose (the wire does not need to be stripped). To ensure that your dog does not receive any impulse in certain areas of the property (e.g. the area between the transmitter in the garage and the wire placed around the edge of the property) you should twist the outward cable around the inward cable: the twists prevent waves being emitted (See Diagram # 4). Insert this connector into the corresponding part of the transmitter (the connector is slanted: if you can not insert it, turn it one half turn) (See Diagram # 1). The flags: These enable the dog to see the area in which he can move freely and the boundaries he must not cross. We recommend that the flags are placed at the inner edge of the beep warning zone, close enough one of the others. Once your dog is familiar with the boundaries, the flags can be removed. Before starting the installation of your EF-4000, it may be useful to make a small sketch of your plot and mark on it the locations of the antenna wire connectors. Switching On/Off Switching On • The Transmitter Switch the transmitter to the On position using the switch button on the left side of the unit: a green indicator light will come on (See Diagram #1). • The collar Fitting the battery: Unscrew the 4 screws on the battery cover (See Diagram #2), insert the battery (CR2) in the position indicated on the battery housing. A beep sounds, indicates that the collar is switched on. Check that the seal is in place on the groove of the battery cover. Before re-tightening the 4 screws, force the strap against the battery cover by pulling it. Using a screwdriver, moderately tighten the 4 screws. Switching Off If the control collar is not to be used for a long period, the battery should be removed from its housing. If you want to take your dog off the property, you are advised to remove the receiver collar. You can also switch the transmitter to Off and the green indicator light will go out. (See Diagram #1) Adjusting the wave range (“warning” and “impulse” zone) Using the transmitter, you can increase or decrease the width of the warning and impulse zone, depending on the configuration of your plot and how the antenna wire is laid. 5 a) An initial warning zone (beeps) Adjustable area from 20 feet to 15 inches (approx) on each side of the wire by using the central knob located on the front of the transmitter. A graduation from 0 to 10 helps you define the width of the zone according to your needs (0 = 1 foot; 10 = 20 feet) (See Diagram # 1). b) A second, impulse zone Adjustable based on 3 fixed pre-set positions: approximately 5 feet ●))), approximately 2.5 feet ●)), and approximately 1 feet ●), on each side of the wire using the slider on the right button of the transmitter unit (See Diagram #1). NB: detection distances vary depending on the length of the wire. c) Validate the zones Before releasing your dog into his play area, you should physically define and evaluate the area of your property where your dog is allowed. First of all fix each wire of the test lamp under each of the receiver contact points, unscrewing them slightly and then retightening them so as to pinch the test lamp wire. Then insert the battery into the collar housing, and turn the transmitter On/off switch to On. Finally set the knob on the potentiometer to position “10” and the slider to position ●))) (See Diagram # 1, p 4). Checking the warning zone Stand at the centre of your animal’s play area, holding the collar by the strap at approximately 1 foot from the ground. Then walk towards the edge of your property to where the antenna wire is laid. At a distance of approximately 20 feet of the wire, you should hear the beeps emitted by the receiver. If you think this distance is too great, go back to the transmitter and change the settings. Turn the potentiometer knob to a lower level (6 or 4 for example) : this reduces the warning zone. Check this new setting on your property. - - Checking the impulse zone Same as above: when you enter the impulse zone, the test lamp lights. If you think this distance is too great, go back to the transmitter. Push the slider to a lower level: this will reduce the Diagram #4: sample installation AUTOMATIC SYSTEM As soon as the animal wearing the collar enters the protected area, he is warned by a beep. If he continues to move forward, towards the perimeter wire he receives impulses. The wire is placed on the ground, buried or raised on an existing fence. For the system to function, the wire must form an uninterrupted loop. Both wires must be spaced 6 to 7 feet apart. Antenna wire 6 to 7 feet between both wires By twisting the wire strand with the inward strand, wave emission is blocked and the animal can move freely within this zone Warning beep area Impulse area Transmitter impulse zone. Check this new setting on your property. Important: zone width varies depending on the length of antenna wire laid out on the property. The longer the antenna wire, the narrower the zone. 6 Setting the impulse intensity The EF-4000 collar is equipped with 8 modes so you can adapt the level of impulses to the size and sensitivity of your dog. To change the mode, the collar must be switched on (battery in its housing). Opening the battery cover gives you access to the push button indicated by a pointer (See Diagram #2). To activate this push button, use a pointed object such as a pencil tip. The mode is changed by pressing and holding the push button: a number of beeps (from 1 to 8) is then emitted by the collar. Keep the button pushed in to run through the modes. Release once the desired mode is reached: the collar memorizes the configuration you select. Mode The table beside shows how the EF-4000 operates in each mode: 1 2 3 4 5 6 7 8 Number of beeps 1 2 3 4 5 6 7 8 Impulse level Very low (small dog or dog with sensitive temperament) Medium (medium dog or dog with normal temperament) Very strong (large dog or dog with difficult temperament) NB: your EF-4000 has been set Mode 4 in the factory. Before using the system, adjust this setting according to your dog sensibility. Three functions safety system: 1) Breakage of antenna wire: If the antenna wire breaks (or the connection fails), the transmitter alerts you to this operating fault with a beep. 2) Leaving the warning zone: After 20 seconds (approx.) of continuous presence in the warning zone, your dog will be signalled to leave the zone by the emission of a few short impulses. 3) Leaving the impulse zone: If your dog remains immobile in the impulse zone for approximately 20 seconds, the system stops emitting corrective impulses. The impulse cycle resumes when your dog leaves this zone. 7 Replacing the battery of the collar DOGTEK recommends using the same type and same brand of batteries as those supplied in your new purchased device. Other brand of batteries might not operate, or not be compatible or alter the performances of your collar. The right batteries can be purchased from DOGTEK or from our distributor. Unscrew the 4 screws on the battery cover and remove the old battery. Insert the new battery in the position indicated on the plastic casing. A beep is emitted indicating that the collar is ready for use. If you inadvertently put the battery in the wrong way, the collar will not emit a beep. Reposition the battery quickly otherwise you can damage the collar. During fence set up and pet training, you will put a greater than normal load on the battery. You may need to replace this original battery after 30-60 days depending on how much testing and training you do. Under normal circumstances battery life is 6 months. NB: when you change the battery, your EF-4000 memorises the mode you selected previously. Changing the contacts points Before replacing the contact points, make sure that you have correctly put the collar out of service (remove the battery from its housing). If your dog has a long-haired coat and the short contact points fitted in the factory are unsuitable, unscrew these contact points and replace them with the long contact points supplied with the accessories. They should be tightened by hand. Do not use pliers to tighten the contact points: this may cause irreparable damage to the product. Checking your EF-4000 Checking it is working properly: You can check that your EF-4000 is working properly at any time and display how it is working using the test lamp. Before making this check, ensure that your collar is out of service (battery removed from the housing). You can then place the test lamp in contact with each of the contact points (make a loop around each contact points). Insert the battery into. Connect the transmitter to the power supply (power unit plugged into the mains and switch On). Walk up to the antenna wire. You should first hear the warning beep then, as you get closer to the wire, the test lamp should light up. Your appliance is working perfectly. Before disconnecting the test lamp, make sure you remove the battery! Checking the mode selected: If you need to, or as your dog’s behavior changes as he becomes used to the EF-4000, you can check the mode you selected some time ago. A short press on the push button under the battery cover enables you to activate the beep and count the number of beeps corresponding to the mode selected (1 to 8 beeps). 8 METHOD AND TRAINING / ADVICE AND INFORMATION Introducing the control collar The introduction period can begin for a young dog at the age of 6 months, after completion of basic training. Do not put the collar on an animal in poor health (heart condition, epilepsy, etc.) or which has behavioral problems. He will need to get used to wearing the collar: leave it on him without using it for several days. Take each stage slowly So that your dog quickly makes the connection between the impulse and his bad behavior, his attention must be attracted, by first warning him with the beep: “beep warning zone” then by the impulse. The pennants will help visualize the start of the warning zone. Encourage him with patting and stroking Let your dog make his training alone to start make his training alone to start with. After the impulse, as soon as he learns to obey and turn back, he should be patted; he will understand more quickly and his desire to obey will be increased. When he has fully understood the connection between the impulse and his bad behavior, you can get on with your own jobs, but continue to praise him at other times, to reinforce his grasp of the “concept of obedience”. Getting the best results Adjusting and positioning the collar: It is very important that the collar is properly adjusted to your dog’s neck. Its position enables straying to be detected and the transmission of the impulses to be effected and can irritate your dog’s neck. To achieve best results from your appliance, you must ensure good contact between the collar and your dog’s skin by careful adjustment of the strap: if the collar is too loose, it will not work properly, if it is too tight your dog may have trouble breathing. If necessary, replace the short contact points with long ones (see section on replacing the contact points). Check the battery of the collar: Make sure the battery is working properly: its condition affects the proper functioning of the control collar. At temperatures below 32°F, the battery is less effective than at a room temperature. Check tightness of contact points: Before each use, make sure both contact points are properly tightened on the unit. Essential requirements: - Never lay the antenna wire near an electrical cable, telephone cable, television or satellite aerial wire. - During thunderstorms, disconnect the transmitter power unit from the mains and especially unplug the antenna wire connector. • • • • Precautions for use Keep the EF-4000 unit out of reach of children Prevent any water from infiltrating the collar when it is open (especially when changing the battery, the transmitter unit or the power unit. Remove the battery from its housing if you are not using the appliance for 3 months or more Never leave an old battery in the collar: it may leak and damage your EF-4000 9 • • • • • • • • • Carefully check that your collar is operating properly if it has not been used for some time. Before each use check the tightness of the contact points. Take care not to store or keep your collar in places exposed to high temperatures, like the parcel shelf of a car. Before fitting the collar, you must have your dog examined by a veterinary surgeon to ensure he is suited to wearing a control collar. The system activates automatically as soon as the animal crosses the unauthorized zone. However, despite the product’s excellent reliability, it may be set off unintentionally. You should never leave your dog unsupervised when he is wearing the collar on. To prevent the collar going off accidentally, we advise against your dog wearing a metal identity tag around his neck. The repeated rubbing of the contact points against the animal’s skin may cause irritation. If this happens, remove the collar until all signs of skin irritation have disappeared. Check your dog’s neck as you adjust the collar or you remove it. Do not leave the collar on your dog for more than 8 hours per day and remove it when he comes into your house. Maintenance Do not use volatile products such as thinner or benzene to clean your EF-4000; Wash the receiver regularly with clean water. Wipe it dry with a soft cloth. To maintain its watertightness, you are strongly advised to change the collar seal once a year. • Troubleshooting Before blaming a problem on your appliance, please read this guide carefully again and make sure it is not due to a low-powered battery or incorrect use. In the event of a problem, reinitialise the system by removing the battery. Wait a few minutes and then put the battery back in, making sure it is the right way round. Carry out a check as described in the section “checking your EF-4000”. Check that the collar is properly adjusted around the animal’s neck; make sure the contact points with his skin. If necessary, replace the short contact points with the longer ones. Check the tightness of the contact points. Check the condition of the battery. Check the wire is properly connected to the transmitter. Check that the power unit is correctly connected to the transmitter and to the mains. Check that the switch button on the side of the transmitter is in On position (position 1 green light on). As time passes by, in case you face some problems with the detection, check the condition of the wires and of the connections (oxidation). If the problem persists, contact your distributor. Warranty • • • • • • • • • DOGTEK guarantees the product against manufacturing defects for the life of the product (conditions applies). Return transport costs for the product will be the purchaser’s sole responsibility. Warranty conditions All electronic components are covered under warranty for the life of the product with proof of purchase. Labor is covered for the first year of ownership. Thereafter, there is a minimum service charge for the repair or replacement of the product. This warranty excludes; accidental damage due to dog chews, misuse, loss, or improper handling is not covered. DOGTEK will not pay for loss of time, inconvenience, loss of use of your product, or any incidental or consequential damages. Warranty is void if product resold. 10 Technical information Transmitter Power Watertightness Use temperature Dimensions L x H x D 120 V AC Showerproof only between - 4°F and 104°F 3.6” x 1.7” x 4.5” Collar Power Battery lifetime Watertightness Use temperature Dimensions L x H x D Weight Collar adjustable to neck sizes 1CR2 lithium 3V battery about 6 months on standby waterproof between - 4°F and 104°F 2.3” x 1.3” x 1.6” 3 ounces (transmitter + battery + strap) from 7” to 26” Antenna wire Gauge 18 AWG or 16 AWG Accessories and spare parts You can purchase the following items from your supplier at any time: - An additional collar, - A dummy collar, - A transmitter unit, - A gender adapter, - A receiver cover, - An additional reel of 18 AWG antenna wire (330 feet), - A set of 3 connectors for the additional antenna wire, - A transmitter connector, - A set of 10 additional flags, - A set of 2 short contact points, - A set of 2 long contact points, - A receiver seal, - A neon test lamp, - A set of 4 receiver screws - A 3V CR2 lithium battery - A grey nylon strap. 11 Collection and recycling of your device at the end of its life The pictogram which appears on your product means that this one can not be thrown with household refuse. You have to bring the device to a collection location suitable for treatment, development, recycling of electric wastes or bring it back to your distributor. Adopting this process, you do something for the environment, you contribute to the preservation of natural resources and the protection of human health. Use this space to record the serial number of your EF-4000 (the number is near the barcode): Transmitter: ………………………………………………………………………………………………… Receiver:…………………………………………………………………………………………………….. www.dogtek.com 12