1
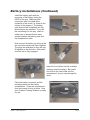
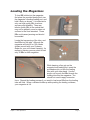
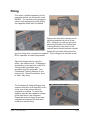
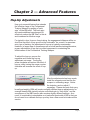
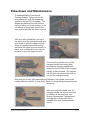
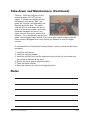
SYSTEMA
Professional
Training Weapon System
Model M16A3
User’s Manual
Revision 1.2 / 2004-08-17
Preface
Thank you for your recent acquisition of the Systema Professional Training
Weapon System. With decades of experiences in making the finest airsoft
upgrade components and countless hours of research and development, we are
confident that you will find years of excellent and trouble-free service from the
Systema Professional Training Weapons. I would like to thank you for the
opportunity to serve you as well as the community that your agency in turn may
serve, and I hope you will find this to be an exceptional training tool, helping
officers prepare for the unexpected.
Best regards,
Kumi Yoshida
CEO, Systema Engineering
Before You Begin...
Please take the time and familiar yourself with the Systema Professional Training
Weapon, and read this user’s manual thoroughly. Remember the Professional
Training Weapon is NOT A TOY. Although it is designed and engineered to be a
safe and effective force-on-force, non-leathal training tool, as with any other
activities or training exercises that serious injuries to you or others can occur
if the unit is handled inappropriately, misused, or improperly disassembled.
Safety Precautions and Equipments
First and foremost, ALWAYS handle the Professional Training Weapon as if it is a
real weapon, first to minimize the possibility of accidents but more so to promote
and exercise safe firearm handling practices.
Secondly, wear appropriate protections during training. We strongly encourage
making full-sealing, ANZI 87.1-1989 rated tactical goggles a REQUIRED
equipment for every participants during force-on-force training using Systema
Professional Training Weapons. Ballistic shooting glasses that does not provide
a complete seal around the user’s eyes are generally considered insufficient eye
protections. If your agency already utilize tactical goggles during operations, use
it during training as well!
Furthermore, other appropriate body protections should also be employed as the
situation calls for. In extreme close-range engagements using the Systema
Training Weapons, helmets, long-sleve uniforms, tactical vests and gloves are
also recommended.
The bottom line is, officer safety is our utmost concern and must not be taken
lightly!
Chapter 1 — Basic Operations
Preparations
The Systema Training Weapon uses a
high-power, rechargeable 8.4v Ni-CD
battery pack as its power source. Before
each training session, please ensure
your battery pack(s) are fully charged for
optimal performance. Refer to your
battery charger’s instructions on how to
charge the battery pack (as well as
discharge / conditioning cycles as
needed) . Both the battery packs and
battery chargers are available from your
Systema dealer.
In addition, before and after each training sessions, visually inspect each
Systema Training Weapon for damages. If any structural damages to the unit is
found, contact your Systema dealer for repair or replacements.
Battery Installations
Prior to use, a battery must be installed
to power the Systema Professional
Training Weapon. To install the battery,
first open the battery compartment door
at the end of the stock by pushing down
the compartment door locking lever,
then pivot the door open.
Locate the battery connector, and
extract the wire until the black, tubular
fuse holder is completely outside of the
battery compartment. Be careful not to
damage the wires. If you need to
replace the fuse, use a needle nose
plier to pull it out of its holder. Only
replace with identically rated fuse units.
Chapter 1 - Basic Operations
Page 2
Battery Installations (Continued)
Install the battery pack with the
connector of the battery facing the
REAR of the gun. Make sure the
connection wire is located at the
underside of the stock (i.e. closer to the
bottom of the weapon). The battery
pack should slide completely into the
stock without any resistant. If you felt
like something is in the way, check to
make sure no electrical wires were
caught between the battery pack and
the compartment walls.
ï
Now connect the battery by lining up the
two connectors and push them together.
The plugs are polarized so they will only
fit together in one direction. Also make
sure the lock is fully engaged.
Insert the fuse holder into the available
opening under the battery. Be careful
not to force the fuse holder into the
compartment, as you may damage the
wires.
Place the battery connector and the
remaining wires into the battery
compartment. Close the compartment
door and ensure it locks in place. Now
your Systema Training Weapon is ready
for use.
Chapter 1 - Basic Operations
Page 3
Loading the Magazines
To load BB bullets into the magazine,
first place the provided loading tool over
the magazine’s feeding/loading port, and
hold it firmly as shown. It is important to
only use high quality BBs to ensure
accuracy and reliability. There are
inferior quality BBs in the market that
may not be perfectly round or does not
conform to the 6mm standard. Those
BBs could cause jamming and should
be avoided.
Locate the top opening of the tube, and
feed BBs into the tube. Although the
magazine will hold 80 or 120 rounds
(please consult with your Systema
dealer for your unit’s exact capacity), for
realism in training you may want to load
only 30 BBs in each magazine.
While keeping a firm grip on the
magazine and loading tool, insert the
provided acrylic rod into the feeding
tube with your other hand. Use the
acrylic rod to push the BBs through the
loading tube into the magazine. You
should not need to apply excessive
force. Repeat the loading process if you need to load more BBs then the loading
tube will hold. When a resistant builds up while pushing the loading rod down,
your magazine is full.
Chapter 1 - Basic Operations
Page 4
Firing
First insert a loaded magazine into the
magazine well as you would with a real
M4/M16. You can ensure the magazine
catch is fully engaged by briefly pulling
the magazine down after its inserted.
Depress the bolt-catch release pad to
simulate releasing the bolt of a real
M16. Although you will not feel a bolt
slamming forward in the Professional
Training Weapon, this action is still
required as an electrical sensor located
behind the bolt-catch will prevent the
gun from firing after a magazine is emptied. This is designed to simulate a real
M16’s operation as closely as possible.
Select the firing mode by using the
safety / fire selector lever. Its operation
and position is the same as a real M16.
2 firing mode is provided: semiautomatic and fully-automatic. Your
Professional Training Weapon is now
ready to fire. Return the selector lever
to “safe” after firing.
The Professional Training Weapon has
a sensor that will cut off electricity to the
motor once it has sensed that the
magazine is emptied. To reload the
weapon, depress the magazine release
button and remove the magazine.
Repeat the previous steps (insert new
magazine and depress the bolt-catch
release) to resume firing.
Chapter 1 - Basic Operations
Page 5
Chapter 2 — Advanced Features
Hop-Up Adjustments
Hop-up is a special feature that extends
the effective range of the Professional
Training Weapon by putting a “backspin” on the BB bullet. The back-spin
will create additional aerodynamic lift,
effectively makes the BB “float” in the air
and increases its effective range.
÷ With Hop-Up
Without Hop-Up ö
For typical in-door, force-on-force training, the engagement distance will be so
short that the effect of hop-up will not be noticeable. As a result, for premisesentry type of training, the adjustment of hop-up is typically unnecessary.
However, in larger area of operations such as urban warfare training/scenarios,
proper adjustments of hop-up is a critical component in maximizing the
effectiveness of the Professional Training Weapon.
To adjust the hop-up, remove the
magazine and locate the hop-up
adjustment set-screw. Turning the
screw clockwise will reduce the effect of
hop-up, while turning the screw counterclockwise will increase the effect of hopup.
Too Much ø
More
Hop-Up
Less
Hop-Up
÷ Just Right
After the adjustments has been made,
install the magazine and test-fire the
weapon in a shooting range. Notice
the trajectory and re-adjust if
necessary. Please also note that every
brand/type/weight of BBs will require a slightly different hop-up adjustments; for
example heavier BBs typically require more back-spin to “stay afloat”, and the
smoothness of the BB’s service also requires slightly different settings. As a
result, it is advisable to standardize on a particular type/model of BB so that you
do not need to re-calibrate the hop-up every time a new round is introduced into
service.
Not Enough ö
Chapter 2 - Advanced Features
Page 6
Take-down and Maintenance
To disassemble the Professional
Training Weapon, first punch-out the
rear receiver pin until the stopper pin
(similar to the real M16) engages. The
stopper pin prevents the rear receiver
pin from falling out of the receiver, so do
not attempt to completely remove the
rear receiver pin from the lower receiver.
With your palm rested firmly on top of
the stock, push the charging handle with
your thumb to pivot the upper receiver.
There is a spring-loaded ball bearing
that holds the upper receiver securely in
place, so a considerable force may be
required to open the upper receiver.
To remove the cylinder unit, pull the
charging handle back firmly while
ensuring the charging handle latch,
located on the left side of the charging
handle, is also released. The cylinder
unit will slide out towards the back as
you pull the charging handle.
Note that due to very tight manufacturing tolerance, the cylinder unit may be
initially difficult to extract. In time it will “break-in” and gradually becomes easier
to remove.
After removing the cylinder unit, the
charging handle can also be removed
by sliding it all the way back then
moving it downwards. Replacement
and upgrade cylinder units will be
available from your Systema dealer
shortly.
Chapter 2 - Advanced Features
Page 7
Take-down and Maintenance (Continued)
To remove the inner barrel, use a plastic
rod (such as the provided acrylic loading
rod) and insert it from the muzzle-end.
Run the acrylic rod along the inside wall
of the outer-barrel until it make contact
with the tip of the inner barrel, then push
the inner barrel out.
Remove the inner barrel by sliding it
through the upper receiver, towards the
rear of the gun.
Occasionally lubricate the rubber seal
and hop-up unit from the loading port of
the inner barrel. Use only pure (100%)
silicon oil, as many other lubricants
(such as mineral oil, automotive
lubricants, or WD-40) can immediately
destroy the o-rings and other rubber
components found within the inner
barrel. Your Systema dealer will be able to supply the correct lubricant for the
Professional Training Weapon.
Caution: While the receiver is in the
opened position, DO NOT touch any of
the electrical connectors and/or the
circuit board itself, especially when the
battery is connected. Damaged
electrical components are NOT userservicable and must be returned to the
factory for repair.
Chapter 2 - Advanced Features
Page 8
Take-down and Maintenance (Continued)
Caution: While the receiver is in the
opened position, DO NOT pull the
trigger. If a battery is installed and the
Sector Gear ø
fire-selector is not set at “Safe”, the
gears will “dry-spin” and potentially misaligning the sector gear. The upper
receiver will not close when the sector
gear is in the wrong position, and major
hardware damages can occur if the
upper receiver is forced to close in this
situation. If you accidentally dry-spin the
gears, tap the trigger lightly until all of the sector gear’s teeth rotates inside the
lower receiver (disappear from view), before you attempt to close the upper
receiver.
To re-assemble the Professional Training Weapon, simply reverse the take-down
procedure:
1. Install the inner barrel
2. Install the charging handle
3. Install the cylinder unit (note the alignment notch on the unit, and make sure
the cylinder is inserted all the way)
4. Ensure the sector gear is aligned correctly
5. Close the upper receiver
6. Move rear receiver pin back to its original position
Notes
Chapter 2 - Advanced Features
Page 9
SYSTEMA CO.
2-62-1 Ikebukuro
Toshima-ku, Tokyo
JAPAN 171-0014
tel: +81.3.5953.8310
fax: +81.3.5953.8320
www.systema-engineering.com
© 2004 SYSTEMA CO. All Rights Reserved