1
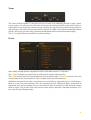
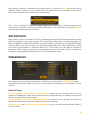
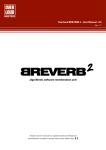
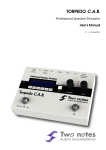
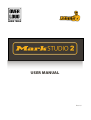
USER MANUAL
Rev. 1.0
INTRODUCTION
Mark Studio 2 faithfully reproduces the sound of Markbass amplifiers, modeling pedal effects,
amps, cabinets, microphones and the room ambience reverb. Mark Studio 2 comes into several
plugin formats and as a stand alone application and works on Mac and Windows systems.
MAIN INTERFACE
The main interface of Mark Studio 2 has several sections: on the top and centre of the interface
you can see the current setup: the amplifier (AMP), the cabinet and microphone (CAB & MIC)
and a collection of pedal effects (EFFECTS). These are the main components of the Mark Studio
2 sound chain. Each element of the setup can be changed and adjusted acting on the controls of
the interface.
On the bottom left corner there is the Preset area (PRESET), where Mark Studio 2 setups can be
saved and recalled.
Below the effects section there is the Tuner (TUNER).
1
INTERNAL DIAGRAM
To better understand how Mark Studio 2 has been designed, take a look to the diagram. The first
block, EFFECTS, contains the five pedal effects. Next comes the AMP box containing the PREamp, the MASTER level and the LIMITER blocks. Next you can see the CAB & MIC block. This main
line of processed sound then gets mixed with a variable portion of LINE OUT and DIRECT signals
to obtain the final sound.
HOW TO CREATE YOUR OWN SETUP
Here is how you create your own setup in Mark Studio 2.
Amplifier, Cabinet, Microphone
Click the AMP MODEL display to see the list of amplifiers, then select the wanted model.
Click the CAB MODEL display to see the list of cabinets, then select the wanted model. You can
activate the bass reflex option setting REFLEX to ON with cabinets for which this option is
present.
Click the MIC MODEL display to see the list of microphones, then select the wanted model.
There are three additional options: speaker cone alignment (CENTER/BORDER), distance from
the cabinet (NEAR/FAR) and phase inversion (useful when you are mixing some amount of
direct sound - see Mix below - and you experience bass frequency deletion due to phase
conflicts).
2
Effects
Mark Studio 2 has five pedal effects to further enrich your sound. If the large top area is showing
the selected amp and cabinet, click the pedals picture in the middle of the interface to flip views
and see the effects. You can drag the pedals to change their position, turn them on/off clicking
the power switch (even when they are zoomed out) and, of course, adjust their sound with the
knobs.
NOTE: the signal path has to be intended from left to right.
Mix
On the bottom right corner of the interface you can see the MIX section, where you can adjust
the overall sound of Mark Studio 2. The ULTRA switch activates an extra low frequency boost.
The DIRECT fader adjusts the amount of direct sound: the sound you have at the amp input
(after all pedal effects). The TWEETER fader equalizes the higher frequencies of the final sound.
The ROOM fader adjusts the amount of room ambience reverberation you would get in a real
room when you put a microphone in front of a cabinet. The REAR fader adjusts the level of an
additional microphone put on the back of the cabinet.
3
Tuner
The Tuner of Mark Studio 2 is very easy to use: just turn it on and play your bass strings, open,
one at a time. You will see a lit point over the tuner bar indicating if the tuning of the string is
under (left) or over (right) the correct tuning. Carefully change the tuning of the string, while it is
still vibrating, until you see the central green indicator lit stably. The tuner automatically detects
which is the string you are tuning (showing the detected note name on the tuner display).
The MUTE option allows to tune the instrument silently.
Preset
Mark Studio 2 keeps presets organized in banks. Each bank contains 128 presets.
The ‘+’ and ‘-’ buttons are respectively to add/remove a bank to/from the list.
The LOAD button loads the selected preset setup to Mark Studio 2. The SAVE button saves the
current setup to the selected preset. The ‘X’ button clears the selected preset.
Additional commands for banks and presets are accessible by right-clicking (or Ctrl-clicking) a
bank or a preset on the respective lists. For example you can Copy/Paste banks and preset to
reorganize your preset storage. Also you can export a bank or a preset to a file and then import
them in again. Very useful when you need to move presets between separate computers or if
you want to keep a backup copy.
4
AUDIO OPTIONS
The stand alone application of Mark Studio 2, if compared to the plugin appearance, has an
additional window title bar. On the left side of the title bar you can find the Options button
which let you access the application Audio Settings.
Here you can set some audio options to second your system configuration.
Output is where you want the final sound to be sent to. The Test button puts a test sound on the
selected output device for a few seconds, so you can check the output immediately.
Input is the device you want to use for the input sound. The meter close to the input selector
shows the real-time level of the sound detected by the selected input device.
Active input channels (where applicable) lists the input channels of the selected input device.
You can select which channels are to be used.
Sample rate let’s you select the sample rate of the Mark Studio 2 audio engine. If you don’t have
particular needs, go with 44100 Hz.
Audio buffer size is very much dependent on your computer overall performance and on the
kind of audio device you are using. Bigger buffers will turn into less CPU load but also into more
latency (the perceived delay between when you play a note and when you start hearing it from
the output). 256 samples is a good starting point. You might want to lower this to 128 samples or
even less if the audio device can support that. Too much low settings can affect Mark Studio 2 or
the whole computer performance: you would then have clicks and crackling also known as
buffer dropouts.
Active MIDI inputs let’s you select the physical or virtual MIDI inputs to be used to remotely
control Mark Studio 2. By design, Mark Studio 2 listens to MIDI input flows from all channels of
the selected MIDI ports.
INPUT CHANNEL SELECTION
Some audio devices (for the stand alone format) and hosts application (for plug-in formats) don’t
allow for Mono-input to Stereo-output operation (which is the setup you’ll more likely need most
of the times).
5
Mark Studio 2 features a dedicated input popup menu. Just click the INPUT jack of the current
amplifier: if Mark Studio 2 senses a stereo input, this option allows you to choose which side of
the stereo connection your instrument is connected to.
This is also a welcome feature for people playing live and often switching between two
instruments. No need to unplug and re-plug cables and re-set input levels: just click the INPUT
jack and select the proper input channel.
AUTOMATION
Mark Studio 2 allows to control a list of its parameters through host-based automation making
room for complex in-mix sound changes. The usage of the automation is strongly dependent on
the host application where Mark Studio 2 has been loaded. In general, after you loaded the Mark
Studio 2 plug-in, you have to access the parameter automation track. Host applications will let
you choose the parameter to automate from a list. Then usually you’ll be able to record that
parameter value changes spinning the corresponding knob on the Mark Studio 2 interface or
sometimes also graphically drawing the curves of the parameter value.
PREFERENCES
On the top right corner of the Mark Studio 2 interface you can find the PREFERENCES button.
The preferences panel of Mark Studio 2 has two sections, here following is a description of both
of them.
General Setup
Ask confirmation when losing unsaved changes option let’s you possibly get rid of the
request of confirmation when you are about to lose unsaved changes (i.e. loading a new preset
after having edited the current setup).
Ask confirmation when overwriting another preset option let’s you possibly get rid of the
request of confirmation when you are about to overwrite a preset.
Backup presets and Restore presets from backup let you save and restore all Mark Studio 2
presets in a file.
6
Deauthorize is a command to deauthorize Mark Studio 1 on the computer where it is running.
This let’s you move the authorization on an a separate computer, for example when you are
about to upgrade your system. Overloud license policy allows each license to be authorized on
up to three computers. Our servers keep track of the authorizations in use so you shouldn’t sell
or anyway dismiss a computer having Mark Studio 2 authorized herein without first deauthorizing it.
MIDI Setup
MIDI direct preset recall option, when activated, makes Mark Studio 2 react to MIDI Program
Change messages by directly loading the corresponding preset (Program Change # = Preset #)
from the currently selected bank.
Amp master volume ... 1st Pedal On/Off ... 5th Pedal On/Off are the parameters that can be
controlled via MIDI. The first one is a MIDI continuous parameter ranging from 0 to 127,
connected to the current amplifier’s master volume. All others are On/Off parameters to control
the power state of the 5 pedal effects.
A very smart function is MIDI learning: the Learn button greatly simplifies your MIDI Setup
operations. You just connect your MIDI foot controller, the click Learn and, on the controller, you
move the control you wish to use to control the corresponding parameter. That’s it!
Mark Studio 2 will automatically detect the income MIDI message setting up all the
corresponding options. However, after this operation if something doesn’t fit your needs, you
can manually set the detected options. Expr. is to control the corresponding parameter with an
expression pedal. In this case the lowest half of the expression range will set On/Off parameters
to Off, while the highest half will set the On.
The Overloud Team
7