1
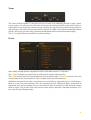
AUDIO OPTIONS
The stand alone application of Mark Studio 2, if compared to the plugin appearance, has an
additional window title bar. On the left side of the title bar you can find the Options button
which let you access the application Audio Settings.
Here you can set some audio options to second your system configuration.
Output is where you want the final sound to be sent to. The Test button puts a test sound on the
selected output device for a few seconds, so you can check the output immediately.
Input is the device you want to use for the input sound. The meter close to the input selector
shows the real-time level of the sound detected by the selected input device.
Active input channels (where applicable) lists the input channels of the selected input device.
You can select which channels are to be used.
Sample rate let’s you select the sample rate of the Mark Studio 2 audio engine. If you don’t have
particular needs, go with 44100 Hz.
Audio buffer size is very much dependent on your computer overall performance and on the
kind of audio device you are using. Bigger buffers will turn into less CPU load but also into more
latency (the perceived delay between when you play a note and when you start hearing it from
the output). 256 samples is a good starting point. You might want to lower this to 128 samples or
even less if the audio device can support that. Too much low settings can affect Mark Studio 2 or
the whole computer performance: you would then have clicks and crackling also known as
buffer dropouts.
Active MIDI inputs let’s you select the physical or virtual MIDI inputs to be used to remotely
control Mark Studio 2. By design, Mark Studio 2 listens to MIDI input flows from all channels of
the selected MIDI ports.
INPUT CHANNEL SELECTION
Some audio devices (for the stand alone format) and hosts application (for plug-in formats) don’t
allow for Mono-input to Stereo-output operation (which is the setup you’ll more likely need most
of the times).
5