1
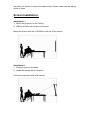
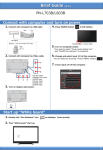
www.auroplus.com
User Manual
1. The use of the products:
Multiscreen is the optical high gain projection screen. It may enhance the
brightness and contrast of the projection. The surface is coated by the special
coating, can write and erase on the surface with the marker pen.
2. Cleaning of screen:
Generally after the use of marker pen, you can wipe and erase the surface with
the white board eraser. Weekly wipe the screen surface with moist clean
clothe. If the surface left the apparent marker on it, use the whiteboard cleaner
to clean.
3. Mainteince of screen:
Spay the whiteboard cleaner on the surface, then use the dry clothe to wipe
the surface till the surface is dry.
4. Cleaning of the eraser:
The material of the eraser is high density sponge. After you erase, the power
will stay in the small openings. Use the vacuum machine to leave the powder
in the eraser.
5. The chosen of Marker:
Select the “ketone” marker for use. ( Tip to choose: The pen holder is the
aluminum material)
6. Warning:
* When the first time use, you have to leave the protection film. The film may
leave few adhesive on it. It might affect the erase. Please use to the
white-marker cleaner to clean the surface when first time use.
* Avoid using sharp-pointed to scratch the surface of screen
* Please do not using solvents to polish the screen
* If you white with the permanent marker and not able to erase, please use
the alcohol or toluene to leave the marker softly. Please make sure the wiping
clothe is clean.
Screen Installation:
Installation I:
1. Mount the projector on the Ceiling
2. Without ambient light in the environment
Mount the screen with the 2 HOOKS on the top of the screen.
Installation II :
1. Projector is put on the table.
2. Install the screen with the bracket.
Follow the steps by Install with bracket
Auroplus Installation Guide
Component List
1.Ironware A x2 pcs
2.Ironware B x2 pcs
3.Screw for A x4 pcs
4.Screw x4 pcs
Auroplus Co.,Ltd
www.auroplus.com
3
1
4
2
Step by step to Installation the Screen
Step1:
Decide the Height of your screen
The Bottom of screen is about 95~115cm
Step2:
Install the Ironware B
Step3:
Install the Ironware A
A top to B bottom is 120cm
Ironware B
Step4:
Put on the screen
Ironware A
Step5:
Screw with Component3
for right and left side
Finish the Installation