1
ASSEMBLY INSTRUCTIONS
A
F
A (16)
B
B (16)
F (1)
A
TOP
F
J
B
L
B
BOTTOM
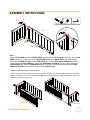
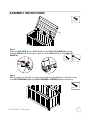
Step 1
Align the SIDE PANEL (L) with the BACK PANEL (J) and insert the BACK PANEL (J) tongue into the SIDE
PANEL (L) groove. Insert a total of (4) LOCKING NUTS (B) into the BACK PANEL (J). Make sure the
hole of the LOCKING NUT (B) faces the SIDE PANEL (L). Push the SIDE PANEL SCREW (A) from the
outside through the SIDE PANEL (L). Ensure the SIDE PANEL SCREW (A) is in line with the hole of the
LOCKING NUT (B). Hold the LOCKING NUT (B) in place with a screwdriver while tightening the SIDE
PANEL SCREW (A) from the outside with the provided HEX KEY (F).
Tighten securely and repeat for all both sides.
* Please note that the SIDE PANELS (L) are interchangeable. However, the TOP of the SIDE, and TOP of the FRONT
PANEL are fully flush. The TOP side of the BACK PANEL (J) has 3 divets where the hinges attach. Please make sure to
assemble your Deck Box right side up.
BOTTOM
© 2014 TRINITY - 800.985.5506
BOTTOM