1
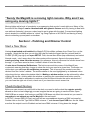
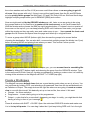
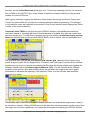
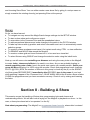
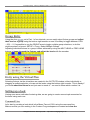
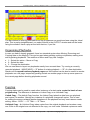
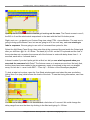
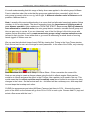
On Stage Lighting - Cham Sys MagicQ Tutorial 1 - Conventional Lighting Control
On Stage Lighting
MagicQ Tutorial Part 1
http://www.onstagelighting.co.uk
This MagicQ tutorial takes it from the top. An anti-quick start guide, we take it slow so as not
to miss the scenery. By the end, you’ll have learned how to set up and patch the console with
conventional lighting fixtures, record cues and deal with data in the programmer - everything you
need to know to get your show up and running.
If you can already use the MagicQ a bit, you should still read this tutorial as it is specially
designed to show you the useful stuff that you might not find on your own and covers good
workflow for all programming. If you have never really used a a Cham Sys console, this tutorial
is going to work for you too.
You might like to take a look at Introduction to the MagicQ which takes a tour around the desk .
This tutorial is intended to be easy to follow with only a version of the MQ PC/Mac software from
Cham Sys (we are running 1.4.00 at the time of writing) and a single screen PC/Laptop with
keyboard and mouse.
I tend to run MagicQ PC with the Norm. screen mode, as the button layout is closest to the actual
console which is more familiar. If you intend to mainly work with a tablet laptop or touchscreen,
you may want to run in Touch mode from the start – this doesn’t matter but some notes about the
positioning of the buttons may not be accurate.
Notation: Hard buttons on the console are written in CAPS such as CLEAR, softbuttons (around
All Rights Reserved - Rob Sayer, 2009
http://www.onstagelighting.co.uk
On Stage Lighting - Cham Sys MagicQ Tutorial 1 - Conventional Lighting Control
the screen) have a capital letter such as New Show (top). Buttons sometimes have a rough
location after them such as (top right) so you can find them. Hard buttons may also have the
abbreviated version as it appears on the MagicQ button in CAPS afterward: RECORD [REC].
This information in this tutorial is as accurate as possible, but please bear in mind that (confession
time) I have not spent a lot of time reading the user manual. One of the plus points of the MagicQ
is that it uses many concepts available on other consoles so reading the manual is not a necessity
for programmers with some experience.
What are we going to do?
So, we are going to light a 3 piece band with 36 ways of dimming, 36 Pars, some Source 4
specials and 4 blinders – a nice simple rig. We are going to visualise our progress onboard the
MagicQ using a virtual plan and discover some pretty useful features along the way. Here’s the
plan:
All Rights Reserved - Rob Sayer, 2009
http://www.onstagelighting.co.uk
On Stage Lighting - Cham Sys MagicQ Tutorial 1 - Conventional Lighting Control
“Surely the MagicQ is a moving light console. Why aren’t we
using any moving lights?”
Moving lights add a level of complexity to programming that we don’t need right now. Many of the
functions of the MagicQ can be demonstrated with generic fixtures and only having to deal with
one attribute (Intensity) gives us a clear head to get to grips with the desk. Conventional lighting
also is simpler to visualise without a “virtual” rig using Capture or WYSWYG and having to worry
about connecting up and patch a visualiser.
Section I - Patching and Dimmer Control
Start a New Show
Having downloaded and installed the MagicQ PC/Linux/Mac software from Cham Sys, run the
program. I think the first time you do this, the help file loads but forget that for a minute and hit
CLOSE [CLSE] (top right) and open SETUP. First, choose New Show (top softbuttons) and select
Normal mode – don’t worry about the other modes at the moment. Agree to the popup about
erasing existing show from the memory (for reference, this only removes the current show from
the app – if you have saved a show, it doesn’t delete it from the store).
A note about Contextual Softbuttons: The buttons around the screen of the MagicQ are
contextual, meaning that they change to show the tools you need at a given time. Confusion can
strike when you can’t see the softbutton you expect. This is because the contexts are often
derived from the “active” window. The active window is the one highlighted by a darkened colour
strip along the top, where the window label is. Making a window active can be achieved by either
clicking the top bar, clicking within the window or pressing the associated hard button such as
GROUP. I have tried to remember to make sure that this tutorial tracks the active window but if
you can’t see the right set of tools, check see if you have the correct screen live.
Check Output Devices
Before we can connect up real life kit to the desk, we need to define what the outputs actually
do and as this is a low budget gig, we can imagine that we are going to use the Enttec Open
DMX USB as an output. Not having a real DMX USB does not effect this tutorial but you need to
remember to set outputs up on the MagicQ in the real world.
In SETUP, choose DMX I/O (top) and you will see a spreadsheet showing a DMX universe list.
Double click on the Out Type field of DMX universe 1, and choose Open USB from the list. Make
sure that the output is set to Enabled and we have DMX universe 1 firing down the dongle.
All Rights Reserved - Rob Sayer, 2009
http://www.onstagelighting.co.uk
On Stage Lighting - Cham Sys MagicQ Tutorial 1 - Conventional Lighting Control
Window Colour Scheme:The images here show yellow and blue windows, rather than the
MagicQ default grey ones. I prefer them and they make better screen shots. If you want to use
the same colour scheme: while still in SETUP, you can hit View Settings and choose the Windows
tab. Double clicking in the Colour Scheme field (Grey – default) and changing it to High Brightness
does the trick. Close the SETUP window with CLOSE.
Patching the MagicQ
Before we can control anything, we need to patch up our dimmers on the MagicQ, so open the
PATCH window and hit Choose Dimmer (top). In the command line (bottom right of touchscreen)
it says Choose Dimmer >. Now we type in the number of dimmers @ which DMX address they
start at. We are only using one DMX universe which is currently 1 so just type 37 @ 1 Enter and
select Patch It from the popup.
To patch to a different universe such as DMX 3, you can type @ 3-1 but we only need one
today. We can now see all our dimmers and their DMX addresses in a spreadsheet which can
be navigated using the scroll bars or arrow keys. We can also Shift+select fields for multiple data
edits like a normal spreadsheet application.
You might have noticed that we patched an extra dimmer by mistake – No 37. We can delete
that now by hitting REMOVE [REM] and clicking in the row of dimmer 37, confirming the delete
in the pop up. So that’s gone away. If we needed to make any changes, to addresses for example,
that could be done easily via that spreadsheet in this window.
Now we have a patch, let’s save the show before we go any further. SETUP ->Save Show (top)
and type in a name. The default location is the SHOW folder of the MagicQ installation and this is
also where the auto backup files are stored.
Test the fixtures, Label and Colour up
Having patched our 36 dimmers on Universe 1 to the Open DMX,we ought to test the rig.
Highlighting a field in the Dimmer 1 row, choose Head Test on (left) which takes the dimmer to
All Rights Reserved - Rob Sayer, 2009
http://www.onstagelighting.co.uk
On Stage Lighting - Cham Sys MagicQ Tutorial 1 - Conventional Lighting Control
100% and makes the row turn red. Moving the arrow down the patch list tests each fixture.
If you haven’t got a real rig in front you open the OUTPUT [OUT] window(top right) and see the
current dimmer on at 100%. Not only does this flash out the rig, it also helps us to label up the
fixtures and assign gel colours to them on the MagicQ. This is worth doing for reasons you will
see in a minute.
Labelling
We know that our first 6 Dimmers are our FOH PARS, so let’s select all the Name fields of fixtures
1-6 using a Shift select. Watch the command line > as we type in “FOH Pars” and hit Enter. The
Name fields all change to FOH Pars. Dimmers 7-12 are our “Mid Pars” so we can set that too
along with Dimmers 13 – 24 which are “Beam Fans” In real life, we might need to check where
our Source Four profiles and Blinders are so with Head Test still on, arrow down through the
Name fields and label each one as they appear on stage. SL Spot, 2x DSC Spot, SR Spot with
Blinders on dimmers 33 – 36.
The other dimmers are genuinely spare so it is good practice change their names from “Dimmer”
to “Spare” in case you need to find spare channels later. Leaving the label set to Dimmer means
that it might get lost among other dimmers that you just haven’t got around to naming. With a
larger dimmer count, being able to find a label like “Spare” or “Spare Truss 1″ quickly.
A note about naming: There is little to be gained from giving each dimmer a unique label and
it takes too much time. Deciding on labels depends on your rig but it’s a good start to use the
fixtures “job” group like Blinders or position such as FOH PARs.
Assigning a colour to each dimmer
Like labels, setting the gel colour of each of our channels helps us visualise the rig on the
MagicQ for the tutorials but also really pays off when programming later on . Again, assigning
colours can be done easily by scrolling down in Head Test mode and looking at the stage
before typing in the gel number. At the Gel field of Dimmer 1 type in 119 and hit Enter. You will
see that the field changes to L119 Dark Blue with a blue icon. If you need to enter a Rosco #gel
just type R followed by the number. Neat, huh? Work down through the patch list setting each
colour as per the plan. You can Shift-Select the Beam Fans before typing in 201 to set them in
one go.
All Rights Reserved - Rob Sayer, 2009
http://www.onstagelighting.co.uk
On Stage Lighting - Cham Sys MagicQ Tutorial 1 - Conventional Lighting Control
You can sort through the patch list by choosing Sort (top right) and choosing a filter such as By
Gel or By Name. This is great for finding specific information about the patch of a particular
fixture or finding all our Spare channels in a multiple complex multi universe rig. Also, try viewing
the patch By Channel or By DMX and see the other options available for editing in those sheets
like fader curve.
Exporting the patch
Now we have patch information with fixture labels and colours we can export the patch to a .csv
file. If you are curious, open up the CSV in a spreadsheet application to see what it looks like.
Being able to create a patch using a spreadsheet program and import it into the MagicQ is pretty
handy, especially if you already use spreadsheets as part of your paperwork. In the PATCH
window, select View Chans (top left) and then Export Heads (top right) and type in a name for the
file. By default the file ends up in the MagicQ folder “Shows” (set within the SETUP window).
Creating auto groups
We spent time entering label and gel information, something that you might not have time to do
everyday. The great thing about having this information is that the MagicQ can use these labels
to create useful fixture selection groups automatically.
Still in the PATCH / View Heads window, select Auto Groups (top) and Dimmer Groups. This has
created a series of selection groups based on our naming and gels which save us having to create
from scratch. Let’s have a look at what has happened.
Open the GROUPS [GRP] window and you will see a lot of new groups. Some of these (like
All Rights Reserved - Rob Sayer, 2009
http://www.onstagelighting.co.uk
On Stage Lighting - Cham Sys MagicQ Tutorial 1 - Conventional Lighting Control
the colour washes such as Dim L119) are more useful than others so we are going to get rid
of some. Most groups with only 1 fixture in are not that useful apart from the SL and SR Spots
so let’s quickly delete groups like Mid Pars L172 and FOH Pars L180 etc. Shift and Arrow keys
highlight multiple groups before you hit REMOVE [REM] and confirm.
Now we might want to tidy the GROUPS window up a bit. Later on we are going to be using
the groups window in it’s small form (a quarter of the touchscreen) so let’s work toward that:
With the window active choose the MIN (top right) window button, if it doesn’t size to a quarter of
the screen on the top left, you can keep pressing SIZE until it behaves. Now order your groups
within the window so they are easily seen and make sense to you – I have moved the least used
groups like All Dimmer and Spare down the page and tidied up in a logical format.
To move a group select MOVE (bottom right) then choose the groups to be moved before
choosing the destination. You can also shift + arrow select multiple groups (the blocks turn Cyan)
before choosing MOVE and placing them where you want. This is what I came up with:
Finally, if group names like Dim L119 don’t inspire you, you can rename them to something like
All Blue by hitting SET (bottom right) and choosing the group from the GROUPS window. Type
in the name and hit Enter. Next up, creating a workspace by making a custom view. Let’s start by
closing all the windows on the MagicQ with SHIFT + CLOSE(top right).
Create a Workspace
The MagicQ has some default views that are a good starting point when you are in a hurry. You
can see these by holding CRTL and selecting a programmed view from the top softbuttons such
as Pallettes or Output. The empty slots on the right are where we are going to create a custom
view to use with this tutorial. We basically set up a view we like, then store it. We want:
● Groups – for fixture selection
● Programmer – to see what’s going on in the programmer.
● Output – a view that let’s us see what’s happening on stage. In reality, you might decide that
having a full rig in front of you is enough
●
Close all windows with SHIFT + CLOSE. Open the minimised GROUPS window and make sure
it is in the top left quarter. You can drag it about but I just keep hitting SIZE until it’s in the right
All Rights Reserved - Rob Sayer, 2009
http://www.onstagelighting.co.uk
On Stage Lighting - Cham Sys MagicQ Tutorial 1 - Conventional Lighting Control
place. Next open the PROGRAMMER [PROG] window and size it until it’s sitting in the top right
quarter.
Finally, open the OUTPUT Window and size it until it fills the bottom half of the touchscreen area.
Make sure that softbuttons View Plan, View Colour and View Grid are selected. Save this view
to a softbutton by pressing RECORD [REC] (bottom right), typing in a name like Custom Prog,
holding CTRL and selecting an empty slot at the top of the screen area. If it’s worked you should
be able to recall CTRL + Palettes (to see the groups and palettes windows) then toggle back to
your custom view in the same way. My view looks like this:
Set up a Grid
Next, we are going to help ourselves to see what’s going on by creating a basic visualisation
tool using a MagicQ grid. Grids are useful tools for things like pixel mapping but can also be used
to create a virtual plan that we can select and view our fixtures on.
With the Outputs window active (top bar is dark blue) select Set Grid Size (top) and type in 25/15.
This sets a grid of 25 squares wide by 15 high in the OUTPUT window to place our fixtures onto.
What we are going to do now is to place individual fixtures into our grid so that they represent a
rough layout of the stage. It doesn’t need to be completely accurate, just clear.
In the OUTPUT window, select View Head Nos for now. Select the Group All FOH Pars and on the
grid, click a position for our Channel 1 somewhere downstage and to the left of centre to represent
where this bar of six lives. Hit the Insert Heads H softbutton (top right when the OUTPUT
Window is active). This puts channels 1-6 in a nice line just like our bar of six but we have two
bars mirror split so we want to represent them as well.
Going back to the GROUPS window, we still have the FOH Pars (Channels 1-6) selected. The
top right encoder has the option Selection – Normal, indicating that the group selection is the
order in which the group was created, in this case numerical 1- 6 . Clicking in the area next to the
All Rights Reserved - Rob Sayer, 2009
http://www.onstagelighting.co.uk
On Stage Lighting - Cham Sys MagicQ Tutorial 1 - Conventional Lighting Control
encoder, we can select Reversed which give us 6-1. Choosing a starting point for out mirrored
bar of PARs on the OUTPUT grid, Insert Heads H adds the reversed selection to the grid and
creates out second FOH bar.
With a group selected, toggling the Selection Order button also brings up the Into Centre and
Centre Out options that are a shortcut to creating selections when programming. The changes
in the selection order are reflected in the top bar of the Groups window which displays the fixture
number of the current selection.
Create the other PARS on the grid using the GROUP selection, Normal/Reverse selection
and Insert Heads H. Inserting the Source 4s and blinders as a group, they take up consecutive
positions on the grid. To make them represent the rig more closely, space them out by moving
them into different slots on the grid with MOVE [MVE], click on fixture, click on destination slot.
Full grid Once you have got all your fixtures laid into the grid, choosing View Colours (top)
shows a layout of gels like the image above. De-select View Grid (top) to remove all the unused
squares and try out your new plan by selecting All Blue from the Group window and toggling the
Selected Heads next to the bottom right encoder to 100%. You will notice that the relevant
squares on the grid turn blue and wheeling down the encoder, the height of the level “graph”
diminishes to represent the lowering of the intensity. Great, now we can see what would be
happening on stage.
You will also see in the PROGRAMMER window that data has entered the programmer, ready to
be saved to a memory. Hitting CLEAR removes the data from the programmer and the output from
the stage. As we are at a good point, let’s save the show again but opening the SETUP window
All Rights Reserved - Rob Sayer, 2009
http://www.onstagelighting.co.uk
On Stage Lighting - Cham Sys MagicQ Tutorial 1 - Conventional Lighting Control
and choosing Save Show. You can either create a new show file by giving it a unique name or
simply overwrite the existing show by just pressing Enter at the prompt.
Recap
So far, we have learned:
● To navigate our way around the MagicQ and change settings via the SETUP window.
● To start a clean show and configure an output.
● To enter data via the Command Line and the spreadsheet views.
● To add conventional dimmers and make changes to the patch in the PATCH window.
● To label up fixtures with rig position and colour information and use it to automatically create
selection groups.
● To create a custom workspace and name it for instant recall using CTRL + a view softbutton.
● To REMOVE and MOVE data around the MagicQ.
● To create a custom grid and insert fixtures into it, to be used as a visual aid.
● To select fixtures using GROUP and change the selection order using the inbuilt tools.
Next up, we will move onto controlling our dimmers and using the many tools on the MagicQ
to create looks, chases and effects to be used in our show. As you are probably busting to
record something onto a fader, here’s the quick start version as a sneak preview. Select your
group All Blue and bring it to 100% using the encoder. Check that programmer has 4 channels
of L119 @ 100% (BTW, the number of fixtures in this group is shown by the (4) on the GROUP
slot) then press RECORD [REC]. Immediately after RECORD, type in the name of your look
while watching it appear in the Command Line – BLUE WASH then hit the S button above a fader.
CLEAR the programmer and you have recorded a memory. Check it out by raising and lowering
the fader.
Section II - Building A Show
This session covers the handling of fixture data, programming looks and chases and
understanding effects. We will also look at laying out the MagicQ to playback our show – in this
case, a three piece band set to be operated “on the fly”.
Note about programming: The MagicQ is a programmer based console, where data is entered
All Rights Reserved - Rob Sayer, 2009
http://www.onstagelighting.co.uk
On Stage Lighting - Cham Sys MagicQ Tutorial 1 - Conventional Lighting Control
into the programmer and then dumped into a scene or chase step. A programmer style desk
records in a different way to an Output recording control. Read all about programmer based
lighting control at On Stage Lighting
Handling Channels
The key to setting up scenes on any control is handling fixture data. As we only have
conventional dimmers in our rig, we only need to worry about Intensity levels. There are number of
options for controlling channels on the MagicQ, here’s a few:
Command Line Entry
A traditional style of entering fixture data, command line programming involves typing instructions
into a keypad and hitting ENTER to action them. You can type in a channel number, followed by
an @ symbol, and then an intensity level – > 10 @ 50 ENTER sets fixture 10 at 50% and enters
this into the programmer. On a laptop without a separate number pad, command line entry is a bit
fiddly.
Intensity Window Entry
As we are only controlling conventional dimmers today, using the Intensity Window is quite an
attractive option – it’s a bit like having traditional fader banks. Open the INTENSITY [INT]
Window and you will see a graphical representation of faders with Name and Colour information.
You can grab the slider and adjust the level which enters the information into the programmer.
Filtering the window by Name or Colour helps reduce the number of sliders on view at any one
time.
All Rights Reserved - Rob Sayer, 2009
http://www.onstagelighting.co.uk
On Stage Lighting - Cham Sys MagicQ Tutorial 1 - Conventional Lighting Control
Group Entry
Using the Auto groups set in Part 1 of our tutorials, we can easily select fixture groups and adjust
their level as a group using the bottom right encoder or use it’s softkey to toggle between 100%
– 50% – 0. It’s possible to use the GROUP area to toggle multiple group selections, to do this
might requires it to be set. SETUP > Prog > Select Mulitple Groups.
Adjusting individual fixtures in a group is often achieved by using the NEXT HEAD or PREV HEAD
buttons to bump through the fixtures and adjust the levels with the encoder.
Entry using the Virtual Plan
Selecting fixtures via the virtual plan we created in the OUTPUTS window, either individually or
dragging a multiple selection, we can set the levels using the bottom right encoder. This is handy if
you know where the fixture is and just want to tweak it – no need to know which number it is.
Setting up a look
Having seen some methods of entering data, we are going to create some simple memories for
the band using each one.
Command Line
Let’s start by creating a look which is the Beam Fans at 100% using the command line.
Make sure that you are working in the Custom Prog workspace we created and clear the
All Rights Reserved - Rob Sayer, 2009
http://www.onstagelighting.co.uk
On Stage Lighting - Cham Sys MagicQ Tutorial 1 - Conventional Lighting Control
programmer with CLEAR [CLR].
Type 13 > 24 @ # (# is Full on the PC) and watch it appear in the command line before
pressing ENTER. You will see the back PARS turn blue on the plan and the data appear in the
programmer. To save it to Playback 1, hit RECORD , type in Beam Fans and select the S button
above the first fader. CLEAR the programmer and try out the fader.
You might find that there is a fade in time when you raise the fader. In that case, you can double
click on the S button to open the CUE Stack window where you will see the Beam Fans cue
information. Set the fade to 0.00s in the field but selecting it and typing 0 ENTER. Now, you have
the fade time controlled by fader only.
While we are in the CUE stack window, we can set the default fade time by choosing View
Defaults (top) – > Step Times and setting them all to 0s. CLOSE the CUE stack window.
We simply entered a range of fixtures and a level but the command line can handle complex
syntax such as:
1 > 24 – 1 > 13 + 13 @ # which is an over engineered version of our previous command.
There are some more details on the command line on the useful shortcuts sheet by Cham Sys.
Personally I am not that keen on command line entry, especially not while using the PC software.
Intensity Window
Let’s set up a custom view to help us work in the intensity window. Close all Windows with
SHIFT + CLOSE and re open the OUTPUT window in the bottom half of the screen. Open the
INTENSITY (INT) window and size it to fill the top half of the screen. Now we can use the Intensity
sliders and see the result so save that view – RECORD > Type in INTS then CRTL + select an
unused view button.
Grab a slider and see it working on the OUTPUT window. What you can’t see is that values are
also being placed into the programmer, the top of the INT window says Intensity (programmer).
Any fixture currently in the programmer turns red, even if you wind the fader to zero, the fixture
remains in the programmer at 0%. With conventional fixtures, this doesn’t matter to much, with
complex fixtures like moving lights – it does. Remove fixtures from the programmer by selecting
their slider, then Remove Cursor (top right).
Changing the INT window to View Presets (top left) displays faders like the real faders on a
conventional lighting desk. These are not related to the programmer and are good for controlling
specials while busking a show, setting fixed levels for houselights or controlling fixtures you don’t
All Rights Reserved - Rob Sayer, 2009
http://www.onstagelighting.co.uk
On Stage Lighting - Cham Sys MagicQ Tutorial 1 - Conventional Lighting Control
want programmed, if the crew is focussing for example.
Go back to the Programmer intensities with View Prog. With the INTENSITY window set to MAX,
we could see all 36 dimmer channels but with only half the screen to play with we need to be able
to zone in on the faders we want. This is where the labelling and colour information comes in.
The left hand encoders are used to set different filters to the displayed faders – Head type (we
only have Dimmer on this show), Gel, and Head Name. The bottom left softbutton toggles back to
view All. Using these filter, we will set up submaster for out 2 band spotlight positions.
CLEAR the programmer and scroll through the Gel filter until you find L202, our spot colour. Push
up the SR spot slider to 100%. Save that spot to PB8 using RECORD, typing in SR Spot and
choosing the S button. CLEAR the programmer once more and repeat with the two DSC spots and
save onto PB9. CLEAR again and finally save the SL spot onto PB10.
Toggle the window filter back to All with the bottom left encoder. Next we are going to record a
Blinders memory, so scroll through the Head Name filter until you hit Blinders. This brings up
our 4 Blinder faders. Choose Select All from the top row of softbuttons and use the bottom right
encoder (Selected Heads) to bring them to 100%. Hit RECORD then the S button on PB2.
You will notice that we didn’t name the look before choosing the destination and that it now has a
number like CS ##. We can name it now by pressing SET which pops up the QWERTY keyboard
before typing in the name and hitting enter. Naming things after they have already been recorded,
including custom views, is done using this SET method.
Groups selection
Next up, we are going to create a colour wash using the Group method and adjust individual
levels using NEXT / PREV. CLEAR the programmer and return to our Custom Prog window using
CRTL + view softbutton.
In the GROUP windows, select All Red and bring to Full using using the encoder. Now, we want
the backlight to be stronger than the front light. Hitting NEXT HEAD selects just the FOH Pars
and turns the others off (Highlight mode) but we want to adjust them while seeing everything so
turn off HIGHLIGHT using the hard button. Knock 20% off the FOH Par channel then hit NEXT
All Rights Reserved - Rob Sayer, 2009
http://www.onstagelighting.co.uk
On Stage Lighting - Cham Sys MagicQ Tutorial 1 - Conventional Lighting Control
again and take 10% off the Mid Par channel – Hmmm, the whole thing could do with lifting a touch,
hitting ALL reselects the entire group and we can wheel on another 5% before RECORDing it to a
playback as RED WASH. So, the whole group incremented relative to their starting value and are
now at 85% and 95%.
Record another look, this time a Cold Wash using both Dark and Light Blues by toggling each
group on and controlling them in tandem. If you can’t multi select them, make sure that Enable
Multiple groups is set in the SETUP / Prog menu as mentioned earlier.
The last thing in this section is to create an Odd/Even Chase on the Beam Fans using the
selection tools. CLEAR the programmer.
Select All Beam Fans from the GROUP window and click and hold ODD/EVEN (right), selecting
ODD from the menu. Take the selection to 100% and RECORD “Beam Chase” to a spare
Playback. CLEAR the programmer and repeat using an EVEN selection, RECORDing the
programmer to the same fader. Hit CLEAR again.
By saving two looks to one fader, we have started a Cue Stack – a list of cues that run in
sequence. When the MagicQ creates a cue stack, it defaults to being a chase that advances
automatically rather than a theatre style cue list . Fire the chase of by raising the playback and you
will see the chase running in the OUTPUT window. As you are probably keen to mess about with
the chase timing, double click on the S button of the playback and fit the Cue Stack window to the
top half of the screen. Play about with the Chase Xfade and Chase Speed until you are happy.
All Rights Reserved - Rob Sayer, 2009
http://www.onstagelighting.co.uk
On Stage Lighting - Cham Sys MagicQ Tutorial 1 - Conventional Lighting Control
The last method of entering information into the programmer we mentioned was using the virtual
plan. This is pretty straightforward, you select fixtures in the OUTPUT window and set the levels
using the encoder. Have a play around with that too, if you like.
Organising Playbacks
In case you hadn’t already guessed, there is a standard syntax when Moving, Removing and
Copying data on the MagicQ. This can be used when patching, setting out palettes, making cues
and organising playbacks. The workflow of Move and Copy has 3 stages:
● 1 – Select the action – Move or Copy
● 2 – Select the data
● 3 – Choose the destination
We can use Move to layout our playbacks exactly how we want them. Try moving a currently
recorded playback : MOVE [MVE]- > “S” button of existing playback – >”S” of a free destination.
Stacks can be moved between playback pages and this method can be also be useful to reorder
playbacks on a full page, temporarily parking a stack on another page to free up some space on
the current page before shunting playbacks around.
Copying
Copying stacks can be used to create other instances of a stack or to create the basis of new
programming. The difference is between a Linked Copy or an Unlinked Copy.
Linked Copy – The default Copy function, the Linked Copy takes the data from one playback
and copies it to another. Altering any instance of a playback changes all copies. This is used
for making the same cue/stack appear elsewhere on the playback and only one instance needs
editing. Action : COPY – > “S” That – > “S” There.
Unlinked Copy - An Unlinked Copy takes copies from the original playback and creates a new
one. Edits to the original are not reflected in the copy, nor vice versa. Unlinked copies are useful
All Rights Reserved - Rob Sayer, 2009
http://www.onstagelighting.co.uk
On Stage Lighting - Cham Sys MagicQ Tutorial 1 - Conventional Lighting Control
for creating a whole new cue or stack, using existing data.
Action : Shift + COPY – > “S” That – > “S” There.
Cues, Cues Stacks and Playbacks
Now we have nearly filled up a page worth of playbacks, we better take a while to understand cue
storage on the MagicQ.
Cues
When we created a look and stored it to a fader we actually did two things – saved a cue and
assigned it to a fader. Each cue created is stored in the Cue Store, a bit like a back cupboard
where things can get lost. Deleting a cue from a Playback using REMOVE + S button actually
only removes it from the fader, the cue lives on in the Cue Store and can only be completely
deleted from there. This is good news if you accidentally delete a look from a fader and it turns out
that you wanted it.
Delete the cue RED WASH from it’s playback with REMOVE [REM] + S and confirming at the
popup. Next, open the CUE STORE (right) window. You will see all the cues recorded in this
show file, find the RED WASH cue and copy it back to it’s playback with COPY > RED WASH >
Playback S button. There, no harm done. You can check the contents of a cue live on stage by
using Test Cue (top) in the CUE STORE window.
Stacks
When we created the Beam Fan chase, we made the first Cue Stack – a series of connected
cues. Cue Stacks also have their own cupboard, found by pressing STACK STORE and this can
be used to pick a stack and assign it to a fader in the same way. You can test the stack in the
cupboard too.
NB. If a cue is part of a cue stack, it cannot be deleted via the store while it’s stack still exists. But
let’s not get too hung up on that now.
Recap
In this section, we have learned to:
● Select and control fixtures
● Enter data into the programmer using different methods
● Record, Name and Move scenes
● Create a Cue Stack to be used as a chase.
● Create Copies and Linked Copies
● To find and organise Cues and Cue Stacks in the store
●
Next time, we will be looking at creating another page of playbacks with other types of memory
All Rights Reserved - Rob Sayer, 2009
http://www.onstagelighting.co.uk
On Stage Lighting - Cham Sys MagicQ Tutorial 1 - Conventional Lighting Control
including a theatre style cue stack, FX engine driven dynamic effects and setting up the desk to
run our show.
Here’s the sneak preview.
Creating another page of playbacks just requires a page change using the NXT button (bottom
left) and recording new scenes to the empty slots.
A theatre style cue stack is stored like a chase, with multiple records on one playback. The timing
is changed by double clicking the S button to open the Stack window and choosing Cue Timing
(top) instead of Chase Timing. While in the Cue Stack window, take a look at the data fields for
each cue such as Delay, Fade etc.
The FX engine is applied by choosing a Group like All Beam Fans, Add FX (top) and choosing
a fade like Ramp ^. Adjusting the encoders marked FX gives you direct control over different
elements of the effect such as timing, spread and size. See if you can work out what they all do,
using the output window to view the results.
Section III Creating More Playbacks and FX
In this tutorial we will create another page of playbacks, a short opening sequence using a
theatre cue stack and use the FX generator to quickly make some snazzy effects with the Beam
Fans. We will also look at some of the theatre stack timing options.
Editing Cues
We already know how easy it is to record information into a cue (enter data into the programmer,
hit REC and choose a playback), we haven’t yet learned how to edit that information after it has
been stored.
Like most programmer based consoles, editing happens back in the Programmer and changes are
usually output “live” to the stage while overriding any other playbacks that are running at the time.
This means that you can edit parts of cues while leaving the other playbacks outputting and the
end result will not mix your data up.
An example: During the sound check you are playing back out a two colour wash using two
faders– Red and Blue. You want to adjust the levels in the Blue Wash only, editing that information
in the programmer before saving it back to the Blue Wash fader.
All Rights Reserved - Rob Sayer, 2009
http://www.onstagelighting.co.uk
On Stage Lighting - Cham Sys MagicQ Tutorial 1 - Conventional Lighting Control
A non programmer based desk that records output requires that you record individual cue
information without other playbacks running (in this case, Red Wash) – a pain when you need
to program or edit during rehearsals and don’t want to alter the entire look on stage.
But, the MagicQ is a programmer console and we can make individual changes and add them to
specific cues.
Getting edit information into the Programmer
Different consoles have their own way of loading information into the programmer and the MagicQ
PC has a few choices.
At it’s simplest, we just want to load the Blue Wash Cue into the programmer to be edited
so we use INCLUDE (a term borrowed from Avolites) then Choose the S button the playback
fader. This loads the entire cue in to the Programmer (the CLR button light shows that there is
information there) and we can make changes to the levels using any method – Keypad, Groups
and Encoder,
Programmer spreadsheet or the Programmer Intensity Window.
When happy with the new levels (that are output to stage and override the current state of
the fixtures we changed) pressing UPDATE. Depending on the SETUP – > Prog Settings,
the programmer then either clears itself or leaves the data there for you to carry on working –
adjusting levels and recording another cue, for example.
The reason you would like to leave values in the Programmer until you are ready to CLEAR
them is you can use those values to record new cues, update old ones or even remove parts
of other cues altogether. If the Programmer doesn’t clear itself, don’t forget that the levels will
continue to override your stage look until you hit CLR. That’ll be why those blues are still up,
even after you have moved on to another task.
All this talk of cue edits brings us neatly on to blind mode.
Blind Mode
If you have used any kind of memory lighting desk, you may have come across Blind Mode
before. The concept is to enable you to record or edit cue information without it appearing live
on stage. While the usefulness of not being able to see what you are doing can be a bit limited,
using Blind Mode has been a traditional method of inputting “known” data (like dimmer levels
recorded on an old fashioned channel sheet) while the show is running.
Imagine the electrician of a touring show, having not had enough time to put both acts into the
house lighting console, carefully entering and recording the cue levels for Act II in blind mode
All Rights Reserved - Rob Sayer, 2009
http://www.onstagelighting.co.uk
On Stage Lighting - Cham Sys MagicQ Tutorial 1 - Conventional Lighting Control
during Act I. This is not a joke, it has happened on more than one occasion. Fortunately, we now
we have improved desk reliability and better portability of show data.
Anyway, to enter Blind Mode on the MagicQ you just need to toggle the BLIND button and you
will see that the results of programmer output are not reflected live on stage (as seen in the
OUTPUT window). The recording and editing process remains the same.
It is important to understand the effects on stage of both the Programmer (overrides conflicting
playback data) and Blind Mode (hides the Programmer data from live output) when you find things
aren’t behaving as expected. To stop programmer data altering the output either CLEAR the
programmer and dump everything in it or hit BLIND to hide it.
When it comes to using a programmer based console in a complex environment like rehearsing
while you are programming, it pays to know exactly what is in the programmer. The PROG
data window is your friend here but most operators also build a rough list of “things I have done
since I last hit CLEAR” in their heads.
Default Cuelists
Before we add some playbacks to Page 2, let’s consider that we might want some faders to
appear on every single playback page. How about the Blinders – they always come in handy.
We could create a linked copy on multiple pages and on different faders but there is an easy way
to make sure that a Memory, Stack or Chase appears in the same spot across every page. Called
a Default Cuelist, we need to set it in the Playbacks windows which is opened using the PB [right].
Open the PB window.
The Playback Window gives you a graphical view of the playbacks on the desk, can be used to
organised playback layout and, most importantly, gives you access to playbacks that might not
be physically available on your version of the MagicQ . As the show files are universal, there is a
possibility that a show was created with an extra fader wing and memories place on playbacks that
you don’t have buttons for. Wing / Extra playbacks are marked with a W-# and can be activated
from the PB window.
All Rights Reserved - Rob Sayer, 2009
http://www.onstagelighting.co.uk
On Stage Lighting - Cham Sys MagicQ Tutorial 1 - Conventional Lighting Control
But we just want to make our Blinders playback a default, so select it’s “S” button and look at
the bottom left encoder – it has a Default On/Off toggle. Set it to On and you will notice that the
Blinders playback now has DEF above it’s label. Now, which ever playback page you change to
using NXT or PRV [Bottom Left], the Blinders remain available.
All shows are different but there is often a cue that you need constant access to.
Using Pages
Organising Playback pages very much depends on personal taste though some tips can be found
at Using Submasters for Busking. Here are some different ways that programmers might organise
pages for this kind of gig.
Song per page –This is a classic techniques that is good if you are touring a specific act with your
own set programming on a per song basis. While the set list order changes, the actual cues per
song don’t. The MagicQ even has a little feature lets you load a text file set list which it then uses
to re order your song pages ready for the show that night.
Fast/Slow pages – When busking an unknown show, it’s useful to be able to flick to a page of
stuff that you know fits the tempo.
Warm/Cold pages – Again, an unknown show – you decide if the next track is an upbeat sunny
one or a moody, bluey one.
Main page and FX – I use this one quite a lot, it consists of a Home page to keep most things you
regularly need like colour washes and “backing” stuff. A page above, and sometimes below, are
variations on the playback which include FX like Pan/Tilt Movement or Intensity effects.
How you organise PBs is entirely up to you. The goal is to make sure that you are able to spend
the maximum amount of time looking at the stage and keep up with the show. In this tutorial
series, we are looking at different features of the MagicQ PC so the actual page layouts are not
meant to be examples of the best method.
Creating a theatre stack
Next, we are going to create an opening sequence of cues that run as a theatre stack. This
will be used for the opening sequence of the show – to bring the band on stage. It all sounds a bit
Spinal Tap for a 3 piece, but this is a tutorial.
Open up our Custom Prog view, change to playback Page 2 (using NEXT PAGE [bottom left]) and
clear the programmer.
Our opening sequence will start in blackout, some music will build, we will do some groovy lighting
stuff and the band will appear to rapturous applause. For the sake of the tutorial, this part of the
show will be run from a single cue stack, triggered by a Go button and the odd follow on ( a cue
that executes immediately after the previous cue has finished). This will not be an example of the
art of lighting, it will let us get to know more features of the MagicQ.
All Rights Reserved - Rob Sayer, 2009
http://www.onstagelighting.co.uk
On Stage Lighting - Cham Sys MagicQ Tutorial 1 - Conventional Lighting Control
The first cue of the sequence will actually the preset look for the audience to walk into. Dk Blues
onstage @ 40%, Blinders glowing @ 10% and Beam Fans looking nice at 70%. Set that up in the
programmer and hit Record, type in “ShowOpen” or something then store to a free playback on
Page 2. No need to clear the programmer, we are moving on.
Next, set all the fixtures in the programmer to 0%. How you do it is up to you. You can use
command line, groups or whatever. As we are in Normal mode, “tracking” doesn’t worry us and
there is no need to create a blocking cue (if you don’t know what tracking is, don’t worry about
it for the moment). Just “get them lights what is on and turn ‘em off”, saving it on top of the 1st
cue. CLEAR the programmer, it’s good practice and the next cue is going to use some different
fixtures.
Before we go on, let’s take a look at what we’ve done – open the window for this cue stack by
double clicking the label or “S” button of the playback. Just like when we recorded the Beam Fan
chase in Part 2, we have created two cues that run as a chase by default. We need to change that
with the Cue Timing softbutton. Now, the stack advances when we hit the Go (>) button of that
playback.
Note: When we fire up the Preset before “doors”, we raise the fader of the ShowOpen playback.
This not only sets the master intensity to 100%, it also starts the Preset Cue without pressing Go.
This is because the default behaviour of the MagicQ is “Fader Activates Stack”. We don’t need to
worry too much about this at the moment except to know that it happens.
Back to the stack. To keep track of the cues in the stack, we are going to name them. In the Cue
Stack window, the spreadsheet has a field called “Cue Text”. To create that text, simply click on
the field, type in the label and hit enter. I’ve called mine Preset and B/O so far.
Fade Times
Depending on the setup of your MagicQ PC, the cues recorded so far have default fades times
associated with them. We want out blackout to happen over 3 seconds so click on the Fade field
and hit 3 Enter. Set the Preset to fade in over 2 secs, so as not to cause a sudden cold/hot shock
to the lamps before the show. We don’t want them blowing before we’ve started.
All Rights Reserved - Rob Sayer, 2009
http://www.onstagelighting.co.uk
On Stage Lighting - Cham Sys MagicQ Tutorial 1 - Conventional Lighting Control
Open up the OUTPUT window to view the grid and try out the cues. The Preset comes in over 2,
the B/O in 3 and the whole stack wraps back to the start with the final Go button press.
Right, next cue – go back to our Custom Prog view using CTRL + top softbutton. The next cue is
going to bring up the Beam Fans, but we are going to do it is a cool way, each one starting to
fade in sequence. We are going to use a bit of command line syntax for this:
Select the ALL Beam Fans Group, then enter this at the command line and watch the Output grid
after you hit Enter: @# / 4 > 0/1 Enter. The hash (#) is FULL on the PC keyboard and the rest of
the syntax has set a complex time across all of the fixtures in order with delay times from 1 – 4
seconds, each with a 1 second fade in.
It doesn’t matter if you don’t quite get this at first, but did you see what happened when you
executed the command with Enter? The fixtures came on in sequence over time. Not only that,
but the times have been added to the programmer, ready to be saved in the next cue straight
away. So let’s do it – save it with REC – “Fans Up” – S button of the ShowOpen playback.
To look at what we’ve done, open the Cue Stack window again and select the new cue before
hitting View Cue (top) which shows the levels of the look. To see the timing information, use View
Times:
You can see a delay time of 0 > 4 seconds and a fade time of 1 second. We could change the
delay range from zero the three by clicking in the field and typing 0 > 3 Enter.
All Rights Reserved - Rob Sayer, 2009
http://www.onstagelighting.co.uk
On Stage Lighting - Cham Sys MagicQ Tutorial 1 - Conventional Lighting Control
It’s worth understanding that this range of delay times was applied to the whole group All Beam
Fans in selection order (the order that the group was selected when recorded), which for an
auto group is numeric and on our rig, left to right. A different selection order of fixtures would
produce a different fade in.
Note: I recently did some troubleshooting in a venue that had allocated seemingly random fixture
numbers to it’s moving heads. The above example shows the importance of creating order of
your dimmer numbers, fixture addresses FROM THE START. Because our PAR rig channels
were allocated in a sensible order, the auto group feature created a sensible fixture group and
the cue was easy to create. If you are interested, one of the first things I did at the venue with
random fixture allocations was to create some basic groups using a custom selection order
tailored to their rig plan. It was either that or go round re addressing a whole bunch of moving
heads rigged >8 metres over ice.
We can see the individual times of each PAR by viewing Adv Timing in the View Times window.
Each fixture has it’s own set of timings for each parameter. In the case of the PARs, only intensity
/ Dim timing is shown.
Save the show while we’re at it. Setup – > Save Show – Enter overwrites the current file.
Next we are going to create a dimmer chase using the built in effects engine. Best practice
would be to create and save the effect in the FX store, like a palette, to be used in the cue. This
would mean that the effect could be used in multiple cues stored /edited in one place for easy
changes in the future.. So that’s what we’ll do – this effect will be a sideways run, with snap fade
ins and steps that overlap each other.
CLEAR the programmer and select All Beam Fans and set them to 50% – this sets the centre
point of the effect so the fixtures will go from 0% to 100% in each cycle. Choose Add FX (top) and
select a Saw wave with the icon ^.
All Rights Reserved - Rob Sayer, 2009
http://www.onstagelighting.co.uk
On Stage Lighting - Cham Sys MagicQ Tutorial 1 - Conventional Lighting Control
To get snap fade ins, we need to set the FX cross fade to 0 using the encoder on the right. The
other most important encoder is the top left Spread adjustment. It’s currently set to Even 100%,
toggle it to 0% to see what it does. The Spread controls where in the cycle the fixtures run
their FX, all together or evenly spread across the entire group and anywhere in between. Have
play with it and see what it does. The speed of the entire effect is controlled using the Speed
encoder, bottom right. Size (the 0 – 255 amount that the effect deviates from the centre point) can
be adjusted using the Size encoder. Put the Size at 255 to see a full dimmer saw between 0 and
100%, the centre point being 50%, with a smaller effect when set to 128.
When you are finished with the effect, store it in the FX store ready to be used in the next cue
or any other cues when the mood takes you. Open the FX window, press REC – > type in “Beam
Wave” – > and click an empty square in the FX window.
Clear the programmer, select All Beam Fans again, apply the effect from the FX window and save
to the next cue in our stack. Test the stack by running through the cues.
To be clear, the last cue we recorded was an effect generated by the console. We could have
selected the fixtures, assigned the Dimmer Saw and and recorded it straight into the cue.
Instead, we chose to record the effect to a kind of FX palette. This can then be used in many
cues with different fixtures using a single reference point for adjustments and editing. The effect
itself is recorded and that effect is then recored to the cue. This gives us two choices when it
comes to edits – directly in cue or via the FX store and there is a distinction.
An edit to the effect in the FX store will change the effect in that cue and any others it has been
All Rights Reserved - Rob Sayer, 2009
http://www.onstagelighting.co.uk
On Stage Lighting - Cham Sys MagicQ Tutorial 1 - Conventional Lighting Control
used in.
An edit to the cue will change only that cue and break the link with the stored FX. The cue now
has it’s own effect data.
Use INCLUDE – > FX window slot or INCLUDE – > Cuelist / Cue then UPDATE respectively.
Cue Stack Timing Options
Now we have a simple four cue theatre stack, it is worth a quick look at a few of the timing and
related options you will want to know about at this stage. Open the window of our ShowOpen
stack by doubling clicking the S button over the fader.
With the View Stack softbutton activated we can see the list of cues in the stack, plus other
information relating to playback of each cue. They include:
Wait – The wait time between the Go command being given (the Go button, for example) and the
cue executing. Follow indicates no wait time – an immediate Go with the command.
Halt – This sets the behaviour of the cue, relative to the previous one and can change the cue into
a follow on (one that executes straight after the previous cue has finished running). The simple
options are Halt – Yes (wait for the next Go command) or Halt – No (execute as soon as the
previous cue has completed).
Delay – We have already come across delay set across our fixtures which is a good example
of delay in action. Delaying individual fixtures or attributes (with complex fixtures) can produce
a variety of cue executions in one place. The distinction with Wait is that Wait is waiting for the
whole cue to execute whereas Delay can be more detailed.
Fade – The Fade in time of the cue which can be set globally or to individual fixtures or attributes,
similar to Delay.
Next Cue – The default setting of Next fires the next cue number in the sequence, numerically
speaking. Setting Next Cue to another cue number allows you to create jumps in the stack.
We are not really concerned with the remaining options in this spreadsheet today so let’s finish our
look at cue stack timing by reminding ourselves how to see more complex timing information.
Choosing a cue by highlighting it in the Cue Stack window using the left hand field, pressing the
top softbutton View Cue brings up data about that particular cue. View Levels shows us the
channel level information while toggling View Times shows us a detailed breakdown of the
timing data. In Simple View, this gives us global time setting for each attribute (in our case we
only have Intensity). Advanced View shows us timing information on a per fixture basis. If we
had complex fixtures like moving heads, this would also enable us to see individual attributes like
Pan and Tilt.
Not only can we view the timing data, we can also change it from here too – Simple for global
changes and Advanced for detailed ones. So you can see how we have started to get into quite a
All Rights Reserved - Rob Sayer, 2009
http://www.onstagelighting.co.uk
On Stage Lighting - Cham Sys MagicQ Tutorial 1 - Conventional Lighting Control
powerful but complex area of lighting control. We’ll leave timing there for today.
Finally, the end of the beginning.
This series of MagicQ PC tutorials was designed to give simple but practical examples to help you
find your way through the minefield of learning a complex lighting console. We started with a very
simple rig, had some clear goals and patched and programmed our way to better understanding.
There is much to learning professional lighting consoles and On Stage Lighting will be looking
at further aspects of the MagicQ PC at some time in the future, including moving lights and
running complex shows.
For now, you have a much better understanding of the basics of the Cham Sys MagicQ PC (and,
by default, many others) that you can take to the next level. If you have been keeping up, here’s
what we know so far – I think you’ll be pleasantly surprised:
●
●
●
●
●
●
●
●
●
●
●
●
●
How to start a show on MagicQ PC and set a DMX Output device.
How to patch up generic fixtures with good labels and colour information.
How to navigate around the MagicQ and basic routines such as Copy, Move and editing data.
How to set up custom views and create your own workspace.
How to set up a Grid and use it as a virtual fixture plan.
How to use Auto Groups and create your own selection tools.
How to handle channel data and set up looks using different methods.
How to use the programmer to manipulate fixture data.
How to create playbacks on MagicQ PC and use Copy and Move keep a tidy house.
How to use the tools for editing cues and chases.
How to create a theatre stack on the MagicQ and alter timing information.
How to use the shape generator to create complex lighting effects quickly.
How to apply complex timing across fixtures and attributes.
While working through those big tasks, you have started to really get to grips with the fine details
of navigation and workflow on MagicQ PC and I hope you feel more confident on the console.
Rob Sayer - Editor, On Stage Lighting
http://www.onstagelighting.co.uk
All Rights Reserved - Rob Sayer, 2009
http://www.onstagelighting.co.uk