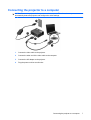
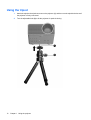
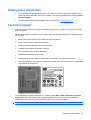
1
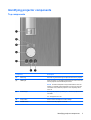
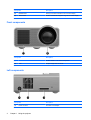
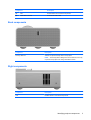
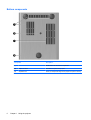
HP Notebook Projection Companion
User Guide
© Copyright 2009 Hewlett-Packard
Development Company, L.P.
Microsoft, Windows, and Windows Vista are
U.S. registered trademarks of Microsoft
Corporation.
DLP and the DLP logo are trademarks of
Texas Instruments.
The information contained herein is subject
to change without notice. The only
warranties for HP products and services are
set forth in the express warranty statements
accompanying such products and services.
Nothing herein should be construed as
constituting an additional warranty. HP shall
not be liable for technical or editorial errors
or omissions contained herein.
First Edition: December 2009
Document Part Number: 595221–001
Table of contents
1 Using the projector
Identifying projector components ......................................................................................................... 3
Top components .................................................................................................................. 3
Front components ................................................................................................................ 4
Left components .................................................................................................................. 4
Back components ................................................................................................................ 5
Right components ................................................................................................................ 5
Bottom components ............................................................................................................. 6
Connecting the projector to a computer ............................................................................................... 7
Turning on the projector ....................................................................................................................... 8
Turning off the projector ....................................................................................................................... 9
Adjusting the projector focus .............................................................................................................. 10
Using the on-screen display ............................................................................................................... 11
Using the tripod .................................................................................................................................. 12
2 Troubleshooting
Solving common problems ................................................................................................................. 13
Getting more information .................................................................................................................... 15
Technical support ............................................................................................................................... 15
Appendix A Specifications
Appendix B Spare parts
Index ................................................................................................................................................................... 18
iii
iv
1
Using the projector
The following items are included in the HP Notebook Projection Companion accessory kit:
(1)
HP Notebook Projection Companion
(2)
AC adapter
(3)
Power cord*
(4)
Video cable
(5)
Tripod
(6)
Carrying case
(7)
User Guide disc
(8)
Warranty
*Power cords may vary in appearance by region and country.
1
WARNING! Read and observe these precautions and all others in this manual to reduce the risk of
injury and equipment damage. Do not look directly into the lens when the lamp is on. Do not expose the
projector to rain or moisture, and do not use it near water. Keep paper, plastic, and combustible material
at least 2 ft (0.5 m) away from the projector lens and exhaust vents. Do not allow liquid, food, or small
objects to get inside the projector. If material gets inside the projector, contact HP for assistance. Do
not put anything on top of the projector. Do not place any liquids where they might spill on the projector.
Do not block any vents on the projector. Do not place the projector near any source of heat, such as a
radiator or amplifier. Use only an approved power cord rated for the voltage and current marked on the
product label. Do not overload any outlet or extension cord. Do not circumvent the grounding prong on
the power cord. Route all cables so they are not located where people can step on them or trip on them.
Place the projector flat on its base on a sturdy surface. Do not stand the projector on its front surface.
Do not touch the lens with your fingers. Use a soft, dry cloth to clean the projector case. Do not open
the projector. If the projector is damaged in any way, contact HP for assistance.
CAUTION: To prevent damage to the projector or its components during use, observe these
precautions:
Avoid using the projector near appliances that generate heat.
Avoid exposing the projector to excessive dust. Dust may cause the projector to fail and automatically
shut down.
Be sure that the projector is placed in a well-ventilated area.
Avoid blocking the projector's vents and openings.
Do not operate the projector over 47.5°C temperature. The projector operates well within this
temperature range.
2
Chapter 1 Using the projector
Identifying projector components
Top components
Component
Description
(1)
Focus ring
Move the ring to the left or right to adjust the focus of the projector.
(2)
TEMP light
When the light is on, indicates that temperature is over 47.5°C and
that the projector will automatically shut down.
NOTE: Excessive temperature may indicate that the vents are
blocked. To maintain optimal temperature, be sure the vents are
not blocked. Also, allow the projector to cool completely after it
turns off.
(3)
STATUS light
Blinking: The projector is powering on, or one of the projector's fans
has failed.
On: The projector is in use.
(4)
4-way button
Press to select and adjust on-screen settings.
(5)
POWER button
Press to turn the projector on and off.
Identifying projector components
3
Component
Description
(6)
ENTER button
Allows you to select a function in the on-screen display.
(7)
MENU button
Press to activate and navigate through the on-screen display.
Front components
Component
Description
(1)
Vent
Enables airflow to cool internal components.
(2)
Lens
Projects images onto the screen.
Left components
4
Component
Description
(1)
Connects an AC adapter.
Power connector
Chapter 1 Using the projector
Component
Description
(2)
Vent
Enables airflow to cool internal components.
(3)
Video cable connector
Connects the video cable.
Back components
Component
Description
Security cable slot
Attaches an optional security cable to the projector.
NOTE: The security cable is designed to act as a deterrent, but it may
not prevent the projector from being mishandled or stolen.
Right components
Component
Description
Vent
Enables airflow to cool internal components.
Identifying projector components
5
Bottom components
6
Component
Description
(1)
Vents
Enable airflow to cool internal components.
(2)
Tripod connector
Connects the tripod to the projector.
(3)
Adjustable foot
Allows you to adjust the height of the projector for optimum viewing.
Chapter 1 Using the projector
Connecting the projector to a computer
NOTE: Turn on the projector before you turn on the computer. This allows the computer to
automatically detect the projector and configure the video settings.
1.
Connect the video cable to the projector.
2.
Connect the other end of the video cable to the computer.
3.
Connect the AC adapter to the projector.
4.
Plug the power cord into a wall outlet.
Connecting the projector to a computer
7
Turning on the projector
1.
Press the POWER button on the projector.
NOTE: Turn the projector on before turning on the computer, so that the computer will
automatically detect the projector and configure the video settings. The STATUS light stays on
while the projector is in use.
2.
Press the POWER button on the computer.
NOTE: During the power-on sequence, the projector displays the logo for approximately 10
seconds.
8
Chapter 1 Using the projector
Turning off the projector
CAUTION:
1.
Turn the projector off before disconnecting the AC adapter.
Press the POWER button on the projector.
To confirm that you want to turn off the projector, a message requests you to press the POWER
button again.
NOTE: If you do not want to turn off the projector, press the MENU button to clear the message.
Or, you can ignore the message, and it will disappear after 30 seconds.
2.
Press the POWER button again. (The cooling fans continue to operate for 10 seconds.)
Turning off the projector
9
Adjusting the projector focus
10
1.
Move the projector backward or forward to increase or decrease the projected image size. The
projector focuses at a distance up to 8.5 feet (2.6 m). It projects a screen-size image ranging from
15 to 60 inches (38 to 153 cm).
2.
When the image size is set, move the focus ring to the left or right to optimize the image for viewing.
Chapter 1 Using the projector
Using the on-screen display
Use the 4-way button to navigate to a menu or menu items. Press up, down, left, or right to highlight
your choices through the various menus. Then, press the ENTER button to select a menu item. When
an item is selected, it changes to dark blue.
To return to the main menu, press the MENU button.
To exit the on-screen display, use the 4-way button to select Exit or Return, and then press the
ENTER button.
Select
To do this
Input
Picture
Setup
Help
●
Select the input source, such as VGA or composite.
●
Scan input signals.
Adjust the on-screen display settings:
●
Color settings, such as brightness, contrast, sharpness, color
saturation, and tint
●
VGA settings, such as auto-sync, frequency, tracking, vertical
offset, and horizontal offset
●
Picture mode
●
Picture enhancement
●
White intensity
●
Select a language for the on-screen display.
●
Reset all settings for the projector.
●
Use auto keystone and keystone to adjust image distortion by
tilting the projector.
●
Adjust advanced options, such as the projector's position (or
location), aspect ratio, and power timeout.
Get information about the projector, such as the on-screen display
version number and the number of hours the lamp has been used.
Using the on-screen display
11
Using the tripod
12
1.
Attach the tripod to the tripod connector on the projector (1), and then turn the tripod clockwise until
the projector is firmly connected.
2.
Turn the adjustable knob (2) to tilt the projector for optimal viewing.
Chapter 1 Using the projector
2
Troubleshooting
Solving common problems
Problem
Possible cause
Solution
No image appears on the screen.
A cable is disconnected.
Be sure that all cables are properly
connected.
Check all connector pins to be sure they
are not bent or broken.
Partial, scrolling, or incorrectly projected
image.
The tracking, frequency, or resolution
settings may need to be adjusted.
Press the 4-way button left to
automatically adjust the frequency and
tracking. An on-screen message
indicates that an automatic adjustment is
in progress.
Be sure the resolution of the computer is
set to SVGA 858x600.
If you have difficulty changing the
resolution or the monitor freezes, restart
the computer and projector.
If the problem continues, upgrade the
computer with the latest version of the
video card driver. Contact technical
support for more information.
The projected image is not displayed on
the screen.
The VGA display settings may need to be
changed.
Using the Picture menu, adjust the VGA
display settings of the projector.
In Windows, change the display
resolution on the computer to an
allowable setting.
The image is unstable, flickering, or has
a flickering vertical bar.
The tracking may need to be adjusted.
Adjust the tracking by pressing the
MENU button, and then selecting
Picture > VGA settings > Tracking.
The image is distorted.
The focus may need to be adjusted.
Use the projector's focus ring to adjust
the projected image.
Be sure that the projection screen is
within the required distance from the
projector (8.5 feet [2.6 m]).
The image color is incorrect.
The display is receiving the incorrect
signal output from the VGA graphics
card.
Using the Picture menu, set the signal
output to RGB.
Using the Picture menu, verify that the
colors (red, green, blue) are properly set.
Solving common problems
13
14
The TEMP light is on.
The projector is overheated. (The
projector automatically shuts down.)
Be sure that nothing is near or blocking
the vents of the projector, and that the
vents are free of dust or other objects.
After the projector cools completely, turn
on the projector again.
The STATUS light is blinking.
One of the projector's fans may have
failed. (The projector automatically shuts
down.)
Be sure to let the projector cool
completely. Check the fan mode in the
Setup menu. Change the fan mode to
normal or high. The high setting turns the
fan at a faster speed, which helps to keep
the projector cooler.
The on-screen display does not appear
on the screen.
The MENU button may be locked.
Press and hold the MENU button for 15
seconds to unlock the button and enable
the on-screen display.
Chapter 2 Troubleshooting
Getting more information
●
For comprehensive information about your HP computer, as well as governmental agency and
safety information about the use of your computer, access Help and Support by selecting Start >
Help and Support.
●
For product news and software updates, see the HP Web site: http://www.hp.com.
Technical support
If you cannot solve a problem using the troubleshooting tips in this chapter, you may need to contact
technical support.
For the fastest possible resolution of your problem, have the following information available when you
call or e-mail:
●
Model name and number for the computer and for the projector
●
Serial numbers for the computer and projector
●
Dates the computer and projector were purchased
●
Conditions under which the problem occurred
●
Error messages that have been displayed
●
Hardware and software you are using
●
The manufacturer and model of components connected to the computer and projector
●
The serial number for the projector, and other information, can be found on the service tag located
on the bottom of the projector
To contact technical support using your HP computer, select Start > Help and Support > Contact
support and start a chat session with a support specialist. You can also refer to the Worldwide
Telephone Numbers booklet, included with the projector, for contact information.
NOTE:
Technical support chat may not be available in all languages.
Getting more information
15
A
Specifications
Dimensions
16
Height
9.3 cm (3.6 in.)
Width
11.1 cm (4.4 in.)
Diagonal
4.0 cm (1.6 in.)
Weight
.42 kg (.9 lb.)
Contrast ratio
800:1
Brightness
Up to 100 lumens
Light source
Red/green/blue LED module
Resolution
SVGA (858x600)
Zoom focus
Fixed zoom/manual focus
Display technology
0.45-in. DLP
Projection screen (diagonal)
38 - 152 cm (15 - 60 in.)
Maximum projection distance
2.6 m (8.5 ft.)
Noise
32 dB
Power consumption
58 W
I/O connectors
30-pin video cable in/VGA out
Appendix A Specifications
B
Spare parts
Description
Part number
Tripod
598359-001
Video cable
590763-001
Projector
590762-001
Carrying case
585976-001
AC adapter
463958-001
NOTE: The projector does not include a replaceable lamp. The projector uses light-emitting diode
(LED) technology instead of a standard gas/filament bulb. LED technology provides a longer life solution
than standard bulbs, so replacements are not necessary.
17
Index
A
adjustable foot 6
advanced settings 11
B
buttons
4-way 3
ENTER 4
MENU 4
POWER 3
C
Carrying case, spare part
number 17
E
ENTER button 4
F
focus ring 3
H
Help and Support 15
Help menu 11
I
Input menu 11
L
language settings 11
lens 4
M
MENU button 4
menus
Help 11
Input 11
Picture 11
Setup 11
18
Index
P
Picture menu 11
POWER button 3
power connector 4
power cord 1
power, turning off 9
power, turning on 8
projector focus 10
S
security cable slot 5
Setup menu 11
spare parts 17
specifications 16
STATUS light 3
T
technical support 15
TEMP light 3
tripod 1, 12
tripod connector 6
V
vents 4, 5, 6
VGA settings 11, 13
video cable 1
video cable connector 5