1
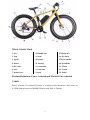
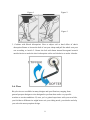
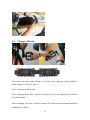
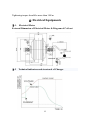
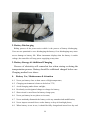
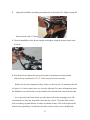
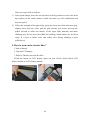
INSTRUCTION MANUAL IMPORTANT: This manual contains important safety, performance and service information. Read it before you take the first ride on your new bicycle, and keep it for reference. Content Ⅱ-4 SAFETY WARNING Ⅰ. Mechanism Electric Schematic Diagram of Whole Vehicle Ⅰ-1 Derailleur Ⅲ. Assembly Ⅰ-2 Stem IV. USAGE Ⅰ-3 Direction Adjustment of IV-1.Safety Front Wheel IV-2.Inspect Ⅰ-4 Brake IV-3:Wet weather riding Ⅰ-5 Seat, Seat Post IV-4:The Ⅰ-6 Tyre weight Ⅰ-8 Battery Holder V. Ⅰ-9 Pedal Ⅳ.Postscript Ⅱ. Electrical Equipments Ⅱ-1 Electric Motor Ⅱ-2 Battery Charger Ⅱ-3 Battery permissible Maintenance Ⅳ-1. Correct application Ⅳ-2. Driving Ⅴ. Quality Warranty 1 total Safety Warnings 1. Do not operate your E-Bike before reading this user manual thoroughly. 2. Do not disassemble the battery pack and modify the unit or your warranty will be void and you will be responsible for the modification. 3. Wear a helmet and safety equipment. An unprotected head is highly susceptible to injury, even from the slightest contact, but wearing a helmet that meets Australian safety testing standards may help prevent injury. 4. Check the tire pressure of front and rear wheels. Pressure to be around 50PSI before riding. 5. Make sure that the battery pack has been fully charged before first use, and remove the charger after fully charging .Turn the main battery switch off while charging or not using. 6. Check that all electrical connections and mechanical parts are securely locked and fastened before using your E-Bike. 7. Your E-Bike is not recommended for competition, stunt, any aggressive or off-road riding. Refer to your warranty terms and conditions. 8. The performance and mileage of the unit will be varied with the battery condition, temperature, terrain, wind speed, tire pressure, rider weight and the maintenance. 9. Adjust the height of the saddle to fit your body size. Take heed of the maximum height markings on the post of the saddle. Your authorized dealer will give you assistance if requested. 10. Refer to the instruction sheet for the SHIMANO 7 Gear to switch 7 stages of gears for a more comfortable riding at different slopes. 12. Always consult your doctor for advice on your physical condition and follow traffic rules while riding. 13. Ensure you wear safe footwear and keep loose articles of clothing clear of moving parts on your E-Bike while riding. 14. Always handle the battery pack with care and do not drop it. 15. Do not connect the terminals of battery pack with any foreign object. 2 Whole Vehicle Mark 1. tyre 8. Handle bar 15.discbrake 2. rim 9. stem 16. fly wheel 3. spoke 10. frame 17.kick stander 4. motor 11. battery 18. derailleur 5.disc rake 12. controller 19. Chain 6. fork 13.seat post 20. Crank 7. brake lever 14.seat 21. Pedal Product Definition: Power Assisted and Throttle Two-wheeled Vehicle Power Assisted Two-wheeled Vehicle is working with continuous rated power of 0.35KW and top speed in 20MPH(32km/h) with PAS or Throttle. 3 Ⅰ. Mechanism Ⅰ-1. Derailleur 7 gears derailleur Ⅰ-2. Angle & Height Adjustment of Stem Step one: put the stem nuts on the top of fork Step two: put on the stem Step three: screw the nuts 4 Step four: screw top nuts on stem, tighten, but do not over tighten. Ⅰ-2.1 Angle Adjustment of Tool-adjustable Stem Loosen adjusting screw anticlockwise with internal hexagonal wrench, and then adjust the angle. Handlebar can be adjusted to proper angle by loosing lock screw. Ⅰ-2.2 Horizontal Angle & Height Adjustment of Tool-adjustable Stem Take out the rubber plug,Insert a 5mm internal hexagonal wrench in the hole to loosen the tightened front fork anticlockwise. Loosen the bolt according the aforesaid method, hold the handlebar by two hands and turn the handlebar left and right as well as lift it higher or lower to get the proper height. After finishing the procedure, tighten it clockwise. Ⅰ-3. Direction Adjustment of Front Wheel Make stem in horizontal and adjustable status as above. Face the vehicle and stand right in front of the vehicle. Hold the front wheel by two legs and turn the handlebar. Adjust the center of front wheel vertically to the center of handlebar. Ⅰ-4. Brake Adjustment Ⅰ-4-1. Disc-Brake Adjustment The city bike uses the Australian style of the brake system. The right brake lever is for the front wheels while the left for rear wheel. Important: Brake pad wear limit: replace the brake pads before the friction material has been worn down to less than 2.5 mm. 1. Open the brake lever and place the nipple end of the short brake cable into the lever, then close the lever. Secure the ferrule against the lever using the cable adjusting barrel. 5 2. Depress the brake lever about 10 times as far as the grip to check that everything is operating correctly and that the shoe clearance is correct before riding the bike. Front disc brake assemble and adjust. 6 Rear disc brakes assemble and adjust Ⅰ-5. Saddle Adjustment 1. Loosen the lock bolt to adjust cushion angle with a 5mm internal hexagonal wrench as shown in the figure. Range of adjustment is -15°~15°. Note: it is commonly better to adjust the cushion horizontally to the ground line. 2. As shown in Figure 1, loosen the lock bolt with a 5mm internal hexagonal wrench to adjust saddle height to a proper position. If a quick-release seat post clamp is used, pull the quick-release lever only. Hint: What is proper height? Heel can be freely put on pedal with leg straight. When cycling pedal action is done, knees can be slighted bent (show in Figure 3). Feet can touch the ground without standing. Note: When adjusting seat post upwards, safety line cannot be exceeded. Safety line (11111111) should be in the frame tube (as Figure 2). Tightening torque of seat post clamp should not be less than 18N.m 7 Figure 1 Figure 2 Figure 3 3. Cushion with Shock Absorption/ How to adjust soft or hard effect of shock absorption Rotate to loosen the bolt of seat post clamp and pull the whole seat post out according to Article 2. Rotate the bolt with 8mm internal hexagonal wrench anticlockwise to make the shock absorption softer and clockwise to make it harder. I-6. Tires Bicycle tires are available in many designs and specifications, ranging from general-purpose designs to tires designed to perform best under very specific weather or terrain conditions. If, once you’ve gained experience with your new bike, you feel that a different tire might better suit your riding needs, your dealer can help you select the most propriate design. 8 The size, pressure rating, and on some high-performance tires the specific recommended use, are marked on the sidewall of the tire .The part of this information which is most important to you is Tire Pressure. WARNING: Never inflate a tire beyond the maximum pressure marked on the tire’s sidewall. Exceeding the recommended maximum pressure may blow the tire off the rim, which could cause damage to the bike and injury to the rider and bystanders. The best and safest way to inflate a bicycle tire to the correct pressure is with a bicycle pump which has a built-in pressure gauge. Tire pressure is given either as maximum pressure or as a pressure range. How a tire performs under different terrain or weather conditions depends largely on tire pressure. Inflating the tire to near its maximum recommended pressure gives the lowest rolling resistance; but also produces the harshest ride. High pressures work best on smooth, dry pavement. Very low pressures, at the bottom of the recommended pressure range, give the best performance on smooth, slick terrain such as hard-packed clay, and on deep, loose surfaces such as deep, dry sand. Tire pressure that is too low for your weight and the riding conditions can cause a puncture of the tube by allowing the tire to deform sufficiently to pinch the inner tube between the rim and the riding surface. Tire Valves The tire valve allows air to enter the tire’s inner tube under pressure, but doesn’t let it back out unless you want it to. There is American Valve . The bicycle pump you use must have the fitting appropriate to the valve stems on your tire. The tires use a American valve, which is like the valve on a car tire. To inflate a American valve tube, remove the valve cap and push the air hose or pump fitting onto the end of the valve stem. To let air out of a American valve, depress the pin in the end of the valve stem with the end of a key or other appropriate object. 9 1. Check whether rim is deflected or loosened and whether spoke is loosened or broken before riding. If any unusual condition, ask professional technician for adjustment or change. 2. Please change the tyre if cover tyre grain is worn and torn. 3. Please guarantee proper PSI. When inflating, please take nominal value of cover tyre as reference. Never inflate over the pressure or under the pressure. Caution: Please make sure the contact area of tyre and ground should not be less than 10cm while riding. I-8. Battery Holder Batteries Installation: open the lock of the battery box, support the side of the battery box , and pull it out (as left picture); Remove the battery out: put down the end of the battery box aligned to the card slot, and then press down the end handle, and then lock (as right picture). Fuse of battery protection Charging the position: To connect the charger interface in this location. 10 I-9. Change of Pedals Left pedal and right pedal should be clarified when changing. Pedal spindle is usually engraved with “R” and “L”. Tool: 15mm open end wrench When changing Right side, clockwise rotation is to lock and anticlockwise rotation is to disassemble. When changing Left side, clockwise rotation is to disassemble and anticlockwise rotation is to lock. 11 Tightening torque should be more than 18N.m Ⅱ. Electrical Equipments Ⅱ-1. Electrical Motor External Dimension of Electrical Motor & Diagram of Coil-out Ⅱ-2 Technical indicators and structural of Changer 12 Ⅱ-2-5. Maintenance & Attentions: 2.1 Charger should be used with designated battery strictly according to requirements. It is forbidden to charge non-original battery with this charger. 2.2 Charger is dangerous due to the high voltage it contains. If any faults or failures are found, please contact the dealer or the manufacturer for help. User or non-professional servicemen of the Company are forbidden to open the charger. 2.3 Charger and battery should be in indoor environment with good ventilation and heat dissipation when charging. Places within 1m around battery and charger should be free of inflammables. Never use the charger in the environment which is with moist, high temperature, inflammables and explosive gas. 2.4 Never take the charger along with the vehicle so as to avoid damage caused by vibration. 2.5 Carefully read the contents before application. Manufacturer assumes no liability or responsibility for any damages caused by misuse of abnormal operation. Ⅱ-3. Technical Data & Structure of Battery Ⅱ-3-2. Product Application 1. Battery Charging Battery should be charged timely after riding the electric fat bike. Lithium battery of the Company should be charged with designated charger. Connect the output plug to the charger and then connect the charger to100V-240V smart alternating current power supply. Battery can be used after charging 6-7 hours until the charging indicator light turn from red to green. 13 2. Battery Discharging Riding process of the power assist vehicle is the process of battery discharging. Users are not permitted to over discharging the battery. Over discharging may cause severe damage to battery life. When instrument displays that the battery is under voltage, the controller will stop power supplying at any time. 3. Battery Storage & Additional Charging Reserve of electricity will somewhat lose when storing or during the transportation process. Battery should be additional charged before use. Charging method is as above. 4. Battery Use, Maintenance & Attention 4-1 Never put battery close to heat source of high temperature; 4-2 Charging environment is better to be below 37℃; 4-3 Avoid charging under direct sunlight; 4-4 Resolutely use designated charger to charge the battery; 4-5 Short circuit is not allowed at battery charge port; 4-6 Never put battery in wet places or in water; 4-7 Never randomly dismantle the battery or do any unauthorized modification; 4-8 Never impose external forces on the battery or drop it from high places; 4-9 When battery is not in use, it should be fully charged and stored in a dry and 14 cool place. Places within 1m around the battery should be free of inflammables and is insulating. Battery should be kept away from heavy load and children. Complete additional charging should be conducted every 2 months. 5. Warranty Period: 2 years since the date of leaving factory. Special Warning: 1 . Never clean the vehicle with hydraulic monitor which may cause damage to ○ electrical components due to water intake. 2 . If the product smokes or burns when damaged by external forces, put it out with ○ dry-chemical fire extinguisher or sandy soil. 3 . Although lithium battery is environmental friendly product, it also contains ○ various kinds of chemical substances. When it is broken due to aging, it may pollute the environment. Therefore, please discard it as useless within 36 months since the date of purchase, and give it to skilled company for professional treatment. 5. Disclaimers of Manufacturer a. no responsibility for any damages caused by nonconforming the requirements in application instruction; b. no responsibility for any damages caused by any unauthorized modification c. no responsibility for any damages caused by force majeure. Ⅱ-5. Cycle wiring diagram 15 III. Assembly 1. Pedals are marked “L” and “R” for left and right respectively. Screw in clockwise for the “R” pedal and counter-clockwise for “L”. Tighten both with a wrench firmly but not excessively as the crank threads are made of aluminum alloy. 16 2. Align the handlebar assembly perpendicular to the front fork. Tighten using the 5mm wrench with 15-18n.m. 3. Turn the handlebar to the desired angle and tighten using the 4mm wrench with 8-10n.m 4. Seat Post Do not adjust the seat post beyond its maximum extension mark. Always keep a minimum of 3 1/2” of the seat post in the seat tube. Brakes are the most important safety feature on the bicycle. To minimize the risk of injury, it’s vital to ensure they are correctly adjusted. For more information about the Shimano rear roller brakes can be found in the manuals that come with the bike. As on any bike, the front brakes provide almost all of the stopping power. We recommend you keep the front disk clean and free of dirt. Clean the disk weekly with a cleaning rag and Windex or other non-harsh cleaner. This will help keep the brakes from squeaking. Periodically check the tension of the screws holding the 17 brake disk to the motor. 5. Front and rear hub assemble Front wheel hub assemble with 30-35 n/m with a 18# spanner. Rear wheel hub assemble about 30-35n/m with 15# spanner. IV: USAGE IV-1:SAFETY The E-Bike is best described as an urban bike and is best suited for usage in an urban environment and paved roads. While cycling, it is your responsibility to be attentive of your surroundings and traffic rules. a. Always wear a cycling helmet which meets the latest certification standards and is appropriate for the type of riding you do. Always follow the helmet manufacturer’s instructions for fit, use and care of your helmet. Most serious bicycle injuries involve head injuries which might have been avoided if the rider had worn an appropriate helmet. 18 b. Wear shoes that stay on your feet and grip firmly to the pedals. Do not wear sandals or ride barefoot. c. Dress to be visible on the road and avoid loose clothes that will tangle with moving parts of the bicycle. d. Keep your speed at levels appropriate to road conditions e. Be aware of wet weather conditions, as these affect braking distance. Brake earlier than you normally would on dry roads. f. Familiarize yourself with the traffic rules in the state you are riding in. g. Avoid cycling in poor weather and visibility conditions such as fog, night, heavy rain and snow. Keep your lights on in such conditions. h. Familiarize yourself with the usage of the bike and how to maintain it. IV-2: Inspect Before every ride, make a quick inspection of your bike’s mechanical and electronic features. Be safe, not sorry. Frame and fork: Visually check for damage, do not ride if bent or fractured. Wheels and tires: Make sure tires are correctly inflated. Check by putting one hand on the saddle, one on the intersection of the handlebars and stem, then bouncing your weight on the bike while looking at tire deflection. Compare what you see with how it looks when you know the tires are correctly inflated; and adjust if necessary. Tires in good shape ? Spin each wheel slowly and look for cuts in the tread and sidewall. Replace damaged tires before riding the bike. Wheels true? Spin each wheel and check for brake clearance and side-to-side wobble. If a wheel wobbles side to side even slightly, or rubs against or hits the brake pads, take the bike to a qualified bike shop to have the wheel trued. CAUTION: Wheels must be true for the brakes to work effectively. Wheel truing is a skill which requires special tools and experience. Do not attempt to true a wheel unless you have the knowledge, experience and tools needed to do the job correctly. 19 Wheel rims clean and undamaged? Make sure the rims are clean and undamaged along the braking surface, and check for excess rim wear. Handlebar and stem: Tightened firmly in the ‘face forward’ positions. Brakes Squeeze, brake levers: Brake cables should remain unobstructed by other cables or accessories. Chain Turn crank arms: to ensure chain runs smoothly. Keep the chain lubricated and clean. Gearing: Your bike has a 7 speed Shimano shifting system. For your initial ride, we suggest you put the bike in 4th gear and get used to riding the bike before shifting gears. Use the upper lever to shift up, and use the lower lever to shift down. You do not have to be moving to shift gears. IV-3: WET WEATHER RIDING WARNING: Wet weather impairs traction, braking, and visibility for both the rider and for other vehicles sharing the road. The risk of accident dramatically increases in wet conditions. Wet brakes and wet rims dramatically increase braking distance. Ride more slowly and brake sooner when riding in wet conditions. Under wet conditions, the stopping power of your brakes (as well as the brakes of other vehicles sharing the road) is dramatically reduced and your tires do not grip nearly as well. This makes it harder to control speed and easier to lose control. To make sure that you can slow down and stop safely in wet conditions, ride more slowly and apply your brakes earlier and more gradually than you would under normal, dry conditions. IV-5: The permissible total weight (bicycle + rider): 130Kg V: Maintenance 20 Before every ride: Perform mechanical safety checks and use a fully charged battery. Every 10 hours of riding: Clean the bike, including chain rings and sprocket. Clean the chain. Check the tension of the screws holding the brake disk to the motor. Every 20 - 30 hours of riding: Squeeze the brakes and rock the bike to check for any looseness with each forward or backward movement. If the headset is loose, tighten it or have your dealer check it. Lift the front wheel and rotate handlebars to check for tightness of steering, it may be necessary to lubricate ball bearings. Check and recalibrate the brakes, replace if worn out. Squeeze spokes in adjoining pairs between your thumb and index finger. They all should have the same tension. Have your dealers re-spoke or true the wheel if necessary. Check cables for rust, kinks and fraying, have your dealer replace them if necessary. Repairing a punctured tire If you have a punctured tire, we recommend that you get a bike dealer to repair the tire. You can always, of course, carry out the repairs on your own. As there are no electronic components on the rear wheel, follow standard procedures as with normal bicycles with internal gears. Read the Shimano gear manual provided for more instructions. As the front wheel contains the hub motor, there are additional steps in the case you require the entire wheel to be removed from the bike. A philips head screwdriver will be required to open the cable housing to first unplug the wires than run from the motor to controller. Unplug these before proceeding to remove the front wheel. Be mindful of the tightening assembly sequence of washers, nuts and spacers. In order to help prevent flat tires, we suggest you add SLIMER tire sealant to both front and rear tires. This sealant is available at most bicycle shops and is easy to install. If you have little experience with bicycle maintenance, we recommend you consult your local bike shop to make adjustments. Ⅳ.Postscript Ⅳ-1. Correct application 1. Before the electrically power assisted cycle is used, the height of the saddle and the handlebar shall be adjusted to ensure comfort during riding and 21 reduce fatigue. The height of the saddle and the handlebar changes upon different riders. Normally, the saddle shall be adjusted until the rider can put one foot on the ground (the whole cycle almost stands vertically) and the handlebar shall be adjusted until the rider can stretch forearms comfortably and feel shoulders and arms relaxed. However, it shall be ensured in advance that the seat post and the handle stem are inserted over the safety lines for the adjustment of the saddle and the handlebar. 2. Check and adjust the front and rear brakes before the electrically power assisted cycle is used. The front brake is controlled by the right brake handle and the rear brake is controlled by the left brake handle. The front and rear brakes shall be adjusted until braking is achieved by the left and right brake handles which reach half stroke. Replace brake shoes timely when abraded excessively. 3. Check the chain before the electrically power assisted cycle is used. It is hard to ride when the chain is too tense and it is easy to vibrate or touch other components when the chain is too loose. The chain slack shall be 1-2mm. It can be properly tensioned if the cycle is not pedaled. When the chain is adjusted, loosen the nut of the rear wheel and then evenly tighten or loosen the left/right adjusting screw to adjust the tension of the chain. Then re-fasten the nut of the rear wheel. 4. Check chain lubrication before the electrically power assisted cycle is used. Touch and observe whether the chain axis rotates flexibly and whether chain links are severely corrosive. If corrosion or inflexible rotation occurs, properly add lubricating oil and if it is serious, replace the chain. om5 B* p$ 5. Before the electrically power assisted cycle is used, check the tyre pressure, flexibility of the handlebar, flexibility of the front and rear wheels, circuit, battery, motor, lighting, fasteners and others and ensure they are satisfactory. (1)Insufficient tyre pressure will increase the abrasion between tyres and the ground, which reduces the distance per charge; moreover, it reduces the flexibility of the handlebar and affects the comfort and safety during riding. Add pressure when it occurs and tyre pressure shall be consistent with suggested pressure values in the Operation Instruction of the Electrically Assisted Power 22 Cycle or required pressure values in the tyre surface. ( 2 ) When the handlebar is inflexible, seized, rigid or tight, lubrication or adjustment shall be conducted timely. For lubrication, butter, calcium-based or lithium-based grease is normally adopted. When it is adjusted, loosen the locking nut of the front fork and rotate the fork block until the rotation flexibility reaches requirements. Then lock the locking nut of the front fork. (3)The inflexibility of the front and rear wheels will increase the rotational friction and energy consumption, which may reduce the distance per charge. Therefore, lubrication and maintenance shall be carried out timely in the case of any malfunction. For lubrication, butter, calcium-based or lithium-based grease is normally adopted. Replace steel balls or hub in the event of hub malfunction; send it to the professional repairer in the event of motor malfunction. (4)For circuit check, make it switch on and check whether it works normally, whether the connectors are inserted firmly, whether the fuse works normally and especially whether the output terminal of the battery is reliably connected to cables. Eliminate all errors timely if necessary. (5)Before using the cycle, you shall check the battery and judge whether the remaining power is enough for riding. If it is not enough, you shall pedal the cycle to avoid under voltage working of the battery. (6)Before using the cycle, you shall also check the work condition of the motor. Observe and hear the working motor. Repair it timely if any abnormality is found. (7)Before using the cycle, you shall check lighting, especially at night. The headlight shall be on and the beams shall be within 5-10 meters far from the head of the cycle. (8)Before using the cycle, you shall check whether all primary fasteners are fixed, such as handlebar, handle stem, saddle, seatpost, front wheel, rear wheel, central axis, locking nut and pedals which shall not be loose. If any fastener is loose or fallen down, it shall be fastened or replaced timely. Suggested torque for fasteners is normally 18N.m for handlebar, handle stem, saddle, seatpost, front wheel and pedals as well as 30N.m for the locking nut of the central axis and 23 rear wheel. 7. This electrically power assisted cycle is not suitable for uneven or much sloppy roads (normally ≤8°). You shall slowly drive or push the cycle forward under such road condition. Due to such bad condition, the service life of the motor, controller and battery will be shortened and they are likely to be damaged. 8. When the electrically power assisted cycle is used when it is cold, pay attention to the remaining power and voltage indication of the battery. Under cold condition, the depth of discharge shall be properly reduced and it is forbidden to drive when under voltage, since the charge capacity and discharge capacity are lowered in cold days. 9. The electrically power assisted cycle can work normally in rainy or snowy days. However, when it rides across accumulated water, the height of accumulated water shall not exceed the bottom line of the central shaft tube to prevent water from entering and causing damage. The cycle shall be cleaned to be dry after running in rainy or snowy days. Electrical components which are immersed in water shall be dried with dryer to prevent corrosion, creepage, short circuit or other malfunction. 10. You shall reduce your speed when riding in rainy or snowy days and increase braking distance to prevent sideslip or accidental u-turn which may cause damage to body. 11. The electrically power assisted cycle shall not be exposed to sunlight for a long time and shall be stored in a cool place. Exposure to sunlight will accelerate aging of paint, plastic parts, rubber parts and electronic parts, and also reduce their service life and reliability. 12. When the battery is charged, only an attached charger or a charger of model designated by our company can be used. The battery and the charger shall be put in a ventilated place for charging and placed stably and far from inflammable goods, explosive goods, high temperature, moisture or shower. It is forbidden to cover the battery or the charger during charging. They shall be out of children’s reach. Before charging, confirm that the power supply and frequency from the grid are consistent with charger requirements. Connect the battery with the 24 output terminal of the charger and the input terminal of the charger with the grid. After charging is finished, disconnect the grid and then disconnect the charger with the battery. 13. The battery can not be used in the event of undervoltage. It shall be charged immediately. Deep discharge or overdischarge is forbidden. 14. The battery shall be kept in a cool and moderately moisture place with face upwards. For a long-term storage, the battery shall be charged every three months and half charge is enough. 沂南 15. Carefully read the User Manual for this electrically power assisted cycle before using this cycle for the first time. Understand the performance of this electrically power assisted cycle and do not lend it to others who are not able to operate an electrically power assisted cycle. 16. Mental patients, alcoholics and other disabled not suitable for riding are not allowed to use electrically power assisted cycles. Riders with heart disease, epileptics and color-blinded riders shall ride this electrically power assisted cycle carefully. 17. Electrically power assisted cycles are non-motor vehicles and riders shall comply with local traffic regulations. You shall ride it on the non-motor vehicle lanes or locally designated lanes for such cycles. 18. Electrically power assisted cycles shall be kept in a cool, ventilated and dry place and also far from corrosive liquid or gas. During storage, electrically power assisted cycles shall keep vertical with sufficient tyre pressure. Heavy goods can not be loaded on the cycles and the battery shall be stored separately. Ⅳ-2. Driving 1. Preparations before driving 25 Individualized adjustment Bicycles are designed in accordance with ergonomics and with proper size, which can not only reduce injuries but also increase comfort. It is normally measured as follows: Ride on the cycle and put your feet on the ground; keep 2.5cm from the crotch to the top tube and 5cm to the all-rounder. For women’s cycles, the joint between the top tube and the head tube shall be kept 2.5cm from the crotch. 2. Riding skill and safety Correct riding posture ensures safety: the riding posture is dependent on the relative position of the contact between the rider and the cycle (handlebar, saddle and pedals). It is also closely related to the height of the rider. The riding posture is important for determining the efficiency of muscle exercise and also the safety of operating handlebar and brakes. Follow these riding skills for safety: 1) Adjust the height of the saddle: step the pedals downwards with heels; the joint and muscle of the lower limbs shall flexibly bend and stretch, and meanwhile the feet can be slightly straight. 2) Forward and backward: step on the pedals at the angle of 45 degree and then adjust the saddle forward or backward until it can match with the hamstring strength at the pedals to be at the best position. 3) Adjust the position of the handlebar: generally, the upturned grip shall be nearly 30-50mm higher than the saddle, and the flat handle shall be as high as the saddle. The downturn grip shall keep its top as high as the saddle. After adjustment, pay attention to the handlebar direction and then lock it. 4) Correct riding posture: keep your upper body slightly forward and elbows bent as equilateral triangle. 5) Sitting posture: it is similar to riding a horse; distribute your body weight to the handlebar and pedals; do not put all your weight on the saddle as it causes 26 hurt to hips. 6) Pedaling skill: put the front 1/3 point of the shoes at the center of the pedals. Your feet movement shall be parallel with the central line of the cycle. If not, the efficiency of pedaling will be reduced. Keep even speed, otherwise you may feel tired. Specially note pulling function which pulls the pedals. 3. Speed change skill: 1) Do not pedal the cycle reversely when changing speed to avoid chain dropping caused by malfunction. 2) Do not change the variable gear ratio dramatically; gradually change speed upon terrain to avoid feet fatigue. 3) When you are 60 meters from the slope, gradually change your speed upon slope. Normally, people are used to change speed when it is hard to climb, which affects speed, causes danger of falling down and also increases abrasion of components. 4) For long-term storage, change the chain to the minimum crankset and the small flywheel to avoid elastic fatigue of components. 4. Braking skill: the most important for safe driving 1) Emergency brake skill: for emergency brake, rear brake shall be before front brake. However, people normally brake both at emergency. If the braking distance is proper, it can brake safely; but if deceleration is too fast, the rider may be cast forward. To avoid such danger, it is best to brake intermittently and meanwhile push your hips backwards, especially in rainy days or on boracite roads. 2) Speed control skill: especially when you ride downhill as it speeds up and prepare for speed change, you must control brake to decelerate before change in order to prevent danger of exceeding the yellow line and being off the road. 5. Climbing skill: When you are climbing the slope, it is not enough to step pedals hard, which makes you feel tired. So please adjust the assisted power to highest in advance .Then you can shift the derailleur base on you personal preference. 27 There are some skills as follows: 1) After speed change, move the rear flywheel to the big crankset or move the front big crankset to the small crankset, which can make you feel comfortable and keep the speed. 2) Utilize the strength of the upper body: grasp the lower part of the downturn grip, slightly move back the waist, pull the grip towards your breast and step the pedals forward to utilize the muscle of the upper body naturally and make climbing easy. Do not leave the saddle for pedaling, which makes you feel tired easily. It is best to inhale twice and exhale once during climbing to gain sufficient air. 5. How to turn on the electric bike ? 1.Turn on battery 2. Turn on LCD display 3. Pedal or Throttle can start the ebike. 4.Push the button on LCD display again can turn off the ebike.(Check LCD display details on LCD display manual) 28 Ⅴ. Quality Guarantee 1. In accordance with the contents of the guarantee, you can enjoy the original quality assurance and after-sales service. 2. Apply for a free repair, held this warranty, the bicycle with you, directly contact to the original purchase store. 3. There is a frame number of all the company’s products, for product traceability and sales advice. 4. Please keep this guarantee safely, if lost will not be entertained. If past the warranty period for free repairs, if your bicycle need to be repaired, please contact any store, they will be happy to serve you, but need to charge the cost fee and the wages. The warranty period and the conditions list in this guarantee only provide free service from morning till night, and does not burden any legal obligation 29