1
The TimeSafe® Configuration Management System
AccuRev Administrator’s
Guide
Version 4.6.1
February, 2008
11 Feb, 2008
AccuRev Administrator’s Guide
Copyright © AccuRev, Inc. 1995–2008
ALL RIGHTS RESERVED
TimeSafe and AccuRev are registered trademarks of AccuRev, Inc.
AccuBridge, AccuReplica, AccuWork, and StreamBrowser are trademarks of AccuRev, Inc.
All other trade names, trademarks, and service marks used in this document are the property of
their respective owners.
Table of Contents
The AccuRev Repository .......................................................................1
Repository Access Permissions .......................................................................................1
READ ME NOW: Assuring the Integrity of the AccuRev Repository............................1
Backing Up the Repository ..............................................................................................3
Restoring the Repository..................................................................................................4
Archiving Portions of the Repository ..............................................................................5
Moving a Workspace or Reference Tree..........................................................................5
Moving a Depot ...............................................................................................................5
Removing a Depot ...........................................................................................................5
A Word of Caution on Windows Zip Utilities .................................................................5
Storage Layout .................................................................................................................6
The AccuRev Server ..............................................................................9
Operating-System User Identity of the Server Process....................................................9
Unix//Linux Identity, 9
Windows Identity, 9
AccuRev User Identity of the Server Process ................................................................10
If You’re Using the ‘Traditional’ User-Authentication Scheme, 10
If You’re Using the ‘AccuRev Login’ User-Authentication Scheme, 11
Starting the AccuRev Server.......................................................................................... 11
Running the Server Automatically at Operating System Startup, 11
Starting the Server Manually, 11
Server Configuration File...............................................................................................12
Controlling the Server’s Operating-System User Identity, 12
Unix/Linux: Setting the Server’s Home Directory, 13
Controlling Login Session Longevity, 13
Non-expiring login sessions, 13
Controlling Multithreading of the AccuRev Server, 14
Server Logging...............................................................................................................14
Logging Levels, 14
Unix/Linux Systems Only: Log File Rotation, 14
Controlling Server Log Verbosity, 14
Verbose Server Logging, 14
Log Messages for Failed Commands, 16
Server Watchdog ............................................................................................................16
Watchdog Logging, 17
Controlling Server Operation.........................................................................................17
Unix/Linux: ‘acserverctl’ Utility, 17
Windows: ‘Services’ Console, 18
Server-Control Files, 18
Open Filehandle Limits and the AccuRev Server..........................................................20
Changing the Per-Process Open File Descriptor Limit, 20
Linux, 20
Solaris, 21
HP-UX, 22
AccuRev Administrator’s Guide
iii
System Clock Synchronization ...........................................................23
Detecting System Clock Discrepancies — Timewarp ...................................................23
Fixing System Clock Discrepancies ..............................................................................23
Automatic, Gradual Convergence of System Clocks, 23
AccuRev-Related Guidelines, 24
AccuRev’s Built-in Synchronization Scheme, 24
AccuRev Synchronization Algorithm, 25
Manual Synchronization Tools, 25
Setting the System Clock on the AccuRev Server Machine, 26
Setting the System Clock on AccuRev Client Machines, 26
Archiving of Version Container Files ................................................27
The ‘archive’ Command ................................................................................................28
Determining Which Versions to Archive, 28
Dry Run Capability, 28
Archiving the Versions, 29
The ‘reclaim’ Command ................................................................................................29
Attempts to Access Archived Versions ..........................................................................30
Using ‘hist’ to Research Previous ‘archive’ Commands ...............................................30
Restoring Archived Versions — The ‘unarchive’ Command ........................................31
Replication of the AccuRev Repository .............................................33
Master and Replica.........................................................................................................33
AccuRev Licensing in a Replication Environment........................................................35
Installation Procedure: Assumptions .............................................................................35
Setting Up the Master Server .........................................................................................35
Setting Up the Replica Server ........................................................................................36
Install AccuRev, 36
Revise the Server Configuration File, 36
Establish an AccuRev User Identity for the AccuRev Server Process, 37
Synchronize the Site Slice, 37
Configure the Replica Server to Include the Desired Depots, 38
Using the Same Host as Both Master Server and Replica Server..................................38
Setting Up a Client Machine to Use a Replica Server ...................................................39
Using a Replica Server...................................................................................................39
The Update Command, 39
Triggers and Replication ................................................................................................40
Creating New Depots .....................................................................................................40
Adding and Removing Depots from a Replica Repository, 41
Synchronizing a Replica Manually ................................................................................41
On-Demand Downloading of a Version’s Storage File, 41
Automating Replica Synchronization ............................................................................42
Synchronization Security ...............................................................................................42
The replica_site.xml File................................................................................................43
Moving the AccuRev Server and Repository to Another Machine .45
Procedure for Moving the Repository............................................................................45
On the Destination Machine ..........................................................................................45
On the Source Machine..................................................................................................46
AccuRev Administrator’s Guide
iv
On the Destination Machine ..........................................................................................46
AccuRev Security Overview ...............................................................49
Users and Groups ...........................................................................................................49
Usernames and Groupnames, 49
User Authentication .......................................................................................................49
The “traditional” User-Authentication Method, 49
The “accurev_login” User-Authentication Method, 50
The “custom” User-Authentication Method, 50
The ‘server_auth_trig’ Script, 51
Selecting the User-Authentication Method, 51
How AccuRev Records the User-Authentication Method, 52
Restriction on Access to the “Add User” Command, 52
Locks on Streams ...........................................................................................................52
Access Control List (ACL) Permissions ........................................................................52
Restricting Access to Commands using Triggers ..........................................................53
Which Security Feature Should I Use? ..........................................................................53
AccuRev Triggers ................................................................................55
Pre-Operation Triggers...................................................................................................55
Client-Side Triggers, 55
Server-Side Triggers, 55
Post-Operation Triggers .................................................................................................57
Triggers in a Replication Environment ..........................................................................57
Transaction-Level Integration Trigger ...........................................................................57
Preparing to Use an AccuRev-Provided Trigger Script .................................................58
Enabling a Trigger..........................................................................................................58
pre-create-trig, pre-keep-trig, pre-promote-trig, server-post-promote-trig, 59
server_admin_trig, 59
server_preop_trig, 59
server_dispatch_post, 60
Notes on Triggers in Multiple-Platform Environments, 60
The Trigger Parameters File...........................................................................................60
Format of the “pre-create-trig” Trigger Parameters File, 61
Overwriting the ‘pre-create-trig’ Trigger Parameters File, 62
Format of the “pre-keep-trig” Trigger Parameters File, 63
Format of the “pre-promote-trig” Trigger Parameters File, 65
Overwriting the ‘pre-promote-trig’ Trigger Parameters File, 66
Format of the “server-post-promote-trig” Trigger Parameters File, 67
Format of the “server_preop_trig” Trigger Parameters File, 68
Controlling Element Type and Exclusive File Locking with a “server_preop_trig” Script, 69
Format of the “server_admin_trig” Trigger Parameters File, 71
Format of the “server_dispatch_post” Trigger Parameters File, 71
Encoding of Element Lists, 72
Encoding of Command Comments, 73
Trigger Script Contents, 73
Trigger Script Exit Status, 73
File Handling by Trigger Scripts, 74
Trigger Script Execution and User Identities.................................................................74
‘Administrative Users’ in Trigger Scripts......................................................................75
AccuRev Administrator’s Guide
v
The Trigger Log File ......................................................................................................75
Integrations Between AccuRev and AccuWork.............................................................75
Change-Package-Level Integration, 75
Enabling the Integration, 76
Triggering the Integration, 77
Transaction-Level Integration, 79
Enabling the Integration, 79
Triggering the Integration, 79
Implementation and Customization of the Transaction-Level Integration, 79
If Both Integrations are Enabled, 80
The ‘maintain’ Utility ..........................................................................83
‘maintain’ Command Reference ....................................................................................83
Backup/Restore of the AccuRev Repository .................................................................86
Removing a Depot from the AccuRev Repository ........................................................87
Before You Begin, 88
Depot Removal Procedure, 88
Reusing a Depot’s Name, 89
AccuRev Administrator’s Guide
vi
The AccuRev Repository
The AccuRev Server program manages a data repository, which provides long-term storage for
your organization’s development data — for example, all versions of all source files. (Among
other things, AccuRev is a special-purpose database management system; the files in the
repository — thousands of them — are part of this database.) By default, the repository resides in
subdirectory storage of the AccuRev installation directory. The repository consists of:
•
site_slice directory: implements a database that contains a user registry, list of depots, list of
workspaces, and other repository-wide information.
•
depots directory (“slice”): contains a set of subdirectories, each storing an individual depot. A
depot subdirectory stores one or both of:
•
A version-controlled directory tree: all the versions of a set of files and directories, along
with a database that keeps track of the versions.
•
A database of AccuWork issue records.
When it starts, the AccuRev Server program determines the location of the site_slice directory by
looking at the SITE_SLICE_LOC setting in configuration file acserver.cnf. This file must reside in
the same directory as the Server program (accurev_server) itself.
Repository Access Permissions
The operating-system user identity of the AccuRev Server process must have full access to all the
files and directories within the data repository. For maximum security, this should be the only user
identity with permission to access the repository. The only exception to this might be an acadmin
AccuRev administrator account, as suggested in Operating-System User Identity of the Server
Process on page 9.
This user identity must also have access to the bin directory where the AccuRev executables are
stored.
READ ME NOW: Assuring the Integrity of the AccuRev Repository
The integrity of the AccuRev data repository is critically important. If information in the
repository is lost or corrupted, your organization's ability to do business may be severely
compromised. The integrity of the data repository relies on the integrity of underlying software
(the file system, including the device drivers for data storage devices) and underlying hardware
(the data storage devices themselves). Certain practices will enhance the safety and reliability of
these underlying facilities. We strongly recommend the following:
•
Use high-quality disk drives and disk controllers.
•
Reduce the impact of a hard-disk failure by using disk mirroring (for example, using a RAID
system) or other fault-tolerant disk subsystems.
AccuRev Administrator’s Guide
1
•
Power the AccuRev server machine with an uninterruptible power supply (UPS), with
automatic shutdown of the server machine if the UPS is running out of power. This reduces
the likelihood of interrupted data transfers to disk.
•
Establish a good data-backup regimen, and make sure your backups are reliable by doing test
restores on a regular basis. (See Backing Up the Repository on page 3.)
This section focuses on one aspect of data integrity: guaranteeing “write” operations to the
repository. The AccuRev Server process does not, itself, perform the act of writing data on the
disk. Like all application programs, it makes a “write” request to the operating system
(Unix/Linux, Windows). In turn, the operating system performs a “write” operation to the disk
itself. (On some larger systems, there may be additional links in this chain of write operations.)
Operating systems and disk subsystems often use special techniques that boost the performance of
write operations, but can compromise data integrity. For example, when an application program
makes a write request, the operating system might:
•
Acknowledge the request immediately — good, because the application program can then
proceed to its next operation.
•
Delay actually sending the data to the disk (“write-behind”) — bad, because a system failure
at this point might result in the data never being stored on the disk.
It is essential that such techniques not be used when the AccuRev Server process sends
information to the disk containing the AccuRev data repository. The Server always follows each
write request with a “synchronize the disk” request. Sometimes, this ensures that data is safely on
disk before the Server proceeds to its next task. For example, this is typically the case if the
repository is stored on a disk that is local to the machine on which the Server is executing.
But in some situations delayed-write techniques may be used even when the AccuRev Server
makes “synchronize the disk” requests. This is typically the case if the repository is located on a
network shared file system. In such situations, the Server's “synchronize the disk” requests are
effectively ignored, so that successful completion of write operations to the AccuRev repository
cannot be guaranteed. (Some disk subsystems implement such a guarantee by having their own
battery backup; buffered data is flushed to disk when the power fails.)
In an attempt to avoid such unsafe situations, the AccuRev Server process attempts to determine
whether the file system where the repository is stored guarantees the successful completion of
write operations. If it decides “no”, the Server refuses to use the repository. This determination is
not foolproof — both “false positives” and “false negatives” are possible.
There's a workaround in the “false negative” case — where the AccuRev Server process decides
that the file system does not guarantee write operations, but you know that writes are, in fact,
guaranteed. In this case, set environment variable AC_FS_WRITE_GUARANTEED to the value 1 in
the environment in which the Server process runs; then restart the Server process.
If you have any question about the safety of your data-storage system, please contact AccuRev
Support Services.
AccuRev Administrator’s Guide
2
Backing Up the Repository
Note: before you start, consult A Word of Caution on Windows Zip Utilities below.
AccuRev supports live backup of the data repository: making copies of the data repository files
while the AccuRev Server is running. The backup command takes just a few seconds to make
checkpoint copies of certain site_slice files in a subdirectory named backup. It also records a
“high water mark” file, valid_sizes_backup, in each depot directory, noting the depot’s current
transaction level. Transactions that are underway at the time the backup command executes are
not included.
During backup command execution, clients can continue to work, but may notice a slight delay:
transactions arriving at the AccuRev Server are queued for execution after completion of the
backup command.
After executing the backup command, you can make a complete copy of the repository (the
storage directory tree), without worrying about synchronization or time-skew.
CAUTION: Do not execute the backup command while you are running the repository-backup
program. This can place incorrect data into the backup copy of the repository.
The append-only nature of AccuRev’s databases makes this simple scheme possible. No matter
when you make the backup copies, you’ll be able to restore the repository to its state at the time
you executed the backup command.
IMPORTANT NOTE: the live-backup scheme relies on the ability to copy files that are currently
in use by the AccuRev Server process. To support this scheme, your backup/restore tool must
be able to copy files that are currently “open” at the operating system level. In addition, the
backup/restore tool should have these features:
•
Ability to preserve files’ timestamps.
•
Ability to preserve files’ ownership and execute permissions.
•
Ability to back up zero-length files. (See Server-Control Files on page 18.)
If you have any doubts or questions, contact AccuRev Support Services.
Thus, the repository backup procedure is:
1. “Checkpoint” the database portion of the repository:
accurev backup mark
2. If your backup utility cannot copy files that are currently open at the operating system level,
stop the accurev_server program. (See Controlling Server Operation on page 17.)
3. Use a backup/restore tool provided with your operating system or a third-party backup/restore
tool to create a backup copy of the entire directory tree below the storage directory. This
backup can be all-at-once or piecemeal; for example, you can back up the site_slice directory
and the individual subdirectories within the depots directory with separate commands.
Note: if your site slice is in a non-standard location (as specified by the SITE_SLICE_LOC
setting in the acserver.cnf file — see Server Configuration File on page 12), or if some
AccuRev Administrator’s Guide
3
depots are in non-standard locations (perhaps moved with the chslice command), then your
job in backing up the entire repository is more complicated than simply to copy the storage
directory.
4. If you stopped the accurev_server program in Step 2, start it again. (See Controlling Server
Operation on page 17.)
Restoring the Repository
If you have backed up the repository according to the directions above, you can easily restore the
repository to the time at which you executed the backup command:
1. Stop the accurev_server program. (See Controlling Server Operation on page 17.)
2. Restore the backup copy of the storage directory, using the backup/restore tool that you used
to create it.
Note: if your site slice is in a non-standard location (as specified by the SITE_SLICE_LOC
setting in the acserver.cnf file — see Server Configuration File on page 12), or if some
depots are in non-standard locations (perhaps moved with the chslice command), then your
job in restoring the backup of the entire repository is more complicated than simply to restore
the storage directory.
3. Go to the site_slice directory.
4. Overwrite database files with the checkpoint files in the backup subdirectory:
cp backup/* .
(Unix/Linux)
copy backup\*.* .
(Windows)
This “rolls back” the database to the time of the backup command — which might be
significantly before the time at which the repository was copied to the backup medium.
5. Reindex the site slice:
maintain reindex
6. Restore and reindex each depot:
maintain restore <depot-name>
maintain reindex <depot-name>
7. Restart the accurev_server program. (See Controlling Server Operation on page 17.)
Note: suppose a particular depot’s files were not backed up for several hours after the backup
command was executed. During that interval, several new versions of file gizmo.c were
created with the keep command. All of those versions will officially be lost when the
repository is restored to its state at the time the backup command was executed. But you can
still retrieve a copy of the last-created lost version of file gizmo.c from the backup medium:
it’s in a container file in the data subdirectory of the depot directory.
AccuRev Administrator’s Guide
4
Archiving Portions of the Repository
The container files that store the contents of individual file versions can be moved to offline
storage, in order to save online storage space for the repository. For details, see Archiving of
Version Container Files on page 27.
Moving a Workspace or Reference Tree
Note: before you start, consult A Word of Caution on Windows Zip Utilities below.
First, make sure that no user or script process is currently using the workspace or reference tree.
Move the physical contents of the workspace tree or reference tree with a backup/restore tool (e.g.
tar, zip, xcopy /s). Then, let AccuRev know about the move:
accurev chws -w <workspace-name> -l <new-location>
accurev chref -r <reftree-name> -l <new-location>
Moving a Depot
Note: before you start, consult A Word of Caution on Windows Zip Utilities below.
First, make sure that no user or script process is currently using the depot. (To guarantee this, you
may wish to stop the AccuRev Server process.) Move the physical contents of the depot with a
backup/restore tool (e.g. tar, zip, xcopy /s). Then, let AccuRev know about the move:
accurev chslice -s <slice-number> -l <new-location>
(Use accurev show depots to determine the slice number of the depot.)
Removing a Depot
A depot can be removed completely from the repository with the maintain rmdepot command.
This operation is irreversible! For details, see Removing a Depot from the AccuRev Repository on
page 87.
A Word of Caution on Windows Zip Utilities
Be careful when using WinZip® or PKZIP® on a Windows machine to perform the tasks
described above: backup/restore of the entire repository, or moving a workspace, reference tree,
or depot. You may want to use tar on a Unix/Linux machine to “pack up” a directory tree, and
then use the Zip utility on a Windows machine to “unpack” it.
•
When moving the entire repository or an individual depot, be sure to disable conversion of
line-terminators during the “unpack” step:
•
In WinZip, make sure the option “TAR file smart CR/LF conversion” is not selected
(Options > Configuration > Miscellaneous).
•
In PKZIP, make sure the “CR/LF conversion” setting is “None -- No conversion”
(Options > Extract).
AccuRev Administrator’s Guide
5
Enabling conversion of line-terminators during the “unpack” step will corrupt the text files in
a depot's file storage area (see File Storage Area below). The AccuRev Server always expects
lines in these text files to be terminated with a single LF character, no matter what kind of
machine the server is running on.
•
Conversely, when moving a workspace or reference tree, you may wish to enable “TAR file
smart CR/LF conversion”. The files in a workspace or reference tree are handled directly by
text-editors, compilers, testing tools, etc. Many Windows text-editors are incapable of
handling text files whose lines are terminated with a single LF character.
•
Zip utilities typically refuse to copy files that are open at the operating system level.
Typically, you can work around this limitation by stopping the accurev_server program, but
this defeats AccuRev’s “live backup” feature.
Storage Layout
Each AccuRev depot is stored in a separate directory tree under the installation area’s storage
directory. The storage directory is a sibling of the executables (“bin”) directory. For example, if
AccuRev is installed at /usr/accurev and depots named moe, larry, and curly are created, the
directory layout would be:
/usr/accurev
bin
storage
site_slice
depots
moe
larry
curly
A depot consists of three parts:
Configuration Files
The mktrig command creates a one-line configuration file that names the script to be
executed when the trigger fires for transactions involving this particular depot. For example,
making a trigger of type “pre-keep-trig” creates a configuration file in the depot named prekeep-trig. (This file might contain the pathname /usr/local/bin/accurev_prekeep.pl.)
Metadata Area
The metadata area stores information about versions, times, and source file storage locations
within the source file storage area of the depot. The metadata is stored in files ending with
.ndb and .ndx.
The metadata area must be physically located on the machine where accurev_server is
running. This guarantees the integrity of physical disk writes. Moving the metadata area to a
remote file system compromises data integrity and is not supported by AccuRev, Inc.
AccuRev Administrator’s Guide
6
File Storage Area
Whenever a user creates a new real version of a file with the keep command, the AccuRev
Server copies the file from the user’s workspace to the depot’s file storage area. The newly
created storage file is permanently associated with the real version-ID in the workspace
stream (e.g. 25/13), and also with subsequently created virtual version-IDs in higher-level
streams (7/4, 3/9, 1/4).
Storage files are located in subdirectory tree data within the depot directory. The files may be
in compressed or uncompressed form. Compressed files may correspond to more than one real
version. Conceptually, storage files are numbered sequentially starting with 1 and going up to
2**64. (That should be enough.) Within the data directory, they’re arranged in a hierarchy for
faster access. For example, storage file #123456 would be stored as data/12/34/56.sto.
Recovery information for the storage file is stored in a like-named .rrf file (e.g.
data/12/34/56.rrf).
You can relocate a depot’s file storage area onto other disk partitions or even onto remote
disks. The cautions about storing data locally do not apply to files in the data directories.
However, exercise extreme caution when relocating storage in this area. Make sure you have
first done a full backup and have shut down the accurev_server program.
AccuRev Administrator’s Guide
7
AccuRev Administrator’s Guide
8
The AccuRev Server
The AccuRev data repository is managed by a single program, the AccuRev Server
(accurev_server). This program must be started prior to running any AccuRev client commands.
The AccuRev Server process should be the only process that directly manipulates the AccuRev
repository. No person should attempt to work directly with the repository, unless it is an
emergency.
Operating-System User Identity of the Server Process
Like all processes, the AccuRev Server process has an operating-system user identity. It should be
a unique user identity, not used by any other program. This helps to ensure that no other user or
process has access to the data repository.
Unix//Linux Identity
We strongly recommend that you do not run the AccuRev Server process run as
root; this would open a large security hole. For example, some user-supplied trigger scripts
run under the operating-system identity of the AccuRev Server. (See Trigger Script Execution
and User Identities on page 74.) Running user-supplied scripts as the root user is a significant
security risk!
CAUTION:
We suggest that you create an operating-system user named acserver, belonging to a group
named acgroup. (Any similar names will do.) Only the AccuRev Server should run as acserver.
For emergency “manual” access to the repository, you can create another user identity — say,
acadmin — and place that user in the same group, acgroup. You can configure Unix/Linux-level
auditing and place other appropriate controls on this account; this leaves the acserver account
(and thus, the AccuRev Server process) unencumbered by such controls.
Configure the AccuRev Server to run with the acserver/acgroup identity by placing these names
in the server configuration file, acserver.cnf. See Controlling the Server’s Operating-System
User Identity on page 12.
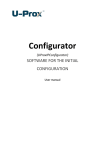
Windows Identity
The AccuRev Server runs as a Windows service. By default, the AccuRev Server runs as the
built-in local user named System. You can use the Services applet to configure the AccuRev
Server to run under another identity (“account”):
AccuRev Administrator’s Guide
9
This user identity must have access to the AccuRev executables (bin) directory and to the data
repository. See Repository Access Permissions on page 1.
AccuRev User Identity of the Server Process
In addition to its user identity at the operating system level, the AccuRev Server process
sometimes needs an AccuRev username (principal-name) identity:
•
When it executes a server-side trigger script that invokes AccuRev client commands, such as
annotate or promote.
•
When it performs a synchronization with the master repository — explicit or implicit replica
sync command. This applies only if the AccuRev Server is managing a replica repository.
If either of these situations applies to the AccuRev Server that you are administering, you must
take steps to establish a valid AccuRev username for the AccuRev Server. The AccuRev
username need not be special or reserved. Just make sure that any security controls — ACL
permissions and/or server_admin_trig script — are configured to allow that particular AccuRev
username to perform the required operations. See AccuRev Security Overview on page 49.
Note: for security reasons, we recommend that the operating-system identity of the AccuRev
Server process (for example, acserver) should not also be an AccuRev username.
The sections below explain how to do this; it depends on which user-authentication method your
AccuRev Server employs: “traditional” or “AccuRev login”. For more on these schemes, see
User Authentication on page 49.
If You’re Using the ‘Traditional’ User-Authentication Scheme
With the “traditional” user-authentication scheme, you can set the value of environment variable
ACCUREV_PRINCIPAL to establish a process’s AccuRev user identity. On a Unix/Linux machine,
set the environment variable in a login script for the designated operating-system identity — for
example, acserver. Here’s a Bourne shell / Bash example:
export ACCUREV_PRINCIPAL=jjp
AccuRev Administrator’s Guide
10
If You’re Using the ‘AccuRev Login’ User-Authentication Scheme
With the “AccuRev login” user-authentication scheme, a session file establishes the AccuRev
user identity of a process. Create a long-lived session file for the AccuRev Server’s operatingsystem identity as follows:
1. Open a command-shell or C-prompt window.
2. Set environment variable ACCUREV_HOME to the home directory of the operating system user
that the AccuRev Server runs as (for example, acserver).
If the AccuRev Server is running as the local System account on a Windows machine, the
home directory is C:\.
3. Create a long-lived session file for the AccuRev username that the AccuRev Server will use:
accurev login -n jjp
Password: ********
Note: if you are creating a session file on a replica server machine, to be used for
communicating with the AccuRev Server process on the master server machine, direct the
login command to the master server machine. For example:
accurev login -n -H bingo_master jjp
Password: ********
This session file will be valid indefinitely, thanks to the –n option.
Starting the AccuRev Server
The following sections describe how to start the AccuRev Server program, either automatically at
operating system bootstrap time, or manually at a command prompt. (You can also perform a
“manual” startup with a Unix/Linux shell script or a Windows batch file.)
Running the Server Automatically at Operating System Startup
Typically, the Server program is started automatically when the operating system boots on the
server machine. On Unix/Linux systems, an “rc” or “init.d” startup script starts the
accurev_server program. The AccuRev installation program does not install the startup script
automatically, however. You must customize and install the sample startup script, named accurev,
located in the extras/unix subdirectory of the AccuRev installation directory. See the README
file in that subdirectory for complete instructions.
On Windows systems, the AccuRev installation program automatically configures the
accurev_server.exe program as a Windows service. Use the standard Services program on the
Windows Control Panel to control the Server program.
Starting the Server Manually
The AccuRev Server must be started manually in the following environments:
AccuRev Administrator’s Guide
11
•
Windows systems: If you’ve changed the startup type of the AccuRev service to “Manual”,
you can start the service from the Services program. Alternatively, run the server_start.bat
script, located in the AccuRev executables (bin) directory.
•
Unix/Linux systems: Start the Server with the acserverctl utility:
<AccuRev-executables-dir>/acserverctl start
The Server will run with your operating-system user identity. (Make sure that the server
configuration file’s USER and GROUP settings are commented out. See Controlling the
Server’s Operating-System User Identity on page 12.)
Server Configuration File
When it starts, the AccuRev Server program reads configuration file acserver.cnf, located in the
AccuRev executables directory. This configuration file is generated during installation, but can be
edited manually thereafter.
Here is a sample acserver.cnf:
MASTER_SERVER = accurev_server_machine.company.com
SITE_SLICE_LOC = /partition0/site_slice
IMPORTANT NOTE:
the white space surrounding the equals sign (=) in configuration files is
mandatory.
The name of the server machine should be the fully-qualified server name, including a domain
name and Internet extension. Using just the server name may work in most situations, but fullyqualified is preferred. Alternatively, you can use the IP address of the server machine.
The SITE_SLICE_LOC setting points to the directory that the Server uses for storing information
about the site such as the user registry, depot information, etc. This directory:
•
Must be owned by the operating-system account that the Server runs as (for example,
acserver).
•
Must be physically located on the server machine. The SITE_SLICE_LOC location must not be
within a remotely mounted file system (Unix/Linux) or within a shared directory (Windows)
on a remote machine.
Controlling the Server’s Operating-System User Identity
Note: the settings described in this section apply to Unix/Linux machines only.
The following specifications determine the user identity and group membership of the operating
system process in which the AccuRev Server runs:
USER = <user-name>
GROUP = <group-name>
When the AccuRev Server starts, it uses the Unix/Linux setUID facility to change its user identity
and group membership. This succeeds if the Server is started by the root user — either
AccuRev Administrator’s Guide
12
automatically at system bootstrap time or manually, using the acserverctl utility. (See Controlling
Server Operation on page 17.)
The setUID fails if the Server is started manually by an ordinary user. In this situation (for
example, you are running a test installation of AccuRev), make sure that these settings are
commented out:
#USER = ...
#GROUP = ...
With these settings commented out, the AccuRev Server runs under the identity of the user who
started it.
Unix/Linux: Setting the Server’s Home Directory
In addition to having a user identity and group membership, the AccuRev Server has an AccuRev
home directory. This directory is used for a variety of purposes — for example, to store a login
session file created by a server_admin_trig trigger script.
By default, the AccuRev home directory is the same as the operating-system home directory, as
indicated by the environment variable HOME. It’s a best practice to override the HOME value by
setting the value of environment variable ACCUREV_HOME. If the AccuRev Server is started
automatically at system startup time by a script in the “rc” or “init.d” directory, the most logical
place to set the AccuRev home directory is in this startup script:
export ACCUREV_HOME=/users/acserver
Controlling Login Session Longevity
A successful user login creates a session that by default expires 4 hours (240 minutes) after the
last AccuRev command is executed. You can change this behavior by creating or modifying this
acserver.cnf setting:
SESSION_TIMEOUT = <number-of-minutes>
On Unix/Linux systems, a user can control the timeout for an individual session by setting
environment variable SESSION_TIMEOUT before logging in. For example, to set a 15-minute
timeout interval for a single session:
export SESSION_TIMEOUT=15
accurev login derek
Non-expiring login sessions
The following setting in acserver.cnf causes user sessions never to expire:
SESSION_TIMEOUT = 0
No matter what the setting, users can create non-expiring sessions with login –n.
AccuRev Administrator’s Guide
13
Controlling Multithreading of the AccuRev Server
The AccuRev Server is a multi-threaded program, architected to support a maximum of 256
concurrent threads. To conserve system resources, you can specify a lower maximum in the
acserver.cnf file:
MAX_THREADS = 25
As it’s running, the AccuRev Server may reduce the maximum even further than the specified
MAX_THREADS level, depending on the available computing resources.
Server Logging
The AccuRev Server maintains a log file, acserver.log, in subdirectory logs of the site_slice
directory. Each log message includes a timestamp, the AccuRev username that invoked a client
command, and the IP address of the client machine.
Logging Levels
Logging information can be preserved at various levels of detail, as specified in acserver.cnf:
# log level 2 or 3 is recommended by AccuRev support team
LOG_LEVEL = 2
Unix/Linux Systems Only: Log File Rotation
On Unix/Linux server machines, log file rotation keeps the log file from growing too large.
Periodically, the AccuRev Server timestamps the current log file and moves it to subdirectory logs
of the site_slice directory. For example, the log file might be renamed acserver-2002-01-23-0447-29.log. The Server then creates a new acserver.log file. The log file is rotated weekly; it is also
rotated whenever the AccuRev Server is restarted.
Controlling Server Log Verbosity
The AccuRev Server maintains a log file, acserver.log, in subdirectory logs of the site_slice
directory. To enable the most verbose logging, add this line to the acserver.cnf file:
LOG_LEVEL = 3
At log level 1, each execution thread produces one line in the log. At log level 2, each execution
thread can produce multiple log lines. Log level 3 essentially combines levels 1 and 2. At higher
log levels, some of the messages detail the work of server subtasks.
Verbose Server Logging
The Server is a multi-threaded program, so it can handle several client commands concurrently. A
typical AccuRev client command causes the AccuRev Server to execute a set of server subtasks.
For each client command, the Server’s “master thread” creates a new “worker thread” to perform
the set of subtasks for that particular command. When the worker thread has performed all the
AccuRev Administrator’s Guide
14
subtasks, it exits. When the LOG_LEVEL is 2 or 3, the log messages indicate many of the details of
server subtask execution.
For example, a single update command can generate a set of log messages like this:
2008/02/07
2008/02/07
2008/02/07
2008/02/07
2008/02/07
2008/02/07
2008/02/07
2008/02/07
2008/02/07
16:24:20
16:24:20
16:24:20
16:24:20
16:24:20
16:24:20
16:24:20
16:24:20
16:24:20
connection 1076 on
1076 mary
1076 mary
1076 mary
1076 mary
1076 mary
1076 mary
1076 mary
connection 1076 on
00000E98 cache 0 started
*update
00000E98 1.2.3.101
cur_wspace
00000E98 1.2.3.101
ws_type
00000E98 1.2.3.101
stream_top
00000E98 1.2.3.101
check_time
00000E98 1.2.3.101
update
00000E98 1.2.3.101
end
00000E98 1.2.3.101
00000E98 success 0.563 0 0 0 1.2.3.101 mary
These messages may or may not appear on consecutive lines of the log file. If multiple client
commands are being executed concurrently by different worker threads, the log messages that the
threads generate will be interleaved in the log file.
Let’s examine each message in the above example:
2008/02/07 16:24:20
connection 1076 on 00000E98 cache 0 started
The first message is generated at the time (2008/02/07 16:24:20) a client request is accepted
by the Server’s master thread. This is connection 1076 between the client and the server).
The master thread creates a new worker thread (worker thread-ID 00000E98) and hands the
request off to it.
2008/02/07 16:24:20
1076 mary
*update
00000E98 1.2.3.101
This message indicates the user who invoked the command (mary), the name of the command,
marked with an asterisk (*update), and the IP address of the client machine (1.2.3.101).
2008/02/07
2008/02/07
2008/02/07
2008/02/07
2008/02/07
2008/02/07
16:24:20
16:24:20
16:24:20
16:24:20
16:24:20
16:24:20
1076
1076
1076
1076
1076
1076
mary
mary
mary
mary
mary
mary
cur_wspace
ws_type
stream_top
check_time
update
end
00000E98
00000E98
00000E98
00000E98
00000E98
00000E98
1.2.3.101
1.2.3.101
1.2.3.101
1.2.3.101
1.2.3.101
1.2.3.101
Each time the worker thread begins a particular subtask, it sends a message to the log. In the
lines shown above, the client command is implemented through server subtasks cur_wspace,
ws_type, stream_top, check_time, update, and end. (The last subtask is always named end.)
Each message also includes the username, thread-ID, and client IP address.
... connection 1076 on 00000E98 success 0.563 0 0 0 1.2.3.101 mary
The last message is generated by the worker thread after it has completed all subtasks and is
about to exit. (If the LOG_LEVEL is 1, this is the only message generated for each client
command.) In addition to the username, thread-ID, and client IP address data also included in
the preceding messages, this message reports summary measures, listed in boldface above:
•
success / failure (success in the example above): The overall result of the attempt to
execute the client command.
AccuRev Administrator’s Guide
15
•
run time (0.563): the total time, in seconds, that the worker thread took to process the
entire client command.
•
last check (0): the time, in seconds, elapsed since last progress update from worker thread.
In a success message, this value is 0. In a failure message, this value is non-zero.
•
time delta (0): the time difference between the clocks on the client and server machines.
•
exit status (0): the exit code for thread: 0 = success, non-zero = error.
Log Messages for Failed Commands
Internal AccuRev Server errors are logged like this:
2006/09/05 15:17:07 -Error- from 0000084C: 5 General internal error file.c:862 - Bad position requested for: wspaces.ndb o: 512 sz: 0
In this example, the database file wspaces.ndb had been accidentally renamed.
Server Watchdog
The AccuRev Server is designed for high reliability, to ensure the integrity of the repository and
its availability to AccuRev users. But even the robust software systems are occasionally
compromised; the AccuRev Server can be brought down by a bad disk sector or an
administrator’s mistaken command.
The reliability of the AccuRev Server is further enhanced by a companion program, termed the
Watchdog, which runs on the same machine. The sole function of the Watchdog is to monitor the
Server and restart it in the event of a failure. The effect of the Watchdog on Server performance is
insignificant.
Note: both the Server and Watchdog show up in the operating system’s process table with the
same name: accurev_server.
Every 10 seconds, the Watchdog sends a simple command to the Server. If the Watchdog detects
that the Server is not responding or is not functioning properly, the Watchdog restarts the Server.
If the Watchdog detects 5 such failures within a 3-minute timespan, it doesn’t restart the Server;
such a situation indicates the need for server reconfiguration or investigation by the AccuRev
support team. (If ACCUREV_WATCHDOG_FAST_FAIL_DISABLE is set in the Watchdog’s
environment, it keeps trying to restart the Server indefinitely.)
For the most part, the Watchdog is “transparent”, making administration simple:
•
The Watchdog process starts automatically when the Server process is started (typically, at
operating system bootstrap time).
•
The administrative commands for stopping the Server process cause both the Watchdog and
Server to stop. These commands have been reworked to terminate the Watchdog directly;
before it exits, the Watchdog terminates the Server.
Tools that control the execution of the Server and Watchdog are in described in section
Controlling Server Operation on page 17.
AccuRev Administrator’s Guide
16
Watchdog Logging
The Watchdog maintains a simple log file, acwatchdog.log, in subdirectory logs of the site_slice
directory. On Unix/Linux server machines, the Watchdog log file is rotated similarly to the Server
log file.
Controlling Server Operation
AccuRev includes facilities for controlling the operation of the AccuRev Server and the new
Watchdog. The user interface varies by platform:
•
Unix/Linux: the acserverctl command-line utility
•
Windows: the standard Services console
Unix/Linux: ‘acserverctl’ Utility
If the AccuRev Server is running on a Unix/Linux machine, you can control its operation with the
acserverctl program. This is a Bourne-shell script, located in the AccuRev bin directory. (It is
based on the control script for the Apache Web server.)
Note: by default, acserverctl assumes that AccuRev is installed at /opt/accurev. If this is not
the case, you must run acserverctl in an environment where ACCUREV_BIN is set to the
pathname of the AccuRev bin directory. For example:
env ACCUREV_BIN=/var/accurev/bin acserverctl ...
acserverctl provides a set of non-interactive commands. The format of each command is:
acserverctl <command-name>
(Omitting <command-name> is equivalent to executing acserverctl help.) The commands are:
start
Start the Server and Watchdog processes.
stop
Tell the Server and Watchdog processes to stop gracefully.
status
Report whether the Server is running or not.
pause
Tell the Server to stop accepting new requests from AccuRev clients.
resume
Tell the Server to start accepting new requests from AccuRev clients again.
AccuRev Administrator’s Guide
17
restart
Tell the Server process to stop gracefully; this allows the Watchdog to restart it. If the
Watchdog is not running, a start or hardrestart is performed.
kill
Forcibly stop the Server and Watchdog processes. This is accomplished by sending a TERM
signal to each process. The script gets the process-IDs from files acserver.pid and
acwatchdog.pid, located in the site_slice directory. These files are written automatically
when the processes are started.
hardrestart
Perform a kill, followed by a start.
help
Display an acserverctl command summary.
The various “tell a process” capabilities are implemented through server-control files. (See
Server-Control Files below.)
Windows: ‘Services’ Console
If the AccuRev Server is running on a Windows machine, you can control its operation from the
standard Windows Services console. The Services console is located in the Windows Control
Panel; in some versions of Windows, it’s in a subdirectory called Administrative Tools.
The context (right-click) menu of the AccuRev service includes these commands:
start
stop
pause
resume
restart
For descriptions of these commands, see Unix/Linux: ‘acserverctl’ Utility above. On Windows,
the restart command brings down both the Server and the Watchdog, by performing a stop
followed by a start.
Server-Control Files
On all platforms, the AccuRev Server and Watchdog processes check, once per second, for the
existence of several “server-control files” in the site_slice directory. The existence of the servercontrol file causes the process to perform a particular action. In most cases, the contents of the file
are irrelevant; a zero-length file will do.
acserver.command.pause
(used by the pause server-control command) Tells the Server to stop accepting new requests
from AccuRev clients. The Server completes transactions that are already in progress and logs
its “paused” status to the log file. Then, it continues to run, but the only thing it does is
AccuRev Administrator’s Guide
18
monitor the acserver.command.pause file. When this server-control file is removed, the
Server resumes normal operation.
This server-control file is not removed when a new Server process starts up. If the file exists,
the Server starts up in the paused state.
acserver.command.shutdown
(used by the stop and restart server-control commands) Tells the Server to “finish up
quickly” and exit. The Server immediately stops accepting new requests from AccuRev
clients. It continues to work on transactions that are already in progress, but it aborts any
transactions that are not completed within 10 seconds. Then, the Server exits.
If the Watchdog is running, it detects the Server’s shutdown and starts up a new Server
immediately. Thus, this server-control file typically causes a Server restart. In any event, this
file is automatically removed whenever a new Server process starts up.
If 10 seconds is not the appropriate interval for “finishing up quickly”, place another integer
(such as 120) in the acserver.command.shutdown file. The Server exits when there are no
more transactions to work on, or when the timeout interval has passed, whichever comes first.
acwatchdog.command.shutdown
(used by the stop server-control command) Tells the Watchdog to exit cleanly. When the
Server detects that the Watchdog has exited, it exits also, just as if it had found an
acserver.command.shutdown file (see above). In this case, however, there is no longer a
Watchdog process, so no restart of the Server takes place.
This server-control file is automatically removed when a new Server process starts up.
acserver.command.taskkill
Use this capability only as a “last-resort”. Typically, it’s preferable to restart the entire
AccuRev Server process (which allows in-progress tasks to complete), rather than terminating
just one of its worker threads.
To terminate a particular worker thread:
•
Go to the site_slice directory.
•
Determine the ID number of the worker thread by examining the thread-status table
(Tools > Server Tasks command).
•
Place the thread’s ID number (e.g. 42) in the flag file:
echo 42 > tempfile
mv tempfile acserver.command.taskkill
(Windows: use ren command)
Using the mv (or move) command instead of the echo command to create the taskkill file
prevents a race condition that might cause the server to see taskkill as an empty file.
Important note: after terminating a thread, restart the AccuRev Server as soon as possible.
This minimizes the likelihood that terminating the thread will cause a memory resource leak
in the Server process, impairing overall system performance.
AccuRev Administrator’s Guide
19
Open Filehandle Limits and the AccuRev Server
The AccuRev Server is designed to handle multiple client commands concurrently: any number
of requests that “read” data, along with one command that “writes” data. Accomplishing such
concurrency typically requires that the AccuRev Server have many files open at the same time.
Each operating system imposes limits on how many files can be open simultaneously. There may
be an “open file descriptor” limit for each user process, or an overall limit for all user processes,
or both. If the AccuRev Server hits the open file descriptor limit, additional client requests will be
queued until file descriptors become available. (No client command is cancelled, and no data is
lost. Hitting the open file descriptor limit just slows AccuRev Server performance.)
The table below indicates the default open file descriptor limits for the various AccuRevsupported operating systems. Following the table are instructions for increasing these limits.
Operating System
Default Limit on Open
Filehandles
Command to Change Limit on Open Filehandles
Windows 2000,
Windows 2003,
Windows XP
2048 per system
none
Solaris 7
64 per process
no command; must reconfigure Unix kernel (see below)
Linux (Red Hat Fedora 3)
about 3500 per system
/sbin/sysctl –w fs.file-max=10000
Linux (Power PC 2.4)
1024 per process
AIX 5.1
2000 per process
HP-UX 11
360 per process
Tru64 5.1
4096 per process
IRIX 6.2
1024 per process
SCO UnixWare 7.1.1, 7.1.4 60 per process
no command; must rebuild Unix kernel (see below)
no command; must rebuild Unix kernel (see below)
Note: If you are performing a pre-purchase evaluation of AccuRev in an environment with a
limited number of users and a limited amount of data, there is no need to make any changes.
The default limits will be more than adequate.
Changing the Per-Process Open File Descriptor Limit
The procedure for increasing a process’s maximum number of open files varies from operating
system to operating system.
Note: in all cases, be sure to remove file acserver.handle.limit, located in the AccuRev
site_slice directory, before restarting the AccuRev Server or rebooting the operating system.
This file caches the current value of the open-files limit.
Linux
You must be the root user to perform the following procedure.
1. Change the overall limit on the number of open file descriptors each process can have (e.g. to
10,000):
> /sbin/sysctl –w fs.file-max=10000
AccuRev Administrator’s Guide
20
The number you specify is stored in file /proc/sys/fs/file-max.
2. Add this line to file /etc/pam.d/login:
session
required
/lib/security/pam_limits.so
3. Change the capabilities of the Bash shell command ulimit, by creating or editing the “nofile”
(number of open files) lines in file /etc/security/limits.conf. Example:
*
*
soft
hard
nofile
nofile
1024
10000
These lines specify that:
•
By default, a Bash shell (and its subprocesses) can have as many as 1024 open file
descriptors.
•
A Bash shell can execute the command ulimit –n number, with 65535 as the maximum
value of number. This enables that particular shell (and its subprocesses) to have up to
number open files. (The person executing the ulimit command doesn’t need to know what
the “hard limit” specified in /etc/security/limits.conf is — he can just enter the command
as ulimit –n unlimited to get the maximum value.)
4. Test your change, by entering a ulimit command in a Bash shell, setting the limit somewhere
in between the soft and hard specifications you made in Step 3. For example:
> /bin/bash
$ ulimit -n
1024
$ ulimit -n 5000
$ ulimit -n
5000
5. Restart the AccuRev Server process from a Bash shell:
> <AccuRev-bin-directory>/acserverctl stop(stop the AccuRev Server)
> /bin/bash(start a Bash shell)
$ <AccuRev-bin-directory>/acserverctl start(restart the AccuRev Server)
Solaris
You must be the root user to perform the following procedure.
1. Change the overall limit on the number of open file descriptors each process can have (e.g. to
5,000), by adding or changing this line in file /etc/system:
set rlim_fd_max=5000
2. Reboot the operating system.
AccuRev Administrator’s Guide
21
HP-UX
You must be the root user to perform the following procedure.
1. Enter this command to start the System Administration Manager utility:
> sam
2. Select Kernel Configuration, then Configurable Parameters.
3. Select the maxusers parameter.
4. Increase the value of this parameter, for example to 128.
5. Invoke the Actions > Process New Kernel command, to create a new HP-UX kernel.
6. Exit the System Administration Manager utility.
7. Reboot the operating system.
AccuRev Administrator’s Guide
22
System Clock Synchronization
Time plays a fundamentally important role in AccuRev’s architecture and in its day-to-day
operations. Some examples: each transaction is logged in as depot database at a particular time; a
snapshot reconstructs the state of a stream at an arbitrary time; the stat command and the
AccuRev GUI use timestamps to optimize the lookup of modified files within a workspace.
AccuRev is a networked product: programs execute on one server machine and (typically)
multiple client machines. In a perfect world, the system clocks on all these machines would
always be perfectly synchronized. This would ensure that data items on the server machine (say,
versions created by keep commands) and corresponding data items on a client machine (the files
that were kept) have timestamps that are consistent with each other.
Software systems do exist that keep all the machines in a network synchronized to within
milliseconds. If your organization has deployed such a system, then you don’t need to read any
further in this chapter!
Most software development organizations don’t have — and don’t need — synchronization at the
millisecond level. AccuRev defines a 5-second tolerance as “good enough for software
configuration management”. This chapter describes AccuRev’s own facilities for detecting and
fixing system-clock discrepancies, along with other facilities commonly available on Windows
and Unix/Linux systems.
Detecting System Clock Discrepancies — Timewarp
A timewarp (clock skew) occurs when the discrepancy between a client machine’s system clock
and the server machine’s system clock exceeds the allowable tolerance of 5 seconds. Timewarp
problems typically occur during initial system setup and during time zone adjustments. For
example, the change from Eastern Standard Time to Eastern Daylight Time can cause a timewarp
on a machine that is not configured correctly to handle the time zone adjustment.
For most AccuRev operations, a timewarp check is performed when the client contacts the server.
Fixing System Clock Discrepancies
The sections below describe various schemes for dealing with discrepancies between system
clocks in the AccuRev client-server environment. We begin with the most desirable scheme:
automatic, smooth clock adjustment. We end with the least desirable scheme: manual, sudden
clock adjustment.
Automatic, Gradual Convergence of System Clocks
An optimal scheme for synchronizing machines’ system clocks has these attributes:
•
All machines in the network participate in the scheme, so the entire network is kept
synchronized.
•
Each machine’s system clock is adjusted automatically (perhaps requiring some initial
installation or configuration task).
AccuRev Administrator’s Guide
23
•
System clock adjustments can be made “smoothly”: for example, a discrepancy of 10 seconds
can be gradually eliminated over the span of a few minutes by a minor speed-up or slow-down
of a machine’s clock. Presumably, such adjustments are imperceptible to human users and
won’t cause any “surprises” in time-sensitive applications.
Synchronization systems fitting this “gradual convergence” description are typically based on the
standard Network Time Protocol (NTP) or its variant, the Simple Network Time Protocol
(SNTP). One example, available on recent versions of Windows, is the Windows Time service
(http://support.microsoft.com/default.aspx?scid=kb;en-us;307897&sd=tech). This provides a
complete solution if all machines in your network are running Windows.
For a more general, multi-platform solution, see http://www.ntp.org. AccuRev has gotten good
results from one particular SNTP client, Automachron (http://www.oneguycoding.com).
AccuRev-Related Guidelines
Here are guidelines for using a “smooth convergence” system in an AccuRev network:
•
Configure the system so that a single machine in the network acts as the “time source” that
other machines synchronize with.
•
Ideally, have all AccuRev machines participate in the synchronization system.
•
If this isn’t possible, make sure that the AccuRev server machine participates in the
synchronization system. (AccuRev itself will take care of synchronizing its client machines to
the server machine; see the next section.)
The purpose of these guidelines is to ensure that no AccuRev client machine gets into a situation
of synchronizing itself with two different, and possibly conflicting, machines: the AccuRev server
machine and the (S)NTP “time source” machine.
AccuRev’s Built-in Synchronization Scheme
The system clocks on all the machines running AccuRev client or server software are
automatically synchronized by AccuRev. In contrast with the “smooth” clock-adjustment scheme
used by sophisticated (S)NTP-based systems, AccuRev uses a simpler “sudden adjustment”
scheme. For example, a 10-second discrepancy is eliminated all at once, not gradually. Moreover,
adjustments are not made on a regularly scheduled basis, but only when an AccuRev client
program contacts the server program.
Note: you can disable auto-synchronization by having the AccuRev Server process run with
environment variable AC_SYNCTIME set to 0. There is no way to include non-AccuRev
machines in this scheme.
For many networks, AccuRev’s simpler scheme is altogether satisfactory. But some organizations
may be running networked applications that don’t react gracefully to the “surprise” of a
machine’s system clock suddenly changing by a significant number of seconds. Such
organizations may not be satisfied with AccuRev’s simpler scheme.
AccuRev Administrator’s Guide
24
AccuRev Synchronization Algorithm
Each time a client program contacts the server program, AccuRev compares the system clocks on
the two machines:
•
If the discrepancy is less than 5 seconds, no clock-related change occurs. AccuRev proceeds
to execute the user’s command.
•
If the discrepancy is between 5 and 60 seconds:
•
AccuRev automatically tries to change the client machine’s system clock to match the
server machine’s. (On a Unix/Linux client machine, this succeeds only if the client
program is running as the root user, which is not advisable in most situations.)
•
For certain commands, AccuRev displays a warning message ...
client_time:
server_time:
timewarp:
...
2006/07/27 14:30:02 Eastern Standard Time (1154025002)
2006/07/27 14:24:29 Eastern Standard Time (1154024669)
333 seconds
... then exits without executing the user’s command. The following commands fall into
this category:
update
co (with –n option)
keep (with –n or –m option)
promote (with –p option)
stat or diff (with –n or –m or –p option)
mkstream or chstream or hist (with –t option and an absolute time
specification; for example, –t 2006/07/12 00:00:00)
•
•
For commands other than the ones listed above, AccuRev proceeds with command
execution.
If the discrepancy exceeds 60 seconds, AccuRev displays a warning message, listing both
machines’ system times and the size of the timewarp (as shown above), then exits without
executing the user’s command.
Manual Synchronization Tools
The least desirable scheme for keeping system clocks synchronized is to occasionally type clockadjustment commands manually on one or more of the machines. This method can be improved a
bit by using scripts and scheduling tools such as cron (Unix/Linux) and at (Windows).
Only the root user (Unix/Linux) or a user with administrator privileges (Windows) can set the
system clock manually.
AccuRev Administrator’s Guide
25
Setting the System Clock on the AccuRev Server Machine
On a Unix/Linux machine, the date command changes the system clock. What time should you
set the clock to? In many cases, you can use rsh or telnet to determine the time on another “time
source” machine.
On a Windows machine, use the net time command to synchronize with a specified “time source”
machine, or with the domain controller machine. To set the clock to a particular time, use the date
command in a Command Prompt window, or double-click the digital clock in the Windows task
bar (lower-right corner of the screen).
Setting the System Clock on AccuRev Client Machines
The accurev synctime command changes a client machine’s system clock to match the clock on
the server machine. The GUI command is Tools > Synchronize Time. These commands should
not be necessary very often, given the scheme described in section AccuRev’s Built-in
Synchronization Scheme above.
AccuRev Administrator’s Guide
26
Archiving of Version Container Files
Users execute a keep command to preserve the current contents of a version-controlled file (“file
element”) in an AccuRev depot. Similarly, users execute an add command to place a file under
version control. The add and keep commands:
•
copy the current contents of the file to a container file, located in the depot’s file storage area.
•
create an associated version object in the depot’s database.
In accordance with the TimeSafe principle, the version object can never be deleted from the
database or modified in any way. The corresponding container file is always accounted for, and
can be in either of these states:
•
normal — the container file is located in the depot’s file storage area (the data subdirectory
of the depot directory). AccuRev commands, such as update, cat, and diff, can access the
contents of the version.
•
archived — the container file has been moved to a gateway area outside the depot’s file
storage area. AccuRev commands cannot access the contents of an archived version. After
container files have been moved to the gateway area, an administrator can use standard
operating system or third-party tools to transfer the container files to off-line storage: tape,
CD-ROM, removable disk drive, Web-accessible storage, etc.
The AccuRev CLI commands archive and unarchive shift container files back and forth between
the normal and archived states. Before using unarchive, the administrator would transfer the
AccuRev Administrator’s Guide
27
appropriate container files from off-line storage back to the gateway area. Then, invoking
unarchive moves the container files back into the depot’s data directory.
The ‘archive’ Command
The command accurev archive processes one or more versions of file elements, shifting the
versions’ container files from normal status to archived status. The command has this format:
accurev
[ -a
[ -s
[ -c
archive [ -E <element-type(s)> ] [ -i ]
| -I <stream-category(s)> ]
<stream> ] [ -t <transaction-range> ]
<comment> ] [ -R ] [ -Fx ] { -l <list-file> | <element-list> }
Determining Which Versions to Archive
archive determines the set of versions to archive as follows:
•
Start with a particular set of file elements, which you specify as command-line arguments in
the <element-list>, or in a list-file (plain-text or XML format). You can include directories in
this list; in this case, use the –R option to include the recursive contents of those directories.
•
Optionally, take the subset of versions whose element type matches the specification made
with –E. (Note that different versions of an element can have different element types.)
•
Optionally, take the subset of versions that were created in a particular streams (–s, for
example, your current workspace stream). You can also archive versions from all streams in
the depot (–a).
•
Optionally, take the subset of versions created in a specific transaction, or range of
transactions:
–t <number>
–t <number>–<number>
•
single transaction
range of transactions
In addition to the multiple subsettings of versions described above, you can use the –I option
to include versions in the set, based on where in the stream hierarchy they are referenced. For
example, you can include versions that were not originally included in the set because they are
referenced by one or more snapshots.
If you don’t use the –a or –I option, archive refuses to archive any version that is currently visible
in any stream or snapshot. Specified versions that are already archived are silently ignored.
Dry Run Capability
Using the –i option (in addition to the other options described above) generates an XML-format
listing of the desired versions, but does not perform any actual archiving work. It is highly
recommended that you do this “dry run” before actually archiving any versions, to avoid any
surprises.
AccuRev Administrator’s Guide
28
Archiving the Versions
After determining which versions to process, the archive command moves a version’s container
file from a “normal” location under the data directory:
.../storage/depots/gizmo/data/25/07.sto
... to a corresponding “archived” location in the archive_gateway/out area:
.../storage/depots/gizmo/archive_gateway/out/data/25/07.sto
archive also marks the version as “archived” in the depot database.
Subsequent attempts by AccuRev commands to retrieve the contents of the archived version will
fail.
The changes made by this command are recorded in the depot database as a transaction of type
archive. You can use the –c option to specify a comment string to be stored in this transaction.
You can search for particular comment strings when using the hist command to locate previous
archive transactions. See Using ‘hist’ to Research Previous ‘archive’ Commands on page 30.
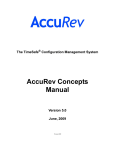
The ‘reclaim’ Command
The archive command merely moves container files from one location (the depot’s data area) to
another location (the depot’s archive_gateway area). To reduce the amount of disk space
consumed by the archived versions, you must:
AccuRev Administrator’s Guide
29
1. Copy the files from the
archive_gateway directory tree to
off-line storage. You can use
operating system commands (copy,
xcopy, cp, tar) and/or third-party
data-backup utilities to accomplish
this.
Be sure to use a tool that preserves
the source data’s directory hierarchy
in the copied data.
WARNING! AccuRev has no way of tracking which tool you use for this purpose, or
what off-line storage medium you copy the files to. It’s up to you to maintain good records
of these activities!
2. Delete the files from the archive_gateway
directory tree, using the reclaim
command:
accurev reclaim [ -p <depot> ]
-t <archive-transaction>
You must specify a single transaction of
type archive, created by previous archive
command(s).
Attempts to Access Archived Versions
The archive command affects depot storage only. It has no immediate effect on any workspace.
But you might subsequently enter an AccuRev command that attempts to access a version that has
been archived. For example, if version gizmo_int/8 of file floor_layout.gif has been archived,
then this command fails:
accurev cat -v gizmo_int/8 floor_layout.gif > old_layout.gif
In such cases, a message is sent to stderr and the command’s exit status is 1.
Using ‘hist’ to Research Previous ‘archive’ Commands
Each depot’s database contains a complete record of all version-archiving activity for that depot.
Execution of the archive command is recorded as a transaction of kind archive. You can use the
hist command to locate all such transactions:
accurev hist -a -k archive
You can also select just those archive transactions that were created with a particular comment
string:
accurev hist -a -k archive -c "stadium images"
AccuRev Administrator’s Guide
30
In a reclaim command, you must indicate the storage space to be reclaimed by specifying the
number of an archive transaction.
Restoring Archived Versions — The ‘unarchive’ Command
After you have archive’d some versions and reclaim’ed the disk space:
•
The versions’ container files are no longer in the depot’s data area.
•
Copies of the container files are no longer in the depot’s archive_gateway/out area (since
you’ve transferred them to off-line storage).
If you decide you need to restore some or all of the archived versions, you must first copy the
container files from off-line storage back to the archive_gateway area. You must place the files
under archive_gateway/in, at the same relative pathname as they were originally placed under
archive_gateway/out. For example, if the archive command places a container file at:
.../storage/depots/gizmo/archive_gateway/out/data/25/07.sto
... you must restore the file from off-line storage to this pathname:
.../storage/depots/gizmo/archive_gateway/in/data/25/07.sto
After placing all the container files in the archive_gateway/in area, you can execute the
unarchive command. This command has the same format as archive. That is, you specify the
versions to be restored in exactly the same way as you originally archived them (with one
exception — see below).
For example, to archive all non-active versions of GIF image files in stream gizmo_maint_4.3:
accurev archive -s gizmo_maint_4.3 *.gif
Later, you can restore all those versions:
accurev unarchive -s gizmo_maint_4.3 *.gif
Exception: you can use the –a option to unarchive all the versions currently in the
archive_gateway/in area. In this case, the unarchive command syntax doesn’t mimic the
archive command syntax exactly:
accurev unarchive -s gizmo_maint_4.3 -a
This set of restored versions might have been archived in a single step or in multiple steps.
AccuRev Administrator’s Guide
31
AccuRev Administrator’s Guide
32
Replication of the AccuRev Repository
This chapter describes how to set up and use AccuRev’s repository replication feature. One server
machine stores the “master” copy of the AccuRev data repository; any number of additional
server machines can store “replicas” of the repository. Each replica contains some or all of the
repository’s depots. Users can send commands to the AccuRev Server software running on any of
these machines.
Note: use of the repository replication feature requires purchase of the AccuReplica product
from AccuRev, Inc.
Master and Replica
One host in the network acts as the AccuRev server machine: it runs the AccuRev Server process
and contains the AccuRev repository in its local disk storage. In a replication scenario, this
original host (or more precisely, this instance of the AccuRev Server process) is termed the master
server.
One or more additional hosts in the network can act as replica servers. Each such host runs its own
instance of the AccuRev Server process; likewise, each such host has its own copy of the
AccuRev repository. The diagram below shows the servers in a replication scenario, along with
various client machines.
We use the terms master repository and replica repository to distinguish the multiple repositories
in a replication scenario. The master repository is always complete and up-to-date; all transactions
(operations that change the repository) are handled by the master server and are logged in the
master repository.
By contrast, a replica repository can become out of date during day-to-day usage: it can be
missing recent transactions initiated by clients using other replica servers or the master server.
You can issue a simple synchronization command to download such missing transactions from
the master repository to the replica repository. This makes the replica repository database into an
exact copy (temporarily, at least) of the master repository database. Synchronization also occurs
automatically whenever a transaction is initiated by a client using that replica server.
A replica repository can contain a selected subset of the depots in the master repository. If the
master repository contains 10 depots, one replica repository might be configured to contain 4 of
the depots, another replica repository might be configured to contain 7 of them, and a third replica
repository might be configured to contain all 10 depots.
For more details on day-to-day operations involving master and replica repositories, see the
sections starting with Using a Replica Server on page 39. First, we address licensing issues and
describe the replica setup process.
AccuRev Administrator’s Guide
33
Before Replication
server
client
client
client
repository
After Replication
master
server
client
client
client
master
repository
replica
repository
replica
server
replica
server
replica
repository
clients
clients
AccuRev Administrator’s Guide
34
AccuRev Licensing in a Replication Environment
A standard AccuRev license (Professional Edition or Enterprise Edition) enables your
organization to maintain a single data repository, managed by a single AccuRev Server process
running on a particular machine. This license also enables a certain number of users to access the
repository with AccuRev client software.
The most obvious (and easiest) way to add replication to this environment is to have the existing
server machine become the master server. Let’s say that you want to replicate the repository at
two remote sites — one with 10 client users, the other with 25 client users. In this case, your
organization needs to purchase:
•
two copies of AccuRev Replication Server
•
ten individual Remote User Licenses
•
one Remote Site License (for the 25 users at the second remote site)
Installation Procedure: Assumptions
The procedures in the following sections make the following assumptions about your AccuRev
installation:
•
The original AccuRev server machine is named masthost. If one or more replicas have
already been created, then this machine is already the master server.
•
The machine to be made into a replica server is named replhost.
Restriction: masthost and replhost must both have “big-endian” hardware architectures, or must
both be “little-endian”. Little-endian architectures include Intel and AMD, running either
Windows or Linux software. Big-endian architectures include Sparc (Sun) and PA-RISC
(Hewlett-Packard), and PowerPC (AIX).
The same host can act both as the master server and as the replica server (or even as multiple
replica servers). This can be convenient for performing testing of new releases, validating your
organization’s development procedures, etc. Before proceeding to the next section, read the notes
in Using the Same Host as Both Master Server and Replica Server on page 38.
Setting Up the Master Server
The change described in this section needs to be made just once — when transitioning from a
non-replicated setup to a replicated setup.
1. Stop the AccuRev Server process on masthost.
2. Edit the acserver.cnf file, which is located in the AccuRev bin directory. Add the following
line:
REPLICATION_ENABLED = true
enabling replication poses a potential security risk. Before proceeding, be sure to
read Synchronization Security on page 42.
CAUTION:
AccuRev Administrator’s Guide
35
3. Note the MASTER_SERVER and PORT settings in the acserver.cnf file. You’ll need these
settings in Step 9 below.
4. Restart the AccuRev Server process on masthost.
5. Create an AccuRev username that will be used as the user identity for all client requests from
the new replica server. We’ll use repl43svr as the username.
Setting Up the Replica Server
The following sections detail the steps for setting up replhost as an AccuRev replica server, using
the repository data from masthost.
Install AccuRev
6. Obtain from AccuRev Support Services a keys.txt file containing a license to run the
AccuRev Server software on replhost. Most specifications, including the number of users,
should match the license on masthost. The host name will differ — and the port number
might differ, too.
7. Install the AccuRev software on replhost. During installation, choose both the Custom and
Full options. If you’ve already installed AccuRev on this machine, choose a new location for
the installation directory. The installation wizard will prompt you to specify the storage
location for the new, local repository on replhost (“Customize: Choose a Folder for AccuRev
Server Data Storage”).
Revise the Server Configuration File
8. Stop the AccuRev Server process on replhost.
9. Edit the acserver.cnf file, which is located in the AccuRev bin directory.
•
Change the keyword MASTER_SERVER to LOCAL_SERVER, and change the keyword PORT
to LOCAL_PORT. But don’t change the value of either setting.
•
Add new MASTER_SERVER and PORT settings, using the values of these settings on
masthost. (These are the settings you noted in Step 3.)
After these edits, the four lines might look like this:
MASTER_SERVER = masthost
PORT = 5050
...
LOCAL_SERVER = replhost
LOCAL_PORT = 5050
Note: there is no relationship between the LOCAL_PORT and PORT numbers. They can be the
same or different.
AccuRev Administrator’s Guide
36
Establish an AccuRev User Identity for the AccuRev Server Process
These steps ensure that the replhost operating system process in which the AccuRev Server will
run has an AccuRev username (“principal-name”) identity with enough rights to access all the
files in the masthost repository. AccuRev ACL permissions control access to depots and streams
for specified AccuRev users and groups.
Be sure to use the same username that was created on masthost in Step 5 above — in our
example, the name repl43svr.
10. Create an operating-system user named repl43svr. Then log in as repl43svr.
11. If replhost is running ...
•
... Unix/Linux: by editing the server configuration file, configure repl43svr to be the
operating-system user identity of the AccuRev Server on replhost. See Operating-System
User Identity of the Server Process on page 9.
•
... Windows: the AccuRev Server runs as a Windows service; you must reconfigure it to
run as repl43svr, instead of as LocalSystem. In the Control Panel’s Services program:
open the Properties window for the AccuRev service, go to the Log On tab, select “This
account”, and enter repl43svr and its Windows password.
Next, you’ll establish repl43svr’s AccuRev-level credentials.
12. If you’re using the “traditional” user-authentication scheme.
•
Make sure that repl43svr’s AccuRev-level password is set. (This password is independent
of the user’s operating-system password.) The AccuRev-level password is stored in file
authn, in the .accurev subdirectory of repl43svr’s home directory.
If you’re using the “AccuRev login” user-authentication scheme.
•
Open a command-shell or C-prompt window.
•
Set environment variable ACCUREV_HOME to repl43svr’s home directory.
•
Create a “permanent” session file for user repl43svr, for accessing the AccuRev Server on
masthost from the client machine replhost:
accurev login -n -H masthost repl43svr
Password: ********
The –n option makes this session file valid indefinitely.
Synchronize the Site Slice
13. Start the AccuRev Server process on replhost.
14. Run this client command on replhost:
accurev replica sync
AccuRev Administrator’s Guide
37
This command copies data from masthost’s site slice to replhost’s site slice. In particular, it
makes the AccuRev Server on replhost aware of all the depots in the master repository on
masthost.
15. Create a standard session file for user repl43svr, for accessing the AccuRev Server on
replhost:
accurev login repl43svr
Password: ********
Note: there are now two session files for user repl43svr, one for accessing masthost and the
other for accessing replhost.
Configure the Replica Server to Include the Desired Depots
The AccuRev repository on replhost now has an up-to-date site slice, but the repository doesn’t
yet contain detailed data on any depots.
16. List all the depots in the master repository, by executing this command on replhost:
accurev show -fix depots
In the XML-format output, the depots that exist in the master repository, but are not replicated
on replhost, are listed with this attribute:
ReplStatus = "missing"
17. For each depot that is to be replicated on replhost, execute a mkreplica command on
replhost. For example, if depots named widget, gadget, and cust_support are to be
replicated:
> accurev mkreplica -p widget
Created replica of depot ’widget’.
Synchronizing ...
Done.
> accurev mkreplica -p gadget
...
> accurev mkreplica -p cust_support
...
Using the Same Host as Both Master Server and Replica Server
In a production environment, it doesn’t make sense to have the same machine act as both the
master server and a replica server. But it does make sense to use a single machine to test new
software or work processes. You can use the same machine as both masthost and replhost in the
procedures described in sections Setting Up the Master Server on page 35 and Setting Up the
Replica Server on page 36. If you do so, keep these points in mind:
•
There must be two separate AccuRev installations on the machine.
AccuRev Administrator’s Guide
38
•
Each installation has its own acserver.cnf configuration file, located in the AccuRev bin
directory. The SITE_SLICE_LOC setting must be different in each acserver.cnf file. Similarly,
the DEPOTS_DEFAULT setting must be different.
•
There is no way to associate the same depot slice with multiple repositories. A depot slice can
be located outside the area specified by the DEPOTS_DEFAULT setting — with mkdepot –l on
the master server; with mkreplica –l on a replica server; or with chslice on either kind of
server. But don’t use these techniques to make multiple instances of the AccuRev Server think
that they are managing the same slice location.
Setting Up a Client Machine to Use a Replica Server
A machine on which the AccuRev client software is installed can use any server — either a
replica server or the master server. As always, the SERVERS setting in the client configuration file
— acclient.cnf in the AccuRev bin directory — specifies which AccuRev Server process is to be
sent client command requests. Examples:
SERVERS = replhost:5050
(use replica server)
SERVERS = masthost:5050
(use master server)
You can switch a client back and forth among multiple replica servers (and possibly the master
server, too). It’s as simple as editing the client’s acclient.cnf file.
Using a Replica Server
When your client machine is set up to use a replica server, you can issue all AccuRev commands
in the usual way. In general:
•
Configuration management commands that read data from the repository — such as files,
diff, and cat — use the replica repository.
•
Configuration management commands that write data to the repository — such as keep,
promote, and merge — use the master repository. After the master repository has been
modified, the local replica repository is automatically brought up to date. For details, see
Synchronizing a Replica Manually on page 41, which describes how you can bring the local
replica repository up to date when you are not writing data to the repository.
•
All AccuWork issue management operations are handled by the master server. Thus,
replication does not improve AccuWork performance.
The Update Command
The update operation works as follows when you execute it on a client that uses a replica server:
1. An implicit replica sync command is performed, copying database transactions from the
master repository to the replica repository. This brings the replica database completely up to
date.
AccuRev Administrator’s Guide
39
2. A stat operation is performed on the replica server, to determine the state of the workspace
stream and its backing stream.
3. Data files representing new versions of elements are copied from the file storage area in the
master repository to the file storage area in the replica repository.
4. Data files are copied from the replica repository to your workspace tree. In addition to the files
retrieved from the master repository in the preceding step, this can include files that have
already been “downloaded” to the replica repository through other users’ commands.
5. On both the replica server and the master server, the transaction level of the workspace is set
to the most recent transaction (or to the transaction specified with update –t).
Triggers and Replication
A user’s invocation of an AccuRev command on a client machine may cause a client-side trigger
and/or a server-side trigger to fire. A client-side trigger fires on the user’s client machine — no
ambiguity there. But in a replication environment, there are two AccuRev Servers to consider: the
one on the replica server machine and the one on the master server machine. Where does a serverside trigger fire?
•
An rmreplica command fires a server_admin_trig trigger on the replica server. The
AccuRev user identity (“principal-name”) of the user who invoked the command is passed to
the trigger script.
•
An replica sync command fires a server_admin_trig trigger on the master server. The
AccuRev user identity of the AccuRev Server process on the replica server is passed to the
trigger script — not the identity of the user who invoked the command. The command-name
is passed to the trigger script as replica_sync.
•
For all other commands that write to the repository, a server-side trigger fires on the master
server. The AccuRev user identity (“principal-name”) of the user who invoked the command
is passed to the trigger script.
Creating New Depots
New depots can be created only in the master repository, not in a replica repository. If a client
using a replica repository issues a mkdepot command, an error occurs:
Cannot create a new depot on the replica server
After creating a new depot in the master repository, you can include it in a replica repository with
this sequence of commands, issued on a client that uses the replica server:
accurev replica sync
accurev mkreplica -p <depot-name>
AccuRev Administrator’s Guide
40
Adding and Removing Depots from a Replica Repository
After you have set up a replica repository, you can use the commands mkreplica and rmreplica
to change which depots are included in the replica repository. These commands are described in
the AccuRev CLI User’s Guide.
Synchronizing a Replica Manually
During the course of development, your local replica repository typically becomes out-of-date
with respect to the master repository. This occurs when other users send commands to other
replica servers or directly to the master server. In both such cases, new transactions are entered in
the master repository, but are not entered in the your local replica repository.
At any time, you can enter this CLI command to bring your local replica repository up to date:
accurev replica sync
This transfers data from the master repository site slice to the replica repository site slice. It also
transfers database transactions from the master repository to the replica repository — but only for
the depots that are included in the local replica. It does not transfer the corresponding storage files
for keep transactions. See On-Demand Downloading of a Version’s Storage File on page 41.
A replica sync command is performed automatically on the local replica after each operation that
is initiated by a client of the local replica, and that makes a change to the repository. See Using a
Replica Server on page 39.
Note: you never need to synchronize directly with other replicas; synchronizing with the
master is sufficient to bring your replica up to date.
On-Demand Downloading of a Version’s Storage File
As a performance optimization, AccuRev copies database transactions only — not storage files
that hold the contents of keep versions — when it synchronizes the master repository with a
replica repository ...
•
... during a replica sync command.
•
... during the automatic replica synchronization that follows an operation, invoked by a client
using a replica server, that modifies the repository.
Storage files for versions are downloaded from the master repository to the local replica
repository during an update. (See The Update Command on page 39.) The storage file for an
individual version is downloaded when a client using a replica server explicitly references that
version. Examples:
accurev cat -v talon_dvt/12 foo.c
accurev diff -v talon_dvt/12 foo.c
Both these commands cause the storage file for version talon_dvt/12 of file foo.c to be
downloaded to the local replica repository before the command itself is executed.
AccuRev Administrator’s Guide
41
Automating Replica Synchronization
If a workgroup is much less active than other workgroups, its local replica repository can “fall
behind” the master repository significantly. This can also occur if the workgroup uses the local
replica repository mostly as a reference — for frequent read operations, but infrequent write
operations. Falling behind in this way does no harm, but it can be bothersome. When some user
finally does perform a write operation — keeping a new version of a file, or changing the location
of a workspace — the local replica repository automatically “catches up”, which might involve
downloading tens or hundreds of transactions.
To prevent the local replica repository from falling too far behind, we recommend that you use
operating system tools to perform an accurev replica sync command automatically, at regular
intervals — say, every 15 minutes. On a Windows machine, use the Scheduled Tasks program in
the Control Panel. On a Unix/Linux host, set up a cron job to execute this command.
Synchronization Security
Note: this section describes a security risk that exists only for organizations using the AccuRev
Replication Server product. This risk does not apply to organizations that use the standard
AccuRev software, without the replication option.
The repository synchronization scheme poses a potential security risk: the acserver.cnf server
configuration file on an AccuRev server machine can name any master server machine in a
MASTER_SERVER setting. And by default, the targeted master server will comply with any
synchronization request — even an accurev replica sync command executed on a completely
unrelated client machine.
We strongly recommend using the server_admin_trig trigger on the master server machine to
implement an authentication scheme, so that the master server will send repository data over the
wire only to valid requestors. The following Perl code might be added to the sample
server_admin_trig script included in the examples subdirectory of the AccuRev distribution:
if ($command eq "replica_sync") {
if ($principal ne "rep01_acadmin" and $principal ne "rep02_acadmin") {
print TIO "Repository synchronization disallowed:\n";
print TIO "Authentication by the server_admin_trig script failed.\n";
close TIO;
exit(1);
}
}
This code allows users rep01_acadmin and rep02_acadmin to perform repository
synchronization, rejecting requests from all other user identities.
Note: a server_admin_trig script identifies the command as replica_sync, even though the
actual CLI command is replica sync.
AccuRev Administrator’s Guide
42
The replica_site.xml File
Each replica repository’s site slice directory contains an XML-format file, replica_site.xml. This
file contains information about the depots that are replicated in that repository. The mkreplica
and rmreplica commands maintain the contents of this file.
AccuRev Administrator’s Guide
43
AccuRev Administrator’s Guide
44
Moving the AccuRev Server and Repository to
Another Machine
The AccuRev data repository should be physically located on the machine that runs the AccuRev
Server process. (This is firm dictate, but not an absolute restriction — see READ ME NOW:
Assuring the Integrity of the AccuRev Repository on page 1.) The repository consists of multiple
slices: the site slice contains information that pertains to the entire repository, and each depot has
its own slice. Each slice contains a database consisting of multiple files.
From time to time, you may want (or need) to have the AccuRev server process run on a different
machine. To accomplish this, you must:
•
Perform a “full” (client and server) installation of AccuRev on the new machine.
•
Move the data repository to the new machine.
If the new machine has a different byte order than the old machine, you must migrate each slice to
use the “opposite-endian” data format. This involves swapping the bytes in each machine-level
word. The results of the migration are stored in a new subdirectory within each slice. This
procedure is safe: the original slice data is never modified, and there is no harm in performing the
migration procedure multiple times.
Procedure for Moving the Repository
Make sure you perform each of the following steps on the appropriate server machine. We call
them:
•
The “source” machine — where the AccuRev server is currently running and the data
repository is currently located.
•
The “destination” machine — the machine to which you want to move the data repository.
Note: the steps below always show Unix/Linux pathname separators ( / ). When you’re
executing commands on a Windows machine (either source or destination), be sure to use
Windows pathname separators ( \ ).
The procedure calls for multiple stops and starts of the AccuRev Server process. For details on
how to accomplish this, see Controlling Server Operation on page 17.
On the Destination Machine
1. Perform that a “full” (that is, both client and server) installation of AccuRev on this machine.
In the steps below, we’ll refer to the installation directory on the destination machine as <destinstall-dir>. The installation directory pathname need not be the same as on the source
machine. But if the pathnames differ, you’ll need to do some extra work (Step 20 – Step 24).
2. Run this command on the destination machine:
accurev hostinfo
AccuRev Administrator’s Guide
45
3. Send the output of this command to AccuRev Support Services, as part of a request for a new
license key for the destination machine. When you get the new license key, install it in the
site_slice directory, according to the supplied instructions.
4. Store an additional copy of the license key outside the AccuRev repository, for use in Step 15.
Perform Step 5 only if the source and destination machines are oppositeendian:
5. Copy the following file to a secure location:
<dest-install-dir>/storage/site_slice/datadict.ndb
On the Source Machine
6. Execute the command accurev show slices and accurev show depots, and save the output for
reference in the following steps.
7. Stop the AccuRev Server process, as described in Controlling Server Operation on page 17.
8. Perform a full backup of the AccuRev repository, as described in Backing Up the Repository
on page 3.
Perform Step 9 – Step 10 only if the source and destination machines are
opposite-endian.
9. Migrate the site slice, using the maintain program located in the AccuRev bin directory:
maintain migrate
This creates a swapped subdirectory under the site_slice directory.
10. For each depot listed in the show depots output (Step 6), migrate the depot’s slice:
maintain migrate <depot-name>
This creates a set of swapped subdirectories in the depot slices.
11. Copy the entire tree starting at directory storage within the AccuRev installation area. Be sure
to use a method that preserves file ownership (e.g. tar –cp).
On the Destination Machine
12. Stop the AccuRev Server process.
13. Remove directory <dest-install-dir>/storage.
14. “Paste” (unpack, unzip, tar –x) the copy of the directory tree you made in Step 11, so that the
pasted data becomes <dest-install-dir>/storage.
AccuRev Administrator’s Guide
46
15. Overwrite file <dest-install-dir>/storage/site_slice/keys.txt with the copy of the license key
that you saved in Step 4.
Perform Step 16 – Step 18 only if the source and destination machines are
opposite-endian.
16. Move all *.ndb database files from the site_slice/swapped directory up to the site_slice
directory. This overwrites the original *.ndb files there.
17. Move all *.ndb files from the <depot-name>/swapped directories up to the parent <depotname> directories. This overwrites the existing *.ndb files in the <depot-name> directories.
18. Restore the copy of <dest-install-dir>/storage/site_slice/datadict.ndb that you made in
Step 5.
Perform Step 20 – Step 24 only if the AccuRev installation directory is at a
different pathname on the source and destination machines.
19. Remove file sessions.dat from the site_slice directory. This file contains data on client usage
at the repository’s old location.
20. Reindex the site slice:
maintain reindex
21. Restart the AccuRev Server process.
22. Log in to the AccuRev Server.
23. For each depot, determine the corresponding slice number (see Step 6) and run this command:
accurev chslice -s <slice-number>
-l <dest-install-dir>/storage/depots/<depot-name>
24. Stop the AccuRev Server process.
Almost done!
25. Reindex each depot:
maintain reindex <depot-name>
26. Restart the AccuRev Server process.
AccuRev Administrator’s Guide
47
AccuRev Administrator’s Guide
48
AccuRev Security Overview
This chapter presents an overview of AccuRev’s security-related features. We discuss and
compare the following topics, and provide pointers to more detailed documentation.
•
Users and Groups
•
User Authentication
•
Locks on Streams
•
Access Control List (ACL) Permissions
•
Restricting Access to Commands using Triggers
Users and Groups
Each AccuRev user must have an AccuRev username (also called a “principal-name”). AccuRev
maintains its own user registry in the repository; it is separate from the registry maintained by
your machine’s operating system (or the network).
Optionally, you can create AccuRev user groups, and add users to the groups as “members”.
Starting in Version 4.5, groups can be nested within one another; that is, a group can be a member
of another group. AccuRev groups are independent of operating system groups.
Groups are used by the ACL facility to grant or deny access to a particular resource for an entire
set of users. They are used by the Locks facility to specify a set of users to which a stream lock
does or does not apply. (See Locks on Streams on page 52 and Access Control List (ACL)
Permissions on page 52.)
Usernames and Groupnames
Each AccuRev group has a user-defined name. Usernames and groupnames share a “namespace”
in the AccuRev repository. This means that a user and a group cannot have the same name.
User Authentication
With a few exceptions, a user cannot execute AccuRev commands unless he is authenticated as a
registered AccuRev user. For authentication purposes, each registered AccuRev user has a
username/password pair recorded in the registry. A user’s password can be empty.
AccuRev automatically distinguishes two categories of users — those who have non-empty
passwords and those whose passwords are empty. The keywords authuser and anyuser,
respectively, are used by the ACL facility to designate these categories. The keyword notauth
indicates that the user is not authorized to execute AccuRev commands.
The “traditional” User-Authentication Method
Prior to Version 4.5, AccuRev supported a single method for authenticating users. This is now
termed the traditional method. In this method, your AccuRev username is, by default, the same
AccuRev Administrator’s Guide
49
as your operating-system login name. The user can establish a different username by setting
environment variable ACCUREV_PRINCIPAL.
Whenever the user invokes a command that requires user authentication:
1. AccuRev determines the username, by getting the value of ACCUREV_PRINCIPAL from the
environment, or by asking the operating system for the user’s login name.
2. If there’s a non-empty password for this username in the AccuRev user registry, AccuRev
compares this password with the contents of file authn, located in subdirectory .accurev of
the user’s operating-system home directory. The user is authenticated as an authuser if the
strings match (case-sensitive). If they don’t match, the user gets notauth status.
If there’s an empty password for this username in the AccuRev user registry, AccuRev still
checks the authn file. The user is authenticated as an anyuser if the file is empty.
The “accurev_login” User-Authentication Method
Starting in Version 4.5, AccuRev also supports a method wherein a user is authenticated through
an explicit login to the AccuRev Server. Using the GUI or the CLI, the user invokes the Login
command and enters his password (possibly empty). This launches a user session, which is
typically of limited duration (a few hours). When the session expires, the user must login again to
continue using AccuRev.
The “custom” User-Authentication Method
AccuRev also supports script-based authentication of AccuRev users. This custom method works
as follows:
1. The user invokes the Login command through the AccuRev GUI or CLI client, and types a
password.
2. The client encrypts the password and transmits the username/password combination to the
AccuRev Server.
3. The AccuRev Server verifies that the username exists in the repository’s user registry. It does
not check the password, however.
4. The AccuRev Server invokes a script named server_auth_trig, passing it an XML-format
parameters file that includes the username/password combination. The exit status of this script
determines the success/failure of the Login command. See The ‘server_auth_trig’ Script on
page 51 for details.
This feature provides tremendous flexibility. For example, an authentication script could use an
external user database, accessed through an LDAP interface, to perform AccuRev user
authentication.
If you adopt the custom user-authentication method, it makes sense to purge user passwords from
the AccuRev user registry. Passwords are stored in unencrypted format, and thus present a
AccuRev Administrator’s Guide
50
potential security problem. For example, user derek can remove his password from the AccuRev
user registry with this command:
accurev chpasswd derek ""
(two consecutive double-quote characters)
Similarly, new users should be added to the AccuRev user registry with no password:
accurev mkuser justine
(no password argument following username)
The ‘server_auth_trig’ Script
The server_auth_trig user-authentication script, used by the custom user-authentication method,
is similar to the server_admin_trig administrative trigger script. A sample script, implemented in
Perl, is included in the AccuRev software distribution, in the examples subdirectory.
To deploy a user-authentication script, place an executable file in subdirectory triggers of the
site_slice directory:
•
Unix/Linux: the file must be named server_auth_trig or server_auth_trig.pl
•
Windows: the file must be named server_auth_trig.bat or server_auth_trig.exe
The script is called when a user invokes the AccuRev Login command. It executes in a
subprocess of the AccuRev Server. The script’s standard input is a simple XML document, with
the structure shown in this example:
<triggerInput>
<hook>server_auth_trig</hook>
<command>login</command>
<ip>192.168.6.186</ip>
<username>derek</username>
<password>MyP@ssw0rd</password>
</triggerInput>
(No password encryption is necessary, because this XML document is passed to the subprocess
through an operating system pipe, not through a file.) The script’s standard output is appended to
file triggers.log, located in the logs subdirectory of the site_slice directory. No output is required,
however; only the script’s exit status is significant:
•
If exit status is zero, the user’s Login command succeeds.
•
If exit status is nonzero, the user’s Login command fails.
The user’s Login command also fails if the script does not execute properly — for example, if a
runtime error occurs or the script file is not executable.
Selecting the User-Authentication Method
When you install AccuRev on the machine where the AccuRev Server process will run, the
AccuRev Installation Wizard automatically sets the authentication method. Thereafter, you can
switch methods with the authmethod command. Example:
accurev authmethod accurev_login
AccuRev Administrator’s Guide
51
The switch takes place immediately. This might cause user confusion, so be careful!
How AccuRev Records the User-Authentication Method
The current user-authentication method is stored in file preferences.xml in the site_slice
directory. (Don’t confuse this with individual users’ preferences.xml files.) For example:
<preferences>
<authmethod>accurev_login</authmethod>
</preferences>
As an alternative to the authmethod command, you can change the user-authentication method
by editing this file, then stopping and restarting the AccuRev Server process.
Restriction on Access to the “Add User” Command
User authentication is performed by the add-new-user command (GUI: Add User, CLI: mkuser).
To prevent a chicken-and-egg problem, user authentication is bypassed if the AccuRev user
registry is currently empty. After the first AccuRev user has been created, only an authenticated
user can add users to the AccuRev user registry.
Locks on Streams
Each stream can have one or more locks on it. A lock prevents a certain set of users from using the
stream to create new versions of elements. That is, it prevents execution of the Promote
command — either promoting from the designated stream, or promoting to the designated stream,
or promoting in either direction.
A lock can be absolute, applying to all users. Alternatively, you can specify that a lock applies to
a particular AccuRev user, or to a particular AccuRev group. Conversely, you can specify that a
lock applies to everyone except a particular AccuRev user, or to everyone except a particular
AccuRev group.
Locks can also prevent reconfiguration of the contents of a stream with the include/exclude
facility.
For more on locks, see the lock reference page in the AccuRev CLI User’s Manual.
Access Control List (ACL) Permissions
In addition to (or instead of) locks, each stream can have one or more permissions on it. Whereas
a lock controls the ability to create new versions (through the Promote command), a permission
is more general: in addition to controlling Promote, it controls the ability to read data from the
stream, using such commands as Annotate, Diff, and Open. A permission also controls
workspace-specific commands, such as Update and Populate.
Unlike locks, which always apply to individual streams, ACL permissions can be configured to
apply to entire stream subhierarchies.
AccuRev Administrator’s Guide
52
You can create an ACL permission that applies to an entire depot. This provides a way of
controlling access to all of a depot’s file system data, in all streams. It also provides a way to
control access to a depot’s AccuWork issue database.
For more on ACL permissions, see the setacl reference page in the AccuRev CLI User’s Manual.
Restricting Access to Commands using Triggers
By default, any registered AccuRev user can execute any AccuRev command. Many
organizations wish to restrict users’ access to certain commands, such as the ability to maintain
users, groups, and passwords, the ability to lock streams and create ACL permissions, and so on.
Triggers provide a flexible mechanism for implementing command-based security.
Many AccuRev commands can be configured to “fire a trigger”. This causes a user-defined script
to execute ...
•
either before the command executes (pre-operation trigger), or afterward (post-operation
trigger)
•
either on the client machine, or on the server machine
A pre-operation trigger can affect the execution of the command or cancel it altogether. Typically,
a security-related trigger checks the identity of the user invoking the command, then decides
whether or not to allow the command to proceed.
Some triggers are configured on a per-depot basis, using the mktrig command. These triggers
monitor individual commands (add, keep, and promote). Three are pre-operation triggers that
fire on the client machine; one is a post-operation trigger that fires on the server machine.
Other triggers are configured, on a per-depot or whole-repository basis, by placing a script in a
well-known location on the server machine. These triggers monitor groups of commands, rather
than individual commands.
For more on triggers, see the chapter AccuRev Triggers on page 55.
Which Security Feature Should I Use?
AccuRev’s security features overlap to a considerable extent. For example, when a user invokes
the promote command, any of these mechanisms can prevent the command from proceeding:
•
a lock on the source or destination stream
•
an ACL permission on the destination stream, on a higher-level stream, or on the entire depot
•
a pre-promote-trig trigger script, which runs on the client machine
•
a server_preop_trig trigger script, which runs on the server machine
How do you decide which feature to use in a given situation? There are no absolute rules, but here
are some guidelines:
AccuRev Administrator’s Guide
53
To script or not to script?
The trigger mechanism depends on execution of user-supplied scripts, written in Perl, Python,
or some other scripting language. There’s a trade-off: scripting required development time
and significant expertise, but is infinitely flexible.
In many situations, you may be able to use the AccuRev software distribution’s sample Perl
scripts, which are designed for fill-in-the-blanks customization.
It makes sense to implement as much security as possible with locks and ACL permissions
(and perhaps the sample trigger scripts), before delving into original trigger scripting.
Locks vs. ACL permissions
Roughly speaking, a lock controls the placing of data into a stream, whereas an ACL
permission controls the reading of data from a stream. (There are plenty of exceptions to this
general rule.)
Both locks and permissions can be targeted at specific users or groups. The ACL is more
flexible: you can create any number of permissions for the same stream, but only limited
number of locks.
Running trigger scripts: client machine vs. server machine
Running trigger scripts on the client machine conserves networking and server resources. But
keep in mind that all client machines must have copies of the scripts (or must have network
access to a central script repository).
Running trigger scripts on the server machine provides administrative simplicity and
centralized logging.
AccuRev Administrator’s Guide
54
AccuRev Triggers
A trigger is a “code hook” or callback built into certain AccuRev commands. When a user enters
the command, the corresponding trigger “fires”; this causes a user-defined or built-in procedure to
be performed just before or after the command executes. Typically, a user-defined procedure is
implemented as a script in the Perl scripting language. Sample Perl scripts are available in the
examples subdirectory of the AccuRev installation directory.
Note: in this chapter, “trigger script” refers to any executable program, written in any
language, that is executed when a trigger fires.
AccuRev supports both pre-operation triggers and post-operation triggers. In addition, there are
triggers that integrate AccuRev’s configuration management facility with its issue management
facility (AccuWork); these triggers have pre- and post-operation components.
Some triggers are set with the mktrig command; others are set by placing the script at a special
location.
Pre-Operation Triggers
The following triggers execute a procedure before the user-requested command executes. Each of
these triggers has the ability to cancel execution of the user’s command. (See Trigger Script Exit
Status on page 73.) Some of the triggers fire on the client machine, and others on the server
machine. It’s possible for a single command (e.g. keep) to cause triggers to fire both on the client
and on the server.
Client-Side Triggers
The following pre-operation triggers fire on the client machine:
•
pre-create-trig: fires on the client machine prior to execution of an add command (GUI: Add
to Depot). It does not fire for an ln command (GUI: Paste Link), which creates a link
element.)
The trigger script must specify the element type (directory, text, binary, or ptext) of each
element to be created by the command. This overrides the element type specified with the add
–E option.
•
pre-keep-trig: fires on the client machine prior to execution of a keep command.
•
pre-promote-trig: fires on the client machine prior to execution of a promote command or a
purge command (GUI: Revert to Backed Version or Revert to Most Recent Version).
Server-Side Triggers
The following pre-operation triggers fire on the server machine.
AccuRev Administrator’s Guide
55
•
server_admin_trig: fires on the server machine prior to execution of certain commands. This
is a repository-wide trigger — it fires no matter what depot, if any, the user’s command
applies to. The following commands cause server_admin_trig to fire:
addmember
lsacl
rmmember
chdepot (see note) mkdepot
rmreplica
chpasswd
mkgroup
rmtrig
chref
mkreplica
rmws
chslice
mkstream
setacl
chstream
mktrig
unlock
chuser, chgroup
mkuser
chws (see note)
mkws, mkref
defcomp
ismember
reactivate
replica_sync
lock
remove
write_schema
Note: when the chdepot command renames a depot, server_admin_trig fires twice: there’s a
“chdepot” firing for the renaming of the depot object, followed by a “chstream” firing for the
renaming of the depot’s root-stream object. Similarly, when the chws command renames a
workspace, server_admin_trig fires twice: there’s a “chws” firing for the renaming of the
workspace object, followed by a “chstream” firing for the renaming of the workspace stream
object.
The last three commands are not standard AccuRev CLI commands:
•
The defcomp command is not user-visible; it’s used in the implementation of the
include/exclude facility CLI commands incl, excl, incldo, and clear.
•
The replica_sync command recognized by the server_admin_trig trigger corresponds to
the CLI command replica sync.
•
The write_schema command is generated by the AccuRev GUI when the Save button is
clicked in the Schema Editor.
Note: prior to Version 3.5, the services now provided by server_admin_trig were provided
by a trigger named server_all_trig. (In the AccuRev-provided sample trigger script, this
includes allowing commands to be executed only by a specified list of AccuRev users.) For
backward compatibility, the older trigger is still supported.
WARNING: The server_all_trig trigger is now deprecated. Support for this trigger will be
withdrawn in a future AccuRev release.
AccuRev Administrator’s Guide
56
•
server_preop_trig: fires on the server machine prior to execution of certain commands. This
is a depot-specific trigger — it fires only for commands that operate on the depot(s) where the
trigger has been activated. The following commands cause server_preop_trig to fire:
add
promote
keep
co
reclaim
revert
purge (GUI: Revert to Backed)
For add or keep, the server_preop_trig script can specify the exclusive file locking state
(parallel or serial) of the element(s) processed by the command. This overrides any
specification made with the –E command-line option.
The server_admin_trig and server_preop_trig triggers are independent of each other and are
fired by different sets of commands — for a given command, only one of these triggers will fire.
But these triggers can fire in addition to the triggers enabled with the mktrig command (precreate-trig, pre-keep-trig, pre-promote-trig, and server-post-promote-trig) and the
server_dispatch_post trigger.
Post-Operation Triggers
The following triggers execute a procedure after the user-requested command executes
successfully. If the user’s command fails, the post-operation trigger does not fire. A postoperation trigger always fires on the server machine.
•
server-post-promote-trig: fires on the server machine subsequent to execution of a promote
command.
•
server_dispatch_post: fires on the server machine each time an AccuWork issue record is
created or modified. This trigger is intended to enable email notification to interested users. A
sample Perl script is available in the examples/dispatch subdirectory of the AccuRev
installation directory.
Triggers in a Replication Environment
See Triggers and Replication on page 40.
Transaction-Level Integration Trigger
You can achieve tight coordination of your organization’s configuration management and issue
management capabilities by enabling one or both of the integrations between AccuRev’s
configuration management and issue management facilities. The transaction-level integration is
enabled by a trigger on a depot-by-depot basis:
accurev mktrig -p WidgetDepot pre-promote-trig client_dispatch_promote
The “client_dispatch_promote” integration routine is built into the AccuRev software — no
scripts are required — and includes both pre-operation and post-operation components:
1. On the client machine, a user invokes the AccuRev promote command.
AccuRev Administrator’s Guide
57
2. The pre-operation part of the trigger fires on the client machine, prompting the user to specify
one or more AccuWork issue records (SPACE-separated). If this part of the trigger fails (e.g.
the user specifies a non-existent issue record), the promote command itself is cancelled.
3. The promote command completes, and is recorded in the AccuRev repository as a
transaction.
4. The post-operation part of the trigger fires on the server machine, updating the issue record
that the user specified by adding the number of the promote transaction to the affectedFiles
field.
If you use the built-in “client_dispatch_promote” integration routine as the pre-promote-trig
trigger, you must not also set a server-post-promote-trig trigger. Doing so would suppress the
post-operation component of the “client_dispatch_promote” routine. For information on handling
this situation and other aspects of customizing the transaction-level integration, see
Implementation and Customization of the Transaction-Level Integration on page 79. (This section
also describes another integration between configuration management and issue management,
which works at the change-package level instead of the transaction level.)
Note: the purge command (GUI command Revert to Backed) also triggers this integration,
because it is uses the depot’s pre-promote-trig trigger capability.
Preparing to Use an AccuRev-Provided Trigger Script
Sample trigger scripts are installed with AccuRev, in the examples subdirectory. These sample
scripts are implemented in the platform-neutral Perl scripting language. Use the following
procedure to install and use one of these scripts:
1. Install Perl. There are many source on the Web for Perl. We recommend the ActivePerl
distribution from http://www.activestate.com. This distribution includes a conversion utility,
pl2bat, which makes a Perl script executable under Windows, by embedding the Perl code in
a Windows batch file (.bat).
Be sure to install Perl on all appropriate machines. Note that some pre-operation triggers run
on the client machine, while others run on the server machine. All post-operation triggers run
on the AccuRev server machine.
2. Get a copy of the sample script. Copy the sample script from the examples subdirectory of
the AccuRev installation directory to an AccuRev workspace. Then use the add command to
place the script under version control.
3. Prepare the script. Open the script in a text editor, and customize the script according to the
instructions included as comment lines. Before embarking on heavy script customization, be
sure to read The Trigger Parameters File on page 60.
4. Enable the Trigger. Enable the trigger, either with the mktrig command or by placing the
script in the proper location. See the following section for details.
Enabling a Trigger
Depending on its type, an AccuRev trigger is enabled in one of these ways:
AccuRev Administrator’s Guide
58
•
Executing an accurev mktrig command, specifying the location of the script. AccuRev
simply records the location you specify in the repository; it doesn’t make a copy of the script.
Make sure that no one moves it!
•
Placing the executable script file in the location prescribed for that type of trigger.
For details, consult the appropriate subsection below:
pre-create-trig, pre-keep-trig, pre-promote-trig, server-post-promote-trig
Use the mktrig command to enable use of the script in a particular depot. For example:
accurev mktrig -p WidgetDepot pre-keep-trig /usr/ac_scripts/addheader
The –p option isn’t necessary if your current directory is in a workspace associated with that
depot. When the trigger fires, AccuRev will search for the script at the specified pathname (in the
example above, /usr/ac_scripts/addheader).
We strongly suggest specifying an absolute pathname. Otherwise, when the trigger fires,
AccuRev will use the user’s search path (for pre-create-trig, pre-keep-trig, or pre-promotetrig) or the search path of the AccuRev Server’s user identity (for server-post-promote-trig) to
find the specified script file.
server_admin_trig
Place an executable file in subdirectory triggers of the site_slice directory:
•
Unix/Linux: the file must be named server_admin_trig or server_admin_trig.pl
•
Windows: the file must be named server_admin_trig.bat
Example:
C:\Program Files\AccuRev\storage\site_slice\triggers\server_admin_trig.bat
Note: for compatibility with previous AccuRev releases, the script can also be named
server_all_trig, with the appropriate suffix. If the directory contains both server_admin_trig
and server_all_trig executables, only server_all_trig is executed.
server_preop_trig
Place an executable file in subdirectory triggers of the slice directory of one or more depots
(accurev show slices displays slice directory locations):
•
Unix/Linux: the file must be named server_preop_trig or server_preop_trig.pl
•
Windows: the file must be named server_preop_trig.bat
Example:
/opt/accurev/storage/depots/talon_tests/triggers/server_preop_trig
AccuRev Administrator’s Guide
59
server_dispatch_post
Place an executable file in the AccuRev executables (bin) directory on the AccuRev Server
machine:
•
Unix/Linux: the file must be named server_dispatch_post or server_dispatch_post.pl
•
Windows: the file must be named server_dispatch_post.bat
Note: for compatibility with previous AccuRev releases, the script can also be named
dispatch_email, with the appropriate suffix.
Example:
C:\Program Files\AccuRev\bin\server_dispatch_post.bat
Notes on Triggers in Multiple-Platform Environments
Observe these guidelines in a multiple-platform environment, where the trigger script will be
accessed from both Windows machines and Unix/Linux machines:
•
Don’t even try to arrange for exactly the same script file to be accessed by all users, on all
platforms. Instead, place scripts to be accessed by Unix/Linux users in one directory and
equivalent scripts to be accessed by Windows users in another directory.
•
Make sure the Windows script has a .bat suffix (e.g. check_for_comments.bat), and that the
Unix/Linux script has no suffix (check_for_comments).
•
Make sure the scripts run correctly on their respective platforms. And remember to revise all
versions of the script when you revise any one of them!
•
In the mktrig command, specify the script name without a suffix — e.g.:
accurev mktrig -p WidgetDepot pre-keep-trig check_for_comments
The Trigger Parameters File
When a trigger fires and executes a user-supplied script, AccuRev passes two arguments to the
script:
•
The first argument is the pathname of a flat-text file containing information about the
transaction that is about to be performed (or was just completed).
•
The second argument is the pathname of an XML-format file containing the same
information. (In some cases, detailed below, the XML-format file contains a small amount of
additional information that is not contained in the flat-text file.)
Exceptions: only one argument, the pathname of an XML-format file, is passed to a
server_preop_trig script or a server_admin_trig script.
These files are called trigger parameters files. The flat-text file contains a series of values —
usually one value per line — in a prescribed order. The XML-format file contains a set of
elements below the top-level <triggerInput> element. Each such element contains the
information for one parameter: the parameter name is the element tag, the parameter value is the
AccuRev Administrator’s Guide
60
element contents (sometimes encoded as a set of subelements). For example, here are two trigger
parameters files generated by the same user command:
Flat-text trigger parameters file
pre-create
talon
talon_dvt_john
4
adding some files
this multi-line
comment has
four lines
C:/wks/talon/dvt_john
john
/tools/cont.sh
/tools/end.sh
/tools/start.sh
XML-format trigger parameters file
<triggerInput>
<hook>pre-create</hook>
<depot>talon</depot>
<stream1>talon_dvt_john</stream1>
<changePackages></changePackages>
<comment>adding some files
this multi-line
comment has
four lines</comment>
<topDir>C:/wks/talon/dvt_john</topDir>
<principal>john</principal>
<elemList>
<elem>/tools/cont.sh</elem>
<elem>/tools/end.sh</elem>
<elem>/tools/start.sh</elem>
</elemList>
</triggerInput>
The information contained in the trigger parameters file varies among the trigger types, as
described in the following sections.
Format of the “pre-create-trig” Trigger Parameters File
The following table presents the information in the trigger parameters file sent to a pre-createtrig script. This information describes the creation of one or more new elements to a depot (CLI:
add, GUI: Add to Depot).
Note: the trigger fires on creation of a new file or directory element, but not on creation of a
new link element (CLI: ln, GUI: Paste Link).
The order of the parameters in this table is the order in which they appear in the flat-text trigger
parameters file. (Less importantly, it’s also the order in which they appear in the XML-format
trigger parameters file.)
Parameter
Description
hook
output_file
depot
stream1
Type of trigger: pre-create.
(XML-format parameters file only) Not used by this trigger.
Name of depot targeted by the command.
Name of the workspace stream in which the new elements are to
be created.
AccuRev Administrator’s Guide
61
Parameter
Description
changePackages
(XML-format parameters file only) The change packages affected
by this command; currently defined to be empty for a pre-createtrig trigger.
Zero or more comment lines specified by the user (see Encoding
of Command Comments on page 73 below).
(XML-format parameters file only) Integer indicating the element
type specified by the user: 0=none specified, 2=text, 3=binary,
4=ptext.
Pathname to the top-level directory of the user’s workspace tree,
as it is listed by the show wspaces command.
AccuRev username of person invoking the command.
One or more files/directories to be added to the depot. For general
notes, see Encoding of Element Lists on page 72 below.
comment
elemType
topDir
principal
elemList
elements
In the flat-text trigger parameters file, the elements to be created are listed, one per line, at the end
of the file:
/tools/cont.sh
/tools/end.sh
/tools/start.sh
<-- end-of-file of trigger parameters file
There is no need to supply an element count, since an end-of-file condition signals the end of the
element list.
In the XML-format trigger parameters file, the element paths are encoded as <elem> subelements of <elemList>:
<elemList>
<elem>/tools/cont.sh</elem>
<elem>/tools/end.sh</elem>
<elem>/tools/start.sh</elem>
</elemList>
(There is also an <elements> element with the same <elem> sub-element data.)
Overwriting the ‘pre-create-trig’ Trigger Parameters File
A pre-create-trig script must overwrite its flat-text parameters file with data that indicates the
type of each element to be created. Each line must describe one new element:
<element-pathname>
<element-type>
... where <element-pathname> is a pathname from the input “elemList”, and <element-type> is a
numeric code:
1 directory
2 text file
AccuRev Administrator’s Guide
62
3 binary file
4 ptext file
Make sure that the element-type value is 1 for every directory in the original list. You can’t
change the element-type of a directory! You can however, change among the text-file, binary-file,
and ptext-file types. For example, you might override AccuRev’s default classification of file
ReadMe.html as 2 (text-file), setting the element-type to 3 (binary-file) instead.
See Controlling the Element Type and Exclusive File Locking State on page 40 of the AccuRev
CLI User’s Guide for a discussion of element types.
Example: to have an add command create two text-file elements, two binary-file elements, and a
directory element, a pre-create-trig script would replace its flat-text parameters file with this
data:
/tools/end.sh 2
/tools/icons 1
/tools/icons/end.png 3
/tools/icons/start.png 3
/tools/start.sh 2
Note: there is currently no provision for the script to overwrite the XML-format trigger
parameters file. The data to be passed to the AccuRev Server must be in flat-text format.
Format of the “pre-keep-trig” Trigger Parameters File
The following table presents the information in the trigger parameters file sent to a pre-keep-trig
script. This information describes the creation of a new versions of one or more existing elements
in a depot (CLI: keep, GUI: Keep).
The order of the parameters in this table is the order in which they appear in the flat-text trigger
parameters file. (Less importantly, it’s also the order in which they appear in the XML-format
trigger parameters file.)
Parameter
Description
hook
output_file
depot
stream1
Type of trigger: pre-keep.
(XML-format parameters file only) Not used by this trigger.
Name of depot targeted by the command.
Name of the workspace stream in which the new versions are to
be created.
(XML-format parameters file only) change packages affected by
this command; currently defined to be empty for a pre-keep-trig
trigger.
changePackages
comment
Zero or more comment lines specified by the user (see Encoding
of Command Comments on page 73 below).
AccuRev Administrator’s Guide
63
Parameter
Description
elemType
(XML-format parameters file only) Integer indicating the element
type specified by the user: 0=none specified, 2=text, 3=binary,
4=ptext.
Pathname to the top-level directory of the user’s workspace tree,
as it is listed by the show wspaces command.
AccuRev username of person invoking the command.
A specification for each new element version to be created. For
general notes, see Encoding of Element Lists on page 72 below.
topDir
principal
elemList
elements
In the flat-text trigger parameters file, the versions to be created are listed, one per line, at the end
of the file. Each line contains three specifications:
<element-pathname>
<version-ID>
<element-type>
There is no need to supply an element count, since an end-of-file condition signals the end of the
element list. For example:
/tools/icons/end.png talon_dvt_john/5 3
/tools/icons/end.sh talon_dvt_john/9 2
/tools/icons/start.png talon_dvt_john/2 3
/tools/icons/start.sh talon_dvt_john/13 2
In the XML-format trigger parameters file, each version to be created is encoded as an as <elem>
sub-element of <elemList>. The element’s attributes specify the version-ID (stream and version
attributes) and the element-type (elemType attribute). The element pathname is encoded as the
contents of <elem>.
The following example contains the same data as the flat-text example above:
<elemList>
<elem
stream="talon_dvt_john"
version="5"
elemType="3">/tools/icons/end.png</elem>
<elem
stream="talon_dvt_john"
version="9"
elemType="2">/tools/icons/end.sh</elem>
<elem
stream="talon_dvt_john"
version="2"
elemType="3">/tools/icons/start.png</elem>
<elem
stream="talon_dvt_john"
version="13"
elemType="2">/tools/icons/start.sh</elem>
</elemList>
AccuRev Administrator’s Guide
64
In either format, the element-type value can be either 2 (text file), 3 (binary file), or 4 (ptext file).
Note that different versions of an element can have different types.
In addition to the <elemList> element, the parameters file includes an <elements> element, with
additional information on each file: its element-ID and the real version-ID of the workspace’s
current version (not the one about to be created):
...
<elem
eid="58"
ver="3/4">/tools/icons/end.png</elem>
...
Format of the “pre-promote-trig” Trigger Parameters File
The following table presents the information in the trigger parameters file sent to a pre-promotetrig script. This information describes the creation of a new versions of one or more existing
elements in a depot (CLI: promote, GUI: Promote).
Note: the pre-promote-trig trigger also fires on execution of a CLI purge command (GUI:
Revert to Backed) — but only when the version is being purged from a dynamic stream, not
a workspace.
The order of the parameters in this table is the order in which they appear in the flat-text trigger
parameters file. (Less importantly, it’s also the order in which they appear in the XML-format
trigger parameters file.)
Parameter
Description
hook
output_file
action
Type of trigger: pre-promote.
(XML-format parameters file only) Not used by this trigger.
(XML-format parameters file only, and only for the purge
command) The character string purge.
(XML-format parameters file only) The issue number (or
numbers, SPACE-separated) specified by the user with the
promote –I command-line option.
Name of depot targeted by the command.
Name of the workspace or stream that the versions are to be
promoted from.
(XML-format parameters file only) Name of the stream that the
versions are to be promoted to.
option_I
depot
stream1
stream2
changePackages
comment
(XML-format parameters file only) change packages affected by
this command; currently defined to be empty for a pre-promotetrig trigger.
Zero or more comment lines specified by the user (see Encoding
of Command Comments on page 73 below).
AccuRev Administrator’s Guide
65
Parameter
Description
elemType
(XML-format parameters file only) Integer indicating the element
type specified by the user: 0=none specified, 2=text, 3=binary,
4=ptext.
Pathname to the top-level directory of the user’s workspace tree,
as it is listed by the show wspaces command.
AccuRev username of person invoking the command.
One or more files/directories to be promoted. For general notes,
see Encoding of Element Lists on page 72 below.
topDir
principal
elemList
elements
In the flat-text trigger parameters file, the elements to be created are listed, one per line, at the end
of the file:
/tools/cont.sh
/tools/end.sh
/tools/start.sh
<-- end-of-file of trigger parameters file
There is no need to supply an element count, since an end-of-file condition signals the end of the
element list.
In the XML-format trigger parameters file, the element paths are encoded as <elem> subelements of <elemList>:
<elemList>
<elem>/tools/cont.sh</elem>
<elem>/tools/end.sh</elem>
<elem>/tools/start.sh</elem>
</elemList>
In addition to the <elemList> element, the parameters file includes an <elements> element, with
additional information on each element: its element-ID and the real version-ID of the version to
be promoted):
<elements>
<elem
eid="51"
ver="8/13">/tools/cont.sh</elem>
</elements>
Overwriting the ‘pre-promote-trig’ Trigger Parameters File
A pre-promote-trig script can work in tandem with a server-post-promote-trig script, providing
customized “before and after” processing around the execution of Promote commands:
•
The pre-promote-trig script overwrites its flat-text triggers parameters file.
•
The first line of the overwritten parameters file becomes the value of the
<fromClientPromote> parameter passed to the server-post-promote-trig script.
AccuRev Administrator’s Guide
66
Note: there is currently no provision for a pre-promote-trig script to pass data to a serverpost-promote-trig script by overwriting the XML-format trigger parameters file.
Format of the “server-post-promote-trig” Trigger Parameters File
The following table presents the information in the trigger parameters file sent to a server-postpromote-trig script. This information is generated by AccuRev, and describes the Promote
command that has just executed. The first line of this file provides a mechanism for passing userspecified data from a pre-promote-trig script to a server-post-promote-trig script. See
Overwriting the ‘pre-promote-trig’ Trigger Parameters File on page 66.
The order of the parameters in this table is the order in which they appear in the flat-text trigger
parameters file. (Less importantly, it’s also the order in which they appear in the XML-format
trigger parameters file.)
Parameter
Description
hook
output_file
depot
stream1
fromClientPromote
Type of trigger: server-post-promote.
(XML-format parameters file only) Not used by this trigger.
Name of depot targeted by the command.
Name of the stream that the versions were promoted to.
A single text line containing the issue number (or numbers,
SPACE-separated) specified by the user during the Promote
command. If no issue number was specified, the flat-text
parameters file contains a blank line and the XML-format file
contains an empty element.
(XML-format parameters file only) A set of <changePackageID>
subelements, specifying the same information as
<fromClientPromote>.
The transaction number of the Promote transaction that just
completed.
The time of the Promote transaction that just completed.
Zero or more comment lines specified by the user in the Promote
command (see Encoding of Command Comments on page 73
below).
AccuRev username of person invoking the command.
A specification for each version that was promoted. For general
notes, see Encoding of Element Lists on page 72 below.
changePackages
transNum
transTime
comment
principal
elemList
and
elements
The following example shows the data encoded in <elemList> and <elements>:
<elemList>
<elem
stream="9"
AccuRev Administrator’s Guide
67
version="7"
elemType="2">/dir00/sub00/file04.txt</elem>
</elemList>
<elements>
<elem
eid="8"
ver="9/7">/dir00/sub00/file04.txt</elem>
</elements>
Format of the “server_preop_trig” Trigger Parameters File
The parameters file passed to a server_preop_trig script is in XML format:
<triggerInput>
<hook> ... </hook>
<command> ... </command>
<principal> ... </principal>
<ip> ... </ip>
...
</triggerInput>
The set of subelements under the <triggerInput> element depends on the user’s command. The
following table provides a summary. For full details, see the sample server_preop_trig script in
the examples directory in the AccuRev installation area.
Parameter
Description
hook
output_file
Type of trigger: server_preop_trig.
(XML-format parameters file only) The name of the file that the
server_preop_trig script can create in order to control the
element type and/or exclusive file locking state of the elements
processed by an add or keep command. See Controlling
Element Type and Exclusive File Locking with a
“server_preop_trig” Script on page 69.
(add, keep commands only) The exclusive file locking state
specified with the –E command-line option: serial or parallel.
The user command: add, keep, promote, purge, or revert.
AccuRev username of person invoking the command.
The IP address of the client machine.
The user’s workspace stream.
The workspace’s parent (backing) stream.
Name of depot targeted by the command.
(promote command only) The number of the AccuWork issue
record entered by the user, when prompted by the transactionlevel integration or the change-package-level integration.
hierType
command
principal
ip
stream1
stream2
depot
fromClientPromote
AccuRev Administrator’s Guide
68
Parameter
Description
changePackagePromote
(promote command only) A set of <changePackageID>
subelements, specifying the change packages (that is, issue
records) specified in the user’s command.
These forms of the promote command generate a
<changePackagePromote> element:
•
promote –I (user specifies issue record number(s) on the
command line)
•
promote (user prompted to specify issue record number(s)
by the transaction-level or change-package-level integration)
•
promote –Fx (user specifies a set of issue records with an
XML file)
comment
The user can also specify issue record(s) through the AccuRev
GUI.
Comment string specified by the user. If the comment spans
multiple lines, line-terminators are embedded in the string, but
the final line does not have a line-terminator.
elemList
elements
A set of <elem> subelements, each specifying one element
processed by the user’s command.
Controlling Element Type and Exclusive File Locking with a “server_preop_trig” Script
The trigger parameters file sent to a server_preop_trig script contains an <output_file> element
— for example:
<triggerInput>
<hook>server_preop_trig</hook>
<output_file>cache/0_0.out</output_file>
...
The script can create a file at this relative pathname (it doesn’t exist when the trigger fires), in
order to control the element type and/or exclusive file locking state of some or all of the elements
processed by the user command.
The XML element named <elements> in the trigger parameters file contains the data that the
script needs to generate the output file— for example:
<elements>
<elem
count="0"
eid="0"
elemType="text"
hierType="parallel">/dir03/sub05/able.txt</elem>
<elem
count="1"
AccuRev Administrator’s Guide
69
eid="0"
elemType="text"
hierType="parallel">/dir03/sub05/baker.bin</elem>
<elem
count="2"
eid="0"
elemType="text"
hierType="parallel">/dir03/sub05/carr.doc</elem>
</elements>
For each AccuRev element to be processed, <elements> contains information about how the new
version of the element will be created — unless the script intervenes. This includes both the
element type (elemType attribute) and the exclusive file locking state (hierType attribute).
Note: <elemList> contains a subset of the data in <elements>, and can be safely ignored.
Suppose the example code above was passed to the server_preop_trig script by the add
command, which the user invoked to place three files under version control: able.txt, baker.bin,
and carr.doc. And suppose that the script decides to specify that:
•
Elements baker.bin and carr.doc are to be placed in the serial exclusive file locking state.
•
The first version of baker.bin is to have the binary element type.
In this case, the output file should contain the following code:
<elemList>
<elem count="1"
<elem count="2"
</elemList>
hierType="serial" elemType="binary"></elem>
hierType="serial"></elem>
Notes:
•
The top-level XML element in the output file is <elemList>, not <elements>.
•
Each <elem> XML subelement identifies an AccuRev element through the count attribute
(representing the position on the command-line); no element pathname is required.
•
The value of the hierType attribute must be either serial or parallel.
•
An <elem> is required only for AccuRev elements whose exclusive file locking state is to be
changed from the default (or with a keep command, to be changed from its existing state).
Thus, there need not be an <elem> for file able.txt, which is to be created in the default
locking mode, parallel.
•
The number of <elem>s need not match the number of AccuRev elements being processed by
the command; if there are “too many”, the final <elem>s are silently ignored; if there are “too
few”, the final AccuRev elements get the default processing.
•
A server_preop_trig script can coexist with a pre-create-trig script, both of them making
element-type specifications. The pre-create-trig script must specify an element type for every
new element; this is not a requirement for the server_preop_trig script. If both scripts specify
an element type for the same element, the server_preop_trig script “wins”.
AccuRev Administrator’s Guide
70
Format of the “server_admin_trig” Trigger Parameters File
The parameters file passed to a server_admin_trig script is in XML format: The set of
subelements under the <triggerInput> element depends on the user’s command. The following
table provides a summary. For full details, see the sample server_admin_trig script in the
examples directory in the AccuRev installation area.
Parameter
Description
depot
hook
command
principal
user
group
newName
newKind
ip
stream1
stream2
stream3
streamType
Name of depot in which the AccuWork issue database resides.
Type of trigger: server_admin_trig.
The user command.
AccuRev username of person invoking the command.
(chuser, chpasswd) AccuRev username being modified.
(ismember, addmember, rmmember) AccuRev groupname
(chuser, chgrp) new AccuRev username or groupname.
(chuser) new user kind (dispatch or cm).
The IP address of the client machine.
The stream targeted by the user command.
The parent (backing) stream of stream1.
(chws, chstream) The new name of the workspace or stream.
(mkstream, mksnap) The kind of stream being created by the
command: regular, pass-through, or snapshot.
(remove, rmws, reactivate) Name of object targeted by the
command.
(remove, rmws, reactivate) Type of object targeted by the
command: 1=reference tree; 2=workspace; 3=stream; 5=user;
6=group
objectName
objectType
Format of the “server_dispatch_post” Trigger Parameters File
The parameters file passed to a server_dispatch_post script is in flat-text format. The order of
the parameters in the table below is the order in which they appear in the file.
Parameter
Description
hook
project
Type of trigger: server-post-dispatch.
Name of depot in which the AccuWork issue database resides.
stream
blank line.
AccuRev Administrator’s Guide
71
Parameter
Description
from_client_promote
Two SPACE-separated fields:
•
The number of the transaction that created the previous
version of this issue record. (The number 0 indicates that this
is a newly created issue record.)
• The issue number
The number of the transaction that created this new version of the
issue record.
The time at which transaction_num was created.
blank line.
The AccuRev principal-name of the user who saved the issue
record.
transaction_num
transaction_time
comment_lines
author
Encoding of Element Lists
In both kinds of trigger parameters files, each element is listed by its path relative to the depot’s
top-level directory:
/tools/cont.sh
The path begins with a slash in order to simplify constructing the element’s full pathname on the
client machine: just append the given element pathname to the topDir pathname (the top-level
directory of the user’s workspace tree).
In the flat-text trigger parameters file, the elements (or elements-to-be) to be processed by the user
command are listed, one per line, at the end of the file:
/tools/cont.sh
/tools/end.sh
/tools/start.sh
<-- end-of-file of trigger parameters file
(Unlike the set of comment lines, there is no need to supply an element count; an end-of-file
condition signals the end of the element list.)
•
For pre-create-trig and pre-promote-trig, the element pathname appears alone on the line.
•
For pre-keep-trig, each element is followed by the version-ID of the version about to be
created (with the workspace specified by name), followed by the element-type code:
/dir07/sub04/file02.txt
rack_dvt_john/3
2
As always the element-type coding is: 1=directory, 2=text file, 3=binary file, 4=ptext file.
•
For server-post-promote-trig, each element is followed by the real version-ID of the
promoted version (with the workspace specified by number), followed by the element-type
code:
/doc/Chapter_03.rtf
AccuRev Administrator’s Guide
9/7
4
72
In the XML-format server_preop_trig trigger parameters file, the element paths are encoded as
<elem> sub-elements of the <elemList> element:
<elemList>
<elem>/tools/cont.sh</elem>
<elem>/tools/end.sh</elem>
<elem>/tools/start.sh</elem>
</elemList>
Encoding of Command Comments
In the flat-text trigger parameters file, the user’s comment is indicated by a line-count (0 or
greater), followed by the lines of the comment, if any:
4
adding some files
this multi-line
comment has
four lines
<-- number of comment lines to follow
In the XML-format trigger parameters file, the user’s comment is encoded as the contents of the
<comment> element: a single string. For a multi-line comment, this string has line-terminators
embedded:
<comment>adding some files
this multi-line
comment has
four lines</comment>
<-- embedded line-terminator
<-- embedded line-terminator
<-- embedded line-terminator
Note that the final line-terminator is automatically stripped from all comment strings.
The sample set of trigger scripts includes a Perl script for each kind of trigger. The script’s
comments include a detailed description of the layout of the parameters file for that kind of
trigger.
Trigger Script Contents
A trigger script can send email, start a build, update a Web site, or perform many other tasks. In
particular, you can run AccuRev commands to get more information. One common use of the
server-post-promote-trig trigger is to run the hist command using the transaction number of the
promotion, generating the list of promoted elements for inclusion in an email notification.
Trigger Script Exit Status
The exit status (return value) of a pre-create-trig, pre-keep-trig, pre-promote-trig,
server_preop_trig, or server_admin_trig script is important:
•
A zero exit status indicates success: the AccuRev command is allowed to proceed.
•
A non-zero exit status indicates failure: the AccuRev command is canceled and the depot
remains unchanged.
AccuRev Administrator’s Guide
73
File Handling by Trigger Scripts
A trigger script can overwrite its parameters file (after reading it, presumably). This provides a
way for the script to communicate with the AccuRev command or with a “downstream” script:
•
The parameters file for a pre-keep-trig script ends with a series of lines, one per element to be
kept:
<pathname-of-element>
<version-ID>
<element-type>
<pathname-of-element> is not a full file system pathname, but starts at the workspace’s toplevel directory (which is included earlier in the parameters file). <version-ID> is the new
version to be created for that element. <element-type> is the numeric code 1, 2, 3, or 4, as
described above. Note that different versions of an element can have different types.
See sample trigger script addheader.pl in the examples subdirectory of the AccuRev
installation directory.
•
The parameters file for a pre-promote-trig script ends with a series of lines, one per element
to be promoted:
<pathname-of-element>
<pathname-of-element> is not a full file system pathname, but starts at the workspace’s toplevel directory (which is included earlier in the parameters file).
A pre-promote-trig script can overwrite its parameters file, in order to communicate with a
server-post-promote-trig script: the first line of the overwritten parameters file becomes the
value of the from_client_promote parameter in the server-post-promote-trig script.
See sample trigger script client_dispatch_promote_custom.pl in the examples/dispatch
subdirectory of the AccuRev installation directory, along with server_post_promote.pl in the
examples subdirectory.
A trigger script can also send data to STDOUT and STDERR. If the command for which the trigger
fired was executed in the AccuRev CLI, this data appears in the user’s command window. If a
GUI command caused the trigger to fire, the script’s exit status determines whether the user sees
the STDOUT/STDERR data: in the “failure” case (non-zero exit status), the data is displayed in an
error-message box; in the “success” (zero exit status) case, the data is discarded.
Trigger Script Execution and User Identities
When a trigger script executes on a client machine, it runs under the identity of the AccuRev user
who entered the command. Since the user himself is registered (i.e. has a principal-name) in the
AccuRev user registry, there won’t be any authentication problems if the trigger script runs
AccuRev commands that access the repository.
When a trigger script executes on the server machine, it runs under the AccuRev user identity of
the AccuRev Server itself. Methods for setting an AccuRev username for the AccuRev Server
process are described in AccuRev User Identity of the Server Process on page 10.
AccuRev Administrator’s Guide
74
If you are using the “traditional” user-authentication method, you can also set the AccuRev
username in the script itself. For example:
$ENV{ACCUREV_PRINCIPAL} = "jjp";
system("accurev hist ...");
If you are using the “AccuRev login” user-authentication method, we recommend against using
the login command to set the AccuRev username in the script itself. You would have to include
the password for the AccuRev username in the script; this presents a significant security risk.
‘Administrative Users’ in Trigger Scripts
The sample Perl trigger scripts supplied by AccuRev provide a very simple implementation of the
“administrative user” concept: a user is permitted to perform certain operations only if his
username is recorded in the administrator hash defined in the script:
$administrator{"derek"} = 1;
$administrator{"allison"} = 1;
...
if ( ! defined($administrator{$principal}) ) {
print TIO "Execution of '$command' command disallowed:\n";
...
The Trigger Log File
When a trigger script runs on the AccuRev server machine — for a server-post-promote-trig,
server_preop_trig, or server_admin_trig trigger — an invocation line is written to file
trigger.log in the logs subdirectory of the repository’s site_slice directory:
##### [2004/06/28 20:50:42] running: '"C:\Program Files\AccuRev\bin\pst_pro.bat" ...
If the script produces console output (STDOUT and/or STDERR), this output is also sent to the
trigger.log file.
As with other server log files, the trigger.log file is “rotated” periodically, to keep active logs
from growing too large.
Integrations Between AccuRev and AccuWork
This section describes two similar, but separate facilities that integrate AccuRev’s configuration
management functionality with its issue management (AccuWork) functionality. Both
integrations record information about the Promote transaction in a user-specified AccuWork
issue record. One of them uses an issue record’s change package as the point of integration; the
other uses a particular field in the issue record as the point of integration.
Change-Package-Level Integration
When a promote command is executed in a user’s workspace (but not in a higher-level dynamic
stream), the change-package-level integration records all the promoted versions on the Changes
subtab of a user-specified AccuWork issue record.
AccuRev Administrator’s Guide
75
Enabling the Integration
The change-package-level integration is enabled on a depot-by-depot basis. Open the AccuWork
Schema Editor for a particular depot’s issue database, and go to the Change Packages subtab.
Filling in the lower section, “Change Package Triggers”, enables the integration for that particular
depot.
The Change Package Triggers section is structured as a set of condition/query pairs. One of the
queries will be selected for execution at promote-time. If the first condition in the left column is
satisfied, the first query in the right column will be executed; otherwise the second condition will
be evaluated, and if it’s satisfied, the second query will be executed; and so on.
results format
for Show
Issues and
Show Diff
By Issues
commands
one of these
queries will be
executed at
Promotetime
.
.
.
and its results
will be
displayed in
this format
Each clause of a condition performs a test on the Promote destination stream. For example, this
condition is satisfied if the user is promoting to either of the streams possum_mnt or possum_tst:
The query corresponding to each condition can be any AccuWork query, which selects a set of
issue records.
AccuRev Administrator’s Guide
76
The Change Package Triggers section also specifies the format of each query’s results table — the
fields to appear as columns, the column widths, the order of the columns (fields), and the sort
order of the rows (records).
Triggering the Integration
Once the integration is enabled for a depot, it is triggered whenever a user performs a promote
command in a workspace associated with that depot.
If the Promote command is invoked through the AccuRev GUI:
1. One of the AccuWork queries specified in the Change Package Triggers section is executed,
selecting a certain set of issue records.
2. Those records are displayed to the user in the results table format specified in the Change
Package Triggers section.
3. The user selects one or more of the issue records. There is also a New Issue button, which
enables the user to create a new issue record “on the fly”.
4. The command completes its work.
5. The versions involved in the command are recorded in the change package section (Changes
page) of the selected issue record(s).
If the promote command is invoked through the AccuRev CLI:
1. Just as with the GUI, one of the AccuWork queries specified in the Change Package Triggers
section is executed, selecting a certain set of issue records.
2. The user is prompted to specify an issue record:
Please enter issue number ?
AccuRev Administrator’s Guide
77
Users can bypass this prompt by specifying an issue number with the –I option:
> accurev promote -I 4761 chap01.doc
Validating elements.
Promoting elements.
Promoted element \.\doc\chap01.doc
You can specify multiple issue records with the –I option like this:
... -I "4761 4795 5006" ...
Note: attempting to update an existing change package entry might cause a “change package
gap” or “change package merge required” situation, either of which cancel the promote
command. For example:
Promoting elements.
Change package gap: /doc/chap01.doc
You can handle a change package gap by adding the –g option to the promote command. This
combines the new and existing change package entries by “spanning the gap”:
> accurev promote -I 4761 -g chap01.doc
Validating elements.
Promoting elements.
Promoted element \.\doc\chap01.doc
There is no way to have the promote command automatically handle a “change package
merge required” situation. You must either perform a merge on the element to be promoted, or
remove the existing change package entry for that element.
For more on “change package gap” and “change package merge required” situations, see
Updating Change Package Entries on page 37 of the AccuRev Concepts Manual.
3. Assuming the user-specified issue record is one of those selected by the query, the command
completes its work, and the promoted versions are recorded in the change package section of
the selected issue record.
What happens if the user specifies no issue record or a non-existent issue record, such as 99999 or
0? In both the GUI and CLI cases:
•
If the user enters “0” (or equivalently, makes a blank or non-numeric entry), AccuRev checks
whether issue record #0 is among the issues selected by the query executed in Step 1.
Note: the query can select issue record #0, even though it doesn’t exist — for example with
this clause:
issueNum
equal to
0
•
If the query does select issue record #0, the user’s command completes but no information
is sent to the issue database. This provides a way for the user to bypass the integration
when performing the promote command.
•
If the query does not select issue record #0, the user’s command is cancelled, and no
information is sent to the issue database.
AccuRev Administrator’s Guide
78
•
If the user specifies a non-existent issue record, such as “99999”, the command is cancelled,
and no information is sent to the issue database.
Transaction-Level Integration
The integration between configuration management and issue management at the transaction
level records the number of each promote transaction in a particular field of a user-specified issue
record.
Enabling the Integration
The transaction-level integration is enabled on a depot-by-depot basis, by setting the depot’s prepromote-trig trigger. For example:
accurev mktrig -p kestrel pre-promote-trig client_dispatch_promote
Note that “client_dispatch_promote” is simply a keyword, not the name of a script file. The
integration is implemented by two cooperating routines, one built into the AccuRev client
software, one built into the AccuRev server software.
Triggering the Integration
Once the integration is enabled for a depot, it is activated whenever a user executes the Promote
command in any workspace or dynamic stream.
1. The depot’s default query, as defined on the Queries tab (Issues > Queries), is executed and
the results are displayed to the user.
2. The user selects one of the issue records. Note that if no
default query is defined for the depot, the user is
prompted to type an issue record number.
3. The promote command completes its work, propagating
the versions to the backing stream.
4. The promote transaction number is recorded in the
affectedFiles field of the selected issue record. (This
change to the issue record is, itself, recorded as a
transaction, of kind dispatch.)
If the user enters “0” or makes a blank entry, the promote command completes but no change is
made to any issue record. This provides a way for the user to bypass the integration.
Over time, the affectedFiles field of a given issue record can accumulate a SPACE-separated list of
Promote transaction numbers.
Implementation and Customization of the Transaction-Level Integration
When the transaction-level integration is activated, processing takes place on both the AccuRev
client machine and the AccuRev server machine:
AccuRev Administrator’s Guide
79
•
The client-side processing — querying the AccuWork issue database and prompting the user
to specify an issue record — is structured as a pre-promote-trig trigger routine built into the
AccuRev client software.
•
The server-side processing — updating of the AccuWork issue record — is structured as a
server-post-promote-trig trigger routine built into the AccuRev server software.
You enable the integration by setting the pre-promote-trig trigger with the
“client_dispatch_promote” keyword, as described above. You don’t need to explicitly set a
server-post-promote-trig trigger script. If you do, the script runs instead of — not in addition to
— the server-side built-in routine.
In most cases, you’ll want to avoid setting a server-post-promote-trig trigger script, just letting
the built-in routines do their work. But suppose that after a Promote, you want the server machine
to perform operations in addition to those defined in the transaction-level integration — for
example, updating reference trees and sending email messages. In such cases:
1. Create a script that performs the server-side part of the transaction-level integration, along
with the desired additional processing. Start with the sample script
server_dispatch_promote_custom.pl, which is located in the examples/dispatch
subdirectory of the AccuRev installation directory.
2. Place the script in the AccuRev bin directory.
3. Use a mktrig command to make the script the depot’s server-post-promote-trig trigger
script.
Further customizations of the transaction-level integration are possible. For example, you might
want the user to be able to specify several issue records, not just one. Or you might want to link
promote commands in one depot with the AccuWork issue database in another depot. Or you
might want to update an issue record field other than affectedFiles. In such cases, you’ll want to
dispense with the built-in “client_dispatch_promote” routines altogether:
1. Start with the sample script client_dispatch_promote_custom.pl (in the examples/dispatch
subdirectory), and create your own script for use as a pre-promote-trig script to execute on
the client.
2. As described above, start with the sample script server_dispatch_promote_custom.pl (in the
examples/dispatch subdirectory), and create your own script for use as a server-postpromote-trig script to execute on the server.
If Both Integrations are Enabled
Both the change-package-level and transaction-level integrations can be enabled for a given depot
at the same time. In this case, a user performing a Promote command in a workspace is prompted
to specify an issue record just once, not twice. The prompting for an issue record by the changepackage-level integration takes place as usual. That issue record is then updated by both
integrations.
AccuRev Administrator’s Guide
80
Note that even if both integrations are enabled, a Promote command performed in a dynamic
stream (not a workspace) activates just the transaction-level integration, not the change-packagelevel integration.
AccuRev Administrator’s Guide
81
AccuRev Administrator’s Guide
82
The ‘maintain’ Utility
This document describes AccuRev’s maintain utility, an administrative tool for occasional use
under the guidance of an AccuRev Support Services representative. Before executing a maintain
command, you must first stop the AccuRev Server process.
The maintain utility is a non-interactive command-line tool, with a simple command structure.
For example:
maintain reindex <depot-name>
The maintain program is located in the AccuRev bin directory. If the command-line client
program, accurev, is on your search path, then so is maintain.
Each of the maintain commands is described in the next section. Following that are “how to”
sections involving use of maintain commands.
‘maintain’ Command Reference
chpasswd
maintain chpasswd <user> <new-password>
Changes the password stored in the AccuRev repository for an existing principal-name
(named AccuRev user). To remove a user’s password, use two consecutive double-quote
characters as the <new-password> parameter:
maintain chpasswd derek ""
If you are using AccuRev’s “traditional” user-authentication method, the user should invoke
the accurev setlocalpasswd command to change his “local password” on each client machine
that he uses. A user’s local password is stored in file authn in subdirectory .accurev of the
user’s home directory.
chuser
maintain chuser <user-ID> <new-username>
Changes the principal-name (AccuRev username) of an existing user. You specify the user by
the unique numeric user-ID, which is immutable. This command is similar to the accurev
chuser command.
dbcheck
maintain dbcheck
Checks the consistency of the streams database (streams.ndb) in the site_slice directory, and
checks the consistency of all the database (.ndb) files in all depots.
Note: be sure to stop the AccuRev Server process before running this command.
export
maintain export [ <depot-name> ] [ <table> [ <start-rec> [ <end-rec> ] ] ]
AccuRev Administrator’s Guide
83
Produces an ASCII dump of one of the following:
•
all the database tables in the repository’s site slice directory
•
all the database tables in the specified depot
•
a particular database table in the site slice directory, or in a specified depot
•
a range of records in a particular database table (the first record is 1; omitting the final
<end-rec> argument says “all the remaining records”)
To export part or all of a database table in the site slice, you must specify an empty string as
the <depot-name> argument — for example, with two consecutive double-quote characters.
The <table> argument must be one of:
projects streams wspaces pools sec_group principal acl lock
For a database table in a depot, the <table> argument must be one of:
ancestry archives comp elems groups history issue issue0
issue_relate issue_ver link loc ser storage trans ver vir_ver
export_csv
maintain export_csv [ <depot-name> ] [ <table> [ <start-rec> [<end-rec>] ] ]
Like export, but produces a dump of comma-separated values.
export_indices
maintain export_indices [<depot-name>] [<table> [<start-rec> [<end-rec>]]]
Like export, but reports index tables only. For the site slice, the only index table is stream.
loc128
maintain loc128 <depot-name>
Changes the maximum length of a pathname segment (the simple name of a file or directory)
to 128 characters, for the specified depot.
Use this command to “upgrade” depots created with earlier versions of AccuRev; in later
versions, all depots are created with the 128-character maximum for pathname segments.
migrate
maintain migrate
maintain migrate <depot-name>
Converts the specified depot from little-endian to big-endian format, or vice-versa. If you
omit the <depot-name> argument, it converts the site_slice directory. In all cases, the
conversion is non-destructive: the data structure itself is not modified or deleted; the
converted data is written to a subdirectory named swapped within the site_slice directory or
depot directory. Converting the “endian-ness” consists of reversing the order of the 8-bit bytes
in each machine-level word. For a step-by-step conversion procedure, see Moving the
AccuRev Server and Repository to Another Machine on page 45.
AccuRev Administrator’s Guide
84
reindex, restore
Along with backup, provides a facility for backing up and restoring the AccuRev repository.
See Backup/Restore of the AccuRev Repository on page 86.
rmdepot
maintain rmdepot <depot-name>
Removes a depot from the AccuRev repository. All streams, snapshots, and workspace
streams are also removed from the repository. (Workspace trees are not removed.) For details,
see Removing a Depot from the AccuRev Repository on page 87.
sizes
maintain sizes [ <depot-name> ]
With no argument, lists information about each database file in the site slice: the name of the
database file, the database schema version, the high water mark (“valid size”), the actual file
size, and the number of records. Here’s a sample line:
db: wspaces schema: 2 valid size: 434672 file size: 434672 valid records: 804
With a <depot-name> argument, lists information about each database file in the specified
depot.
timeshift
maintain timeshift <depot-name> <earlier-trans-#> <later-trans-#> <seconds>
Adds/subtracts a number of seconds to the timestamps of a range of transactions, for the
specified depot. The <seconds> parameter must be an integer; use a negative integer to shift
timestamps backward. All transactions in the specified transaction range (inclusive) are time
shifted.
This command refuses to make any change if any shifted transaction would move past any
ushifted transaction. That is, the command refuses to change the order of transactions in the
repository.
timeshiftstreams
maintain timeshiftstreams <depot-name> <earlier-time> <later-time> <secs>
Adds/subtracts a number of seconds to the startTime property of certain streams in a
specified depot. This property, which appears in an XML-format listing of the stream (show
–fx streams), records the stream’s creation time (mkstream) or the time the stream was last
modified (chstream).
Only those streams whose current startTime is in the specified time range are affected. You
must specify the <earlier-time> and <later-time> arguments in “startTime style” — as a pair
of integers, each of which is the number of seconds since Jan 1, 1970 UTC. Example:
maintain timeshiftstreams duplo 1154016840 1154019950 5
AccuRev Administrator’s Guide
85
Use an XML-format show streams listing to determine the appropriate values for the
<earlier-time> and <later-time> arguments. You may also find the following Perl script
useful: it converts an integer time to human-readable format:
>>> perl -e "print scalar localtime(1154019950)"
Thu Jul 27 13:05:50 2006
unmap
maintain unmap <depot-name>
Applies the AccuRev Server’s temporary index maps to its actual index files. If a user
accesses an index while it is being updated, a temporary map is created. This keeps the
information accessed by any particular user stable and unchanging during the time of their
request, while allowing new requests to see the more recent information.
The AccuRev Server uses any existing temporary maps to update the real index files
whenever a repository write operation is performed and there are no other requests pending. If
this opportunity does not present itself in a timely manner, you can stop the Server and run
unmap, which applies all temporary maps for the specified depot. This operation will
complete relatively quickly.
Note: be sure to stop the AccuRev Server process before running this command. You can run
the equivalent AccuRev CLI command, accurev unmap, without stopping the AccuRev
Server process.
vercheck
maintain vercheck [ -c | -q ] [ -e <eid> ] <depot-name>
Checks the storage containers in the specified depot’s data directory tree, to verify that a
storage container file (.sto) exists for each file version recorded in the depot database. It also
reports occurrences of “crc mismatch” problems: the actual checksum (CRC) of a .sto file
does not match the checksum recorded in the corresponding rapid recovery file (.rrf).
In addition, you can correct “crc mismatch” problems, using these options:
•
–q option: for each file with a “crc mismatch”, (step 1) compute the checksum of the .sto
file, and (step 2) replace the “c:” value in the .rrf file with this newly computed value.
•
–c option: like –q, start with this step for each file: (step 0) change the .sto file by
removing all its CR characters — that is, all bytes with the value 0x0D.
You can restrict the processing to versions of a particular element with the –e option.
vercheck fixes all the versions of the element that have a “crc mismatch” problem, leaving
other versions as is.
Backup/Restore of the AccuRev Repository
An accurev command (backup) and two maintain commands (restore and reindex) are
involved in the scheme for backing up and restoring the AccuRev repository with a minimum of
disruption to development activities.
AccuRev Administrator’s Guide
86
The command accurev backup mark declares a “checkpoint” of the entire AccuRev repository,
by:
•
Copying all the database files (.ndb) and the index file stream.ndx from the site_slice
directory to a subdirectory named backup.
•
Recording the current state of each depot’s database files in file valid_sizes_backup in the
depot directory.
This is an accurev command — it can be executed while the AccuRev Server process is running
and development activities are ongoing. The backup mark command does not actually copy any
files to a backup medium; it just marks a consistent state of the repository files. After executing
this command, you can back up the repository files, in any order, and on any schedule, while users
continue to use AccuRev. For more information, see Backing Up the Repository on page 3.
At any time after you’ve executed an accurev backup mark command and copied the repository
files to a backup medium, you can restore the repository to its state at the time the backup
command was executed. This is an offline procedure — the AccuRev Server must be stopped
when you run it. The procedure is documented in section Restoring the Repository on page 4. The
maintain commands involved are:
restore
maintain restore <depot-name>
Rolls back all the database files (.ndb) in the specified depot to their state at the time of the
accurev backup mark command. This is a “logical truncate” operation — a file-system
truncate is not performed on the database files.
reindex
maintain reindex [ <depot-name> ]
Reads various database files (.ndb) and recreates the corresponding index files (.ndx). This
operation is performed on the database files of the specified depot; if you omit the <depotname> argument, the operation is performed on the repository-wide database files in the
site_slice directory
Removing a Depot from the AccuRev Repository
This section describes a procedure for removing a depot completely from the AccuRev repository.
Removing a depot:
•
Deletes every version of every file and directory in the depot.
•
Deletes the entire history of the depot — all transactions involving the depot and its elements.
Removing a depot does not affect any of the workspaces or reference trees that contain copies of
the depot’s elements.
AccuRev Administrator’s Guide
87
Before You Begin
We strongly recommend that you preserve a backup copy of the AccuRev data repository before
deleting any depots. See Backing Up the Repository on page 3. Much of a depot’s data is stored in
its slice of the repository. Use the command accurev show slices to determine the pathname of a
depot’s slice; you’ll need it in Step 3 below.
Depot Removal Procedure
The following procedure must be performed on the machine where the AccuRev repository
resides.
1. Stop the AccuRev Server process:
•
Unix/Linux: use the acserverctl utility, located in the AccuRev bin directory:
acserverctl stop
•
Windows: use the Services program, or enter the command net stop accurev in a
Command Prompt window.
2. Execute the maintain program’s remove-depot command. This utility program is located in
the AccuRev bin directory.
maintain rmdepot <depot-name>
For safety, the rmdepot command goes through two confirmation steps, including having you
retype the depot name. The command displays some messages, ending with:
Site reindex complete.
The rmdepot command completely removes the depot’s records from the repository database
in the site_slice directory. (There’s one exception: the depot’s name remains in the database.
See Step 5.)
3. Remove the depot directory subtree (slice) from the AccuRev storage directory tree. Be
careful not to remove any other depot’s directory subtree! If you’re not sure where the depot’s
slice is located, use the command accurev show –fi slices to determine the pathname. (This
command requires the AccuRev Server to be running.)
For example, if the depot is named widget and AccuRev is installed on a Unix/Linux machine
at /opt/accurev, use this command:
rm -r /opt/accurev/storage/depots/widget
4. Restart the AccuRev Server process:
•
Unix/Linux: use the acserverctl utility, located in the AccuRev bin directory:
acserverctl start
•
Windows: use the Services program, or enter the command net start accurev in a
Command Prompt window.
AccuRev Administrator’s Guide
88
5. At this point, the depot’s name remains in the AccuRev repository database. It won’t appear in
an accurev show depots command listing, but will appear in an accurev show –fi depots
command listing.
Reusing a Depot’s Name
6. If you want to reuse the depot’s name with accurev mkdepot, you must first rename the
deleted depot with accurev chdepot -p <depot-name> <new-name>.
AccuRev Administrator’s Guide
89
AccuRev Administrator’s Guide
90