1
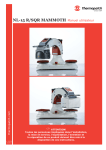
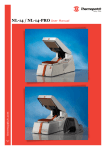
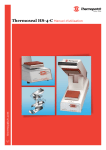
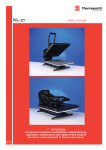
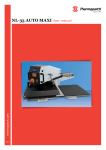
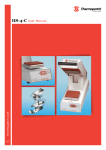
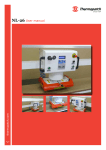
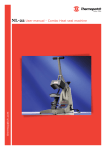
thermopatch.com NL-15 R/SQR MAMMOTH V. 3.0 ENG Jan2014 User manual ATTENTION! All persons involved in installation, commissioning, operation, maintenance and repair of this product should be made available to these instructions. Copyrights thermopatch.com © 2014, Thermopatch bv, Almere, The Netherlands. No part of this publication may be reproduced by any means without the prior written permission of Thermopatch bv, The Netherlands. Thermopatch and the Thermopatch logo, Thermoseal and Thermocrest are registered trademarks of Thermopatch. V. 3.0 ENG Jan2014 Manual NL-15 R / SQR V.3.0 ENG translation from Original Version NL-15 R / SQR V.3.0 NL QC/TDPT/mn-fh January 2014 2 Introduction Dear User, Welcome to the growing group of Thermopatch users. Your purchase has been manufactured with the utmost care to ensure that you benefit as long as possible from your Thermopatch product. The products by Thermopatch are designed with special attention to your convenience. Should you discover any fault or damage upon receipt of this product, please contact your local Thermopatch vendor. The manual has been prepared in accordance with NEN 5509 and in conformity with the Machinery Directive 2006/42/EC. This user manual is intended not only for all users of the machine, but also for those who install and maintain the NL15 R / SQR. The goal is to familiarize you with the operation, to provide for safe working instructions and guidelines for periodical maintenance. This manual applies to machines NL-15 R / SQR from serialnumbers for type R: M14-03-0420 and for type SQR: SQR13-0456. ATTENTION! thermopatch.com In order to make safe and optimal use of the NL-15 R / SQR, it is important to take note of and understand the contents of this manual. V. 3.0 ENG Jan2014 Manual NL-15 R / SQR V.3.0 ENG translation from Original Version NL-15 R / SQR V.3.0 NL QC/TDPT/mn-fh January 2014 3 thermopatch.com Contents V. 3.0 ENG Jan2014 Copyrights Introduction Contents DECLARATION OF CONFORMITY 1. General description 1.1 Delivery 1.2 Conditions of warranty 2. Intended use 3. Technical specifications 3.1 Specifications of the NL-15 R / SQR 4. Overview of safety measures and warnings 4.1 Safety 5. Transport and storage 5.1 Transport 5.2 Storage 6. Operating instruction 6.1 Operating the NL-15 R / SQR 6.2 Automatic mode 6.3 Safety Frame 6.4 The control panel 6.5 Change settings 6.5.1 Temperature settings 6.5.2 Pressure settings 6.5.3 Time settings 6.5.4 Power save 6.5.5 Different seal times left and right (optional) 6.5.6 Second sealing cycle 6.5.7 Interrupting the sealing cycle 6.5.8 Messages in the display 7. Assembly and installation 7.1 Assembly 7.2 Installation 8. Maintenance instructions 8.1 Daily maintenance 9. Technical annexes Parts list 01 Drawing 01 Parts list 02 Drawing 02 Parts list 03 for NL-15 R Drawing 03 for NL-15 R Parts list 03 for NL-15 SQR Drawing 03 for NL-15 SQR Parts list 04 Drawing 04 Parts list 05 Drawing 05 Parts list 06 for pneumatic parts Drawing 06 pneumatic diagram with parts Drawing 07 Electrical wiring diagram 10. Faults 11. End of life Manual NL-15 R / SQR V.3.0 ENG translation from Original Version NL-15 R / SQR V.3.0 NL QC/TDPT/mn-fh January 2014 4 2 3 4 5 6 6 6 7 8 8 9 9 11 11 11 12 12 12 12 13 14 14 14 15 15 15 16 16 16 17 17 17 18 18 19 19 20 21 22 23 24 25 26 27 28 29 30 31 32 33 34 35 DECLARATION OF CONFORMITY We, Thermopatch B.V. Draaibrugweg 14 1332 Almere The Netherlands herewith declare, on our own responsibility, that the machinery: Thermopatch Thermoseal NL-15 R / SQR, which this declaration refers to, is in accordance with the conditions of the following Directive(s): 2006/42/EG (Machinery directive) 2004/108/EG (EMC directive) Based on DEKRA IEC 610101-1 testrapport nr. 2166589.60PEP The Netherlands, Almere, 21-01-2014 thermopatch.com Jan Bausch, Director V. 3.0 ENG Jan2014 Manual NL-15 R / SQR V.3.0 ENG translation from Original Version NL-15 R / SQR V.3.0 NL QC/TDPT/mn-fh January 2014 5 1. General description The pneumatic Mammoth is a practical and universal heat seal press with two press pads for optimal use. Therefore, you do not have to wait during the press cycle, but can prepare the next article. Textile labels, company emblems, repair patches, transfers, in short all Thermopatch materials for marking and repair are easily and permanently pressed on all types of fabric. The machine is hand operated but can also be set to automatic operation. In that case, the press cycle is performed automatically when the swivelling arm comes in the end position. 1.1 Delivery The NL-15 R / SQR is mounted onto a pallet and fixed with straps, covered with a cardboard box. The following articles can be found at: NL-15 R / SQR heat seal machine • Power cord • 6 mm air hose • Quick installation guide • quality checklist • Manual on CD-ROM • CE Declaration of Conformity • If one of these articles should be missing or faulty, please contact your Thermopatch supplier. thermopatch.com 1.2 Conditions of warranty Thermopatch points to its warranty and product liability conditions as laid down in our conditions of sales. These can be obtained at your Thermopatch supplier. V. 3.0 ENG Jan2014 Manual NL-15 R / SQR V.3.0 ENG translation from Original Version NL-15 R / SQR V.3.0 NL QC/TDPT/mn-fh January 2014 6 2. Intended use The pneumatic NL-15 R / SQR is a heat seal machine that is intended for the application of textile labelling, repair patches and transfers. In short, all Thermopatch marking and mending materials can be applied with the NL-15 R / SQR. WARNING! thermopatch.com Any use other than described above can be dangerous and cause damage and thus qualifies as ‘misuse’ which excludes Thermopatch bv from any liability. V. 3.0 ENG Jan2014 Manual NL-15 R / SQR V.3.0 ENG translation from Original Version NL-15 R / SQR V.3.0 NL QC/TDPT/mn-fh January 2014 7 3. Technical specifications 3.1 Specifications of the NL-15 R / SQR 800 Watts 230 Volt 204 °C 25-210 °C 1-60 sec. 3-6 bar 470 mm 540 mm 470 mm 85 kg 65 kg 160 mm 4.0 Ampere <70 dB (A) NL-15 SQR Power Power supply Operating temperature Temperature range Press Time range Discharge pressure range Machine height (open) Machine width Machine depth Gross weight, including packaging Net weight Size sealing pads, square Fuses A-weighted noise level 800 Watts 230 Volt 204 °C 25-210 °C 1-60 sec. 3-6 bar 470 mm 540 mm 470 mm 85 kg 65 kg 140 x 140 mm 4.0 Ampere <70 dB (A) thermopatch.com NL-15 R Power Power supply Operating temperature Temperature range Press Time range Discharge pressure range Machine height (open) Machine width Machine depth Gross weight, including packaging Net weight Size sealing pads, round Fuses A-weighted noise level V. 3.0 ENG Jan2014 Manual NL-15 R / SQR V.3.0 ENG translation from Original Version NL-15 R / SQR V.3.0 NL QC/TDPT/mn-fh January 2014 8 4. Overview of safety measures and warnings 4.1 Safety The NL-15 R / SQR has several features to ensure your safety. The safety frame The press plate of the NL-15 R / SQR is provided with a safety frame. When this is touched or firmly moved, the heat sealing cycle is automatically interrupted. To resume work, turn the machine off and on again. The emergency stop button In addition to the mandatory safety measures in conformity with the Machinery Directive, from serial numbers: Model R: M14-03-0420 and model SQR: SQR13-0456, an emergency stop button has been provided to be able to intervene even faster in case of unforeseen events. The safety thermostat The safety thermostat on the heating element will interrupt the power supply when the temperature rises above 270°C. ATTENTION! Make sure you are informed about the contents of this manual before starting to work with the NL-15 R / SQR. This ensures an optimal and safe use of the machine. ATTENTION! Always turn the power off (unplug it) when you need to carry out maintenance work or when cleaning the machine. ATTENTION! In case of emergency, press the emergency stop button! thermopatch.com ATTENTION! Take care that there is enough space around the machine. Cables and connections must not get pinched. Although the heat radiation of the press is low, there should be enough space for cooling down. ATTENTION! Avoid contact with the press element and the heating element. ATTENTION! Pull the fabrics tight around the press pad and ensure that your hands are away from the sealing pad before operating the machine. V. 3.0 ENG Jan2014 Manual NL-15 R / SQR V.3.0 ENG translation from Original Version NL-15 R / SQR V.3.0 NL QC/TDPT/mn-fh January 2014 9 Warning symbols The following warning symbols have been mounted onto the machine for added safety: WARNING! Hot surface WARNING! Electric tension WARNING! thermopatch.com Pinching hazard V. 3.0 ENG Jan2014 Manual NL-15 R / SQR V.3.0 ENG translation from Original Version NL-15 R / SQR V.3.0 NL QC/TDPT/mn-fh January 2014 10 5. Transport and storage 5.1 Transport When the machine needs to be moved, Thermopatch advises to use the original packaging. The machine has to be lifted by the screw that is fixing the swiveling arm and the handle on the front of the machine. thermopatch.com 5.2 Storage When the machine needs to be stored, Thermopatch advises to use the original packaging. The machine should be stored on a pallet, off the floor, in dry conditions. V. 3.0 ENG Jan2014 Manual NL-15 R / SQR V.3.0 ENG translation from Original Version NL-15 R / SQR V.3.0 NL QC/TDPT/mn-fh January 2014 11 6. Operating instruction 6.1 Operating the NL-15 R / SQR You can work with the Mammoth when the machine is connected to the mains. • Set the airpressure • See paragraph 6.8 for information regarding the pressure settings required for the NL-15 R / SQR. • Place the plug in the socket and turn on the NL-15 R / SQR with the ON - OFF switch mounted on the back of the machine. • Wait until the factory set temperature is reached. This will take approx 1 minute. The standard operating temperature has been set to 204 °C. The press can be operated now. 6.2 Automatic mode You can use the NL-15 R / SQR in Auto mode by pressing the AUTO -button The press cycle will automatically start when the swivel arm is positioned above the press plate.The robot symbol ( The automatic mode ( ) is shown in the display. ATTENTION! ) should be switched off, when you wish to change the set values for temperature, pressure and press time. When the automatic mode is activated, the key board will not respond. thermopatch.com 6.3 Safety Frame The upper platen of the press head of the NL-15 R / SQR is enclosed by a safety frame. This frame will react if it is moved or touched and will interrupt the sealing cycle immediately. Switch the machine off and on again to resume work. V. 3.0 ENG Jan2014 Manual NL-15 R / SQR V.3.0 ENG translation from Original Version NL-15 R / SQR V.3.0 NL QC/TDPT/mn-fh January 2014 12 6.4 The control panel NL-15 R / SQR control panel The pressure, temperature and time are shown on the display. The minimum, maximum and default values for temperature and pressure have been set by the manufacturer. The following icons are present on the display: KEYS Temperature setting Pressure setting thermopatch.com Time setting + Plus (higher) - Minus (lower) AUTO SYMBOLS ON SCREEN Automatic mode on Power saving mode on Next to time indicator Second sealing cycle active Interruption of the safety circuit V. 3.0 ENG Jan2014 Manual NL-15 R / SQR V.3.0 ENG translation from Original Version NL-15 R / SQR V.3.0 NL QC/TDPT/mn-fh January 2014 Automatic mode on / off 13 6.5 Change settings The automatic mode ( ATTENTION! ) should be switched off, when you wish to change the set values for temperature, pressure and press time. When the automatic mode is activated, the key board will not respond. 6.5.1 Temperature settings The default operating temperature of 204 °C has been set by the manufacturer. In case you want to adjust the operating temperature above or below the default temperature range, please contact the service department of your supplier. The default temperature range is: minimum 25 °C, maximum 210 °C. ATTENTION! The NL-15-R / SQR has maximum a tolerance of 10 ° C above or below the set temperature. If the limit of + or - of 10 ° C is exceeded, the machine cannot be operated. Temperature change You can change the temperature in steps of 1 degree by pushing the -button 1 x pushing the + and the -. You change from Celsius to Fahrenheit and vice versa by pushing the -button for 3 seconds. thermopatch.com Temperature check The temperature is displayed digitally by pressing one key. An additional check of the temperature between the press plates can be performed by means of Thermolabels. V. 3.0 ENG Jan2014 Om de temperatuur te controleren doe het volgende: To check the temperature, do the following: 1. Let the machine heat up for about 1 minute. 2. Set the time to 12 seconds and close the machine. 3. After opening the machine again, put the Thermolabel on the press pad and close the machine again. 4. Take the label away immediately after opening the machine. 6.5.2 Pressure settings The working pressure of the machine has been set to 5 bar. The pressure regulator on the machine only influences the pressure on the press cylinder. The opening and closing of the NL-15 R / SQR is done with the pressure that is supplied by the machine. The NL-15 R / SQR has a pressure safety range; this means that a maximum pressure of about 6 Bar and a minimum pressure of 4 Bar is allowed. When the air pressure exceeds Manual NL-15 R / SQR V.3.0 ENG translation from Original Version NL-15 R / SQR V.3.0 NL QC/TDPT/mn-fh January 2014 14 these limits, the machine cannot be operated. You can set the pressure with the control panel. Change pressure You set the minimum pressure range in steps of 0,1 Bar by -button and then the + or - button once. pushing the You set the maximum pressure range in steps of 0,1 Bar by -button and then push the + or – button pushing the twice (2x). The standard working pressure for textile repair and marking is 5 Bar. 6.5.3 Time settings The default sealing time setting of the NL-15 R / SQR is 12 seconds. Adjusting the settings can be done with the control panel. Change time Push the -button once. Change the time setting in steps of 1 second by pushing the - or + button. The range is 1 - 60 seconds. thermopatch.com 6.5.4 Power save When you want the machine to switch to a lower energy level when you are not working, you can use the power save mode. Push the -button twice. Set the power save mode in steps of 1 minute by pushing the + or – button. Power save ranges from 1-60 minutes. If it is set to 0 the power save mode is not active and the machine will be heated continuously. 6.5.5 Different seal times left and right (optional) To enable sealing 2 different products in a short time, the seal time for the left and the right sealing pad can be set on a different parameter Push the -button three times. Change the time for the left sealing pad in steps of 1 second by pushing the + or – button. If the time is set on 0 seconds the seal time left and right are equal. V. 3.0 ENG Jan2014 Manual NL-15 R / SQR V.3.0 ENG translation from Original Version NL-15 R / SQR V.3.0 NL QC/TDPT/mn-fh January 2014 15 6.5.6 Second sealing cycle In some cases it is desirable to seal a second time. Push the AUTO button during three seconds. A second seal cycle of 2 seconds takes place. You can switch this option off by pushing the button for three seconds once more. ATTENTION! If the first sealing cycle has been interrupted, the second cycle will not start. 6.5.7 Interrupting the sealing cycle There are various means to interrupt the sealing cycle of the machine. You can interrupt the operation by: 1. Pushing a button of the display randomly. 2. Turning the on/off switch on the front. 3. Stir the safety bar. 4. Push the emergency stop button, pull out and switch on the machine again. ATTENTION! If the first sealing cycle has been interrupted, the second cycle will not start. 6.5.8 Messages in the display A description is given below of the messages in the display which appear immediately after turning on the machine. Further, we will discuss some failure codes that can be displayed on the control panel display. • During heating up of the machine the temperature, pressure and time are displayed. • During the press cycle the press time is displayed from 0 to the programmed sealing time • Automatic mode ON/OFF is displayed with the Robot- thermopatch.com icon( ). is displayed during POWER SAVE MODE. • 6.5.9 Error codes There are 6 different failure codes that can be displayed; contact your Thermopatch supplier. 01 Sensor defective or broken sensor cable 02 Sensor short cut 03 04 Element defective or broken element cable Pressure set too low 05 Pressure set too high 06 Safety switch interrupted or defective V. 3.0 ENG Jan2014 Manual NL-15 R / SQR V.3.0 ENG translation from Original Version NL-15 R / SQR V.3.0 NL QC/TDPT/mn-fh January 2014 16 7. Assembly and installation 7.1 Assembly To work seamlessly with the NL-15 R / SQR, it is very important that the machine can dispose of supply of clean, dry air. The water condenser is an additional safety measure. Provide pressure of 4-6 bar from the compressor or its own air supply. Attach a tube with a diameter of 6 mm at the compressor or own air supply and the air regulator of the NL15 R / SQR. 7.2 Installation Upon delivery, the NL-15 R / SQR is fastened with straps to a pallet. The arm of the machine is locked with a bolt (M12). Lift the machine out of the box holding it by this bolt and the handle. Put the machine on a work table near an earthed socket. Remove the bolt. Take care that there is enough free space around the machine. Also take care that there are no items near the machine that are sensitive to heat radiation. If you have to move the machine at a later time, it is recommended to pack it in a similar way. Let the press cool down before you pack it. thermopatch.com 7.3 Electrical requirements The Mammoth should be connected to the electricity grid (230 V alternating current). Use the machine’s power cable to provide current. The Mammoth is an earthed machine and has been provided with two fuses of 4.0 amps. V. 3.0 ENG Jan2014 Manual NL-15 R / SQR V.3.0 ENG translation from Original Version NL-15 R / SQR V.3.0 NL QC/TDPT/mn-fh January 2014 17 8. Maintenance instructions 8.1 Daily maintenance Clean the outside of the machine regularly with a clean, moist cloth. First switch off the machine, let it cool down and pull the plug out of the socket. The inner part of the press must also be cleaned from dust now and then. First switch off the current before performing this operation and remove the bottom plate. For good press results it is important to keep the press surfaces clean. Therefore, clean the coating of the upper plate with a clean, dry cloth. Do not touch the heating element! Also clean the rubber of the press shoe daily with a dry cloth. Do not use solvents or other chemical substances to remove impurities. Do not let buttons, zips, etc. come between the plates. In this way, the silicone rubber will remain intact for a long time. thermopatch.com 8.2 Periodic maintenance The mechanism of the NL-16 R / SQR needs no maintenance. Run water from the separator at least once a week. The rubber pad and the upper plate must be cleaned once or several times daily. Clean them with a clean and dry cloth when they have cooled down. They must be absolutely smooth and clean. Both the and the lower press pad should be replaced regularly. In order to replace the adhesive, the press machine must be warm. Remove the old pad and carefully remove all glue residues from the metal surface. The surface must be absolutely clean and smooth, so that the new sticks well. Teflon replacement In order to be able to replace the teflon of the upper platen, the press needs to be warmed up until 80 °C. Remove the worn teflon sheet and remove glue residue carefully from the metal surface by using a scraper or a putty knife. After this, brush the surface with with a copper wire brush. Finally clean the upper platen with a soft cloth. The newly applied teflon will only adhere well when the surface is completely clean. 8.3 Parts for regular replacement for maintenance: Sealing pads Art.nr. • for type R: 160 mm round SPAMA-01-04 for type SQR: 140 x 140 mm SPAMA-01-04 VA Self adhesive tefl on sheet • for type R: 160 mm, round SPAMA-03-21 for type SQR: 150 x 150 mm SPAMA-03-21 V Fuse • 4 A TR SPAMA-04-10 V. 3.0 ENG Jan2014 Manual NL-15 R / SQR V.3.0 ENG translation from Original Version NL-15 R / SQR V.3.0 NL QC/TDPT/mn-fh January 2014 18 9. Technical annexes In this chapter you will find the parts lists, the applicable exploded views and the pneumatic and electrical wiring diagrams. Parts list 01 Code dwg Description 1 Description 2 Quantity Thermopatch Code 01-01 Socket set screw M10 x 16 2 * 01-02 Rubber buffer D=65, h=35 2 SPAMA 01-02 01-03 Rubber buffer D=50, h=40 3 SPAMA 01-03 01-04 Resilient pad 2 SPAMA 01-04 01-05 Plain washer 10,5 x 20 x 2 5 SPAMA 01-05 01-06 Hex. Head bolt M10 x 50 2 SPAMA 01-06 01-07 Nut M10 3 SPAMA 01-07 SPM005 Distance bush 2 SPAMA 005-B SPM027 Support, resilient pad 2 SPAMA 027-B SPM059 Mounting frame 1 SPAMA 059-C thermopatch.com *Thermopatch does not hold stock for this item V. 3.0 ENG Jan2014 Manual NL-15 R / SQR V.3.0 ENG translation from Original Version NL-15 R / SQR V.3.0 NL QC/TDPT/mn-fh January 2014 19 thermopatch.com Drawing 01 V. 3.0 ENG Jan2014 Manual NL-15 R / SQR V.3.0 ENG translation from Original Version NL-15 R / SQR V.3.0 NL QC/TDPT/mn-fh January 2014 20 Parts list 02 Code dwg Description 1 Description 2 Quantity Thermopatch Code M12 x 150 3 * 02-02 Socket Head screw loctite Plain washer 13 x 24 x 2,5 3 * 02-03 Spring lock washer 12,2 x 21,2 x 2,5 3 02-04 Plain washer 8,4 x 16 x 1,6 2 * 02-05 Socket Head screw M8 x 20 2 * SPM002 Shaft, hinge point 4 SPAMA-002-B SPM016 Top cam, column 1 SPAMA-016-C SPM034 Distance bush, column 1 SPAMA-034-B SPM055 Main column, arm 1 SPAMA-055-B SPM056 Hinge block 1 SPAMA-056-C (incl. 4x GSM-6570-50) 02-01 thermopatch.com *Thermopatch does not hold stock for this item V. 3.0 ENG Jan2014 Manual NL-15 R / SQR V.3.0 ENG translation from Original Version NL-15 R / SQR V.3.0 NL QC/TDPT/mn-fh January 2014 21 thermopatch.com Drawing 02 V. 3.0 ENG Jan2014 Manual NL-15 R / SQR V.3.0 ENG translation from Original Version NL-15 R / SQR V.3.0 NL QC/TDPT/mn-fh January 2014 22 thermopatch.com Parts list 03 for NL-15 R Code dwg Description 1 Description 2 Quantity Thermopatch Code 03-01 Hex. Head bolt M6 x 16 4 * 03-02 Plain washer 6,4 x 12 x 1,6 10 * 03-03 Bush 1 SPAMA 03-03 03-04 PT-1600 TP 1 SPAMA-03-04 03-05 Socket head screw M6 x 90 2 * 03-06 Nut M6 3 * 03-07 Hex. Head bolt M16 x 20 1 * 03-08 Socket button screw M6 x 10 1 * 03-09 Slide bearing 1 SPAMA 03-09 03-10 Plain washer 8,4 x 16 x 1,6 4 * 03-11 Socket button screw M8 x 20 4 * 03-12 Socket button screw M10 x 16 8 * 03-13 Socket head screw M3 x 8 4 * 03-14 Plain washer 3,2 x 7 x 0,5 4 * 03-15 Socket set screw M6 x 50 2 * 03-16 Nut M6 2 * 03-17 Spring 2 SPAMA 03-17 03-18 Lock nut M6 2 * 03-19 Thermostat TP 1 SPAMA-03-19 03-20 Lock washer 4 SPAMA 03-20 03-21 Teflon self-adhesive (not on drawing) 1 SPAMA-03-21 03-26 Spring 03-27 Bolt 4 SPAMA-03-27 SPM001 Bracket safety switch 2 SPAMA 001-C SPM025 Bracket air cylinder 1 SPAMA 025-D SPM026 Handle, press arm 1 SPAMA 026-B SPM028 Heater shield 1 SPAMA 028-B SPM029 Isolating plate 1 SPAMA 029-C SPM030 Silicon element 1 SPAMA 030-B SPM032 Safety rack 1 SPAMA 032-C SPM033 Safety bracket 1 SPAMA 033-C SPM039 Aluminium disc 1 SPAMA 039-C SPM057 Press arm 2 SPAMA 057-C SPAMA-03-26 *Thermopatch does not hold stock for this item ** Only replace when the heating element or the PT1600 sensor is replaced. V. 3.0 ENG Jan2014 Manual NL-15 R / SQR V.3.0 ENG translation from Original Version NL-15 R / SQR V.3.0 NL QC/TDPT/mn-fh January 2014 23 thermopatch.com Drawing 03 for NL-15 R V. 3.0 ENG Jan2014 Manual NL-15 R / SQR V.3.0 ENG translation from Original Version NL-15 R / SQR V.3.0 NL QC/TDPT/mn-fh January 2014 24 Parts list 03 for NL-15 SQR Code dwg Description 1 Description 2 Quantity Thermopatch Code 01-08 Countersunk bolt M10x12 2 SPAMA 01-08 01-09 Spring pen D=6 l=20 2 SPAMA 03-26 01-10 Rubber buffer * D=65 H=35 2 SPAMA 01-02 01-11 Ceramic terminator 1 SPAPEN03-04 03-03 Bush 1 SPAMA03-03 03-04 PT-1600 1 SPAMA03-04 03-19 Thermostat 1 SPA105012 03-26 Spring 1 SPAMA03-26 SPM301 Support resilient pad* 160x160 2 SPAMA027-V SPM302 Heatershield 150X150 1 SPAMA028-V SPM303 Safety rack 160X160 1 SPAMA32-Z SPM304 Resilient pad 150X150 2 SPAMA01-04-V SPM305 Heater 150X150 1 SPAMA-030-C SPM306 Insulation 150X150 1 SPAMA-039-V SPM307 Cover aluminum 150X150 1 SPAMA307 SPM308 Safety front 1 SPAMA308 SPM309 Safety back 1 SPAMA309 thermopatch.com *Thermopatch does not hold stock of this item V. 3.0 ENG Jan2014 Manual NL-15 R / SQR V.3.0 ENG translation from Original Version NL-15 R / SQR V.3.0 NL QC/TDPT/mn-fh January 2014 25 thermopatch.com Drawing 03 for NL-15 SQR This drawing only applies to the de NL-15 SQR V. 3.0 ENG Jan2014 Manual NL-15 R / SQR V.3.0 ENG translation from Original Version NL-15 R / SQR V.3.0 NL QC/TDPT/mn-fh January 2014 26 Parts list 04 Code dwg Description 1 Description 2 Quantity Thermopatch Code 04-01 Flat head bolt M3 x 12 4 * 04-02 Display TP 1 SPAMA 04-02 04-03 Lock nut M3 8 * 04-04 Plain washer 3,2 x 7 x 0,5 20 * 04-05 Socket head screw M3 x 16 4 * 04-06 Micro switch 2 SPAMA 04-06 04-07 Distance bush 4 SPAMA 04-07 04-08 Main board TP 1 SPAMA 04-08 04-09 Fuse holder *** 1 SPAMA 04-09 04-10 Fuse 4A slow BN238547 1 SPAMA 04-10 04-11 04-13 04-14 Socket head screw Safety switch Foot switch connector M3 x 20 Not on drawing 4 2 1 * SPAMA 04-13 SPAMA 04-14 04-15 Pull relief Not on drawing 1 SPAMA 04-15 04-17 Sunk head bolt M3 x 25 4 * 04-18 Nut M3 4 * 04-19 Bracket switches 1 SPAMA 071-A 04-20 Adjustment bracket 1 SPAMA 070-A 04-21 Net entry incl. filter 1 SPA105003 SPM004 Cover, top cam 1 SPAMA 004-B thermopatch.com *Thermopatch does not hold stock for this item. V. 3.0 ENG Jan2014 Manual NL-15 R / SQR V.3.0 ENG translation from Original Version NL-15 R / SQR V.3.0 NL QC/TDPT/mn-fh January 2014 27 thermopatch.com Drawing 04 V. 3.0 ENG Jan2014 Manual NL-15 R / SQR V.3.0 ENG translation from Original Version NL-15 R / SQR V.3.0 NL QC/TDPT/mn-fh January 2014 28 Parts list 05 Code dwg Description 1 Description 2 Quantity Thermopatch Code 05-01 Socket button screw M5 x 10 26 * 05-02 Plain washer 5,3 x 10 x 1 35 * 05-03 Hex. Head bolt M5 x 16 9 * 05-05 Nut M5 1 * SPM035 Protective strip 3 SPAMA-035-B SPM036 Cover, hinge block, front 1 SPAMA-036-B SPM037 Cover, hinge block, rear 1 SPAMA-037-B SPM038 Bracket main board 1 SPAMA-038-C SPM060 Main cover, frame 1 SPAMA-060-E SPM061 Element cover, front 1 SPAMA-061-D SPM062 Top cover, press arm 1 SPAMA-062-C SPM063 Element cover, back 1 SPAMA-063-D thermopatch.com *Thermopatch does not hold stock for this item V. 3.0 ENG Jan2014 Manual NL-15 R / SQR V.3.0 ENG translation from Original Version NL-15 R / SQR V.3.0 NL QC/TDPT/mn-fh January 2014 29 thermopatch.com Drawing 05 V. 3.0 ENG Jan2014 Manual NL-15 R / SQR V.3.0 ENG translation from Original Version NL-15 R / SQR V.3.0 NL QC/TDPT/mn-fh January 2014 30 Parts list 06 for pneumatic parts Code dwg 06-01 06-02 06-03 Description 1 Description 2 Cylinder Extra: XB6*Z-2668 Adapter nipple 3/81/4 ¼”-90degr-hose4mm Quantity Thermopatch Code 1 SPAMA-06-01 2 SPAMA-06-02 2 SPAMA-06-03 06-04 5mm-90degrhose4mm 3+1 SPAMA-06-04 06-05 Hose L= SPAMA-06-05 06-06 5/2 valve 1 SPAMA-06-06 06-07 Connector, incl. wire 1 SPAMA-06-07 06-08 Mounting plate 1 SPAMA-06-08 06-09 Silencer 2 SPAMA-06-09 06-10 T-fitting 4-4-6 1 SPAMA-06-10 06-11 Hose L= SPAMA-06-11 06-12 Air preparation unit 1 SPAMA-06-12 06-13 Pressure sensor 1 SPAMA-06-13 06-15 5mm-90degrhose6mm 1 SPAMA-06-15 thermopatch.com *Thermopatch does not hold stock for this item. V. 3.0 ENG Jan2014 Manual NL-15 R / SQR V.3.0 ENG translation from Original Version NL-15 R / SQR V.3.0 NL QC/TDPT/mn-fh January 2014 31 thermopatch.com Drawing 06 pneumatic diagram with parts V. 3.0 ENG Jan2014 Manual NL-15 R / SQR V.3.0 ENG translation from Original Version NL-15 R / SQR V.3.0 NL QC/TDPT/mn-fh January 2014 32 thermopatch.com Drawing 07 Electrical wiring diagram V. 3.0 ENG Jan2014 Manual NL-15 R / SQR V.3.0 ENG translation from Original Version NL-15 R / SQR V.3.0 NL QC/TDPT/mn-fh January 2014 33 10. Faults If a problem should occur, please consult the list below; if the problem you are facing cannot be solved by yourselves contact your supplier. Fault Heating plate does not heat up. Possible cause 1. ON/OFF switch is not set to ON Oplossing Check 2. Machine is not connected to the Check electricity grid 3. Electronics not connected to the Check machine 4. Temperature sensor defective Check 5. Electronics wrongly set Check 6. Electronics defective Check 7. Heating element defective Check and replace when necessary Heating plate is too hot or 1. Check the temperature settings too cold. Correct Machine opens too soon Machine does not close Correct Check 1. Check the sealing time settings 1. Pressure or temperature is not correct 2. Swivel arm is not in final position 3. Contact switch is not correctly positioned Insufficient adhesion of patches, label tapes, labels or fixing of the transfers 1. Press time too short 2. Incorrect pressure 3. Heating plate too cold thermopatch.com 4. Press pad of lower plate worn out 5. Teflon below heating plate dirty or worn V. 3.0 ENG Jan2014 Manual NL-15 R / SQR V.3.0 ENG translation from Original Version NL-15 R / SQR V.3.0 NL QC/TDPT/mn-fh January 2014 34 Bring swivelling arm back to end position Correct Increase time settings by 2 seconds and check results Set pressure correctly with knob and check results Check temperature Replace Clean with soft cloth or replace 11. End of life Choose to dispose of the machine responsibly when it has reached its end of life. Electrical machinery, accessories and packaging should be recycled as much as possible in an environmentally responsible manner. - Dismantle the machine groups: steel parts / pneumatic components / electrical components - These can be separated and returned for recycling. ATTENTION! thermopatch.com Always dispose according to current and locally applied guidelines for health and safety and disposal requirements. V. 3.0 ENG Jan2014 Manual NL-15 R / SQR V.3.0 ENG translation from Original Version NL-15 R / SQR V.3.0 NL QC/TDPT/mn-fh January 2014 35 thermopatch.com Thermopatch Thermopatch Thermopatch Thermopatch Corporate Headquarters European Headquarters Australia Pty Ltd Canada Inc USA The Netherlands Australia Canada T T T T +1 315 446-8110 +31 36 549 11 11 +61 395325722 +1 519 748-5027 F F F F +1 315 +31 36 +386 2 +1 519 445-8046 532 03 98 80 55 232 748-1543 [email protected] [email protected] [email protected] [email protected] V. 3.0 ENG Jan2014