1
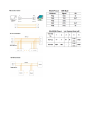
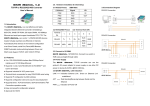
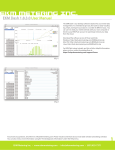
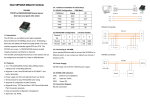
EKM iSerial v.2
TCP/IP to RS232/422/485 Converter
User’s Manual
Introduction
The EKM iSerial is a cost effective and highly
integrated Serial-to-Ethernet Converter.
Embedding a 8051CPU, 64KB OTP ROM, 32K bytes
SRAM, 10/100 Mbps Ethernet and serial port support
handshake RTS, CTS. The EKM iSerial can control
RS232/422/485 devices located virtually anywhere (via
ethernet or internet). Automatically finds devices in the
network. Serial Port, Telnet, WEB Browser,
SNMP. Automatic mode switching between Driver and
RAW mode Support TCP/IP, UDP, DHCP, PPPoE.
is your local IP address.
Features:
3-in-1 RS-232/422/485 interface. Max 230Kbps Serial
interface and 10/100 Mbps Ethernet.
Supports 4- and 2- wire RS-485 with AUTO-SENDTM
and built-in terminator.
Supports industrial 24 VDC power input.
Terminal block for easy RS-422/485 serial wiring.
Supports IP configuration by MAC address.
Supports configuration store and copy for easy
deployment.
Supports Driver, TCP Server/Client, UDP Server/Client,
Pair Connection operation modes.
Easy and powerful configuration program.
Approval: CE, RoHS.
2. If your LAN (Local Area Network) already uses the
Connect to Ethernet 10/100M: Connect to a switch or
HUB using a straight-through cable
Power Supply The EKM iSerial TCP/IP converter can
use the product’s 9V power adapter for power supply or
use other DC power or device.(9-24VDC, @ 5001000mA).
LED indication: LINK – green indicates ethernet link
established. ACT - Data Sending/Receiving between
iSerial and the Ethernet. PWR - Indication of Power
ON
EKM-iSerial Setup:
1. Plug an ethernet cable into the iSerial and into your
Mac Users:
From the Apple menu at the top left of your screen,
click on System Preferences, then on Network. Make
sure whichever local network you are connected to is
highlighted to the left (Airport, ethernet, etc.). Your
local IP address will be noted in the sentence to the
right (“Wi-Fi is connected to XXXXXX and has the IP
address 192.168.1.XXX”, etc.).
IP address range 192.168.1.xxx proceed to step 3. If
not, change your LAN IP address range by performing
the following:
Windows 7:
Disconnect your computer from your network/ internet/
LAN. Plug your iSerial into your computer using an
ethernet cable.
Follow the fairly straightforward tutorial located here:
http://windows.microsoft.com/enUS/windows7/Change-TCP-IP-settings
Write down the IP address and Subnet mask settings
before you change them and after you change them.
You will need these to restore your computer’s original
settings.
Follow the steps 1 to 4 in the tutorial. In step 2 rightclick on Local Area Network. In step 4 click on “Use
the following IP address.” In the “IP address” line,
enter the IP address: “192.168.1.237”. In the
“Subnet mask” line enter “255.255.255.0”. Default
Gateway: “192.168.1.1”
Windows XP:
Disconnect your computer from your network/ internet/
LAN. Plug your iSerial into your computer using an
ethernet cable.
router or LAN. Connect power to your iSerial.
Does your LAN (Local Area Network) already use the
IP address range 192.168.1.xxx? If it does, proceed to
step 3. If you are unsure, perform the following to find
out:
Window Users:
From the START menu, choose “Run...”. Type “cmd”
(no quotes) and hit ENTER. Windows 7 users can
simply type "cmd" into the start menu line and press
enter. In the window that opens, type “ipconfig” (no
quotes) and hit the ENTER key. Look for “IP Address”
or “IPv4 Address.” The number right across from that
From the START menu, choose Settings-->Control
Panel -->Network Connections. Double-click the
“Network Connections” icon. In the “Network
Connections” window, double-click “Local
Area Connection”.
In the “Local Area Connection Status” window, click the
“Properties” button.
In the “Local Area Connection Properties” window,
select “Internet Protocol (TCP/IP)” and click the
“Properties” button.
In the “Internet Protocol (TCP/IP) Proerties” window,
note if “Obtain IP address automatically” or “Use the
following IP Address” is selected. If “Use the following
IP Address” is selected, write down the IP address and
Subnet mask settings. You will need these to restore
your computer’s original settings. Click the radio
button for “Use the following IP Address”.
In the “IP address” line, enter the IP address:
“192.168.1.237”. In the “Subnet mask” line enter
“255.255.255.0”. Click “OK”. Click “OK”. Click
“Close”.
Mac/OSX:
Plug your iSerial into your computer using an ethernet
cable.
Click on the Apple icon at top left of screen. Click on
System Preferences, then Network. Turn off Airport
and disconnect Firewire. Click on Ethernet. Where it
says “Configure IPv4:” select “Manually” from the
drop down menu. In the “IP address” line, enter the IP
address: “192.168.1.237”. In the “Subnet mask” line
enter “255.255.255.0”. Click on “Apply.
3. Now you can access your iSerial:
Type: 192.168.1.125 into the URL or your web browser
(this is the default IP address of the iSerial). This will
take you to a page that asks for your User ID and
Password. Default User ID: admin
Default Password: admin
Note: some users experience issues with the Safari
and Internet Explorer browsers – Firefox works best.
On the left, click on UART
Note: Do not click on “Firmware Update” or “Bootloader
Update”! This will make your iSerial unusable and we
have no way to restore the iSerial for you. Only do this
if you are sure you know what you are doing.
You can now change the default IP address of the
iSerial to match the original range of your computer's
Local Area Network if you changed it previously. Click
on Administrator on the top left. Click on System
IP Configuration. Enter an address in your original IP
address range. You can make up the last two or three
digits. After this you will revert your computer's
IP address back to it's original settings. Be sure to
keep track of the new IP address of the iSerial as you
will need it to read your meters with the EKM Reader
software and may need it in the future to access your
EKM-iSerial. If you lose it we cannot retrieve it for you.
For EKM-Omnimeter v.3 meters make sure the settings
are: RS-485, 9600 baud, 7 data bit, even parity, 1 stop
bit.
For all other meters (v.2) make sure the settings are:
RS-485, 1200 baud, 7 data bit, even parity, 1 stop bit.
Connecting your EKM meters to the iSerial:
Using RS-485 twisted pair, bare ended wire (commonly
found in CAT5 cable), connect RS-485 A on all
meters to T+ on iSerial, Connect RS-485 B on all
meters to T- on iSerial. GND is not necessary.
Your meter(s) are now ready to be read over your local
area network, using our EKM Reader software. Please
see documentation about downloading and setting this
up here:
http://www.ekmmetering.com/information/the-completeguide.html#answer12
Firewalls and DNS:
To be able to read your meter(s) over the internet, you
will need to make settings in your firewall (usually this
is your router) at the site where the meters and iSerial
are installed. To make it possible for requests coming
from a remote computer to reach the iSerial, your
router needs to be set to allow the incoming requests to
pass. This is called opening ports in the firewall or port
forwarding in most routers. If you do not have a static
IP address (most people do not) you will have to set up
with a website like DynDNS.org, No-IP.com, or others
to get an address you can always connect to remotely.
Here is a brief explanation from No-IP.com's website:
http://www.noip.com/support/guides/routers/router_port_fowarding.ht
ml
If you do not feel comfortable doing this the use of a
computer networking professional is always
recommended.
Explanation of Relevant Menu Features:
Under “Administrator”:
Authentication Configuration
The Users can change the username and password to
prevent unauthorized access.
User Name: default “admin” Password: default
“admin”
System IP Configuration
The EKM iSerial supports two IP connection types:
Static IP and DHCP. These types are listed in the web
page for the IP Configuration setting. Each setup
screen and available features will differ depending on
what kind of IP connection types you select. Default is
Static IP. We will only guide you through the use of
Static IP and its configuration.
Static (or Fixed) IP
IP Address: default 192.168.1.125
Subnet mask: default 255.255.255.0
Gateway: default 192.168.1.1
Primary DNS: default 0.0.0.0
If you need to change these settings, perform these
steps:
Step 1: Enter IP address that is consistent with your
LAN IP address range.
Step 2: Enter Subnet mask
Step 3: Enter Gateway (Router) IP address
Step 4: Enter Primary DNS IP address
Step 5: click “Update” button
Server, TCP Client, UDP Server and UDP Client.
These modes are listed in the Web page for the
Operation Mode setting. Each setup screen and
available features will differ depending on what kind of
operation mode you select. Default is TCP Server.
EKM Metering kWh meters utilize TCP Server mode.
TCP Server
Port Number: default 50000, range 0 to 65535
If you are setting the device as passive to accept
commands from remote and the data must be
guaranteed to be received by the peer, then you can
set EKM iSerial as TCP Server. Be sure the Port
Number is the same as the remote control application
you are using.
Client mode inactive timeout (minutes): default 20
( 0=Disable) If you want to keep the connection
between EKM iSerial and your remote control
application always on, set the value to 0. Otherwise
the EKM iSerial will terminate this connection after
inactivity for the specified time.
TCP Client
Remote Connection Port Number: default 50000,
range 0 to 65535 Remote Server IP Address: default
210.200.181.102
If you are setting the device as active to report realtime status to remote and the data must be guaranteed
to be received by the peer you can set EKM iSerial as
TCP Client. Be sure the Remote Connection Port
Number is the same as the remote control application
you are using and set the correct Remote Server IP
Address.
UDP Server
Local Port Number: default 50000, range 0 to 65535
If you are setting the device as passive to accept
commands from remote and the absolute integrity of
the data to be received by the peer is not your concern,
then you can set EKM iSerial as UDP Server. Make
sure the Local Port Number is the same as in the
remote control application you are using.
UDP Client
Remote Connection Port Number: default 50000,
range 0 to 65535 Remote Host IP Address: default
192.168.1.2
If you are setting the device as active to report realtime status to remote and the absolute integrity of the
data to be received by the peer is not your concern,
then you can set the EKM iSerial as UDP Client. Be
sure the value in Remote Connection Port Number is
the same as the remote control application you are
using and set the correct value of Remote Host IP
Address.
DHCP
Using DHCP will mean that the IP address of the EKM
iSerial may change, making it much more difficult to
maintain your connection to the EKM iSerial. If you
choose to use DHCP, it is assumed that you have your
own reasons for doing so, that you know what you are
doing, and that you won’t need instruction or guidance. UART Control (RS-232,RS-422,RS-485)
The EKM iSerial supports three serial types: RS232,
System Status
RS422 and RS485, Select the appropriate Mode. EKM
This screen shows the EKM iSerial current status. All of Metering kWh meters utilize RS-485 serial mode and
the information provided is read-only.
the following default settings: Baud Rate: default
9600(v.3 meters) or 1200(v.2 meters), range 300bps
Load default setting
to 230.4Kbps Character Bits: 5, 6, 7(default), 8 Parity
Allow users to reset the EKM iSerial to return the initial Check: Even (default), even, odd, space, mark Stop
value, but the MAC Address will not be updated.
Bits: 1 (default), 1.5 or 2 Hardware Flow Control:
None (default), CTS/RTS (or Hardware)
Operation modes
The EKM iSerial supports four operation modes: TCP