1
Glyph Technologies GPM-216™ User Manual
Chapter 1
Introduction…………………………………………………………………………………………………………………………… 3
Features..………………………………………………………………………………………………………………………………. 4
How to Connect the GPM-216…………………………………………………………………………………………………. 5
About GPM-216 Modes - Setup and Performance……………………………………………………………………. 6
Details of the GPM-216 Front Panel………………………………………………………………………………………… 7
Details of the GPM-216 Back Panel………………………………………………………………………………………… 8
Chapter 2
Unpacking Your GPM-216……………………………………………………………………………………………………… 9
Requirements……………………………………………………………………………………………………………………….. 10
Connecting and Checking the Hardware…………………………………………………………………………………. 11
Test Drive the GPM-216: Inputs and Gain……………………………………………………………………………….. 12
Chapter 3
Front Panel User interface……….……………………………………………………………………………………………. 14
About Function and Mode…………………………………………………………………………………………………….. 15
Perform Mode, Tuner Function, Setup Mode………………………………………………………………………..… 16
Configuration………………………………………………………………………………………………………………………. 19
Configure All Units……………………………………………………………………………………………………………….. 20
Configure Single Unit………………………………………………………………………………………………………….… 26
Glyph GPM-216
Appendix A
Getting Started…………………………………………………………………………………………………………………….. 37
Appendix B
Beatnet………………………..…………………………………………………………………………….……………………….. 40
Appendix C
GNU General Public License…………………………………………………………………………………………………… 41
2
Glyph GPM-216
Chapter 1
Introduction
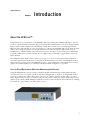
About the GPM-216™
Congratulations on your purchase of the GPM-216. When performing, the GPM-216 will improve the way
you hear yourself and other musicians. Plug your instruments and microphones into the front-panel audio
inputs, and the audio is digitized. It is distributed as audio data streams over a network using standard
Ethernet cables. The unit has an easy to use interface to control your individual mix of local and networked
audio sources using front panel controls and an LCD screen. It has front-panel output connectors for
headphones or earbuds, and line outs on the back for powered wedges or other audio gear. Send/Return
loops allow musicians to patch in external effects or EQ for their overall mix, or apply them to their own
input channels.
The GPM-216 enables bands to have a private, peer-to-peer (or, more accurately, musician-to-musician)
network, independent from the house sound system. Each musician creates their own individual monitor
mix exactly the way they want it. The GPM-216 provides a way for musicians to mix and monitor network
signals on a rack-mountable piece of hardware through earbuds, headphones or speakers.
Peer-to-Peer/Musician-to-Musician Monitoring Architecture
Using the Glyph Monitor system on stage is dramatically different than using a traditional monitoring
setup because it does not require a dedicated monitor mixing board or engineer. Its design implements a
peer-to-peer architecture, where all the units connect to one another, instead of connecting to a central
mixer. Signals from performers are split at each performer's unit, sending to both the monitoring network
and the front of house (FOH) mixing board. Each performer’s unit contains the basic functions of a mixing
board (mic pre, gain, volume, pan, mute, phase reverse).
3
Glyph GPM-216
Features
GPM-216 features
•
•
•
•
•
•
•
•
•
•
•
•
•
•
Peer-to-peer, no board sends or monitor board required.
Signals plug directly into the GPM-216, cable split sends signals back to mixer.
Units connect with CAT5 Ethernet cable.
Front-panel inputs, gain and three-color LED input meters.
Each GPM-216 transmits 2 streams of audio and can mix up to 16 stereo or mono incoming streams.
Large LCD screen and “soft labels” display the functions of controls on the front panel. The same
knob, in different modes, is used to adjust various parameters.
Save and recall monitor mix settings and get the same mix every show for quicker setup and more
consistent sound.
Multiple monitor “profiles” allow you to quickly change between pre-set settings
Front and back panel outputs for use with headphones, earbuds and powered wedges.
Setup mode allows programming the unit in advance of the performance.
Enclosure can be tabletop or rack-mountable with optional rack ears.
Uses standard network protocols for use with other computers.
Graphical configuration via Java and web interface.
Built-in reverb and instrument tuner
GPM-216 compared to other personal monitoring systems
Other personal monitoring systems, which use a transmitter/receiver architecture, require a mixing board
because signals need to be centralized and distributed onto the network from one box, the transmitter.
This works fine if the signals are already gathered in one place, but fails in situations where the central
mixing board doesn't have the outputs needed to patch into the transmitter, or if the outputs are already
being used for other things. This proves to be a problem for sound engineers to accommodate in many
situations.
Since all of the units connect to each other without the use of any outputs from the main board, a band can
use the GPM-216 system in venues where monitoring would be otherwise very difficult. Picture a venue
where a band brings its own PA system, including a front of house mixing board, but does not want to
bring a separate monitor mixing board or monitor engineer. By first connecting the instruments to each
GPM-216 on stage, the engineer does not need to bother with monitors at all. The signal flow is truly from
musician to musician.
Advantages of personal networked monitoring
•
•
•
•
•
•
•
•
•
•
•
4
Every Musician creates his own mix.
No mixing board required.
No volume wars on stage.
Musician is allowed to have "more me".
Band plays more quietly because they can hear what they want.
Less stage volume = better mix, sound not coming from two places.
Same mix every night with saved presets.
Saves monitor setup and check time.
Don't need a monitor board, depending on how it's configured.
FOH engineer spends more time mixing the band, less time on monitors.
GPM-216 is an upgradeable platform for future product enhancements and interfaces.
Glyph GPM-216
• Bands can use it for practice, recording, jamming and playing gigs.
• Less gear to haul to the gig.
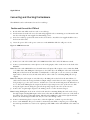
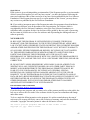
How to Connect the GPM-216
Figure 1: Stage connection Diagram
Connecting the GPM-216 on stage
Each musician carries a GPM-216 with them to the gig, and sets it up with their gear on stage. The unit acts
as a console for mixing each musician’s monitor. Here’s how it’s connected:
5
•
•
•
•
Glyph GPM-216
Musicians connect instruments to the analog inputs, which can accommodate sources such as vocal
mics, instrument mics, direct guitar, keyboard or bass signals. It can also handle the output from a
mixer, or output from guitar/bass amps.
The "loop through" outputs on the back of the unit are connected to the FOH mixing board. This can
be done through the existing stage snake head. The signals delivered to the FOH console are
unaffected by the GPM-216. It is essentially a cable split.
Musicians connect the main outputs of the GPM-216 to their monitor of choice, which could be
headphones, earbuds, or amplifiers driving traditional wedges.
GPM-216 units are connected together via standard CAT5 Ethernet cable through an Ethernet 100
switch.
Signals from everyone in the band are seen as "inputs" on every GPM-216. Musicians mix local and
incoming sources, and broadcast their own sources onto the network for others to mix. Musicians select a
source via a front panel selector button and can quickly change volume, pan, mute and solo for that
source. It is designed for easy readout with an LCD screen for identifying names of sources, placement in
the stereo spectrum and status of mute or solo. All of the controls and the screen are well lit for stage use.
About GPM-216 Modes - Setup and Performance
Setup Mode
The front panel has controls for mixing incoming sources to create a personal monitor mix. It also has
controls for programming the unit in advance of the performance. This is called Setup Mode. Setup Mode
allows a user to change parameters that will remain more or less the same during performance. During
setup mode, the GPM-216 does not transmit local sources to the network. Examples of Setup Mode
parameters would be:
• Unit name
• CPU usage
• Save diagnostics info
• Mixer software version
• Source name
• Stereo/mono source transmit
• Source channel number
• Phase reverse (polarity)
• Phantom power
• Network configuration
Performance Mode
Most of the time the GPM-216 will be used in Performance Mode. While in this mode, the user can make
changes to each source while performing. Examples of Performance Mode parameters would be:
• Volume
• Mute
• Solo
• Pan
• Instrument Tuner
6
Glyph GPM-216
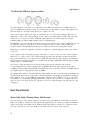
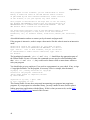
Details of the GPM-216 Front Panel
Here is a guide to the front panel controls.
Figure 2: GPM-216 Front Panel
1.
16 Selector buttons - in Performance Mode, buttons select sources while the LCD screen displays
current information about those sources, such as the status of solo and mute. In Setup Mode, buttons
are used for data entry
2. Mode Select button - switches between Performance and Setup Mode
3. Function Select knob - selects functions under each Mode, such as Volume and Pan under
Performance Mode; and Diagnostics, Polarity and Phantom Power under Setup Mode
4. LCD screen - 160 x 80 pixels (2.8" x 1.5") with a blue background and white lettering. Displays current
selections and control labels
5.
P1 button - a Soft Key that changes binary parameters, like mute and solo, on and off
6. P2 button - a Soft Key that changes binary parameters, like mute and solo, on and off
7.
Data knob - changes continuous parameters, like source volume level and source pan position
8. Volume knob - controls audio level sent to headphone jack and rear line outputs for personal mix
9. Treble knob - controls treble sent to headphone jack and rear line outputs for personal mix
10. Bass knob - controls bass sent to headphone jack and rear line outputs for personal mix
11. USB Port - provided for future expansion
12. Power switch
13. Input A gain control knob - controls input A level at front combo input jack and rear XLR input jack
14. Input A three-color LED meters - displays signal level of analog A input
15. Input A - combo XLR and balanced TRS ¼" mic/instrument input
16. +48V Phantom power LED indicator
17. Input power LED indicator - displays that there is power to input section
18. Input B - combo XLR and balanced TRS ¼" mic/instrument input
19. Input B three-color LED meters - displays signal level of analog B input
20. Input B gain control knob - controls input B level at front combo input jack and rear XLR input jack
21. Stereo headphone jack - provides monitoring connection from front panel
7
Glyph GPM-216
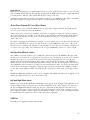
Details of the GPM-216 Back Panel
1.
80mm Fan for exhausting heat from the unit
2. Input A - Female XLR mic/instrument input (can also be used as output)
3. Thru A - Male XLR mic/instrument output (can also be used as input)
4. Input B - Female XLR mic/instrument input (can also be used as output)
5.
Thru B - Male XLR mic/instrument output (can also be used as input)
6. Thru A and B - Balanced TRS 1/4” loop-through outputs
7.
Aux Send/Return 1 and 2 - TRS per input channel, returns to the main mix
8. Left and Right Main Insert - TRS send/return inserts for main mix
9. Left and Right Main Output - Balanced TRS 1/4” main outputs to monitors
10. CAT5 Ethernet Connector
11. I/O Expansion Port for future functionality
12. Power supply cooling fan
13. Power connector
8
Glyph GPM-216
Chapter 2
Installation
Unpacking Your GPM-216
Your GPM-216 and accessories are packaged in a sturdy shipping container. Please inspect the container
for evidence of shipping damage and mishandling.
Caution:
If the container is damaged, file a report with the carrier or dealer immediately. Do not attempt to
unpack and operate your GPM-216 until the carrier or dealer confirms the damage.
If the container is in good condition, proceed with unpacking. Verify that all of the items described in the
next section are present and in good condition.
Inspecting Your GPM-216
Caution:
If any of the items you expect to find in your container is missing or damaged, contact the dealer
before proceeding any further.
You should keep the shipping container and all packing materials in a safe place, in case you should have
to use them at a later date.
GPM-216 Package
Below is a list of the GPM-216 component parts.
• GPM-216 unit
• Ethernet cable
• Power cable
• 4 rubber feat
• Rack ears and ear-mounting screws
• Four rack-mounting screws
9
•
•
Glyph GPM-216
This manual
Documentation CD with drivers, software, warranty registration, spec sheets and manuals
Requirements
Macintosh Computer (for graphical configuration)
•
Mac OS X
Windows Computer (for graphical configuration)
•
•
Computer with Ethernet port or Ethernet host bus adapter
Windows 2000 or XP
CAT5 Cable
•
Length can be up to 328 feet (100 meters)
Ethernet Switch
•
•
•
100Base T
10Base T IS NOT SUPPORTED
Glyph has tested and recommends the NetGear 8-port (model FS608) and the NetGear 5-port (model
FS605) switches
Monitoring Device of Your Choice
•
•
•
•
10
Headphones using 1/4” stereo front panel connector
Earbuds adapting to a 1/4” stereo front panel connector
Powered wedges using L/R back panel connectors
Power amp and wedges using L/R back panel connectors
Glyph GPM-216
Connecting and Checking the Hardware
The GPM-216 can be rack-mounted or used on a tabletop.
Position and Connect the GPM-216
1.
Decide if the unit will be used in a rack or on a tabletop.
2. If rack mounted, attach rack ears to the unit using supplied rack ear mounting screws. Mount the unit
into the rack using the four supplied rack-mounting screws.
3. If used on a tabletop, position the unit on a flat, level surface. Attach the four supplied rubber feat to
the bottom of the unit.
4.
Insert the power cable to the power connector on the GPM-216 while the wall power is off.
Figure 1: GPM-216 rear view
Firewire ports
SCSI
tors
Power
connector
5.
Connect one end of the CAT5 cable to the GPM-216 and the other end to the Ethernet switch.
6. Connect your instruments or microphones to the analog inputs, either on the front or the back of the
GPM-216.
Note: The front of the GPM-216 has two Neutrik “universal” inputs. These inputs can accommodate XLR
or ¼” TRS cables. The XLR pins of the input are wired directly to the XLR pins of the male and female
XLR jacks on the back of the unit. This essentially makes a cable split, so you can connect your XLR
input cables to the front or back of the unit, and use either of the two remaining XLR jacks as loop
outputs.
Note: The TRS pins of the input are wired directly to the TRS jacks on the back of the unit. When a ¼”
cable is inserted into the front panel universal input, it flips a switch that selects the output of the line
level preamp to go to the A/D converter, and therefore sent to the monitoring network. When there is
no ¼” cable in the TRS input, the output of the mic level preamp is sent to the A/D converter. The
front panel gain controls change the gain of both preamp outputs sent to the A/D converter.
7.
Connect the “loop-through” outputs to the mixing console or other downstream gear.
Note: If using XLR inputs on the front or back of the unit, the remaining XLR jacks can be used as loopthrough outputs. If using TRS inputs on the front of the unit, the TRS Thru connectors on the back of
the unit become the loop-through outputs. This allows the GPM-216 to pick off the signals and send
them to the monitoring network before they are sent to the mixing console.
8. Connect a monitoring device of your choice, either headphones, earbuds or powered wedges.
9. Power on the GPM-216. The power switch is a momentary switch like a computer power switch. Flip
the switch up and allow it to return to its original spot. The LEDs on the unit will flash as the unit boots
up.
11
Glyph GPM-216
Test Drive the GPM-216: Inputs and Gain
The universal input connections can accept balanced or unbalanced signals via ¼” or XLR connectors.
Since the GPM-216 has built-in preamps, you can just plug your microphone or guitar cable right into the
universal input. No external preamp, direct box, or mixer is needed.
To use a microphone, plug the microphone’s XLR cable into one of the universal inputs. Whenever an
XLR cable is connected to a universal input, the microphone preamp is enabled and the gain range of the
trim knob is set to range from +10 to +58dB. The input impedance of each microphone preamp is
1.5Kohms. Full-scale input is 9dBu with the trim set to minimum gain.
The GPM-216 can provide 48 volts of phantom power for microphones that require it. Phantom power can
be enabled by going into Setup Mode, or via the Configurator remote software, and the LED on the
faceplate marked +48v will light up. Phantom power will be provided to both microphone inputs.
Phantom power will not be applied to any line level equipment or guitars plugged in using cables with ¼”
connectors.
To use a guitar or line level signal, just plug a cable with a ¼” connector into one of the universal inputs.
Whenever a ¼” cable is connected to a universal input, the guitar/line preamp is enabled and the gain
range of the trim knob is set to range from 0 to +45dB. The guitar/line preamp can support both guitar &
line level signals. The input impedance of each guitar/line preamp is 102Kohms. Full-scale input is 18dBu
with the trim set to minimum gain.
If you want to adjust the input level of a universal input, just turn the trim knob and watch the
corresponding level meter. The red light at the top will light anytime the input signal is greater than –
6.5dBFS (or within 6.5dB of clipping). The yellow light represents a signal greater than –12.5dBFS and the
green light represents a signal greater than –24.5dBFS.
For optimal audio quality, you should adjust the input trim knob so that your loudest input signal lights up
the yellow light, but not the red. When the red meter light shines extra bright, the signal has been clipped.
If the signal level ever exceeds 0dBFS the signal will be “clipped” and you will hear a “pop” or “tick” in the
sound. This is a very bad thing, and clipping should be avoided at all costs! There is enough headroom so
that you can be conservative in this area, and there is no need to push the input levels right up to the edge
of clipping.
Back Panel Details
About Cable Splits, Phantom Power, Mic Preamps
In a typical stage use, microphone signals would connect first to the GPM-216, and would loop out to the
FOH console. This is considered a cable split with the signal being sent to the mic preamp in the GPM-216
and the mic preamp at the FOH console simultaneously. Cable splits are already very common in venues
where the stage mics are sent to the FOH console and the monitor console at the same time.
12
Glyph GPM-216
Many mics need phantom power applied. Phantom power can be applied from two places at the same time,
and everything should still work smoothly. The preamp with the higher phantom power output will end up
powering the mic, while the other will not add any more voltage to the wire.
A similar situation holds true when two microphone preamps are pre-amplifying a microphone signal. The
microphone signal is not ganged and there will be no audio degradation in the signal.
About Direct Outputs (D.I.) and Direct Boxes
It is important to point out that the GPM-216 does not have direct outputs included, and it will often be
necessary to use a direct box after the GPM-216.
A direct box is an electronic device utilizing a transformer or amplifier to change the electrical output of
an electric instrument (for example, an electric guitar) to the impedance and level usually obtained from a
microphone. The function of a direct box can also be built into another piece of gear and is sometimes
called a direct out.
If you plan on plugging an instrument (for example, an electric guitar) into one of the front panel universal
inputs, you would still need to patch a ¼” cable from the rear panel TRS Thru connector to a direct box.
The direct box would change the impedance from instrument to microphone level, which would allow you
to connect to the stage snake. You could not use the rear panel XLR Thru connector as a direct output.
Auxiliary Send/Return 1 and 2
The auxiliary send/return jacks are two ¼” TRS jacks on the back panel of the GPM-216. The tip is send,
the ring is return, and the sleeve is ground. The aux jacks act as per channel inserts for the two local A and
B inputs. The purpose is to provide an insert point for local processing units such as reverb, EQ and
dynamics into the musician's signal flow. These jacks are directly wired to the inputs on the GPM-216 so
that the musician can affect his own input signal in his monitor only. The affected signal is not broadcast to
other GPM-216s on the network, it can only be heard on that musician’s unit. You can use the input gain
control on the external processing unit to adjust the input level if the output from the GPM is too high or
too low. The return signal level will be determined by the output level control on the external processing
unit.
NOTE: The GPM-216 has built-in reverb for the local inputs. If the GPM’s internal reverb is applied to local
signals, they will be broadcast to the network with reverb.
Left and Right Main Insert
Similar to the aux jacks, the GPM-216 has Main Inserts that appear on the back panel. The Main Inserts are
used for adding local processing such as reverb, EQ and dynamics to the entire mix prior to being sent to
the Left and Right Main Outputs. Again, the effects are only heard on that musician’s unit and are not
broadcast to other units over the network. You can use the input gain control on the external processing
unit to adjust the input level if the output from the GPM is too high or too low. The return signal level will
be determined by the output level control on the external processing unit.
USB Port
The USB port is supplied for future functionality.
13
Glyph GPM-216
Chapter 3
User Interface
Front Panel User Interface
You can think of the GPM-216 as a basic rack-mounted mixer. Like a mixer channel, it has inputs, gain
(trim), pan, mute, solo, faders, aux buses and inserts. But unlike a traditional mixer, you have to mix 16
channels with only one set of fader, mute and solo controls. These controls are shared between each
channel using soft labels on the LCD screen. When you press one of the selector buttons to select a source,
the LCD will display information about that source, and you use the Mute, Solo and Volume controls
under the LCD to mix that source with the others.
As an example, say you have four audio sources to mix: sax, bass, drums and keyboards. Each source is
mapped to a channel. You have chosen to place sax on channel 1, bass on channel 2, keyboards on channel
3 and drums on channel 4. If this were a traditional mixer, you would have done this by physically patching
the inputs into the unit. With the GPM, however, you have “patched” them in advance by creating a profile.
(More about profiles later). If you want to change the volume of the bass in your mix, you will press Selector
button 2 to select the bass channel. You then turn the Data knob to change the volume of the bass. If you
then want to change the volume of the sax, press Selector button 1. Turning the Data knob will then change
the volume of the sax in the mix.
The LCD provides information to help you when using the GPM. It will display labels for the Selector
buttons, the P1 and P2 buttons and the Data knob. It will also display information about the selected audio
source, such as its name (“sax”) and its current volume, mute and solo settings.
LCD Screen
The LCD screen is 160 x 80 pixels (2.8" x 1.5") with a blue background and white lettering. It can display 7
rows of text with 26 characters per line. It is used to display current selections and control labels from the
front panel. Information is displayed using light letters on a dark background. Control labels are displayed
using dark letters on a light background.
14
Glyph GPM-216
P1, P2 and Data Knob
Underneath the screen there are two buttons, P1 and P2, and the Data Knob. The bottom line of the LCD
screen is used to display the “soft labels” of these buttons and knob. For example, in the Mix: Volume
function, the P1 button mutes the selected source, the P2 button solos the selected source, and the data
knob controls the volume of that source.
Selector Buttons
There are 16 Selector buttons on the front of the GPM-216. Each button has three LEDs behind it that
deliver different information to the user. In Perform Mode, the buttons are used to select the incoming
signal and display information about that signal using a green LED, red LED and amber LED. The red and
green LED’s are located to the left of the button and the amber LED is located to the right of the button.
Green LED
When the green LED is lit solid it means that this button is selected. The green LED does not have a
blinking state.
Red LED
The red LED shows a special circumstance about that source or menu choice. For instance, in Perform
Mode, if the red LED is on solid the source is muted. If the red LED is blinking, the source is soloed. If the
red LED is on solid, the source is muted.
Amber LED
The amber LED shows that there is a choice available for that button. In Perform mode, if the amber LED
is on solid or blinking, there is an audio source available for that button. On solid means that the audio
source is from another GPM, blinking means that the audio source is from a local input on that GPM unit.
When performing, you only need to remember blinking means me.
Profiles
Profiles are a snapshot of the settings on your unit. Once you have configured the unit you store the
settings. Every time the unit is restarted it will restore your settings. If you wish, you can create more than
one profile. If you play in more than one band, or want a different mix for different locations, you can save
the changed settings in a new profile. You can then select the stored profile that contains the pre-set
settings appropriate for your performance.
About Function and Mode
A function is a program that can be run on your GPM unit. For example, to change the volume of a source
in your mix, you will use the Mix: Volume function and to change the pan position of a source you use the
Mix: Pan function. You can choose the current function by turning the Function knob. When you change
functions, you will see the name of the current function on the top left of the LCD. The LCD will also
15
Glyph GPM-216
display labels for the Selector buttons, the P1 and P2 buttons and the Data knob. In some functions, the
use of these controls will change. Checking the labels can guide you to the use of the controls when you
change functions.
Perform Mode
In order to simplify the use of the GPM while performing, the GPM runs in two modes: Setup and
Perform. In Perform mode the Function knob selects between the Mixer: Volume, Mixer: Pan and the
TUNER functions. Typically when performing you will only need two functions: Mixer: Volume and Mixer:
Pan. When configuring or troubleshooting the unit, there are other functions to assist you. Different
functions are available in each mode.
In Perform Mode, when you push a Selector button, various information will be shown on the LCD screen.
The top line of the screen will indicate which function of perform mode is selected (Mix: Volume, Mix: Pan
or Tuner). The 2nd from the top line of the LCD screen will show what the selector buttons do, while the
3rd line down identifies the source itself. The identification appears as two names separated by a colon,
the first name is the name of the unit where the source originates and the second name is the name given
to the source. Before the GPM-216 unit has been configured with a profile, the default name for each
GPM-216 will be GPMxxx (where the “xxx” is a random number) and the source will be identified as
InputA or InputB. Once configured with a profile a source will be identified with the names given to the
unit and the inputs.
The mode button’s LED’s will tell you if you are in Setup or Perform mode. When in Perform mode the
green LED will be on solidly.
Tuner Function
The TUNER function is a utility to allow an instrument connected to either of the GPM-216’s inputs to be
tuned. The buttons beneath the LCD screen select which input signal passes into the tuner and the screen
displays which input has been selected for tuning. When a note is played, the tuner will display the note
closest to the one being played, the frequency of that note and the indication FLAT, TUNED or SHARP. If
the note is FLAT or SHARP, a number of characters will be displayed in the lower left hand portion of the
screen indicating the degree away from tuned the note being played is. The more characters that are
displayed (F if Flat, S if Sharp) indicate the further away from being in tune.
The TUNER utility is directly associated with the GPM-216 inputs meaning that instruments can be tuned
regardless of how the unit’s input configuration is set. This means, for example, that if the unit is
configured for one mono input (which would be Input A), it is still possible to tune an instrument
connected to Input B.
Setup Mode
To enter Setup mode, press the Mode button twice in quick succession (just like you would double click
with a mouse). To return to Perform mode, press the Mode button once.
The mode button’s LED’s will tell you if you are in Setup or Perform mode. When in Setup mode the
blinking red LED will be on.
16
Glyph GPM-216
In Setup mode the Function knob selects between many functions that enable you to configure the GPM,
save settings permanently, select between stored profiles, troubleshoot the system and more.
Setup Mode consists of two sections of informational displays as well as several operational utility
functions.
The two informational displays can be reached by entering Setup Mode and rotating the Function knob
until the screen displays the headings of MIX: Info or SYSTEM:Info
MIX: Info:
The informational displays in this section are switched between by pressing the lighted selector buttons as
follows:
1.
2.
3.
4.
Unit Name (the current name of the GPM unit)
Current profile name
Current Input designation (two mono inputs, one mono, stereo, etc.)
Software Build number
SYSTEM: Info:
The informational displays in this section are also switched between by using the lighted selector buttons as
follows:
1.
2.
3.
4.
5.
6.
7.
8.
IP address (the network address of the unit)
Current CPU usage
Max CPU usage
Jack Xrun Total (a troubleshooting diagnostic statistic)
CPU Temperature (a troubleshooting diagnostic)
Operating System Build number
Hardware Build number
Save Diag (pressing the button labeled Save generates a diagnostic log file for troubleshooting
purposes – should only be used at the direction of Glyph technical support)
Setup Mode Functions:
Rotating the Function knob while in Setup Mode will make available the following options and utilities:
Save Settings:
Pressing the Save button will save the current Volume and Pan settings to the Current Profile.
Remote Config:
17
Glyph GPM-216
This function is required to use the GPM Configurator utility. Press the button labeled “ON” and verify
that the screen now confirms this. In order to use any of the utilities that require this state, the GPM unit
must remain with this notation on the screen.
Phase Setting:
This function allows for the phase of local audio input channel(s) to be changed. The options are Normal,
Reverse (Input) A and Reverse (Input) B. The change of phase occurs immediately upon turning the knob
labeled Set.
Note: As Phase can only be changed on a local input source; it is necessary to have a local source selected
before entering Setup Mode.
Phantom Power:
This utility both displays the current state of the GPM unit’s Phantom Power setting and allows
for this setting to be changed. The change takes effect immediately upon pressing either the On
or Off button.
Note: Phantom Power is a requirement of some types of microphones and its use should follow
the specifications and requirements of the microphone’s manufacturer.
Select Profile:
When this function is selected, selector buttons will light indicating the presence of profiles existing on the
GPM unit. Pressing the lighted buttons will display the name of each profile. When the desired profile
name is displayed, pressing the button labeled Select will make this profile the current one. The profile
will be active as soon as the select button is pressed.
Change Local Input:
This function allows for changing the type of Local Input. Rotating the Options knob will provide the
selections of Two Mono, One Mono, Stereo, None (no local input) and Collapse. The Collapse designation
will take an existing setting of Two Mono or Stereo and “collapse” it to a single mono input. The change in
local input type will take effect as soon as the select button is pressed.
Network: Configure:
This function allows the GPM unit to obtain its necessary IP address in three different ways: “Fast Auto”,
“Safe Auto” and “Use DHCP”. The two “Auto” options are similar with the “Safe” option performing some
extra collision detecting routines to verify a unique IP address. Using this setting will cause the GPM unit
to take a few seconds longer to initialize when powered up. This option should only be needed if the
default setting of “Fast Auto” fails to provide a unique IP address for the GPM unit. The “Use DHCP”
option can only be used on a network containing a DHCP server. The “Fast Auto” option is the preferred
setting and is suitable for most network environments that consist of only GPM units and one or two
computers.
18
Glyph GPM-216
TUNER: Setup
This option allows the frequency scale of the Tuner to be adjusted. In default configuration, the frequency
of the note “A” is 440 cycles per second. Rotating the knob labeled “freq” will adjust what the Tuner utility
identifies as a “TUNED” A. All other notes will be adjusted accordingly.
Set Reverb:
Reverb can be added to the local inputs. The local input signal, with reverb, will be broadcast to the
network for the other GPM units to hear. When this option is selected, the Selector lights will blink in
accordance with how the local inputs are configured on the unit. Each input can be assigned either the
same or a different reverb type. The choices are:
No Reverb
Vocal Plate
Small Room
Small Plate
Small Hall
Slap Chamber
Medium Room
Medium Plate
Medium Hall
Large Room
Large Plate
Large Hall
Configuration
Graphical Configuration Software
The Graphical Configuration software allows you to setup and configure the GPM-216 units from a
computer on the same local network as the GPM-216 units. The configuration software (Setup.exe) must
be installed on a computer running the Windows 2000, XP or Macintosh OS X operating system. You will
need Java software installed on your machine. The GPM Configurator install will also install Java. If you
already have Java installed, uncheck the checkbox specifying Java on the appropriate dialog box during
installation of the GPM Configurator software.
Once the GPM Configurator software is installed, this computer should be connected to the same network
switch as the GPM units and then restarted. It is also necessary to be certain that the computer being used
is set to “Receive an IP address automatically” to ensure proper connectivity to the GPM units.
19
Glyph GPM-216
Configurator Main Page
There are two ways to configure the GPM-216 units within the Configurator Software. Configure Single
Unit allows you to make detailed changes to a single GPM unit, while Configure All Units allows you to
make general changes to many units at the same time. We will go through the steps of configuring several
units at once, and then configuring the units further by themselves.
Figure 1: Configurator Main Page
Configure All Units
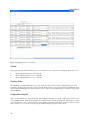
When you click Configure All Units, it informs you to place all the units in remote configuration mode.
You will need to do this to see them remotely. Press “continue” after all units are in remote configuration
mode.
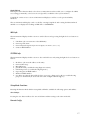
Figure 2: Prepare Units for Configuration
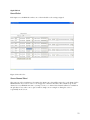
After it scans the network for available units, you will see the Configure All Units page. Here you will see a
list of the GPM-216 units available on the network, and you can change various aspects of them. The
changes you make will be stored as a Profile in the memory of each GPM-216 unit. You first must name this
Profile something so that it makes sense with the setup you are doing. If you are setting the units up for
20
Glyph GPM-216
practice, you might want to name the profile “Practice”. If you are setting up for a recording session, you
might want to name the profile “Recording”. In our example we’ll name it “Test”.
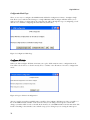
Figure 3: Configure All Units
Blink Unit
On the far left side of the Configure All Units page, you’ll see the Blink Unit button. When you click this
button, the corresponding unit will blink the LEDs on the selector buttons.
System name
When several units are booted up for the first time, they are given a default name so you can determine
which is which. The naming convention is “GPMXXX” where “XXX” is a random number. In our
example, the units are named GPM462 GPM282, GPM968 and GPM443. Use the Blink Unit button to
determine which unit is which, and name them something that makes sense as to which instrument or
person will be using the unit. In our example they will be named John, Paul, George and Stan.
Local input
The GPM-216 has two local inputs on the front of the unit. From the perspective of the network, these
inputs can be configured as one stereo source, one mono source, two mono sources, or no local sources.
In our example all units will have two mono inputs.
21
Glyph GPM-216
1.
2.
3.
4.
John sings and plays guitar so we will set his local input to Two Mono Sources
Paul sings and plays bass so he will have Two Mono Sources
George sings and plays guitar so he will have Two Mono Sources
Stan uses two microphones on his drums so he will also have Two Mono Sources
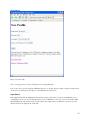
Naming Sources
The names that you give to the sources will be the names that everybody sees on their individual GPM-216
units.
Note: The selector buttons on the GPM-216 can access mono or stereo sources. If you choose to use mono
sources, each source will be accessed on the front panel with a separate selector button. If you use stereo
sources, you can access both signals of the stereo source with one selector button.
The GPM-216 will display the Unit name first, then the input name. For John’s guitar, it will display like
this:
Input: 1:John:guitar
In our example, the Configurator screen would look like this:
Figure 4: Naming sources
22
Glyph GPM-216
Reverb Select
Each input on each GPM-216 can have one of the included reverb settings assigned.
Figure 5: Reverb Select
Source Channel Select
The next part of the Configurator determines the Input source that will be mapped to each channel of the
GPM-216 units. If you select a source to be mapped to a channel, then that source will show up on that
channel of every GPM-216 unit. Once you map a source to a channel, that channel will not be available in
the pick lists for any other sources. Just to make it simple, in our example we’ll map the sources
sequentially on the screen.
23
Glyph GPM-216
Figure 6: Mapping sources to channels
Polarity
The polarity drop down menu allows you to set the phase reverse of the two local signals. Your choices are:
1.
2.
3.
Normal (both channels are unchanged)
Invert1 (Input A phase reverse enabled)
Invert2 (Input B phase reverse enabled)
Phantom Power
The GPM-216 can apply phantom power to microphones that need it. To turn on phantom power in the
Configure All Units page, just select “ON” from the Phantom Power drop down box for the GPM-216 units
that are using phantom powered microphones. You can also turn on phantom power using the front panel
of the GPM-216.
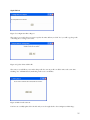
Configuration Complete
Once you have finished creating the Profile with Configure All Units, you need to upload the Profile to all
of the GPM-216 units. Click the Configuration Complete button and the Configurator will check for errors
in your Profile. By “errors”, what is meant is entry fields accidentally left blank or giving two units the same
name. If there are errors, the error message box will identify the specifics of the errors.
24
Glyph GPM-216
Figure 7: Configuration Error Report
The next screen verifies that you want to update the units. When you click “Yes” you will copy the profile
containing these settings to the units.
Figure 8: Update Units with Profile
The next screen will allow you to make this profile the current profile on all the units at the same time.
Clicking “Yes” will immediately make this profile active on all units.
Figure 9: Make Profile Current
You have successfully updated the Profile and you are brought back to the Configurator Main Page.
25
Glyph GPM-216
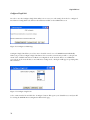
Configure Single Unit
In order to use the Configure Single Unit utility, it is necessary to set the unit(s) desired to be configured
into Remote Config ON mode and leave that indication visible on the GPM LCD screen.
Figure 10: Configurator Main Page
Configure Single Unit allows you to have more detailed control over each GPM-216 unit individually.
When you press the Configure Single Unit button, the network is scanned and you will see a drop down
menu of the available units that are in Remote Config Mode on the network. If there are GPM units
powered up on the network that are not in Remote Config mode, a dialog box will appear specifying what
those units are.
Figure 11: Configure Single Unit
Select a unit from the list and click the “Configure” button. This opens your default browser and you will
be viewing the GPM Monitor Configuration Wizard web page.
26
Glyph GPM-216
Figure 12 GPM Configurator Opening page.
There are several menu options available at this point:
1.
2.
3.
4.
5.
6.
7.
8.
9.
10.
New Profile
Edit Profile
Download Profile
Backup Profile
Set Current Profile
Delete Profile
Copy Diagnostic Logs to your Computer
Download Software
Restore Factory Software
About Configuration Wizard
The GPM unit keeps its configuration in configuration profiles that are stored on the GPM unit. Each
configuration profile that you create (New Profile) has a name. It includes the GPM unit name,
information regarding the local audio inputs, and mapping information for external channels. You can
have more than one profile stored on a GPM unit. This allows you to completely reconfigure the GPM unit
by selecting a different current profile (Set Current Profile).
27
Glyph GPM-216
You can backup a GPM profile from the GPM unit to your computer (Backup Profile). You can download a
backed up profile from your computer to the same GPM unit or to a different GPM system (Download
Profile). You can also edit or delete profiles stored on the GPM unit (Delete Profile).
In addition to profile management, the configuration wizard can be used to upload diagnostic logs under
the direction of Glyph technical support and to download software updates to the GPM unit.
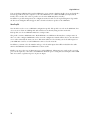
New Profile
New Profile is used to create a GPM unit configuration profile. The profile is stored on the GPM unit. You
can create more than one GPM profile and switch between them by using Set Current Profile.
Each profile stored on a GPM unit must have a unique name.
The profile contains a GPM unit name. Each GPM unit on a GPM network must have a unique name. If
there are other configured GPM units on the network, configuration wizard will check to be sure that there
are no other units with the name you enter. This name will be used to identify your local audio inputs on
your GPM unit as well as on other GPM units connected to the network.
In addition, you must select the number and type of local audio inputs that will be included in the audio
mix for this GPM unit and other GPM units on the network.
Finally, you can set the state of phantom power on the GPM unit. Phantom power can be used to provide
power to microphones connected to the GPM unit. Phantom power setting affects both inputs on the GPM
unit. You cannot set phantom power on just one input.
28
Glyph GPM-216
Figure 13: New Profile.
After creating a profile, it can be changed later by using Edit Profile.
You can also alter a profile using the GPM unit interface to change channel volume and pan settings. These
can then be saved using a menu option on the GPM unit in Setup mode.
Input Names
Each input included in the GPM mix is identified by a name. This name is used on the GPM unit you are
configuring. It is also used to identify this input on other GPM units connected to the network. The GPM
unit will display the input name in the format "unit name":"input name". In addition, you must select the
channel used for the input in the audio mix.
29
Glyph GPM-216
Input refers to the physical audio input attached to connectors A and B on the front or rear of the GPM
unit. Each input on the GPM unit is mapped to a mixer channel. Each input on other GPM units on the
network is also mapped to a mixer channel. A channel can be selected by one of the 16 buttons on the
front of the GPM unit in order to change volume, pan position, mute and solo.
You must also decide about whether or not one of the included reverb types is to be assigned to each of the
inputs. The drop down menu will display the lost of reverb options.
The input phase drop down menu(s) allow you to set the phase reverse of the two local signals. Your
choices are:
1.
2.
3.
30
Normal (both channels are unchanged)
Reverse A (Input A phase reverse enabled)
Reverse B (Input B phase reverse enabled)
Glyph GPM-216
Figure 14: Local Input Names.
Once the local inputs have been given names and assigned to channels, you can save the profile. If you
wish to additionally configure the external sources from other GPM-216 units on the network, use the
Advanced Configuration Options utility.
Figure 15: End Basic Configuration
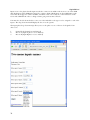
Map External Inputs
This step allows you to assign audio inputs from other GPM units to channels in your audio mix.
Each input included in the GPM mix is identified by a name. This name is used when assigning the source
to a channel. The format of this name is "unit name":"input name". For example, if the GPM unit was
named "john" and the input was named "guitar", you will identify the input as "john:guitar".
31
Glyph GPM-216
Figure 16: Map External Inputs.
If you do not map external inputs, the input will be assigned to a channel based on the channel selected
when the other GPM unit was configured. In the case of collision, the input will be assigned to an available
channel.
Note: An easy way to configure multiple GPM units is to connect them all to the network and choose unit
and input names for all GPM units. Skip the Map External Inputs step and save the configuration. You can
then edit each profile (Edit Profile). All external inputs will appear by name on the pick lists. If there are no
external inputs on the pick lists, the GPM unit has detected no inputs available on the network.
32
Glyph GPM-216
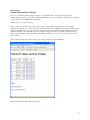
Channel Volume and Pan Settings
You can set an initial volume and pan setting for each channel that is assigned to an input. Later,
volume and pan settings can be changed using the GPM unit user interface. These can then be saved using
a menu option on the GPM unit in Setup mode.
Volume is set on a scale of 0 to 100.
Pan sets the stereo position of the input. A percentage of the input is assigned to the left and right
channels. The default is to set 50% to the left channel and 50% to the right channel ("50<>50"). This setting
will place the input dead center in the mix. Setting the input 100% in the left channel and 0% in the right
("100<>0") will place the input full to the left. Setting the source 0% in the left channel and 100% in the
right ("0<>100") will place the input full to the right. We will leave it to you to work out the effects of the
other settings.
The format "50<>50" matches the way the pan setting is displayed on the GPM unit.
Figure 17: Channel Volume and Pan Settings.
33
Glyph GPM-216
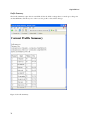
Profile Summary
The Profile Summary is just what it sounds like. It lists the all the settings that were made up to that point
on that GPM unit, and allows you to either save the profile or discard the changes
Figure 18: Profile Summary.
34
Glyph GPM-216
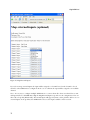
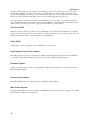
Edit Profile
The Edit Profile utility allows for changes to be made in any profile stored on a GPM unit. After selecting
Edit Profile from the list on the opening page, use the drop down box to select the profile you wish to edit.
If no profiles appear on the list, there are no stored profiles on the GPM unit.
Figure 19: Select profile to edit.
Download and Backup Profile
Profiles stored on any GPM unit can be backed up (copied from the GPM unit to a computer running the
GPM Configurator software). To Backup a profile using a Windows computer, right-click on the profile
name and select “Save Target As” (or “Save Link As” depending on the default browser being used) and
then choose a location on the computer to save the profile. Once a profile has been backed up, it can be
downloaded to the same or another GPM unit. Once the Download Profile utility has been selected, use
35
Glyph GPM-216
the Browse button and locate the profile to be downloaded. Once the profile has been selected, use the
Download Profile button to transfer the profile to the GPM unit. If the downloaded profile is the only
profile on the GPM unit it will become active immediately. If there are other profiles already on the GPM
unit, the Set Current Profile utility will need to be used to make this profile the active one.
Note: Each profile contains the unit name for the GPM unit it was created for. If a profile is backed up
from one GPM unit and then downloaded onto another GPM unit, it is likely that the downloaded profile
will need to be edited to provide a more appropriate unit name to avoid confusion.
Set Current Profile
When there is more than one profile stored on a GPM unit, the Set Current Profile utility is used to make
whichever one is desired to be the active profile. Use the drop down box to choose the desired profile and
click the Next button. The new profile will take effect immediately.
Delete Profile
A utility used to delete any profiles on the GPM unit no longer wanted.
Copy Diagnostic Logs to Your Computer
This utility provides a means for transferring troubleshooting diagnostic information from the GPM unit
to a computer. This utility should only be used at the direction of Glyph Technical Support
Download Software
A utility to provide software updates to the GPM unit. This utility should only be used at the direction of
Glyph Technical Support.
Restore Factory Software
This utility should only be used at the direction of Glyph Technical Support.
Mixer Status Snapshot
This option will display the current settings on the GPM-216 unit. In order to get the “snapshot”, the GPM216 unit must be in Remote Config mode.
36
Glyph GPM-216
Appendix A - Getting Started
Out of the box
Remove your GPM units from the packing material.
Check for damage.
Plug in the GPM units.
1. Connect the power cord to the GPM units and plug it into your power strip. Connect an Ethernet cable
to each GPM unit and connect it to your Ethernet switch (hub). Connect the power cord to your Ethernet
switch and plug it into your power strip.
2. Connect your microphones and instruments to your GPM units using connectors Input A and Input B.
By default, each unit is configured to have two mono input sources, but we will see how to change this
later.
3. Connect your monitors, headphones or earbuds.
Turn on the GPM units
By default, the GPM unit will power up as soon as power is applied but, if the unit has been shut down,
press the Power button on the far right side of the front of the unit.
• What if there is no display on the LCD and no lights go on?
⇒
Check the power.
Check your network connection
Look at the front of your GPM. Amber lights should be ON next to some of the buttons. These indicate
that there are audio sources from other GPM units detected on the network. There should be blinking
amber lights next to two of the Selector buttons. These are the Selector buttons for your audio sources. We
will learn later how to assign sources to different channels.
•
What if there is a blinking amber light, but no solid on amber lights? Then your GPM cannot see any
other units.
⇒
Check that the other GPM units have been turned on.
⇒
Check that the Ethernet cable is securely connected to the GPM units and to the Ethernet switch
(hub).
• What if there are some amber lights, but not one for every other GPM?
⇒
Then your network connection is OK, but there is something wrong with the network connection
for one or more of the other machines. Check their Ethernet connections.
Listen to your instrument
Press the selector button next to the blinking amber light. Look at the screen. At the top it should say “Mix:
volume”
• What if it says “Mix: Pan” or “Tuner”?
37
Glyph GPM-216
You have probably accidentally turned the Function knob. Turn it one or two clicks until you see
“Mix:volume”
• What if it says something else?
⇒
You have probably accidentally pressed the Mode button and placed the GPM in Setup mode. Press
the Mode button once. You should see a solid green LED next to the Mode button.
⇒
Turn the Data Knob under the screen clockwise. If you look at the screen, you can see that the control is
labeled “Volume” as you turn the knob; you will see the volume on the screen increase from 0. Set it at 50
to start. You are changing the volume of your instrument in the mix.
Turn the volume knob to the right of the screen clockwise. This increases the volume of the mix in your
monitor, headphones or earbuds.
Play your instrument or speak into your microphone. You should hear it in your monitor.
• What if there is no sound?
⇒
Check your instrument or microphone.
⇒
Check that your instrument or microphone is connected to Input A or Input B.
⇒
Check that there is LED activity next to the Gain A or Gain B (depending on which connector you
have used for your instrument). If not, turn the appropriate gain knob clockwise while playing to
increase the gain.
⇒
Make sure that you have selected the correct channel in the mix. The green light should be on next
to the same Selector button as the blinking amber.
⇒
Check that the red LED next to your Selector button is not solid on. If it is, you have accidentally set
this channel to Mute.
⇒
Try increasing the volume in the mix by turning the Volume knob under the screen.
⇒
Try increasing the monitor volume by turning the Volume knob the right of the screen to increase
the monitor volume.
Listen to the other instruments
When all musicians can hear their own instrument it is time to listen to the others. Have one musician play.
Press the selector button next to the first (non-blinking) amber light that is on. Turn the volume knob
under the display to make the volume non-zero. If you hear no sound, go on to the next Selector with an
amber light. Turn this volume knob. Continue until you can hear the instrument. When you do, you have
found the channel for that instrument. Set the volume to suit your preference.
•
What if none of the channels seem to work? Check the network connection of the GPM belonging to
the musician you wish to hear. (See “Check your network connection” above.) Check that the other
musician can hear the instrument locally. (See “Listen to your instrument” above.)
After you have set the desired mix volume for the first musician, do the same for all other instruments.
Make some music
Congratulations! You have checked out all of your GPM units - and you have created your first personal
mix.
38
Glyph GPM-216
Creating a Profile
The power of the GPM will only be released when you learn to use profiles. A profile allows you to assign a
meaningful name to each audio source, to assign it to a channel, and to store source volume and pan
settings so you can get the same mix every time you turn on the GPM.
Plan ahead
There are many possible ways to configure your GPM units. We will discuss the simplest way here. As you gain
experience, you can alter the profile that we create here, or create new ones.
The simplest approach is to configure all the GPM units used by your band so that the same source appears on the
same channel on each GPM unit. Each musician will then set their own volume and pan settings for the source to
create a personal mix.
1. Decide what type of sources each GPM unit will provide. A GPM unit can provide a single stereo source, a single
mono source or two mono sources.
2. Choose a name for each GPM unit. A good choice would be the name of the musician who will be using the unit.
Unit names are limited to 6 characters, and each unit name must be unique.
3. Choose a name for the input on each unit. If you have two mono sources you will need two names; if stereo or
one mono you will need one name. A good choice is the name of the instrument.
⇒
The combination of unit name and input name will identify the source in the mix. If the unit name is “John”
and the two mono inputs are “guitar” and “vocals” then the two source names in the mix will be
“John:guitar” and “John:vocals”.
4. Decide which channel will be assigned to each source in the mix. This will determine which Selector button
selects that source when you want to change its volume or pan position or to mute or solo it. You can cluster them
together, using 1, 2, 3, 4, etc. or you can space them out on the display, using 1, 3, 5, 7, etc. In addition, you can
group them as you like.
In this example we have seven sources named “John:guitar”, “John:vocals”, “Paul:bass”, “Paul:vocals”,
“George:guitar” , “George:vocals” and “Stan:drums”. We have decided that we want all of the vocals grouped
together on the top row of selectors and all of the instruments on the bottom row. So our channel assignments will
be:
John:guitar - 9
John:vocals - 1
Paul:bass - 10
Paul:vocals - 2
George:guitar - 11
George:vocals - 3
Stan:drums - 12
Planning is complete. It is time to run the Configurator. Please refer to Chapter 3, page 18 of the GPM-216 Manual.
39
Glyph GPM-216
Appendix B
Beatnet Software
Behind the front panel of the GPM-216 there is a Linux computer running Glyph’s Beatnet software. This is an
embedded Linux OS that interfaces with the front panel and allows you to mix a personal monitor and program the
GPM-216. It can be upgraded with new software for added features and can accommodate future expansion of the
hardware also.
40
Glyph GPM-216
Appendix C
Portions of the GPM-216 software are Copyright © 2005 – 2006 by Music Gear, Inc., Ithaca, NY
Other portions of the GPM-216 software adhere to the GNU General Public License as shown
below. The source code of this portion of the software can be obtained from
[email protected] for a small fee.
GNU GENERAL PUBLIC LICENSE
Version 2, June 1991
Copyright (C) 1989, 1991 Free Software Foundation, Inc.
51 Franklin Street, Fifth Floor, Boston, MA 02110-1301, USA
Everyone is permitted to copy and distribute verbatim copies
of this license document, but changing it is not allowed.
Preamble
The licenses for most software are designed to take away your freedom to share and change it.
By contrast, the GNU General Public License is intended to guarantee your freedom to share and
change free software--to make sure the software is free for all its users. This General Public
License applies to most of the Free Software Foundation's software and to any other program
whose authors commit to using it. (Some other Free Software Foundation software is covered by
the GNU Lesser General Public License instead.) You can apply it to your programs, too.
When we speak of free software, we are referring to freedom, not price. Our General Public
Licenses are designed to make sure that you have the freedom to distribute copies of free
software (and charge for this service if you wish), that you receive source code or can get it if
you want it, that you can change the software or use pieces of it in new free programs; and that
you know you can do these things.
To protect your rights, we need to make restrictions that forbid anyone to deny you these rights
or to ask you to surrender the rights. These restrictions translate to certain responsibilities for you
if you distribute copies of the software, or if you modify it.
For example, if you distribute copies of such a program, whether gratis or for a fee, you must
give the recipients all the rights that you have. You must make sure that they, too, receive or can
get the source code. And you must show them these terms so they know their rights.
We protect your rights with two steps: (1) copyright the software, and (2) offer you this license
which gives you legal permission to copy, distribute and/or modify the software.
Also, for each author's protection and ours, we want to make certain that everyone understands
that there is no warranty for this free software. If the software is modified by someone else and
passed on, we want its recipients to know that what they have is not the original, so that any
problems introduced by others will not reflect on the original authors' reputations.
Finally, any free program is threatened constantly by software patents. We wish to avoid the
danger that redistributors of a free program will individually obtain patent licenses, in effect
41
Glyph GPM-216
making the program proprietary. To prevent this, we have made it clear that any patent must be
licensed for everyone's free use or not licensed at all.
The precise terms and conditions for copying, distribution and modification follow.
TERMS AND CONDITIONS FOR COPYING, DISTRIBUTION AND MODIFICATION
0. This License applies to any program or other work which contains a notice placed by the
copyright holder saying it may be distributed under the terms of this General Public License. The
"Program", below, refers to any such program or work, and a "work based on the Program"
means either the Program or any derivative work under copyright law: that is to say, a work
containing the Program or a portion of it, either verbatim or with modifications and/or translated
into another language. (Hereinafter, translation is included without limitation in the term
"modification".) Each licensee is addressed as "you".
Activities other than copying, distribution and modification are not covered by this License; they
are outside its scope. The act of running the Program is not restricted, and the output from the
Program is covered only if its contents constitute a work based on the Program (independent of
having been made by running the Program). Whether that is true depends on what the Program
does.
1. You may copy and distribute verbatim copies of the Program's source code as you receive it,
in any medium, provided that you conspicuously and appropriately publish on each copy an
appropriate copyright notice and disclaimer of warranty; keep intact all the notices that refer to
this License and to the absence of any warranty; and give any other recipients of the Program a
copy of this License along with the Program.
You may charge a fee for the physical act of transferring a copy, and you may at your option
offer warranty protection in exchange for a fee.
2. You may modify your copy or copies of the Program or any portion of it, thus forming a work
based on the Program, and copy and distribute such modifications or work under the terms of
Section 1 above, provided that you also meet all of these conditions:
a) You must cause the modified files to carry prominent notices stating that you changed
the files and the date of any change.
b) You must cause any work that you distribute or publish, that in whole or in part
contains or is derived from the Program or any part thereof, to be licensed as a whole at
no charge to all third parties under the terms of this License.
c) If the modified program normally reads commands interactively when run, you must
cause it, when started running for such interactive use in the most ordinary way, to print
or display an announcement including an appropriate copyright notice and a notice that
there is no warranty (or else, saying that you provide a warranty) and that users may
redistribute the program under these conditions, and telling the user how to view a copy
of this License. (Exception: if the Program itself is interactive but does not normally print
such an announcement, your work based on the Program is not required to print an
announcement.)
These requirements apply to the modified work as a whole. If identifiable sections of that work
are not derived from the Program, and can be reasonably considered independent and separate
works in themselves, then this License, and its terms, do not apply to those sections when you
42
Glyph GPM-216
distribute them as separate works. But when you distribute the same sections as part of a whole
which is a work based on the Program, the distribution of the whole must be on the terms of this
License, whose permissions for other licensees extend to the entire whole, and thus to each and
every part regardless of who wrote it.
Thus, it is not the intent of this section to claim rights or contest your rights to work written
entirely by you; rather, the intent is to exercise the right to control the distribution of derivative
or collective works based on the Program.
In addition, mere aggregation of another work not based on the Program with the Program (or
with a work based on the Program) on a volume of a storage or distribution medium does not
bring the other work under the scope of this License.
3. You may copy and distribute the Program (or a work based on it, under Section 2) in object
code or executable form under the terms of Sections 1 and 2 above provided that you also do one
of the following:
a) Accompany it with the complete corresponding machine-readable source code, which
must be distributed under the terms of Sections 1 and 2 above on a medium customarily
used for software interchange; or,
b) Accompany it with a written offer, valid for at least three years, to give any third party,
for a charge no more than your cost of physically performing source distribution, a
complete machine-readable copy of the corresponding source code, to be distributed
under the terms of Sections 1 and 2 above on a medium customarily used for software
interchange; or,
c) Accompany it with the information you received as to the offer to distribute
corresponding source code. (This alternative is allowed only for noncommercial
distribution and only if you received the program in object code or executable form with
such an offer, in accord with Subsection b above.)
The source code for a work means the preferred form of the work for making modifications to it.
For an executable work, complete source code means all the source code for all modules it
contains, plus any associated interface definition files, plus the scripts used to control
compilation and installation of the executable. However, as a special exception, the source code
distributed need not include anything that is normally distributed (in either source or binary
form) with the major components (compiler, kernel, and so on) of the operating system on which
the executable runs, unless that component itself accompanies the executable.
If distribution of executable or object code is made by offering access to copy from a designated
place, then offering equivalent access to copy the source code from the same place counts as
distribution of the source code, even though third parties are not compelled to copy the source
along with the object code.
4. You may not copy, modify, sublicense, or distribute the Program except as expressly provided
under this License. Any attempt otherwise to copy, modify, sublicense or distribute the Program
is void, and will automatically terminate your rights under this License. However, parties who
have received copies, or rights, from you under this License will not have their licenses
terminated so long as such parties remain in full compliance.
43
Glyph GPM-216
5. You are not required to accept this License, since you have not signed it. However, nothing
else grants you permission to modify or distribute the Program or its derivative works. These
actions are prohibited by law if you do not accept this License. Therefore, by modifying or
distributing the Program (or any work based on the Program), you indicate your acceptance of
this License to do so, and all its terms and conditions for copying, distributing or modifying the
Program or works based on it.
6. Each time you redistribute the Program (or any work based on the Program), the recipient
automatically receives a license from the original licensor to copy, distribute or modify the
Program subject to these terms and conditions. You may not impose any further restrictions on
the recipients' exercise of the rights granted herein. You are not responsible for enforcing
compliance by third parties to this License.
7. If, as a consequence of a court judgment or allegation of patent infringement or for any other
reason (not limited to patent issues), conditions are imposed on you (whether by court order,
agreement or otherwise) that contradict the conditions of this License, they do not excuse you
from the conditions of this License. If you cannot distribute so as to satisfy simultaneously your
obligations under this License and any other pertinent obligations, then as a consequence you
may not distribute the Program at all. For example, if a patent license would not permit royaltyfree redistribution of the Program by all those who receive copies directly or indirectly through
you, then the only way you could satisfy both it and this License would be to refrain entirely
from distribution of the Program.
If any portion of this section is held invalid or unenforceable under any particular circumstance,
the balance of the section is intended to apply and the section as a whole is intended to apply in
other circumstances.
It is not the purpose of this section to induce you to infringe any patents or other property right
claims or to contest validity of any such claims; this section has the sole purpose of protecting
the integrity of the free software distribution system, which is implemented by public license
practices. Many people have made generous contributions to the wide range of software
distributed through that system in reliance on consistent application of that system; it is up to the
author/donor to decide if he or she is willing to distribute software through any other system and
a licensee cannot impose that choice.
This section is intended to make thoroughly clear what is believed to be a consequence of the
rest of this License.
8. If the distribution and/or use of the Program is restricted in certain countries either by patents
or by copyrighted interfaces, the original copyright holder who places the Program under this
License may add an explicit geographical distribution limitation excluding those countries, so
that distribution is permitted only in or among countries not thus excluded. In such case, this
License incorporates the limitation as if written in the body of this License.
9. The Free Software Foundation may publish revised and/or new versions of the General Public
License from time to time. Such new versions will be similar in spirit to the present version, but
may differ in detail to address new problems or concerns.
44
Glyph GPM-216
Each version is given a distinguishing version number. If the Program specifies a version number
of this License which applies to it and "any later version", you have the option of following the
terms and conditions either of that version or of any later version published by the Free Software
Foundation. If the Program does not specify a version number of this License, you may choose
any version ever published by the Free Software Foundation.
10. If you wish to incorporate parts of the Program into other free programs whose distribution
conditions are different, write to the author to ask for permission. For software which is
copyrighted by the Free Software Foundation, write to the Free Software Foundation; we
sometimes make exceptions for this. Our decision will be guided by the two goals of preserving
the free status of all derivatives of our free software and of promoting the sharing and reuse of
software generally.
NO WARRANTY
11. BECAUSE THE PROGRAM IS LICENSED FREE OF CHARGE, THERE IS NO
WARRANTY FOR THE PROGRAM, TO THE EXTENT PERMITTED BY APPLICABLE
LAW. EXCEPT WHEN OTHERWISE STATED IN WRITING THE COPYRIGHT HOLDERS
AND/OR OTHER PARTIES PROVIDE THE PROGRAM "AS IS" WITHOUT WARRANTY
OF ANY KIND, EITHER EXPRESSED OR IMPLIED, INCLUDING, BUT NOT LIMITED
TO, THE IMPLIED WARRANTIES OF MERCHANTABILITY AND FITNESS FOR A
PARTICULAR PURPOSE. THE ENTIRE RISK AS TO THE QUALITY AND
PERFORMANCE OF THE PROGRAM IS WITH YOU. SHOULD THE PROGRAM PROVE
DEFECTIVE, YOU ASSUME THE COST OF ALL NECESSARY SERVICING, REPAIR OR
CORRECTION.
12. IN NO EVENT UNLESS REQUIRED BY APPLICABLE LAW OR AGREED TO IN
WRITING WILL ANY COPYRIGHT HOLDER, OR ANY OTHER PARTY WHO MAY
MODIFY AND/OR REDISTRIBUTE THE PROGRAM AS PERMITTED ABOVE, BE
LIABLE TO YOU FOR DAMAGES, INCLUDING ANY GENERAL, SPECIAL,
INCIDENTAL OR CONSEQUENTIAL DAMAGES ARISING OUT OF THE USE OR
INABILITY TO USE THE PROGRAM (INCLUDING BUT NOT LIMITED TO LOSS OF
DATA OR DATA BEING RENDERED INACCURATE OR LOSSES SUSTAINED BY YOU
OR THIRD PARTIES OR A FAILURE OF THE PROGRAM TO OPERATE WITH ANY
OTHER PROGRAMS), EVEN IF SUCH HOLDER OR OTHER PARTY HAS BEEN
ADVISED OF THE POSSIBILITY OF SUCH DAMAGES.
END OF TERMS AND CONDITIONS
How to Apply These Terms to Your New Programs
If you develop a new program, and you want it to be of the greatest possible use to the public, the
best way to achieve this is to make it free software which everyone can redistribute and change
under these terms.
To do so, attach the following notices to the program. It is safest to attach them to the start of
each source file to most effectively convey the exclusion of warranty; and each file should have
at least the "copyright" line and a pointer to where the full notice is found.
one line to give the program's name and an idea of what it does.
Copyright (C) yyyy name of author
45
Glyph GPM-216
This program is
modify it under
as published by
of the License,
free software; you can redistribute it and/or
the terms of the GNU General Public License
the Free Software Foundation; either version 2
or (at your option) any later version.
This program is distributed in the hope that it will be useful,
but WITHOUT ANY WARRANTY; without even the implied warranty of
MERCHANTABILITY or FITNESS FOR A PARTICULAR PURPOSE. See the
GNU General Public License for more details.
You should have received a copy of the GNU General Public License
along with this program; if not, write to the Free Software
Foundation, Inc., 51 Franklin Street, Fifth Floor, Boston, MA 02110-1301,
USA.
Also add information on how to contact you by electronic and paper mail.
If the program is interactive, make it output a short notice like this when it starts in an interactive
mode:
Gnomovision version 69, Copyright (C) year name of author
Gnomovision comes with ABSOLUTELY NO WARRANTY; for details
type `show w'. This is free software, and you are welcome
to redistribute it under certain conditions; type `show c'
for details.
The hypothetical commands `show w' and `show c' should show the appropriate parts of
the General Public License. Of course, the commands you use may be called something other
than `show w' and `show c'; they could even be mouse-clicks or menu items--whatever
suits your program.
You should also get your employer (if you work as a programmer) or your school, if any, to sign
a "copyright disclaimer" for the program, if necessary. Here is a sample; alter the names:
Yoyodyne, Inc., hereby disclaims all copyright
interest in the program `Gnomovision'
(which makes passes at compilers) written
by James Hacker.
signature of Ty Coon, 1 April 1989
Ty Coon, President of Vice
This General Public License does not permit incorporating your program into proprietary
programs. If your program is a subroutine library, you may consider it more useful to permit
linking proprietary applications with the library. If this is what you want to do, use the GNU
Lesser General Public License instead of this License.
46