1
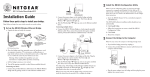
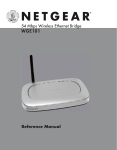
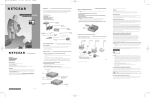
What you do:
What you need:
1.
Connect the provided Ethernet cable between the WGE101 Wireless
Bridge (A) and the gaming console (B).
•
WGE101 54 Mbps Wireless Ethernet Bridge.
•
A switch or hub (such as the NETGEAR FS605, FS608, or EN104TP).
2.
Connect the power adapter to the wireless bridge and plug the power
adapter in to a power outlet. The Power
and Wireless
lights
should light up.
•
3.
After the Wireless light
Broadband Internet access through a 802.11b or 802.11g wireless
router with no security features enabled OR through a router with a
802.11b or 802.11g wireless access point with no security features
enabled.
•
Game consoles, computers, printers, or other Ethernet-enabled
devices that you want to connect to your network.
54 Mbps Wireless Ethernet Bridge WGE101
Installation Guide
Follow these quick steps to install your bridge.
Note: Before you begin, have your wireless network set up and working.
Unpack the box, verify the contents, and follow the instructions in this
installation guide. For more details, see the WGE101 Reference Manual
on the WGE101 54 Mbps Wireless Ethernet Bridge Resource CD or at
www.netgear.com/docs/wge101.
lights up, turn on the gaming console.
If the bridge and the gaming console are successfully connected, the
Network light
will light up. This light flashes when there is
network activity.
Note: If your setup works with the default settings, you don’t need to configure
the bridge unless you have to change the Country/Region setting (from the default
value of United States) or the bridge’s default IP address (because the network has
another WGE101 bridge on it).
Share the Wireless Bridge Setup
Note: When you set up the bridge, place it away from potential sources of
interference, such as computers, monitors, TVs, microwaves, cordless phones,
or large metal surfaces.
WGR614 54 Mpbs
Wireless Router
Cable
or DSL
modem
B
WGE101 54 Mbps
Wireless Ethernet Bridge
1.
Shut down or power down the Ethernet-enabled devices that you
want to connect through the bridge.
2.
Connect the provided Ethernet cable between the bridge and the
switch (or hub).
3.
Connect an Ethernet cable between the switch (or hub) and each
computer or printer that you want to be able to communicate
through the bridge.
4.
Plug the power adapters into the bridge and the switch (or hub) and
then plug the power adapters into a power source. The Power
and Wireless
lights should light up.
5.
After the Wireless light
lights up, power up any game console(s)
first. Then power up the other Ethernet-enabled devices.
If the bridge and the Ethernet-enabled devices are successfully connected,
the Network light
will light up. This light flashes when there is
network activity.
WGE101 54 Mbps
Wireless Ethernet Bridge
WGR614 54 Mbps
Wireless Router
What you do:
Fast Ethernet
Switch FS605
Cable or DSL modem
A
Gaming console or other
Ethernet-enabled device
Gaming console or other
Ethernet-enabled device
Internet Gaming Setup
What you need:
•
WGE101 54 Mbps Wireless Ethernet Bridge.
•
Broadband Internet access through a 802.11b or 802.11g wireless
router with no security features enabled OR through a router with a
802.11b or 802.11g wireless access point with no security features
enabled.
•
Ethernet-enabled game console.
Ethernet-enabled
computer
Note: If your setup works with the default settings, you don’t need to configure
the bridge unless you have to change the Country/Region setting (from the default
value of United States) or the bridge’s default IP address (because the network has
another WGE101 bridge on it).
Configuring the Bridge
You configure the bridge to change the Country/Region setting, to change
the bridge’s IP address, to enable the security settings, or to change other
settings. To configure the bridge you must have it connected to a personal
computer — either directly or through a switch or hub.
If you have a Windows® computer, you can configure the bridge’s basic
connection settings using the NETGEAR Smart Navigator.
WGE101 802.11g Wireless Ethernet Bridge Lights
(With a Macintosh®, Linux®, or UNIX® computer, you use browserbased configuration software to change the bridge’s settings. See the
WGE101 Reference Manual on the WGE101 54 Mbps Wireless Ethernet
Bridge Resource CD for details.)
To use the NETGEAR Smart Navigator:
1.
Connect the bridge to a Windows computer.
2.
Insert the WGE101 54 Mbps Wireless Ethernet Bridge Resouce CD
into the CD-ROM drive and follow the instructions to install the
NETGEAR Smart Navigator.
3.
Choose Programs>NETGEAR
WGE101 Bridge>Smart
Navigator from the Start menu.
4.
Select the bridge in the device list.
5.
Click Connection Settings.
6.
To change the Country/Region,
select a different country or
region.
8.
9.
WLAN
Green
LAN
Green
OFF: No power to the unit.
ON: Power applied to the unit.
OFF: No wireless LAN activity.
Flashing: Searching for an access point or
wireless router.
ON: Communicating to a wireless LAN.
OFF: No Ethernet traffic.
Flashing: Wired Ethernet traffic.
ON: Connected to the Ethernet.
Reset to Factory Defaults
Press the Default button (located between the Ethernet port and the AC
adapter socket) for at least 6 seconds and then release the button. When
the lights stop flashing the bridge has been reset.
July 2003
Check that the wireless-enabled computer or printer is on the same
wireless network as the computer using the bridge.
•
Make sure the WEP key (if WEP is enabled) and Country/Region
selection are the same for all devices using the same wireless network.
I cannot configure the WGE101 using a browser.
You did not specify the correct IP address for the bridge.
•
Type the bridge’s IP address . The default address is 192.168.0.201.
•
Make sure the IP addresses for your computer and the bridge have
the same IP subset address. The IP addresses for both devices should
start with the same numbers (for example, 192.168.0.yyy). Also, the
subnet masks should match (for example, 255.255.255.0).
The Wireless light
By registering your product at www.NETGEAR.com/register, we can provide
you with faster expert technical support and timely notices of product and
software upgrades.
is always blinking.
•
Make sure the WGE101 is within range of the wireless network
•
Make sure that the Network Name (SSID), WEP, and
Country/Region settings match those of the router or access point.
is on, but I cannot connect to the Internet.
There is a network configuration problem.
•
If the warning about selecting the incorrect region, appears, click Yes.
To make other changes (like changing the IP address or changing the
password), click the Advanced Settings button on the Smart Navigator
window. If you get a warning about the IP address not matching the
network IP address, see the Smart Navigator Reference Manual on the CD.
See the WGE101 Reference Manual on the CD for details about working
with the browser-based configuration sofware.
•
Technical Support
The Wireless light
To apply these changes, click OK, type admin as the User name and
password as the Password, click OK.
There is a network configuration problem.
If you have trouble setting up your WGE101, check these tips. The troubleshooting section in the WGE101 Reference Manual on the WGE101 54 Mbps
Wireless Ethernet Bridge Resource CD has more details and additional tips.
The bridge has not connected to a wireless network.
Make any other needed
connection settings changes.
M-10131-02
Green
Quick Troubleshooting Tips
Note: Having the wrong
Country/Region setting may
violate local laws.
7.
PWR
My bridge-enabled computer cannot communicate with my wirelessenabled computer or printer.
Make sure the wireless network security (WEP) settings and the
bridge’s security (WEP) settings match.
•
Make sure the IP addresses for the computer, bridge, and router all
start with the same numbers (for example, 192.168.0.yyy). Also, the
subnet masks should match (for example, 255.255.255.0).
•
If a gaming console connected through a switch or hub cannot
connect to the Internet, with power on disconnect everything from
the switch or hub. Re-connect the bridge, then the game console(s).
Finally, connect any other device(s).
PLEASE REFER TO THE SUPPORT INFORMATION CARD THAT SHIPPED
WITH YOUR PRODUCT.
NETGEAR, INC.
Support Information
Phone: 1-888-NETGEAR (for US & Canada only) — 24x7 phone support
For other countries see your Support information card.
E-mail: [email protected] (24x7 online support)
Web site: www.NETGEAR.com
0560 !
Attention: When you configure the wireless settings of this device
please make sure to select the correct country settings. Due to EU-law,
the country settings must be identical to the country where the device
is operating (important due to non-harmonized frequencies in the EU).
©2003 by NETGEAR, Inc. NETGEAR, the Netgear logo, Everybody’s Connecting, Auto
Uplink and The Gear Guy are trademarks or registered trademarks of Netgear, Inc. in the
United States and/or other countries. Microsoft and Windows are trademarks or registered
trademarks of Microsoft Corporation in the United States and/or other countries. Other
brand or product names are trademarks or registered trademarks of their respective owners.
Information is subject to change without notice. All rights reserved.