1
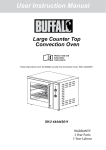
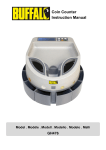
Cautions
Specification
Before Use
In Use
• Check that your mains power supply
• Do not attempt to remove
corresponds to the voltage shown in this
the Jug or Lid while
the machine is working.
manual (also shown on the rating plate,
located under the Motor Body ).
• Do not operate the motor
• Do not connect the Plug into
when the Jug is empty.
your socket with wet hands.
After Use
• Ensure that the Mains Lead is not near
• Ensure the Cutter Blade
any hot surface, and is not in a position on
Assembly has come to a
the worktop where it could be ‘snagged’. The
complete stop before removing
Mains Lead should not hang over the side of the
the Lid from the Jug .
worktop, where it could accidentally snagged
•
Always disconnect the electricity
or pulled by children. There is a cord shortening
supply before removing
facility located under the Motor Body .
the Jug from the Motor
• Do not move the appliance around
Body , or approaching any
by pulling the Mains Lead .
part that moves in use.
• Inspect the Jug to ensure it is free from
• Do not use fingers to scrape
chips or cracks - these could cause the
food away from the Cutter
Jug to break during use causing injury.
Blade Assembly . A plastic
• Always keep the appliance out
scraper may be used, but only
of the reach of children.
when the electricity supply
has been disconnected.
• This appliance is not intended for use by
persons (including children) with reduced
• Care must be taken handling
physical, sensory or mental capabilities or
the sharp blades when
lack of experience or knowledge, unless
assembling, emptying the Jug
they have been given supervision or
and during cleaning.
instruction concerning use of the appliance
• Unplug the appliance
by a person responsible for their safety.
when not in use.
• This appliance is not intended to be
• Pull the plug (not pull Mains Lead)
operated by means of an external timer
to disconnect from mains socket.
or a separate remote-control system.
• Do not immerse the Motor
• The appliance should only be used as
Body in water.
instructed: there is potential
Faults
and damage
for injury from misuse.
•
If
the
Jug is chipped or cracked
• Never mount the Cutter Blade Assembly
•
If
the
Mains Lead has
onto the Revolving Spigot
been damaged in any way.
without the Jug attached.
• If the Blender appears to be
• Never leave the appliance unattended
faulty or damaged in any way
while it is operating.
• Do not switch on or attempt
• The Jug and Lid must be securely
to operate. Please contact
locked in position before operating the
Judge Customer Services, for
machine: do not attempt to defeat
address see Guarantee Section.
the safety interlock mechanisms.
Never attempt to repair to
• Do not use any other jug or parts other
the appliance yourself
than those supplied with the appliance.
• Please keep your purchase receipt.
Blender with Glass Jug
Name
Model No.
Capacity
Rated Voltage
Rated Frequency
Rated Power
Judge Blender
with Glass Jug
JEA51
1.5L
220 - 240v
50Hz
550W
Judge 2 Year Domestic Electrical Guarantee
•
•
•
•
The Judge 2 Year Domestic
Electrical Guarantee covers the
product to be free of defects in
materials and workmanship for
a period of TWO YEARS from the
date of original retail purchase.
During this period, JUDGE will,
at their option, repair or replace
defective parts of the product,
or replace the product, providing
the Use Care and Safety
Advice have been followed.
The Guarantee does not cover
damage, defect or failure
caused by or resulting from
accidents, external damage,
alteration, modification, abuse,
misuse or misapplication.
HORWOOD SHALL NOT BE
LIABLE FOR INCIDENTAL OR
CONSEQUENTIAL DAMAGES
RESULTING FROM THE USE OF
THIS PRODUCT (INCLUDING
COLOUR FADING, SCRATCHES OR
ACCUMULATED DIRT) WITHOUT
FOLLOWING THE USE, CARE
& SAFETY INSTRUCTIONS.
Note: Due to the introduction
of improvements from time to
time, the right is reserved to
supply products which differ
slightly from those illustrated and
described in this publication.
Errors and Omissions Excepted.
The Guarantee does not
cover any damage caused by
taking the appliance apart
yourself, or attempting to
repair the appliance yourself.
CUSTOMER SERVICES
Horwood, Avonmouth Way,
Bristol, BS11 9HX, Great Britain
•
THE PRODUCT IS INTENDED
FOR DOMESTIC USE ONLY.
[email protected]
•
Please keep your Purchase
Receipt and contact us
directly if you encounter any
problems with your product.
www.judgecookware.co.uk
Blender
with
Glass Jug
Model No. JEA51 - 550W
Instruction
Manual
Please read this
instruction manual
carefully before use and
save for later reference.
Tel: 0117 940 0000
CORRECT DISPOSAL OF THIS PRODUCT
This marking indicates that this product should not be disposed with other household wastes throughout
the EU. To prevent possible harm to the environment or human health from uncontrolled waste
disposal, recycle it responsibly to promote the sustainable reuse of material resources. To return your
used device, please use the return and collection systems or contact the retailer where the product was
purchased. They can take this product for environmental safe recycling.
FOR DOMESTIC USE ONLY
Blender with Glass Jug
UNPACK YOUR BLENDER CAREFULLY (CUTTER BLADES ARE SHARP!)
AND REMOVE PACKING PIECES, LABELS AND STICKERS BEFORE USE.
Blender with Glass Jug
Identifying the parts
of your Judge Blender
Assembly
• BEFORE FIRST USE: wash
Measuring Cup /
Pouring Hole Cover
(SPARE PART CODE: JEA51M)
Lid, with Pouring Hole
(SPARE PART CODE: JEA51L)
Glass Jug
1300
1200
1100
1000
• The appliance should be sited on a
• Before removing food from the
1.
600
500
Sealing Gasket
Cutter Blade Assembly
(Take Care - Sharp Blades)
2.
3.
Jug Base
Revolving Spigot
4.
Motor Body
Pulse Button
Operating Switch
0 = OFF
1 = Low Speed
2 = High Speed
5.
•
Mains Lead and Plug
•
For Spare Parts please contact
Judge Customer Services for address see Guarantee Section.
Blender with Glass Jug
• Thoroughly wash the Jug
• Reassemble the
Assembly
, Lid and Cutter Blade
using warm soapy water.
• Unscrew the Jug Base
from the Glass Jug by
turning anti-clockwise (if this is a little stiff simply
pour some hot water between the glass jug and the
Jug Case ) remove the Sealing Gasket , Cutter
Blade Assembly and wash using warm soapy water.
/ / / / /
appliance and store
with Lid ajar
in a safe place.
are also
dishwasher safe.
Removing processed food
900
800
700
Storage
• Detachable parts
Use
l
1500 m
1400
(SPARE PART CODE: JEA51J)
Jug Handle
2. The Lid is a push-fit into
the top of the Jug .
3. Lower the assembled Jug onto
the Motor Body . Turn clockwise
until the Jug locks into place.
• NOTE: the appliance will not
operate until assembled correctly.
assembled Jug and Lid in warm
soapy water, rinse and dry.
• Ensure that the appliance is
disconnected from the electricity
supply before assembly.
1. The Measuring Cup pushes
into the Lid Pouring Hole - turn
the Measuring Cup clockwise
to positively lock into place.
Periodic Cleaning
dry, level and stable surface,
away from direct heat.
With the appliance switched OFF
( Position 0) add ingredients to
the Jug by removing the lid .
When you have added your
ingredients to the Jug , push the
Lid securely back into position.
Stabilise the appliance by placing
one hand on top of the Lid
(with the Measuring Cup /
Pouring Hole Cover fitted)
For best results begin blending
by pressing the Pulse Button
two or three times, allowing the
ingredient pieces to drop to the
bottom of the Jug between bursts.
Food may then be further
blended by using the Operating
Switch in position 1 (low
speed) or 2 (high speed).
The Lid must always be
attached to the Jug while
the appliance is operating.
Ingredients may also be added
to the Jug while the appliance
is operating ( Position 1/2)
by removing the Pouring Hole
Cover from the Lid .
Jug , wait until the Cutter Blades
have stopped spinning.
1. Disconnect the appliance
from the electricity supply.
2. Remove the Lid .
3. Pour food from the Jug
, scraping contents down with
a spatula if necessary.
• To remove foods of a more solid
consistency, remove the Jug
from the Cutter Blade Assembly
(Take Care - Sharp Blades)
and Jug Base . Scrape food
from the Jug with a spatula.
Self Clean Function
• Once you have emptied the contents,
simply add 1L of water and a
small amount of liquid detergent
and follow the “Use” & “Removing
processed food” instructions.
Blender with Glass Jug
• Motor Body
is wipe clean only, using a damp,
soapy cloth.
Tips
• Keep ingredient pieces roughly
• Use a plastic spatula to scrape-down
the same size when possible, this
makes uniform blending easier.
Cubes approx. 2.5cm / 1” are ideal.
• It is usually best to put liquid
ingredients into the Jug
first.
• The maximum temperature of
• The appliance can complete
liquid foods that can be processed
is 80°C. It is better to allow
soups, broths etc to cool to a
lower temperature if possible.
a task in seconds - stop and
check the consistency every few
seconds rather than overblend.
• Most chopping tasks are best
performed by using the pulse control.
• Do not overload the motor with
• If processing hot liquids the
maximum capacity is reduced to 1L
• At least one cup of liquid must
extra heavy or extra large loads.
If the blender has been overfilled,
disconnect from mains electricity
supply and remove some of the
ingredients before continuing.
be added to Ice Cubes before
they will blend properly.
• The Judge Blender is versatile
• If you run the motor continuously for
3 minutes, wait at least 5 minutes
before running the motor again.
any pieces of food that stick to the
inside of the Jug : Ensure the
machine is disconnected from mains
electricity supply before placing
utensils or fingers into the jug.
but it isn’t a replacement for
all other kitchen gadgets: it will
not mash potatoes, whisk egg
whites, chop raw meat, knead or
mix stiff doughs or extract juices
from fruit and vegetables.
Blender with Glass Jug