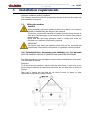
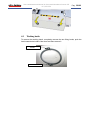
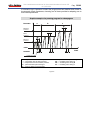
1
EN Use and Maintenance Manual for Pneumatic Membrane Presses PE-PF / PEC-PFC P_0610R03GB.doc EN Read all the following safety recommendations very carefully before undertaking any action whatsoever with your machine. FIRST LEARN AND THEN ALWAYS FOLLOW ALL THE SAFETY RECOMMENDATIONS Read these safety recommendations very carefully before installing and using the machine. Also read all the explanatory and warning signs attached to the machine itself. Make sure that they are always easy to read, replacing any damaged or missing signs without delay. Read this manual carefully before using the machine to make sure that you are thoroughly familiar with how it works and all the controls. Never postpone learning this important information until you are already working with the machine. Never allow any unauthorized persons unfamiliar with the equipment to come into the vicinity or operate the machine. Always keep this manual readily available so that anyone taking action on the machine can refer to it. If the machine is sold or transferred to third parties, it is compulsory to hand over all the related technical documentation, use and maintenance EXPLANATION OF THE SYMBOLS Several symbols are used in this manual and on the machine itself to accompany hazard warnings and safety recommendations. These warnings and recommendations serve primarily to ensure the safety of Installers, Technicians and Operators, but also to avoid the machine being damaged. THIS SYMBOL IS USED TO DRAW YOUR ATTENTION TO THE RISK OF FATAL ACCIDENTS, SEVERE INJURIES AND EXTENSIVE DAMAGE IN THE EVENT OF THE SPECIFIED SAFETY MEASURES BEING DISREGARDED. THIS SYMBOL DRAWS ATTENTION TO RISKS OF A GENERAL NATURE. THIS SYMBOL IS USED TO DRAW YOUR ATTENTION TO THE RISK OF FATAL ACCIDENTS, SEVERE INJURIES AND EXTENSIVE DAMAGE IN THE EVENT OF THE SPECIFIED SAFETY MEASURES BEING DISREGARDED. THIS SYMBOL DRAWS ATTENTION TO RISKS DERIVING FROM THE PRESENCE AND USE OF ELECTRICITY. IMPORTANT This word is used to identify paragraphs in the manual containing essential information concerning the machine. Read the related information DEFINITIONS The following are definitions of the individual and legal entities involved in handling and using the machine. OWNWER: In this user manual, the OWNER is the legal representative of the company or body, or the individual, that purchased the machine. The Owner is responsible for ensuring compliance with all the safety requirements specified in the present manual and in the current legislation in the country where the machine is installed. This last aspect is waived if the Owner appoints a plant MANAGER, who thus takes responsibility for implementing the safety recommendations and for compliance with the safety standards relating to the use of the machine and relations with the OPERATOR. INSTALLER: In this user manual, the INSTALLER is the legal representative of the company appointed by the OWNER to install and connect the machine to the hydraulic, electrical and compressed air supply networks (etc.) at the plant. The Installer is responsible for correctly handling and installing the machine in compliance with the recommendations of this manual and with the current legal requirements in the country where the machine is used. OPERATOR: In this user manual, the OPERATOR is the person authorized by the OWNER or MANAGER to take all action on the machine for its usage, adjustment, control and routine servicing, as detailed in this manual (with which Operators must strictly comply, limiting their action to the explicitly allowable procedures). TECHNICIAN: In this user manual, the TECHNICIAN is the person directly authorized by the Manufacturer or, failing this (and entirely under the latter's responsibility), by the Manufacturer's Dealer in the various European Community states outside Italy, to carry out all extraordinary servicing procedures, as well as any adjustments, tests, repairs and replacements of parts proving necessary during the working life of the machine. GENERAL SAFETY RECOMMENDATIONS ! In unloading the machine on arrival, lifting and positioning it at the workplace, and all other handling procedures, comply scrupulously with the recommendations of the relevant section of this manual. Pay particular attention when handling wheel-mounted machines, which have to be moved by hand once they are on the ground. To prevent any risk of crushing, only move the machine by pushing it, never by pulling it, so that nobody can ever come to be in the path of the machine as it moves. Anyone handling the machine must be supervised by another person uninvolved in the procedure, who shall keep a constant watch to ensure that no obstacles or persons get in the machine's way and no other hazardous situations occur. This supervisor must promptly alert the person moving the machine of any hazards so that the machine can be stopped immediately. ! The surface on which the machine slides, like the surface on which it is used, must meet all the essential safety requirements: it must be perfectly horizontal and smooth, with nothing to interfere with the machine's movements. Check in advance to ensure that the whole distance to cover with the machine meets all the above-mentioned requirements. Make sure that the sliding and supporting surfaces have a load-bearing capacity sufficient to withstand the weight of the machine both empty and in use. Any discontinuity in the floor, e.g. expansion joints, grids and manholes, must meet the specified requirements. ! ! ! Never, for any reason whatsoever, lift the machine by any hoisting points other than those indicated. Before the machine is used, it must always be immobilized using the fixing devices provided. The machine must be placed in an area accessible only to the OPERATORS and TECHNICIANS; failing this, it must be protected by a barrier situated at least 2 m away from its outer edge. OPERATORS and TECHNICIANS may access the area where the machine is used providing they are adequately clothed and equipped with the personal protective equipment specified by law (safety shoes, gloves, helmet, etc.). The INSTALLER's personnel, or any visitors, must always be accompanied by an OPERATOR. Unauthorized personnel must never be allowed to remain alone in the vicinity of the machine. The place of installation must be made inaccessible to children. ! OPERATORS shall restrict themselves to taking action on the machine's controls, so they must not open any of the panels, except for the one for accessing the controls (if any). ! The INSTALLER shall restrict himself to taking action on the connections between the plant and the machine, so he must not open any panels, or operate any controls. ! In all handling, usage, servicing or repairs on the machine, it is compulsory to comply with all current safety standards in the country where the machine is used. This applies both to the equipment and to the operating methods adopted. ! Always disconnect the electric power supply before taking any action to install, service, repair or move the machine. This is of fundamental importance to prevent the risk of death, severe injury and extensive damage to the plant. ! In certain stages of normal use, some of the containers comprising the machine are under pressure (e.g. the filter vessel, plenum chamber, erosion-type dosing units, etc.). Never open such containers or remove any components connected to them before you have completely vented said pressure. Venting must be done through the valves provided on the machine specifically for this purpose. ! ! ! ! ! ! ! ! ! ! ! ! ! ! ! Never move the machine during normal working cycles. Before each new working cycle, make sure that any mobile electric connections (power cords, plugs, etc.) are sound and efficient. If they show any signs of damage, repairs must be made only by a specialized TECHNICIAN. Never take any action not mentioned in this manual under your own initiative. Connect the machine to the mains electric power supply according to the recommendations of this manual. Before starting the machine, check the efficiency of the earthing for the electric circuitry and machine frame or structure. Never use power cords of inadequate cross-section or provisional connections, not even briefly, and certainly not in the event of an emergency. Start the machine only after you have made sure of its perfectly safe connection to the systems providing the energy and anything else it needs to function properly (mains electricity and water, compressed gas supply, water drainage network, etc.). Keep a safe distance from any mechanical parts in motion. Immediately report any alarms or the tripping of any automatic machine safety devices to the TECHNICIAN. Never manually reset the machine after an alarm or an automatic safety device has been tripped without first identifying and dealing with the problem that caused them. Never remove the guards over moving parts while the machine is in operation. Before starting the machine, make sure all guards are correctly installed. Routinely perform all the scheduled servicing operations. Dispose of the packaging material for the machine at a suitable landfill, taking particular care over any film and plastic bags, which can expose children to the risk of suffocation. Never release the processing waste deriving from the working process directly into the environment. REGULATIONS FOR USING THE MACHINE IN THE FOODSTUFFS SECTOR The following considerations apply only to machines used with foodstuffs, i.e. destined to come into contact with products for human consumption: The machine in your possession has been designed and built to make it suitable for contact with foodstuffs, and fluids in particular. If in doubt about the intended uses of your machine, refer to the relevant chapter in this manual. ! ! For logistic reasons related to the phases prior to its use (e.g. transport to the user's premises, storage in warehouses, etc.), it is impossible to guarantee the delivery of the machine in conditions suitable to enable its immediate use without an accurate, preliminary sanitization. This is the responsibility of the end user, who may have to comply with any established protocols, e.g. HACCP. DEMOLITION AND DISPOSAL OF THE MACHINE ! At the end of its working life, the machine must be demolished and disposed of. ! THE MACHINE MUST ONLY BE DEMOLISHED AND DISPOSED OF BY ADEQUATELY-TRAINED AND PROPERLY-EQUIPPED PERSONNEL IN COMPLIANCE WITH THE FOLLOWING PROCEDURE. ! 1. Divide the machine into its constituent parts, separating the materials it is made of: ! ! ! ! ! ! ! ! ! mechanical parts (reducers, pump bodies, etc.); metal parts (structure, piping, etc.) electrical parts; rubber parts; plastic and synthetic parts. 2. All resulting materials must be treated and disposed of in accordance with the legal requirements in the country where the machine is used. 3. All components contaminated by oil and oily residues must be considered as special waste and disposed of by authorized consortiums. The same applies to the lubricants that periodically have to be changed. 4. In the event of the machine being placed out of commission, even only temporarily, it must be stored in an area inaccessible to children. All circuit breakers and isolators must be segregated and disconnected. Make a thorough check and release any built-up residual energy, e.g. liquids or gases under pressure inside containers or piping. The machine must also be checked from the static standpoint, to eliminate the risk of any single machine parts moving unexpectedly. THE MANUFACTURER ACCEPTS NO LIABILITY FOR DAMAGE TO PERSONS OR PROPERTY DUE TO THE RE-USE OF SINGLE MACHINE PARTS FOR ANY OTHER THAN THE ORIGINAL PURPOSES OR IN OTHER ASSEMBLY CONDITIONS. INSPECTION OF THE GOODS ON RECEIPT When it is delivered, the machine must be checked by the Customer to identify any signs of damage that it may have suffered in transit and ensure that the machine is complete in every part, as listed on the order form. If there are signs of damage, make an immediate note of the anomalies detected on the transport document (delivery note or CMR), adding the wording “RECEIVED WITH RESERVE DUE TO EVIDENT DAMAGE TO THE MACHINE”. Delivery ex works includes insurance coverage for any damage in accordance with the Italian law 450 of 22.08.1985 "Compensation limit". In the event of complaints, the Customer must be able to produce an adequate photographic documentation of the most obvious damage. GUARANTEE The Manufacturer guarantees the machine for the period indicated in the order form. The GUARANTEE consists exclusively in the replacement or repair, free of charge, of any parts acknowledged as being defective. The GUARANTEE does not cover electrical parts. The GUARANTEE is valid only if all installation and usage instructions have been followed (not only those stated by the Manufacturer, but also those suggested by current practice). The GUARANTEE becomes null and void in the event of any servicing procedures being undertaken by personnel not authorized by the Manufacturer. If the machine alarm sounds or one of the automatic safety devices is tripped, the machine must not be reset manually until the cause of the shutdown has been dealt with. Repeated manual resets can be sufficient reason for the Guarantee to become null and void. The GUARANTEE is valid providing any flaws or defects are reported within eight days of their detection; moreover, the GUARANTEE takes effect providing the use of the machine was suspended immediately after the fault was discovered. AFTER-SALES ASSISTANCE When requesting any information, servicing, or other services, it is essential to specify the SERIAL NUMBER of your machine. It is impossible to provide accurate instructions or schedule servicing measures unless this information is provided. RECOMMENDATIONS FOR PROTECTION AGAINST FREEZING If there is a danger of the ambient temperature dropping to 0°C / 32°F, be sure to empty any liquids (water or product to treat) from all of the machine's hydraulic circuits to prevent ice forming in the piping and damaging parts of the machine. NOTES ........................................................................................................................................................................................................................................ ........................................................................................................................................................................................................................................ ........................................................................................................................................................................................................................................ ........................................................................................................................................................................................................................................ ........................................................................................................................................................................................................................................ ........................................................................................................................................................................................................................................ ........................................................................................................................................................................................................................................ ........................................................................................................................................................................................................................................ ........................................................................................................................................................................................................................................ ........................................................................................................................................................................................................................................ ........................................................................................................................................................................................................................................ ........................................................................................................................................................................................................................................ ........................................................................................................................................................................................................................................ ........................................................................................................................................................................................................................................ ........................................................................................................................................................................................................................................ ........................................................................................................................................................................................................................................ ........................................................................................................................................................................................................................................ ........................................................................................................................................................................................................................................ ........................................................................................................................................................................................................................................ ........................................................................................................................................................................................................................................ ........................................................................................................................................................................................................................................ ........................................................................................................................................................................................................................................ ........................................................................................................................................................................................................................................ Use and Maintenance Manual for Pneumatic Membrane Presses PEPF / PEC-PFC Pag. 2/96 Contents 1 2 3 4 5 6 7 8 General information ............................................................................................................................................. 6 1.1 Introduction .......................................................................................................................... 6 1.2 Considerations on the instructions ..................................................................................... 6 1.3 How to use these instructions .............................................................................................. 7 1.4 General description .............................................................................................................. 8 1.5 Customer Support Service ................................................................................................... 9 1.6 Warranty................................................................................................................................ 9 1.7 Identification of the machine ............................................................................................ 10 1.8 Use (allowable uses)........................................................................................................... 10 1.9 Requirements for use with foodstuffs............................................................................... 11 1.10 Misuse (uses that are not allowable) ................................................................................ 11 Safety 12 2.1 Foreword ............................................................................................................................. 12 2.2 Authorized machine operators.......................................................................................... 12 2.2.1 Password ................................................................................................................................... 12 2.3 General safety rules ............................................................................................................ 13 2.4 Rules for using the machine .............................................................................................. 14 2.5 Safety devices ...................................................................................................................... 15 2.6 Checking the efficiency of the safety devices ................................................................... 17 Installation requirements ..................................................................................................................................18 3.1 Lifting the machine ............................................................................................................ 18 3.2 Leveling and fixing the machine on the floor .................................................................. 20 3.3 Dimensions of the room where the press is installed ...................................................... 20 3.4 Working spaces around the machine ................................................................................ 21 3.5 Electric wiring ..................................................................................................................... 22 3.6 Choosing the language for the display .............................................................................. 22 3.7 Checking the cyclic sense of the power phases ................................................................ 23 3.8 Checking the phase balance .............................................................................................. 23 3.9 Pneumatic connections ...................................................................................................... 24 3.10 Water connections .............................................................................................................. 25 3.11 Preliminary operations before start-up ............................................................................ 26 Operating the manual devices ..........................................................................................................................27 4.1 Loading hatch ..................................................................................................................... 27 4.2 Movable side covers ........................................................................................................... 27 4.3 Washing hatch..................................................................................................................... 29 Controls and signals ...........................................................................................................................................30 5.1 Control panel ...................................................................................................................... 30 5.2 Acoustic and luminous signals........................................................................................... 31 5.3 Symbols on the control panel display ............................................................................... 31 How a pressing program takes place ..............................................................................................................33 6.1 The concept behind the pressing programs ..................................................................... 33 Basic instructions for operating the press .....................................................................................................36 7.1 Loading................................................................................................................................ 36 7.1.1 Vertical loading through the hatch ........................................................................................ 37 7.1.2 Axial loading ............................................................................................................................ 37 7.2 Pressing................................................................................................................................ 39 7.3 Unloading ............................................................................................................................ 40 7.4 Washing the press ............................................................................................................... 40 7.4.1 Washing with water ................................................................................................................. 40 7.4.2 Chemical washing (for mod. PEC-PFC only) ....................................................................... 43 Detailed description of the controls.................................................................................................................45 8.1 Description of the controls ................................................................................................ 45 8.2 Changing a pressing program ............................................................................................ 50 Use and Maintenance Manual for Pneumatic Membrane Presses PEPF / PEC-PFC Pag. 3/96 9 Press maintenance ..............................................................................................................................................52 10 11 12 13 14 15 16 17 18 19 20 21 9.1 Routine maintenance when the press is in regular use ................................................... 52 9.2 Preparing the press for lengthy periods of inactivity ....................................................... 53 9.2.1 Dry vane compressor maintenance ........................................................................................ 53 9.3 Membrane maintenance .................................................................................................... 53 9.4 Extraordinary maintenance ............................................................................................... 54 Demolition and disposal ....................................................................................................................................55 Technical data table ............................................................................................................................................56 Technical data table ............................................................................................................................................57 Technical data table ............................................................................................................................................58 Technical data table ............................................................................................................................................59 Flow chart..............................................................................................................................................................60 Configurations layout .........................................................................................................................................61 Key to configurations ..........................................................................................................................................62 TABLE 1: Servicing procedures ......................................................................................................................63 TABLE 2: Alarms and solutions .....................................................................................................................64 Pressing program chart .....................................................................................................................................66 Pressing programs ..............................................................................................................................................67 Use and Maintenance Manual for Pneumatic Membrane Presses PEPF / PEC-PFC Pag. 4/96 This manual is the property of Della Toffola S.p.A. No part of this publication may be reproduced, circulated, translated into any language, transmitted or copied in any form or by any means, electronic, mechanical, photocopying, recording or otherwise, without prior permission from Della Toffola S.p.A. © ALL RIGHTS RESERVED ENQUIRIES AND FURTHER INFORMATION: For any enquiries or further information concerning the use of the machine or the contents of this manual, or for any technical support, please contact the Della Toffola S.p.A. Customer Support Service, using the following references: Della Toffola S.p.A. – Servizio Assistenza Via Feltrina 72 - 31040, Signoressa di Trevignano (TV) (Italia) Tel.: +39 0423 6772 Fax: +39 0423 670841 PRESERVATION: Always keep a copy of this manual near the machine and readily available to the user, and store a spare copy in a safe place. If the manual is lost or damaged, contact Della Toffola S.p.A. for a replacement. This manual reflects the state of the machine as at the time when it was developed. Bear in mind that, in accordance with current legislation, this instructions manual forms an integral part of the machine and must accompany the machine at all times. DOCUMENT IDENTIFICATION: Use and Maintenance Manual for Pneumatic Membrane Presses PE-PF / PECTitle PFC File code P_0610R03GB.doc Rev. N.: 03 – 03.14 Use and Maintenance Manual for Pneumatic Membrane Presses PEPF / PEC-PFC Pag. 5/96 Use and Maintenance Manual for Pneumatic Membrane Presses PEPF / PEC-PFC 1 Pag. 6/96 General information 1.1 Introduction This manual contains all the information required for the proper use and maintenance of your pneumatic press. The operator must fully understand the information contained in this booklet since proper installation, use and maintenance of the press and monitoring of the incoming and outgoing product are essential to ensure optimum results. This manual is an integral part of your press and must therefore be kept with care in a place where it is quickly and easily accessible for consultation. If the press is sold, all the technical documentation supplied with the machine, e.g. user manuals and electrical wiring diagrams etc., must be forwarded to the new owner. Before taking any action on the machine, it is essential for the operator to be able to carry out all the operations described in this manual and to know how to repeat them whenever necessary. Always keep the instructions manual on hand when taking action on the machine. Special attention must be paid to the safety recommendations concerning the use of the machine. The operators’ personal safety depends largely on their understanding and implementing these safety recommendations. The Manufacturer accepts no liability for any damage caused directly or indirectly to persons or property as a result of failure to comply with the recommendations of this user manual. 1.2 Considerations on the instructions Given the numerous variables that can affect the use of the machine, it is extremely difficult to provide unequivocal recommendations on the best way to handle the various operations. However, once you have gained a little experience with the use of the machine, its great potential for meeting your every need with a great variety of products will soon become self-evident. Machines in special versions or with structural modifications to suit a given customer’s requirements may differ in some aspects from those described herein without this affecting the efficiency and performance of the machine in any way. a) This manual contains the instructions for the standard version of the machine and it may be that your version of the machine is not equipped with some of the devices described herein. b) To ensure the machine a long and efficient life, it is advisable to comply scrupulously with the instructions provided in this manual. c) Carry out routine checks on the efficiency of all machine components; in the event of any malfunctions, do not use operate the machine for any reason until the problem has been solved. d) Do not take any action under your own initiative that is not considered in this manual. Use and Maintenance Manual for Pneumatic Membrane Presses PEPF / PEC-PFC Pag. 7/96 e) Keep this manual carefully and readily accessible for operators to consult. f) The Manufacturer declines all liability for malfunctions, breakages, accidents, etc, caused by ignorance of or failure to comply with the instructions provided in this manual. This also applies to unauthorized adaptations, modifications and the installation of unauthorized accessories. The Manufacturer also declines all liability in the event of damage or injury due to: - natural catastrophe; - the use of inappropriate detergents; - stray electrostatic currents; - erroneous maneuvers; - inadequate maintenance. For any problems not considered in this manual, please contact your nearest Customer Support service. 1.3 How to use these instructions This document has been prepared specifically to enable the owner's personnel to use the machine easily and safely. The following symbol is used to emphasize requirements that are fundamental to personal safety: The following symbol is used to emphasize requirements relating to the use of electricity that may jeopardize the physical safety of personnel if they are not met: Operators are consequently advised to pay particular attention when reading these parts of the manual. A numerical reference is often provided in the text to indicate parts illustrated in the overall layout provided at the end of this manual; the page displaying the corresponding layout can be kept open to make it easier to consult. Use and Maintenance Manual for Pneumatic Membrane Presses PEPF / PEC-PFC 1.4 Pag. 8/96 General description These pneumatic presses have a tubular membrane fixed to a supporting shaft with four fins: the shaft and membrane assembly is then mounted on the shaft of a perforated stainless steel rotating drum. The whole drum and membrane assembly is mounted on a stainless steel framework which also supports the membrane inflating equipment, the must transfer assembly and the computerized control system for all the machine’s functions. During the pressing cycle, the membrane is pressed all over the inside wall of the drum to create a total pressing surface area of 360°. The special construction features of the press ensure an exceptionally high output and rapid operating cycles with a corresponding marked reduction in pressing times. Membrane inflation is programmable and gradual to minimize clouding of the must. The drum, collection tank and all metal components in contact with the product are made of AISI 304 stainless steel to guarantee their lasting and reliable service over time. The pneumatic presses PE - PEC – PF - PFC are all much the same from the functional and structural point of view. The PE - PF presses have an open drum while the PEC - PFC models have a closed drum. In the open-drum versions, the liquid is continuously delivered through numerous holes on its surface; in the closed version, operators can choose either to keep all the fluid being pressed inside the drum for as long as it suits them to do so, or to pour off the fluid continuously through the channels provided. At the customer's request (for some models only), the following variants can be installed (see the layout at the end of the manual): - elastic membrane - closed or open drum - one or more pneumatically or manually operated loading hatches - a pneumatically operated unloading hatch - a wheel-mounted or fixed product collection tank - a manually or pneumatically operated mobile chute for product collection - a blower or compressor on board the machine - a manually or pneumatically operated loading valve - direct or chain driven drum rotation - a flow meter on the product outlet - a disposal system (conveyor belt, auger, etc.) - a liquid extraction valve and pump assembly The difference between the various sizes of the models lies mainly in the different filling capacities, weights and, in some cases (at the customer’s request), in the mains power frequency (50 or 60 Hz). Use and Maintenance Manual for Pneumatic Membrane Presses PEPF / PEC-PFC 1.5 Pag. 9/96 Customer Support Service The Manufacturer offers a Customer Support Service for technical assistance in solving any problems with the adjustment, use, or servicing of the machine. Requests for assistance must be made only after first carefully analyzing the defects/malfunctions in question and their likely causes. When contacting the Customer Support Service, specify the following: ● the machine’s serial number; ● its year of manufacture; ● a description of the defects/malfunctions observed; ● any tests already performed; ● any adjustments and changes made, with their effects and consequences; ● any other information deemed useful in solving the problem If you need technical support or assistance on the use of the press, please contact: DELLA TOFFOLA S.p.A. Tel. +39 0423 6772 Fax. +39 0423 670841 E-mail [email protected] 1.6 Warranty The Manufacturer agrees to repair any manufacturing defects that come to light during the period of warranty coverage. Parts subject to normal wear and tear are not covered by warranty. Warranty coverage is provided only if the user scrupulously uses the machine properly, as explained in the user manual. Only the Manufacturer’s original spare parts must be used to replace damaged or defective components. Modifications made to the machine without the Manufacturer’s authorization make the warranty immediately null and void. IMPORTANT Della Toffola S.p.A. declines all liability for damages caused by repairs performed by unauthorized personnel. Use and Maintenance Manual for Pneumatic Membrane Presses PEPF / PEC-PFC 1.7 Pag. 10/96 Identification of the machine The machine is identified by means of a nameplate located as illustrated in the figure. The nameplate must be kept intact and visible because it specifies the main characteristics of the machine, i.e. - manufacturer's name and address; name of the machine; serial number; year of manufacture; weight 1.8 Use (allowable uses) The pneumatic presses with a central membrane are designed and built for dejuicing vegetable products, e.g. grapes, apples and other fruits. No other uses are allowable and the press must never be used for any purposes other than those described in this manual. These systems are intended exclusively for use by suitably trained and qualified operators, given specific information on how to use the components and conduct the working cycle as specified by Della Toffola S.p.A. The press is not suitable for use in environments with an explosive atmosphere. Use and Maintenance Manual for Pneumatic Membrane Presses PEPF / PEC-PFC 1.9 Pag. 11/96 Requirements for use with foodstuffs These machines have been designed and built in compliance with all current legal requirements concerning their use in contact with foodstuffs destined for human consumption. The end user must nonetheless bear in mind that it is impossible, for reasons relating to their transportation and subsequent installation at the user’s premises, to deliver machines “ready for use” from the hygienic and sanitary standpoint. The user must therefore take all necessary steps to sanitize the equipment in order to comply with all the hygiene standards established by current legislation. All legal requirements concerning the drinking water supply used for washing the drum and other procedures must also be met (for Italy DPR 24 May 1988 n° 236) to prevent any risk of contamination. 1.10 Misuse (uses that are not allowable) Since the machine has been designed to assure safety in its normal or reasonably predictable use, pay careful attention to the following requirements: - any uses other than the one for which the system was designed (as described in the previous paragraph "Intended use") is strictly forbidden; the use of parameters other than as specified in the paragraph “Checking the phase balance” cannot guarantee adequate safety and reliability and is consequently strictly forbidden. Use and Maintenance Manual for Pneumatic Membrane Presses PEPF / PEC-PFC 2 Pag. 12/96 Safety 2.1 Foreword Job safety is one of the main concerns of Della Toffola's designers. In the manufacture of this machine, every effort has been made to provide for all possible hazardous situations and, of course, to adopt suitable safety measures. Nonetheless, some risk of accident deriving mainly from a careless or improper use of the machine remains. That is why it is essential to read this section very carefully before proceeding to take action of any kind on the machine. Carefully reading this manual and consequently making proper use of the machine are essential to its safe operation, otherwise Della Toffola S.p.A. can accept no liability for any accidents or damage. Likewise, Della Toffola S.p.A. declines all liability for changes made to the machine without the manufacturer’s prior written permission since they may negatively affect the CE marking and consequently make the corresponding manufacturer's declaration of conformity null and void. 2.2 Authorized machine operators In addition to the rules provided below, the person responsible for the machine must comply with all local regulations relating to occupational health and safety. The person responsible for the machine must provide operators with training on the following issues: - safety and accident prevention standards; - standards relating specifically to the machine; - the safe and proper conduction of the various processing and maintenance steps; - usage restrictions. The person responsible for the machine must appoint operators authorized to handle the various procedures, establishing their responsibilities and any restrictions on their actions. Only said operators may work with the machine. 2.2.1 Password The control panel has some controls and configurations that are password protected. To input the password, first press the protected button (identified by a small padlock sign); a window appears with the fields for inputting your username and password. Password-protected controls are reserved exclusively for use by qualified and authorized technicians. There are 4 access levels on the control panel, i.e. 2.2.1.1 User (Level 0) - no password This is the person actually operating the machine. 2.2.1.2 Customer’s technician (Level 1) – Default user “A” This is the person at the customer’s premises who is able to handle the machine in complete safety. The user “A” can start all the working steps but cannot access the machine parameters. Use and Maintenance Manual for Pneumatic Membrane Presses PEPF / PEC-PFC Pag. 13/96 2.2.1.3 Customer’s qualified technician (Level 2) - Default user “B” This is the person at the customer’s premises who can input and modify the processing parameters for the various working steps, and can also access the advanced configuration of the machine parameters (e.g. to change the working times, pressures, programs, to access the manual controls, etc.). 2.2.1.4 Della Toffola technician/administrator (Level 3) This is the Della Toffola project leader who can access all the machine settings, parameters and historical data, and who can define and modify the passwords. 2.3 General safety rules The machine must not be used by any authorized persons. It is forbidden for anyone under the influence of drugs, alcohol or medication affecting the speed of their reactions to assemble, commission, control, service or dismantle the machine. ● The machine must be used only if it is in safe operating conditions. ● In all handling, usage, maintenance or repair procedures, the user must strictly comply with all the accident prevention requirement in force in the country where the machine is used. This also applies to any tools used and to the working method adopted by the user. ● Only use the machine for its intended purpose. Any other or improper uses cannot assure sufficient safety. ● It is strictly forbidden for any outside or unauthorized personnel to come within the vicinity of the machine while it is operating. ● It is forbidden for anyone to take independent action or to perform maneuvers other than those for which they have been authorized, or that may affect their own or other people's safety. ● The functional efficiency of the emergency stop button must be ckeced every time the system is started up. ● It is compulsory for the operator to promptly deal with or report any damage or changes to parts of the machine that may affect its safe use. ● Never dismantle, modify or disable parts of the machine (functional parts, control systems or safety devices). ● In the workplace, it is forbidden to use clothes or personal belongings that, given the nature of the process and the characteristics of the machine, might constitute a hazard to personal safety. Personal clothing worn at the workplace must consequently have no loose parts that may be drawn in by any moving parts. ● Never wear bracelets, necklaces or other objects that may be caught up in moving parts. ● Always use clothing and personal protection devices as specified in this manual and in the safety standards adopted at the plant. ● The personnel authorized to take action on the machine must use only the equipment provided and appropriate tools (in good working order) for any servicing work they undertake; the established methods must be scrupulously and constantly followed. Use and Maintenance Manual for Pneumatic Membrane Presses PEPF / PEC-PFC Pag. 14/96 ● While at work, personnel must remain in the right position and always avoid exposing themselves to any risk. ● Workstations must be kept clean and tidy; all waste of any kind must be placed in suitable containers. ● It is forbidden to undertake any operations not specified in this manual and without first making the machine safe. ● The responsibilities for the assembly, dismantling and reassembly, commissioning and servicing of the machine must be clearly defined and scrupulously followed. ● Never aim jets of water at the electrical parts of the machine. ● In the event of fire, use dry extinguishers to avoid spreading the flames further. ● In the event of an emergency, every worker must contribute - each according to their own abilities, experience and aptitude - with the people appointed to undertake fire prevention, fire-fighting, evacuation, safety and first aid measures. ● Any work done on the electrical equipment must be handled exclusively by a qualified electrician. ● For all maintenance or repair procedures performed on the machine, operators must always disconnect the mains power supply first. This step is of fundamental importance to the prevention of any accidental start-ups that might be a cause of severe personal injury and/or damage to property. 2.4 Rules for using the machine ● Never overload the machine with the product to press. Excessive loading can cause severe damage, such as membrane tearing or permanent machine deformation. ● It is absolutely forbidden to access the inside of the press. Any hatches or manholes must never be used by the press operator for such a purpose. ● Before every new working cycle, check the integrity and efficiency of the mobile electric connections (power cord, plugs, etc.). If there are any signs of wear or damage, the operator should not undertake any repairs personally, but should contact a qualified technician or the customer support service. Use and Maintenance Manual for Pneumatic Membrane Presses PEPF / PEC-PFC 2.5 Pag. 15/96 Safety devices EMERGENCY STOP BUTTON The machine is complete with a mushroom-head emergency stop button. - Using the emergency button In the event of any danger or severe malfunction during the normal operation of the machine, that may place the personnel or the machine itself at risk, stop the machine immediately by pressing the emergency button. The efficiency of this emergency device must always be checked before starting to use the machine. - Restoring the machine to normal operation after an emergency stoppage. After identifying and dealing with the problem that prompted the emergency stoppage, the machine can be restored to normal operation by releasing the emergency button. To release the emergency button, rotate the mushroom-head button in the direction indicated by the arrow. In some cases the emergency button is released simply by pulling it slightly. Then press the start button again. IMPORTANT Never manhandle or remove these devices for any reason whatsoever because they guarantee the safe performance of the various procedures. MOVABLE SIDE COVERS The presses are fitted with two movable side covers (one on each side) the purpose of which is to immediately interrupt the operation of the machine if they are opened and also to protect the operator while the machine is functioning. If these covers are opened while it is functioning, the machine stops instantly. To restore the machine to operation, close the one or more side covers that have been opened, reset the alarm and press START AUXILIARIES on the control panel. Use and Maintenance Manual for Pneumatic Membrane Presses PEPF / PEC-PFC To reset the alarm, press the Alarms button RESET button for a few seconds. Pag. 16/96 and then press and hold the SAFETY CABLES (for mod. PEC-PFC only) The PEC-PFC presses are also fitted with two safety cables (one in each side) that serve the purpose of instantly stopping the machine in the event of an emergency. Safety cable Movable cover Movable cover Safety cable To stop the press, pull gently on one of the two cables. To restore the machine to operation, release the corresponding limit switch (by pulling the knob located on it, see figure below), reset the alarm and press START AUXILIARIES on the control panel. To reset the limit switch pull the knob To reset the alarm, press the Alarms button RESET button for a few seconds. and then press and hold the Use and Maintenance Manual for Pneumatic Membrane Presses PEPF / PEC-PFC 2.6 Pag. 17/96 Checking the efficiency of the safety devices IMPORTANT Checking the safety devices is fundamental to the safety of the operator and the machine and should therefore be done with the utmost attention. Checking the emergency stop button Always make sure the mushroom-head emergency button is in good working order before using the machine: when it is pressed, it must bring all machine movements to an immediate halt. Checking the limit switches on the side covers Before starting the machine, always make sure that the limit switches are in good working order. When the press is being used in AUT mode, the machine must stop instantly if one of the side covers is opened, the button begins to flash and of the message “Side covers open limit switch” appears in the list of alarms. Checking the safety cables Before starting the machine, always make sure that the safety cables are in good working order. If one of the two cables is pulled, the machine must stop immediately. Use and Maintenance Manual for Pneumatic Membrane Presses PEPF / PEC-PFC 3 Pag. 18/96 Installation requirements Prior to delivery, all our presses undergo stringent testing to ensure their proper operation in different working conditions. The following instructions must be scrupulously followed to ensure the proper and safe installation of the press. 3.1 Lifting the machine DANGER Before unloading the press, make sure the floor on which it is to stand is capable of withstanding the weight of the machine. The surface on which the machine is installed must be strong enough to take the combined weight of the machine and its contents (the product being treated). Make sure that the lifting apparatus used to unload and move the machine has a sufficient load-bearing capacity. IMPORTANT The surface over which the machine travels must be flat, horizontal and unobstructed. The machine cannot travel on a gradient, however minimal. THE TRANSPORTATION, UNLOADING AND ASSEMBLY OF THE MACHINE MUST BE HANDLED ONLY BY AUTHORIZED AND QUALIFIED PERSONNEL. The lifting apparatus to use will depend on the model and dimensions of the press. The options are as follows: Example 1 To lift and move the machine in transit, lower the side covers (1) and hook up the press using the eyebolts (2) attached to the frame, two on each side, as shown in Figure 1. Take care to ensure that the belts do not come to bear on plastic or other deformable components or electric cables. Figure 1 Use and Maintenance Manual for Pneumatic Membrane Presses PEPF / PEC-PFC Pag. 19/96 After completing the lifting procedure, release the belts and close the side covers. Example 2 Lift the machine with the aid of a crane and belts anchored to the four lifting points welded to the machine frame (Figure 2). Take care to ensure that the belts do not come to bear on plastic or other deformable components or electric cables. Figure 2 Empty weight (kg) Model PE12 PE16 PE25 PE35 PE50 PE80 PE100 PF160 PF200 PF240 PF350 PEC25 PEC35 PEC50 PEC80 PEC100 PFC160 PFC200 PFC240 PFC350 PFC480 PFC700 Weight when empty (kg) 690 750 1140 1330 2000 2800 3040 5750 6200 7100 12000 1400 1450 2200 3050 3500 5850 6450 7300 12200 15000 18000 Weight when fully loaded (kg) 1890 2350 3640 4830 7000 10800 13040 21750 26200 31100 47000 3900 4950 7200 10050 13500 21850 26450 31300 47200 63000 88000 Once it has been lowered onto the floor, the press is easy to move about because it is mounted on wheels. Use and Maintenance Manual for Pneumatic Membrane Presses PEPF / PEC-PFC Pag. 20/96 IMPORTANT Pay particular attention when moving wheel-mounted machines that need to be repositioned manually once on the floor. To avoid the risk of crushing, these machines must only be displaced by pushing, never pulling, them to ensure that nobody can ever come to be in the trajectory of the machine. The person moving the machine must be supervised by another person uninvolved in the activity, but watching constantly for any obstacles or people in the vicinity, or hazardous situations that might develop in the trajectory of the maneuver underway. The supervisor must promptly warn the operator of any hazardous situation so that the machine being displaced can be stopped in good time. If necessary, a kit can also be installed to enable the motor-driven displacement of the press. 3.2 Leveling and fixing the machine on the floor Once the machine has been positioned in the workplace, it must be adjusted with the aid of a normal spirit level. Repeat this leveling procedure to restore it to a perfectly level position every time the machine is repositioned (even if it is only rotated around its vertical axis). After completing the leveling procedure, take steps to fix the machine to the floor to ensure that it remains perfectly stable when in use. Wheel-mounted machines must be fixed by applying the brakes generally located on the two pivoting wheels. IMPORTANT The drawbacks deriving from to failure to comply with these recommendations exonerate the manufacturer from any civil or penal liability. 3.3 Dimensions of the room where the press is installed For a straightforward and safe use and maintenance of the press, it is important to allow for the following minimum spaces in the room where the press is installed (see Figure 3). Figure 3 Use and Maintenance Manual for Pneumatic Membrane Presses PEPF / PEC-PFC Pag. 21/96 MODEL A (mm) B (mm) in normal use B (mm) for extraordinary maintenance (removing ties) C (mm) D (mm) in normal use D (mm) for extraordinary maintenance (removing ties) PE12 400 600 1700 400 500 500 PE16 400 600 2000 400 500 500 PE-PEC25 500 600 2300 500 500 500 PE-PEC35 500 600 2500 500 500 500 PE-PEC50 500 600 2500 500 500 500 PE80 650 600 600 650 500 2500 PE100 650 600 600 650 500 2500 PEC80 600 600 600 600 500 2500 PEC100 600 600 600 600 500 2500 PF-PFC160 600 900 900 600 800 2500 PF-PFC 200 600 900 900 600 800 2500 PF-PFC 240 600 900 900 600 800 2500 PF-PFC 350 600 900 900 600 800 2500 PFC480 600 900 900 600 800 2500 PFC700 600 900 900 600 800 2500 If you use the axial valve to fill the press, the distance between the ceiling and the machine must be at least 50 cm for presses up to mod. PE-PEC50, and at least 100 cm for all the other models. For loading through the hatch, operators must allow for a distance sufficient to suit the method they intend to use (pumping, manual filling, etc.). 3.4 Working spaces around the machine The figure below shows the spaces generally needed for the normal working procedures involved in the use of the presses. Figure 4 Use and Maintenance Manual for Pneumatic Membrane Presses PEPF / PEC-PFC Pag. 22/96 A Area for operating the axial valve and for mobile and fixed hydraulic connections. B Areas for monitoring the pressing process, washing the drum, operating the manual devices (on some models only), opening/closing the loading hatch, washing hatch, movable covers and drainage cap. C 3.5 Area for operating and checking the electric and pneumatic devices. Electric wiring Make sure the mains power supply corresponds to the press specifications. DANGER The power connection, like all other ordinary and extraordinary action on the electric circuit of the press, must be done by a qualified TECHNICIAN and the mains power supply line must comply with current standards (IEC, etc.) and legal requirements. It is important to remember that it is compulsory to earth the press as well as the electric system. This press is powered with a three-phase voltage. The mains power supply is connected by means of the power cord supplied with the press, already connected at the factory to the terminal block inside the switchboard. In models not already fitted with this power cord, the connection to the mains must be made via the terminal block situated inside the control panel, using terminals L1, L2, L3. For presses that are fitted with a product disposal device (conveyor belt, auger, etc.) or with any other optional equipment, connect the corresponding plugs to the sockets provided underneath the press’s control panel. 3.6 Choosing the language for the display You can choose the language for the controls and messages on the display. Turn on the power to the control panel by turning the main on/off switch to position 1. Then press START AUXILIARIES. Wait for the display to come on. Make sure that you are in MAN mode. If not, press the Configurations button on the display and then “Manual controls”; then press on the selector to change the position from AUT to MAN. Press the Panel parameters -> Language -> button and select the language of your choice. Use and Maintenance Manual for Pneumatic Membrane Presses PEPF / PEC-PFC 3.7 Pag. 23/96 Checking the cyclic sense of the power phases After connecting the press to the mains power supply, enable the main circuit breaker and press START AUXILIARIES. If one of the power phases has been connected wrongly, a control device stops all on the display begins to flash. the press functions and the alarms button to display the Alarms page, which indicates the date Press the next button and time and gives a description of the alarm that has taken place. On the Alarms page, there are also controls for resetting the alarm and disabling the siren. You need to take action to correct the position of the wires on the plug or on the terminal block, then reset the alarm, by pressing and holding the RESET button for a few seconds on the Alarms page and then pressing START AUXILIARIES. 3.8 Checking the phase balance Do not operate the electric motors if the voltage unbalance between the phases is greater than 3%. Use the following formula to check the balance: % voltage unbalance = max. voltage shift from mean mean voltage x 100 A B Example: rated mains voltage 400V 3 ~ 50 Hz AB = 409V BC = 398V AC = 396V mean voltage = 409 + 398 + 396 3 = 401V How to calculate the percentage of unbalance: % voltage unbalance = 409 – 401 401 x 100 = 1.99% This value is acceptable because it is less than the maximum allowable, i.e. 3%. IMPORTANT If the mains voltage has an unbalance greater than 3%, contact the Electricity Board. Operating the machine with a voltage unbalance between the phases greater than 3% makes the GUARANTEE NULL AND VOID. The mains power supply must coincide with the rated value ± 10%. C Use and Maintenance Manual for Pneumatic Membrane Presses PEPF / PEC-PFC 3.9 Pag. 24/96 Pneumatic connections DANGER To avoid any unexpected movement of pneumatic parts (valves, hatches, etc), the machine must only be connected to the compressed air supply with the main ON/OFF switch turned off. IMPORTANT All the presses are tested and approved for use with compressed gases. The supply pressure of these gases must comply with the pressure rating shown on the press’s test plate. The type-approval of the machine is indicated by stamps on the vessel and by a test-approval booklet, both issued by the competent testing body. The owner of the machine must preserve this booklet with care, making it available to the testing body during periodic inspections. The models of press complete with devices operated by pneumatic jacks (valves, loading hatches, must chute, etc.) require an outside compressed air supply at a pressure of approximately 4 bar, which has to be connected to the 1½" GAS coupling generally located near the control panel. The presses up to mod. PE - PEC50 do not require any outside pneumatic connections for membrane inflation because they have their own compressor on board the machine. The presses from mod. PE-PEC 80 onwards generally have a blower installed on board the machine, which provides only a part of the air needed for this purpose. To completely inflate the membrane, the machine needs an outside supply of compressed air with a flow rate sufficient to create a pressure in the membrane suited to the values for which the press was test-approved. It is therefore essential to provide a suitable compressor or compressed air tank (which are not included among the standard accessories). If necessary, a compressor or blower can be installed on any of the models. The membrane inflating and compressed air systems must comply with the following requirements: - both flexible (plastic) and rigid (steel) pipes may be used to make the connections; the latter are particularly recommended for the membrane air supply system given the large cross sections normally involved; - the weight of the pipes must not come to bear on deformable press components; - the piping used must be capable of withstanding the mechanical stress generated by the pressurized air; - the piping must be of a suitable size. Pressure regulator The models that do not have the compressor on board the machine (generally from mod. PE-PEC 80 onwards) are fitted with a compressed air delivery and regulating unit attached by means of a rapid coupling, which serves a very important purpose for the machine’s pneumatic system and that is why some steps need to be taken to avoid any risk of operator injury or severe damage to the machine. Use and Maintenance Manual for Pneumatic Membrane Presses PEPF / PEC-PFC Pag. 25/96 IMPORTANT - - It is of fundamental importance to avoid changing the pressure regulator setting for any reason whatsoever because pressures beyond the maximum allowable, which is 3 bar, could cause severe machine damage and place operators in the vicinity at risk. If the pressure regulator becomes faulty, immediately stop the machine and take action to replace the regulator straight away. It is strictly forbidden to remove or manhandle the pressure regulator. Routinely check to ensure that the pressure gauge on the regulator indicates a pressure no higher than 3 bar. 3.10 Water connections The press must be properly connected to the various tanks to which it sends the product being processed and also to a number of accessories. Moreover, - - - both mobile (flexible plastic conduit) and fixed (steel) piping can be used; the rigid connection piping must be fixed independently from the press so that its weight does not come to bear on the couplings; use flexible couplings to connect the rigid pipes in order to prevent the reciprocal transmission of vibrations; the piping must be compatible with legal requirements concerning the product to be processed (e.g. suitable for beverages or aggressive liquids); the piping must be able to withstand the mechanical stress generated by the press, e.g. it must not tend to shrink with the suction force of the must extractor pump; the piping must be suitably sized, with a diameter proportional to the flow rate of the press and never smaller than the corresponding couplings; whatever type of fixed or mobile piping you use, routinely check the couplings for leaks; all the intake and return piping must always be separated from the must delivery piping and clearly marked to identify the type of fluid it conveys (must, drinking water, drainage water, etc.); the water drainage piping must always be clearly identifiable and fitted with terminal traps and anti-backflow devices. To load the product to press through the axial valve, connect the feed piping to the inlet IN and the must collection tank to the outlet OUT (or to the must sorting valve unit, where applicable). The grapes can also be loaded through the hatch 8 (some models can be fitted with two manually or pneumatically operated loading hatches, see “Configurations layout ” page 61). The open presses PE-PF are fitted with a device for washing the drum so it is necessary to connect a clean water supply at a pressure of at least 4 bar to the 2” gas coupling (or two couplings from mod. PE80 onwards) shown in the figure. Use and Maintenance Manual for Pneumatic Membrane Presses PEPF / PEC-PFC Pag. 26/96 Coupling 2 for drum washing water, 2” gas (from mod. PE 80 onwards) Coupling 1 for drum washing water, 2” gas A normal flexible hose connected to a water delivery pump can also be used. 3.11 Preliminary operations before start-up Before starting the press, check the inside of the drum for any foreign bodies that might puncture the membrane. It is also a good idea to first wash the machine with a normal jet of water, washing both the collection tank and the inside of the drum. Allow the water to run through the piping in order to remove any traces of dirt. Before washing, always make sure the electric panel cover has been closed. DANGER Manual cleaning with liquids must be done with the utmost care. Always disconnect the press from the mains power supply before washing with a jet of water. Before filling the press, make sure it is perfectly stable (see also paragraph 3.2). Apply the brakes to the wheels (for the wheel-mounted models only). Use and Maintenance Manual for Pneumatic Membrane Presses PEPF / PEC-PFC 4 Pag. 27/96 Operating the manual devices Some models are fitted with devices (movable covers, loading hatches and washing hatches) that our manually operated. 4.1 Loading hatch Presses mod. PEC-PFC To open the manual loading hatch on the closed presses mod. PEC-PFC, use the lever provided with the machine. This lever engages in the hole in the pin for turning the handle (see Figure A). A B C LEVER KNOB Hatch closed Pull the knob downwards and simultaneously turn the handle with the aid of the lever. Hatch open. Then push the hatch to the left to move it. Presses mod. PE-PF To open the manual loading hatch on the open presses mod. PE-PF, press on the lever (1) and simultaneously push the hatch (2) so as to make it slide to the left or right (depending on the model). The hatch is fitted with two locking devices (3) for adjusting the opening during the unloading of the press. 4.2 Movable side covers Presses mod. PEC25-35-50 To open the side covers take hold of the handle (2) and then pull the locking lever (1) outwards as shown in the figure. Slowly accompany the cover until it has descended completely (2). Use and Maintenance Manual for Pneumatic Membrane Presses PEPF / PEC-PFC Pag. 28/96 LOCKING LEVER To close the side cover, raise it until the locking lever (1) clicks into place. DANGER Pay careful attention when handling the movable side covers because they are heavy. Always accompany the movement of a side cover and never allow it to slide freely because it could cause severe machine damage. Exercise due care when the side guards are lowered. In the event of an emergency, immediately press the EMERGENCY STOP button. Presses from mod. PEC80 onwards Release the two side cover locking hooks (1) and then grasp the cover with the handles provided and move it sideways (2). Then lock the side cover in the open position (3) (this only applies to some models). Presses from mod. PE-PF Press on the levers (1) shown in the figure to release the side cover and then lower it by allowing it to rotate on its hinges (2). Use and Maintenance Manual for Pneumatic Membrane Presses PEPF / PEC-PFC 4.3 Pag. 29/96 Washing hatch To remove the washing hatch, completely unscrew the two fixing knobs, push the hatch towards the inside of the drum and then remove it. KNOB KNOB Use and Maintenance Manual for Pneumatic Membrane Presses PEPF / PEC-PFC 5 Pag. 30/96 Controls and signals 5.1 Control panel CONTROL PANEL DISPLAY EMERGENCY STOP BUTTON MAIN ON/OFF SWITCH POWER PILOT LIGHT USB PORT START AUXILIARIES Figure 5 EMERGENCY STOP BUTTON: when pressed, it immediately stops the machine. To start the process again from the point where it was suspended, release the button and press START AUXILIARIES. POWER PILOT LIGHT: this is a luminous button that comes on to indicate that the power supply to the control panel is enabled. START AUXILIARIES: this provides power to the auxiliaries. USB PORT: this enables you to insert a USB pen for exporting or importing data and programs. CONTROL PANEL DISPLAY: this is a touch screen display with which you can interact, view and customize the machine’s operation and working cycles. In MAN mode, you can manually operate some devices, open/close the valves, rotate the drum, start/stop the motors, open/close the one or more loading hatches and must collection tanks (if they are pneumatically operated). In MAN mode, you can also change the values and settings of the pressing programs. To start/stop, close/open the various components, simply press on the corresponding symbol. Use and Maintenance Manual for Pneumatic Membrane Presses PEPF / PEC-PFC Pag. 31/96 In AUT mode, on the other hand, you can start/stop every single step in the pressing and washing cycles. MAIN ON/OFF SWITCH: The main on/off switch has two positions, 0 (OFF) and 1 (ON). It enables the power to the control panel and consequently also to the machine. DANGER It is important to pay the utmost attention when the press is in use, and especially when the drum is turning. Should it prove necessary, press the EMERGENCY STOP button to stop the press immediately. If the EMERGENCY STOP button is pressed, the message “Emergency stop button pressed” will appear on the Alarms page. After you have ascertained and dealt with the cause of the emergency stoppage, you can release the button, reset the alarm and press START AUXILIARIES. IMPORTANT When the membrane releases air to deflate as part of a normal working cycle, the noise from the machine may make it necessary for the operator to use ear defenders or other suitable PPE (personal protective equipment). 5.2 Acoustic and luminous signals IMPORTANT For safety reasons, the START command can only be used after an approximately 5-second delay marked by an acoustic signal, whereas the STOP command always takes immediate effect. Immediately after a START command has been given, a continuous acoustic signal alerts anyone nearby that a machine procedure is about to begin. After 5 seconds, the procedure starts, the acoustic signal goes off and the luminous column indicates one of the following conditions: • a signal with a light remaining on indicates the delay after a command has been • • given that do not involve any rotation of the drum; a signal with a flashing light indicates that the drum is rotating, in both MAN and AUT mode; a signal with a light remaining on indicates that the drum is at a standstill during a process in AUT mode. 5.3 Symbols on the control panel display The display shows several symbols, controls and tools, the meaning of which is outlined below. HOME: this is the main page which shows a series of controls and information on the status of the machine. During a pressing process, it shows a graph illustrating the trend of the cycle. CONFIGURATIONS: this shows information on the machine and the program installed. It also gives operators access to program customization options, manual controls and panel settings (date/time, language, panel). Use and Maintenance Manual for Pneumatic Membrane Presses PEPF / PEC-PFC Pag. 32/96 ALARMS: this is for accessing the Alarms page. When it flashes, it means that one or more alarms have been tripped. HELP: this is a brief guide that, when enabled, describes the meaning of certain commands. AUT/MAN MODE SELECTOR: this is a 1st-level password-protected button that enables you to switch between the automatic and manual modes. In AUT mode, you can start the various working steps, while in MAN mode you can make changes to programs, manually operate single machine components (valves, motors, pumps, etc.), perform membrane inflation and deflation, drum rotation and other procedures. The button is password-protected to prevent unauthorized personnel from changing its position. identifies controls for which HELP is available (providing the HELP option has been enabled). identifies controls that are password-protected. key for saving or confirming. key for exiting or cancelling. Use and Maintenance Manual for Pneumatic Membrane Presses PEPF / PEC-PFC How a pressing program takes place After loading the drum with the product to press, the central membrane begins to inflate, pressing the product against the walls of the drum and thereby squeezing out the juice. After a certain period of time, a vacuum is created inside the membrane, which deflates and contracts against the central shaft, while the compressed product crumbles away from the sides of the rotating drum. A sequence of pressing and crumbling steps constitutes a PRESSING CYCLE (Figure 6). Diagram of a pressing cycle g Time required to fully inflate the membrane g ta/tb s s na/nb Time required to fully deflate the membrane and draw in nitrogen. ta/tb Pressure Time during which maximum pressure is maintained inside the membrane. During this step, the compressor may stop and start several times to restore the pressure inside the membrane, which drops continuously as the must is extracted. This phase is characterized by a “saw tooth” pattern, as illustrated in the adjacent diagram. 0 Vuoto 6 Pag. 33/96 Tempo na/nb Crumbling time. When the membrane has fully contracted, the compressor stops and the drum begins to turn, crumbling the mass attached to its surface. Figure 6 A series of several cycles, during which the timing and pressure settings are adjusted, constitutes a PRESSING PROGRAM. A general pressing program, as illustrated in the diagram in Figure 7, is composed of several working cycles. 6.1 The concept behind the pressing programs The press is equipped with an exclusive, highly flexible programming system capable of meeting every user’s needs. First of all, it enables you to choose between 23 different programs, the first of 20 of which can be changed to suit a given operator’s need, while the last three (red, white and champagne) cannot be modified. The 20 programs can easily be adjusted and customized after inputting a 2nd-level password. You can also create new programs by permanently overwriting existing ones or exporting, copying or resetting them to zero the corresponding configurations. The programs can vary considerably, depending on the type of product being processed. The following two examples of graphs, one for standard wines and one from champagnes, will give you an idea of the trend of a processing cycle. Use and Maintenance Manual for Pneumatic Membrane Presses PEPF / PEC-PFC Pag. 34/96 Diagram of a standard pressing program a Pressure Pressione Maximum Pressione pressure Massina 0 bar Vacuum Vuoto Minimum Pressione pressure Minima b c tb ta na Tempo Time nb 11Ciclo di pressatura pressing cycle Figure 7 a = preliminary compression tb = pressure holding time during b b = pressure build-up na = crumbling turns during a c = final compression at maximum pressure nb = crumbling turns during b and c ta = pressure holding time during a A pressing program always begins with a “preliminary compression time” (a) during which all the cycles reach a minimum pressure setting. This is followed by a “pressure build-up” step (b) comprising a series of cycles during which the working pressure gradually increases to the maximum pressure (see example of a standard program) and the mean pressure (see example of a program for champagne). It should be noted that, for the duration of (a), the press uses a different pressure holding time (ta) and a different crumbling time (na) from those used afterwards for the rest of the program (tb, nb). This optimizes the extraction of the virgin must during (a). In both the examples, the final pressing step (c) takes place at maximum pressure. Each program can be modified even while it is running; changes made during the process are only temporary and remain enabled until the end of the cycle. The diagram of a champagne pressing program begins with a “preliminary compression time” (a), during which all the cycles reach the established minimum pressure. In the subsequent period (b), unlike the case of the standard program, all the cycles reach a mean pressure. The cycles reach the maximum pressure in the final step (c) (see Figure 8). It should also be noted that one pressing program may vary considerably from another in relation to the quality of the grapes, their degree of maturity, the vintage, the location of the vineyards, and so on. Use and Maintenance Manual for Pneumatic Membrane Presses PEPF / PEC-PFC Pag. 35/96 It is therefore up to operators to select the program that best satisfies their needs on the strength of their experience, choosing one of those provided or adapting one to their own requirements. Graphic example of a pressing program for champagnes Pressure a b c tc Maximum pressure tb Mean pressure ta Minimum pressure 0 bar Vacuum na nb nc Time 1 pressing cycle a = compression time at minimum pressure b = compression time at mean pressure c = compression time at maximum pressure ta = pressure build-up time during a tb = pressure build-up time during b tc = pressure build-up time during c na = crumbling turns during a nb = crumbling turns during b nc = crumbling turns during c Figure 8 Use and Maintenance Manual for Pneumatic Membrane Presses PEPF / PEC-PFC 7 Pag. 36/96 Basic instructions for operating the press The pneumatic presses are equipped with a complete and practical electronic programming and control system. By following the essential instructions outlined in this section, you can complete a normal working cycle without any prior in-depth knowledge of all aspects of the machine’s functions and programs. For a thorough understanding of all the controls (e.g. to customize programs), the operator can also refer to Section 8. “Detailed description of the controls”. There are two working modes: automatic AUT and manual MAN, which can be selected from the touch screen display. In MAN mode, you can manually operate several devices including: the opening and closing of the valves, drum rotation, the motors and pumps, the opening/closing of one or more loading hatches and must collection tanks (some models only). In MAN mode, you can also change the values and settings of the pressing programs, create new programs or cancel old ones. In AUT mode, you can start/stop every single step involved in a loading, pressing and washing cycle. To switch from AUT to MAN mode or vice versa, press the button on the top right hand side of the display (AUT – MAN) and then press the AUT/MAN selector on the bottom right-hand side. IMPORTANT For safety reasons, switching between the AUT/MAN operating modes is 1st-level password protected. Without a password, any unauthorized operator will be unable to change the position of the selector and therefore cannot access the manual controls. The press’s working cycle is divided essentially into four steps, i.e. loading the product to press, pressing, unloading and washing. 7.1 Loading Loading is the step that enables you to fill the press with the product to press. The pneumatic presses are fitted with two separate systems for loading the product, i.e. vertical loading (through the hatch) and axial loading, so operators can choose the system that best meets their needs, also depending on the equipment available. To start the loading cycle, select automatic mode AUT, then press the LOAD button on the display. Then choose the loading method you require (axial or vertical) and press START CYCLE. In the message that appears in the transparent popup window, press the ok button to confirm and start the process. To stop the loading cycle at any time, press STOP CYCLE on the touch screen display. Press START CYCLE to restart the cycle from where it was interrupted, or else press ABORT to permanently cancel the procedure that was underway. Use and Maintenance Manual for Pneumatic Membrane Presses PEPF / PEC-PFC 7.1.1 Pag. 37/96 Vertical loading through the hatch Loading through the hatch is generally used for products unsuitable for pumping, such as whole grapes. Depending on the model, the press can be fitted with one or more hatches that are opened manually or pneumatically. The position of the drum during the loading process is always with the hatch 8 facing upwards. Already during the loading process, there will be a natural runoff of fluid, which can be collected in a tank or drawn off by a manually or pneumatically operated mobile chute 12. This liquid is then removed using various methods, depending on the model of the press, the optional accessories installed (extractor pump, must selection valves) and the configurations of the program. To start the vertical loading cycle through the hatch, select the automatic mode AUT and press the LOAD button on the display. Select the vertical loading method and press START CYCLE. In the message that appears in the transparent popup window, press the button to confirm and start the procedure. Open the loading hatch (see paragraph 4.1) - or two hatches on some models using the manual or pneumatic controls and pour in the product to press. IMPORTANT Never overload the machine with the product to press. Excessive loading can cause severe damage, such as membrane rupture or permanent machine deformation. Make sure the product is distributed evenly all over the drum inside the press and not accumulating in certain areas; to facilitate the distribution of the product it is advisable to rotate the drum a few times during the filling procedure. To start rotating the drum, stop the loading process by pressing the STOP CYCLE and then press TURN AGAIN and close the loading hatch. After rotating the drum to distribute the product evenly, press START CYCLE to continue filling the drum, or press ABORT to terminate the loading process. As soon as the press is full, loading through the hatch has to be stopped manually by the operator by pressing the STOP CYCLE button, then the ABORT button. After completing the loading process, close the hatch (or two hatches on some models) and proceed with pressing. 7.1.2 Axial loading The axial loading system enables you to load the press with the product to press through the valve V23. Axial loading is generally used for products suitable for pumping and it is more effective than loading through the hatch because the drum can be rotated while the product is being loaded, thus facilitating the even distribution of the product and speeding up the filling procedure. Use and Maintenance Manual for Pneumatic Membrane Presses PEPF / PEC-PFC Pag. 38/96 Already during the loading process there will be a natural runoff of fluid that is collected in a tank or drawn off by a manually or pneumatically operated mobile chute 12. This liquid is then removed by various means depending on the model of the press, the optional accessories installed (extractor pump, must selection valves) and the configurations of the program. To start the axial loading cycle, open the axial loading valve V23 (manually on some models), select automatic mode AUT and press the LOAD button on the display. Select the loading method -> AXIAL and press START CYCLE. In the message that appears in the transparent popup window, press the button to confirm and start the procedure. To facilitate the even distribution of the product inside the drum, it is advisable to turn on the automatic drum rotation option during the filling process. The control for enabling AUTOMATIC ROTATION is in the menu LOAD -> AXIAL, where you can input the ROTATION DELAY, the NUMBER OF TURNS RIGHT and the NUMBER OF TURNS LEFT. The ROTATION DELAY is an initial interval during which the drum remains at a standstill to enable the "soft" loading of the product, after which it begins to turn first right and then left. As soon as the press becomes full, the axial loading cycle can be interrupted by the operator either manually, by pressing the STOP CYCLE button and then the ABORT button, or automatically thanks to a safety pressure switch, which stops the loading process (in some models only) and alerts the operator with an acoustic signal when the press is full. IMPORTANT The loading action is automatically controlled by a pressure switch installed inside the drum, which serves the purpose of closing the axial valve automatically (some models only) and it trips a siren when the right quantity of product to load has been reached. DANGER Never overload the machine with the product to press. Excessive loading can cause severe damage, such as membrane rupture or permanent machine deformation. IMPORTANT In the event of any malfunction or failure of the pressure switch, it is essential to pay careful attention to avoid overloading the press because the axial valve will no longer be controlled by the pressure switch and will consequently remain open. For each pressing cycle, a test is run automatically to check on the proper operation of the machine components, including the pressure switch. If the display shows the alarm message “AXIAL LOADING PRESSURE SWITCH” (see Table 2, page 64), contact the customer support service without delay. Use and Maintenance Manual for Pneumatic Membrane Presses PEPF / PEC-PFC Pag. 39/96 7.1.2.1 Carbonic maceration (for mod. PEC-PFC only) With the closed presses mod. PEC-PFC, you can also complete the carbonic maceration of the product during the axial loading process, before undertaking the pressing procedure. This maceration is achieved by closing the outlets for the liquid and keeping all the product inside the drum for a given period of time. button on the “LOAD AXIAL page to view the next page and Press the enable the Maceration process. 7.2 Pressing To start the pressing program, select the automatic mode AUT PRESSING button on the display. and press the Choose the program you wish to run and then press START CYCLE and to confirm and start the pressing cycle. To choose a pressing program from among the 23 available, you need to press on the PRESSING button on the display (see figure below) and then scroll down the menu. Select the program you need and press program you have chosen. to confirm and load the During the pressing cycle, the display shows a graph illustrating the program underway and its state of progress. It also shows the name and number of the program, the pressure inside the membrane, the processing times that have elapsed and those remaining to be completed. Using the arrow keys , you can scroll down and view the other pages containing the whole pressing program graph. The program can easily be modified even while it is underway, in which case any changes made are only temporary and remain enabled until the end of the cycle. You can start and stop the program several times without any consequences on its completion, it will always start again from where it was interrupted. To stop the program at any time, press the STOP CYCLE button. Press the START CYCLE button to start the program again from where it was interrupted. If you want to start the program from the beginning instead, or replace it with another, press the ABORT button to cancel the procedure underway. You can start the pressing cycle at any time to manually begin one or more crumbling steps. To do so, stop the pressing cycle by pressing STOP CYCLE and then press TURN AGAIN. After the drum’s rotation to crumble the residue, press START CYCLE to return to the pressing step, or press ABORT to abandon the procedure. Use and Maintenance Manual for Pneumatic Membrane Presses PEPF / PEC-PFC 7.3 Pag. 40/96 Unloading This is the step for removing the solid residue from inside the machine at the end of a pressing process. The pressure inside the central membrane is released, and the membrane contracts against the drum rotation shaft. Before starting to unload, turn on the (optional) conveyor belt using the manual controls. To do so, select manual mode MAN conveyor belt and press on the symbol of the to start it. To start the unloading cycle, select automatic mode AUT UNLOAD button on the display. Then press the START CYCLE button and again and press the to confirm and start unloading. At this point, the drum begins to rotate until the hatch (or two hatches on some models) is in a lateral position. A message appears on the display inviting the operator to open the hatch (manually in some models) to unload the residue; once this procedure has been confirmed, the unloading cycle can begin. To stop the unloading cycle at any time, press the button STOP CYCLE on the display; press START CYCLE to start the cycle again from where it was interrupted. When no more solid residue emerges from the hatch, stop the unloading cycle by pressing STOP CYCLE and then ABORT. 7.4 Washing the press The method for washing the press may vary depending on the model of press, the type of drum, the type of membrane and the amount of fouling needing to be removed. There are two different washing methods, i.e. washing with water and chemical washing (only for mod. PEC-PFC) Washing with water is generally used at the end of each pressing cycle to remove any loose solids remaining inside the drum, while chemical washing with a detergent (only for mod. PEC-PFC) is used periodically to thoroughly clean any fouling and sanitize the inside of the press. 7.4.1 Washing with water Mod. PE-PF The “open” presses mod. PE-PF are equipped with a perforated washing hose (or two from model PE 80 onwards) for washing the outside of the drum with highpressure water jets; the coupling 16 for the washing hose therefore needs to be connected to a water supply with a pressure of approximately 4 bar. The inside of the drum is washed manually using a normal jet of water or the spray gun provided (with some models). To wash the "closed" presses mod. PEC-PFC, you can add water to the drum through the coupling 17. Some models can be fitted with a pump for delivering the washing water. Use and Maintenance Manual for Pneumatic Membrane Presses PEPF / PEC-PFC Pag. 41/96 To complete the process for washing the drum with water, select automatic mode AUT and press WASHING. - Select the type of washing -> DRUM - Input the WASHING PRESSURE and the number of turns for the FINAL RINSE. - Press START CYCLE and to confirm and start the procedure. PEC-PFC Models In order to wash PEC-PFC Model “closed” presses, inject water inside the drum through the coupling 17. Some models may be equipped with a pump for the injection of wash water To complete the process for washing the drum with water, select automatic mode AUT and press WASHING. - Select the type of washing -> DRUM - Input the WASHING PRESSURE and the number of turns for the FINAL RINSE. - Press START CYCLE and to confirm and start the procedure. PE-PEC - PEC-PFC Models After the washing operation has been confirmed , the drum makes a few turns during which the manual operations for the cleaning of the outside of the drum can be performed. For PE-PF Models, use the washing hose with high-pressure sprays of water. IMPORTANT Pay careful attention during any manual cleaning of the machine with the aid of liquids to avoid aiming a jet of water against any electrical parts. Washing tube (only for PE-PF) After the number of turns set for external washing, the drum will position itself in such way as to make it easier for the operator to remove the drainage cap and open the loading hatch and the washing hatch (see also paragraphs 4.1, 4.2 and 4.3). Use and Maintenance Manual for Pneumatic Membrane Presses PEPF / PEC-PFC Pag. 42/96 After this, use a rubber hose or the washing tube (if available) in order to wash the inside of the drum as shown in the figure. with rubber hose with washing tube Water MAX 3 bar 50°C Muovere la lancia partendo dal fondo del tamburo verso il portello in modo da estrarre i residui solidi Slightly inflate the membrane using the manual control (see item 6.3 in Section 8) in order to smoothen out the wrinkles in the membrane that might contain residue and then perform another rinsing. Elastic membranes do not require this operation. with rubber hose with washing tube With the aid of a broom, clean the bottom of the drum to detach any remaining solid scraps, removing them through the hatch or the drainage cap. Use and Maintenance Manual for Pneumatic Membrane Presses PEPF / PEC-PFC Pag. 43/96 After completing the washing procedure, close the loading hatch, the washing hatch, the drainage cap and the side covers. Press the button on the display to confirm the end of the washing cycle. 7.4.2 Chemical washing (for mod. PEC-PFC only) The closed presses model PEC-PFC can be washed normally with water as explained in the previous paragraph 7.4.1, or after adding detergent to the inside the drum. The choice of washing method depends on the level of fouling and the amount of solid residue inside the drum. To start the chemical washing process, select automatic mode AUT press WASHING. and - Select the washing method -> CHEMICAL (for closed presses PEC-PFC only) - Input the INFLATION MAINTENANCE TIME - Input the VACUUM MAINTENANCE TIME - Input the INFLATION PRESSURE - Input the VACUUM PRESSURE - Input the NUMBER OF CYCLES - Then press START CYCLE and to confirm and start the procedure. The message INPUT DETERGENT then appears on the display and you can input the chemical detergent through the coupling 17 or through the loading hatch. To complete the chemical washing cycle, fill the bottom of the drum to approximately 20 cm deep with water and caustic soda (at a maximum concentration of 3-5%). - It is essential to avoid any use of chlorine or chlorine-based products. - For any sanitation treatments, use 3% hydrogen peroxide (H2O2) (10 volumes). After adding the detergent, press chemical washing cycle. to confirm and proceed with the Use and Maintenance Manual for Pneumatic Membrane Presses PEPF / PEC-PFC Pag. 44/96 The drum will make a few turns with the membrane completely contracted against the rotation shaft (figure A), after which it will come to a stop and the membrane will inflate slightly in order for it to be immersed in the washing liquid (figure B). After a programmable maintenance time, the membrane will contract once against the rotation shaft and the drum will resume turning. 20 cm approx These steps are repeated alternately a given number of times to accurately wash all areas of the drum and membrane. To stop the washing cycle at any time, press STOP CYCLE on the touch screen display; press START CYCLE to start the cycle again from where it was interrupted, or press RESET CYCLES to abandon the procedure underway and the previous procedures. After chemical washing has been concluded, the drum will make a few turns in order to help the operator remove the drainage manifold and drain all the chemical detergent. After this operation has been concluded, perform a thorough rinsing with water in order to remove all remaining chemical detergent. Rinsing with water is performed in the same way and using the same chemical washing program described above, with the only exception that instead of chemical detergent, inject water through the coupling 17 or through the loading hatch. IMPORTANT Pay the utmost attention when manually cleaning the machine with the aid of a liquid. Never aim jets of water at the electrical parts of the machine. Use and Maintenance Manual for Pneumatic Membrane Presses PEPF / PEC-PFC 8 Pag. 45/96 Detailed description of the controls This section gives a detailed description of all the features of the controls used in the program, including the procedure for creating customized pressing programs (paragraph 8.2). 8.1 Description of the controls The press is equipped with advanced software and a touch screen display with which operators can interact to customize the machine’s operation and working cycles. The symbols used to identify the pumps, valves, etc., are generally colored red if they are disabled, closed or switched off, while they are colored green if they are enabled, open or functioning. For instance, if the symbol that identifies a given valve is colored green, this means that the valve is open; if the symbol for a given motor is colored red, then the motor is switched off, and so on. All the times displayed are given in minutes and decimals of a minute (the figures shown after the decimal point). EXAMPLE: 2.5 = 2 minutes and 30 seconds; 0.7 = 42 seconds, etc. The touch screen display shows controls, graphs, layouts and other types of information on the current status of the machine: 1 HOME This is the page on the screen that summarizes the main processing data and it is typically the one that remains displayed when the press is in operation. It shows the layout of the machine, complete with its valves, piping and related components. The homepage also shows buttons that vary according to the model of press and the functions enabled; you may consequently see buttons for accessing the layout of the compression unit, the washing program, the layout of the unloading valve assembly, or the layout of the loading assembly. 2 LOAD The next window is for choosing the type of loading method to use: AXIAL or VERTICAL. To change the values of the related parameters, select MAN mode and press on the numerical field that you want to change; then input the new value using the keyboard that appears in the transparent popup window and press Enter to confirm. Once you have changed the parameters, it is no longer possible to restore the factory default settings automatically. The values and configurations can also be modified “on the fly” while a process is underway in AUT mode, but such changes are not saved permanently and the program returns to the initial configurations at the end of the cycle. 2.1 AXIAL AXIAL loading is done through the axial valve V23 that, depending on the models, may be manually operated or a pinch valve. When you select the axial loading method, the following configurations appear on the display: Use and Maintenance Manual for Pneumatic Membrane Presses PEPF / PEC-PFC Pag. 46/96 2.1.1 Automatic rotation DISABLED the drum stays at a standstill during loading, but it can be made to rotate manually by stopping the loading cycle and pressing “TURN AGAIN”. 2.1.2 Automatic rotation ENABLED The drum turns automatically during the loading cycle to facilitate the distribution of the product. 2.1.2.1 Rotation delay this is the initial interval before rotation starts designed to facilitate a "soft" loading of the product. 2.1.3 Number of turns right indicates how many right turns will be performed during axial loading 2.1.4 Number of turns left indicates how many left turns will be performed during axial loading 2.1.5 key (next page) 2.1.5.1 2.1.6 Maceration this is for the operator to enable/disable maceration during the loading process. If enabled, the unloading valves remain closed for a given period of time to keep all the product inside the drum. START CYCLE This starts the axial loading cycle. When this button is pressed, a window appears in the transparent popup window for you to confirm or cancel the procedure. 2.1.6.1 Stop cycle suspends the AXIAL loading cycle currently underway 2.1.6.2 Turn again starts the rotation of the drum to facilitate the even distribution of the product that has been loaded. 2.1.6.3 Abort completely cancels the AXIAL loading cycle currently underway. 2.2 VERTICAL VERTICAL loading is done through the loading hatch 8, either manually or using mechanical systems that are not a part of the supply. 2.2.1 START CYCLE This starts the loading cycle through the hatch. When you press this button, a transparent popup window appears for you to confirm or cancel the procedure. 2.2.1.1 Stop cycle suspends the vertical loading cycle currently underway 2.2.1.2 Turn again starts the drum rotation to facilitate the even distribution of the product that has been loaded Use and Maintenance Manual for Pneumatic Membrane Presses PEPF / PEC-PFC 2.2.1.3 3 Pag. 47/96 Abort completely cancels the vertical loading cycle currently underway. PRESSING This screen shows the graph of the pressing program with the related working times and pressures. The next screen also gives you access to the list of programs available and enables you to choose which one you want to start. Using the arrow keys you can scroll down and view the other pages comprising the whole graph of the pressing process. 3.1 Start cycle This starts the pressing cycle. When you press this button, a transparent popup window appears for you to confirm or cancel the procedure 4 3.1.1 Stop cycle suspends the pressing program currently underway 3.1.2 Turn again starts the rotation of the drum. 3.1.3 Abort completely cancels the pressing program currently underway. UNLOAD 4.1 Start cycle This starts the unloading cycle. When you press this button, a transparent popup window appears for you to confirm or cancel the procedure. 5 4.1.1 Stop cycle suspends the unloading cycle currently underway 4.1.2 Turn again starts the rotation of the drum. 4.1.3 Abort completely cancels the unloading cycle currently underway. WASHING Depending on the model, the press can be washed in two different ways: by washing the drum (with water) at the end of each cycle, or with a chemical washing cycle (using a detergent, for mod. PEC-PFC only). See paragraph 7.4. 5.1 Washing the drum 5.1.1 Washing pressure 5.1.2 Final rinsing turns 5.1.3 START CYCLE This starts the drum washing cycle. When you press this button, a transparent popup window appears for you to confirm or cancel the procedure. 5.1.3.1 Stop cycle suspends the drum washing cycle Use and Maintenance Manual for Pneumatic Membrane Presses PEPF / PEC-PFC 5.1.3.2 Pag. 48/96 Abort completely cancels the drum washing cycle 5.2 Chemical washing 6 5.2.1 Inflation maintenance time this is the time, expressed in minutes, during which the positive pressure is kept constant inside the membrane. 5.2.2 Vacuum maintenance time this is the time, expressed in minutes, during which the pressure of the vacuum (negative pressure) is maintained. 5.2.3 Inflation pressure this is the value, in bar, of the membrane inflation pressure used to facilitate the removal of any solid residue from the surface of the membrane. 5.2.4 Vacuum pressure this is the value, in bar, of the negative pressure needed to contract the membrane against the rotation shaft. 5.2.5 Number of cycles this indicates the number of cycles used to complete the chemical washing process 5.2.6 START CYCLE this starts the chemical washing cycle. When you press the button, a transparent popup window appears for you to confirm or cancel the procedure. 5.2.6.1 Stop cycle suspends the chemical washing cycle 5.2.6.2 Abort completely cancels the chemical washing cycle CONFIGURATIONS This screen enables you to access the general program configurations. The main screen shows the version of the program installed, PLC, and of the operator interface, OP. The screen also shows: - the type (closed or open press) - the model. 6.1 SET this page is reserved for a qualified technician and is passwordprotected. 6.2 PROGRAM MANAGER this is for accessing the graph of the pressing program to make any changes (which are temporary in AUT mode or permanent in MAN mode). 6.2.1 List of programs this is for accessing the list of available programs 6.2.2 Save this is for saving any changes made to a program Use and Maintenance Manual for Pneumatic Membrane Presses PEPF / PEC-PFC Pag. 49/96 6.2.3 Reset this is for completely zeroing all the values in a program. 6.2.4 Copy steps this is for copying one or more steps in a program. Input the number of the column containing the step to copy and the destination where the steps are to be copied. 6.2.5 USB this is a command for exporting or importing one or more programs using an USB pen. Follow the on-screen instructions. 6.2.6 TOTAL TIME this is the estimated total time needed to complete the whole pressing cycle. 6.3 MANUAL CONTROLS This screen shows the machine’s flow chart complete with all the devices and the controls for their manual operation. The manually-operated controls enable you to manage every single component (valves, motors, pumps, hatches, chutes, conveyor belts, augers, etc.) by pressing directly on the component concerned. The manual controls also enable you to start the clockwise or anticlockwise rotation of the drum and to obtain a negative or a positive pressure inside the membrane. IMPORTANT The maximum membrane inflation pressure in MAN mode is 0.3 bar. The manually-operated controls are only enabled when the MAN mode has been selected and they can be used by pressing directly on the component concerned. The “manual controls” window also shows the following buttons: 6.3.1 AUT/MAN mode selector 6.3.2 Compressor unit this shows the layout of the compression unit 6.3.3 Washing (some models only) this shows the layout of the washing unit 6.3.4 Unloading (some models only) this shows the layout of the assembly for unloading and sorting the product 6.4 PANEL PARAMETERS This screen contains the buttons for configuring the panel, the language and the date/time. 6.4.1 Panel 6.4.1.1 Screen this is for adjusting the screen settings (brightness, contrast, screensaver, timeout, etc.) 6.4.2 Language this is for selecting the language to use for the software. 6.4.3 Date/time is for changing the date and time. Use and Maintenance Manual for Pneumatic Membrane Presses PEPF / PEC-PFC Pag. 50/96 6.5 ADVANCED PARAMETERS In this password-protected section, you can access and configure the advanced program parameters. These advanced parameters cannot be modified by the operator, but only by an authorized qualified technician equipped with the necessary password. 7 ALARMS This shows a list of any alarms that have been tripped, in chronological order with the date and time, and a description of the type of alarm. 7.1 Reset Once the problem that tripped the alarm has been dealt with, the list can be reset by pressing and holding the RESET button for a few seconds. The description of the alarm nonetheless remains saved in the software’s history. 7.2 Button for silencing the acoustic signal indicating that one or more alarms have been tripped. 7.3 History This shows a list of all the alarms that have occurred, in chronological order with the date and time. 8 HELP This is a brief guide that, when enabled, describes the meaning of the controls marked by the symbol . To disable the Help option, press the 8.2 button and select Disable. Changing a pressing program Every program (except for the last three, RED, WHITE and CHAMPAGNE) can be adjusted to suit the operator's needs. As explained in item 6.2 of paragraph 8.2, every program can easily be modified even while it is running in automatic mode AUT, but in this case the changes made will be temporary and remain enabled only until the end of the cycle. On the other hand, changes made to programs in the manual mode MAN are permanent and they overwrite the program when they are saved. IMPORTANT Changes made by the operator are permanent in that they definitively replace the default settings. You cannot automatically recover the factory default programs. The default or operator-modified data are input permanently and are not cancelled, not even after a lengthy power failure. • • Before undertaking any customization of a program, it is advisable to become thoroughly familiar with all the instructions contained in the present manual and especially with Section 6 “How a pressing program takes place” in order to fully understand the pressing diagram, the functions and the interactions of the various times comprising a program. Use and Maintenance Manual for Pneumatic Membrane Presses PEPF / PEC-PFC Pag. 51/96 To change a pressing program, complete the steps below in the following order: - Select MAN mode; Configurations - Select and load the program that you want to change; Configurations Program manager Programs list. - Select in the menu the program that you want to change and press Manual controls MAN . - Then press on the column that you want to change in order to display the list of commands available for making changes: Select the required command and input the required values then press to confirm. - After completing any changes, press Save to permanently save the changes you have made. Use and Maintenance Manual for Pneumatic Membrane Presses PEPF / PEC-PFC 9 Pag. 52/96 Press maintenance 9.1 Routine maintenance when the press is in regular use DANGER Always disconnect the press from the mains power supply before carrying out any maintenance work on the inside or outside in order to avoid the risk of accidental start-ups while the operator is near the machine. To ensure the press provides a trouble-free and lasting service, the operator must comply with the simple procedures set out below, which are designed to guarantee the machine’s optimum performance at all times. Table 1 on page 63 indicates the necessary maintenance procedures to implement when the press is in regular use. These procedures must be implemented scrupulously at the specified intervals. Greasing The presses have two lubricators for lubricating the drum’s bronze bushings and bearings (see Figure 9) ONE ON EACH SIDE Figure 9 For mod. PE-PEC 80 onwards, the presses have an oil-lubricated compressed air supply and regulator unit, located near the electrical panel. Periodically check the oil level and top up as necessary with KPM Airoil 32 oil. To do so, unscrew and remove the oil flask. Use and Maintenance Manual for Pneumatic Membrane Presses PEPF / PEC-PFC 9.2 Pag. 53/96 Preparing the press for lengthy periods of inactivity At the end of the season, scrupulously follow the steps outlined below in addition to the routine maintenance procedure (see the routine maintenance table). 1) Check and top up the oil level in the drive motor gear box if necessary; 2) Fill the lubricators with grease; 3) Check the condition of the compressor unit; 4) Scrupulously follow the maintenance procedures for the membrane (paragraph 9.3). 9.2.1 Dry vane compressor maintenance Whenever seasonal use or extended periods of machine inactivity are foreseen, the following compressor maintenance procedure is recommended in order to reduce to a minimum the formation risk of rust inside the pump casing during such period that might lead to future seizure or breakage. 1) At the end of the season of use or prior to an extended period of inactivity, remove the compressor’s lateral protective casing by loosening the plastic knobs or screws and remove the filters housed inside. 2) Start the compressor for 20-30 seconds and then spray some Teflon spray (Kluber Fluoropan T 20 Spray; Interflon Fin Lube TF Aerosol, Aluchem Alusynt Microflon; or similar products) around the compressor’s suction area. The Teflon will come to be deposited inside the unit and protect its internal parts. 3) Switch off the compressor. 4) Re-assemble the filter(s) and re-close the lateral protective casing 5) Repeat the operation at the end of each work season or before an extended period of inactivity. 9.3 Membrane maintenance The inflatable membrane is made of a top-quality material approved to food-grade standards that ensures its durability and utmost reliability. To preserve these features, wash the membrane with a jet of lukewarm water (max 40-50°C) at a pressure of no more than 3 bar (see paragraph 7.4.1 Washing with water) and, where necessary - but no more than once or twice per season - use an alkaline solution containing sodium hydroxide (caustic soda) at a maximum concentration of 3-5%, followed by another thorough rinse (see paragraph 7.4.2 Chemical washing). - Never use chlorine or chlorine-based products. - For any sanitation treatments, use 3% hydrogen peroxide (H2O2) (10 volumes). DANGER The use of corrosive caustic substances is potentially hazardous to the operator. Only use the recommended doses. Before using detergents, always read the manufacturer’s instructions on the packaging and take all specified precautions. Use and Maintenance Manual for Pneumatic Membrane Presses PEPF / PEC-PFC Pag. 54/96 Sharp objects (e.g. scissors, knives) accidentally loaded with the mass of grapes for pressing can puncture the membrane, which can be promptly and repeatedly repaired whenever necessary (except for elastic membranes), and only needs replacing when worn or after lengthy usage. When it is time to change a membrane, contact your nearest customer support service. Prior to shutdown for a long idle period, slightly inflate the membrane to eliminate any creases that may cause permanent damage to the membrane; this step is unnecessary for elastic membranes because that they are always remain smooth and never form creases even when they are completely deflated. To slightly inflate the membrane, use the manual controls in MAN mode (see item 6.3 in Section 8). 9.4 Extraordinary maintenance All servicing procedures that are not part of the scheduled maintenance discussed in this manual (e.g. replacement of membranes, linings, bearings, seals, etc.) should be considered “extraordinary maintenance” and should be handled ONLY BY THE MAINTENANCE SERVICE OR OTHER AUTHORIZED PERSONNEL, who must be thoroughly informed about the predictable potential risks. Use and Maintenance Manual for Pneumatic Membrane Presses PEPF / PEC-PFC Pag. 55/96 10 Demolition and disposal The demolition and disposal procedures must be entrusted only to suitably trained and equipped personnel. Dismantle and separate the plastics from electric motors, piping, steel and other materials. The disposal of waste must always be done in compliance with current legislation according to the type of product. All components contaminated by oil or acids must be considered as special waste and must be disposed of by authorized consortia. The Manufacturer accepts no liability for any damage caused directly or indirectly to persons or property as a result of failure to comply with the above recommendations. In addition, the manufacturer can accept no liability for personal injury or damage to property consequent to the reuse of single machine parts for purposes or in assembly situations other than those originally intended. Use and Maintenance Manual for Pneumatic Membrane Presses PE-PF / PEC-PFC Pag. 56/96 11 Technical data table Modello – Model - Modell – Modèle - Modelo PE 12 PE 16 PE 25 PE 35 PE 50 PE 80 PE 100 Pressure massima ammissibile (PS) - (PS) Maximum allowable pressure - Zulässiger Höchstdruck (PS)Pression maximale admissible(PS) - Presión máxima admisible (PS) bar 1.8 1.8 1.8 1.8 1.8 1.8 1.8 Pressione di lavoro - Running pressure - Betriebsdruck - Pression de travail - Presión de trabajo bar 1.6 1.6 1.6 1.6 1.6 1.6 1.6 Livello pressure sonora(2) / Sound pressure level(2) / Schalldruckpegel(2) Niveau de pression sonore(2) / Nivel de presión acústica(2) db(A) Lunghezza – Length Länge – Longeur - Longitud A mm 2510 2770 3190 3790 4270 5490 6450 Larghezza – Width Breite – Langeur - Ancho B mm 1300 1300 1650 1650 2025 2200 2200 Altezza – Height Höhe – Hauteur - Altura C mm 1770 1770 2180 2180 2510 3090(1) 3090(1) Dimensioni portello di carico - Loading hatch dimensions - Befüllungstürmaße Dimensions porte de chargement Dimensiones boca de carga D mm 510X460 510X460 600 x 510 600 x 510 600 X 510 575 X 625 575 X 625 Attacco caricamento uva - Grape loading connection Befüllungsanschluss - Raccord chargement raisin - Connexión carga uva E - DN 100 100 100 100 100/120 125 125 Attacco uscita mosto - Must outlet connection - Anschluss Mostauslauf Raccord sortie moût - Connexión salida del mosto F - DN 50 50 50 50 65 100 100 kg 690 750 1140 1330 2000 2800 3040 Potenza soffiante - Blower power - Radialgebläseleistung Puissance turbine centrifughe - Potencia ventilador kW - - - - - 3 3 Potenza compressore - Compressor power Verdichterleistung - Puissance compresseur - Potencia compresor kW 2.2 2.2 4 4 7.5 11.5 (7.5*) 15 (7.5*) Potenza motore rotation drum - Drum rotating motor power - Trommeldrehungmotor leistung Puissance moteur pour la rotation tambor - Potencia motor por la rotación del tambor kW 1.1 1.1 1.8 2.2 4 4 4 Potenza totale installata - Total installed power - Installierte Gesamtleistung Puissance totale installée - Potencia total instalada Massa – Weight Masse – Masse - Peso kW 4.8 4.8 5.8 6.2 11.5 7** 7** Capacità caricamento uva intera - Quantity of whole grapes per batch - Füllkapazität mit ganzen Trauben Capacité de chargement raisin entier - Capacidad de carga con uva entera kg(~) 850 1100 1800 2500 3500 5600 7000 Capacità caricamento uva pigiata - Quantity of crushed grapes per batch Füllkapazität mit vermaischten Trauben Capacité de chargement raisin écrasé - Capacidad de carga con uva pisada kg(~) 2400-3600 3200-4800 5000-7500 7000-11000 10000-15000 16000/24000 20000/30000 Capacità caricamento uva fermentata - Quantity of fermented grapes per batch Füllkapazität mit gegorenen Trauben Capacité de chargement raisin fermenté - Capacidad de carga con uva fermentada kg(~) 3500-5500 5000-7000 7500-11000 11000-16000 15000-22000 24000/36000 30000/45000 *Available on request - **Excluding ccompressor power. - (1) Overall size of (optional) standard-height extension – (2) Measured 1 m away from the machine and 1.60 m off the floor or the platform on which the machine is installed . Use and Maintenance Manual for Pneumatic Membrane Presses PE-PF / PEC-PFC Pag. 57/96 12 Technical data table Modello – Model - Modell – Modèle - Modelo PF 160 PF 200 PF 240 PF 350 Pressure massima ammissibile (PS) - (PS) Maximum allowable pressure - Zulässiger Höchstdruck (PS) Pression maximale admissible(PS) - Presión máxima admisible (PS) bar 1.8 1.8 1.8 1.8 Pressione di lavoro - Running pressure - Betriebsdruck - Pression de travail - Presión de trabajo bar 1,6 1,6 1,6 1,6 (2) (2) (2) Livello pressure sonora / Sound pressure level / Schalldruckpegel Niveau de pression sonore(2) / Nivel de presión acústica(2) db(A) Lunghezza – Length Länge – Longeur - Longitud A mm 7150 8400 9400 9400 Larghezza – Width Breite – Langeur - Ancho B mm 2650 2650 2650 3350 Altezza – Height Höhe – Hauteur - Altura C mm 3750(1) 3750(1) 4000(1) 4575(1) Dimensioni portello di carico - Loading hatch dimensions - Befüllungstürmaße Dimensions porte de chargement Dimensiones boca de carga D mm 575 X 625 575 X 625 575 X 625 800 X 750 Attacco caricamento uva - Grape loading connection Befüllungsanschluss - Raccord chargement raisin - Connexión carga uva E - DN 150 150 150 150 Attacco uscita mosto - Must outlet connection - Anschluss Mostauslauf Raccord sortie moût - Connexión salida del mosto F - DN 150 150 150 150 kg 5750 6200 7100 12000 Potenza soffiante - Blower power - Radialgebläseleistung Puissance turbine centrifughe - Potencia ventilador kW 5.5 5.5 5.5 11 Potenza compressore - Compressor power Verdichterleistung - Puissance compresseur - Potencia compresor kW 15* 15* 15* 22* Potenza motore rotation drum - Drum rotating motor power - Trommeldrehungmotor leistung Puissance moteur pour la rotation tambor - Potencia motor por la rotación del tambor kW 7.5 9 9 11 Potenza totale installata - Total installed power - Installierte Gesamtleistung Puissance totale installée - Potencia total instalada kW 13** 14.5** 14.5** 22** Massa – Weight Masse – Masse - Peso Capacità caricamento uva intera - Quantity of whole grapes per batch - Füllkapazität mit ganzen Trauben Capacité de chargement raisin entier - Capacidad de carga con uva entera kg(~) 11200 14000 17000 24000 Capacità caricamento uva pigiata - Quantity of crushed grapes per batch - Füllkapazität mit vermaischten Trauben Capacité de chargement raisin écrasé - Capacidad de carga con uva pisada kg(~) 32000/48000 40000/60000 50000/70000 70000/100000 Capacità caricamento uva fermentata - Quantity of fermented grapes per batch -Füllkapazität mit gegorenen Trauben Capacité de chargement raisin fermenté - Capacidad de carga con uva fermentada kg(~) 50000/72000 60000/90000 70000/110000 100000/150000 *Available on request - **Excluding ccompressor power. - (1) Overall size of (optional) standard-height extension – (2) Measured 1 m away from the machine and 1.60 m off the floor or the platform on which the machine is installed . Use and Maintenance Manual for Pneumatic Membrane Presses PE-PF / PEC-PFC Pag. 58/96 13 Technical data table Modello – Model - Modell – Modèle - Modelo Pressure massima ammissibile (PS) - (PS) Maximum allowable pressure - Zulässiger Höchstdruck (PS) Pression maximale admissible(PS) - Presión máxima admisible (PS) Pressione di lavoro - Running pressure - Betriebsdruck - Pression de travail - Presión de trabajo PEC 25 PEC 35 PEC 50 PEC 80 PEC 100 bar 1.8 1.8 1.8 1.8 1.8 bar 1.6 1.6 1.6 1.6 1.6 Livello pressure sonora(2) / Sound pressure level(2) / Schalldruckpegel(2) Niveau de pression sonore(2) / Nivel de presión acústica(2) db(A) Lunghezza – Length Länge – Longeur - Longitud A mm 3670 4210 4490 5490 6450 Larghezza – Width Breite – Langeur - Ancho B mm 1800 1800 2030 2200 2200 Altezza – Height Höhe – Hauteur - Altura C mm 2320 2320 2520 3090(1) 3090(1) Dimensioni portello di carico - Loading hatch dimensions - Befüllungstürmaße Dimensions porte de chargement Dimensiones boca de carga D mm Ø 480 Ø 480 Ø 480 Ø 550 Ø 550 Attacco caricamento uva - Grape loading connection Befüllungsanschluss - Raccord chargement raisin - Connexión carga uva E - DN 100 100/120 100/120 125 125 Attacco uscita mosto - Must outlet connection - Anschluss Mostauslauf Raccord sortie moût - Connexión salida del mosto F - DN 50 50 50 100 100 kg 1400 1450 2200 3050 3500 Potenza soffiante - Blower power - Radialgebläseleistung Puissance turbine centrifughe - Potencia ventilador kW - - - 3 3 Potenza compressore - Compressor power Verdichterleistung - Puissance compresseur - Potencia compresor kW 4 4 7.5 11.5 (7.5*) 15 (7.5*) Potenza motore rotation drum - Drum rotating motor power - Trommeldrehungmotor leistung Puissance moteur pour la rotation tambor - Potencia motor por la rotación del tambor kW 1.8 2.2 4 4 4 Potenza totale installata - Total installed power - Installierte Gesamtleistung Puissance totale installée - Potencia total instalada kW 5.8 6.2 11.5 7** 7** Massa – Weight Masse – Masse - Peso Capacità caricamento uva intera - Quantity of whole grapes per batch - Füllkapazität mit ganzen Trauben Capacité de chargement raisin entier - Capacidad de carga con uva entera kg(~) 1800 2500 3500 5600 7000 Capacità caricamento uva pigiata - Quantity of crushed grapes per batch - Füllkapazität mit vermaischten Trauben Capacité de chargement raisin écrasé - Capacidad de carga con uva pisada kg(~) 5000-7500 7000-11000 10000-15000 16000/24000 20000/30000 Capacità caricamento uva fermentata - Quantity of fermented grapes per batch -Füllkapazität mit gegorenen Trauben Capacité de chargement raisin fermenté - Capacidad de carga con uva fermentada kg(~) 7500-11000 11000-16000 15000-22000 24000/36000 30000/45000 *Available on request - **Excluding ccompressor power. - (1) Overall size of (optional) standard-height extension – (2) Measured 1 m away from the machine and 1.60 m off the floor or the platform on which the machine is installed . Use and Maintenance Manual for Pneumatic Membrane Presses PE-PF / PEC-PFC 14 Pag. 59/96 Technical data table Modello – Model - Modell – Modèle - Modelo PFC 160 PFC 200 PFC 240 PFC 350 PFC 480 PFC 700 Pressure massima ammissibile (PS) - (PS) Maximum allowable pressure - Zulässiger Höchstdruck (PS) Pression maximale admissible(PS) - Presión máxima admisible (PS) bar 1.8 1.8 1.8 1.8 1.8 1.8 Pressione di lavoro - Running pressure - Betriebsdruck - Pression de travail - Presión de trabajo bar 1.6 1.6 1.6 1.6 1.6 1.6 Livello pressure sonora(2) / Sound pressure level(2) / Schalldruckpegel(2) Niveau de pression sonore(2) / Nivel de presión acústica(2) db(A) Lunghezza – Length Länge – Longeur - Longitud A mm 7150 8400 9400 9400 10200 12800 Larghezza – Width Breite – Langeur - Ancho B mm 2650 2650 2650 3350 3560 3500 Altezza – Height Höhe – Hauteur - Altura C mm 3750(1) 3750(1) 4000(1) 4575(1) 4650(1) 4650 Dimensioni portello di carico - Loading hatch dimensions - Befüllungstürmaße Dimensions porte de chargement Dimensiones boca de carga D mm 765 X 560 765 X 560 765 X 560 765 X 560 765 X 560 (2X) 765 X 560 Attacco caricamento uva - Grape loading connection Befüllungsanschluss - Raccord chargement raisin - Connexión carga uva E - DN 150 150 150 150 150 150 Attacco uscita mosto - Must outlet connection - Anschluss Mostauslauf Raccord sortie moût - Connexión salida del mosto F - DN 150 150 150 150 150 100 kg 5850 6450 7300 12200 15000 18000 Potenza soffiante - Blower power - Radialgebläseleistung Puissance turbine centrifughe - Potencia ventilador kW 5,5 5,5 5,5 11 11 20 Potenza compressore - Compressor power Verdichterleistung - Puissance compresseur - Potencia compresor kW 15* 15* 15* 22* 22* 30* Potenza motore rotation drum - Drum rotating motor power - Trommeldrehungmotor leistung Puissance moteur pour la rotation tambor - Potencia motor por la rotación del tambor kW 7.5 9 9 11 15 18.5 Potenza totale installata - Total installed power - Installierte Gesamtleistung Puissance totale installée - Potencia total instalada kW 13** 14.5** 14.5** 22** 26** 46.5 Massa – Weight Masse – Masse - Peso Capacità caricamento uva intera - Quantity of whole grapes per batch - Füllkapazität mit ganzen Trauben Capacité de chargement raisin entier - Capacidad de carga con uva entera kg(~) 11200 14000 17000 24000 32000 43000 Capacità caricamento uva pigiata - Quantity of crushed grapes per batch - Füllkapazität mit vermaischten Trauben Capacité de chargement raisin écrasé - Capacidad de carga con uva pisada kg(~) 32000/48000 40000/60000 50000/70000 70000/100000 90000/130000 130000/190000 Capacità caricamento uva fermentata - Quantity of fermented grapes per batch -Füllkapazität mit gegorenen Trauben Capacité de chargement raisin fermenté - Capacidad de carga con uva fermentada kg(~) 50000/72000 60000/90000 70000/110000 100000/150000 130000/195000 190000/285000 *Available on request - **Excluding ccompressor power. - (1) Overall size of (optional) standard-height extension – (2) Measured 1 m away from the machine and 1.60 m off the floor or the platform on which the machine is installed Use and Maintenance Manual for Pneumatic Membrane Presses PE-PF / PEC-PFC Pag. 60/96 15 Flow chart n° 2 3 4 5 6 7 8 11 12 Description Drum rotation motor Luminous signal column Lifting points Membrane Drum Sliding side cover Loading hatch Washing hatch Product collection tank Note Elastic or rigid Manual or pneumatic Manual or pneumatic Manual or pneumatic n° FL79 16 17 V23 V67 M1 M61 P33 Description Flow meter Washing water delivery coupling Washing water delivery coupling Axial loading valve Product selection outlet valve Compressor Product extraction plant Pressure switch on inlet Note optional only for mod. PE-PF only for mod. PEC-PFC manual or pinch valve optional compressor or blower optional Pag. 61/96 Use and Maintenance Manual for Pneumatic Membrane Presses PE-PF / PEC-PFC 16 Configurations layout AIR DELIVERY CIRCUIT DRUM ROTATION DRUM LOADING AND WASHING HATCHES PRODUCT COLLECTION AXIAL LOADING FLOWMETER PRODUCT EXTRACTION Connections Connections with the same symbol may be associated Use and Maintenance Manual for Pneumatic Membrane Presses PE-PF / PEC-PFC 17 Key to configurations AIR DELIVERY CIRCUIT DRUM ROTATION 1A) with compressor on board machine and three solenoid valves 1B) without compressor and three solenoid valves 1C) with compressor on board machine and two solenoid valves 1D) without compressor and two solenoid valves 1E) with blower on board machine 2A) direct drive 2B) chain drive DRUM 3A) closed (presses mod. PEC-PFC) 3B) open (presses mod. PE-PF) LOADING AND WASHING HATCHES 4A) manual loading and washing hatches 4B) two manual loading hatches and one manual washing hatch 4C) pneumatic loading hatch and manual washing hatch 4D) pneumatic loading and washing hatches 4E) two pneumatic loading hatches and one manual washing hatch 4F) two pneumatic loading hatches and one pneumatic washing hatch 5A) small product collection tank (for mod. PEC-PFC) 5B) product collection tank (for mod. PEC-PFC) 5C) product collection tank (for mod. PE-PF) 5D) manually-opened product collection chute 5E) pneumatically-opened product collection chute 6A) without valve for axial loading 6B) with manual valve for axial loading 6C) with manual valve for axial loading and pressure switch 6D) with pinch valve for axial loading and pressure switch 7A) without flow meter 7B) with flow meter 7C) with flow meter installed beyond the product extraction pump 8A) direct outflow 8B) with product extraction pump 8C) with product extraction pump and pneumatic valve 8D) with product extraction pump and two pneumatic and one manual product selection valves 8E) with product extraction pump and three pneumatic product selection valves 8F) with two pneumatic and one manual product selection valves 8G) with three pneumatic product selection valves PRODUCT COLLECTION AXIAL LOADING FLOW METER PRODUCT EXTRACTION Pag. 62/96 Pag. 63/96 Use and Maintenance Manual for Pneumatic Membrane Presses PE-PF / PEC-PFC 18 TABLE 1: Servicing procedures COMPONENT LUBRICANT TYPE and MANUFACTURER MAINTENANCE FREQUENCY ARAL BP-MACH ESSO MOBIL SHELL AGIP ARALUB HL 3 ENERGREASE LS 3 BEACON 3 MOBILUX 3 ALVANIA G3 ALVANIA R3 - 1 DRUM SUPPORTING BRONZE BUSHES Fill the drum lubricators with the recommended bearing grease. Use the lubricators provided on the ONCE A WEEK sides of the press (see paragraph 9.1) 2 HINGES AND SLIDING GUIDES IN GENERAL Grease lightly. AT THE START AND END OF EACH WORKING SEASON ARALUB HL 3 ENERGREASE LS 3 BEACON 3 MOBILUX 3 ALVANIA G3 ALVANIA R3 - DRUM ROTATION GEARED MOTOR Top up the reducer if there are signs of a drop in oil level. Do not mix different types of oil, be they the same make or different CHECK WEEKLY AND AT makes. LEAST AT THE START AND Avoid mixing mineral oils with END OF THE SEASON synthetic oils. Oil level checks, top-ups and complete oil changes must be done while the reducer is warm. DEGOL BG 320 GR XP 320 SPARTAN EP 320 MOBILGEAR 632 OMALA OIL 320 BLASIA 320 COMPRESSOR (if any) Clean the air filters at the end of each working season. Every two years check the state of wear on the graphite packing and replace with a new set if necessary (*). 3 4 (*) this must be done exclusively by qualified technicians or the manufacturer’s customer support service. Pag. 64/96 Use and Maintenance Manual for Pneumatic Membrane Presses PE-PF / PEC-PFC 19 TABLE 2: Alarms and solutions ALARM CAUSE / DESCRIPTION SOLUTIONS Emergency button pressed The emergency stop button has been pressed. No auxiliaries Phase sequence anomaly Side cover limit switch tripped Thermal relays tripped Power failure to the control panel In making the electric connection the position of the phases has been inverted or one of them is lacking in the mains power supply The side covers have been opened. The thermomagnetic circuit breaker of one of the motors has been tripped Release the emergency stop button (see paragraph 2.5) Press the AUXILIARIES ON button Reverse the power supply phases No outside consent to unloading The electrical contact for enabling unloading is open Press overloaded, risk of rupture! The maximum limit for loading product in the press has been reached. Beyond this limit the membrane could rupture. Timeout no limit switch Position 0 in rotation Drum rotation pulses No pressing program loaded Maximum number of idle startups (V7) Contact the customer support service Contact the customer support service No pressing program has been selected. Select a pressing program The maximum number of attempts to start the creation of a vacuum has - Check the air circuit been reached. The membrane could be torn or there could be a leakage of - Check the seal on the rings that hold the air. membrane in place The formation of the vacuum takes too long to arrive at the preset vacuum - Check the air circuit setting. The membrane could be torn or there could be a leakage of air. - Check the seal on the rings that hold the membrane in place The PLC is not communicating with one or more peripherals. - Switch the control panel off and then back on again. - Contact the customer support service The type of press has not been configured. The problem may occur after a Contact the customer support service program cutout or reset. The size of the press has not been configured. The problem may occur Contact the customer support service after a program cutout or reset. Maximum idle running time (V7) OTB peripheral alarm Alarm: press not configured Alarm: press size not configured Close the side covers and press AUXILIARIES ON Make sure the setting of the thermomagnetic circuit breaker coincides with the one specified on the motor’s nameplate. Make sure the power supply voltage is as required for the machine. Make sure the cross-section of the power supply cable is sufficient to carry the power required by the machine. After completing these checks, wait a few minutes for the thermomagnetic circuit breaker to cool down and then try resetting it. Make sure all the unloading devices are switched on and the electrical contact signaling the unloading step reaches the press. Contact the customer support service Use and Maintenance Manual for Pneumatic Membrane Presses PE-PF / PEC-PFC Alarm: blower not configured Alarm: maximum number of cycles reached Pressurization parameter beyond maximum limit Vacuum parameter below minimum limit M1 blower (or compressor) anomaly P13 drum membrane pressure high P13 drum membrane pressure low P13 drum membrane pressure anomaly P16 in line pressure switch P17 minimum air pressure M21 washing water pump anomaly P33 axial loading pressure switch M36 drum rotation anomaly V46 timeout opening of hatch 1 opening valve V46 timeout closing of hatch 1 opening valve V46 double limit switch of hatch 1 opening valve V47 timeout opening of hatch 2 opening valve V47 timeout closing of hatch 2 opening valve V47 double limit switch of hatch 2 opening valve V48 timeout opening of hatch 3 opening valve V48 timeout closing of hatch 3 opening valve V48 double limit switch of hatch 3 opening valve M61 must extraction anomaly M62 conveyor belt anomaly V65 timeout opening of chute opening valve V65 timeout closing of chute opening valve V65 double limit switch of chute opening valve The "blower/compressor" option has not been configured. The problem may occur after a program cutout or reset Pag. 65/96 Contact the customer support service Contact the customer support service Contact the customer support service The compressor/blower (if any) is faulty Washing water feed pump (if any) is faulty Contact the customer support service Contact the customer support service Contact the customer support service Contact the customer support service Contact the customer support service Contact the customer support service Contact the customer support service Contact the customer support service Contact the customer support service Contact the customer support service Contact the customer support service Contact the customer support service Contact the customer support service Contact the customer support service Contact the customer support service Contact the customer support service Contact the customer support service Contact the customer support service Contact the customer support service The must extraction pump (if any) is faulty The conveyor belt (if any) is faulty Contact the customer support service Contact the customer support service Contact the customer support service Contact the customer support service Contact the customer support service Use and Maintenance Manual for Pneumatic Membrane Presses PE-PF / PEC-PFC Pag. 66/96 20 Pressing program chart A chart illustrating an example of the red wine pressing program is provided below. The chart is divided into various phases (PHASE 1, PHASE 2, PHASE 3 etc.), each of which is characterized by a certain type of working (pressure increase, drum rotation, deflation, etc). In order to simplify reading, the pressing program has been divided into various STEPS, each one of which is composed of a membrane inflation phase, a pressure holding or maintenance phase, a membrane deflation or vaccum phase, and a drum rotation phase for the crubling of the product. EXAMPLE OF PROGRAM 21 “RED WINE” Phase 1: Pressure increase (membrane inflation) Phase 2: Presure maintenance Phase 3: Pressure reduction (membrane deflation) Phase 4: Drum rotation for product crumbling Use and Maintenance Manual for Pneumatic Membrane Presses PE-PF / PEC-PFC Pag. 67/96 21 Pressing programs The tables below provide all the programs preset by Della Toffola. Preset programs can be modified and personalized as desired. except for the final three programs: Program 21 RED; Program 22 WHITE and Program 23 CHAMPAGNE. PROGRAM 1: CRUSHED RED STEP STEP 1 PHASE 1 PHASE 2 PHASE 3 PHASE 4 STEP 2 PHASE 5 PHASE 6 PHASE 7 PHASE 8 STEP 3 PHASE 9 PHASE 10 PHASE 11 PHASE 12 STEP 4 PHASE 13 PHASE 14 PHASE 15 PHASE 16 STEP 5 PHASE 17 PHASE 18 PHASE 19 PHASE 20 STEP 6 PHASE 21 PHASE 22 PHASE 23 PHASE 24 STEP 7 PHASE 25 PHASE 26 PHASE 27 PHASE 28 STEP 8 PHASE 29 PHASE 30 PHASE 31 PHASE 32 STEP 9 PHASE 33 PHASE 34 PHASE 35 PHASE 36 PRESSURIZATION 0.2 BAR 0.2 BAR 0.2 BAR 0.4 BAR 0.6 BAR 0.9 BAR DURATION 92.7 MINUTES MAINTENANCE VACUUM 3 MINUTES ─ 0.15 BAR 3 MINUTES ─ 0.15 BAR 3 MINUTES ─ 0.15 BAR 3 MINUTES ─ 0.15 BAR 3 MINUTES ─ 0.15 BAR ─ 0.15 BAR ─ 0.15 BAR ─ 0.15 BAR ─ 0.15 BAR 3 MINUTES 3 TURNS RT 1.2 BAR 3 MINUTES 3 TURNS LT 1.4 BAR 3 MINUTES 3 TURNS RT 1.6 BAR ROTATION 4 TURNS RT 4 TURNS LT 4 TURNS RT 4 TURNS LT 4 TURNS RT 3 MINUTES 3 TURNS RT Use and Maintenance Manual for Pneumatic Membrane Presses PE-PF / PEC-PFC PROGRAM 2: WHITE 1 STEP 1 PHASE 1 PHASE 2 PHASE 3 PHASE 4 STEP 2 PHASE 5 PHASE 6 PHASE 7 PHASE 8 STEP 3 PHASE 9 PHASE 10 PHASE 11 PHASE 12 STEP 4 PHASE 13 PHASE 14 PHASE 15 PHASE 16 STEP 5 PHASE 17 PHASE 18 PHASE 19 PHASE 20 STEP 6 PHASE 21 PHASE 22 PHASE 23 PHASE 24 STEP 7 PHASE 25 PHASE 26 PHASE 27 PHASE 28 STEP 8 PHASE 29 PHASE 30 PHASE 31 PHASE 32 DURATION 81.4 MINUTES PRESSURIZATION 0.2 BAR 0.2 BAR 0.2 BAR 0.4 BAR 0.7 BAR 1.1 BAR MAINTENANCE VACUUM ROTATION 4 TURNS RT 4 TURNS LT 4 TURNS RT 4 TURNS LT 4 TURNS RT 3 MINUTES ─ 0.15 BAR 3 MINUTES ─ 0.15 BAR 3 MINUTES ─ 0.15 BAR 3 MINUTES ─ 0.15 BAR 3 MINUTES ─ 0.15 BAR ─ 0.15 BAR ─ 0.15 BAR ─ 0.15 BAR 3 MINUTES 3 TURNS RT 1.4 BAR 3 MINUTES 3 TURNS LT 1.6 BAR Pag. 68/96 3 MINUTES 3 TURNS RT Use and Maintenance Manual for Pneumatic Membrane Presses PE-PF / PEC-PFC PROGRAM 3: DEPLETION STEP STEP 1 PHASE 1 PHASE 2 PHASE 3 PHASE 4 STEP 2 PHASE 5 PHASE 6 PHASE 7 PHASE 8 DURATION 32.1 MINUTES PRESSURIZATION 1.6 BAR MAINTENANCE VACUUM 3 MINUTES ─ 0.15 BAR 1.6 BAR 3 MINUTES ─ 0.15 BAR 3 TURNS LT PRESSURIZATION 1.6 BAR ROTATION 3 TURNS RT PROGRAM 4: STANDARD 1 STEP 1 PHASE 1 PHASE 2 PHASE 3 PHASE 4 Pag. 69/96 DURATION 18.1 MINUTES MAINTENANCE VACUUM 3 MINUTES ─ 0.15 BAR ROTATION 3 TURNS RT Use and Maintenance Manual for Pneumatic Membrane Presses PE-PF / PEC-PFC PROGRAM 5: STANDARD 2 STEP 1 PHASE 1 PHASE 2 PHASE 3 PHASE 4 STEP 2 PHASE 5 PHASE 6 PHASE 7 PHASE 8 STEP 3 PHASE 9 PHASE 10 PHASE 11 PHASE 12 STEP 4 PHASE 13 PHASE 14 PHASE 15 PHASE 16 STEP 5 PHASE 17 PHASE 18 PHASE 19 PHASE 20 STEP 6 PHASE 21 PHASE 22 PHASE 23 PHASE 24 STEP 7 PHASE 25 PHASE 26 PHASE 27 PHASE 28 STEP 8 PHASE 29 PHASE 30 PHASE 31 PHASE 32 STEP 9 PHASE 33 PHASE 34 PHASE 35 PHASE 36 STEP 10 PHASE 37 PHASE 38 PHASE 39 PHASE 40 STEP 11 PHASE 41 PHASE 42 PHASE 43 PRESSURIZATION 0.2 BAR DURATION 130.1 MINUTES MAINTENANCE VACUUM 3 MINUTES ─ 0.15 BAR ROTATION 4 TURNS RT 0.2 BAR 3 MINUTES ─ 0.15 BAR 4 TURNS LT 0.2 BAR ─ 0.15 BAR ─ 0.15 BAR ─ 0.15 BAR ─ 0.15 BAR ─ 0.15 BAR 3 MINUTES 4 TURNS LT 0.2 BAR 3 MINUTES 4 TURNS RT 0.4 BAR 3 MINUTES 4 TURNS RT 0.6 BAR 3 MINUTES 3 TURNS LT 0.8 BAR 3 MINUTES 3 TURNS LT ─ 0.15 BAR ─ 0.15 BAR ─ 0.15 BAR ─ 0.15 BAR 1.00 BAR 3 MINUTES 3 TURNS RT 1.4 BAR 3 MINUTES 3 TURNS LT 1.6 BAR 3 MINUTES 3 TURNS LT 1.6 BAR Pag. 70/96 3 MINUTES Use and Maintenance Manual for Pneumatic Membrane Presses PE-PF / PEC-PFC PHASE 44 STEP 12 PHASE 45 PHASE 46 PHASE 47 PHASE 48 3 TURNS RT 1.6 BAR Pag. 71/96 3 MINUTES ─ 0.15 BAR 3 TURNS RT Use and Maintenance Manual for Pneumatic Membrane Presses PE-PF / PEC-PFC PROGRAM 6: STANDARD 3 STEP 1 PHASE 1 PHASE 2 PHASE 3 PHASE 4 STEP 2 PHASE 5 PHASE 6 PHASE 7 PHASE 8 STEP 3 PHASE 9 PHASE 10 PHASE 11 PHASE 12 STEP 4 PHASE 13 PHASE 14 PHASE 15 PHASE 16 STEP 5 PHASE 17 PHASE 18 PHASE 19 PHASE 20 STEP 6 PHASE 21 PHASE 22 PHASE 23 PHASE 24 STEP 7 PHASE 25 PHASE 26 PHASE 27 PHASE 28 STEP 8 PHASE 29 PHASE 30 PHASE 31 PHASE 32 STEP 9 PHASE 33 PHASE 34 PHASE 35 PHASE 36 STEP 10 PHASE 37 PHASE 38 PHASE 39 PHASE 40 STEP 11 PHASE 41 PHASE 42 PHASE 43 PHASE 44 PRESSURIZATION 0.2 BAR DURATION 123.4 MINUTES MAINTENANCE VACUUM 3 MINUTES ─ 0.15 BAR ROTATION 4 TURNS RT 0.2 BAR 3 MINUTES ─ 0.15 BAR 4 TURNS LT 0.2 BAR ─ 0.15 BAR ─ 0.15 BAR ─ 0.15 BAR ─ 0.15 BAR ─ 0.15 BAR ─ 0.15 BAR ─ 0.15 BAR 3 MINUTES 4 TURNS RT 0.4 BAR 3 MINUTES 4 TURNS RT 0.6 BAR 3 MINUTES 4 TURNS LT 0.8 BAR 3 MINUTES 4 TURNS LT 1.0 BAR 3 MINUTES 4 TURNS RT 1.4 BAR 3 MINUTES 4 TURNS LT 1.6 BAR 3 MINUTES 4 TURNS LT 1.6 BAR 3 MINUTES ─ 0.15 BAR 4 TURNS RT 1.6 BAR Pag. 72/96 3 MINUTES ─ 0.15 BAR 4 TURNS RT Use and Maintenance Manual for Pneumatic Membrane Presses PE-PF / PEC-PFC PROGRAM 7: STANDARD 4 STEP 1 PHASE 1 PHASE 2 PHASE 3 PHASE 4 STEP 2 PHASE 5 PHASE 6 PHASE 7 PHASE 8 STEP 3 PHASE 9 PHASE 10 PHASE 11 PHASE 12 STEP 4 PHASE 13 PHASE 14 PHASE 15 PHASE 16 STEP 5 PHASE 17 PHASE 18 PHASE 19 PHASE 20 STEP 6 PHASE 21 PHASE 22 PHASE 23 PHASE 24 STEP 7 PHASE 25 PHASE 26 PHASE 27 PHASE 28 STEP 8 PHASE 29 PHASE 30 PHASE 31 PHASE 32 STEP 9 PHASE 33 PHASE 34 PHASE 35 PHASE 36 STEP 10 PHASE 37 PHASE 38 PHASE 39 PHASE 40 PRESSURIZATION 0.2 BAR DURATION 116.8 MINUTES MAINTENANCE VACUUM 3 MINUTES ─ 0.15 BAR ROTATION 3 TURNS RT 0.2 BAR 3 MINUTES ─ 0.15 BAR 3 TURNS LT 0.4 BAR ─ 0.15 BAR ─ 0.15 BAR ─ 0.15 BAR ─ 0.15 BAR 3 MINUTES 4 TURNS RT 0.6 BAR 3 MINUTES 4 TURNS LT 0.8 BAR 3 MINUTES 4 TURNS LT 1.0 BAR 3 MINUTES 4 TURNS RT ─ 0.15 BAR ─ 0.15 BAR ─ 0.15 BAR ─ 0.15 BAR 1.4 BAR 3 MINUTES 4 TURNS LT 1.6 BAR 3 MINUTES 4 TURNS LT 1.6 BAR 3 MINUTES 4 TURNS RT 1.6 BAR Pag. 73/96 3 MINUTES 4 TURNS RT Use and Maintenance Manual for Pneumatic Membrane Presses PE-PF / PEC-PFC PROGRAM 8: STANDARD 5 STEP 1 PHASE 1 PHASE 2 PHASE 3 PHASE 4 STEP 2 PHASE 5 PHASE 6 PHASE 7 PHASE 8 STEP 3 PHASE 9 PHASE 10 PHASE 11 PHASE 12 STEP 4 PHASE 13 PHASE 14 PHASE 15 PHASE 16 STEP 5 PHASE 17 PHASE 18 PHASE 19 PHASE 20 STEP 6 PHASE 21 PHASE 22 PHASE 23 PHASE 24 STEP 7 PHASE 25 PHASE 26 PHASE 27 PHASE 28 STEP 8 PHASE 29 PHASE 30 PHASE 31 PHASE 32 STEP 9 PHASE 33 PHASE 34 PHASE 35 PHASE 36 STEP 10 PHASE 37 PHASE 38 PHASE 39 PHASE 40 PRESSURIZATION 0.2 BAR DURATION 108.5 MINUTES MAINTENANCE VACUUM 3 MINUTES ─ 0.15 BAR ROTATION 3 TURNS RT 0.2 BAR 3 MINUTES ─ 0.15 BAR 3 TURNS LT 0.4 BAR ─ 0.15 BAR ─ 0.15 BAR ─ 0.15 BAR ─ 0.15 BAR ─ 0.15 BAR 3 MINUTES 4 TURNS RT 0.4 BAR 3 MINUTES 4 TURNS LT 0.6 BAR 3 MINUTES 4 TURNS LT 0.8 BAR 3 MINUTES 4 TURNS RT 1.0 BAR 3 MINUTES 4 TURNS LT ─ 0.15 BAR ─ 0.15 BAR ─ 0.15 BAR 1.4 BAR 3 MINUTES 4 TURNS LT 1.6 BAR 3 MINUTES 4 TURNS RT 1.6 BAR Pag. 74/96 3 MINUTES 4 TURNS RT Use and Maintenance Manual for Pneumatic Membrane Presses PE-PF / PEC-PFC PROGRAM 9: STANDARD 6 STEP 1 PHASE 1 PHASE 2 PHASE 3 PHASE 4 STEP 2 PHASE 5 PHASE 6 PHASE 7 PHASE 8 STEP 3 PHASE 9 PHASE 10 PHASE 11 PHASE 12 STEP 4 PHASE 13 PHASE 14 PHASE 15 PHASE 16 STEP 5 PHASE 17 PHASE 18 PHASE 19 PHASE 20 STEP 6 PHASE 21 PHASE 22 PHASE 23 PHASE 24 STEP 7 PHASE 25 PHASE 26 PHASE 27 PHASE 28 STEP 8 PHASE 29 PHASE 30 PHASE 31 PHASE 32 STEP 9 PHASE 33 PHASE 34 PHASE 35 PHASE 36 STEP 10 PHASE 37 PHASE 38 PHASE 39 PHASE 40 STEP 11 PHASE 41 PHASE 42 PHASE 43 PRESSURIZATION 0.2 BAR DURATION 134.9 MINUTES MAINTENANCE VACUUM 3 MINUTES ─ 0.15 BAR ROTATION 3 TURNS RT 0.2 BAR 3 MINUTES ─ 0.15 BAR 3 TURNS LT 0.2 BAR ─ 0.15 BAR ─ 0.15 BAR ─ 0.15 BAR 3 MINUTES 4 TURNS RT 0.2 BAR 3 MINUTES 4 TURNS LT 0.2 BAR 3 MINUTES 4 TURNS LT 0.5 BAR ─ 0.15 BAR ─ 0.15 BAR 3 MINUTES 4 TURNS LT 0.6 BAR 3 MINUTES 4 TURNS RT ─ 0.15 BAR ─ 0.15 BAR ─ 0.15 BAR ─ 0.15 BAR 0.8 BAR 3 MINUTES 4 TURNS RT 1.0 BAR 3 MINUTES 4 TURNS LT 1.2 BAR 3 MINUTES 4 TURNS RT 1.4 BAR Pag. 75/96 3 MINUTES 4 TURNS RT Use and Maintenance Manual for Pneumatic Membrane Presses PE-PF / PEC-PFC PHASE 44 STEP 12 PHASE 45 PHASE 46 PHASE 47 PHASE 48 STEP 13 PHASE 49 PHASE 50 PHASE 51 ─ 0.15 BAR ─ 0.15 BAR 1.6 BAR 3 MINUTES 4 TURNS LT 1.6 BAR Pag. 76/96 3 MINUTES 4 TURNS RT Use and Maintenance Manual for Pneumatic Membrane Presses PE-PF / PEC-PFC PROGRAM 10: STANDARD 7 STEP 1 PHASE 1 PHASE 2 PHASE 3 PHASE 4 STEP 2 PHASE 5 PHASE 6 PHASE 7 PHASE 8 STEP 3 PHASE 9 PHASE 10 PHASE 11 PHASE 12 STEP 4 PHASE 13 PHASE 14 PHASE 15 PHASE 16 STEP 5 PHASE 17 PHASE 18 PHASE 19 PHASE 20 STEP 6 PHASE 21 PHASE 22 PHASE 23 PHASE 24 STEP 7 PHASE 25 PHASE 26 PHASE 27 PHASE 28 STEP 8 PHASE 29 PHASE 30 PHASE 31 PHASE 32 STEP 9 PHASE 33 PHASE 34 PHASE 35 PHASE 36 STEP 10 PHASE 37 PHASE 38 PHASE 39 PHASE 40 STEP 11 PHASE 41 PHASE 42 PHASE 43 PRESSURIZATION 0.2 BAR DURATION 156.9 MINUTES MAINTENANCE VACUUM 3 MINUTES ─ 0.15 BAR ROTATION 3 TURNS RT 0.2 BAR 3 MINUTES ─ 0.15 BAR 3 TURNS LT 0.2 BAR ─ 0.15 BAR ─ 0.15 BAR ─ 0.15 BAR ─ 0.15 BAR ─ 0.15 BAR 3 MINUTES 3 TURNS RT 0.2 BAR 3 MINUTES 3 TURNS LT 0.4 BAR 3 MINUTES 4 TURNS RT 0.5 BAR 3 MINUTES 4 TURNS LT 0.75 BAR 3 MINUTES 4 TURNS RT ─ 0.15 BAR ─ 0.15 BAR ─ 0.15 BAR ─ 0.15 BAR 1.00 BAR 3 MINUTES 4 TURNS LT 1.00 BAR 3 MINUTES 4 TURNS RT 1.35 BAR 3 MINUTES 4 TURNS LT 1.6 BAR Pag. 77/96 3 MINUTES 4 TURNS LT Use and Maintenance Manual for Pneumatic Membrane Presses PE-PF / PEC-PFC PHASE 44 STEP 12 PHASE 45 PHASE 46 PHASE 47 PHASE 48 STEP 13 PHASE 49 PHASE 50 PHASE 51 PHASE 52 STEP 14 PHASE 53 PHASE 54 PHASE 55 PHASE 56 ─ 0.15 BAR ─ 0.15 BAR 1.6 BAR 3 MINUTES 4 TURNS RT 1.6 BAR 3 MINUTES 4 TURNS RT 1.6 BAR Pag. 78/96 3 MINUTES ─ 0.15 BAR 4 TURNS RT Use and Maintenance Manual for Pneumatic Membrane Presses PE-PF / PEC-PFC PROGRAM 11: STANDARD 8 STEP 1 PHASE 1 PHASE 2 PHASE 3 PHASE 4 STEP 2 PHASE 5 PHASE 6 PHASE 7 PHASE 8 STEP 3 PHASE 9 PHASE 10 PHASE 11 PHASE 12 STEP 4 PHASE 13 PHASE 14 PHASE 15 PHASE 16 STEP 5 PHASE 17 PHASE 18 PHASE 19 PHASE 20 STEP 6 PHASE 21 PHASE 22 PHASE 23 PHASE 24 STEP 7 PHASE 25 PHASE 26 PHASE 27 PHASE 28 STEP 8 PHASE 29 PHASE 30 PHASE 31 PHASE 32 STEP 9 PHASE 33 PHASE 34 PHASE 35 PHASE 36 STEP 10 PHASE 37 PHASE 38 PHASE 39 PHASE 40 STEP 11 PHASE 41 PHASE 42 PHASE 43 PRESSURIZATION 0.2 BAR DURATION 140.5 MINUTES MAINTENANCE VACUUM 3 MINUTES ─ 0.15 BAR 3 MINUTES ─ 0.15 BAR 3 TURNS LT 0.2 BAR 3 MINUTES ─ 0.15 BAR 3 TURNS RT 0.2 BAR ─ 0.15 BAR ─ 0.15 BAR ─ 0.15 BAR ─ 0.15 BAR 3 MINUTES 3 TURNS LT 0.4 BAR 3 MINUTES 4 TURNS RT 0.5 BAR 3 MINUTES 4 TURNS LT 0.75 BAR 3 MINUTES 4 TURNS RT ─ 0.15 BAR ─ 0.15 BAR ─ 0.15 BAR ─ 0.15 BAR 1.00 BAR 3 MINUTES 4 TURNS LT 1.00 BAR 3 MINUTES 4 TURNS RT 1.35 BAR 3 MINUTES 4 TURNS LT 1.6 BAR ROTATION 3 TURNS RT 0.2 BAR Pag. 79/96 3 MINUTES 4 TURNS LT Use and Maintenance Manual for Pneumatic Membrane Presses PE-PF / PEC-PFC PHASE 44 STEP 12 PHASE 45 PHASE 46 PHASE 47 1.6 BAR 3 MINUTES ─ 0.15 BAR Pag. 80/96 4 TURNS RT Use and Maintenance Manual for Pneumatic Membrane Presses PE-PF / PEC-PFC PROGRAM 12: STANDARD 9 STEP 1 PHASE 1 PHASE 2 PHASE 3 PHASE 4 STEP 2 PHASE 5 PHASE 6 PHASE 7 PHASE 8 STEP 3 PHASE 9 PHASE 10 PHASE 11 PHASE 12 STEP 4 PHASE 13 PHASE 14 PHASE 15 PHASE 16 STEP 5 PHASE 17 PHASE 18 PHASE 19 PHASE 20 STEP 6 PHASE 21 PHASE 22 PHASE 23 PHASE 24 STEP 7 PHASE 25 PHASE 26 PHASE 27 PHASE 28 STEP 8 PHASE 29 PHASE 30 PHASE 31 PHASE 32 STEP 9 PHASE 33 PHASE 34 PHASE 35 PHASE 36 STEP 10 PHASE 37 PHASE 38 PHASE 39 PHASE 40 PRESSURIZATION 0.2 BAR DURATION 119.5 MINUTES MAINTENANCE VACUUM 3 MINUTES ─ 0.15 BAR ─ 0.15 BAR ─ 0.15 BAR ─ 0.15 BAR ─ 0.15 BAR ─ 0.15 BAR 3 MINUTES 4 TURNS RT 0.5 BAR 3 MINUTES 4 TURNS LT 0.75 BAR 3 MINUTES 3 TURNS RT 0.9 BAR 3 MINUTES 4 TURNS RT 1.1 BAR 3 MINUTES 4 TURNS LT 1.3 BAR 3 MINUTES ─ 0.15 BAR 4 TURNS LT ─ 0.15 BAR ─ 0.15 BAR ─ 0.15 BAR 1.4 BAR 3 MINUTES 4 TURNS RT 1.6 BAR 3 MINUTES 4 TURNS RT 1.6 BAR ROTATION 3 TURNS RT 0.4 BAR Pag. 81/96 3 MINUTES 4 TURNS RT Use and Maintenance Manual for Pneumatic Membrane Presses PE-PF / PEC-PFC PROGRAM 13: STANDARD 10 STEP 1 PHASE 1 PHASE 2 PHASE 3 PHASE 4 STEP 2 PHASE 5 PHASE 6 PHASE 7 PHASE 8 STEP 3 PHASE 9 PHASE 10 PHASE 11 PHASE 12 STEP 4 PHASE 13 PHASE 14 PHASE 15 PHASE 16 STEP 5 PHASE 17 PHASE 18 PHASE 19 PHASE 20 STEP 6 PHASE 21 PHASE 22 PHASE 23 PHASE 24 STEP 7 PHASE 25 PHASE 26 PHASE 27 PHASE 28 STEP 8 PHASE 29 PHASE 30 PHASE 31 PHASE 32 STEP 9 PHASE 33 PHASE 34 PHASE 35 PHASE 36 STEP 10 PHASE 37 PHASE 38 PHASE 39 PHASE 40 PRESSURIZATION 0.2 BAR DURATION 119.5 MINUTES MAINTENANCE VACUUM 3 MINUTES ─ 0.15 BAR ─ 0.15 BAR ─ 0.15 BAR ─ 0.15 BAR ─ 0.15 BAR ─ 0.15 BAR 3 MINUTES 4 TURNS RT 0.5 BAR 3 MINUTES 4 TURNS LT 0.75 BAR 3 MINUTES 3 TURNS RT 0.9 BAR 3 MINUTES 4 TURNS RT 1.1 BAR 3 MINUTES 4 TURNS LT 1.3 BAR 3 MINUTES ─ 0.15 BAR 4 TURNS LT ─ 0.15 BAR ─ 0.15 BAR ─ 0.15 BAR 1.4 BAR 3 MINUTES 4 TURNS RT 1.6 BAR 3 MINUTES 4 TURNS RT 1.6 BAR ROTATION 3 TURNS RT 0.4 BAR Pag. 82/96 3 MINUTES 4 TURNS RT Use and Maintenance Manual for Pneumatic Membrane Presses PE-PF / PEC-PFC PROGRAM 14: STANDARD 11 STEP 1 PHASE 1 PHASE 2 PHASE 3 PHASE 4 STEP 2 PHASE 5 PHASE 6 PHASE 7 PHASE 8 STEP 3 PHASE 9 PHASE 10 PHASE 11 PHASE 12 STEP 4 PHASE 13 PHASE 14 PHASE 15 PHASE 16 STEP 5 PHASE 17 PHASE 18 PHASE 19 PHASE 20 STEP 6 PHASE 21 PHASE 22 PHASE 23 PHASE 24 STEP 7 PHASE 25 PHASE 26 PHASE 27 PHASE 28 STEP 8 PHASE 29 PHASE 30 PHASE 31 PHASE 32 STEP 9 PHASE 33 PHASE 34 PHASE 35 PHASE 36 STEP 10 PHASE 37 PHASE 38 PHASE 39 PHASE 40 PRESSURIZATION 0.2 BAR DURATION 119.5 MINUTES MAINTENANCE VACUUM 3 MINUTES ─ 0.15 BAR ─ 0.15 BAR ─ 0.15 BAR ─ 0.15 BAR ─ 0.15 BAR ─ 0.15 BAR 3 MINUTES 4 TURNS RT 0.5 BAR 3 MINUTES 4 TURNS LT 0.75 BAR 3 MINUTES 3 TURNS RT 0.9 BAR 3 MINUTES 4 TURNS RT 1.1 BAR 3 MINUTES 4 TURNS LT 1.3 BAR 3 MINUTES ─ 0.15 BAR 4 TURNS LT ─ 0.15 BAR ─ 0.15 BAR ─ 0.15 BAR 1.4 BAR 3 MINUTES 4 TURNS RT 1.6 BAR 3 MINUTES 4 TURNS RT 1.6 BAR ROTATION 3 TURNS RT 0.4 BAR Pag. 83/96 3 MINUTES 4 TURNS RT Use and Maintenance Manual for Pneumatic Membrane Presses PE-PF / PEC-PFC PROGRAM 15: STANDARD 12 STEP 1 PHASE 1 PHASE 2 PHASE 3 PHASE 4 STEP 2 PHASE 5 PHASE 6 PHASE 7 PHASE 8 STEP 3 PHASE 9 PHASE 10 PHASE 11 PHASE 12 STEP 4 PHASE 13 PHASE 14 PHASE 15 PHASE 16 STEP 5 PHASE 17 PHASE 18 PHASE 19 PHASE 20 STEP 6 PHASE 21 PHASE 22 PHASE 23 PHASE 24 STEP 7 PHASE 25 PHASE 26 PHASE 27 PHASE 28 STEP 8 PHASE 29 PHASE 30 PHASE 31 PHASE 32 STEP 9 PHASE 33 PHASE 34 PHASE 35 PHASE 36 STEP 10 PHASE 37 PHASE 38 PHASE 39 PHASE 40 PRESSURIZATION 0.2 BAR DURATION 119.5 MINUTES MAINTENANCE VACUUM 3 MINUTES ─ 0.15 BAR ─ 0.15 BAR ─ 0.15 BAR ─ 0.15 BAR ─ 0.15 BAR ─ 0.15 BAR 3 MINUTES 4 TURNS RT 0.5 BAR 3 MINUTES 4 TURNS LT 0.75 BAR 3 MINUTES 3 TURNS RT 0.9 BAR 3 MINUTES 4 TURNS RT 1.1 BAR 3 MINUTES 4 TURNS LT 1.3 BAR 3 MINUTES ─ 0.15 BAR 4 TURNS LT ─ 0.15 BAR ─ 0.15 BAR ─ 0.15 BAR 1.4 BAR 3 MINUTES 4 TURNS RT 1.6 BAR 3 MINUTES 4 TURNS RT 1.6 BAR ROTATION 3 TURNS RT 0.4 BAR Pag. 84/96 3 MINUTES 4 TURNS RT Use and Maintenance Manual for Pneumatic Membrane Presses PE-PF / PEC-PFC PROGRAM 16: STANDARD 13 STEP 1 PHASE 1 PHASE 2 PHASE 3 PHASE 4 STEP 2 PHASE 5 PHASE 6 PHASE 7 PHASE 8 STEP 3 PHASE 9 PHASE 10 PHASE 11 PHASE 12 STEP 4 PHASE 13 PHASE 14 PHASE 15 PHASE 16 STEP 5 PHASE 17 PHASE 18 PHASE 19 PHASE 20 STEP 6 PHASE 21 PHASE 22 PHASE 23 PHASE 24 STEP 7 PHASE 25 PHASE 26 PHASE 27 PHASE 28 STEP 8 PHASE 29 PHASE 30 PHASE 31 PHASE 32 STEP 9 PHASE 33 PHASE 34 PHASE 35 PHASE 36 STEP 10 PHASE 37 PHASE 38 PHASE 39 PHASE 40 PRESSURIZATION 0.2 BAR DURATION 119.5 MINUTES MAINTENANCE VACUUM 3 MINUTES ─ 0.15 BAR ─ 0.15 BAR ─ 0.15 BAR ─ 0.15 BAR ─ 0.15 BAR ─ 0.15 BAR 3 MINUTES 4 TURNS RT 0.5 BAR 3 MINUTES 4 TURNS LT 0.75 BAR 3 MINUTES 3 TURNS RT 0.9 BAR 3 MINUTES 4 TURNS RT 1.1 BAR 3 MINUTES 4 TURNS LT 1.3 BAR 3 MINUTES ─ 0.15 BAR 4 TURNS LT ─ 0.15 BAR ─ 0.15 BAR ─ 0.15 BAR 1.4 BAR 3 MINUTES 4 TURNS RT 1.6 BAR 3 MINUTES 4 TURNS RT 1.6 BAR ROTATION 3 TURNS RT 0.4 BAR Pag. 85/96 3 MINUTES 4 TURNS RT Use and Maintenance Manual for Pneumatic Membrane Presses PE-PF / PEC-PFC PROGRAM 17: STANDARD 14 STEP 1 PHASE 1 PHASE 2 PHASE 3 PHASE 4 STEP 2 PHASE 5 PHASE 6 PHASE 7 PHASE 8 STEP 3 PHASE 9 PHASE 10 PHASE 11 PHASE 12 STEP 4 PHASE 13 PHASE 14 PHASE 15 PHASE 16 STEP 5 PHASE 17 PHASE 18 PHASE 19 PHASE 20 STEP 6 PHASE 21 PHASE 22 PHASE 23 PHASE 24 STEP 7 PHASE 25 PHASE 26 PHASE 27 PHASE 28 STEP 8 PHASE 29 PHASE 30 PHASE 31 PHASE 32 STEP 9 PHASE 33 PHASE 34 PHASE 35 PHASE 36 STEP 10 PHASE 37 PHASE 38 PHASE 39 PHASE 40 PRESSURIZATION 0.2 BAR DURATION 119.5 MINUTES MAINTENANCE VACUUM 3 MINUTES ─ 0.15 BAR ─ 0.15 BAR ─ 0.15 BAR ─ 0.15 BAR ─ 0.15 BAR ─ 0.15 BAR 3 MINUTES 4 TURNS RT 0.5 BAR 3 MINUTES 4 TURNS LT 0.75 BAR 3 MINUTES 3 TURNS RT 0.9 BAR 3 MINUTES 4 TURNS RT 1.1 BAR 3 MINUTES 4 TURNS LT 1.3 BAR 3 MINUTES ─ 0.15 BAR 4 TURNS LT ─ 0.15 BAR ─ 0.15 BAR ─ 0.15 BAR 1.4 BAR 3 MINUTES 4 TURNS RT 1.6 BAR 3 MINUTES 4 TURNS RT 1.6 BAR ROTATION 3 TURNS RT 0.4 BAR Pag. 86/96 3 MINUTES 4 TURNS RT Use and Maintenance Manual for Pneumatic Membrane Presses PE-PF / PEC-PFC PROGRAM 18: CHAMPAGNE 1 STEP 1 PHASE 1 PRESSURIZATION STEP 0.2 BAR 0.4 BAR 0.6 BAR 0.8 BAR 1.0 BAR PHASE 2 PHASE 3 STEP 2 PHASE 4 PHASE 5 PHASE 6 STEP 3 PHASE 7 PHASE 8 PHASE 9 STEP 4 PHASE 10 PHASE 11 PHASE 12 STEP 5 PHASE 13 PHASE 14 PHASE 15 STEP 6 PHASE 16 PHASE 17 DURATION 320.1 MINUTES MAINTENANCE VACUUM 4 MINUTES 4 MINUTES 4 MINUTES 4 MINUTES 4 MINUTES ROTATION ─ 0.15 BAR ─ 0.15 BAR 2 TURNS RT 0.2 BAR 0.4 BAR 0.6 BAR 0.8 BAR 1.0 BAR 4 MINUTES 4 MINUTES 4 MINUTES 4 MINUTES 4 MINUTES 2 TURNS LT 0.2 BAR 0.4 BAR 0.6 BAR 0.8 BAR 1.0 BAR 1.2 BAR 4 MINUTES 4 MINUTES 4 MINUTES 4 MINUTES 4 MINUTES 4 MINUTES ─ 0.15 BAR 3 TURNS RT 0.2 BAR 0.4 BAR 0.6 BAR 0.8 BAR 1.0 BAR 1.2 BAR 4 MINUTES 4 MINUTES 4 MINUTES 4 MINUTES 4 MINUTES 4 MINUTES ─ 0.15 BAR 3 TURNS LT 0.2 BAR 0.4 BAR 0.6 BAR 0.8 BAR 1.0 BAR 1.2 BAR 1.4 BAR 4 MINUTES 4 MINUTES 4 MINUTES 4 MINUTES 4 MINUTES 4 MINUTES 4 MINUTES ─ 0.15 BAR 4 TURNS RT 0.2 BAR 0.4 BAR 0.6 BAR 0.8 BAR 1.0 BAR 1.2 BAR 1.4 BAR Pag. 87/96 4 MINUTES 4 MINUTES 4 MINUTES 4 MINUTES 4 MINUTES 4 MINUTES 4 MINUTES ─ 0.15 BAR 4 TURNS LT Use and Maintenance Manual for Pneumatic Membrane Presses PE-PF / PEC-PFC STEP 7 PHASE 18 PHASE 19 PHASE 20 STEP 8 PHASE 21 PHASE 22 PHASE 23 0.2 BAR 0.4 BAR 0.6 BAR 0.8 BAR 1.0 BAR 1.2 BAR 1.4 BAR 4 MINUTES 4 MINUTES 4 MINUTES 4 MINUTES 4 MINUTES 4 MINUTES 4 MINUTES ─ 0.15 BAR 4 TURNS RT 0.2 BAR 0.4 BAR 0.6 BAR 0.8 BAR 1.0 BAR 1.2 BAR 1.4 BAR Pag. 88/96 4 MINUTES 4 MINUTES 4 MINUTES 4 MINUTES 4 MINUTES 4 MINUTES 4 MINUTES ─ 0.15 BAR 4 TURNS LT Use and Maintenance Manual for Pneumatic Membrane Presses PE-PF / PEC-PFC PROGRAM 19: CHAMPAGNE 2 STEP 1 PHASE 1 PRESSURIZATION STEP 0.2 BAR 0.4 BAR 0.6 BAR 0.8 BAR 1.0 BAR 1.2 BAR PHASE 2 PHASE 3 STEP 2 PHASE 4 PHASE 5 PHASE 6 STEP 3 PHASE 7 PHASE 8 PHASE 9 STEP 4 PHASE 10 PHASE 11 PHASE 12 STEP 5 PHASE 13 PHASE 14 PHASE 15 STEP 6 Pag. 89/96 DURATION 433.7 MINUTES MAINTENANCE VACUUM 4 MINUTES 4 MINUTES 4 MINUTES 4 MINUTES 4 MINUTES 4 MINUTES ROTATION ─ 0.15 BAR ─ 0.15 BAR 2 TURNS RT 0.2 BAR 0.4 BAR 0.6 BAR 0.8 BAR 1.0 BAR 1.2 BAR 4 MINUTES 4 MINUTES 4 MINUTES 4 MINUTES 4 MINUTES 4 MINUTES 2 TURNS LT 0.2 BAR 0.4 BAR 0.6 BAR 0.8 BAR 1.0 BAR 1.2 BAR 1.4 BAR 4 MINUTES 4 MINUTES 4 MINUTES 4 MINUTES 4 MINUTES 4 MINUTES 4 MINUTES ─ 0.15 BAR 3 TURNS LT 0.2 BAR 0.4 BAR 0.6 BAR 0.8 BAR 1.0 BAR 1.2 BAR 1.4 BAR 4 MINUTES 4 MINUTES 4 MINUTES 4 MINUTES 4 MINUTES 4 MINUTES 4 MINUTES ─ 0.15 BAR 3 TURNS RT 0.2 BAR 0.4 BAR 0.6 BAR 0.8 BAR 1.0 BAR 1.2 BAR 1.4 BAR 4 MINUTES 4 MINUTES 4 MINUTES 4 MINUTES 4 MINUTES 4 MINUTES 4 MINUTES ─ 0.15 BAR 3 TURNS LT 0.2 BAR 0.4 BAR 0.6 BAR 0.8 BAR 1.0 BAR 4 MINUTES 4 MINUTES 4 MINUTES 4 MINUTES 4 MINUTES Use and Maintenance Manual for Pneumatic Membrane Presses PE-PF / PEC-PFC PHASE 16 PHASE 17 STEP 7 PHASE 18 PHASE 19 PHASE 20 STEP 8 PHASE 21 PHASE 22 PHASE 23 STEP 9 PHASE 24 PHASE 25 PHASE 26 1.2 BAR 1.4 BAR 1.6 BAR 4 MINUTES 4 MINUTES 4 MINUTES ─ 0.15 BAR 4 TURNS RT 0.2 BAR 0.4 BAR 0.6 BAR 0.8 BAR 1.0 BAR 1.2 BAR 1.4 BAR 1.6 BAR 4 MINUTES 4 MINUTES 4 MINUTES 4 MINUTES 4 MINUTES 4 MINUTES 4 MINUTES 4 MINUTES ─ 0.15 BAR 4 TURNS LT 0.2 BAR 0.4 BAR 0.6 BAR 0.8 BAR 1.0 BAR 1.2 BAR 1.4 BAR 1.6 BAR 4 MINUTES 4 MINUTES 4 MINUTES 4 MINUTES 4 MINUTES 4 MINUTES 4 MINUTES 4 MINUTES ─ 0.15 BAR 4 TURNS RT 0.2 BAR 0.4 BAR 0.6 BAR 0.8 BAR 1.0 BAR 1.2 BAR 1.4 BAR 1.6 BAR Pag. 90/96 4 MINUTES 4 MINUTES 4 MINUTES 4 MINUTES 4 MINUTES 4 MINUTES 4 MINUTES 4 MINUTES ─ 0.15 BAR 4 TURNS RT Use and Maintenance Manual for Pneumatic Membrane Presses PE-PF / PEC-PFC PROGRAM 20: CHAMPAGNE 3 STEP 1 PHASE 1 PRESSURIZATION STEP 0.2 BAR 0.4 BAR 0.6 BAR 0.8 BAR PHASE 2 PHASE 3 STEP 2 PHASE 4 PHASE 5 PHASE 6 STEP 3 PHASE 7 PHASE 8 PHASE 9 STEP 4 PHASE 10 PHASE 11 PHASE 12 STEP 5 PHASE 13 PHASE 14 PHASE 15 STEP 6 PHASE 16 PHASE 17 DURATION 277.3 MINUTES MAINTENANCE VACUUM 4 MINUTES 4 MINUTES 4 MINUTES 4 MINUTES ROTATION ─ 0.15 BAR 2 TURNS RT 0.2 BAR 0.4 BAR 0.6 BAR 0.8 BAR 4 MINUTES 4 MINUTES 4 MINUTES 4 MINUTES ─ 0.15 BAR 2 TURNS LT 0.2 BAR 0.4 BAR 0.6 BAR 0.8 BAR 1.0 BAR 1.2 BAR 4 MINUTES 4 MINUTES 4 MINUTES 4 MINUTES 4 MINUTES 4 MINUTES ─ 0.15 BAR 3 TURNS LT 0.2 BAR 0.4 BAR 0.6 BAR 0.8 BAR 1.0 BAR 1.2 BAR 4 MINUTES 4 MINUTES 4 MINUTES 4 MINUTES 4 MINUTES 4 MINUTES ─ 0.15 BAR 3 TURNS RT 0.2 BAR 0.4 BAR 0.6 BAR 0.8 BAR 1.0 BAR 1.2 BAR 1.4 BAR 1.6 BAR 4 MINUTES 4 MINUTES 4 MINUTES 4 MINUTES 4 MINUTES 4 MINUTES 4 MINUTES 4 MINUTES ─ 0.15 BAR 4 TURNS LT 0.2 BAR 0.4 BAR 0.6 BAR 0.8 BAR 1.0 BAR 1.2 BAR 1.4 BAR 1.6 BAR Pag. 91/96 4 MINUTES 4 MINUTES 4 MINUTES 4 MINUTES 4 MINUTES 4 MINUTES 4 MINUTES 4 MINUTES ─ 0.15 BAR 4 TURNS RT Use and Maintenance Manual for Pneumatic Membrane Presses PE-PF / PEC-PFC STEP 7 PHASE 18 PHASE 19 PHASE 20 STEP 8 PHASE 21 PHASE 22 PHASE 23 0.2 BAR 0.4 BAR 0.6 BAR 0.8 BAR 1.0 BAR 1.2 BAR 1.4 BAR 1.6 BAR 4 MINUTES 4 MINUTES 4 MINUTES 4 MINUTES 4 MINUTES 4 MINUTES 4 MINUTES 4 MINUTES ─ 0.15 BAR 4 TURNS LT 0.2 BAR 0.4 BAR 0.6 BAR 0.8 BAR 1.0 BAR 1.2 BAR 1.4 BAR 1.6 BAR Pag. 92/96 4 MINUTES 4 MINUTES 4 MINUTES 4 MINUTES 4 MINUTES 4 MINUTES 4 MINUTES 4 MINUTES ─ 0.15 BAR 4 TURNS RT Use and Maintenance Manual for Pneumatic Membrane Presses PE-PF / PEC-PFC PROGRAM 21: ROSSO Pag. 93/96 DURATION 92.7 MINUTES (NOT MODIFIABLE) STEP 1 PHASE 1 PHASE 2 PHASE 3 PHASE 4 STEP 2 PHASE 5 PHASE 6 PHASE 7 PHASE 8 STEP 3 PHASE 9 PHASE 10 PHASE 11 PHASE 12 STEP 4 PHASE 13 PHASE 14 PHASE 15 PHASE 16 STEP 5 PHASE 17 PHASE 18 PHASE 19 PHASE 20 STEP 6 PHASE 21 PHASE 22 PHASE 23 PHASE 24 STEP 7 PHASE 25 PHASE 26 PHASE 27 PHASE 28 STEP 8 PHASE 29 PHASE 30 PHASE 31 PHASE 32 STEP 9 PHASE 33 PHASE 34 PHASE 35 PHASE 36 PRESSURIZATION 0.2 BAR 0.2 BAR 0.2 BAR 0.4 BAR 0.6 BAR 0.9 BAR MAINTENANCE VACUUM 3 MINUTES ─ 0.15 BAR 3 MINUTES ─ 0.15 BAR 3 MINUTES ─ 0.15 BAR 3 MINUTES ─ 0.15 BAR 3 MINUTES ─ 0.15 BAR ─ 0.15 BAR ─ 0.15 BAR 3 MINUTES 3 TURNS RT 1.2 BAR 3 MINUTES 3 TURNS LT 1.4 BAR 3 MINUTES ─ 0.15 BAR 3 TURNS RT 1.6 BAR ROTATION 4 TURNS RT 4 TURNS LT 4 TURNS RT 4 TURNS LT 4 TURNS RT 3 MINUTES ─ 0.15 BAR 3 TURNS RT Use and Maintenance Manual for Pneumatic Membrane Presses PE-PF / PEC-PFC PROGRAM 22: WHITE Pag. 94/96 DURATION 81.4 MINUTES (NOT MODIFIABLE) STEP 1 PHASE 1 PHASE 2 PHASE 3 PHASE 4 STEP 2 PHASE 5 PHASE 6 PHASE 7 PHASE 8 STEP 3 PHASE 9 PHASE 10 PHASE 11 PHASE 12 STEP 4 PHASE 13 PHASE 14 PHASE 15 PHASE 16 STEP 5 PHASE 17 PHASE 18 PHASE 19 PHASE 20 STEP 6 PHASE 21 PHASE 22 PHASE 23 PHASE 24 STEP 7 PHASE 25 PHASE 26 PHASE 27 PHASE 28 STEP 8 PHASE 29 PHASE 30 PHASE 31 PHASE 32 PRESSURIZATION 0.2 BAR 0.2 BAR 0.2 BAR 0.4 BAR 0.7 BAR 1.1 BAR MAINTENANCE VACUUM 3 MINUTES ─ 0.15 BAR 3 MINUTES ─ 0.15 BAR 3 MINUTES ─ 0.15 BAR 3 MINUTES ─ 0.15 BAR 3 MINUTES ─ 0.15 BAR ─ 0.15 BAR ─ 0.15 BAR 3 MINUTES 3 TURNS RT 1.4 BAR 3 MINUTES 3 TURNS LT 1.6 BAR ROTATION 4 TURNS RT 4 TURNS LT 4 TURNS RT 4 TURNS LT 4 TURNS RT 3 MINUTES ─ 0.15 BAR 3 TURNS RT Use and Maintenance Manual for Pneumatic Membrane Presses PE-PF / PEC-PFC PROGRAM 23: CHAMPAGNE Pag. 95/96 DURATION 277.3 MINUTES (NOT MODIFIABLE) STEP 1 PHASE 1 PRESSURIZATION STEP 0.2 BAR 0.4 BAR 0.6 BAR 0.8 BAR PHASE 2 PHASE 3 STEP 2 PHASE 4 PHASE 5 PHASE 6 STEP 3 PHASE 7 PHASE 8 PHASE 9 STEP 4 PHASE 10 PHASE 11 PHASE 12 STEP 5 PHASE 13 PHASE 14 PHASE 15 STEP 6 PHASE 16 MAINTENANCE 4 MINUTES 4 MINUTES 4 MINUTES 4 MINUTES ROTATION ─ 0.15 BAR 2 TURNS RT 0.2 BAR 0.4 BAR 0.6 BAR 0.8 BAR 4 MINUTES 4 MINUTES 4 MINUTES 4 MINUTES ─ 0.15 BAR 2 TURNS LT 0.2 BAR 0.4 BAR 0.6 BAR 0.8 BAR 1.0 BAR 1.2 BAR 4 MINUTES 4 MINUTES 4 MINUTES 4 MINUTES 4 MINUTES 4 MINUTES ─ 0.15 BAR 3 TURNS LT 0.2 BAR 0.4 BAR 0.6 BAR 0.8 BAR 1.0 BAR 1.2 BAR 4 MINUTES 4 MINUTES 4 MINUTES 4 MINUTES 4 MINUTES 4 MINUTES ─ 0.15 BAR 3 TURNS RT 0.2 BAR 0.4 BAR 0.6 BAR 0.8 BAR 1.0 BAR 1.2 BAR 1.4 BAR 1.6 BAR 4 MINUTES 4 MINUTES 4 MINUTES 4 MINUTES 4 MINUTES 4 MINUTES 4 MINUTES 4 MINUTES ─ 0.15 BAR 4 TURNS LT 0.2 BAR 0.4 BAR 0.6 BAR 0.8 BAR 1.0 BAR 1.2 BAR 1.4 BAR 1.6 BAR VACUUM 4 MINUTES 4 MINUTES 4 MINUTES 4 MINUTES 4 MINUTES 4 MINUTES 4 MINUTES 4 MINUTES ─ 0.15 BAR Use and Maintenance Manual for Pneumatic Membrane Presses PE-PF / PEC-PFC PHASE 17 STEP 7 PHASE 18 PHASE 19 PHASE 20 STEP 8 PHASE 21 PHASE 22 PHASE 23 4 TURNS RT 0.2 BAR 0.4 BAR 0.6 BAR 0.8 BAR 1.0 BAR 1.2 BAR 1.4 BAR 1.6 BAR 4 MINUTES 4 MINUTES 4 MINUTES 4 MINUTES 4 MINUTES 4 MINUTES 4 MINUTES 4 MINUTES ─ 0.15 BAR 4 TURNS LT 0.2 BAR 0.4 BAR 0.6 BAR 0.8 BAR 1.0 BAR 1.2 BAR 1.4 BAR 1.6 BAR Pag. 96/96 4 MINUTES 4 MINUTES 4 MINUTES 4 MINUTES 4 MINUTES 4 MINUTES 4 MINUTES 4 MINUTES ─ 0.15 BAR 4 TURNS RT IT I dati contenuti in questa pubblicazione sono forniti a titolo indicativo ed espressi in forma sintetica. La Della Toffola S.p.A potrà apportarvi in qualunque momento eventuali modifiche motivate dalle normali pratiche di sviluppo tecnologico e commerciale, senza peraltro alterare le caratteristiche essenziali del prodotto. Le istruzioni vengono redatte in lingua Italiana e quindi tradotte nella lingua richiesta dal Cliente. Tali traduzioni vengono eseguite con la dovuta diligenza, e fornite poi al Cliente con le riserve di prassi. La Della Toffola S.p.A. non fornisce alcuna garanzia sulle traduzioni realizzate da essa stessa o per suo conto. Viene riconosciuta come ufficiale la versione aggiornata della pubblicazione in lingua Italiana. Per eventuali informazioni il Cliente può contattare la Rete di Assistenza o direttamente la Della Toffola S.p.A. © Della Toffola S.p.A. - Tutti i diritti sono riservati EN The information contained in this publication is provided for use solely as a guideline, and is intended as a brief summary. Della Toffola S.p.A. may make changes at any time based on normal technological and commercial development, without thereby altering the essential features of the product. The instructions are originally written in Italia and then translated into the language requested by the customer. These translations are carried out with due diligence and supplied to the customer with all due reservations. Della Toffola S.p.A. does not offer any guarantee on the translations performed in-house or on its behalf. The updated version of the publication in Italian shall be considered the official document. For any further information, the customer may contact the Service network or Della Toffola S.p.A. Directly. © Della Toffola S.p.A. - All rights reserved DE Die in der vorliegenden Veröffentlichung enthaltenen Daten sind unverbindlich und in gekürzter Form wiedergegeben. Die Firma Della Toffola S.p.A. behält sich das Recht vor, diese Daten jederzeit im Zuge der technischen Weiterentwicklung oder aus kommerziellen Gründen zu modifizieren, ohne allerdings die wesentlichen Eigenschaften des Produkts zu verändern. Die Anleitungen werden in italienischer Sprache verfaßt und anschließend in die vom Kunden gewünschte Sprache übersetzt. Diese Übersetzungen werden mit der gebührenden Sorgfalt ausgeführt und dem Kunden mit den üblichen Vorbehalten zur Verfügung gestellt. Die Firma Della Toffola S.p.A. haftet nicht für die im eigenen Haus oder in ihrem Auftrag ausgeführten Übersetzungen. Offizielle Gültigkeit hat die überarbeitete Version der Veröffentlichung in italienischer Sprache. Für weitere Informationen wenden Sie sich bitte an eine Kundendienststelle oder direkt an Della Toffola S.p.A. © Della Toffola S.p.A. - Alle Rechte vorbehalten. FR Les données figurant dans cette publication sont fournies à titre indicatif et exprimé es en forme synthétique. Della Toffola S.p.A. pourra en tout moment apporter des modifications éventuelles suite au développement technologique et commercial, sans pour cela altérer les caractéristiques essentielles du produit. Les instructions sont rédigées en langue italienne et ensuite traduites dans la langue demandée par le Client. Les traductions sont effectuées avec diligence et fournies au Client sous toutes réserves. Della Toffola S.p.A. ne fournit aucune garantie sur les traductions effectuées à son intérieur ou pour son compte. La version mise à jour de la publication en langue italienne est considérée la version officielle. Pour tout renseignement, le Client peut contacter le Réseau de Service après-vente ou directement la société Della Toffola S.p.A. © Della Toffola S.p.A. - Tous droits réservés. ES Los datos contenidos en esta publicación son sólo indicativos y están expresados de una forma sintética, Della Toffola S.p.A. podrá modificarlos en cualquier momento, debido a normales prácticas de desarrollo tecnológico y comercial, sin que ello altere las características esenciales del producto. Las instrucciones se redactan en italiano y luego se traducen al idioma pedido por el Cliente. Las traducciones se efectúan con el máximo esmero, pero son entregadas al Cliente con las normales reservas de estos casos. Della Toffola S.p.A. no presta ninguna garantía sobre las traducciones realizadas por la empresa misma o por su cuenta. Se reconoce como oficial la versión actualizada de la publicación en italiano. Para más información, el Cliente puede dirigirse a la Red de Asistencia o directamente a Della Toffola S.pA. © Della Toffola S.p.A. - Reservados todos los derechos N° di Matricola - Serial Number Seriennummer - N° de Matricule N° de Matrícula SERVIZIO ASSISTENZA Per qualunque richiesta di informazioni, interventi etc. è sempre necessario comunicare il NUMERO DI MATRICOLA della macchina. Non è possibile fornire istruzioni precise o programmare interventi senza che sia fornito questo dato. Il numero di matricola è anche stampigliato su una apposita targhetta fissata sulla macchina. ASSISTANCE SERVICE For any request regarding information, service, etc., it is always necessary to indicate the SERIAL NUMBER of the machine. It is not possible to provide precise instructions or schedule servicing unless this information is communicated. The serial number is printed on the plate fixed to the machine, too. KUNDENDIENST Bei allen Anfragen um Informationen, Eingriffe usw. stets die SERIENNUMMER der Maschine angeben. Ohne diese Angabe können keine exakten Informationen geliefert und keine Eingriffe geplant werden. Die Seriennummer ist auch dem Typenschild auf der Maschine zu entnehmen. SERVICE ASSISTANCE Pour toute demande d'informations, d'interventions, etc., il faut toujours indiquer le NUMERO DE MATRICULE de la machine. Il est impossible de fournir des instructions précises ou de programmer des interventions sans cette donnée. Le numéro de matricule est estampillé aussi sur la plaquette fixée sur la machine. SERVICIO DE ASISTENCIA Para cualquier solicitud de información, de intervenciones u otros servicios, indicar siempre el NÚMERO DE MATRÍCULA de la máquina. Es imposible suministrar indicaciones precisas o programar intervenciones sin este dato. El número de matrícula se encuentra impreso también en una placa especial aplicada a la máquina. DELLA TOFFOLA S.p.A. Via Feltrina, 72 31040 SIGNORESSA DI TREVIGNANO (TREVISO) ITALY 800-803276 Tel. +39 0423 6772 Internet: www.dellatoffola.it e-mail: [email protected] Fax +39 0423 670 841 Direzione - Uffici Commerciali Ufficio Amministrazione +39 0423 679 196 Ufficio Tecnico +39 0423 670 491 Ufficio Acquisti