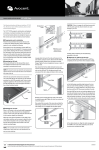
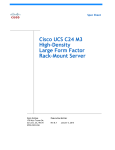
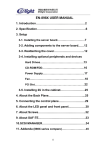
1
FORMAL REPORT THE CLOAK AND DAGGER The development of a lightweight security testing tool using off the shelf hardware and software. Prepared by: Taylor Kraft, Tyler Hellard, Zachary Preece September 2013 - April 2014 TABLE OF CONTENTS Executive Summary .......................................................................... ............................... ........2 Project Vision .............................................................................................................................3 Project Opportunity ....................................................................................................................4 Project Objectives ......................................................................................................................4 Project Team and Stakeholders ................................................................................................5 Project Scope ............................................................................................................................6 Project Acknowledgements .......................................................................................................7 Project Budget ...........................................................................................................................8 Project Result ............................................................................................................................9 Lessons Learned ..................................................................................................................... 10 Achievements .......................................................................................................................... 12 Project Recommendations ....................................................................................................... 13 Conclusion ............................................................................................................................... 14 References .............................................................................................................................. 15 Appendix A – Glossary of Terms ............................................................................................. 17 Appendix B - Linux Installation Instructions ............................................................................. 18 Appendix C – MacBook Air Disassembly and Re-assembly Instructions ................................. 21 Appendix D – Wi-Fi Monitoring and Password Retrieval Instructions ...................................... 40 Appendix E – Server Hardening Instructions ........................................................................... 44 Appendix F – Detailed Budget ................................................................................................. 49 Appendix G – User Manual ...................................................................................................... 53 1 EXECUTIVE SUMMARY The contents of this document outline the vision and goals of our four month final ITCS project at SAIT, The Cloak and Dagger: A low cost wireless penetration tester. The project will be completed by Cloak and Dagger, a team composed of three team members: Tyler Hellard, Zachary Preece and Taylor Kraft. The source of this project came about as a need of Ted Hellard and AppColony for a low profile and inexpensive way to test their security. We also were asked to take a look at it from a business perspective, as a product for possible future development for the small/medium business market. With it being inexpensive to create, it will give companies a cheaper alternative to IT security. The manufacturing of this project will require the skills and techniques that were learned through the Information Technology Computer Systems program (which includes categories such as programming, networking, system administration, hardware integration, server and database administration, and information security) and will therefore will be the scope of the project. The development of The Cloak and Dagger will cost approximately $97,279.49, between the hardware and software costs, as well as the projected labour costs from the Gantt chart. The labour costs will be the major component of the budget with it being approximately $90,554.00 between the three of us. The hardware will be approximately $5801.39 and software is the least expensive component being approximately $924.10. Upon completion of the project, The Cloak and Dagger will present the final deliverable to the SAIT instructors, our clients/sponsors, the general public and the Information Technology Computer Systems Capstone Project Showcase. 2 PROJECT VISION Our project vision is one of providing security and peace of mind to both medium and small business enterprises. These businesses have traditionally either been ignored by the larger security market or have neglected to develop a security plan. The security of our personal and corporate information is becoming more and more important each and every day. We see an opportunity to develop a combination of products that will determine the social and technological vulnerabilities of our client(s). This will be a lightweight, low cost penetration tool and a hardened server installation. This will allow these corporations and businesses to satisfy coming legal and societal requirements for the protection of data. The first deliverable will be a lightweight and low cost penetration tool. This will be used to gather the wireless connection information of our client. This information will then be used to discover the password of the wireless network and gain access. The tool will then be used to run several scans to gather data on the vulnerabilities present on the network. This data will then be used to create a report for the client detailing the vulnerabilities on their network. The second deliverable will be a hardened server installation. The purpose of this deliverable will be to show our client(s) how to begin protecting themselves from security breaches along with giving us a demonstration target. The process of hardening the server will be documented in minute detail. The server will then be tested by using the first half of the project to test the security of the network and the strength of the installation. The server and documentation would then be used by a client as a template for hardening their own server equipment. 3 PROJECT OPPORTUNITY There is a large discrepancy between the security capabilities and knowledge of small/medium businesses when they are compared to large multi-national corporations. This causes the personal information of their clients to be more vulnerable to theft or destruction. It also means they may fail to meet their legal and social obligations in regards to the information. This problem is not one that can be solved by a singular approach. It will require a twopronged approach that will create two physical deliverables. The first will be a Linux based network penetration testing tool. This will allow us to identify the wireless and network vulnerabilities. This information will then be used to prepare a report detailing these vulnerabilities and suggestions to fix them. The second will be a hardened Linux server. This will be used to demonstrate a fully functional hardened server. It will also be used to prepare a document detailing the steps to harden the server. The client can then use these steps to develop a process to harden their own infrastructure. There is currently little technology like this outside of SAIT polytechnic that focuses on small to medium business markets. We see the small to medium markets more vulnerable with the lack of money available to them for security purposes; this will provide them with an easy understanding as well with a very economical solution for their security needs. This project can be completed and maintained without a large sum of money. The initiation of the project is based on a desire to see it being implemented as a starting ground for smaller companies to get a head start on their computer security. PROJECT OBJECTIVES There are several requirements’ that must be met for this opportunity that must be covered: The attack machine must be hidden and capable of remaining undetected in a crowded public area. The attack machine must be capable of gathering wi-fi packets from both WEP and WPA/WPA2 protected networks. It must also be capable of decoding those packets to gain login information. The hardened server must be capable of detecting a vulnerability scan of the network it is a member of. The hardened server must be capable of withstanding several simultaneous basic attacks from an attacker who has gained access to the wireless network. 4 PROJECT TEAM AND STAKEHOLDERS The table that follows is the key stakeholders in this project. Our client and project sponsor is Ted Hellard. He is the current Owner and Managing Partner of the mobile application developer AppColony. He believes there is market for a device and associated documentation to help small and medium sized businesses secure their data. The performing organization is our group known as Cloak and Dagger. We are a small group of people devoted to securing the data of others around us. Stakeholders Comment Project Manager / Team Tyler Hellard, Taylor Kraft, Zachary Preece Client Ted Hellard Performing Organization Cloak and Dagger Sponsor Ted Hellard 5 PROJECT SCOPE Hardware integration: the MacBook Air involved was taken apart and placed within a laptop carry case; the tablet has the propped VNC program integrated within it. One disassembled MacBook Air integrated into laptop carry case One nexus tablet integrated to attack system Attack machine/controller: the attack machine has incorporated the following aspects to be made functional and implemented successfully Linux installation onto a USB drive Kali attack aspects Penetration software Boot ability Integration with tablet. Security of prey and network: has incorporate efficient security to make a realistic attack and to keep the network safe Harden a Windows Server 2012 installation Network security, as to stay within the projects Wi-Fi address allocation OUT OF SCOPE We achieved our out of scope adjectives: Create a well detailed hardening guide for the server installation Create a well detailed guide on the attack processes During the project we reached outside of our scope and accomplished: A full and functional version of windows intrusion detection system. 6 PROJECT ACKNOWLEDGEMENTS Ted Hellard Sponsor of the project. If it were not for Ted, we would have not been able to complete this project the way we had planned to. Jason Fisher Our project advisor, and in charge for distributing some of the equipment that we used to complete this project. Jason also provided us with guidance throughout the completion of this project. 7 PROJECT BUDGET Initial Appropriations To complete our project, we will need $97,279.49 to cover the required hardware equipment, software equipment and operation costs for the project. We have taken hardware, software, networking, security equipment and operation costs in consideration for the calculation of the costs. The breakdown of the initial costs is as follows: Hardware equipment: $5 801.39 Software: $924.10 Management: $25 800.00 Labour: $59 754.00 As the project completed, we calculated the total budget of it, as it turns out, we are under budget. Final Revision Hardware equipment: $5 554.26 Software: $924.10 Management: $3 274.00 Labour: $11 476.77 To see the detailed budget, please go to page 49. 8 PROJECT RESULT The project was completed successfully. The installation of the Linux distribution was successfully installed and updated as the sole available operating system on the MacBook Air. The included security tools in the Linux distribution, Kali, were tested and performed flawlessly. They do not perform at the same speed of a more traditional fully sized laptop but perform at nearly 70% of the speed. This is an acceptable trade off due to the fact we achieve a superior battery life and at about 1/3rd of the cost of a similarly sized machine with a full GPU. The only area where the current prototype is at a disadvantage is when performing a password crack. This is where it performs at about 30 to 40 percent of the speed. The machine was also successfully disguised into the space separating two pockets of a laptop briefcase. This allows it to be hidden and remotely controlled via the Nexus 7 completely. A wireless attack can also be conducted via this method. The second half of the project, a hardened server, was also completed to the best of our abilities. The ports that we do not need were closed and the firewall was setup. We also succeeded in removing Windows commands that are not used by our installed services. We also removed the commands not used upon startup. The most important portion of our hardened server, a Snort installation, was successfully installed. We chose to go with what is known as the Windows Intrusion Detection System. This allows a link between snort and a postgres sql database. This gives us a database of the events that triggered our snort rules. This database can then be read via an apache server and displayed in an easy to use web based platform. 9 LESSONS LEARNED 10 Measure the server racks that the project room has before ordering to see if we need to order a specific rack.(server did not fit in rack) When working with the website, work with it locally, don’t save directly to dropbox folder There are a huge amount of open ports on the server then initially anticipated Use windows firewall with advanced security to close ports There is a 5 minute login delay with the security policy that was implemented. Snort is command line based Snort commands are stored in c:\WINDOWS\system32 There are a lot of different screws when it comes to the MacBook Air(very easy to get confused if you do not label them when you remove them. You can take over permissions from trusted installer by- Right Click on the file/folder > Permissions -> Security tab -> Advanced -> Under permission entries click admin -> then select edit ->then give full control to the account you want -> Apply A USB A USB stick smaller than or equal to 32GB must be used as any larger cannot be formatted to FAT32. The Operating System download required an installation of the Microsoft Secure Download Manager. HP Intelligent Provisioning has an initial setup that must be completed before an operating system can be installed. License key is required for the use of the SAS drives Kali requires a secondary program named Rufus to create a UEFI bootable live USB flash stick The MacBook Air runs a customized version of the UEFI/EFI boot structure. Kali will require the customized files from the UEFI version of Fedora in order to be bootable on the MacBook Air. It will also require the creation of OSX Mavericks recovery USB memory stick in order to restore the OSX Mavericks installation if required The USB drive can only be used to restore an installation of OSX on the machine it was created on. It can also only be used for the version of OSX that was on the machine when the recovery disk was created The 64-bit Kali image must be used in order to enable the use of the UEFI option in Rufus The option for making the USB drive bootable must be selected and the option must be set to use an ISO image and not either FREE-DOS or MS-DOS Booting into the Live USB environment and then installing from the live installer is faster and smoother than booting to the graphical install mode. A network connection and update is required during installation for full functionality. An update of the software upon install is also required. The commands for the post install updates are apt-get update The default Linux web setup page is 192.168.1.1 The version of the aircrack-ng suite in the downloaded version of Kali will give a channel error when trying to sniff for packets. An update to the version 1.2 beta build combine with the --ignore-minus-one option when running the airodump-ng command is required to fix this bug. When the attack target is too far from a wireless access point and using the internal wireless card the four-way handshake indicating authentication may not always be captured when a client authenticates There are two ways to configure the RealVNC service to start when the machine boots. The TD-LINK wireless card is considered plug and play within the Kali environment The video setting in the VNC viewer app should be set to high quality to enable a full screen sharing. Using the Zenmap GUI interface instead of nmap provides easier access to information and storage of scans The beta version of the aircrack-ng suite requires the use of the --ignore-negative-one options when capturing the packets for the handshake Further disassembly of the display assembly itself is required to remove the wi-fi antenna The display T8 torx screws are very difficult to remove without damaging the display The logic board required a little bit of fitting and re-fitting in order for the ports to properly align with their outputs in the case Failure in the file system check. This was due to the battery being drained and disconnected. A WEP attack requires the capture of a large number of individual packets to provide enough information to break the password A 4-way handshake will not be captured by the utility on every occasion. This tends to occur due to signal strength issues. The installation of the graphing components requires an internet connection to install the pear graphing system The problem automated scans in our situation is if something happens to go wrong with it we could end up break the SAIT network and not have control of that scan To install snort you first have to installWinPcap so you can capture and transmit network packets. You also need to configure the conf file to your configuration not the forums. That a screw driver and clamp weren't strong enough to pry the encasing of the wireless antennas. The web site flows and looks better with a three column layout. 11 ACHIEVEMENTS At the beginning of this project, Cloak and Dagger set goals that had to be completed in order to complete this project. Throughout the course of the project, we have completed all the goals that had to be done. These are the following achievements that Cloak and Dagger did through the course of the project: We installed a Linux operating system onto a MacBook Air as the lone operating system Hardened Windows Server 2012 Successfully installed and ran Snort Removed the display for the MacBook Air, and placed it into the laptop messenger bag Remotely controlled the MacBook Air though a tablet 12 PROJECT RECOMMENDATIONS Technical recommendations Use a laptop with a discrete graphics card To fully sew the laptop into the compartment To install a 3G connection to take advantage of using a cloud instance. Keep your website current and up to date throughout your project Team recommendations Starting your project as early as possible as to not get behind. Leave leeway in your charter as to leave room for last minute adjustments Document and timestamp everything for accountability Communicate with your team members often as to keep up to date with their progress. Keep your journal well maintained and up to date 13 CONCLUSION In conclusion, team Cloak and Dagger was successful in building a fully functional lightweight security testing tool using off the shelf hardware and software. This is a proto type item, in which we were able to successfully hide the attacking machine within a laptop carry case, with room for ventilation. With more time we would be able to encase the attack machine or disable the keyboard as to prevent accidental button press within the carry case along with proper re-stitching of the carry case. 14 REFERENCES [1] “Refurbished 64 GB 11-inch Macbook Air” Apple [Online] Available: http://store.apple.com/ca/browse/home/specialdeals/mac [Accessed: 5-Oct-2013] “TP-Link Wireless Adaptor TL-WN722N USB 2.0” Newegg [Online] Available: http://www.newegg.ca/Product/Product.aspx?Item=N82E16833704045CVF&Tpk=TLWN722 [Accessed: 5-Oct-2013] [2] [3] “Nexus 7 32GB Wi-Fi Only” Google [Online] Available: https://play.google.com/store/devices/details/Nexus_7_32GB?id=nexus_7_32gb_2013 [Accessed: 6-Oct-2013] [4] “iFixit The free repair guide for everything written by everyone.” iFixit [Online] Available: http://www.ifixit.com/Parts-Store [Accessed: 6-Oct-2013] [5] “HP Proliant DL360e Gen8 E5-2403 8SFF US” HP [Online] Available: http://www.metafore.ca/Product/Default.aspx?SearchSubmitted=True&ManufacturerName= Hewlett- Packard&ManufacturerID=270&MfPN=686210S01&MfID=270&AltCatID=10010402 [Accessed: 21-Nov-2013] [6] “Startech 25U Open Frame Server Rack Cabinet” Startech [Online] Available: http://ca.startech.com/Server-Management/Racks/25U-4-Post-Server-Open-Frame-RackCabinet~4POSTRACK25 [Accessed: 21-Nov-2013] [7] “Windows Server 2012 Standard License” [Online] Available: https://www.google.ca/url?sa=t&rct=j&q=&esrc=s&source=web&cd=2&ved=0CFsQFjAB&url =http%3A%2F%2Fdownload.microsoft.com%2Fdownload%2F4%2FD%2FB%2F4DB352D 1-C610-466A-9AAF-EEF4F4CFFF27%2FWS2012_LicensingPricing_FAQ.pdf&ei=EXqOUrDFGOBiwKM04GwAw&usg=AFQjCNEtmNeiIPtw0boIAju2kH4iqOAxvw&sig2=s765JxBmI27hC R_K9RGrkg&bvm=bv.56988011,d.cGE [Accessed: 20-Nov-2013] [8] “TSA Approved Messenger Bag” [Online] Available: http://www.futureshop.ca/en-CA/product/init-13-3-polyester-laptop-case-ntnb940/10108348.aspx?path=cff17bf02e5bb956094bd78e772ac095en02 [Accessed: 2-Apr-2014] “Aircracking-ng Website” [Online] Available: http://www.aircrack-ng.org/ [Accessed: 7-Apr-2014] [9] 15 [10] “Fluher, Mantin and Shamir Attack Wikipedia” [Online] Available: http://en.wikipedia.org/wiki/Fluhrer,_Mantin_and_Shamir_attack [Accessed: 7-Apr-2014] 16 APPENDIX A – GLOSSARY OF TERMS WEP – Wired Equivalent Privacy This is an old and obsolete wireless protection standard. Original wireless security standard that has been replaced by newer more secure standards WPA/WPA2 – Wi-Fi Protected Access / Wi-Fi Protected Access II A more secure wireless security standard developed to supplement WEP. It is subject to fewer security vulnerabilities than WEP. Wi-Fi – A wireless local area network A way of providing network connectivity over the wireless spectrum. NMAP – Network Mapper A open source software tool used to discover hosts and running services on a network. Developed by Gordon Lyon originally for Linux. T0-T5 – Stealth level of Network Mapper scan Used to define the level of aggressiveness and frequency of packets being sent by the Nmap scan. It begins with T0 being the stealthiest scan, possibly taking weeks to complete, and T5 being the most aggressive, potentially only taking seconds or minutes to complete. FMS Attack – Fluher, Mantin and Shamir Attack Stream cipher attack that “takes advantage of a weakness in the RC4 key scheduling algorithm to reconstruct the key from a number of collected encrypted message”[10] VNC – Virtual Network Computing 17 APPENDIX B – LINUX INSTALLATION INSTRUCTION Kali Live USB Stick Creation 1) Download Kali 64-bit ISO image from www.kali.org 2) Check the hash values of the resulting downloaded image against the value provided from the download page 3) Download Rufus Live USB Creator from rufus.akeo.ie 4) Connect 4 to 8 GB USB flash drive to computer. 5) Open Rufus Live USB Creator 6) Select your USB Drive from the Device dropdown 7) Select MBR Partition Type for BIOS or UEFI 8) Select Large FAT32 File System type 9) Select Cluster Size 10) Give it a Volume name 11) Select Create a Bootable Disk image check box and from ISO from the Dropdown Menu 12) Select Create extended label and icon files If you wanted to ensure file system and drive integrity you could also select the check for bad blocks check box and choose the number of passes for the check. Kali Installation onto MacBook Air 1) Connect Kali Live USB to computer 2) Turn on machine, holding the ALT button during boot 3) Select the Live USB stick from the boot options menu 4) Select Graphical Install 5) Select Manual Partitioning 6) Create a 500MB partition - At the beginning of the drive - Format to FAT32 - No mount point 18 7) Create 100GB Partition - Set at the beginning of the remaining free space - Format to ext4 - Use / as the mount point 8) Create swap partition - Use remaining freespace - Format as swapspace - No mount point 9) Save and Write the partition information 10) Install Kali 11) Select Yes when asked to install GRUB to the MBR 12) Re-boot the MacBook Air when install completed 13) Hold the ALT key during the reboot and select the USB stick from the boot options 14) Select the live boot option 15) Mount the 500MB FAT32 partition 16) Create a folder named EFI in the root if the FAT 32 partition 17) Create a folder named Boot inside of the EFI folder 18) Download all files from ftp://mirrors.kernel.org/fedora/releases/18/Fedora/x86_64/os/EFI/boot 19) Transfer files to /EFI/Boot on the FAT32 partition 20) Mount installed Kali filesystem 21) Navigate to /boot/grub 22) Copy grub.cfg from /boot/grub to /EFI/Boot on FAT32 partition 23) Open /EFI/Boot/grub.cfg from the FAT32 partition 24) Change instances of Linux to Linuxefi 25) Change instances of initrd to initrdefi 26) Save changes to grub.cfg 27) Enter command shutdown –r now into a terminal window 28) Hold the ALT key during the reboot until the image of an Hard Drive labeled EFI/Boot appears 29) Select EFI/Boo 30) GRUB bootloader will then appear 19 31) Select your boot option Bootloader Information If the EFI/Boot structure is the only boot device on the machine the laptop should begin by loading the GRUB bootloader by default. It will also directly load the full non repair version of the Kali installation without any intervention. This allows the machine to natively boot to Kali and run it as the sole Operating System installed on the machine. There may also be additional repositories required for the update and installation of new software. For instructions on how to add the repositories along with an extensive repository list please visit www.Linuxg.net/add-the-needed-repositories-for-kali-Linux/. Forensics Mode If you need to access the forensics mode for Kali please boot up using the USB installation key that was created earlier in this process. Select the forensics option from the GRUB bootloader instead of the installation or repair options. The forensics mode will not by default mount any file systems external to the operating system. It gives you a clean baseline for a forensics analysis and also helps to prevent intrusions and infections from the system being analyzed. Bootable USB creation Options All of the above instructions for creation of the Live USB creation are assuming you either have access to a Windows 7 or higher installation. There may be other ways to create an Apple UEFI bootable USB drive in either OSX or Linux environments. They would still use an identical .ISO image to the instructions that are used for the creation using Rufus but would require an extensive knowledge of a command line environment. 20 APPENDIX C – MACBOOK AIR DIS-ASSEMBLY AND RE-ASSEMBLY INSTRUCTIONS Macbook Air Disassembly Instructions All Images property of www.ifixit.com Taken by Technical Writer Andrew Goldberg Distributed under the Creative Commons BY-NC-SA 3.0 Important Information highlighted in Red 1. Assemble Required Tools a. Macbook Pro and Air Pentalobe Screwdriver b. Nylon Spudger c. T5 Torx Screwdriver d. T8 Torx Screwdriver 2. Lower Case a. Shut down machine and lay top down on soft surface b. Remove ten screws from bottom of machine and sort by size c. Label screws by size and location 3. Wedge fingers into space between display assembly and lower case 21 4. Pull lower case upwards to pop off the lower case 5. Battery Steps a. This is where the battery will be disconnected i. This will help prevent the shorting out of any components during the disassembly b. Grab nylon spudger and using the flat end pry both sides of the connector upward to dislodge from the socket on the logic board c. Bend the cable attached to the battery away from the logic board, slightly, so that it will not contact the socket during further disassembly 22 6. SSD Removal a. Remove single 2.9mm T5 Torx screw securing the SSD to the Macbook Air Logic board b. Use the flat end of the nylon spudger lift the free end of the SSD enough to hold with free hand c. Be very careful not to lift excessively d. Slowly pull drive straight back to remove from logic board e. During re-installation make sure the SSD is seated fully before re-installing the retaining screw 23 7. I/O Board Cabling a. Use the flat end of the nylon spudger to pry the I/O board cable from the socket attaching it to the I/O board b. Using your hands peel the I/O board cable up from the adhesive on the fan c. Use the flat end of the nylon spudger to lift the I/O board connector from the connector on the logic board i. Be very careful to lift the connector straight up out of the logic board as it is a very deep socket and prying it from side to side may damage the socket d. Remover the I/O board cable 24 8. Fan Removal Steps a. Use the point on the nylon spudger to flip the retaining flap on the fan cable ZIF socket i. Make sure you are prying up on the hinged retaining flap and not on the socket itself b. Remove the two 5.2mm T5 Torx screws and 3.6mm T5 Torx screw securing the fan to the upper case c. Lift the fan assembly out of the upper case and carefully remove the fan ribbon cable out of its socket as your remove it from the machine 25 9. Battery Removal Steps a. Remove from the battery the two 5.2mm T5 Torx screws from the battery closest to the logic board and CPU b. Remove the two 2.6mm T5 Torx screws from the battery closest to the trackpad location c. Remove the single 6mm T5 Torx screw from the center of the battery d. Be sure to label the size and location of all screws removed from the battery e. Lift the battery beginning from the edge closest to the logic board and remove from the upper case i. Do not touch or squeeze the battery cells when handling the battery 10. Logic Board Steps a. Using the flat end of the nylon spudger to free the adhesive loop securing the I/O board power cable to the upper case b. Disconnect the I/O board from the logic board by pulling the power cable gently away from it’s socket on the logic board c. Pull the cable parallel to the face of the logic board toward the front edge of the machine 26 d. Use the point on the nylon spudger to flip the retaining flap on the keyboard backlight ribbon cable socket i. Be careful you are lifting the hinged retaining flap and not the socket itself e. Pull the backlight ribbon cable out of its socket i. Make sure to pull parallel to the logic board until loose f. Using the point of the nylon spudger lift the retaining flap on the trackpad ribbon cable socket i. Make sure you are lifting the flap and not the socket itself g. Pull the trackpad ribbon cable straight out of its socket toward the front edge of the machine 27 h. Use the point of the nylon spudger to de-route the right speaker cble from the slot cut into the logic board i. Use the flat end of the spudger to pry the right speaker connector up and out of it’s socket on the logic board i. Remember to pry from beneath the cables 28 j. Gently push the point of the nylon spudger under the black plastic flap stuck to the display data cable i. This will make the lock pop upward and away from the socket k. Remover the small rubber gasket from the corner of the upper case near the display data cable l. While holding the lock away from the display cable socket gently pull the cable away from the socket i. Make sure you do not ever pull upward on the cable well removing it from its socket as this may cause the socket to break off the logic board 29 m. Use the flat end of the nylon spudger to pry both antenna cable connectors up and off their sockets on the AirPort/Bluetooth card n. Gently de-route the antenna cables from the slot cut into the logic board 30 o. Remove from the logic board three 3.6mm T5 Torx screws used to secure it to the upper case structure p. Gently lift the logic board assembly out of the upper case structure while being careful not to damage the fragile heat sink and any cables that may get caught 31 11. Display Assembly Removal Steps a. Remove the small rubber gasket from the corner of the upper case nearest to the small I/O board b. Use the pointed tip of a nylon spudge to carefully flip up the retaining flap on the microphone cable socket i. Be sure you are prying up on the retaining flap itself and not the socket 32 c. Pull the microphone ribbon cable straight out of its socket d. De-Route the left speaker cable from the notch cut into the small I/O board 33 e. Use the flat end of the nylon spudger to pry the left speaker cable connector up and out of its socket on the small I/O board i. Remember to pry from beneath the wires f. Pull the camera cable parallel to the face of the small I/O board toward the rear edge of the machine to disconnect it from its socket i. Remember not to list upward on this cable as it may result in the breaking off of its socket from the board 34 g. Remove from the small I/O board the single 3.6mm T5 Torx screw securing it to the upper case h. Carefully lift the I/O board from its edge nearest to the logic board and remove it from the upper case 35 i. Peel up the six cable loops used to secure the antenna cables to the upper case j. Gently pull the cable loops lightly out of the channel cut into the upper case one at a time 36 k. Use your spudger to open up the plastic loops as you de-route the antenna cables through them i. Repeat this for all of the retaining loops l. Remove the inner 4.9mm T8 Torx screw securing each display hinge to the upper case i. This is will result in two screws total removed 37 m. Open the display until it is perpendicular to the upper case and place it on a table i. Remove the remaining 4.9mm T8 Torx screw from the lower display bracket n. Remove the last 4.9mm T8 Torx screw securing the display to the upper case i. Before removing the last display screw be sure to hold the display assembly steady with your other hand. Failing to do so may cause components to fall onto the table causing possibly expensive damage 38 o. Push the upper case slightly toward the display assembly then rotate it away from the front of the display assembly p. Once the two display hinges have cleared the upper case remove the display and set it aside To re-assemble the machine into the attack configuration follow these steps in reverse. Any of the steps that involve re-attachment of connections to the display or modules in the display can be safely ignored. You may also wish to remove the antenna from the base of the display which can be accomplished using a Dremel tool and a careful hand. You may wish to confirm the startup functionality before removing the display module. 39 APPENDIX D – WI-FI MONITORING AND PASSWORD RETRIEVAL INSTRUCTIONS These instructions will help you, the user, conduct basic wireless attacks on several styles of networks using several styles of security. These will include attacks against WEP, WPA and WPA networks secured using WPS (Wi-Fi Protected Setup). The instructions are different for each network type but they share a common starting point. Common Instructions 1) Determine network interfaces running on attack machine - ifconfig 2) Choose the wireless interface to use for monitoring - The network will be prefaced with wlan to indicate that it is a wireless network. 3) Place the wireless interface into monitoring mode - airmon-ng start <chosen interface> 4) Confirm wireless interface placed into monitoring mode - iwconfig - You will need to look for the wirless interface chosen in the previous step. If monitoring mode has been successfully enabled it will display an interface with the name of mon0. 5) Look for available networks to attack - airodump-ng <interface> - The interface entered here must be the monitoring interface created in step 3. 6) This command will display as much information that can be gathered about all of the wireless networks accessible by the machine. This information includes the BSSID (mac address of the router), the CH (channel the network is operating on) and the ENC (encryption type). These encryption types include WEP, OPN (open), WPA and WEP? (do not know encryption type) This is now the stage where the instructions differ when cracking WEP and WPA. The cracking of WEP requires the capture of a large number of packets (also known as initialization vectors). 40 7a) Listen to a specific channel and write all of the data to disk to be used for cracking of the password - airodump-ng --ignore-negative-one -c <channel the network is on> --bssid <of target network> -w <prefix for capture file> <monitoring interface> - The ignore negative one option bypasses a known error in the current version of the airodump command. Without this option data will not be captured. - The -c command is what determines the wireless channel the command will copy information from. - The --bssid command is the mac address of the network you wish to capture data from. - The -w command is used to both write to the file and give it a prefix so it is easy to find. - The interface specified here must be the same as created in step 3. 8a) Crack the WEP key using the aircrack-ng command - aircrack-ng -b <bssid> <packetfile> - The -b option in the command accepts identical information to the --bssid option in the previous step. It is the mac address of the target network. - The packet file to be checked is the one containing the prefix given to it in the previous step. You can also scan multiple packet files by using the * wildcard in the name. If for some reason you have not captured enough packets then the command will give you an error and be unable to get the password. At this point you will need to begin from step 7a and repeat. It is recommended that you retrieve between 40 and 85 thousand points of data. This may take anywhere from seconds to minutes depending on the network traffic. The cracking of a WPA password is both simultaneously easier and more difficult than WEP. In order to properly crack a WPA password you must have a password list to run through and compare to the hash value of the captured handshake. There are many easily obtainable large and well organized open source password lists. This is balanced by requiring much less data to be captured by the network portion. A WPA password crack only requires that the handshake between a device and the network be captured. This occurs when a device authenticates to a network. 41 7b) Listen to a specific channel and write all of the data to disk to be used for cracking of the password - airodump-ng --ignore-negative-one -c <channel the network is on> --bssid <of target network> -w <prefix for capture file> <monitoring interface> - The ignore negative one option bypasses a known error in the current version of the airodump command. Without this option data will not be captured. - The -c command is what determines the wireless channel the command will copy information from. - The --bssid command is the mac address of the network you wish to capture data from. - The -w command is used to both write to the file and give it a prefix so it is easy to find. - The interface specified here must be the same as created in step 3. 8b) Wait until the top right corner of the information displayed on the screen tell you that a WPA handshake has been captured. This area will remain blank until the capture has occured. This may take anywhere from hours to days depending on how often people authenticate to the network. 9b) Run the capture file against the user supplied password list. This will hash each value in the password file and compare it to the contents of the WPA handshake. - aircrack-ng --bssid <target network> -w <password/dictionary file> <capture file> - The --bssid option is used identically to the previous steps. This is the mac address of the target network. This is considered useful when your packet file contains the handshakes and information for multiple networks. - The -w option is used to give the location of the password file to hash. - The capture file option is used to specify any file using the prefix that was created in step 7b. This will pull up a command window that will show each password being run through the command along with the rate at which passwords are being hashed. If the password crack is not successful then you have the option to find either a larger password list, which can run into the billions of combinations, or run the packet file through another tool such as hashcat. These tools allow you to bruteforce the password but are outside the scope of this guide. The final attack option is the reaver tool. The reaver tool exploits a vulnerability in the WPS (Wi-Fi Protected Setup). This is a tool that most modern routers are equipped with. There are many small businesses and consumers that never disable this option because of it's simplicity and ease of use. It is symbolized by a button on the router that appears to be two arrows chasing each other. This sends a pin between the two devices. Reaver uses this vulnerability in order to brute force the pin number and connect to the network. 42 7c) Install the Reaver package - apt-get install reaver - This installs the reaver package as not all distributions come with it pre-installed. 8c) Run Reaver against the target network - reaver -i <interface> -b <BSSID> - This will send pins at a constant rate to the designated network until it finds the pin that allows a connection. - The -i option is used to specify the wireless interface that was placed into monitoring mode in step 3 of this guide. - The -b option is used to specify the BSSID or MAC address of the target network. This will continue to run until you either run into the limit of the router or you find the proper pin and gain access to the network. There are some routers that will only allow a certain number of pins to be sent to them before they lock themselves from remote pins. At this point the only way to crack the password is to use one of the previous options. Reaver is also highly dependent on the signal strength of the network connection. If there is a weak signal the pins will not always be able to make it to the router and the attack machine may not also be able to retrieve the response. These instructions cover the most common wireless attack methods. They will allow the penetration of most consumer or small business networks. The best defence against these attacks is to change your password on a regular basis. You can also completely disable the reaver attack vector by disabling the WPS functionality on your router. 43 APPENDIX E – SERVER HARDENING INSTRUCTIONS Hardening Windows Server 2012 The Windows Server 2012 is a very sturdy piece of software that doesn’t need many modifications to harden it. Depending on what services you plan on installing or what you plan on doing with it, you may need to block certain ports, or remove some Windows internal commands. I will tell you how to remove the internal Windows commands and how to block ports. Blocking ports on your Windows Server 2012 1. From the desktop screen you want to search for the Windows Firewall with Advanced Security applet, you can do this in a couple of ways: Hit the Windows key on your keyboard (If you have one), then type Windows Firewall with Advanced Security. Then click on the only applet available. Go to the start menu (Bottom left of the desk top, far left on the tool bar) and open it. Click on the control panel, then go to advanced settings (on the left hand plane). 2. Now that we have this applet window open, we will make use of two options that are listed on the left had side called “Inbound Rules” and “Outbound Rules”. 3. We will start with Inbound Rules, once its selected you will see on the right hand side, Under Actions -> Inbound Rules, you will see an option called “New Rule…” click it 4. The following screen has four options to choose from, Program, Port, Predefined: and Custom. Since we are dealing with a port we will select the Port option, and then click next. 44 5. We now have an option to choose what protocol and what port we want to block, we will start with TCP, and the port you wish to block, we will be going back and blocking the UDP one as well after this. Select TCP and Specific local ports, I will be using port 555 as an example 6. The next screen prompts you to choose one of three options, “Allow the connection”, “Allow the connection if it is secure”, and “Block the connection”. Since we don’t want any communication along this port we will choose the “Block the connection” option. 7. In the next step, the screen wants to know where this rule will apply, in the “Domain”, “Private” and/or “Public” network location, again, as we want to fully block communication from this port we will have all three selected, which should be the default option. Then click “Next”. 8. The final step is to name it; you can name it anything you want. Although I do suggest giving it a practical name so you can find it later, if you need to delete or reconfigure this rule, I will call it “TCP Port 555 Blocked”. Then click “Finish”. We are now ¼ the way there to fully blocking off a port! You can block more than one port at a time, in step 6 you can use the following syntax when selecting the port: EXAMPLE 90, 123, 143-149 It is recommended that you only block one port at a time, as it makes it easier to make changes to it in the long run, as well as its easier to keep it organized this way. We will repeat steps 3-9 for the inbound rule, but instead of the TCP option, we will use the UDP option. Starting from step 2, we will select the “Outbound Rules” option, then, follow exact same procedure as we did for the inbound rules option. Once you have ran through it the first time, you will have to do it again a second time for the UDP or TCP option, which ever option you didn’t select the first time. 45 You have no successfully blocked off one port! You can run an nmap scan on your server (make sure It is OK to do so!) to make sure that it is closed, if nmap doesn’t see it, then you’re in the clear. 46 Deleting Internal Windows Commands With the Windows internal commands, there might a few you may not need depending on what services you plan on installing, or the intended use of the server, here is a guide on how to delete those commands so that won’t be able to be used against you if your system happens to get compromised. All of the commands are located in the system32 folder, which is located here: C:\Windows\System32 If you sort the “Type” and look for applications, this is where the actual commands are, the commands are listed in the name as you would if you were to run the command in the command prompt. If we head on over to this Technet Microsoft website, they have a pretty detailed list of the Windows commands and what they do. http://technet.microsoft.com/en- us/library/cc754340.aspx Please black up all commands you chose to delete, tamper or modify them in anyway. Now that you have a list of all the commands you wish to delete, and they have now been backed up to another drive, let’s get started. So if you initially just try to delete a command it will give you a “File Access Denied” message and not delete the command. Even though you are the administrator for the account you still don’t have permissions to delete it. But with a few simple steps we can give ourselves permissions, so then we are able to delete the command. 1. Right click on the command you wish to delete, and select “Properties” 2. Select the “Security” tab along the top, then click “Advanced” 3. Now select the account you wish to increase the permissions for, and select “Edit” 4. Under “Basic permissions”, click the “Full control” box. Then hit “Ok” 5. Close all the other tabs so that only the System32 window is open 6. You can now delete that command! Just repeat these steps for all the commands you need to delete. 47 Installation and Setup of Windows Intrusion Detection System We use the classic Snort program and it's provided installation instructions for the Windows Intrusion Detection System. These instructions are available at http://www.winsnort.com/index.php?module=Pages&func=display&pageid=39. Some of the software required for installation requires that the user apply for membership in the website. This usually takes between 4 hours and a day to be activated. The instructions can also be followed manually but will require modification of or creation of some of the configuration scripts. 48 APPENDIX F – DETAILED PROJECT BUDGET Initial Appropriations Equipment and Facilities The table below shows the breakdown of the hardware equipment costs. Hardware Equipment Costs Description Quantity Standalone computer and 2 backup Cost of Hardware $1572.90 Wireless network adapter 2 $53.20 Computer Tablet USB Flash Drive Tool kit to fix the equipment 1 4 3 $293.99 $121.76 $224.85 Work on a clean area 3 $59.85 iFixit.com Air Pentalope Screw Driver [4] Macbook screw driver 3 $35.85 TSA Approved Messenger Bag To carry our equipment 1 $360.00 HP DL360e Gen8 E52403 8SFF US Svr/ SBuy (With 2 Hard drives) [5] Server hardware 1 $2495.85 25U 4 Post Server Open Frame Server Rack [6] Server rack 1 $391.64 Monitor LG 19” monitor 1 $105.00 Cat5 Cables Ethernet cables 2 $10.50 D-Link Wi-Fi Router Wireless Router 1 $55.00 USB Mouse USB Keyboard Mouse Keyboard 1 1 $10.50 $10.50 $5801.39 Item 11‐inch Macbook Air 64GB [1] TP-LINK TL-WN722 High Gain Wireless Adapter [2] Nexus 7 32G [3] 32GB USB Stick iFixit.com ProTech Toolkit [4] iFixit.com Magnetic Project Mat [4] Total Hardware Costs 49 The table below shows the breakdown of the software costs of the project. Software Costs Item Description Cost Windows Server 2012[7] Standard Edition $924.10 Linux Operating System Kali Free Perl Programming Language Free C Programming Language Free Metasploit Hacking Tool Free Snort Hacking Tool Free Total Software Costs $924.10 Operation Costs The table below shows the estimated operating costs for each team member broken down into management costs and production/labour costs. Item Hours Rate Cost Management 68 $100.00 $6,800.00 Labour Costs 300 $69.00 $20,700.00 Management 125 $100.00 $12,500.00 Labour Costs 245 $69.00 $16,905.00 Management 65 $100.00 $6,500.00 Labour Costs 321 $69.00 $22,149.00 Tyler Hellard Zachary Preece Taylor Kraft Total Operating Costs $90,554.00 50 Final Revision Equipment and Facilities The table below shows the breakdown of the hardware equipment costs. Hardware Equipment Costs Description Quantity Standalone computer and 2 backup Cost of Hardware $1572.90 Wireless network adapter 2 $53.20 Computer Tablet USB Flash Drive Tool kit to fix the equipment Work on a clean area 1 6 3 $293.99 $182.64 $224.85 3 $59.85 iFixit.com Air Pentalope Screw Driver [4] Macbook screw driver 3 $35.85 TSA Approved Messenger Bag[8] To carry our equipment 1 $51.99 HP DL360e Gen8 E52403 8SFF US Svr/ SBuy (With 2 Hard drives) [5] Server hardware 1 $2495.85 Monitor LG 19” monitor 1 $105.00 Cat5 Cables Ethernet cables 2 $10.50 D-Link Wi-Fi Router Wireless Router 1 $55.00 USB Mouse USB Keyboard Mouse Keyboard 1 1 $10.50 $10.50 $5554.26 Item 11‐inch Macbook Air 64GB [1] TP-LINK TL-WN722 High Gain Wireless Adapter [2] Nexus 7 32G [3] 32GB USB Stick iFixit.com ProTech Toolkit [4] iFixit.com Magnetic Project Mat [4] Total Hardware Costs 51 The table below shows the breakdown of the software costs of the project. Software Costs Item Description Cost Windows Server 2012[7] Standard Edition $924.10 Linux Operating System Kali Free Perl Programming Language Free C Programming Language Free Metasploit Hacking Tool Free Snort Hacking Tool Free Total Software Costs $924.10 Operation Costs The table below shows the estimated operating costs for each team member broken down into management costs and production/labour costs. Item Hours Rate Cost Management 10.28 $100.00 $1 028.00 Labour Costs 55.5 $69.00 $3 829.50 Management 13.85 $100.00 $1 385.00 Labour Costs 58.25 $69.00 $4 019.25 Management 8.61 $100.00 $861.00 Labour Costs 52.58 $69.00 $3 628.02 Tyler Hellard Zachary Preece Taylor Kraft Total Operating Costs $14 750.77 52 APPENDIX G – USER MANUAL 53