1
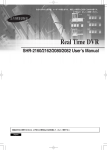
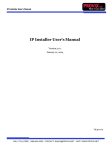
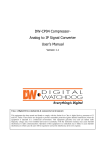
User
manual
SmartViewer
SmartViewer software is used for viewing, playing back and
exporting video footage from Samsung IP and Analogue
video surveillance systems.
Manual includes
Logging In
Starting Live View
Using Digital Zoom
Controlling Fisheye View Mode
Searching Footage
Backing Up
2
SmartViewer
Logging In
1)
Open SmartViewer
2)
Use your username and password to login.
Note: Select “Save ID” to automatically remember ID.
Starting Live View
1)
From the device drop down window, select your site and select connect.
3
SmartViewer
2) Once connected to your sites device the first availabe cameras will display.
3) To change the layout you wish to use simply select 1, 4, 9, 25 or 36 cameras to display
in a grid view from the bottom menu.
4) Once your layout is selected, select and drag individual cameras from the device menu
on the left of screen onto each tile of your layout.
Tip: To add multiple cameras to your layout simply select your site name and drag it
across to the first available tile in the window.
4
SmartViewer
Using Digital Zoom
1)
2)
Select the Digital Zoom menu on the left of screen.
Use the zoom icons to adjust the camera.
Controlling Fish-Eye View Mode
1)
Right click on a Fish-Eye camera and select “Fish-Eye View Mode.” From this menu
select the desired view mode for your Fish-Eye camera.
5
SmartViewer
3)
In “Single View” mode for a fisheye camera it is possible control the cameras position.
Simply select “Single View” from step one and select the PTZ menu on the left of
screen.
Select the Fish-Eye PTZ control button.
4)
Select and drag on the camera screen to move the view of the Fish-Eye camera.
2)
6
SmartViewer
Searching Footage
1)
Select the search menu in the top right corner of SmartViewer.
2)
3)
Ensure your site is selected from the device menu on the left of screen.
Select the date you wish to review.
4)
From the timeline on the bottom of screen simply select the cameras you wish to view.
Use your cursor to select a starting time along the timeline and select play.
7
SmartViewer
Tip: Select your desired layout of 1, 4, 9 or 16 cameras to display in a grid view.
Backing Up
1)
Select the “Backup” icon from the bottom menu.
2)
3)
From the backup dialogue box, select the cameras you wish to backup.
Select your starting and finishing time and your desired backup location where you
would like the backup footage to be stored (E.g. My Documents or a USB memory
stick).
Ensure to select “AVI” as the file format and select the start icon.
4)
8
SmartViewer
5)
A progress bar displays the satus of your backup.
6)
Once the backup is complete simple browse to the folder selected and view the file.