1
Fitting and connecting the cartridge
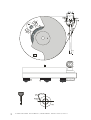
** All cartridges with half inch mounting holes can be fitted. Leaving the needle's protection cover on, fit the
cartridge to the headshell using the screws supplied with the cartridge by passing one screw through each
slot in the headshell (21). Do not tighten the nuts yet.
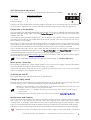
Connect the tonearm wires to the cartridge pins as follows:
white
left channel positive (L+)
red
right channel pos. (R+)
green
right channel return (R -)
blue
left channel return (L -)
The full sound quality of the record player can only be achieved if the cartridge is correctly adjusted. Particular
tools like the PRO-JECT alignment tool are required to accomplish this job properly.
If you are not well acquainted with the adjustment of cartridges you are advised to call upon the willing help of
your PRO-JECT dealer to accomplish this task for you.
The finger lift (21) must be fitted on top of the headshell under the cartridge fixing bolts or nuts - not
between headshell and cartridge body.
Please note: adjusting a cartridge and tonearm calls for the greatest care in order to avoid damaging
the cartridge or tonearm bearings. Leave this work to your dealer if you are in any way unsure of the
necessary steps and precautions to be taken.
Useful tips
The record player should be positioned on a low-resonance surface such as wood or multiple layer ply board
to avoid structural vibrations disturbing replay.
Technical specifications PRO-JECT RPM 5.1 / Pro-Ject 9cc
Nominal speeds
Speed variance
Wow and flutter
Signal to noise
Downforce range
Effective tonearm length
Overhang
Power consumption
Outboard power supply
Dimensions (W x H x D)
Weight
6
33,33/45,11 r.p.m.. *** 78 r.p.m. optional
±0,5 %
±0,08 %
-70dB
10-30mN
9 " (230mm)
18mm
2W
16V/500mA AC, suitable for your country's mains supply
371 x 145 x 300mm
6,5kg
© Audio Trade GmbH · Pro-Ject RPM 5.1 / Ortofon 2M Red · Revision 15.06.11/15.07.11