1
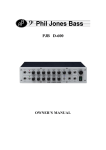
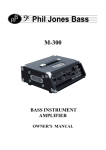
PJB SUITCASE
OWNER’S MANUAL
CONTENTS
Read This First -------------------------------------------------------------Page 2
Overview of the SUITCASE---------------------------------------------Page 3
Front & Back Panel Diagrams------------------------------------------Page 4
Front & Back Panel Description----------------------------------------Page 5
Getting Started-------------------------------------------------------------Page 8
Operation & Positioning--------------------------------------------------Page 8
Transporting & Storing the SUITCASE------------------------------Page 9
Specifications---------------------------------------------------------------Page 10
Simplified Schematic------------------------------------------------------Page 12
Service/Warranty Information-----------------------------------------Page 13
1
Thank you for purchasing the PJB SUITCASE. A great deal of
dedication and passion went into designing and building this nocompromise, high performance compact-combo amplifier. It was
conceived to be a dedicated amplifier for the “connoisseur” bassist.
Reading this manual will enable you to get the best performance from it so
that you may enjoy many years of service.
READ THIS FIRST
• Before using the SUITCASE please read ALL the instructions.
• On receipt of product, check for any signs of physical damage
arising from shipping. If any damage is visible contact your dealer.
• Keep all original packing.
• Never use this product in the vicinity of water. If the SUITCASE
were to get wet, it could kill you by electrocution.
• Do not use this amplifier in a way that would compromise its
ventilation system. When operating, never cover the heatsink on rear
panel.
• Do not locate this amplifier near any heat source.
• This amplifier must be connected only to a power source specified in
this manual.
• For safety do not leave the amplifier plugged into a power source
for long periods of time when not in use.
• Do not let any liquid or foreign objects fall into any openings on
the amplifier.
• Never use this amplifier if it has:
1. Suffered any physical damage.
2. Been subjected to any liquids, rain or moisture.
3. Damaged cables connected to it.
If any of the above occurs, the amplifier should be examined by
qualified service personnel.
• Always operate this amplifier with the correctly rated fuse.
• Never use this amplifier without proper grounding.
2
OVERVIEW OF THE SUITCASE
The SUITCASE is not your usual combo amp. The most striking difference between this
combo and others is that it features an extremely clean and powerful amplifier and full
range compact speaker system. It can accept voltages from 100 to 240 volts by using the
voltage selector switch. Though it is a dedicated bass amplifier, this unit will work ideally
for other instruments, particularly acoustic variety due to its natural Hi-Fi sound character.
The four 5 inch proprietary PJB drivers have been acoustically optimally loaded by precise
computer analysis to provide a full-range, dynamic sound that can play down to an open B
string with ease.
FEATURES
• Two Switchable Active / Passive inputs
• Two 5 Band Graphic EQ
• Optical Limiter
• Headphone Output
• Pre-amp Output
• Balanced Line Output with ground lift.
• Extension speaker output can drive 8-16 ohm speakers
• Dual AC Voltage 120/240V Operation
• Sophisticated protection circuitry
• Special “Soft-Clipping” 300watt Amplifier
• Ultra low noise pre amplifier circuit.
3
FRONT & BACK PANEL DIAGRAMS
INPUT LEVEL
OVER LOAD
PASSIVE
-10dB
+10dB
ACTIVE
50Hz
160Hz
INPUT LEVEL
630Hz 2.5KHz 12KHz
+18dB
+18dB
+12dB
+12dB
+6dB
+6dB
0dB
0dB
-6dB
-6dB
-12dB
-12dB
-18dB
-18dB
OVER LOAD
PASSIVE
-10dB
50Hz
160Hz
+18dB
+12dB
+12dB
+6dB
+6dB
+10dB
ACTIVE
POWER
LIMITER
630Hz 2.5KHz 12KHz
+18dB
0dB
0dB
-6dB
-6dB
-12dB
-12dB
-18dB
-18dB
MAX
0
OFF
ON
MIN
INPUT 1
INPUT 2
DI OUT
HEADPHONE
FX SEND
TUNER
EXT SPEAKER
FX RETURN
PRE-AMP OUT
MINIMUM 8 OHMS
LIFT
GROUND
VOLTAGE SELECTOR
115V
230V
CAUTION
BEFORE OPENING
PULL MAIN PLUG
NO USER SERVICEABLE PARTS INSIDE
REFER TO OWNERS MANUAL
ON
THE SUITCASE
I
AMPLIFIER OUTPUT: 200WATTS / 8 OHMS
300WATTS / 4 OHMS
(WITH 4B CABINET)
SERIAL NO.:
O
OFF
AC~INPUT
PHIL JONES BASS
www.philjonesbass.com
POWER
A DIVISION OF AMERICAN ACOUSTIC DEVELOPMENT LLC
4
MAX
MASTER VOLUME
FRONT PANEL DESCRIPTION
1. INPUT OVERLOAD INDICATOR CHANNEL ONE.
2. INPUT LEVEL CONTROL CHANNEL ONE.
3. 5-BAND GRAPHIC EQUALIZER CHANNEL ONE.
This is a dedicated bass instrument equalizer designed to give you optimized tone of your
instrument. The frequency bands have been set precisely so that your desired tone can be
achieved with the minimum amount of sliders. The EQ filters are set at: 50Hz 160Hz
630Hz, 2.5KHz and 12KHz with 18dB of boost or cut. This EQ has a lot of control on your
sound so do not use too much boost, particularly on the 50Hz or 160Hz bands as this will
greatly limit just how much headroom you have.
4. INPUT OVERLOAD INDICATOR CHANNEL TWO.
5. INPUT LEVEL CONTROL CHANNEL TWO.
6. 5-BAND GRAPHIC EQUALIZER CHANNEL TWO.
7. COMPRESSION ADJUSTMENT LEVEL.
This will vary the level the limiter threshold. The compression ratio is 3dB to 1. Adjust
this to suit your playing style and output power of your instrument.
8. LIMITER INDICATOR.
This blue LED will light up when the signal is being compressed. This will vary on how
hard the instrument is played and how the threshold is adjusted.
9. POWER LED INDICATOR.
With power switched on the LED light is blue.
10. PASSIVE/ ACTIVE BASS INPUT SWITCH CHANNEL ONE.
This switch allows you to match the SUITCASE to match either active or passive basses.
PASSIVE - Higher sensitivity, high impedance input (125mV/4.7MΩ). For bass
instruments that do not have active electronics, suited for older ‘vintage’ basses. This
setting is precisely matched to high impedance pickups enabling them to faithfully
reproduce the true frequency and dynamic range of the instrument.
ACTIVE- Lower sensitivity input setting (300mV) for basses with onboard electronics.
Input matched for low signal to noise ratio and optimum transfer of electrical signal from
modern high-end basses.
11. INSTRUMENT INPUT JACK CHANNEL ONE.
This is a standard ¼ inch mono jack socket.
12. PASSIVE/ ACTIVE BASS INPUT SWITCH CHANNEL TWO.
5
13. INSTRUMENT INPUT JACK CHANNEL TWO.
14. HEADPHONE OUTPUT JACK.
This jack accepts ¼ inch stereo headphone jacks. When a headphone is connected to the
jack, the speakers will be disconnected and therefore no sound from them.
15. LIMITER ON/OFF SWITCH.
Sends signal through limiter or bypass.
16. MASTER VOLUME CONTROL.
This is the master volume control and it controls how much power you send to your
speakers as well as the line out socket on the back of the amp. When setting up your
tone or plugging in your instrument, you should keep this control at a low level. All
instruments are different when it comes to how much output is from the pickups.
Likewise for players, depending on how hard or soft you play.
BACK PANEL DESCRIPTION
1. XLR- DIRECT OUTPUT SOCKET.
This is an ultra-low impedance (200Ω) balanced line out for use with recording or PA
mixing consoles. This output is not controlled by the volume control. Changing the level
on your instrument will however, vary the DI output.
2. GROUND LIFT SWITCH.
This allows the grounding of balanced out socket to be disconnected. This is useful if you
are experiencing hum caused by grounding loops/problems.
3. FX SEND & RETURN SOCKETS.
Connect the FX send to auxiliary FX unit input. Connect the FX Return to auxiliary FX
unit output.
4. TUNER OUTPUT.
Connect to instrument tuner. This output can also be used as an additional line out.
5. PRE AMPLIFIER OUTPUT JACK.
These are used for driving a second amplifier such as the M-500 or the PJB S-1000 slave
amplifier or even a tuner.
6. EXTENSION SPEAKER OUTPUT.
This output is for driving an additional 8 ohm speaker such as the PJB 4B. Do not use a
speaker with an impedance of less than eight ohms as the amp will get too hot and shut
down. A “Speakon” connector is used instead of a conventional jack since the amplifier’s
output is strong and therefore can deliver higher currents than jack sockets can handle.
6
7. AC INPUT SOCKET & FUSE.
Connects the amplifier to AC power supply. Always use a grounded plug and make sure
the AC cable is more than 3A rating at 250-volt AC. If you require a longer AC power cord,
we recommend the PJB heavy duty 20 foot power cords. These are available as an
accessory. Use a slow blow ¾ inch fuse.
8. AC INPUT -VOLTAGE SELECTOR.
Switches the amplifier to run on either 110-120 volt or 220-240 volt AC power. Never try
to run the amplifier on a 220-240 volt supply when switched to 110-120 volt. This can
possibly cause major damage to the amplifier.
9. POWER ON/OFF SWITCH.
This switches the main power on and off in the amplifier. When you turn on the power, it will
have about 2 seconds delay to protect the speaker.
Do not leave the amplifier plugged into a power source for long periods of time when not in
use.
7
GETTING STARTED
BEFORE SWITCHING ON POWER – Check that the voltage selector is set to the
correct voltage in your country. (110volt-120volt USA / Japan or 220-240V Europe/
Australia.)
ALWAYS USE A HIGH QUALITY GROUNDED AC POWER CABLE. NEVER
USE THIS AMPLIFIER WITH THE GROUND CONNECTION REMOVED. We
recommend you use original PJB cables.
OPERATION & POSITIONING
TURN THE VOLUME DOWN on the SUITCASE before plugging in your instrument.
Positioning the SUITCASE for Best Sound
Often, playing in different venues will cause your bass to sound different. This is partially due
to the acoustics of the hall influencing the low frequency waves that are coming from your
speaker. Bass waves are large and room dimensions heavily influence them when the walls
reflect the sound waves, causing them to collide by adding together or canceling each other out.
This causes some fundamental notes (the ones you feel more than hear) to ring out louder than
others and some notes not to be heard at all.
Here is an indication of where fundamental bass frequencies are, showing open string’s
approximate frequencies and acoustic wavelength:
F# string
B string
E string
A string
D string
G string
C string
24Hz
31Hz
41Hz
55Hz
73Hz
98Hz
130Hz
46 feet
36 feet
27 feet
20 feet
15 feet
11 feet
9 feet
This may give you some indication of the offending notes (frequencies) that may be
booming or resonating louder or quieter than others. For example if your speakers are five
feet from a wall, the open A string may sound weak. That could be because the path length
of the reflected sound off the wall from your speaker is exactly corresponding to half a
8
wavelength on the open A string causing at that particular note to cancel out.
Where you position the SUITCASE will ultimately affect your low frequency limit. For
best results keep the SUITCASE on the floor. Placing it on objects off the floor will cause
it to sound thin and lack bass punch. Placing the SUITCASE with the back close to a wall
will help reinforce the lower notes. Placing it in a room corner, will further enhance the low
notes.
Room size makes a large difference in how deep the bass will sound. The further the
distance to the listener the less the bass will be. This is due to the physics of acoustics not the
unit itself.
Unfortunately for bass players, low frequencies are always very difficult to control with
room acoustics. The reproduced wavelengths of the notes you are playing often correspond
to the room dimensions, in which case the reflected sound off the walls interferes with the
sound from the speaker as you get further away from it.
Setting Up the Limiter
Although a limiter is not essential to bass amplification, it can be a useful tool in smoothing
out the character of your instrument or playing style. The SUITCASE limiter has a preset
compression ratio of 3 to 1. For each additional increase of 3dB above the set threshold, the
increase in level is actually 1dB. So the dynamic range of your instrument is reduced.
First set up the limiter by having the compression control (7) set fully clockwise. Now
switch on the limiter (15). Start playing and turn control (7) counter-clockwise. You will
see the blue light start to come on and that is the indication that the limiter is now working.
Set this control to suit your taste.
TRANSPORTING AND STORING THE SUITCASE
When transporting in a vehicle, it is recommended that you use an external case or heavy duty
cover to prevent it being damaged by falling over or other objects falling on it.
When Storing:
• Keep the SUITCASE in a dry location preferably at room temperature.
• Do not store the SUITCASE in temperatures below -20 Degrees C or above 40
Degrees C.
• Do not allow it to get wet. If this occurs, never turn it on in this condition.
• Do not leave the SUITCASE connected to a power source.
9
SPECIFICATIONS
Speaker
Computer Optimized Vented Enclosure
Speaker Frequency Response: 30Hz –15KHz
Speaker Compliment: 4 x 5inch proprietary, extended-range drivers
Speaker Sensitivity: 93dB/W/M
Internal Speaker Impedance: 8 Ohms
Dimensions: 13 ¾ ” W x 16½” H x 17 ½” D
Weight: 49 lbs.
Amplifier
PJB 300watt Solid State amplifier with soft clip feature
Frequency Response
Passive and Active input: 30Hz -60KHz
Low Cut Filter: 24dB/Octave at 30Hz.
Maximum Output Power
LOAD Ω
OUTPUT (Watts RMS)
16
140
8
240
4
350
Signal to Noise Ratio
Better than 86 dB (EQ off, Volume on Full.)
Impedance
Passive Input: >4MΩ/22pF
Active Input: >100KΩ/22pF
Line Input: >75KΩ
Pre Amp Out: < 2KΩ
Bal. Line Out: <200Ω
Levels
Passive Input: 10mV-2.5V
Active Input: 20mV-5V
Pre Amp Out: 1.2V
FX send: 900mV
Bal. Line Out: Typical 100mV
Compressor / Limiter
Gain: 0dB
Compression Ratio: 3dB: 1dB
Graphic EQ
50, 160, 630, 2.5K, 12K at +/- 18dB
Protection Circuits
1. AC line filter.
2. Slow-blow Fuse: 6.3A / 250V for 110V~120V, 4A / 250V for 220V~240V
3. AC Transformer: auto cut off at 130ºC, auto reset at 80º C.
10
4. Transistor Thermal Protection: auto cut off at 90º C.
5. Loudspeaker Short-Circuit Protection.
6. DC Output Protection.
7. Power on mute.
8. Power off mute.
Included Parts
12 ft AC Power Cord
Allen Key
11
12
SERVICE/WARRANTY INFORMATION
The SUITCASE has a warranty period of 2 years, starting from the date of purchase.
The buyer must complete and return the enclosed warranty card within 14 days of
purchase.
This warranty covers defect in materials or workmanship that occurs in normal use. Within
warranty period PJB will repair or replace the defect unit free of labor and parts charge. It
is the buyer’s responsibility to use the unit strictly according to instructions written in this
manual and amplifier manual.
This warranty is not transferable; it is provided to original owner only. Damage/defects
caused by the following conditions are not covered by this warranty:
•
•
•
•
Improper handling, neglect or failure to operate the unit in compliance with the
instructions given in user manual;
Connection or operation of the speakers in any way that does not comply with the
technical or safely regulations applicable in the country where the product is used;
Repairs or modifications by anyone other than authorized PJB service agent;
Damages/defects caused by force majeure or any other condition that is beyond the
control of PJB.
Should you need any warranty service, please bring the SUITCASE back to the dealer
from whom you purchased, along with your sales receipt. Depending on the complexity of
the repair work, your dealer may return the defect unit to PJB service center for repair or
replacement.
Phil Jones Bass
American Acoustic Development LLC
8559 Page Avenue St. Louis, MO 63114 USA
Phone: 314 814 1264
Fax: 314 628 9941
www.philjonesbass.com
[email protected]
Phil Jones Bass is a division of American Acoustic Development LLC.
www.aadsound.com
13