1
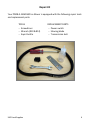
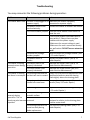
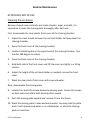
GLOBAL BEAR CORP. PDOB-II-GRM-NSF Ice Shaver Specially designed for making shaved snow! User’s Manual Brought to you by SAC Food Supplies Telephone: +1.714.261.6389 Email: [email protected] Website: http://www.sacfoodsupplies.com January 2013 Table of Contents Machine Overview……………………………………………………………………………………...3 Repair Kit …………………………………………………………………………………………………...4 Operating Instructions ……………………………………………………………………………….5 Troubleshooting ………...………………………………………………………………………………7 Routine Maintenance Cleaning the ice shaver ………………………………………………………..…….………9 Lubricating the center shaft …………………………………………………..….………10 Lubricating the crank handle ……………………………………………….……….….11 Repairs Resetting the electricity leakage breaker ……………………………………….…12 Replacing the power switch ……………………………………………………………..12 Increasing the spring tension of the crank handle …………………………….13 Replacing the shaving blade ……………………………………………………………..13 Fine-tuning the shaving blade …………………………………………………………..14 Replacing the transmission belt ………………………………………………………..15 SAC Food Supplies 2 Machine Overview Global Bear’s PDOB-II-GRM-NSF Ice Shaver is an NSF-certified ice shaving machine specially designed for making shaved snow. It features a highprecision shaving blade and a germ-inhibiting shaving plate. SAC Food Supplies 3 Repair Kit Your PDOB-II-GRM-NSF Ice Shaver is equipped with the following repair tools and replacement parts: TOOLS REPLACEMENT PARTS Screwdriver Wrench (#10 & #12) Squirt bottle Power switch Shaving blade Transmission belt SAC Food Supplies 4 Operating Instructions How to operate a PDOB-II-GRM-NSF Ice Shaver 1. Place the ice shaver on a stable and flat surface. 2. Gently pull the power cord out from the back of the shaver. Adjust the cable to your desired length. (The total length of the power cord is roughly 6 feet.) You may use a twisting motion to facilitate the extension of the power cord and use a sliding motion to return the unwanted portion of the power cord back into the shaver. 3. With the power switch set to the “OFF” position, plug the machine directly into a wall socket. DO NOT use an extension cord. Be sure the electricity supplied matches the specifications listed on the back of the machine. 4. Locate the crank handle on the upper left side of the shaver. Turn the crank handle counterclockwise (backward) to raise the center shaft all the way to the top. 5. Open the front cover of the shaving chamber. 6. Place a shaved snow ice block on the shaving plate. The ice block should be well centered to avoid the tilting of the ice block. 7. Close the front cover of the shaving chamber. 8. Turn the crank handle clockwise (forward) and allow the spikes on the ice block holder to sink into the ice block. 9. Switch on the shaver. The ice block will now begin to spin. 10. Adjust the shaving fineness by turning the precision adjustment knob on the left side of the shaving plate. Turn the knob clockwise to create finer, powder-like shaved snow; turn the knob counterclockwise to create coarser, ribbon-like shaved snow. SAC Food Supplies 5 11. Once you reach the desired shaved snow texture, begin to collect shaved snow. 12. When you are done shaving (or when you need to replace the ice block), be sure to first switch off the shaver. 13. Raise the center shaft and open the shaving chamber. Remove the remaining of the ice block and store it in a chest freezer. 14. Proceed to clean the shaver at the end of a day’s use. (See under Routine Maintenance.) SAC Food Supplies 6 Troubleshooting You may encounter the following problems during operation: Problem Cause The shaver won’t start. The unit is not plugged in to a power supply. The power socket in use has no electricity. The circuit breaker jumped. Action Make sure the shaver is properly connected to a power supply. Connect the shaver to another wall socket. Push the circuit breaker reset button to reset the unit. If the circuits breaker overloads twice or more within 1-2 days, there may be a problem with the power supply. - Make sure the correct voltage is used. - Make sure the unit is connected directly to a wall socket. DO NOT use an extension cord! The electricity leakage Reset the electricity leakage breaker. (See breaker jumped. p. 12 under Repairs.) The power switch is Replace the power switch. (See p. 12 broken. under Repairs.) The shaver is making The center shaft is not Lubricate the center shaft. (See p. 10 unusual noises during properly lubricated. under Routine Maintenance.) operation. The crank handle is not Lubricate the crank handle. (See p.10 properly lubricated. under Routine Maintenance.) The shaver is running The shaving blade and the Simply turn the precision adjustment knob but there is no output. ice block are not in contact. counterclockwise to raise the shaving blade slightly above the shaving plate. The spring under the crank Increase the spring tension of the crank handle has come loose. handle. (See p. 13 under Repair.) The shaving blade is dull. The shaver vibrates severely during operation. The ice block may also become lopsided. The shaver is sitting on an unstable surface. The ice block is offcentered. The shaving blade was not tuned correctly during blade replacement. SAC Food Supplies Replace or sharpen the shaving blade. (See p. 13 under Repairs.) Place the unit on a stable and flat surface. Reposition the ice block so it is well centered in relation to the shaving plate and the center shaft. Fine-tune the shaving blade. (See p. 14 under Repairs.) 7 Problem Cause Action The shaver is not running smoothly. The power cord cannot be pulled out any further. The transmission belt has worn out. Maximum length of the power cord has been reached. The power cord is jammed. Replace the transmission belt. (See p. 15 under Repairs.) Move the shaver to a location closer to the wall socket. (The power cord is roughly 6 feet long.) Twist the power cord while pulling it out gently. If you continue to have trouble, reverse the direction of the twist. DO NOT try to pull out the power cord by force! SAC Food Supplies 8 Routine Maintenance AFTER EACH DAY OF USE Cleaning the ice shaver Because shaved snow ice blocks are made of water, sugar, and milk, it is imperative to clean the shaving plate thoroughly after each use. First, disassemble the clear plastic front cover of the shaving chamber. 1. Adjust the crank handle to lower the ice block holder half way down the shaving chamber. 2. Open the front cover of the shaving chamber. 3. Locate the blocking disc in the upper back of the shaving chamber. Turn the disc 180 degree to unlock. 4. Close the front cover of the shaving chamber. 5. Hold both side of the front cover and lift the cover up slightly in a tilting motion. 6. Adjust the height of the ice block holder as needed; remove the front cover. 7. Wash the clear plastic front cover with soap and water. Next, disassemble the shaving plate. 8. Locate the 2 butterfly screws below the shaving plate. Loosen the screws on both sides and rotate both blocking discs inward. 9. Push the shaving plate upward and remove it from the shaver. 10. Wash the shaving plate in soap and warm water. You may soak the plate, wash it with pressurized water or in a dishwasher, or place the shaving plate in a sterilizer. SAC Food Supplies 9 11. Use a damp clean cloth or paper towel to wipe the walls and the base of the shaving chamber. Wipe with soapy water if necessary, but be sure to rinse off thoroughly. 12. After the shaving plate is cleaned and completely dried, place it back into the shaver. 13. Push and hold the blocking discs outward while tightening the screws. MONTHLY Lubricating the center shaft When the center shaft lacks lubrication, friction between the thread and the gear inside the shaver will cause the machine to produce unusual noises during operation (often a squeaking noise). Therefore, lubricant should be applied to the center shaft monthly even if you are not experiencing any problem with the shaver. Either food-grade grease or food-grade machine oil can be used as a lubricant. 1. Be sure the power switch is set to “OFF” position. 2. Slightly press down the shaft cover and turn counterclockwise to unlock. Remove the shaft cover. 3. Turn the crank handle counterclockwise (backward) to raise the center shaft all the way to the top. 4. Apply your chosen lubricant to the upper and middle sections of the center shaft. Fully cover the gaps between the pitches on the thread. 5. Turn on the shaver and allow the center shaft to descend by itself, which will lubricate the gear in the process. If machine oil is used, manually lower the center shaft for about 10 cm before switching on the shaver. SAC Food Supplies 10 6. When the center shaft reaches the bottom of the shaving chamber, apply lubricant to the lower section of the center shaft. Allow the machine to stay on for about another 30 seconds before turning it off. 7. Repeat Steps #5-8 for 3-5 times. 8. Put back the shaft cover after lubrication is completed. Lubricating the crank handle As with the center shaft, a lack of lubrication inside the crank handle will cause the shaver to produce unusual noises during operation (often a squeaking noise). Therefore, the crank handle should be lubricated monthly even if you are not experiencing any problem with the shaver. Lubricate the crank handle with food-grade machine oil only. 1. Place the shaver on a horizontal position with the crank handle facing up. 2. Use a #12 wrench to loosen the hex bolt on the crank handle. 3. Remove the crank handle. 4. Add machine oil to the cavity below the crank handle. 5. Turn on the shaver and leave it on. Oil will penetrate along the shaft of the crank handle and reach other mechanical parts inside the shaver. The noise you hear should decrease gradually and eventually disappear. This process may take as little as 1-2 minutes or up to 3-5 minutes. 6. Switch off the shaver and reinstall the crank handle. Return the shaver to an upright position. SAC Food Supplies 11 Repairs Resetting the electricity leakage breaker The electricity leakage breaker is located under the top cover of the ice shaver. During transport, sudden impacts can sometimes cause the electricity leakage breaker to trip. 1. Set the power switch to “OFF” position. 2. On the top cover of the shaver, located the 2 stickers covering the screws on the sides of the cover. Remove the stickers. 3. Loosen the screws to remove the top cover. 4. The electricity leakage breaker is located on the rear-left corner of the shaver. To reset, switch off the breaker and then switch it back on. 5. Replace the top cover and securely fasten the screws. 6. Once you are finished, replace the stickers. Replacing the power switch The power switch is one of the consumable parts in the ice shaver. The replacement switch must match the specifications of the old switch. One replacement switch is included in the Repair Kit; additional switches can be purchased from your local Global Bear distributor. 1. Set the power switch to “OFF” position. Unplug the shaver. 2. Remove the 4 screws on the power switch panel. 3. Pull out the power switch panel and disconnect the 2 cables on the back of the switch. Note the specific pin-cable matching order. 4. Push out the existing switch from the back of the panel. 5. Push in a new switch from the front side of the panel. SAC Food Supplies 12 6. Reconnect the 2 cables to the 2 pins on the back of the new switch in the original pin-cable order. 7. Place the power switch panel back to its original position and securely fasten the screws. Increasing the spring tension of the crank handle With time and usage, the tension on the spring under the crank handle will gradually wear out. This may occur after a few months or after a year. 1. Switch on the shaver and allow the crank handle to spin. 2. When the two arms of the crank handle reach a vertical position (perpendicular to the base of the machine) and with the adjacent hex bolt positioned toward the front of the shaver, immediately switch off the shaver. 3. Use a #12 wrench to loosen the hex bolt in a counterclockwise fashion. 4. Rotate the crank handle 180 degrees clockwise (half a circle) to increase the spring tension. 5. Fasten the hex bolt to secure the crank handle. Replacing the shaving blade A dull shaving blade can cause many problems, including unstable or a complete lack of shaving output, insufficient shaving fineness, etc. DO NOT exert added pressure on the crank handle to push down the ice block. Although this action may temporarily correct the problem with a dull blade, in the long run it can significantly reduce the length of a shaver’s life. The proper solution is to sharpen or replace the dull blade. 1. Set the power switch to “OFF” position. SAC Food Supplies 13 2. On the underside of the shaving blade, locate the 2 hex bolts and the 2 washers holding the blade. Use a #10 wrench to take out the bolts and the washers. Remove the blade. 3. Turn the precision adjustment knob counterclockwise to loosen the knob. 4. Next, turn the knob clockwise until a slight resistance is felt. 5. Turn the knob clockwise further for one and a half rotation (rotate 180 degrees 3 times). 6. Now, put on a new or sharpened blade. The blade has two sides: a slanted side and a flat side. The slanted side should be facing left and the flat side should be facing right. In other words, when you are looking down from the top of the shaving plate, the slanted side should be on the top. 7. Put back the washers and the hex bolts. Slightly tighten the bolts with your bare hand. 8. Fine-tune the shaping blade as instructed in the next section. 9. Finally, secure the shaving blade further by evenly tighten the hex bolts with a #10 wrench. (Tighten the bolts alternately and little by little.) Fine-tuning the shaving blade A properly installed shaving blade should be slightly angled, with the end of the blade at the center of the shaving plate positioned lower than the end of the blade toward the outer edge of the shaving plate. If the end of the blade at the center is higher than the end of the blade at the outer perimeter, the ice block will gradually lean toward one direction during operation. 1. Before fine-tuning the shaving blade, be sure the power switch is set to the “OFF” position. SAC Food Supplies 14 2. With a #10 wrench, slightly loosen the hex bolts below the shaving blade. 3. Adjust the height of the shaving blade so that a. the top of the blade at the center of the shaving plate is in line with the surface of the shaving plate; and b. the top of the blade toward the outer edge of the shaving plate is slightly above the surface of the shaving plate. 4. With your bare hand, slightly tighten the hex bolts holding the blade. 5. Double-check the height of the blade by placing a straight edge (such as a credit card or a business card) on top of the shaving plate. Adjust accordingly. 6. Once you are done tuning the shaving blade, secure the shaving blade further: use a #10 wrench to tighten the hex bolts evenly. 7. Again, double-check to make sure that the end of the blade at the outer perimeter sits slightly higher than the end of the blade at the center. Replacing the transmission belt 1. Set the power switch to the “OFF” position. 2. On the top cover of the shaver, located the 2 stickers covering the screws on the sides of the cover. Remove the stickers. 3. Loosen the screws to remove the top cover. 4. Turn the crank handle clockwise (forward) to lower the center shaft all the way down. 5. From the space between the large pulley and the small pulley, use a screwdriver to lift up the transmission belt. 6. Rotate the large pulley clockwise while gently pulling out the belt. SAC Food Supplies 15 7. Next, loop the new belt around the top of the small pulley (toward the back side of the machine). 8. Continue to loop the belt around the right side of the large pulley and rotate the large pulley clockwise to slide the entire belt onto the pulley track. 9. Replace the top cover and securely fasten the screws. 10. Once you are finished, replace the stickers. SAC Food Supplies 16