1
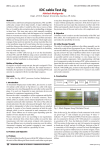
LU M I
S E R I E S
U S E R
MAN UAL
www.graditech.fi
Graditech
Welcome to Graditech!
We thank you for purchasing LUMI speaker wires. We went to great lengths to develop a speaker wire that will offer you
superior performance and years of musical pleasure.
Snow in Finland is light and soft. It quietly drifts to earth days on end engulfing everything. Each flake has its own shape,
uniquely reflecting light. It is nature’s art. And when it snows for days, there is a silence that cannot be described. It is a
silence that simply hugs you. You become one with nature and can feel and sense the Lumi.
Amplifiers and speakers behave differently with different cables. To solve this problem we have developed an adjustable speaker cable that always matches your system allowing it to sound its best with Graditech wires that exhibit “Lumi
quietness.”
Graditech’s Adjustable Loudspeaker Cable™ technology has been created for your listening enjoyment. By using two
or three different matched conductors — single-threaded copper, stranded copper and/or Teflon-insulated silver plated
copper — the ALC™ concept is simple: select the combination of conductors that connect with your system allowing
the music to flow. You will always get clean sound and hear each note and harmonic. It does not matter what equipment
you use or what kind of space you have, the cable will always generate the best synergies. Graditech’s Lumi Series will
always allow your system to sound its best. System dependency is a thing of the past and the search for the perfect
cable has come to an end!
We are sure you will agree that Graditech will unlock the door to pure music. Tune for your system and room and listen.
Tonal quality, pace, harmonics, soundstage, music. It is all there. Enjoy listening!
www.graditech.fi
Unpacking
Lumi 3
The wires have been carefully packed and inspected at the
factory. After unpacking your Lumi speaker wires, please
inspect them for any shipping damage. If any damage is
found, contact your dealer or Graditech immediately.
“One wire for any system with the ability to tune for system
and room… sound, tonal quality, soundstage. System dependency is eliminated and every note comes through.”
LUMI 3 adjustable cable is a new way to approach your
system and music, getting the best sound with just one
cable. Featuring Graditech’s proprietary ALC™ technology to create perfect sound for each and every system,
Lumi 3 consists three different conductors: silver-copper,
stranded copper and solid copper, creating a wide variety
of ways to achieve clear, natural sound regardless of amplifier or speakers. The LUMI Cable Park™ isolates those
wires not being used.
Please keep all original packaging for the entire warrantee
period. If you require replacement packaging please contact Graditech or your dealer.
About LUMI Speaker Wire
There are three models of Lumi speaker wires. Lumi 2 and
3 are adjustable. Lumi 1 is simply plug and play. However,
all Lumi speaker wires require burn in to optimize their
sound. We recommend that you play the wires using all
the conductors for about 100 hours before you begin to
tune for your system.
Lumi 2
Lumi 1
We gave careful consideration to Lumi 2. We listened to
Lumi 1 and then to 3 and then to 1. What was in between?
Was there something in between? Did Lumi 2 have to be
in between? We could not leave well enough alone. Lumi
2 consists of two pair of two different conductors – singlethreaded and stranded – with ALC™. While Lumi 2 does
not have the same potential configurations as Lumi 3, its
geometry maintains the sonic signature and integrity of
Lumi 3. And, Lumi 2 takes Lumi 1 to a new musical level.
Lumi 1 was an interesting challenge. In experimenting with
different configurations and types conductors – stranded
and single-threaded – the sharpness and speed of the
transients were immediately apparent, yet deceiving. We
continued to work on the geometry and conductors until
we had the balance we wanted. Lumi 1 lets you hear the
speed and micro-dynamics of the music. Being our entry
speaker wire we chose not to include ALC™ and believe
that the results of our efforts proved this decision correct.
You can hear the mouth voice of the singer and the surrounding air. We are very happy with this wire. We hope
you will be too.
www.graditech.fi
How To Connect and Tune Your Lumi Speaker Cables
IMPORTANT. Turn off your amplifier when connecting,
disconnecting, and changing leads on your Lumi speaker
wires. Never let the positive and negative connectors touch
each other, even when your amplifier has just been turned
off. The power capacitors in your amplifiers still carry current.
Lumi 2 and 3 have dozens of different configurations. By
listening to each conductor independently and then in parallel with another on both the positive and negative poles,
you will not only learn the full range of sound that your
system can produce, but most important, you will unlock
your system’s door to pure music.
With your amplifier turned off, connect the Lumi speaker
wires to your amplifier. The Cable Park™ end of the wires
attach to your speakers and the end with just a positive
(red) and negative (black) leads attach to your amplifier.
Most amplifiers will accommodate banana plugs. We recommend that you insert the banana plugs into the ends of
the binding posts versus compressing them in the center
holes of the post. Graditech will not warrantee crushed banana plugs.
To burn in you wires, use all the conductors. All Lumi
speaker wires require some playing time before you will
hear their optimum performance.
To listen to and burn in your Lumi speaker cables, simply
connect all the positive leads (red) together by inserting
each banana plug into the back of the other. Do the same
for the negative leads (black). Then connect the positive
lead to the positive input of your speaker and the negative
lead to the negative input of your speaker. Next connect
the positive lead to the positive output of your amplifier
and then connect the negative lead to the negative output
of your amplifier. Repeat the same process for the other
speaker.
Be sure to only connect positive to positive (red to red)
and negative to negative (black to black). Never connect
a positive and negative wire as it may cause damage to
your amplifier. Graditech is not responsible for any damage caused to any piece of equipment should you cross
positive and negative leads.
For Lumi 1 speaker cables, you simply have to
connect the positive lead (red) to the positive input of the your speaker and the positive output
of your amplifier. And, then connect the negative
lead (black) to the negative input of your speaker and the negative output of the amplifier. Lumi
1 speaker wires are ready to play once they are
connected correctly.
Once all the positive and negative leads are correctly connected to both the speakers and amplifier (red to red and black to black NEVER red
to black or black to red) you are ready to listen to
and burn in your Lumi speaker wires.
With Lumi 1 speaker cables, once you have
completed this step the wires are ready to be
listened to. No other adjustments are required.
Tuning Your Cables (only Lumi 2 and 3)
When you believe that your Lumi 2 or 3 speakers cables have been burned in, you are ready
to tune the cables for your system. All adjustments are made at the speakers so there is no
need to disconnect your Lumi speaker cables
from your amplifier.
Turn off your power amplifier. Never try adjusting
your Lumi cables with your amplifier turned on.
We recommend that you begin the tuning process by first listening to each connector individually. It is important to hear and learn the sound
that each conductor produces in your system.
Each conductor will interact with your amplifier
and speakers differently. Taking notes of what
you hear may be helpful.
With your amplifier turned off, disconnect the
positive and negative leads from your speakers.
Remember do not let positive and negative leads
touch each other. Free the solid core conductor
and insert the stranded and silver leads into an
open space in the Cable Park. Do this for both
the positive and negative leads and both right
and left speakers. You should now have four
leads inserted in the Cable Park and the solid
core leads ready to be plugged into the speaker
(See Figure 1). Insert the positive lead into the
positive input of the speaker and the negative
lead into the negative input of the speaker.
www.graditech.fi
Figure 1: Solid core lead ready for playing
Make sure all connections are correct and
there are no crossed leads (positive to negative or negative to positive). Turn on your amplifier and listen.
Once you are familiar with the sound that the
solid core leads produce in your system, turn
off your amplifiers, disconnect your speaker
wires (remembering to not let positive and
negative wires to touch each other) and prepare to listen to the stranded conductors. Unplug the stranded copper conductor from the
Cable Park and insert the solid core conductor
into the empty space. Do this for both positive and negative conductors and right and left
speakers. You should still have four leads in
the Cable Park but the stranded leads are now
free and ready to be plugged into your speakers (See Figure 2). Connect the speaker wires
to the speakers.
Figure 1
Figure 2: Stranded leads ready for playing
Make sure all connections are correct and there
are no crossed leads (positive to negative or
negative to positive). Turn on your amplifier and
listen.
You will begin to hear the different sound the solid and stranded conductors produce. Take notes
as to speed, pace, tonal balance, placement,
etc. You are ready to listen to the silver coated
conductors. You are also now familiar with how
to change the conductors.
Turn off your amplifier, disconnect your speaker
wires, remembering to not let positive and negative wires to touch each other, and prepare to listen to the stranded conductors. Unplug the silver
coated conductor from the Cable Park and insert
the stranded conductor into the empty space.
Do this for both positive and negative conductors and right and left speakers. You should still
have four leads in the Cable Park but the silver
leads are free and ready to be plugged into your
speakers (See Figure 3). Connect your speaker
wire to the speakers.
Figure 2
www.graditech.fi
Figure 3: Silver coated leads ready for playing
Make sure all connections are correct and there are no
crossed leads (positive to negative or negative to positive). Turn on your amplifier and listen.
The sound you now hear will still be different from the
previous two conductors. You will be able to determine
what sound you liked best from each conductor and will
be able to experiment using different combinations of
leads to get the best sound from your system.
10
Figure 3
Figure 4: Example - Graditech factory system configuration
We encourage you to take time and try multiple combinations. If the cables are fully burned in and you have
become familiar with the sound of each conductor, then
finding the right combination of conductors for your system will follow quickly.
HINT
Some systems sound very good using all of the conductors, but it has been our experience that the best
sound comes from using a limited number of conductors. In our factory, one of our reference systems gives
best sound with the solid conductor being used for the
negative pole and the stranded and silver for the positive. Hence, a total of three conductors are being used
(See Figure 4). In another system we have found that
the solid and stranded wires for both the positive and
negative connections and no silver conductors sounded best.
Figure 4
11
www.graditech.fi
12
Lumi Specifications
All Lumi speaker wires share similar sonic characteristics. Careful
consideration has been given to plugs, conductors, and dialectics.
The geometry of the wires is similar but adapted for each series
– Lumi 1, 2, and 3. Banana plugs are used for ease of tuning and
docking.
13
www.graditech.fi
Lumi 3
An adjustable speaker cable comprised of
three twisted pairs of different conductors
to generate the best sound for your system.
Two leads at the amp and six adjustable
leads at the speaker.
Concept: Three different twisted pairs of
wires of different composition and dielectrics designed to maximize the synergy between your speakers and amplifier.
- Silver plated copper with PTFE
insulation, 1.22mm²
- Stranded copper with PVC insulation,
1.52mm²
- Solid copper with THEIC modified
varnish, 1.10mm²
- Total wire area 3.84mm²
- Measurements 2.5m @1kHz
• Capacitance 268pF
• Inductance 0.81uH (Loop)
• Resistance
- Stranded copper 0.034ohm
- Silvered copper 0.037ohm
- Solid copper 0.040ohm
- All parallel 0.013ohm
14
Lumi 2
An adjustable speaker cable comprised
of two twisted pairs of different conductors to generate the best sound for your
system. Two leads at the amp and four
adjustable leads at the speaker.
Lumi 1
A non-adjustable speaker cable comprised
of two twisted pairs of different conductors
to generate the best sound for your system.
Two leads at the amp and two leads at the
speaker.
Concept: Two different twisted pairs of
wires of different composition and dielectrics designed to maximize the synergy
between your speakers and amplifier.
Concept: Two different twisted pairs of
wires of different composition and dielectrics
designed to maximize the synergy between
your speakers and amplifier.
- Stranded copper with PVC insulation,
1.52mm²
- Solid copper with THEIC modified
varnish, 1.10mm²
- Total wire area 2.62mm²
- Measurements 2.5m @1kHz
• Capasitance 136pF
• Inductance 1.29uH
• Resistance
- Stranded copper 0.034ohm
- Solid copper 0.040ohm
- All parallel 0.018ohm
- Stranded copper with PVC insulation,
1.48mm²
- Solid copper with THEIC modified
varnish, 1.08mm²
- Total wire area 2.56mm²
- Measurements 2.5m @1kHz
• Capasitance 134pF
• Inductance 1.28uH
• Resistance 0.019ohm
15
Copyright © Graditech Oy. All rights reserved