1
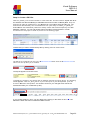
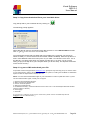
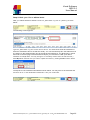
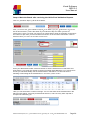
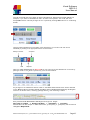
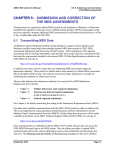
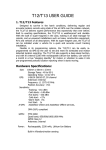
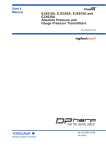
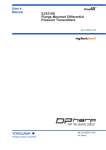
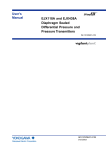
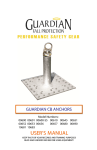
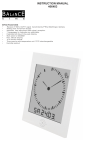
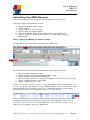
Visual Software
MDS 3.0
User Manual
Submitting Your MDS Records
( The terms Submission File and Zip File are used interchangeably in this document.)
There are 6 steps to the submission process:
1.
2.
3.
4.
5.
6.
Specify the MDSs you wish to submit
Create a Zip file
Copy the Zip file to your local drive
Log on to CMS and send the Zip file
After you submit the Zip file to CMS mark the records as Subm it t ed
After you receive t he Final Validat ion Report from CMS mark the records
appropriately
Step 1: Specify the MDSs you wish to submit:
As shown below click on Dat a Subm ission and t hen on Ready
On the screen shown above specify which MDSs you wish to submit as follows:
1.
2.
3.
4.
5.
6.
Specify a resident alphabetical range.
Specify whether or not to include Medicare Assessments.
Specify the Assessment Reference Date Range.
Specify a single nursing unit or all . (Click on NF t o also view assessment without a unit.)
Specify a single Assessment Type or all .
Specify a single CAT t ype or all
To hold a record and not subm it it , click on t he H alongside the record as shown below. As
soon as you click H it will disappear from t he Ready t ab and now be in t he Hold t ab. Not e
that the tab that you are currently in shows in red. Note also that when you leave Data
Subm issions and t hen ret urn it will bring you back t o your last locat ion.
To submit records that were previously on Hold click on t he Hold t ab t o get a list of all
records on hold, and t hen click on t he R alongside t he record you wish t o subm it . I t will
disappear and im m ediat ely show in t he Ready t ab.
Reliable Health Systems, LLC
2610 Nostrand Avenue
Brooklyn, NY 11210
www.ReliableHealth.com
Page 32
Visual Software
MDS 3.0
User Manual
Step 2: Create a ZIP file:
Click t he Creat e icon as shown below t o creat e a ZI P file. This will creat e a Zip file with all of
the assessments that are Ready to Submit and that show under t he Ready t ab. Only t he
soft ware can place an assessm ent in t he Ready t ab of t he Dat a Subm ission m enu. The
soft ware will aut om at ically t urn t he assessm ent from Not ready t o Subm it t o Ready t o
Subm it when t he assessm ent passes t he validit y checks and will be accept ed by t he CMS
database. However, you can and should change the status of assessments in certain
circum st ances. That s part of what we ll cover in t he following pages.
Confirm that you wish to create the Zip file by clicking Yes as shown below .
The Zip file is creat ed and is now in t he Submission Files t ab. Click t he Submission Files
t ab t o view t he zip files you ve creat ed.
The Zip file appears as shown below:
To display t he records in t he Zip file click on Display Cont ent as shown above. The following
screen appears. Click t he Print but t on t o print t his report to your local printer. ( You can
choose t o Recreat e t he Zip file. You should to do this if you changed some data in the
assessments after you created the zip file.)
If you created a batch in error you can delete it by clicking on the white on blue X . This
deletes the batch but does not delete the MDS records.
Reliable Health Systems, LLC
2610 Nostrand Avenue
Brooklyn, NY 11210
www.ReliableHealth.com
Page 33
Visual Software
MDS 3.0
User Manual
Step 3: Copy the submission file to your local disk drive:
Copy the Zip file to your local disk drive by clicking on
The following prompt appears:
Notice that the file name is comprised of the date and time in YYYYMMDDHHMMSS format.
Click on Save t o save t he file t o a local disk Drive.
You should save the ZIP file to a folder that is accessible to the computer you will use to
submit to CMS (i.e., the PC that has the ATT Dialer software installed). Save the Zip files in a
folder called MDS30 Subm issions and place all your MDS 3.0 subm ission files t here. This is
the directory you will access when you submit your Zip files t o t he st at e. You r e act ually
saving a copy of the Zip file to your computer when you do this step. The Zip files will remain
on the server as well.)
Step 4: Log on to CM S and submit your file.
As per QIES Technical Support Office (www.qtso.com) Transport Layer Security (TLS) 1.0 must be active
in your web browser in order to access the QIES National Systems, including the new MDS 3.0 Submission
System. Follow the steps below to activate TLS 1.0.
Note: You must have administrative rights to your workstation in order to update this value. If you do
not have administrative rights, contact your IT support.
1. Open the Internet Explorer browser.
2. Select "Tools" from the Menu bar.
3. Click on "Internet Options".
4. Select the "Advanced" tab.
5. Underneath "Security", ensure that the box next to "Use TLS 1.0" is checked (this should be located
near the bottom of the list).
6. Click "Apply".
7. Click "Ok".
I f you have any quest ions concerning t his inform at ion, please cont act t he QTSO Help Desk at
[email protected] or 1 800- 339- 9313.
Reliable Health Systems, LLC
2610 Nostrand Avenue
Brooklyn, NY 11210
www.ReliableHealth.com
Page 34
Visual Software
MDS 3.0
User Manual
Step 5: M a r k you r file a s Subm it t e d
After you submit the file to CMS and receive a Subm ission I d click on Subm it as shown
below:
The following screen appears:
Type t he Subm ission I d int o t he box shown above. The subm ission Id will be used later to
track the submission files as we will see shortly. You can retroactively fill in the Submission Id
by clicking on the Submit button next to the zip file and entering it. The Subm ission I d can
be found on the first page of the Submission Report you receive from CMS. (The date is
init ialized t o t oday s dat e. You m ay change it t o accurat ely reflect when t he file was sent .)
Press Updat e . Confirm t hat you wish t o updat e t he bat ch by clicking Yes as shown below:
The Zip file is now marked as submitted as shown below. You may have to click another tab
and t hen ret urn t o t he Subm ission Files t ab t o see your checkm ark.
Reliable Health Systems, LLC
2610 Nostrand Avenue
Brooklyn, NY 11210
www.ReliableHealth.com
Page 35
Visual Software
MDS 3.0
User Manual
Step 6: Mark the Batch after receiving the CM S Final Validation Report
Click t he Validat ion Report tab as show below.
Aft er you receive t he Final Validat ion Report from CMS, t ype your Subm ission I d int o t he
box as shown below. ( This is the same Id you entered in Step 5 to mark your file as
Subm it t ed .) Once you enter your Id here you will be able to click on the button to the left of
the number to pick from your list of batches as shown on the second screen below. Click on
Refresh aft er you ent er t he num ber t he first t im e:
Enter your Submission ID or click from the list to see the assessments in that batch and
their status. If you enter the number in the box manually click Refresh . If you choose from
the list you will automatically see the assessments in that batch. You will now see the
following screen listing all the assessment s in t he bat ch you ve chosen.
Here you can see and do a number of things. You can see status of the assessments in the
batch as show below; how many assessments there are; and how many were rejected or
accepted as marked by you.
Reliable Health Systems, LLC
2610 Nostrand Avenue
Brooklyn, NY 11210
www.ReliableHealth.com
Page 36
Visual Software
MDS 3.0
User Manual
You can now mark t he ent ire bat ch as eit her Accept ed or Rej ect ed as shown below. For
exam ple, if you have 50 assessm ent s and 2 of t hem were rej ect ed. You could Set all t o
Accept ed and t hen m anually change t he 2 t o rej ect ed by clicking R as shown on a following
screen.
The blue outline indicates the current status of the assessment. You can also m ark each record
individually by clicking on the appropriate button as shown below:
Ready to Submit
Hold
Accepted
Rejected
Once you mark assessments as Rejected you can view j ust t hose assesm ent s on t he list by
put t ing a check in t he Show rej ect ed only box as shown below.
Any changes in an assessm ent st at us m ade on t he Dat a Subm ission m enu will be reflect ed
on t he Select or . You can also change the status of an individual assessment by clicking the
t ools icon as shown below, choosing Change St at us , t hen select ing a st at us.
Every assessm ent s Submission status goes t hrough four st ages:
Not ready to submit
Ready to Submit
Submitted
Accepted
Assessm ent s can also be put on Hold while eit her I ncom plet e or Com plet e and can also be
changed to Rejected .
Reliable Health Systems, LLC
2610 Nostrand Avenue
Brooklyn, NY 11210
www.ReliableHealth.com
Page 37