1
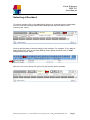
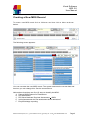
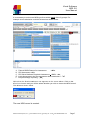
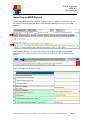
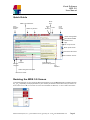
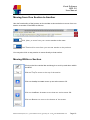
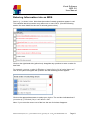
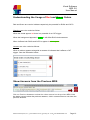
Visual Software
MDS 3.0
User Manual
Visual Software
MDS 3.0
User Manual
PRELIMINARY
Copyright © 2010
Reliable Health Systems, LLC
2610 Nostrand Avenue
Brooklyn, NY 11210
www.ReliableHealth.com
Tel: 718- 338- 2400
Fax: 718- 338- 2741
Reliable Health Systems, LLC
2610 Nostrand Avenue
Brooklyn, NY 11210
www.ReliableHealth.com
Page 1
Visual Software
MDS 3.0
User Manual
Reliable Health Systems, LLC
2610 Nostrand Avenue
Brooklyn, NY 11210
www.ReliableHealth.com
Page 2
Visual Software
MDS 3.0
User Manual
VISUAL MDS 3.0
INDEX
Main MDS 3.0 Tool- bar Functions........................................................................ 4
Selecting a Resident ......................................................................................... 5
Creating a New MDS Record .............................................................................. 6
Selecting an MDS Record ................................................................................... 8
Quick Guide .................................................................................................... 9
Resizing the MDS 3.0 Screen (*NEW*) ................................................................ 9
Navigating Within an MDS
Moving from One Section to Another ......................................................... 10
Moving Within a Section .......................................................................... 10
Entering I nformation into an MDS ....................................................................... 11
Understanding the Usage of Red and Green Colors ................................................ 12
Show Answers from the Previous MDS ................................................................. 12
Signing the MDS (*REVISED*) ........................................................................... 13
Error Checking
On the Section Bar ................................................................................. 14
Editing Status ........................................................................................ 15
Viewing and Printing t he Official MDS Form for the Section ..................................... 16
Using Tools to Simplify Your Work
Show and Edit All Interview Questions ....................................................... 17
Activities of Daily Living Populate ADL s Section G from CNA ...................... 18
View Signatures of Persons Completing the Assessment ............................... 19
Assessment Data A Compact View for Printing ......................................... 20
Show Header Information ........................................................................ 21
Drug Classifications for Medications in Section N ......................................... 22
Import Therapy into Section O ................................................................. 23
Assessment Tools
RUGs Calculation .................................................................................... 24
Change Status ....................................................................................... 24
Correction Request ................................................................................. 24
Deleting MDS Records Created for Practicing .............................................. 24
OBRA Assessment Schedule ..................................................................... 24
Printing an MDS Booklet (Form) ......................................................................... 25
Care Area Triggers (CATs) ................................................................................. 26
Submitting MDS Records (*REVISED*) ................................................................ 27
Reporting:
MDS Census Roster ................................................................................ 30
Medicare Schedule .................................................................................. 30
OBRA Schedule ...................................................................................... 30
Quality Indicator Matrix Form 802 .......................................................... 30
Census and Conditions Form 672 ........................................................... 30
CMI Report ............................................................................................ 30
Importing MDS Records .................................................................................... 31
MDS 3.0 Report Generator ................................................................................ 37
Reliable Health Systems, LLC
2610 Nostrand Avenue
Brooklyn, NY 11210
www.ReliableHealth.com
Page 3
Visual Software
MDS 3.0
User Manual
Main MDS 3.0 Tool- bar Functions:
Select Recently Accessed Resident
Select Module
Selected/ Active Resident
Select Resident
Basic Resident Information for the Selected/ Active Resident
Select an MDS
View List
of MDSs
View CAT Triggers
for Current MDS
View
ADTs
Submit MDSs
Reports and
Report Generator
Documents
Data Explorer
Other
Functions
Print Completed
MDS Form
Resizing the MDS Screen
Reliable Health Systems, LLC
2610 Nostrand Avenue
Brooklyn, NY 11210
www.ReliableHealth.com
Page 4
Visual Software
MDS 3.0
User Manual
Selecting a Resident
To select a resident click on the Magnifying Glass icon as shown below: (Alternately
you can clear the existing resident name and type the last few letters of the
resident s last nam e.)
Click on the first letter of the last name of the resident. For example, if you want to
select John Doe click on the letter D as shown below and then click on Set
alongside the proper name.
Not ice on t he screen below t hat John Doe is now the active resident.
Reliable Health Systems, LLC
2610 Nostrand Avenue
Brooklyn, NY 11210
www.ReliableHealth.com
Page 5
Visual Software
MDS 3.0
User Manual
Creating a New MDS Record
To creat e a new MDS record click on Select or and t hen click on New as shown
below:
The following screen appears:
You can now date the new MDS record. The system assumes the current date and
time but you can change this. See the screen above.
Notice
A.
B.
C.
E.
F.
above that there are five (5) ways to classify the MDS:
Federal OBRA Reason for Assessment
PPS Assessment
PPS Other Medicare Required Assessment OMRA
Is this Assessment the first assessment since admission?
Entry/Discharge reporting
Reliable Health Systems, LLC
2610 Nostrand Avenue
Brooklyn, NY 11210
www.ReliableHealth.com
Page 6
Visual Software
MDS 3.0
User Manual
It is necessary to select one MDS type from within each of the 5 groups. For
example a new admission could be selected as shown below:
A.
B.
C.
E.
F.
Federal OBRA Reason for Assessment
- 01
PPS Assessment 01
PPS Other Medicare Required Assessment OMRA - 0
Is this Assessment the first assessment since admission? - 0
Entry/Discharge reporting - 99
Not ice t hat t he Cont inue but t on now appears on t he screen above. Click on the
Cont inue button and you will be asked whether you wish to create the MDS record.
Click Yes as shown below.
The new MDS record is created:
Reliable Health Systems, LLC
2610 Nostrand Avenue
Brooklyn, NY 11210
www.ReliableHealth.com
Page 7
Visual Software
MDS 3.0
User Manual
Selecting an MDS Record
To select an MDS record for resident John Doe click on Select or and t hen click on
the Open icon alongside the MDS. In the example below there is only one MDS
record.
The following appears. You can now click on any section to begin entering MDS
inform at ion. For exam ple t o ent er inform at ion for sect ion A, click on A as shown
below:
Sect ion A appears as shown below:
Reliable Health Systems, LLC
2610 Nostrand Avenue
Brooklyn, NY 11210
www.ReliableHealth.com
Page 8
Visual Software
MDS 3.0
User Manual
Quick Guide
Show
form
MDS Type and Status
Go to
previous
section
Select any section
Show
all
sections
Tools
Go to
next
section
Check m issing fields
Show Previous MDS
Resize Screen
Sign
Go to top of form
Move up full screen
Move down full screen
Go to bottom of form
Question
Numeric
response
Text response
(Click for drop- down)
CAT
indicator
Green background for RUGs
Red text for CATs
Resizing the MDS 3.0 Screen
To maximize the area on your screen for MDS 3.0 we advise you to use kiosk mode by pressing function
key F11 . Depending on the physical size of your monitor you will then need to fine- tune your screen. As
shown below click on + t o increase t he screen area available for MDS 3.0, or click on - t o decrease it.
Reliable Health Systems, LLC
2610 Nostrand Avenue
Brooklyn, NY 11210
www.ReliableHealth.com
Page 9
Visual Software
MDS 3.0
User Manual
Moving from One Section to Another
Use the functionality of the buttons on the toolbar as shown below to move from one
section to another in the MDS as follows:
Click Next t o m ove from your current section to the next.
Click Previous t o m ove from your current sect ion t o t he previous.
You may also click on any section to move directly to that section.
Moving Within a Section
Click on the blue vertical bar and drag it to scroll up and down within
the MDS.
Click on Top t o m ove t o t he t op of t he sect ion
Click on the Up Arrow to move up an entire screen- full.
Click on t he Down Arrow t o m ove down an ent ire screen- full.
Click on Bot t om t o m ove t o t he bot t om of t he screen.
Reliable Health Systems, LLC
2610 Nostrand Avenue
Brooklyn, NY 11210
www.ReliableHealth.com
Page 10
Visual Software
MDS 3.0
User Manual
Entering Information into an MDS
Sect ion L is shown below. Note that the words of certain questions appear in red.
This indicates that this question may affect one or more CATs. (See the following
section for more details on the use of red and green colors.)
Click on the right hand side (yellow box) alongside any question to enter a value for
that field.
For exam ple, t o ent er a value for Broken or loosely fit t ing full of part ial dent ures
click on the yellow alongside the question and the following choices appear:
Click on the appropriate answer to select your choice. The red box indicates that if
you select [ 1] Checked ( Yes) it will affect a CAT.
Note: I f you move the cursor out of the box the set of choices disappear.
Reliable Health Systems, LLC
2610 Nostrand Avenue
Brooklyn, NY 11210
www.ReliableHealth.com
Page 11
Visual Software
MDS 3.0
User Manual
Understanding the Usage of Red and Green Colors
Red and Green are used to indicate respectively the potential for RUGs and CATs.
Questions are color coded as follow:
When the words appear red there is a potential for a CAT trigger.
When the background appears in green in will affect RUG reimbursement.
When it affects both RUGs and CATs is appear in red on green
Answers are color coded as follows:
When a red box appears alongside an answer it indicates that it affects a CAT
trigger. See the illustration below:
Show Answers from the Previous MDS
Click on Previous Answers t o show t he values ent ered on t he previous MDS. Click
the button once to show the previous answers, click it a second time to not show the
previous answers.
Reliable Health Systems, LLC
2610 Nostrand Avenue
Brooklyn, NY 11210
www.ReliableHealth.com
Page 12
Visual Software
MDS 3.0
User Manual
Signing the MDS
To sign the MDS click on the signature icon as shown below:
The following screen appears:
1. As shown above click on each sect ion you wish t o sign. A
2. Type your password as indicated above.
3. Click on Sign .
appears.
Notice that you can also sign questions V0200B , V0200C and Z0500 .
I f a sect ion was signed in error click on Edit as circled above. You can t hen change
the section signed or delete the signature. See page 19 for more details.
Reliable Health Systems, LLC
2610 Nostrand Avenue
Brooklyn, NY 11210
www.ReliableHealth.com
Page 13
Visual Software
MDS 3.0
User Manual
Error Checking: On the Section Bar
Error checking is done dynamically, on both the section level and the field level, as
you enter the information into the MDS. For example, in the screen below question
B0200 is not com plet ed:
Notice the following indicators above:
1. A red bar appears alongside B0200 indicating the field is missing.
2. The sect ion B square but t on appears in red indict ing t he sect ion is not
complete.
3. Unrelat ed t o B0200 being incomplete, not ice t hat an * appears in t he
sect ion Z box. This indicat es t hat alt hough sect ion Z is com plete there is a
warning. A Warning may appear, for example, when the date entered
indicates that the assessment is late.
Reliable Health Systems, LLC
2610 Nostrand Avenue
Brooklyn, NY 11210
www.ReliableHealth.com
Page 14
Visual Software
MDS 3.0
User Manual
Error Checking: Th e
Edit in g St a t u s I con
To check t he com plet ion st at us of t he ent ire MDS click on Edit ing St at us as shown
above. The following screen appears:
Not ice t hat t hree errors are not ed above. The first is in sect ion B ( quest ion
B0200 ) and t he next t wo are warnings for sect ion Z ( bot h of which apply t o t he
dat e ent ered for quest ion Z0500B, Completion Date.)
You can print t he list of errors by clicking on t he Print icon as shown above.
You can close t he error list ing by clicking on CLOSE WI NDOW . As shown above.
This error checking is quick and efficient. We recommend, however, that before you
finalize t he MDS you should also run t he official CMS validat ion by clicking on CMS
Validat e as shown above. This CMS error checking, however, takes about 20
seconds.
Reliable Health Systems, LLC
2610 Nostrand Avenue
Brooklyn, NY 11210
www.ReliableHealth.com
Page 15
Visual Software
MDS 3.0
User Manual
Seeing and Printing the Official MDS Form for the
Section on W hich You are W orking
To view and print the official MDS form for the section on which you are working click
on the icon as shown above. The form appears as follows:
The section appears with the answers you entered. You can now print that section by
clicking on the print icon as shown above.
To continue completing the MDS click on any section icon.
Reliable Health Systems, LLC
2610 Nostrand Avenue
Brooklyn, NY 11210
www.ReliableHealth.com
Page 16
Visual Software
MDS 3.0
User Manual
Show and Edit All Interview Questions
When you are doing the resident interview it is helpful to see all the interview
questions together. To see and edit all interview questions do the following:
Click on t he t ool icon and t hen on t he Show int erview it em s only icon. All int erview
items appear as shown below:
Reliable Health Systems, LLC
2610 Nostrand Avenue
Brooklyn, NY 11210
www.ReliableHealth.com
Page 17
Visual Software
MDS 3.0
User Manual
Activities of Daily Living
To update your ADLs (Section G) based on the information entered by your CNAs do
the following:
Click on t he t ool icon and t hen on t he Act ivit ies of Daily Living icon. The followings
screen appears:
Alongside any ADL click on t he Updat e but t on t o m ove t he CNA scores ( i.e., t he
scores in t he Calculat ed colum n) int o t he current MDS (replacing the MDS values
shown in t he Current G0110A G0110B colum n) .
For example, to update the ADLs for Locom ot ion On Unit click on t he Updat e
button as shown above.
Reliable Health Systems, LLC
2610 Nostrand Avenue
Brooklyn, NY 11210
www.ReliableHealth.com
Page 18
Visual Software
MDS 3.0
User Manual
Signatures of Persons Completing the Assessment
To view a list of the people who signed the MDS do the following:
Click on t he t ool icon and t hen on t he Signat ures of Persons com plet ing t he
Assessm ent icon. The following screen appears:
The signatures of the people who signed the MDS appear along with the
sections they signed and the date it was signed.
If a section was signed in error click on edit as shown above and the
following screen appears:
To change the section: click on the blue dropdown, select the proper section and
click SAVE .
To delete a section, click on DELETE .
Reliable Health Systems, LLC
2610 Nostrand Avenue
Brooklyn, NY 11210
www.ReliableHealth.com
Page 19
Visual Software
MDS 3.0
User Manual
Assessment Data
A Compact View
To print out the MDS in a Compact View (i.e., using fewer sheets) do the following:
Click on t he t ool icon and t hen on t he Assessm ent Dat a icon. The following screen
appears:
Click on the print icon as shown above to print the MDS in compact form.
Reliable Health Systems, LLC
2610 Nostrand Avenue
Brooklyn, NY 11210
www.ReliableHealth.com
Page 20
Visual Software
MDS 3.0
User Manual
Header Information
To view and edit the MDS header information do the following:
Click on t he t ool icon and t hen on t he Header I nform at ion icon. The following
screen appears:
Note: There should be no need for you to edit the Header Information; all
information in the Header Section is being filled in by the software. If you get
an error on the Header Information section contact your RHS client service
representative.
Reliable Health Systems, LLC
2610 Nostrand Avenue
Brooklyn, NY 11210
www.ReliableHealth.com
Page 21
Visual Software
MDS 3.0
User Manual
M DS 3.0 Drug Class Index
To view the resident s m edicat ions and t he Medication classifications needed for
section N do the following:
Click on t he t ool icon and t hen on t he MDS 3.0 Drug Class I ndex icon. The
following screen appears:
Note that the medications appear only if you are using the VISUAL Electronic Medical
Records (EMR) modules.
Reliable Health Systems, LLC
2610 Nostrand Avenue
Brooklyn, NY 11210
www.ReliableHealth.com
Page 22
Visual Software
MDS 3.0
User Manual
I m por t Th e r a py M in u t e s for Se ct ion
O
To import therapy minutes from the Therapy module into sect ion O of the MDS
click on the tool icon and then on the Therapy icon as shown below:
The following screen appears showing therapy services performed, and the current
values in Sect ion O of t he MDS:
Click on Update Assessm ent as shown above to place the therapy values into
Sect ion O of t he MDS. Click on Sect ion O t o go back to that section.
Reliable Health Systems, LLC
2610 Nostrand Avenue
Brooklyn, NY 11210
www.ReliableHealth.com
Page 23
Visual Software
MDS 3.0
User Manual
Assessment Tools
When you click on the tool icon to the right of the assessment you obtain access to
the following functionality:
1. RUGs Calculation: To view a complete analysis of your RUGs score.
2. Change Status: The ability to change the submission status of the MDS record
t o Ready t o Subm it , Hold and Subm it t ed .
3. Correction Request: Allows you to either modify the existing record or
inactivate the existing record.
4. Delete: To delete the current record. This functionality is to allow you to
delete your practice records. This functionality will be made more difficult
after October 1st.
5. OBRA Assessment Schedule: A detailed listing of all the relevant dates that
are calculated based on the Assessment Reference Date as follows:
Reliable Health Systems, LLC
2610 Nostrand Avenue
Brooklyn, NY 11210
www.ReliableHealth.com
Page 24
Visual Software
MDS 3.0
User Manual
Printing the MDS Record
To print an MDS do the following:
As shown above click on Forms and t hen click on t he View icon alongside the
MDS you wish to print. The form appears as shown below:
Click on the print icon as shown above to print the form.
Reliable Health Systems, LLC
2610 Nostrand Avenue
Brooklyn, NY 11210
www.ReliableHealth.com
Page 25
Visual Software
MDS 3.0
User Manual
Care Area Triggers (CATs)
Click on CAT s CAA s as shown below and t he com put er displays t he CAT t riggers:
Click on any triggered CAT as shown above ( e.g., Com m unicat ion ) and the
computer displays the questions and answers that caused the triggers as shown
below.
Reliable Health Systems, LLC
2610 Nostrand Avenue
Brooklyn, NY 11210
www.ReliableHealth.com
Page 26
Visual Software
MDS 3.0
User Manual
Submitting Your MDS Records
On the tool- bar click on Dat a Subm ission as shown below.
There are 4 steps to the submission process:
1.
2.
3.
4.
Specify the MDSs you wish to submit
Zip the selected MDSs and m ark t he records as Subm it t ed
Copy the Zip file to your local drive
Log on to CMS and send the submission file
Step 1: Specify the MDSs you wish to submit:
On the screen shown above specify which MDSs you wish to submit as follows:
1.
2.
3.
4.
5.
Specify a resident alphabetical range.
Specify whether or not to include Medicare Assessments.
Specify the Assessment Reference Date Range.
Specify a single nursing unit or all .
Specify a single Assessment Type or all .
By clicking on any Ready but t on to the right of the MDS you can toggle the
submission status of any MDS record bet ween Ready and Hold .
Reliable Health Systems, LLC
2610 Nostrand Avenue
Brooklyn, NY 11210
www.ReliableHealth.com
Page 27
Visual Software
MDS 3.0
User Manual
Step 2: ZIP the selected records a nd m a r k t h e m a s Su bm it t e d :
Click t he Creat e icon as shown below to ZIP (compress) the MDS records:
The following screen appears showing the new ZIP file created:
Not ice above t hat t he dat e and t im e are insert ed. Click Updat e as shown above t o
mark these records as submitted and to create the file. You will be asked to confirm
that you are marking the batch:
Click on Yes as shown above and your bat ch is creat ed.
Not ice above t hat t he File Name and Creation Date both correspond to the
submission date specified above.
To display the records in the batch click on Display Cont ent .
To export the records to CHARTS click on the Charts icon.
I f you creat ed a bat ch in error you can delet e it by clicking on t he whit e on blue X .
This deletes the batch but does not delete the MDS records.
Reliable Health Systems, LLC
2610 Nostrand Avenue
Brooklyn, NY 11210
www.ReliableHealth.com
Page 28
Visual Software
MDS 3.0
User Manual
Step 3. Copy the submission file to your local disk drive:
Copy the submission file to your local disk drive by clicking on
The following prompt appears:
Notice that the file name is comprised of the date and time in YYYYMMDDHHMMSS
format. Click on Save t o save t he file t o a local disk Drive.
Step 4: Log on to CM S and transmit your file.
As per QIES Technical Support Office (www.qtso.com) Transport Layer Security (TLS) 1.0 must be active
in your web browser in order to access the QIES National Systems, including the new MDS 3.0 Submission
System. Follow the steps below to activate TLS 1.0.
Note: You must have administrative rights to your workstation in order to update this value. If you do
not have administrative rights, contact your IT support.
1. Open the Internet Explorer browser.
2. Select "Tools" from the Menu bar.
3. Click on "Internet Options".
4. Select the "Advanced" tab.
5. Underneath "Security", ensure that the box next to "Use TLS 1.0" is checked (this should be located
near the bottom of the list).
6. Click "Apply".
7. Click "Ok".
I f you have any quest ions concerning t his inform at ion, please cont act t he QTSO Help Desk at
[email protected] or 1 800- 339- 9313.
Reliable Health Systems, LLC
2610 Nostrand Avenue
Brooklyn, NY 11210
www.ReliableHealth.com
Page 29
Visual Software
MDS 3.0
User Manual
Reporting
Click on Report s t o access t he MDS 3.0 Report Generat or and various other
reports.
Click on the desired report and follow the instructions on the screen.
Reliable Health Systems, LLC
2610 Nostrand Avenue
Brooklyn, NY 11210
www.ReliableHealth.com
Page 30
Visual Software
MDS 3.0
User Manual
Importing MDS 3.0 Records
MDS records, either XML or flat, can be imported into VISUAL MDS 3.0 as follows:
As shown below, click on the drop- down icon and select Tools
A shown below click on Dat a and t hen click on I m port MDS 3.0 Assessm ent s .
The following screen appears:
Reliable Health Systems, LLC
2610 Nostrand Avenue
Brooklyn, NY 11210
www.ReliableHealth.com
Page 31
Visual Software
MDS 3.0
User Manual
There are four logical steps to import MDS records:
1. Import the MDS records into a temporary work area.
2. Review the records to be imported and those that are duplicates.
3. Match manually (i.e., match the MDS to the proper resident) for those records
that cannot be matched by the system.
4. Import the MDSs ( Merge Assessm ent s .)
Step 1: Import the MDS records into a temporary work area
On the top part of the screen shown above type the following:
At Folder Pat h and Nam e t ype t he com plet e pat h of t he files t o be im port ed.
At File Nam e / All t ype t he nam e of t he file t o be im port ed or All t o im port all
files in the directory specified above.
At Clear I m port Dat a place a check- mark to wipe out any records in the temporary
work area (i.e., that are still there from your previous import). Notice that it shows
how many MDS records are in the temporary work area.
Click on I m port .
Reliable Health Systems, LLC
2610 Nostrand Avenue
Brooklyn, NY 11210
www.ReliableHealth.com
Page 32
Visual Software
MDS 3.0
User Manual
Step 2: Review the records to be imported and those that are duplicate
For each of t he following four t ypes of records click on Show in the screen below to
see a listing of the MDSs:
1. MDS Records in the import file that were successfully matched with residents
in the VISUAL census data- base.
2. Duplicate MDSs in the import batch (i.e., the imported records contained 2 or
more records for the same resident, MDS type and date.) Unless it is a
modification (X0100=2), only one will be merged into the MDS data.
3. MDS records in the imported batch that have matching records in the VISUAL
MDS data- base. Except for modifications (X0100=2), they will overlay
(update) the existing records upon merging.
4. MDS records that could not be matched up with any resident in the VISUAL
data- base. You will need to match these records manually.
Reliable Health Systems, LLC
2610 Nostrand Avenue
Brooklyn, NY 11210
www.ReliableHealth.com
Page 33
Visual Software
MDS 3.0
User Manual
Step 3 : Identify manually the records that cannot be identified by the
program
You will need to manually match up any imported MDS Records that could not be
matched by the system to a specific VISUAL resident. The match them do the
following:
Click on Show as shown above and t he following report appears:
To match an MDS record to the appropriate resident, locate the appropriate resident
(using for example the magnifying glass icon). Cut- and- paste the resident id
alongside the appropriate MDS record as shown above.
Click on Updat e . Repeat for each MDS record.
When you are done click on Back . Cont inue wit h t he inst ruct ions shown on t he
following page.
Reliable Health Systems, LLC
2610 Nostrand Avenue
Brooklyn, NY 11210
www.ReliableHealth.com
Page 34
Visual Software
MDS 3.0
User Manual
Step 4: Importing MDS Records
When you are done click on Merge Assessm ent s as shown below.
The MDSs are now imported.
Reliable Health Systems, LLC
2610 Nostrand Avenue
Brooklyn, NY 11210
www.ReliableHealth.com
Page 35
Visual Software
MDS 3.0
User Manual
Reliable Health Systems, LLC
2610 Nostrand Avenue
Brooklyn, NY 11210
www.ReliableHealth.com
Page 36
Visual Software
MDS 3.0 Report Generator
User Manual
Visual Software
MDS 3.0 Report Generat or
User Manual
PRELIMINARY
Copyright © 2010
Reliable Health Systems, LLC
2610 Nostrand Avenue
Brooklyn, NY 11210
www.ReliableHealth.com
Tel: 718- 338- 2400
Fax: 718- 338- 2741
Reliable Health Systems, LLC
2610 Nostrand Avenue
Brooklyn, NY 11210
www.ReliableHealth.com
Page 37
Visual Software
MDS 3.0 Report Generator
User Manual
Reliable Health Systems, LLC
2610 Nostrand Avenue
Brooklyn, NY 11210
www.ReliableHealth.com
Page 38
Visual Software
MDS 3.0 Report Generator
User Manual
VISUAL MDS 3.0 Report Generator
INDEX
Selecting the MDS 3.0 Report Generator .............................................................. 41
Running a Library Report creat ed by RHS .......................................................... 42
Copying an RHS Library Report int o your Facilit y Report s .................................. 43
Creating a new Report ...................................................................................... 44
Adding conditions to your report ......................................................................... 48
Modifying a Previously Created Report ................................................................. 51
Color Coding for CATs (red) and RUGs (green) ..................................................... 52
Reliable Health Systems, LLC
2610 Nostrand Avenue
Brooklyn, NY 11210
www.ReliableHealth.com
Page 39
Visual Software
MDS 3.0 Report Generator
User Manual
Reliable Health Systems, LLC
2610 Nostrand Avenue
Brooklyn, NY 11210
www.ReliableHealth.com
Page 40
Visual Software
MDS 3.0 Report Generator
User Manual
Selecting the MDS 3.0 Report Generator
On t he vert ical t oolbar shown below click on Report s and t hen click on Report
Generat or.
The following screen appears:
In the above screen notice the 4 choices:
Facility Reports:
Library Reports:
Archived Reports:
New:
These are reports that your facility creates.
These are reports created by RHS.
Reports you deleted.
Create a new report.
Of t he above four choices not ice t hat Library Report s is highlight ed in yellow. Click
on any of the buttons to change screens.
Reliable Health Systems, LLC
2610 Nostrand Avenue
Brooklyn, NY 11210
www.ReliableHealth.com
Page 41
Visual Software
MDS 3.0 Report Generator
User Manual
Ru n n in g a
Libr a r y
Report created by RHS
On the screen below notice that alongside each report there are three functions from
which to choose:
Run:
Press Run alongside t he nam e of t he report you wish t o run.
For exam ple, press Run alongside Behavior: Psychosis . The
report displays those residents on the MDS who were identified
as having a Psychosis problem. It is set to look at the last
complete assessment for each resident and only those residents
that are active now. The conditions set for Psychosis is that
either E0100A or E0100B has a checkmark.
Simple Run:
Press Sim ple Run t o run t he report wit hout set t ing any
condit ions. For exam ple, press Sim ple Run alongside
Behavior: Psychosis . The report displays all resident s and
t heir responses for psychosis behavior, regardless of whet her
or not the resident has a Psychosis problem. A sample report
follows: ( Not e: When Sim ple Run is grayed- out, as shown
above alongside the CAT reports it signifies that there are no
conditions associated with the report.)
Click t he Pr in t button above right to print to whatever printer is attached
t o your workst at ion. Click Ex ce l to copy the report to an Excel worksheet. Click
Ba ck to go to the previous screen. Use the following icons to increase or decrease
text size and report widt h. Click Se t t o save t he form at or Re se t
to original.
Reliable Health Systems, LLC
2610 Nostrand Avenue
Brooklyn, NY 11210
www.ReliableHealth.com
Page 42
Visual Software
MDS 3.0 Report Generator
User Manual
Copy a n RH S Libr a r y
Reports
Re por t in t o you r
Fa cilit y
Copy: Press Copy as shown on a screen above and a copy of the report will appear
in your Facilit y Report s. You can then modify this copy to suit the needs of your
facilit y. Not ice below t hat a copy of t he report now appears in your Facilit y
Report s :
When report s are copied int o your Facilit y Report s you have t wo new opt ions:
Edit:
This allows you to make changes to the report including adding items,
modifying or adding conditions and modifying formatting. The conditions
of the report are what you set to see the specific results you are looking
for. For exam ple t he condit ions for t he Facilit y report Behavior:
Psychosis is set t o ret urn t hose resident s who have a checkm ark in
E0100A or E100B.
Archive:
This allows you to delete the report.
Reliable Health Systems, LLC
2610 Nostrand Avenue
Brooklyn, NY 11210
www.ReliableHealth.com
Page 43
Visual Software
MDS 3.0 Report Generator
User Manual
Creating a New Report
As shown below click on New t o creat e a new report .
The following screen appears:
At Report Tit le t ype t he nam e of a report you would like t o creat e. For exam ple, t o
creat e a report t hat shows all resident s wit h hearing aids t ype Resident s Wit h
Hearing Aids and t hen click on Creat e . The following screen appears:
In the above (and on the following) screen there are four sections:
Appearance: Specify the appearance of the new report. Choose from several
formatting options including New page /unit which will create a new page for each
unit.
Organization: Specify one of five basic print orders and choose to separate results by
unit or to quickly show just the number of records returned with Tally Only
Which Residents: Select which residents should appear. Choose the report to run just
for the resident who is currently in the resident box or choose to show residents that
qualify when using one of three date choices or only for active residents. Limit the
report to those residents in a selected unit or units.
Reliable Health Systems, LLC
2610 Nostrand Avenue
Brooklyn, NY 11210
www.ReliableHealth.com
Page 44
Visual Software
MDS 3.0 Report Generator
User Manual
Which Assessments:
Select which assessments should appear. Choose to show
only com plet e assessm ent s. Check Most recent assessm ent or uncheck and choose
from three date ranges to include all assessments within the range you set. Include
only the Type of Assessments (A0310) under A0310.A, A0310.B, A0310.C, and
A0310.F.
Modify the above sections to suit your needs.
Notice the following:
1.
2.
3.
4.
5.
6.
The report generator assumes that you want at least 5 fields on the report:
t he Resident s nam e, t heir unit and bed num ber, t he dat e of t he MDS, and t he
MDS type.
Each column heading is preset for you.
Print the header either horizontally (default) or vertically.
Tally the columns. Shows the totals for each response for that item
Put a check in Sort Priority to sort by that column. The default is by resident
name.
Specify whether the column should be sorted ascending (default) or
descending.
Reliable Health Systems, LLC
2610 Nostrand Avenue
Brooklyn, NY 11210
www.ReliableHealth.com
Page 45
Visual Software
MDS 3.0 Report Generator
User Manual
Choose Select as shown circled above.
To add, for exam ple, t he Hearing Aid field, click on Select as circled above. The
following screen appears:
Since Hearing Aid is quest ion B0300 click on sect ion B as shown above. The
program now displays only t he fields in Sect ion B. ( Not e: As show below click All
t o show all available sect ions. Click RUGs or CATs to display all items that affect
RUGs or CATs. Click Close Display Items to close.)
Click on Hearing Aid as shown above and t hen click on Close Display I t em s .
Reliable Health Systems, LLC
2610 Nostrand Avenue
Brooklyn, NY 11210
www.ReliableHealth.com
Page 46
Visual Software
MDS 3.0 Report Generator
User Manual
As shown below Hearing Aid is now added t o your report :
Notice in the above screen that the description of the column header was set to
B0300 . To change it t o Hearing Aid click on t he icon circled above t hat point s t o
t he descript ion Hearing Aid . I n t he Explanation column you can format the content
of t he field using No, Yes, or Only. ( E.g., I f B0200 was a colum n in t he report you
could show j ust t he num ber 3 if N o is select ed; 3=Highly impaired- absence of
useful hearing if Ye s is select ed; or Highly impaired- absence of useful hearing if
On ly is selected.
In the two Show colum ns you can put a check in t he ^ checkbox t o show t he ^ if
sect ion is answered Blank ( skip pat t ern) . Check t he - checkbox t o show t he - for
t hose it em s answered Not Assessed/ no inform at ion rat her t han a blank for t hat
record in t he report . A ^ or - is a considered a blank when totaled.
With the desired fields and column headers now in place click on Run as shown
above. Clicking RUN runs t he report and also saves your changes.
The following report is produced:
Reliable Health Systems, LLC
2610 Nostrand Avenue
Brooklyn, NY 11210
www.ReliableHealth.com
Page 47
Visual Software
MDS 3.0 Report Generator
User Manual
The report above shows how each resident was scored for Hearing Aid .
Adding Conditions to Your Report
If you want to add a condition so that the report shows only those residents who
have a hearing aid click on Condit ions as shown below.
The following screen appears:
Click on Add as shown above. The following screen appears showing the available
sections and items that can be added to the report:
Reliable Health Systems, LLC
2610 Nostrand Avenue
Brooklyn, NY 11210
www.ReliableHealth.com
Page 48
Visual Software
MDS 3.0 Report Generator
User Manual
Click Display to show your previously selected fields.
As shown above click on B0300- Hearing Aid and t hen click on Close Condition
Items. The condition field in now added as shown below. You can add any item to
your report in the same way. Just find the section then item you want to add.
As shown below t he lit t le red x delet es t he condit ion. The lit t le arrow t o t he right
inserts a new condition above this one in the report. Next choose the the available
options for setting the conditions for the item. Here the option for B0300 is either
equals or does not equals . Click in front of t he 1 t o specify t hat only t hose
residents with a hearing aid will appear on the report. Different items will have
different options. Next you might ignore a caret or a dash (the default) because you
want only to see those residents where B0300=1. Set the conditions of the item so
that the report returns t he records you re int erest ed in seeing.
From the follwing menu options
click Report
Options to return to the edit screen, Save to save your settings, Run to run the
report or Back to return to the previous screen. When you click Run the report is
Reliable Health Systems, LLC
2610 Nostrand Avenue
Brooklyn, NY 11210
www.ReliableHealth.com
Page 49
Visual Software
MDS 3.0 Report Generator
User Manual
shown below. In this case only one resident satisfied the conditions of the report that
you created.
Reliable Health Systems, LLC
2610 Nostrand Avenue
Brooklyn, NY 11210
www.ReliableHealth.com
Page 50
Visual Software
MDS 3.0 Report Generator
User Manual
Modifying a Previously Created Report
To modify a previously created report locate the report and click on Edit alongside
the report as shown below.
The following screen appears: You can edit t he exist ing report or Copy t he report ,
change the name and use this report as a base for a new report. You can then add
new fields to the report or modify the existing fields. Click Save to save your new
report.
There are six functions buttons on the screen to help you accomplish the following
tasks:
Select:
To add additional fields to the report.
Conditions: To add conditions to your report.
Save:
To save your changes.
Run:
To run your report. ( Clicking Run also saves your changes.)
Back:
Takes you back to your list of reports.
Reliable Health Systems, LLC
2610 Nostrand Avenue
Brooklyn, NY 11210
www.ReliableHealth.com
Page 51
Visual Software
MDS 3.0 Report Generator
User Manual
Color Coding for CATs (red) and RUGs (green)
Color coding is used throughout the MDS 3.0 VISUAL Report Generator to signify
fields that affect CATs and RUGs as follows:
CAT fields are always coded red.
RUG fields are always coded green
When a field affects both CATs and RUGs both red and green are used. These colors
appear when you select a field and also in the report columns.
Reliable Health Systems, LLC
2610 Nostrand Avenue
Brooklyn, NY 11210
www.ReliableHealth.com
Page 52