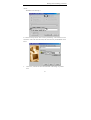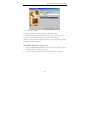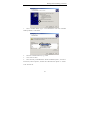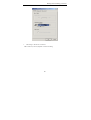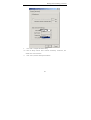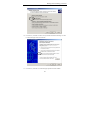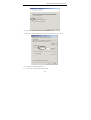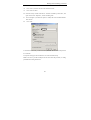
1
ZTE CORPORATION WP806A CDMA Fixed Wireless Phone User Manual Copyright © 2005 by ZTE Corporation All rights reserved. No part of this publication may be excerpted, reproduced, translated or utilized in any form or by any means, electronic or mechanical, including photocopying and microfilm, without the prior written permission of ZTE Corporation. The manual is published by ZTE Corporation. We reserve the right to make modifications on print errors or update specifications without prior notice. Edition: 1st edition, Apr., 2005 Sharing New Technology with You Contents 1 General Information..........................................................................1 1.1 Preface .......................................................................................................1 1.2 Safety Precautions.....................................................................................1 1.3 Cleaning and Maintenance........................................................................3 2 Getting Started..................................................................................4 2.1 Checking the Package ...............................................................................4 2.2 Technical Specifications ...........................................................................5 2.3 Key Definition...........................................................................................6 2.4 Display Icons.............................................................................................8 2.5 Installation .................................................................................................8 2.6 Power supply ...........................................................................................11 2.7 Connecting to the Network .....................................................................11 3 Basic Operations.............................................................................13 3.1 Making a Call ..........................................................................................13 3.1.1 Making a Domestic Call..................................................................13 3.1.2 Dialing PSTN’s Extensions.............................................................13 3.1.3 Making IDD ....................................................................................13 3.1.4 Dialing a Number in the List...........................................................13 3.2 Answering the Call..................................................................................14 3.3 Ending the call.........................................................................................14 3.4 Redialing .................................................................................................14 3.5 Billing Information..................................................................................14 3.6 Call Menu ................................................................................................15 3.7 Making a Three-way Call........................................................................15 4 Function Menu................................................................................17 4.1 Usage of the Function Menu...................................................................17 i Sharing New Technology with You 4.2 NAMES ...................................................................................................17 4.2.1 Searching .........................................................................................18 4.2.2 Adding New Name..........................................................................19 4.2.3 Editing 19 4.2.4 Deleting ......................................................................................... 19 4.2.5 Checking Used Space......................................................................20 4.2.6 Group Settings.................................................................................20 4.2.7 Sending Message.............................................................................20 4.3 Messages .................................................................................................20 4.3.1 Writing Messages ............................................................................21 4.3.2 Viewing Received and Saved Messages.........................................21 4.3.3 Msg setting ......................................................................................22 4.4 Call History .............................................................................................23 4.5.1 Viewing Calls List...........................................................................23 4.6 Profile ......................................................................................................24 4.7 Organizer .................................................................................................24 4.7.1 Alarm Clock ....................................................................................25 4.7.2 Calculator ........................................................................................26 4.7.3 Notepad ..........................................................................................26 4.7.4 World Clock ....................................................................................27 4.8 Divert.......................................................................................................28 4.9 Settings ....................................................................................................28 4.9.1 Phone settings..................................................................................28 4.9.2 Display settings ...............................................................................29 4.9.3 Call setting.......................................................................................29 4.9.4 Security ........................................................................................29 4.9.5 Reset settings...................................................................................30 4.9.6 Manager settings..............................................................................30 5 Text Input .......................................................................................31 5.1 Overview .................................................................................................31 ii Sharing New Technology with You 5.2 Keyboard Definition................................................................................31 5.3 Notes on Input Methods ..........................................................................31 5.3.1 English and Number Input ..............................................................31 5.3.2 Entering Templates/poem ...............................................................33 6 Data Network Access Function.......................................................34 6.1 WIN98 Configuration for Internet Access..............................................34 6.2 WIN2000 Configuration for Internet Access..........................................38 6.3 WIN XP Configuration for Internet Access ...........................................46 7 PC Fax ............................................................................................56 7.1 Summary .................................................................................................56 7.2 System Requirement ...............................................................................56 7.3 Start PC Fax function ..............................................................................56 8 Troubleshooting..............................................................................57 iii Sharing New Technology with You 1 General Information 1.1 Preface Thank you for using WP806A CDMA Fixed Wireless Phone(FWP). To guarantee your phone always in its best condition, please read this manual carefully. Besides its basic call function, the WP806A provides many practical functions including telephone number grouping, clock ,calculator, data service, which bring great convenience and fun to your work and daily life. With its rich functions applied in business, the WP806A phone will be your right-hand assistant. 1.2 Safety Precautions Some electronic devices are susceptible to electromagnetic interference sent by FWP if inadequately shielded, Try to use the phone at least 20 cm away from ordinary telephone, TV sets, radio and other automated office equipment so as to avoid electromagnetic interference. Operating of FWP may interfere with medical devices like hearing aids and pacemakers. Consult a physician or the manufacturer of the medical device before using the FWP. Be aware of the usage limitation when using FWP at places such as oil warehouses or chemical factories, where there are explosive gases or explosive products being processed, because even if your phone is in idle state, it still transmits radio frequency (RF) energy. 1 Sharing New Technology with You Do not touch the antenna while calling. Keep the antenna free from obstructions and position the antenna straight up. This will ensure best call quality. Please put the phone on the safe place. The phone may cause injury if used as a toy by children. Please use original accessories or accessories that are authorized by ZTE. Using any unauthorized accessories may affect your FWP’s performance, hurt your phone or even cause danger to your body and violate related national regulations about telecom terminals. As your FWP can produce electromagnetic field, do not place it near magnetic items such as computer disks. Do not expose your FWP to direct sunlight or store it in hot areas. High temperatures can shorten the life of electronic devices. Prevent liquid from leaking into your phone. Do not attempt to disassemble the FWP by yourself. Non-expert handling of the devices may damage them. Make sure that FWP is power on and in service area before making emergency call. Dial the emergency call number after you pick up the handset, and press CALL/REDIAL key to send. Unplug the external power adapter or take out the battery before you put the phone out of use for a long period of time. It is highly recommended to charge the battery before initial use. The battery might have been discharged during storage and delivery. Do not unplug the connector of the data cable from the phone when the 2 Sharing New Technology with You power is on. 1.3 Cleaning and Maintenance The phone is not water-resistant, so do not use it in high humidity places such as the bathroom. If you want to clean your phone, please use clean fabric that is a bit wet or anti-static. Turn off your phone before you clean it. Do not use harsh chemical cleaning solvents or strong detergents to clean your phone, such as alcohol, dilution agent and benzene. Use the phone within a temperature range of -10°C~55°C and a humidity range of 25%~85%. 3 Sharing New Technology with You 2 Getting Started 2.1 Checking the Package Please check all the parts shown below and make sure no piece is missing or broken. ( The appearance of the parts in your package may be different from those in the manual.) Main Unit (1) Handset (1) External power adapter (1) Handset Cord (1) User Manual (1) 4 Antenna (1) Certificate of quality (1) Sharing New Technology with You DB9 data cable (1) USB data cable and USB Driver CD (optional) (1) (optional) 2.2 Technical Specifications z Air interface protocol: IS-2000SR1, downward compatible with IS-95A/B. z Frequency range: Tx: 824~849MHz Rx: 869~894MHz z LCD: LCD/outgoing number/ talk time/ clock/ CID/ RSSI signal intensity/ battery level/ short message indication z External interfaces: a. External power socket (DC) b. DATA interface c. Antenna connector TNC (F) z External power adapter Power supply: 90V~270V, 50Hz(AC) z Voice decoding: 13K QCELP/ 8K EVRC z Dimensions (W×H×D): 176mm×213.5mm×75.5mm(exclude antenna) z Battery : Continuous standby time : Approx. 72 hours (depending on the network condition). Continuous talk time: Approx. 2 hours (depending on the network 5 Sharing New Technology with You condition). For other parameters about battery and charger, please refer to the real objects. 2.3 Key Definition (1) (2) (3) (4) (5) (8) (9) (6) (10) (11) (7) (1) LCD (2) NAMES/BACK (Right Soft Key): To access the phone book and execute functions as shown in the lower right corner of the LCD. (3) CLR key: 6 Sharing New Technology with You Clear the last entry. (4) MENU/SELECT (Left Soft Key): To access the main menus and execute functions as shown in the lower left corner of the LCD. (5) CHG/PWR LED: It glows red when you charge the battery, and turns green when the battery is fully charged. (6) 0~9 number keys: To enter numbers and characters. (7) * key and # key: They have different functions in different modes or function menus. Please refer to corresponding sections. (8) Up/Down/Left/Right key (Scroll keys): To move the cursor when entering letters and to scroll through menu options and displays, can be set as short cut keys. (9) key: Switch on/off the phone; hang up; display calendar in the idle state, return to the idle state from menu. (10) CALL/REDIAL key: To make a call or redial the last number called after you pick up the handset or press HANDFREE key. (11) HANDFREE: Hand-free key. Hint: 7 Sharing New Technology with You z The shape of the key shown in this manual may be different from your real phone. z In this manual, the expression “press a key-press” stands for pressing a key shortly, while “hold the key-press” for pressing a key for 2~3 seconds. 2.4 Display Icons The icons listed below may appear on your phone’s LCD. Signal indicator. More bars indicates stronger signal. Indicates that you have received a new message. If the icon blinks, it indicates that the message box is full. The Alarm is set. You have set “divert all calls”. Battery level indicator. More black bars indicate higher level. Enable mute mode. Bar incoming calls. Bar outgoing calls. Bar incoming and outgoing calls. 2.5 Installation Back sight of WP806A: Antenna connector Battery switch Data interface External power socket 8 Sharing New Technology with You 1. Handset: Connect the main unit and the handset with the handset cord. 2. Antenna: Install the antenna to the antenna connector. Hold the plastic stick of the antenna and turn the metal screw clock-wise. Do not turn the antenna directly. 3. Adapter Plug the AC/DC adapter into an appropriate wall outlet. Please use original accessories. Good grounding may guarantee your terminal in a reliable service status. 9 Sharing New Technology with You AC Plug 4. Computer Use the DB9 data cable or USB data cable for connecting the data interface to the computer for data service. Power off the phone then stick in or pull out the data cable. 5.Power on: If you use the external power adapter, hold key , and then get started after self-test. If you use the built-in spare battery of the phone ,turn the battery switch on the back side of the phone to “∣”, hold after self-test. 6. Power off: Hold key to power off the phone. 10 key , and then get started Sharing New Technology with You 2.6 Power supply There are two ways of power supply: 1. Use the external power adapter. 2. Use the built-in spare battery of the phone. When using the phone, please connect it with the external power adapter. With external power supply, the phone will automatically check electricity quantity of the battery and charge the built-in battery. Use the built-in spare battery of the phone in case of power failure or when there is no available power socket nearby. If the electricity of the built-in battery will be used up, please connect the external power adapter for charging in time. The screen will prompt and the buzzer will beep. CHG/PWR LED: While charging, the LED indicates red. If the battery is full, the LED changes to green color. 2.7 Connecting to the Network After the phone are decoded, the phone will automatically search for the network. When the connection is set, the name of the network service provider will be displayed at the center of the screen. The display may not be the same as below with different service providers. 11 Sharing New Technology with You Now your phone is in the idle state. Besides receiving and sending calls, you can do the following things: z Press to display the calendar. z Press Right Soft key to enter the NAMES. z Press Left Soft key to enter the function menu. Please refer to Chapter 4. Note: If “EMERGENCY CALLS ONLY” is shown on your screen, you can only send emergency calls relating to the strength of the signal. 12 Sharing New Technology with You 3 Basic Operations 3.1 Making a Call 3.1.1 Making a Domestic Call After you pick up the handset or press HANDFREE key, Enter the telephone number by Number key ( add area code when making a long distance call) , and press CALL/REDIAL key to send a call. If the call is over, hang up or hook on the receiver, and then press key to return to the idle state. 3.1.2 Dialing PSTN’s Extensions After you pick up the handset or press HANDFREE key, Dial the exchange number and then the extension. 3.1.3 Making IDD Method: Pick up the handset or press HANDFREE key, hold the * key until your screen displays the prefix symbol “+” of an international call. Then enter the code of the country you want to dial and the complete telephone number. Country codes follow the conventions (Get rid of “0” before the area code when you make a call). For example, +862112345678. 3.1.4 Dialing a Number in the List Generally, 10 recent calls you have made / received are saved in a list of 13 Sharing New Technology with You the phone, and the last made or received call is saved at the top of the list (please refer to Section 4.5 “Call History”. All numbers are grouped as missed calls, received calls and dialed calls. Your phone lists all the numbers so that you can view all the call logs. Pick up the handset or press HANDFREE key, press CALL/REDIAL key to enter call history, scroll down the list , press CALL/REDIAL key and OK Left Soft key to dial the selected number in the list. 3.2 Answering the Call When the phone rings, LCD will display the incoming number. Pick up the receiver to answer the call, and timing will start for the call. Note: To display the incoming number requires network support. 3.3 Ending the call Put down the handset when you answer the call by picking up the handset. Press HANDFREE key when you answer the call by pressing HANDFREE key. Press key to return to the idle state after ending call. 3.4 Redialing Press CALL/REDIAL key twice and OK Left Soft key to redial the last number called after you pick up the handset or press HANDFREE key. 3.5 Billing Information Note: This function require network support. The phone adopts pulse-charging mode and the charging unit is “unit”. When the call is over, the billing information will displayed. For example, the 14 Sharing New Technology with You message means: when a call is connected, 2unit will be displayed; since then, 2units will be added per 10 seconds. If you dial a free number, the phone will display 0unit. For example, if call duration is 15 seconds, 4units will be displayed. If call duration is 20 seconds, 6units will be displayed. 3.6 Call Menu During calling, you can enter the call menu by pressing MENU. The operation methods are the same as those in the function menu; please refer to Section 4.1 “Usage of the Function Menu”. You can do the following operations in Call menu: z Hold /Retrieve Keep the current session or resume the held call. z Mute Not send local voice. z DTMF off/on Enable or disable sending DTMF tone. z Menu Enter the organiser menu. Note: This Call menu only appears in the session process, which supports Three-way Call. 3.7 Making a Three-way Call The phone supports the Three-way call. When two parties are talking, one of which can dial the number of the third party without hanging up the current 15 Sharing New Technology with You session. When the session is ongoing, the receiver/caller enters the number of a third party and the current call will not be affected. If the receiver/caller presses CALL/REDIAL key at this moment, the current session will be hung on, and the receiver/caller will not hear the former call temporarily. Press CALL/REDIAL key again and the call will resume. The user can hear the ring-back tone from the third party before he answers. When the third party answers, the three persons can talk at the same time. If the user presses CALL/REDIAL key, the third party will be hung up and it becomes an ordinary call between two persons again. Note: The network service provider should support the Three-way call function. When the calls are switched, the hung-on party should not hang up or it will stop the original two-way call. 16 Sharing New Technology with You 4 Function Menu 4.1 Usage of the Function Menu Scrolling search function: Enter the Function main menu by pressing MENU/SELECT key in idle state. Enter the call menu by pressing Menu in call state. Pressing Up/Down Key to select in menu interface. In function menu, you can select or quit some menu by pressing Left Soft Key or Right Soft Key according to the prompt displayed on the screen. Function menu includes items as follows: Messages, Call History, Profile, Organizer, Divert, Settings. In idle state, press NAMES to enter the NAMES interface. Please look for details in this chapter. 4.2 NAMES In idle state, access the NAMES interface by pressing Right Soft key. It shows List empty when there is no record in the NAMES, you can select ADD to add records. The saved records will be ordered by the first letter of the name. In that case, press Left/Right Key to switch between the sort modes. 17 Sharing New Technology with You Press Up/Down Key to select the records. In the NAMES list interface, press Left Soft Key to view the details of the record. In the detailed information interface, press MENU to access the menu interface of the selected record. The menu options are as follows: ¾ Send message: Access the creating message interface. ¾ Set as default: Set this number as the default number of this record. Generally, The first of the numbers matching each name is set as a default number. ¾ ¾ Delete number: Select whether to delete the number. Add to Speed: You can assign the phone number to a speed-dialing key. Scroll to the desired key and press SELECT to assign. Then, you can hold the selected number key to directly dial the number in idle state. In the speed dialing keys list, press DELECT to delete the assignment. 4.2.1 Searching In the NAMES interface, press MENU, select Search and then enter the 18 Sharing New Technology with You name you want to search. Quick-search: In the NAMES list interface, you can enter letter to go to the record of the name that begin with similar letter. For example, if you want to search the name “JASON”, you can enter “J” by pressing “5” key, then the cursor will move to the names that begin with “J”. If there is no such record in the NAMES, it will stop at the most appropriate record. 4.2.2 Adding New Name In the NAMES list interface, press MENU and select Add New Name. Enter the name you want to add. Select the group. Enter the phone number you want to add. 4.2.3 Editing In the NAMES list interface, press MENU and select Edit. You can edit the current record including the name, the number and the group. 4.2.4 Deleting In the NAMES list interface, press MENU and select Delete. You can 19 Sharing New Technology with You delete all the information of the current record. 4.2.5 Checking Used Space In the NAMES list interface, press MENU and select Used Space. You can view the saved number and maximum number of entries saved in the phone. 4.2.6 Group Settings In the NAMES list interface, press MENU and select Group Settings. Press TONE to select the ring tone of groups. Press RENAME to change the group names. 4.2.7 Sending Message In the NAMES list interface, press MENU and select Send message. Access the creating message interface. 4.3 Messages If the network supports and you have subscribed this service, you can send and receive text short messages freely. Your phone can save 40 short messages. The maximum length of each message will be 160 characters in English. In idle state, press MENU, select Messages to access the Messages menu interface. When a new message coming, your phone will ring and/or light to notify you. (The prompt modes depend on your settings.) 20 Sharing New Technology with You 4.3.1 Writing Messages In Messages interface, select Create Msg and press SELECT to access message input interface to enter the message . When you finish entering the message, press OK, and then use Up/Down Key to select Send to One, Send to Many or Save. z Select Send to One, you can directly enter the receiver’s number, or press NAMES to select a number in the NAMES. z Select Send to Many, enter the name list, select the receivers’ numbers. z Select Save to save messages to the Sent Msg box. When saving, you can directly input the destination number according to prompts on the screen. There will be prompt information on the screen after the message is sent successfully. 4.3.2 Viewing Received and Saved Messages z Select Received Msg to view received messages. z Select Sent Msg to view those messages saved but not sent. z In the received or sent message list, select READ to view the message. At this time press OPTIONS to do the following operations: -Edit: Edit current message. 21 Sharing New Technology with You -Delete: Delete current message. -Voice Call: Call the sender. (The menu appears only when reading messages in the Received Msg.) -Save No: Save the sender number to the phonebook. (The menu appears only when reading messages in the Received Msg.) -Extract nos: Extract numbers from the text of the current message and display them in a list. Choosing one number will bring you to the dialing window. -Send: Send the message. (The menu appears only when reading messages in the Sent Msg.) z When you read the message in Received Msg, select REPLY to reply, When you read the message in Sent Msg, select SEND to send the message. z Delete all: Delete all the messages saved in Received Msg or Sent Msg. z If a name card message is received, a prompt message will appear after choosing READ. You can save the name card message to the phone book after confirmation. 4.3.3 Msg setting You have to make necessary settings before using SMS service. Select MENU→ Messages → Message Settings. z Delivery Ack: If the Delivery Ack option is set On, a message report will be sent to inform you after the message reaches the SMS center. Note: This function needs network support. z Templates: When editing messages, templates can be brought out by 22 Sharing New Technology with You double pressing * Key. In this menu, you can edit or change these phrases. z Set Poem: When editing messages, set poems can be brought out by triple pressing * Key slowly. In this menu, you can edit or change these phrases. z Priority: Press CHANGE to set the priority of sending messages. There are 4 options: Norm, Inte, Urge or Emer. z Validity: In the period of validity, the message center will repeat to deliver a message till it is received. Press CHANGE to select a valid time and then press BACK to confirm and return. Note: This function needs the network to support. 4.4 Call History 4.5.1 Viewing Calls List z Choose All Calls to view the list of all calls. z Choose Missed Calls to view the calls that you received but did not answer. z Choose Received Calls to view the calls that you answered. z Choose Dialled Calls to view the calls that you made. z Choose Erase history to clear all lists. In the call list interface, press SELECT to view the detail of this call. - Press SAVE to save the number to NAMES. - Press SMS to send a message to this number. - Press CALL/REDIAL key → Ok Left Soft key to dial this number directly after you pick up the handset or press HANDFREE key. 23 Sharing New Technology with You 4.6 Profile You can choose different profiles in different occasions, or you can customize the profiles according to your own needs. In idle state, press MENU, select Profile to access the profile interface. You can select the profile type you need in this submenu. Press CHANGE to change the current profile. There are 3 options: Normal, Outdoor and Silent. These options have been preset by the manufacturer. In Edit profile submenu, You can change the detailed settings of the selected profile, z Ring Tone: Many ring tones for selection. z Ring Vol: Adjust the volume of the ring tone by Left/Right Key or Up/ Down key , and press OK to save the change. z Speaker Vol: Adjust the volume of the earpiece by Left/Right Key or Up/ Down key , and press OK to save the change. z Key tones: Press CHANGE left soft key to change the volume of the key tone to Low or High. z Warn tone: Enable or disable the warning tone. z Message alert: Select the alert tone type when a new message is coming or select to turn off the alert tone. 4.7 Organizer In idle state, press MENU, select Organizer to access the Organizer interface. The phone provide 4 functions: 24 Sharing New Technology with You 1.Alarm Clock: The phone provides alarm clock services. 2.Calculator: The phone provides simple calculating functions, such as addition, subtraction, multiplication and division. 3. Notepad: Recording lots of necessary data. 4. World Clock: The phone allows you to check time information on major cities worldwide. 4.7.1 Alarm Clock Your phone can set up to 5 alarm clocks at the same time. If there have existed 5 alarm clocks, Set alarm menu will not appear. 1. Set alarm: Select Set Alarm submenu, you can set the following options according to instructions: alarm type (Single/Daily/Weekly alarm), date, time, normal, and alert tone. You can set part of the items and the rest items will use default values. If the alarm clock is properly set, a small corresponding icon will appear on the screen in the idle state. 25 Sharing New Technology with You 2.View List Alarms: Select List alarms submenu, use Up/Down Key to select the desired alarm clock, press SELECT to submenu list, then select VIEW/EDIT to view/edit the alarm clock settings, select Delete to delete the settings, select Enable/Disable to enable/disable it. 3. Clear All: Select Clear all to clear all alarm clocks. 4.7.2 Calculator Press 0~9 Number Keys to enter numbers, press # Key to enter decimal point. Repeatedly press Left Soft Key or * key rapidly to switch among +, –, ×, ÷. Press CLR key to clear the last digit or results. Press EXIT Key to exit the calculator. Press EQUAL to get results. Note: This calculator has limited accuracy and rounding errors may occur, especially in long division. 4.7.3 Notepad It can record up to 30 events with the length of 30 characters, for the user to consult at any time. Enter NotePad, and directly enter the Add screen if there are no events recorded, Or the list screen will appear .Use Up/Down Key to select the desired note. 26 Sharing New Technology with You I will go to Landon My sister will give MENU DELETE Select MENU to submenu list, select DELETE to delete selected note. In submenu list: z Select Edit to view/edit the selected note, press # key to switch between the input methods. z Select Add to add a new note. z Select Used space to view the used and total numbers of notepads. z Select Clear all to delete all notes. NotePad Edit Edit Add SELECT BACK 4.7.4 World Clock Enter World Clock, you can view the time of desired city by using Scroll Keys. Press EXIT to exit World clock. Beijing 10:49 EXIT 27 Sharing New Technology with You 4.8 Divert This service enables you to divert some incoming calls to other preset numbers or switch between two calls. Please contact your service provider for details. Set Diverts: Set diverts in different conditions. ¾ All calls: Divert all incoming calls unconditionally. ¾ When busy: Divert incoming calls when the line is busy. ¾ No answer: Divert incoming calls when there is no answer. ¾ When hide: Divert incoming calls when the line is busy or when there is no answer. ¾ Call Waiting: Switch between two calls when the third part is incoming while calling. After choosing one of the above 5 options, you can select the following options: ¾ On: Only registered services are functional. ¾ Off: Delete the divert service. Note: This function need network supports. 4.9 Settings In idle state, press MENU, select Settings to access the settings interface. 4.9.1 Phone settings Select and enter the Phone settings submenu. z Fastkey setting Set the shortcut menu contents corresponding to 28 Sharing New Technology with You Up/Down/Left/Right key and CLR key in the idle state. 4.9.2 Display settings z Backlight: Press CHANGE to set the backlight On or Off. Or choose Save mode, which disables backlight from 8:00 to 17:00 except at spare time. z Greetings: View or edit greetings at start-up. 4.9.3 Call setting z Minute Alert: Press CHANGE to select an alert notification 5 or 15 seconds ahead of every 1 minute after call connection, or select Off. z Call Connect: If you choose On, you can hear put-through prompt tone while making calls. z IP setting (set by operator): You can set an IP code. In this case, you can use the IP function in Phonebook or Call history, i.e. IP number will be automatically added before the phone number that you want to dial. z DDD setting (set by operator): Set the local area code (including “0”). Note: IP setting and DDD setting should be set by service provider via NMS. Please don’t set it by yourself; otherwise, the phone usage may be affected. 4.9.4 Security Security features protect you from illegal use of your phone. Note: You need to input lock code to enter security settings interface. The default lock code is 1234. 29 Sharing New Technology with You z Password: Select CHANGE to set On to avoid unauthorized viewing of your short messages. Set Off to disable it. Note: The default password for short messages is 5678. z Handset lock: Select CHANGE to set On/Off to enable or disable the phone lock protection. If the phone lock is enabled, only emergency calls can be made. z Handset call bar: -Bar incoming: Select Bar all to ban all incoming calls. Select List to ban all numbers in the list. Select Cancel all to cancel all restrictions. -Bar outgoing: Select Bar all to ban all outgoing calls except emergency calls. Select List to ban all numbers in the list. Select Cancel all to cancel all restrictions. 4.9.5 Reset settings In this menu, you can select to restore the related settings of the phone to factory settings. 4.9.6 Manager settings Select Manager settings, the phone will prompt to enter password. Please contact your network service provider to get the manager password. Hide IP: set the phone whether to display IP number when the IP number is dialing. Press CHANGE to set On or Off. Clean admin data: Press SELECT, it will prompt that the admin data was cleaned out. 30 Sharing New Technology with You 5 Text Input 5.1 Overview Your phone provides the following input methods: English input (letters and numbers), commonly used symbols and idioms input. 5.2 Keyboard Definition The commonly used keyboard is defined as follows. For keyboard definitions in the specific input mode, please refer to Section 5.3 “Notes on Input Methods”. z Left Soft key usually means OK or SELECT, and Right Soft key usually means EXIT or BACK. z Scroll key is usually used for up/down movement and page up/down. z # key switches between the input methods. z Number keys (0~9) represent letters and numbers. z * key Press * key to enter symbols, double-press * key to enter Templates, and triple press * key to enter Set Poem. 5.3 Notes on Input Methods 5.3.1 English and Number Input The keyboard definition for entering English and numbers is as follows: 31 Sharing New Technology with You Corresponding character or Key function 1 - . , : ; ? / _ @ & ! etc. 2 ABCabc2 3 DEFdef3 4 GHIghi4 5 JKLjkl5 6 MNOmno6 7 PQRSpqrs7 8 TUVtuv8 9 WXYZwxyz9 0 Space0 Switch between symbols, * idioms and poems. Switch between the input # methods Up key Scroll up Down key Scroll down Left Soft Key CLR key OK Clear Exit 32 Notes Entering the common English punctuations Sharing New Technology with You Key Corresponding character or function Notes key The general procedure of entering English is as follows: z Each key corresponds to multiple English letters. Repeatedly press the key rapidly until the desired letter appears. When the cursor moves, enter the next letter. z Use # key to switch between the input methods. z In the uppercase or lowercase mode, press 0 key to enter a space. z Use CLR key to clear errors. 5.3.2 Entering Templates/poem In entering short messages, the phone provides some commonly used templates and poems for convenience. The general procedure for entering templates is as follows: z Double-press * key to enter Templates, press* key again to enter Set poem. z Use Up/Down key to view the templates or poem list. z Press SELECT to choose the templates or poem. z 10 commonly used templates or poem are provided. 33 Sharing New Technology with You 6 Data Network Access Function You can surf the Internet freely in wireless condition. Connect the computer with WP806A phone by data cable. After finishing the right configuration, you can access Internet by “Dial-Up Networking” in computer. The phone will display as follows after the data link is set up successfully. If you want to exit the Internet, you can disconnect the connecting on the computer. When the phone is connected to the Internet, you cannot make and receive the call. 6.1 WIN98 Configuration for Internet Access 1. Create a standard 28,800 bps Modem on the PC. Select “Control Panel -> Modems”, and then click “Add”. 2. Click “Next”, and select “Don’t detect my modem; I will select it from a list”. 34 Sharing New Technology with You 3. Select “Standard Modem Type” as the Manufacturers and “Standard 28800bps Modem” as the Models. 4. Select the Communication Port, e.g., COM1. 35 Sharing New Technology with You 5. Click “Next” to finish. 6. Select the newly created Modem in “Modems”, as shown in the interface, select “Properties”, and then select “Maximum speed” as “115200” in the “General” tab. 7. Click “Advanced” in the “Connection” tab, Add at+fclass=0;at+crm=2;at$qcmdr=3 to the Extra setting; and cancel “Use flow 36 Sharing New Technology with You control”. The Modem is set after Step 7. 8. Create the dial-up network. Enter “Dial-Up Networking”, and double-click “New Connection”. Fill in the connection name, and select the newly created Modem as the device. 9. Click “Next”, and fill in the area code and number. The settings vary with the areas. 37 Sharing New Technology with You 10. Click “Next” to finish. 11. Double-click the newly created connection in the dial-up network. 12. Enter the user name and password, and then click “Connect” for dial-up access. 13. Open the web page in IE for network access with successful dial-up. Note: Local service provider should provide the user name and password, no calling permitted when surfing the Internet. 6.2 WIN2000 Configuration for Internet Access 1. Create a standard 28,800 bps Modem on the PC. Select “Control Panel → Phone and Modem Options”, and then click “Add”. 2. Click “Next” and select “Don’t detect my modem; I will select it from a list”. 38 Sharing New Technology with You 3. Select “Standard Modem Type” as the Manufacturers and select “Standard 28800 bps Modem” as the Models. 4. Select the Communication Port, e.g., COM1. 5. Click “Next” to finish. 6. Select the newly created Modem in “Phone and Modem Options”, as shown in the interface, select “Properties”, and then select “Maximum Port Speed” as “115200” in the “General” tab. 39 Sharing New Technology with You 7. The setting in “Advanced” is as follows: Add at+fclass=0;at+crm=2;at$qcmdr=3 to the Extra setting. 40 Sharing New Technology with You 8. Click “Change Default Preferences”, select “Port speed” as “115200”, select “Flow control” as “None”, as shown in the following interface: 41 Sharing New Technology with You 9. Click “OK” to complete the Modem setting. 10. Create the dial-up network. Enter “Network and Dial-Up Connection”, and double-click “New Connection”. 11. Click “Next”, and select “Dial-up to the Internet”. 42 Sharing New Technology with You 12. Click “Next”, and select “I want to set my Internet connection manually, or I want to connect through a local area network ”. 13. Click “Next”, and select “I connect through a phone line and a modem”. 43 Sharing New Technology with You 14. Click “Next”, and select the newly created Modem. 15. Click “Next”, fill in the phone number, which vary with the areas, e.g., “#777”. 16. Fill in the user name and password. 17. Click “Next”, and enter the connection name. 44 Sharing New Technology with You 18. Click “Next”, and select “Do not create Internet account”. 19. Click “Next” to finish. 20. Select the newly created connection in “Network and Dial-up Connection”, and right click to select “Properties”, cancel use dialing rules. 21. Click “Configure”, and select the speed as 115200, and cancel “Enable hardware flow control”. 22. Click “OK”. 23. Double-click the newly created connection, and enter the user name and password for connection. 24. Open the web page in IE for Internet access with successful dial-up. Note: Local service provider should provide the user name and password, no calling permitted when surfing the Internet. 45 Sharing New Technology with You 6.3 WIN XP Configuration for Internet Access 1. Create a standard 33,600 bps Modem on the PC. Select “Control Panel→ Phone and Modem Options”, and then click “Add”. 2. Click “Next” and select “Don’t detect my modem; I will select it from a list”. 3. Select “Standard Modem Type” as the Manufacturer and select “Standard 33600 bps Modem” as the Model. 46 Sharing New Technology with You 4. Click “Next”, Select the serial port, e.g., COM1. 5. Click “Next” to finish. 6. Select the newly created Modem in “Phone and Modem Options”, select 47 Sharing New Technology with You “Properties”, and then select “Maximum port speed” as “115200” in the “Modem” tab. 7. The setting in “Advanced” is as follows: Add at+fclass=0;at+crm=2;at$qcmdr=3 to the Extra setting. 48 Sharing New Technology with You 8. Click “Change Default Preferences”, select “Flow control” as “None”. 49 Sharing New Technology with You 9. Click “OK” to complete the Modem setting. 10. Create the dial-up network. Enter “Network Connections”, and double-click “Create a New Connection”. 50 Sharing New Technology with You 11. Click “Next”, and select “Connect to the Internet”. 12. Click “Next”, and select “Set up my connection manually”. 51 Sharing New Technology with You 13. Click “Next”, and select “Connect using a dial-up modem”. 14. Click “Next”, and select the newly created Modem. 52 Sharing New Technology with You 15. Click “Next” and fill in the Phone number, which vary with the areas. 16. Fill in the user name and password. 53 Sharing New Technology with You 17. Click “Next”, and enter the connection name. 18. Click “Next”, and select “Do not create Internet account”. 19. Click “Next” to finish. 20. Select the newly created connection in “Network Connections”, and right click “Properties”. Cancel “Use dialing rules”. 21. Click “Configure”, and select the speed as 115200, and cancel “Enable hardware flow control”. 54 Sharing New Technology with You 22. Click “OK”. 23. Double-click the newly created connection, and enter the user name and password for connection. 24. Open the web page in IE for Internet access with successful dial-up. Note: Local service provider should provide the user name and password, no calling permitted when surfing the Internet. 55 Sharing New Technology with You 7 PC Fax 7.1 Summary After your phone is connected to the computer with data cable, you need to run WinFax Pro from Symantec Corp in the PC to use PC fax function. The remote terminal can be set as follows: z Remote PC + WP806A phone or wireless access box z Remote electrograph + WP806A phone z Remote electrograph + ordinary phone (PSTN) 7.2 System Requirement z OS:WIN98 / WIN2000 / WINXP z Memory:64M or above z Hard disk space:500M or above z CPU frequency:500M Hz or above z Support RS232 interface 1 or 2 / USB interface z Application software: WinFax (Please purchase it by yourself.) 7.3 Start PC Fax function Please setup right modem setting and serial port setting, then read WinFax User Guide to get to know how to use the WinFax. 56 Sharing New Technology with You 8 Troubleshooting Fault Solution No dialing tone after off-hook Hook on, and then hook off or press HANDFREE key No response in the key system Power off and then on once interface (after several attempts) Incorrect display of system time Check whether the antenna is connected correctly and whether the system signal is too weak No display in the system interface Check whether the battery has after disconnecting the external electricity, or check whether the power adapter battery is damaged, or power on the phone again No display in the system interface Check whether the power adapter is after power-on well connected, or check whether the battery has electricity, and then connect the power adapter or battery reliably 57 Sharing New Technology with You Fault Solution Display of “Not in the qualified The phone currently is not in the service area” service area qualified by the network service provider via NMS. Please contact the network service provider. Unable to send the number after Check whether you have hooked pressing CALL/REDIAL key off (Note: Be sure to hook off before sending the number when making a call.) The system stops sending dialing Hook on, and then hook off to tone and returns to the main make a call interface 20 seconds after hook-off No response of key press after you Press end making a call. the idle state Other abnormalities First refer to the User Manual, and key to return to then check whether the parts such as power adapter and antenna are correctly connected. If there are no such problems, power off and then power on the phone again. 58