1
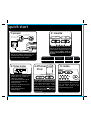
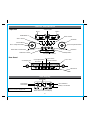
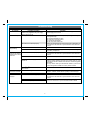
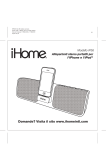
Model iP88
The Home System
For Your iPhone® or iPod®
Questions? Visit www.ihomeintl.com
Table of Contents
Quick Start ........................................................................................................................................................................1
Controls and Indicators / iP88 Display..........................................................................................................................2
Setting Up the iP88...........................................................................................................................................................3
Using the iP88.............................................................................................................................................................. 4
Replacing iP88 Backup Batteries ...................................................................................................................................5
A Consumer Guide to Product Safety ...........................................................................................................................6
Troubleshooting ...............................................................................................................................................................7
This product bears the selective sorting symbol for waste electrical and electronic equipment
(WEEE).
This means that this product must be handled pursuant to European Directive 2002/96/EC in order
to be recycled or dismantled to minimize its impact on the environment.
For further information, please contact your local or regional authorities.
Electronic products not included in the selective sorting process are potentially dangerous for the
environment and human health due to the presence of hazardous substances.
Maintenance
• Place the unit on a level surface away from sources of direct sunlight or excessive heat.
• Protect your furniture when placing your unit on a natural wood and lacquered finish. A cloth or other protective material should
be placed between it and the furniture.
• Clean your unit with a soft cloth moistened only with mild soap and water. Stronger cleaning agents, such as Benzene, thinner
or similar materials can damage the surface of the unit.
quick start
1:power
2: inserts
Push plug head in
to change plugs
Push button to
release plug head
Attach AC adaptor cable to DC jack
on back of the iP88 and plug the
other end into a wall socket.
Select the dock insert for your
iPhone or iPod® model from the
table below and place insert in
dock1/dock2. Never dock an
iPhone/ iPod without an insert
in place.
Use this insert
For this iPhone / iPod
3: time zone
• Move the DST switch on back
of unit to +1 or -1 (adds or
subtracts an hour)
• Press & hold the Time Zone
button on back until the
display flashes
• Turn the Set Wheel to select
your time zone
• Press the Time Zone
button again.
4: iPhone/
iPod
Gently dock an iPhone or iPod
into dock 1/dock 2 with proper
insert (iPhone/iPod must not be
in a skin or case). The
iPhone/iPod will charge while
docked. Press the
Button for
the matching dock to play your
iPhone/iPod.
1
iPhone 3G
insert 15
iPod touch 2G
insert 16
nano 5G
insert 18
iPhone 3G/3GS
iPod touch 2G
nano 5G
5: radio
Press the Radio button and turn
the Set Wheel to tune in a
station. See page 4 for
programming presets.
Controls and Indicators
Top Panel
Alarm 2 Button
Dock 2
Dock 1
Preset Buttons 1-8
Alarm 3 Button
Alarm 1 Button
Set Wheel
Volume Wheel
Dock 2 Play/Pause Button
Dock 1 Play/Pause Button
Alarm Reset / Power Button
Radio/line-in Button
EQ Button
Sleep Button
Snooze/Dimmer Button
Rear Panel
Time Sync Button
AC Adaptor Jack
Line-in Jack
Clock Adjust Button
DST switch
Time Zone Button
FM Antenna
iP88 Display
Time Display
PM Indicator
Alarm Indicators
AM Indicator
Battery Low Indicator
NOTE: AM/PM indicators will not appear when
clock is set to 24 hour display mode
Radio / Alarm Time / iPod Display
2
Setting Up the iP88
Connect iP88 to Power Source
Plug the AC adaptor cable into the AC Adaptor Jack and the other end into a standard 100-240V AC wall socket. Adaptor must be plugged
in to operate unit. The iP88 does not operate on batteries (a battery back up system maintains clock settings during power failures).
This unit is a preset Clock: the clock is preset at the factory. It’s simple to match the Time Zone setting to your location (US only).
1. Depending on your location and whether or not Daylight Saving Time (DST) is in effect, manually set the DST Switch located at the
back of the unit to +1 to add an hour or to -1 to subtract an hour. A DST icon will appear on the display when set to +1.
2. Press and hold the Time Zone Button located on the back of the unit until the Time Zone flashes on the lower part of the display. Turn
the Set Wheel to select your time zone. Note: Time Zone is disabled when clock display is set to 24 hours.
3. Press the Time Zone Button again (or no button within 10 seconds) to exit the time zone setting mode.
4. If the displayed time is not correct, please see Setting Time and Calendar below.
Setting Time and Calendar
1. Press and hold the Clock Adjust Button located at the back of the unit until the time flashes on the display.
2. Turn the Set Wheel to the correct time. Remember to set the correct AM or PM time. The AM/PM Indicators appear to the left of the
time display.
3. Press the Clock Adjust Button again. The year will flash. Turn the Set Wheel until the current year is displayed.
4. Press the Clock Adjust Button again. The month and date will flash. Turn the Set Wheel until the current month/date is displayed.
5. During Time set, press either the
or
button to toggle the clock display format to 12 hours or 24 hours.
6. Press the Clock Adjust Button again (or no button within 10 seconds) to exit the time/calendar setting mode.
Time Sync from iPhone/iPod
The iP88 Time Sync feature allows you to sync the time setting on the iP88 to the time from your iPhone or recent model iPod (iPod
Touch, iPod Nano and iPod Classic; older iPod models such as iPod mini do not support this feature).
1. Press and hold the Time Sync Button located at the back of the unit “Time Sync” flashes on the lower part of the display.
2. The iP88 will sync to the time on your iPhone/iPod. NOTE: If 2 iPhone/iPods are docked, the iP88 will sync with the device in Dock 1.
3. Once sync is completed,“Time Updated” will appear on the display.
4. If sync was not successful, “Sync Failed” will appear on the display. If this happens, please try again with a different iPhone/iPod.
NOTE: iPhone time is automatically updated to the correct time via cell phone towers. The time on your iPod is accurate only to the time
on the computer the last time the iPod was synced to it. It’s possible to have up to 59 seconds difference between the iP88 and synced
iPhone/iPod.
Using the Alarms
iP88 has a triple alarm system so you can set three separate alarms to different alarm times, wake-to sources and frequencies (daily,
weekdays or weekend).
Setting the Alarms
1. Press and hold the ,
or
Button until the alarm time flashes on the lower part of the display. Turn the Set Wheel to set the
alarm time. Remember to set the correct AM or PM time.
2. Press the Alarm Button again to confirm the desired alarm time and then turn the Set Wheel to set the alarm frequency (7 = the whole
week, 5 = weekdays, 2 = weekends only).
3. Press the Alarm Button again to confirm alarm frequency then turn the Set Wheel to select alarm source to wake to: Buzzer, Dock-1’s
iPhone/iPod, Dock-2’s iPhone/iPod or Radio.
4. For wake to iPhone/iPod, you can further select normal wake (wake to playing sound) or wake to playlist. For wake to playlist, you
must create a playlist named “iHome”. The iP88 will play music randomly from within the “iHome” playlist.
If the selected alarm source is dock 1 or dock 2 and no iPhone/iPod is docked/detected, the iP88 will default to a buzzer alarm.
5. For wake to radio, after selecting Radio as wake to source, press the Alarm Button and then turn the Set Wheel to select a radio
station or press one of the preset buttons to wake to a preset radio station (see Using Radio on page 4 for details on setting radio
stations and presets).
6. Press the Alarm button again (or no button within 10 seconds) to exit the alarm setting mode. The alarm will be armed once set and
the corresponding alarm icon will light up. The lower part of the display will show the earliest set alarm time.
3
Using the iP88
Reviewing, Arming and Disarming Alarm (Turn Alarm Function On and Off)
1. Once an alarm is armed, the lower part of the display will show the alarm time. If more then one alarm is armed, the earliest alarm
time will show.
2. To review the alarm time, press an alarm button once. The related alarm time will show on the lower part of the display.
3. During alarm review, press the alarm button once to toggle it on or off. If the alarm is armed, the related alarm icon will light up.
Resetting the Alarm to Come on the Next Day
1. When the alarm is sounding, press the
Button to stop alarm and reset it to come on the next set day. For example, if alarm is set
for 5 days and you press the alarm reset on Friday, the alarm will come on again on Monday, not Saturday.
Snooze Operation
1. Press and hold the Snooze/Dimmer Button for a few seconds until the snooze time flashes. Turn the Set Wheel to set the snooze
timer from 1 to 29 minutes.
2. Press the Snooze/Dimmer Button after an alarm sounds. The alarm will be silenced for the set snooze duration time then sound
again. Snooze can be pressed several times during the 1 hour alarm cycle.
Sure Alarm
The iP88 has a sure alarm feature. If backup batteries are installed, the buzzer alarm will still sound in the event of a power failure.
Charging your iPhone/Pod
Note: Please make sure you are using the correct insert for your iPhone/iPod and that it is properly docked into the iP88. Failure to do
so may damage your iPhone/iPod.
1. While an iPhone/iPod is docked in the unit and the unit is connected to AC power, it recharges (until fully charged).
Listening to iPhone/iPod
1. Dock the already playing iPhone/iPod in Dock 1 or Dock 2. The iP88 will automatically turn on and you will hear the music playing from
your iPhone/iPod.
Note: If the playing song/music loudness is too low on the iPod itself, the iP88 may not detect iPod is in play mode. Press the relative
dock 1 or dock 2
Button to play it.
2. If an iPhone/iPod is playing in one dock and you dock another playing iPhone/iPod, the iP88 will keep playing the first iPhone/iPod
and turn off the second/other one. Press the dock 2
Button to play the iPhone/iPod in dock 2 and turn off dock 1 (and vice versa).
3. When an iPhone/iPod is docked and in standby mode, press the relative
Button (dock 1 or dock 2) to play it. “Dock-1” or “Dock-2”
will appear briefly in the lower part of the display to show which dock is currently in play mode.
4. Press the
Button again to pause play; press again to resume it.
5. Turn the Volume Wheel to adjust the system volume.
6. Press the EQ Button to select and turn the Set Wheel to set Treble, Bass,3D Sound on/off and Left/Right Balance.
7. Press
or
Button on the remote control to go to the next or previous track. Press and hold while track is playing for high speed
forward or reverse music search of the current track.
8. To turn off the unit, press the
Button. An iPhone/iPod will continue charging while docked.
Listening to Radio
Setting up Antenna
Extend FM wire antenna fully for best reception. Do not strip, alter or attach to other antennas.
Tuning and Playing the Radio
1. Press the Radio Button as needed to turn on iP88 and cycle through Radio and Line-in modes.
2. When radio mode is selected, turn the Set Wheel to tune the radio to a desired station. The current radio frequency appears in the
lower right of the display. You can also press and hold the
or
Button on the remote to scan for the next clear station.
3. To memorize a station as a preset, use the Set Wheel to select your station. Press and hold the Preset Button until odd number
presets flashes on display; press again for even number presets and allow to time-out. You will hear 2 beeps confirming the preset
has been assigned.
4. To access a preset station, press the desired Preset Button once (for odd number presets) or twice (for even number presets).
5. Turn the Volume Wheel to adjust the system volume.
6. Press the EQ Button to select and turn the Set Wheel to set Treble, Bass,3D Sound on/off and Left/Right Balance.
7. To turn off the unit, press the
Button. An iPhone/iPod will continue charging while docked.
4
Using the iP88
Using the Line-in Jack
You can play any iPod without a docking port or other MP3 player or portable audio device through the iP88 via the Line-in Jack.
1. Plug one end of a standard audio patch cord (not included) into the headphone or line-out jack on your device and the other end of
the patch cord into the iP88 Line-in Jack located on the back of the unit.
2. Press the Radio Button until “Line-in” appears in the lower part of the display.
3. Turn on and play your device.
4. Turn the Volume Wheel to adjust the system volume.
5. Press the EQ Button to select and turn the Set Wheel to set Treble, Bass,3D Sound on/off and Left/Right Balance.
6. To turn off the unit, press the
Button. Please remember to turn off your device, too.
Sleep Operation
Sleep mode lets you sleep to your iPhone/Pod or radio, gradually lowering the volume until the unit shuts off at the selected time.
1. Press the Sleep Button to enter sleep mode. The sleep time will show in the lower display.
2. Press the Sleep Button again as needed to adjust the sleep timer from 120, 90, 60, 30 or 15 minutes.
3. When the display changes back to show the real time, press the Sleep Button once to show the sleep time remaining. Pressing it
again will change sleep time to next lowest increment.
4. iP88 has independent volume setting for sleep mode so you can adjust the sleeping volume without affecting the normal volume. The
sleep volume will remain at that level the next time you enter sleep mode until controls are changed.
5. To stop listening at any time, press the
Button to turn unit off.
Dimmer Operation
During normal operation, press the Snooze/Dimmer Button to control the brightness of the LCD display.
Using the iP88 in Other Countries
Different regions of the world use different FM radio frequency steps and ranges. You will need to select the one that matches the standards
in your region (USA, EUROPE, JAPAN, AUSTRALIA,or CHINA). The default setting is USA; if you live in the US, you may skip this section.
1. Make sure the iP88 is OFF (not playing in any mode). Press and hold the Radio Button for about 5 seconds until “Radio xxx” appears
in the lower part of display. Press the + or - Button to set the “xxx” to your region.
2. Press the Radio Button again (or no button within 5 seconds) to exit the radio frequency setting mode.
Important: AM radio will only work if the radio frequency range set to USA.
Replacing iP88 Backup Batteries
Install/Replace Backup Battery
The iP88 uses a backup battery system to provide continuous alarm operation and clock settings
in the event of a power failure. If the Battery Low Icon located on the right of the display is flashing,
it is time to replace the backup batteries. Please make sure the AC adaptor is connected, otherwise
all settings may be lost during battery replacement.
Open the battery compartment cover located on the bottom of the unit. Insert 2 “AA” batteries
as indicated. We recommend the use of alkaline batteries for longer life.
Batteries information:
• Do not mix old and new batteries.
• Do not mix alkaline, standard (carbon -zinc) or rechargeable (nickel-cadmium) batteries.
5
A Consumer Guide to Product Safety
When used in the directed manner, this unit has been designed and manufactured to ensure your personal safety. However,
improper use can result in potential electrical shock or fire hazards. Please read all safety and operating instructions
carefully before installation and use, and keep these instructions handy for future reference. Take special note of all
warnings listed in these instructions and on the unit.
1.
2.
3.
4.
5.
6.
7.
8.
9.
10.
11.
12.
13.
14.
Water and Moisture – The unit should not be used near water. For example: near a bathtub, washbowl, kitchen sink,
laundry tub, swimming pool or in a wet basement.
Ventilation – The unit should be situated so that its location or position does not interfere with its proper ventilation.
For example, it should not be situated on a bed, sofa, rug or similar surface that may block ventilation openings. Also,
it should not be placed in a built-in installation, such as a bookcase or cabinet, which may impede the flow of air
through the ventilation openings.
Heat – The unit should be situated away from heat sources such as radiators, heat registers, stoves or other appliances
(including amplifiers) that produce heat.
Power Sources – The unit should be connected to a power supply only of the type described in the operating
instructions or as marked on the appliance.
Power-Cable Protection – Power supply cables should be routed so that they are not likely to be walked on or
pinched by items placed upon or against them. It is always best to have a clear area from where the cable exits the
unit to where it is plugged into an AC socket.
Cleaning – The unit should be cleaned only as recommended. See the Maintenance section of this manual for
cleaning instructions.
Objects and Liquid Entry – Care should be taken so that objects do not fall and liquids are not spilled into any
openings or vents located on the product.
Attachments – Do not use attachments not recommended by the product manufacturer.
Lightning and Power Surge Protection – Unplug the unit from the wall socket and disconnect the antenna or cable
system during a lightning storm or when it is left unattended and unused for long periods of time. This will prevent
damage to the product due to lightning and power-line surges.
Overloading – Do not overload wall sockets, extension cords, or integral convenience receptacles as this can result
in a risk of fire or electric shock.
Damage Requiring Service – The unit should be serviced by qualified service personnel when:
A. the power supply cable or plug has been damaged.
B. objects have fallen into or liquid has been spilled into the enclosure.
C. the unit has been exposed to rain.
D. the unit has been dropped or the enclosure damaged.
E. the unit exhibits a marked change in performance or does not operate normally.
Antenna – Do not connect an external antenna to the unit (other than that provided).
Periods of Nonuse – If the unit is to be left unused for an extended period of time, such as a month or longer, the
power cable should be unplugged from the unit to prevent damage or corrosion.
Servicing – The user should not attempt to service the unit beyond those methods described in the user’s operating
instructions. Service methods not covered in the operating instructions should be referred to qualified service personnel.
Questions? Visit www.ihomeintl.com
6
Troubleshooting
Symptom
Possible Problem
Solution
iP88 does not turn on
AC adaptor isn't plugged into a working wall
socket or not plugged into the power supply
jack on back of the unit
Plug the AC adaptor into a working wall socket and plug the connector
into the supply jack on the unit
iP88 doesn’t respond
iP88 requires a reset
If unit is plugged in and doesn't respond, try resetting the unit by
following these steps:
a) remove iPhone/iPod from dock
b) unplug unit from power source
c) remove back up batteries
d) wait 1 hour, then resume use
iPhone/iPod is not docked properly
Remove your iPhone/iPod from the dock and check for obstruction on
the connectors in the dock and on your iPhone/iPod. Then reseat it in
the dock.
Batteries are weak
Replace with new batteries
Batteries were not installed properly
Check to make sure the polarity ( + and – ends) matches the diagram
in the battery compartment
iPhone/iPod is not docked properly
Remove your iPhone/iPod from the dock and check for obstruction on
the connectors in the dock and on your iPhone/iPod. Then reseat it in
the dock.
Your iPhone/iPod software is too old
Upgrade software on your iPhone/iPod via iTunes on your computer
iPhone/iPod is locked up/plays but no sound
comes out
Check the volume setting. Make sure your iPhone/iPod is working
properly before docking into the unit. Please refer to your
iPhone/iPod manual for details. See above for software upgrade
information.
You may need to reset your iPhone/iPod. Refer to your iPhone
or iPod user guide for details on how to perform a reset.
Using 1st or 2nd generation iPod, iPod Shuffle or
other devices.
iP88 cannot control those iPod models or other devices.
iP88/iPhone/iPod
performance is erratic
The iP88 is reacting to external interference
Move unit away from potential sources of external interference such as
computers, modems, wireless devices (routers) or fluorescent light.
No sound from iP88
Volume is set too low on iP88
Make sure volume is turned up
iPhone/iPod didn’t
charge up
iPhone/iPod is not installed properly
Remove your iPhone/iPod from the dock and check for obstruction on
the connectors in the dock and on your iPhone/iPod. Then reseat it in
the dock.
iPhone/iPod is locked up/ frozen
Please make sure your iPhone/iPod is working properly before docking
into the unit. Please refer to your iPhone/iPod manual for details.
Battery Low icon
always flashing
iPhone/iPod does not
respond to the unit/iPod
is playing but no sound
comes out
iPhone/iPod battery has problem
7
Troubleshooting
Symptom
Sound is distorted
Possible Problem
Solution
Volume level is set too high
Decrease the volume
Sound source is distorted
If the iPhone/iPod original sound source (MP3) is old or of poor quality,
distortion and noise are easily noticed with high-power speakers. Try a
different audio source such as a music CD.
If you are using an external sound source like older generation of iPod
or iPod Shuffle, try reducing the output volume on the device itself. Also
try turning bass boost OFF.
EQ settings are too high. For example, if the
treble is too high, the 3D effect may not sound
as good
Lower EQ settings.
Unit/adaptor gets
warm after extended
play at high volume
This is normal
Turn unit off for awhile or lower volume
Snooze time
is too long/short
Custom snooze time not set
Press and hold Snooze button then turn set wheel to adjust
Alarm not working
AM/PM time/alarm time not set correctly
When setting clock or alarm time, take note of the AM/ PM indicator
Alarm time or source selected for alarm 2 or
Alarm 3 , not alarm 1, etc.
Make sure to set the alarm time and source for the alarm icon 1, 2 or
3 that is shown on the clock display
7-5-2 days setting is not correct
7 days is every day alarm, 5 days is Mon-Fri, and 2 days is Sat-Sun. See
page 3 for setting alarms.
Calendar is not set correctly, which can affect
7/5/2 day alarm operation
See page 3 for setting Clock/Calendar Section.
8
Questions? Visit www.ihomeintl.com
iP88INTLUK-070309-B
©SDI Technologies 2009 All rights Reserved
Printed in China