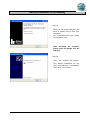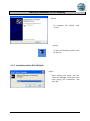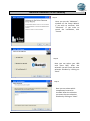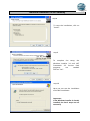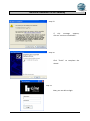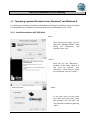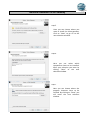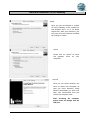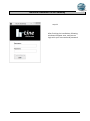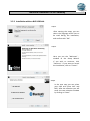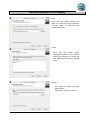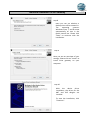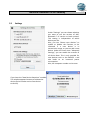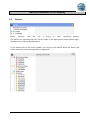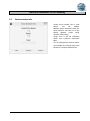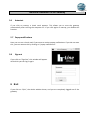
1
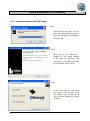
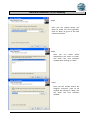
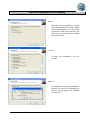
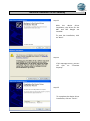
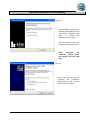
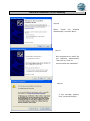
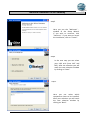
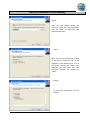
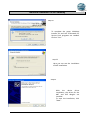
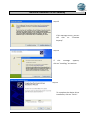
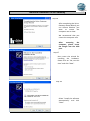
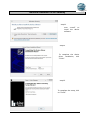
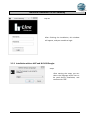
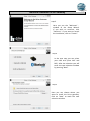
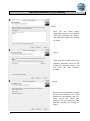
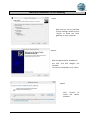
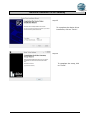
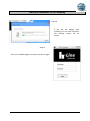
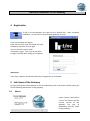
Benutzer Handbuch hLine Gateway
User Manual hLine Gateway
HMM Diagnostics GmbH
Friedrichstr. 89
69221 Dossenheim (Germany)
www.hmm.info
Seite 1 von 41
Benutzer Handbuch hLine Gateway
Contents
1
2
3
Page
introduction ........................................................................................................................ 3
tasks of the gateway........................................................................................................... 3
installation .......................................................................................................................... 3
3.1 Windows XP operating system ......................................................................................... 3
3.1.1
installation with an ANT USB Stick ..................................................................... 4
3.1.2
installation with a BLE USB Stick: ....................................................................... 8
3.1.3
Installation with an ANT and BLE USB Dongle: ................................................ 15
3.2
Operating systems Windows Vista, Windows7 und Windows 8 ............................. 22
3.2.1
Installation with an ANT USB Stick ................................................................... 22
3.2.2
Installation with a BLE USB Stick ...................................................................... 26
3.2.3
Installation with an ANT und BLE USB Dongle: ................................................ 30
4 Registration ...................................................................................................................... 36
5 Sub-Items of the Gateway ................................................................................................ 36
5.1
About ........................................................................................................................ 36
5.2
Settings ..................................................................................................................... 37
5.3
Log Dates .............................................................. Fehler! Textmarke nicht definiert.
5.4
Devices ..................................................................................................................... 39
5.5
Seriennummer Info .................................................................................................. 40
5.6
Autostart .................................................................................................................. 41
5.7
Popup notifications .................................................................................................. 41
5.8
Sign out ..................................................................................................................... 41
6 Exit .................................................................................................................................... 41
Seite 2 von 41
Benutzer Handbuch hLine Gateway
1 Introduction
Thank you for choosing the hLine gateway. With this gateway, you can now transfer your
vital data in the hLine-online.com portal and manage them. This manual will guide you step
by step through the gateway.
If you need further assistance or have questions, please contact our Support Team under
[email protected].
2 Tasks of the gateway
The hLine gateway is used for transmission of the measured vital data from a meter to your
computer, tablet, etc. These vital data are transferred by instruments which have an ANT or
BLE modulus. The data is transmitted via the hLine gateway to the server, which updates the
data in hLine-online.com portal regularly.
3 Installation
You have to download the file "Setup hLine" hLine for the gateway from
http://www.hmm.info/downloads.html. Then, run the file and follow the remaining steps of
the installation wizard:
Step 1
Important:
Please insert the dongle (it does not matter which one you have) only AFTER completing the
installation and restarting the computer AFTER the USB interface.
3.1 Windows XP operating system
The following installation procedures (subdivided according to the different types of dongle)
are designed to be installed on a Windows XP operating system.
Seite 3 von 41
Benutzer Handbuch hLine Gateway
3.1.1 Installation with an ANT USB Dongle
step 2
After starting the setup, you can
select the language, which has to
be used during the installation,
and click "OK".
step
step 3
3
Here you see the "Welcome" window of the Setup Wizard.
If you wish to continue, click
"Continue". If you want to cancel
the installation, click "Cancel.
step 4
In the next step you can select
your USB stick (here ANT). After
the selection you will get to the
next selection window by clicking
on "Next".
Seite 4 von 41
Benutzer Handbuch hLine Gateway
step 5
Here you can choose where you
want to install the hLine gateway.
Click on "Next" to go on to the next
selection window.
step 6
Here you can select which
components you want to install.
You enter the next selection
window after clicking on "Next".
step 7
Here you can choose where the
program shortcuts have to be
created. By clicking on "Next" you
will reach the next selection
window.
Seite 5 von 41
Benutzer Handbuch hLine Gateway
step 8
Here you can set whether a symbol
of hLine Gateways has to be created
on the desktop and / or at the Quick
Launch bar. After your selection you
will enter the next selection window
by clicking "Next".
step 9
To start the installation, click on
"Install".
step 10
To complete the setup, the Windows
Installer 3.1 and. NET Framework 3.5
Service Pack programs are needed.
Click on "Yes".
Seite 6 von 41
Benutzer Handbuch hLine Gateway
step 11
Here you can choose whether you
want to restart now or later your
computer.
We recommend that you restart
the computer now.
After restarting the computer
please insert the dongle into the
USB port.
step 12
Then, this window will appear.
This wizard installation for the
ANT USB software is completed.
Click "Next" to continue.
Seite 7 von 41
Benutzer Handbuch hLine Gateway
step 13
To complete the wizard, click
"Finish".
step 14
To start the Gateway, please click
on the icon.
3.1.2 Installation with a BLE USB Stick:
step 2
After starting the setup, you can
select the language, which has to be
used during the installation, and
click "OK"
Seite 8 von 41
Benutzer Handbuch hLine Gateway
step 3
Here you see the "Welcome" window of the Setup Wizard.
If you wish to continue, click
"Continue". If you want to
cancel the installation, click
"Cancel.
step 4
Here you can select your USB
stick (here BLE). After the
selection you will reach the next
selection window by clicking on
"Next".
step 5
Here you can select which
components have to be
installed. After the selection
you enter the next selection
window by clicking on "Next".
Seite 9 von 41
Benutzer Handbuch hLine Gateway
step 6
Here you can select where the
hLine Gateway will be installed.
Click on "Next" to reach the next
selection window.
step 7
Here you can set whether a
symbol of hLine gateways has
to be created on the desktop
and / or the Quick Launch bar.
After your selection you reach
the next selection window by
clicking on "Next".
Seite 10 von 41
Benutzer Handbuch hLine Gateway
step 8
To start the installation, click on
"Install".
step 9
To complete the setup, the
Windows Installer 3.1 and. NET
Framework 3.5 Service Pack
programs
are
needed.
Click on "Yes".
step 10
Here you can see the installation
of the BLE installation.
Important:
If the Windows Installer is already
installed, the last 3 steps are not
necessary!
Seite 11 von 41
Benutzer Handbuch hLine Gateway
step 11
With the device driver
installation, the driver for the
ANT and BLE dongle are
installed.
To start the installation, click
on "Next".
step 12
If this message occurs, you can
still click on "Continue
Anyway".
step 13
To complete the device driver
installation, click on "Finish“.
Seite 12 von 41
Benutzer Handbuch hLine Gateway
step 14
After completing the hLineGateway Setup Wizard, you
can choose whether you
want to restart the
computer now or later.
We recommend that you
restart the computer now.
After
restarting
the
computer, please insert
the dongle into the USB
port.
step 15
Here starts the wizard for
installing the hardware.
Please click on "No, not this
time" and click "Next“.
Seite 13 von 41
Benutzer Handbuch hLine Gateway
step 16
Select "Install the software
automatically" and click "Next".
step 17
We recommend to install the
the software automatically.
Then click on “next” to
continue with the installation.
step 18
If this message appears,
Click "Continue Anyway".
Seite 14 von 41
Benutzer Handbuch hLine Gateway
step 19
Click "Finish" to complete the
wizard.
step 20
After finishing the installation, this window
will appear, and you are able to login.
3.1.3 Installation with an ANT and BLE USB Dongle:
step 2
After starting the setup, you can
select the language, which has to
be used during the installation,
and click "OK.
Seite 15 von 41
Benutzer Handbuch hLine Gateway
step 3
Here you see the "Welcome" window of the Setup Wizard.
If you wish to continue, click
"Continue". If you want to cancel
the installation, click on "Cancel".
step 4
In the next step you can select
your USB stick (here ANT and
BLE). After the selection you will
reach the next selection window
by clicking on "Next".
step 5
Here you can select which
components have to be installed.
After your selection you will reach
the next selection window by
clicking on "Next".
Seite 16 von 41
Benutzer Handbuch hLine Gateway
step 6
Here you can choose where you
want to install the hLine gateway.
Click on "Next" to reach the next
selection window.
step 7
Here you can set whether a symbol
of the hLine Gateways has to be
created on the desktop and / or at
the Quick Launch bar. After your
selection you will enter the next
selection window by clicking on
"Next".
step 8
To start the installation, click on
"Install“.
Seite 17 von 41
Benutzer Handbuch hLine Gateway
step 10
To complete the setup, Windows
Installer 3.1 and. NET Framework 3.5
Service Pack programs are needed.
Click on "Yes“.
step 11
Here you can see the installation
of ANT installation.
step 12
With the device driver
installation, the driver for the
ANT and BLE dongles are
installed.
To start the installation, click
"Next".
Seite 18 von 41
Benutzer Handbuch hLine Gateway
step 13
If this message occurs, you can
still click on "Continue
Anyway“.
step 14
If
this
message
appears,
click on "Installing“ to continue.
step 15
To complete the device driver
installation, click on "Finish“.
Seite 19 von 41
Benutzer Handbuch hLine Gateway
step 16
After completing the hLineGateway Setup Wizard, you
can choose whether you
want to restart the
computer now or later.
We recommend that you
restart the computer now.
After
restarting
the
computer, please insert
the dongle into the USB
port.
step 17
Here starts the wizard for
installing the hardware.
Please click on "No, not this
time" and click "Next“.
step 18
Select "Install the software
automatically" and click
"Next".
Seite 20 von 41
Benutzer Handbuch hLine Gateway
step 19
If
this
message
appears,
click on “continue installation“.
step 20
Click "Finish" to complete the
wizard.
step 21
Now, you are able to login.
Seite 21 von 41
Benutzer Handbuch hLine Gateway
3.2 Operating systems Windows Vista, Windows7 und Windows 8
The following installation procedures (subdivided according to the different types of dongle)
are designed for the installation of the operating systems of Windows Vista, 7 or 8.
3.2.1 Installation with an ANT USB Stick
step 2
After starting the setup, you can
select the language which is used
during the installation, and
confirm it with "OK".
step 3
Here you see the "Welcome" window of the Setup Wizard. If
you wish to continue, click
"Continue". If you want to cancel
the installation, click on "Cancel".
step 4
In the next step you can select
your USB stick (here ANT). After
the selection you will enter the
next selection window by pressing
"Next".
Seite 22 von 41
Benutzer Handbuch hLine Gateway
step 5
Here you can choose where you
want to install the hLine gateway.
Click on "Next" to go on to the
next selection window.
step 6
Here you can select which
components have to be installed.
After your selection you enter by
clicking "Next" to the next
selection window.
step 7
Here you can choose where the
program shortcuts have to be
created. By clicking on "Next" you
will reach the next selection
window.
Seite 23 von 41
Benutzer Handbuch hLine Gateway
step 8
Here you can set whether a symbol
of hLine Gateway to be created on
the desktop and / or in he Quick
Launch bar. After your selection, you
will enter the next selection window
by clicking on "Next".
step 9
Please click on "Install" to install
the gateway hLine on your
computer.
step 10
Here you can select whether you
want to restart the computer to
stop the hLine Gateway Setup
Wizard immediately or wait until
later. We recommend that you
restart the computer now.
After restarting the computer
please insert the dongle into the
USB port.
Seite 24 von 41
Benutzer Handbuch hLine Gateway
step 11
After finishing the installation, following
window will appear next, and you can
login with your username and password.
Seite 25 von 41
Benutzer Handbuch hLine Gateway
3.2.2 Installation with an BLE USB Stick
step 2
After starting the setup, you can
select the language which has to
be used during the installation,
and confirm with "OK".
step 3
Here you see the "Welcome" window of the Setup Wizard.
If you wish to continue, click
"Continue". If you want to cancel
the installation, click on "Cancel“.
step 4
In the next step you can select
your USB stick (here ANT and
BLE). After the selection you will
enter the next selection window
by clicking on "Next".
Seite 26 von 41
Benutzer Handbuch hLine Gateway
step 5
Here you can choose where you
want to install the hLine gateway.
Click on "Next" to enter the next
selection window.
step 6
Here you can select which
components have to be installed.
After your selection you enter the
next selection window by clicking
"Next".
Schritt 7
Here you can choose the Start
Menu folder.
Please click "Next" to confirm.
Seite 27 von 41
Benutzer Handbuch hLine Gateway
step 8
Here you can set whether a
desktop icon will be created. In
The
operating
systems:
Windows Vista, 7, and 8 create
automatically an icon in the
Quick Launch bar. Please click
"Next" to continue with the
installation.
step 9
Here you see an overview of your
settings. Please click on "Install" to
install hLine gateway on your
computer.
step 10
With the device driver
installation, the driver for the
ANT and BLE dongles are
installed.
To start the installation, click
"Continue“.
Seite 28 von 41
Benutzer Handbuch hLine Gateway
step 11
Click "Install" to
install the device
software.
step 12
To complete the device
driver installation, click
"Finish".
step 13
To complete the setup, click
on "Finish".
Seite 29 von 41
Benutzer Handbuch hLine Gateway
step 16
After finishing the installation, this window
will appear, and you are able to login.
3.2.3 Installation with an ANT and BLE USB Dongle:
step 2
After starting the setup, you can
select the language which has to
be used during installation, and
confirm with "OK".
Seite 30 von 41
Benutzer Handbuch hLine Gateway
step 3
Here you see the "Welcome" window of the Setup Wizard.
If you wish to continue, click
"Continue". If you want to cancel
the installation, click on "Cancel“.
step 4
In the next step you can select
your USB stick (here ANT and
BLE). After the selection you will
enter the next selection window
by pressing "Next".
step 5
Here you can choose where you
want to install the hLine gateway.
Click on "Next" to reach the next
selection window.
Seite 31 von 41
Benutzer Handbuch hLine Gateway
step 6
Here you can select which
components have to be installed.
After your selection you enter a
new selection window by clicking
on "Next".
step 7
Here you can choose where the
program shortcuts have to be
created. By clicking on "Next", you
will enter the next selection
window.
step 8
Here you can set whether a symbol
of the hLine Gateway has to be
created on the desktop and / or
Quick Launch bar. After your
selection you will enter the next
selection window by clicking on
“Next”.
Seite 32 von 41
Benutzer Handbuch hLine Gateway
step 9
Here you can see an overview
of your settings. Please click on
"Install" to install the hLine
gateway on your computer.
step 10
With the device driver installation,
the ANT and BLE dongles are
installed.
To start the installation, click "Next".
step 11
Click "Install" to
install the device
software.
Seite 33 von 41
Benutzer Handbuch hLine Gateway
step 12
To complete the device driver
installation, click on "Finish“.
step 13
To complete the setup, click
on "Finish“.
Seite 34 von 41
Benutzer Handbuch hLine Gateway
step 16
If you put the dongle after
installing into the USB interface,
this window screen will be
shown.
step 17
Then, this window appears, and you are able to login.
Seite 35 von 41
Benutzer Handbuch hLine Gateway
4 Registration
To log in to the gateway, you have to do a double click - after successful
installation - on the icon on your desktop gateway of hLine.
Then, this window will appear.
Here you can enter your username and your
password, and then click on login.
You can also do a check under
"Automatic Login". Then, you do not have
to login manually after startig the computer.
Important:
If the icon is black in the Quick Launch bar, the gateway is connected.
5 Sub-Items of the Gateway
By right-clicking the mouse button on the hLine Gateway icon in the lower task bar takes you
to the following subsections of the gateway:
5.1
About
Under "About" you will find
a list of the names and the
current version of the
gateway, the year of
publication and the name
of the producer.
Seite 36 von 41
Benutzer Handbuch hLine Gateway
5.2
Settings
Under "Settings" you can choose whether
you want to use the version of ANT,
Bluetooth ® LE version or both versions.
This setting is independent of which
device you use.
Also, you can "detect new devices" to
enable or disable the function, to be
informed if a new device is in
transmission range, or you can add a new
device. Under the menu item "Advanced
Settings", you can enable the transfer of
all device data. This is only possible for
new devices such as the MOVEP + and
also leads to an increased power
consumption.
Also, the computer number can be seen.
If you have the "New Device Detection" enabled,
This window appears because of a detection
device (Serial number varies from device
to device).
Seite 37 von 41
Benutzer Handbuch hLine Gateway
5.3
Data Log
"Data Log" is a listing of whether the data sent from one device were successfully
transmitted to the server, or if the transmission failed.
Additionally, there is the information that the gateway is successfully connected to the
server. This list is primarily for possible review whether the data is transferred.
With a right-click on the list, it is possible to delete the history.
Seite 38 von 41
Benutzer Handbuch hLine Gateway
5.4
Devices
Under "Devices" you will see a listing of your registered devices.
The devices are specified with your serial number in the appropriate section (blood sugar,
blood pressure, scales and pedometers).
If you double-click on the serial number, you will get more details about the device and
under which user name this equipment is registered:
Seite 39 von 41
Benutzer Handbuch hLine Gateway
5.5
Seriennummer Info
Under serial number info, a new
device
can
be
added.
When a device transmits data, the
serial number and the art of the
device appears under serial
number information.
Under User it will be indicated
which user transmits measured
data.
This is displayed for devices which
are suitable for multiple users and
based on a unique identification.
Seite 40 von 41
Benutzer Handbuch hLine Gateway
5.6
Autostart
If you click on startup, a check mark appears. This allows you to start the gateway
automatically after turning the computer on. If you click again on startup, you disable this
function.
5.7 Popup notifications
Here you can set a check mark if you want to receive popup notifications. If you do not want
this, you can remove this by clicking on "popup notifications".
5.8
Sign out
If you click on "Sign Out", this window will appear
with which you can log in again.
6 Exit
If you click on “Quit”, the whole window closes, and you are completely logged out of the
gateway.
Seite 41 von 41