1
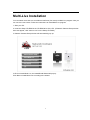
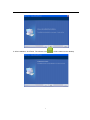
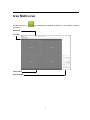
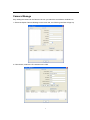
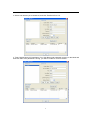
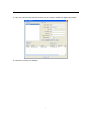
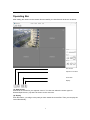
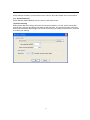
Multi-Live
V1.1
For
Wireless Network Camera
Please read this manual carefully before you attempt to
use this software and retain it for your future reference.
1
Multi-Live Installation
You can watch more than one surveillance interfaces (four most) via Multi-Live program. Also you
can use it to record video. Follow the instructions to install Multi-Live program.
1. Start your PC.
2. Insert the Setup CD-ROM in the CD-ROM drive of the PC. (If Network Camera Setup window
does not appear, click "autorun.exe" on the Setup CD-ROM.)
3. Network Camera Setup window will automatically pop up.
4.Click on Install Multi Live, the InstallShield Wizard will pop up.
Click Next to install Multi-Live according to the wizard.
2
5. After installation, click Finish. The shortcut icon
3
will be created on the desktop.
Use Multi-Live
Double click the icon
will pop up.
on the desktop after installing the Multi-Live. The following interface
Menu Bar
Tool Bar
Image Field
Operating Bar
4
Camera Manage
Only adding the camera to the Camera List can you watch the surveillance via Multi-Live.
1. Select the Option-Camera Manage on the menu bar, the following interface will pop up.
2. Click Search, search the IP cameras on the LAN.
5
3. Select one camera you’ve searched, and click Transfer Info to List.
4. Type Camera Name, IP/Host Name, Port, User Name and password correctly on the blank and
then click Add. If the password is wrong, you will be unable to connect camera.
6
5. Click one camera in the Camera List then you can modify or delete the camera information.
6. Click OK to confirm your settings.
7
Operating Bar
After adding the camera to the camera list successfully, the interface will be shown as below:
One screen
Split to four screens
Full screen
Replay
(1) Split Screen
Four kinds of screens for your request: 1and 4. You also can select the screen type via
Window-Split Screen (1/4) and Full Screen on the menu bar.
(2) Replay
Click this button, you will go to the path you have saved the record files. Then you can play the
record files directly.
8
(3) Volume
Slide the slide block horizontally to adjust volume.
(4) Image Connect & Disconnect
Click to connect
to audio and video of the IP camera.
Click to disconnect
to the audio and video of the IP camera.
You also can connect and disconnect via Control-Connect on the menu bar. To connect &
disconnect all IP cameras, click Control-Connect-Connect All & Disconnect All on the menu bar.
(5) Zoom in/Zoom out
Click on + button and the cursor turns to a magnifier. Move the magnifier to the desired location
and click on an image area. Press – button to return to the normal view.
(6) Record
Click once to start a record, click one more time to stop record.
You also can enable & disable the record function via Control-Record-Start Record & Stop
Record on the menu bar. To start & stop to record all IP cameras, click Control-Record-Start
Record All & Stop Record All on the menu bar.
(7) Snapshot
Click this button to capture a still image, and you can save it.
Check Control-Snapshot on the menu to capture a still image of the moment when you click.
(8) Alarm
Click once to enable the alarm function, click one more time to disable alarm function. The alarm
setting up should be done on the alarm setup web interface, please refer to UserManual for IP
Camera.
You also can enable & disable the alarm function via Control-Alarm on the menu bar.
To enable & disable alarms on all IP cameras, click Control-Alarm-Enable All Alarm & Disable All
Alarm on the menu bar.
(9) Mute
Check Control-Mute on the menu, you will turn off the sound on the Multi-Live IP Camera.
(10) Toolbar&Control Panel
9
Check Window-Toolbar or Control Panel on the menu to show the toolbar or the control panel.
(11) Aspect Ratio(4:3)
Check Window-Aspect Ratio(4:3) on the menu to set video screen.
(12) Record Config
Select Option-Record Config to enter the record config interface. You can set the record path,
max file size, reserved free space and alarm record time here. The record time here is the time
when motion detection alarm trigger, but not the record time you enable record function. Click OK
to confirm your settings.
10