Transcript
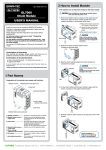
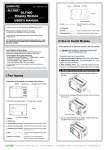
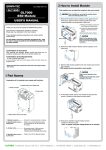
GL7-HV-UM-151
GL7-HV
GL7000
High Voltage Module
USER’S MANUAL
Thank you very much for buying this GRAPHTEC product.
This item is a standalone measuring module. Please use it by
installing it on the main module .
These directions describe preparations and cautions before
measurement.
For safe use, please make sure to read “4 Regarding
Maximum Input Voltage”
For the details concerning operation procedures etc., read
the User’s manual recorded on the CD-ROM (included with
the main module)
You can use in GL7000 firmware (V1.10) and GL-Connection(V1.10) or later.
For details, please read the "GL7000 upgrade method" included in CD-ROM
(bundled GL7-HV).
2 How to Install Module
This explains how to attach the module to the main module.
3 How to Connect to Analog Signal Terminal
This explains how to connect the input cable.
When installing or removing the module, please
make sure that the power is off.
1, Remove the fixation screws (4 places on the upper part and
lower parts), place the alarm module parallel to the main
module and slide it in the direction of the arrow.
4
(2) Loosen the drop-off prevention
screws on the upper part in 2
places.
1
2
High-voltage terminal (Terminal
-:
Low voltage terminal (Terminal
for inputting the high-voltage side
of the input signal)
for inputting the low-voltage side of
the input signal)
+
(1) Remove the fixation screws from
the 2 places on the lower part.
3
+:
-
Slide it in the direction of the
arrow. If you pry it at an angle
there is a risk of damaging the
connector.
During wiring, confirm that the
signal's supply source is turned OFF
to prevent electrical shocks.
Also, position the GL7000 input cable
away from any power lines and
ground cables.
Voltage input
Confirmation of the attached items.
• User’s manual (this book): 1 • Upgrade CD-ROM: 1
If by any chance faults are found, please contact the store where you
bought the item.
1
3, Slide the high voltage module parallel to the main module and
connect the connector.
Connector
3, Power LED
Nail
To avoid break-downs or short-circuiting accidents, please
make sure to abide by the items written below.
4, Fix the high voltage module and the main module in place with
the screws. (4 places on the upper and lower parts)
2
4
4, Module fixation screw (Lower part)
5, Analog signal input terminal
1, Module connector.............. Connector for connecting all kinds of modules.
2, Module fixation screw.......
Fixation screw for the adjoining module.
(Upper part)
To prevent drop off, do not remove from
the module.
3, Power LED..........................
The Power LED will light up green when
the power has been turned on and the
module has been recognized.
4, Module fixation screw.......
Fixation screw for the adjoining module.
(Lower part)
Terminal for inputting analog measurements.
GND terminal
•
GND terminal
Grounding
Using the filter function of the instrument
Setting the filter to anything but OFF on the main body's
input settings menu.
Insulated BNC cable
(RIC-142/143 cable is recommended.)
4 Regarding Maximum Input Voltage
2, Module fixation screw (Upper part)
5, Analog signal input terminal..
Insulated BNC Connector
Slide it in the direction of the
arrow.
Inserting it at an angle may cause
damage to the nails.
1 Part Names
1, Module connector
Make absolutely sure to ground the chassis GND
of the measuring object
Absolutely making sure to ground the chassis GND of the
measuring object to a favorable ground may have an effect.
Connecting the chassis GNDs of the measuring
object and the instrument
Connecting the chassis GND of the measuring object and
the GND terminal of the main module with an electrical
cable as short and thick as possible, and further gaining
potential equalization by grounding it may have an effect.
2
* Please note that items mentioned in this book may change without
prior notice.
Explanation of the module's part names and functions.
•
•
Equipment to
be measured
2, Remove the high voltage module's fixation screws
(2 places on the lower part).
After opening the package, please confirm that there are no
problems (scratches and dirt) on the exterior before use.
In case the measured values fluctuate due to exogenous
noise, the following measures are recommended.
(Depending on the type of noise, the result may change.)
(3) Removing the alarm module.
Alarm module
Confirmation of the exterior
5 Noise Countermeasures
•
1
4
Maximum input voltage
In case the input voltage exceeds the specifications, the
circuit at the input part will break down so even if the input
voltage exceeds the specifications only for an instant, please
don't input.
Please take care that no static electricity is applied on the
analog signal input terminal.
<Input terminal (+) /Input terminal (-) interval (A etc. on the figure below)>
Maximum input voltage : 1000Vp-p
<Input terminal (-)/Input terminal (-) interval (B etc. on the figure below)>
Maximum input voltage: 300VACrms
Withstand voltage: 2300VACrms/1minute
<Input terminal (-)/GND terminal interval (C etc. on the figure below)>
Maximum input voltage: 300VACrms
Withstand voltage: 2300VACrms/1minute
3
5, Similarly, install the alarm module on the last part and fix it with
screws.
2
••
1
3
During installation, a
4kgf.cm screw tightening
torque is recommended.
(Screen for when the optional
display module is connected)
For details, please refer to the User’s manual recorded on the CD-ROM (included with the main module)
6 Specifications
GL7-HV (High Voltage Module) specifications
Item
Input ch number
Input terminal shape
System
Sampling interval
Contents
2 ch/1 module
Insulated BNC Connector
All ch insulation, simultaneous sampling, unbalanced input
1, 2, 5, 10, 20, 50, 100, 200, 500 usec,
1, 2, 5, 10, 20, 50, 100, 125, 200, 250, 500 msec,
1, 2, 5, 10, 20, 30 sec, 1, 2, 5, 10, 20, 30 min, 1hour
Built-in RAM
2,000,000 data
Input coupling
DC, AC, DC-RMS, AC-RMS
Measurement range DC, AC : 2, 5, 10, 20, 50, 100, 200, 500, 1000V F.S.
DC-RMS, AC-RMS : 1, 2, 5, 10, 20, 50, 100, 200, 500Vrms F.S.
Crest Factor: (Range between 1and 200Vrms) 4 or less (Range
of 500Vrms) 2 or less
Measurement accuracy DC, AC : ±0.25% of F.S.
(23℃±5℃)
DC-RMS: Sine wave ±0.5% of F.S. (20Hz≤F≤1kHz)
* 30 minutes more after
±1.5% of F.S. (1kHz<F≤20kHz)
power-up
AC-RMS: Sine wave ±0.5% of F.S. (100Hz≤F≤1kHz)
GND connection
±1.5% of F.S. (1kHz<F≤20kHz)
Filter Line (DC only)
Response time: 500ms or less (Crest Factor 4 or less)
A/D converter
System: sequential comparison system
Resolution: 16-bit
Effective Resolution(DC,AC) : Approx. ±Range 1/40,000
(DC-RMS,AC-RMS) : Approx. Range1/20,000
Temperature
Gain: ±0.01% of F.S./℃
coefficient
Zero: ±0.02% of F.S./℃
Input resistance
1 MΩ ±5%
Input signal source
1 kΩ or less
resistance
Maximum input
Input terminal(+) /Input terminal (-) interval : 1000 Vp-p
voltage
Input terminal(-) /Input terminal (-) interval : 300 VACrms
Input terminal (-)/GND terminal interval: 300 VACrms
Withstand voltage
Input terminal(+) /Input terminal (-) interval: 2300 VACrms/1 minute
Input terminal (-)/GND terminal interval: 2300 VACrms/1 minute
Insulation resistance Input terminal (-)/GND terminal interval: 50 MΩ or more (at DC500 V)
Common mode rejection ratio 90 dB or more (50/60 Hz signal source 300Ω or less)
S/N (Noise)
48 db or more (+/- at short)
Frequency response DC Coupling : DC~200 kHz (+1/-3 dB)
AC Coupling : 4 Hz~200 kHz (+1/-4.5 dB)
Filter
LPF : OFF, Line (1.5 Hz), 5 Hz, 50 Hz, 500 Hz, 5 kHz, 50 kHz
(Attenuation) -3 dB (-5.2 dB to -1.4 dB) /6 dB oct
External dimensions
49.2 × 136 × 160 mm (not including protruding parts)
[W×D×H] (approximate)
Weight
740g
* Crest factor = Peak value / Effective valu
Test Equipment Depot - 800.517.8431 - 99 Washington Street Melrose, MA 02176 - TestEquipmentDepot.com