1
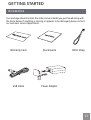
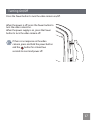
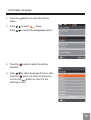
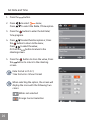
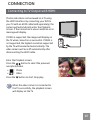
User Manual
GE 1080p Digital Camcorder
DVX
X
imagination at work
CONTENTS
CONTENTS................................................................................................. 2
PRECAUTIONS.......................................................................................... 6
Preface............................................................................................................................6
Copyright...............................................................................................................6
Trademarks...........................................................................................................6
About this Manual...............................................................................................6
Symbols used in this Manual.............................................................................6
WARNING.......................................................................................................................7
SAFETY PRECAUTIONS..................................................................................................9
Video camera notes............................................................................................9
Memory card notes.............................................................................................9
LCD screen notes...............................................................................................10
P lease read the following important information
carefully before using this product...............................................................10
WATER & DUST PROOF PRECAUTIONS....................................................................11
Water & Dust Proof............................................................................................11
Precautions Before Using................................................................................11
Precautions When Using..................................................................................11
Maintenance Precautions After Using..........................................................12
GETTING STARTED.................................................................................13
Accessories .................................................................................................................13
Each Component Name............................................................................................14
Charge and Insert SD Card.......................................................................................15
Charging..............................................................................................................15
Insert SD/SDHC Card.........................................................................................16
Turning On/Off............................................................................................................17
Setting Language and Date/Time..........................................................................18
Set Display Language.......................................................................................19
Set Date and Time..............................................................................................20
BASIC OPERATION.................................................................................21
Recording Movies.......................................................................................................21
Zoom Function....................................................................................................21
White Balance....................................................................................................22
Shooting...............................................................................................................22
LCD Screen Display in Different Modes.................................................................23
Shooting Screen.................................................................................................23
Video Recording.................................................................................................24
Playback..............................................................................................................25
DISP.......................................................................................................................26
PLAYBACK...............................................................................................27
Preview Photos and Videos......................................................................................27
Video.....................................................................................................................27
Zoom in Photos...................................................................................................29
Screen Display in the Playback Mode...........................................................30
Delete Photos and Videos................................................................................31
MENU SETUP...........................................................................................32
Photo Setup.................................................................................................................32
Quality..................................................................................................................33
Exposure Metering............................................................................................33
HDR.......................................................................................................................34
Continuous Shot.................................................................................................34
Date Imprint........................................................................................................35
Movie Setup.................................................................................................................36
Movie Resolution................................................................................................37
Exposure Metering Modes...............................................................................37
HDR.......................................................................................................................38
General Setup..............................................................................................................39
Beep Setup..........................................................................................................40
LCD Brightness...................................................................................................40
World Time..........................................................................................................41
Power Saver........................................................................................................41
firmware Version...............................................................................................42
Format Memory..................................................................................................42
Reset.....................................................................................................................43
Copy to Card.......................................................................................................43
Playback Setup...........................................................................................................44
Delete...................................................................................................................45
Slide Show...........................................................................................................47
Red Eye Removal................................................................................................48
CONNECTION.........................................................................................49
Connecting to TV Output with HDMI......................................................................49
Connecting to a PC via USB......................................................................................50
APPENDICES...........................................................................................52
Specifications: DVX.....................................................................................................52
Error Messages...........................................................................................................55
Troubleshooting.........................................................................................................57
PRECAUTIONS
Preface
Thank you for purchasing this GE digital video camera. Please read this manual
carefully and keep it in a safe place for future reference.
Copyright
Copyright 2012 General Imaging Company All rights reserved.
No part of this publication may be reproduced, transmitted, transcribed, stored
in a retrieval system, or translated into any language or computer language, in
any form, by any means, without the prior written permission of General Imaging
Company.
Trademarks
All trademarks mentioned in this manual are used for identification purposes
only and are properties of their respective owners.
About this manual
This manual provides you with instructions on how to use your GE digital video
camera. Every effort has been made to ensure that the contents of this manual
are accurate, however General Imaging (Asia) Company reserves the right to
make changes without notice.
Symbols used in this manual
Throughout this manual, the following symbols are used to help you locate
information quickly and easily:
Indicates important information.
Indicates precautions to be taken while operating the video camera.
WARNING
Do not expose the video camera battery pack or other accessories to rain or
humidity to to reduce the risk of fire hazard or electric shock fire hazard or
electric shock.
For customers in the U.S.A.
Tested To Comply With FCC Standards
FOR HOME OR OFFICE USE
FCC Statement
This device complies with part 15 of the FCC Rules. Operation is subject to the
following two conditions:
(1) This device may not cause harmful interference, and
(2) This device must accept any interference received, including interference that
may cause undesired operation.
For customers in Europe
"CE" mark indicates that this product complies with the European
requirements for safety, health, environment and customer protection.
"CE" marked video cameras are intended for sales in Europe.
This symbol [crossed-out wheeled bin WEEE Annex IV] indicates separate
collection of waste electrical and electronic equipment in the European
countries. Please do not throw the equipment into the trash. Please
electronically recycle responsibly.
Declaration of Conformity
Model Name:
DVX
Trade Name:
GE
Responsible Party: General Imaging Co.
Address:1411 W. 190th Street, Suite 550, Gardena, CA 90248, USA.
Telephone Number: +1-800-730-6597
(Outside U.S. & Canada: +1-310-755-6857)
SAFETY PRECAUTIONS
Video Camera Notes:
Do not store or use the video camera in the following types of locations:
• In direct sunlight for a long period of time or high temperatures (above 40ºC)
• In environments with high magnetic fields
• In very humid or dusty places
Doing so may shorten the life of the digital video camera or allow foreign
materials to enter the camera, which could damage the internal components and
effect operation.
If the video camera will not be used for a long period of time, we suggest you
download photos/videos and remove the SD memory card.
If the video camera is taken from a relatively cool environment (lower than
40ºC/104F) and placed in a warmer or more humid atmosphere, condensation
may occur within the camera. We suggest you wait for the camera to come to
room temperature before turning on or using the video camera.
General Imaging is not responsible for any loss of data, camera malfunction or
non-operation.
Memory Card Notes:
When using a new SD memory card, or a SD memory card has been initialized
by a PC, you might have to format the card if the camera is not reading it.
However, please back up any data on the card prior to inserting it into the DVX
as the formatting will delete all data on the card.
To edit image data, copy the image data to a PC first.
Do not change or delete the folder names or file names in the SD memory card
from your PC, as this may make it unusable and/or unreadable.
Only remove and insert a SD memory card when the camera is off as data loss
and/or corruption may occur.
Do not turn the camera off when the firmware is being updated or data, picture
loss and/or corruption may occur.
The SD memory card can only be inserted one way into the DVX video camera.
LCD Screen Notes:
Due to current LCD manufacturing technology, you may see a few light or dark pixels
on your LCD screen. This is normal.
These light or dark pixels will not affect the quality of the photo or video image.
If the LCD screen is damaged, take particular care with the liquid crystal material
inside the screen. If any of the following situations arise, take the recommended
immediate action indicated below:
• If liquid from the LCD screen comes in contact with your skin, wash thoroughly
with soap and running water.
• If liquid from the LCD screen gets into your eye, flush the affected eye with
clean water for at least 15 minutes and then seek immediate medical
assistance.
• If liquid from the LCD screen is swallowed, flush your mouth thoroughly with
water and try to induce vomiting. Then seek immediate medical assistance.
Please read the following important information carefully
before using the product:
• Do not disassemble or attempt to service the video camera yourself.
• Do not drop or knock the video camera. Improper handling may damage the
product and void the warranty.
• Turn off the video camera before inserting or removing the SD memory card.
• Do not touch the camera lens.
• Do not expose the camera lens to direct sunlight for extended periods of time.
• Do not use abrasive cleansers, alcohol-based, or solvent based cleaners to
clean the video camera body. To clean, wipe the video camera lens with a
soft, professional lens cleaning cloth and special cleaning agent for cameras
and electronics.
10
Water & Dust Proof Precautions
Water & Dust Proof
• The video camera meets JIS/IEC waterproof grade 8 (IPX8) and JIS/IEC
dustproof grade 6 (IPX6).
• The accessories included with the video camera are not for use in wet
conditions.
Precautions Before Using
• Please make sure that the SD cover and HDMI/USB interface cover
(hereinafter referred to as “interface cover”) are locked securely.
• The rubber mating surfaces on the covers and doors should be clean and free
of foreign matter to insure a tight seal.
• Units with damaged waterproof rubber seals should not be used in wet or
damp conditions.
• Don’t use the video camera in a geothermal spring.
• When using the video camera in water, a wrist strap is recommended.
Precautions When Using
• Don’t use the video camera below 5 meters (approximately 15 feet) underwater.
• Don’t use the video camera under water for more than 2 hours.
• The camera should not be dropped into water. Avoid jumping or diving into
water with the camera as the SD cover or interface cover may open on
impact.
• Do not open the SD cover or interface cover underwater .
11
Maintenance Precautions After Using
• Wipe the video camera with a clean, dry, lint free cloth.
• When the SD cover or interface cover is opened, there may be water drops
on the inside of the SD cover or interface cover and on the contact surface of
video camera body; make sure to dry these areas completely.
• After using the video camera in the water or near sand, mud or other foreign
materials, wash it thoroughly with clean water (don’t open the SD card cover
or interface cover while when cleaning). After cleaning, wipe the video camera with a clean, dry, lint free cloth.
• To help maintain the camera's waterproof ability, wipe off any dust, sand
or other foreign materials from the rubber gaskets and corresponding slot
areas.
• Do not use any chemical agents to clean the camera. Do not use silicone
grease on the rubber.
Damaged rubber gaskets with cracks or scratches will allow water to
penetrate the camera and the camera will no longer be waterproof.
12
GETTING STARTED
Accessories
Your package should contain the video camera model you purchased along with
the items below. If anything is missing or appears to be damaged, please contact
our customer service department.
Warranty Card
Quick Guide
USB Cable
Power Adapter
Wrist Strap
13
Component Names
17
16
X
15
1
14
X
18
13
19
2
3
12
20
23
21
4
8
5
9
10 11
7
22
6
1
LCD Screen
12 SD Card Slot
2
Shooting Button
13 SD Card Slot Switch
3
Playback Button
14 Power Button
4
Up Button / Zoom In Button
15 Status Indicator
5
Left Button / Disp lay
16 Lens
6
Down Button / Zoom Out
Button
17 Microphone
7
Right Button / White Balance
18 USB/HDMI Card Slot Switch
8
OK Button / Record Button
19 USB lock
9
Wrist Strap Hole
20 HDMI Interface
10 Delete Button
11 Menu Button
14
21 USB Jack
22 Tripod Socket
23 Speaker
Charge and Insert SD Card
Charge:
This video camera has an internal battery. You can use the following three
methods to charge the video camera:
1. Use the provided USB cable to connect the video camera with the adapter (see
figure 1)
2. Use the provided USB cable to connect the video camera to a PC (see figure 2)
3. Connect the camera's flip-out USB connector to a PC directly (see figure 3)
1
2
3
X
X
x
The DVX should charge for approximately 4 hours for the first time, and the
status indicator will turn green when the battery is fully charged.
If you use method 1 to charge, the charging time is approximately 3 hours.
If you use method 2 or 3 to charge, the charging time is approximately 5
hours.
15
Insert SD/SDHC Card
1. Open SD Card Cover (see diagram 1 and 2)
2. Insert SD Card (see diagram 3)
3. Close SD Card Cover (see diagram 4 and 5)
Write-Protection Buckle
X
X
X
X
X
1
2
3
4
5
After opening the buckle on the SD Card Cover according to the arrow direction
shown in the figure ①, SD Card Cover will open automatically. To remove SD
card, gently press it down to pop it out.
Optional SD/SDHC cards are not included in the accessories and must be
purchased separately.
When selecting Full HD size (1920X1080, 1440X1080) to record video, use
High Speed Card (above Class 4).
When taking video if a "Memory card accessing is slow" message appears
on the LCD screen, change the SD card to a High Speed Card (above class 4)
or reformat the current card and re-try taking video.
16
Turning On/Off
Press the Power button to turn the video camera on/off.
When the power is off, press the Power button to
turn the video camera on.
When the power supply is on, press the Power
button to turn the video camera off.
If there is no response on the video
camera, press and hold the power button
and the
button for at least two
seconds to reset and power off.
17
Setting Language and Date/Time
Language, Date / Time setting menu will appear when turning the video
camera on for the first time.
Use the following procedures to set the camera to your preferences:
1. Press the Power button to turn the video camera on
2. Press the
3. Press the
18
button to select the settings
button to confirm the settings
Set Display Language
1. Press the
menu.
2. Press
Press
3. Press the
interface.
button to enter the setting
to select
menu;
to select the Language option.
button to enter the setting
4. Press
to select language of choice. Then
Press the
button to return to the menu;
or Press the
button to return to the
shooting screen.
19
Set Date and Time
1. Press the
2. Press
Press
button.
to select
menu;
to select the Date / Time option.
3. Press the
button to enter the Set Date/
Time program.
4. Press
to select function option or, Press
the
button to return to the menu;
Press
to select the value;
Or Press the
button to return to the
shooting screen.
5. Press the
button to store the value, Press
the
button to return to the shooting
screen.
Date format is: M-D-Y;
Time format is: 24 hour format
When selecting the option, the screen will
display the icons with the following Two
colors:
White: not selected
Orange: Current selection
20
BASIC OPERATION
Movie Recording
This function allows you to record movies.
1. Press the Power button to turn the video camera
on.
2. Press the
button to begin taking video.
3. Press the
button to end the video recording.
Zoom Function
Press the
button to zoom in or zoom out:
•
:Digital Zoom In
•
:Digital Zoom Out
When the zoom function is engaged, the
zoom icon displayed on the screen will
change from white to orange. .
21
White Balance
With White Balance, users can adjust the color temperature under different light
sources to adjust correct color.
Press the button to scroll through the White
Balance options. Available options include:
White Balance: Auto
White Balance: Daylight
White Balance: Cloudy
White Balance: Fluorescent
White Balance: Incandescent
White Balance: Waterproof
Shooting While Recording
You can take photos while simultaneously recording video.
During the process of recording a video, simply
press the
button to take photos.
22
LCD Screen Display in Different Modes
Shooting Screen:
1
1. Battery status indicator
2
05-17-2012 09:13
14
2. Memory card
13
3. Remaining number of pictures
4. image resolution
5. Image Quality
3
6. White Balance
4
5
6
7. Continuous Shot
12
9999+
11
1.0x
8. WT Ratio
9. HDR
99:59:59
7
8
9
10
10.Histogram
11.Video Quality
12.Remaining video time
13.Face Detection
14.Shooting date and time
23
Video Recording:
1. Battery status indicator
2. Memory card
3. During recording
05-17-2012 09:13
1
2
15
3
4. The number of available photos
5. The number of photos have been
taken
6. Image Quality
7. White Balance
8. Continuous Shot
4
5
14
3
00:01:23
6
7
13
12
1.0x
9. WT Ratio
10.HDR
6
8
9
10
11
11.Zoom out
12.Zoom in
13.Video Recording Indicator
14.Video shooting time
(during shooting)
15.Shooting date and time
Using this facility, the number of shots is limited by the file size of the single
frames.
24
Vertical
1
00:10:12
Horizontal
23/342
8
7
8
1
2
00:10:12
23/342
7
3
3
4
4
5
6
6
2012-05-17
2012-05-17
09:13
09:13
Playback:
1. Battery status indicator
2. Previous photo/video
3. Selected film /image
4. Video file reminder display
5. Next photo/video
6. Shooting date and time
7. Ranking order/number of the
current photos
8. Film length
25
Display
In shooting mode press the
the following two screens:
Display One
26
/ DISP button, you can switch the screen between
Display Two
PLAYBACK
Preview Photos and Videos
You can view photos and videos either vertically
or horizontally when in playback mode.
1. Press the
button.
button to select the
2. Vertical: Press
previous /next photo /video;
Horizontal: Press
button to select the
previous /next photo /video.
3. Play the selected video, press the
to enter the playback mode.
button
00:02:11
00:10:12
Video:
1 2
In the playback mode, each button description is
shown as follows:
1 Pause
4 Fast Forward
2 Fast Backward
5 Increase Volume
3
4
5
3 Decrease Volume
When playing videos, the operation guides
will appear on the screen. Press the
button
to play or pause. When viewing in horizontal
mode, the operation guides and time access will
not automatically display. Press
to
display them.
00:02:11
00:10:12
1
2 3 4 5
While the video is playing, press the button to
fast forward the video, or press to fast reverse
it.
In the Pause screen, press the button to switch
to the previous frame photo; press the button
to switch to the next frame photo.
27
When playing in the video mode, press the
Playback screen.
In the Pause screen, press the
screen.
button to return to the
button to return to the Playback
In the Playback mode, only the first frame of the video is displayed.
Fast Forward Display: 2x / 4x / 8x / 16x
Fast Backward Display: 2x / 4x / 8x / 16x
When the video camera is turned off, press the
it on, and enter Playback mode.
28
button for 2 sec to turn
Using Zoom in Playback Mode
In the Playback mode, images can be magnified up to 4x by using the function
button.
1. Press the
mode.
button to return to the Playback
2. Vertical: Press the
button to select a
photo; Horizontal: Press the
button to
select a photo.
3. Press the
button to magnify photos up to
4x. (See note below)
4. Press the
button to move the
position of display area.
5. Press the
button again to return to the
Playback screen (the original size).
This zoom feature can only be used on
still images. It is not available in video
playback.
The maximum zoom capacity is 4x in this
mode.
29
Screen Display in the Playback Mode
Press the button to display the following modes (the picture is displayed in the
horizontal position):
Playback Screen
When shooting, press
Playback mode; press
Shooting screen.
button to return to
button to return to the
Thumbnail
When in playback mode, press the button,
3x3 thumbnails will display on screen. Press the
buttons to select the photo or video to
be viewed.
Date Folder
When in Thumbnail Mode, press the button,
and the thumbnails will be sorted by shooting
date; or press the button to return to the
Playback screen.
Date Folder Thumbnail
With the Date Folder displayed on screen,
press the
button to enter the Date Folder
Thumbnails (only photos in the Date Folder are
displayed) or press
again to return to the
Playback screen.
When 3X3 Thumbnails and Date Folder
Thumbnails are displayed on the screen,
press the button to enter the date
folder screen.
30
Delete Photos and Videos
In the Playback mode (Playback screen / Thumbnail / Date Folder / Date Folder
Thumbnail), press the button to delete the currently selected photo/video.
1. Press the button to return to the Playback
Mode (Playback screen / Thumbnail / Date
Folder / Date Folder Thumbnail).
2. Press the
button to select the
photo/video to be deleted.
3. Press the button to display the photo/
video to be deleted on the screen.
button to select Yes or Cancel
4. Press the
Yes: Deletes the current photo/video
Cancel: Returns to the previous screen.
5. Press the
button to save the setting and
return to the Playback mode.
Erased photos/videos are permanently
deleted and cannot be recovered.
31
MENU SETUP
Photo Setup
Mode:
Press the
1. Select
button to enter the Setup Menu.
menu.
button to select the option in
2. Press the
the Photo Setup menu or press
button
to return to the Shooting screen.
3. Press the
button to enter the options
menu once you have selected an option
within Photo Setup.
4. Press the
to select option.
5. Press the
button to select and return to
the Photo Setup menu; or press button
to return to the menu; or press
button to
return to the Shooting screen.
32
Quality
The image quality menu adjusts the compression ratio of the images. Higher
quality settings give better photos, but will take up more memory space.
There are three options for Image Quality:
Quality: Best
Quality: Fine
Quality: Normal
Exposure Metering
This specifies the area of the picture that the camera uses to correctly expose
the picture.
There are three options for Exposure Metering:
• Exposure Metering: Spot - this uses one
point in the frame, usually the center of
the frame, to determine correct exposure.
• Exposure Metering: Center - this uses the
center of the frame to determine correct
exposure.
• Exposure Metering: AiAE - this
uses multiple areas of the frame to
"intelligently" determine correct exposure.
33
HDR
HDR (High Dynamic Range) automatically takes multiple exposures of the same
picture and overlaps them to lighten dark areas and darken light areas, thereby
correcting exposing the picture.
There are two options for HDR:
• HDR: ON
• HDR: OFF
Continuous Shot
Continuously hold down
button to perform continuous shooting; to stop,
please release
button.
The Continuous Shot has two options:
• Continuous Shot: ON
• Continuous Shot: OFF
34
Date Imprint
Saves the date and time data with the picture.
There are three options for Imprint Date:
• Imprint Date: Date / Time
• Imprint Date: Date
• Imprint Date: OFF
35
Movie Setup
Mode:
Press the
button to enter the Setup Menu.
1. Press the
button to select the
menu.
2. Press the
button to select the option
in the Movie Setup menu or press the
button to return to the Shooting screen.
button to enter the setting
3. Press the
interface of the corresponding options in the
Movie Setup Menu.
4. Press the
to select the value.
button to save the value and
5. Press the
return to the Movie Setup Menu; or press
the button to return to the menu; or press
the
button to return to the Shooting
screen.
Movies cannot be recorded without a
SD/SDHC card in the camera.
36
Movie Resolution
Size setup refers to the Movie Resolution and aspect ratio expressed in pixels.
The Movie Resolution setting has five options:
• 1920X1080p: 30FPS
• 1280x720p: 60FPS
• 1280x720p: 30FPS
• 1440X1080p: 30FPS
• 640x480p: 30FPS
HD recording time is limited to less than 29
minutes.
Exposure Metering Modes
Exposure Metering is used to setup a target area for the exposure to be obtained.
There are three options for Exposure Metering:
• Exposure Metering: Spot
• Exposure Metering: Center
• Exposure Metering: AiAE
37
HDR
HDR (High Dynamic Range) takes several exposes and overlaps them. This
lightens darker areas of the photo and darkens lighter areas, thereby correctly
exposing the picture.
There are two options for HDR:
• HDR: ON
• HDR: OFF
38
General Setup
Mode:
Press
button to enter Setup menu.
1. Press
button to select
menu.
2. Press
button to select the options in
the General Setup menu.
button to enter the menu of
3. Press
corresponding options in the General Setup
menu.
to select function option or select ,
4. Press
press
button to save selection and return to
the menu; press
to select the menu option;
or press
button to return to the shooting
screen.
5. Press
button to save the menu option,
press
button to return to the Shooting
screen.
39
Beep Setup
Use Beep Setup to adjust the volume of beep when buttons are pressed.
There are two options in Beep Setup:
• ON
• OFF
LCD Brightness
Use LCD Brightness to adjust the brightness of your screen.
In the LCD Brightness screen, press
button to select auto or different brightness
ratio, press
button to save the menu option.
Press
button to return to the Shooting
screen.
40
World Time
When overseas, adjust the World Time setting to the time zone of the city
nearest you.
There are two options in World Time:
•
Location
•
Travel Target
Power Saver
Use the Power Saver function to prolong battery life between charges.
The Power Saver function has two options:
• ON
• OFF
When power saving function is turned on,
the screen will automatically turn off after
one minute and the video camera will
automatically turn off after three minutes.
41
Firmware Version
Use this option to view the current Firmware version of the video camera.
There are two options in Firmware Version:
• FW Update (can update the version with
the new version on SD card)
• Cancel
To check if there is a newer Firmware version
available, please go to: www.ge.com/
digitalcameras. Firmware versions are available
under 'Support'.
The firmware update can't be completed if
the battery is not sufficiently charged.
Format Memory
Use Format Memory function will delete all data in the storage card and
internal memory.
There are two options in Format Memory:
• Yes
• No
When there is no memory storage card in
the camera, Format Memory will format
the internal memory. If there is a memory
card in the camera, Format Memory will
only format the memory storage card.
42
Reset
Use the Reset function to set the video camera to factory default values.
The Reset has two options:
• Yes
• No
Copy to Card
Use Copy to Card function to copy the files stored in the internal memory card
to storage card.
The Copy to Storage Card has two options:
• Yes
• No
43
Playback Setup
Mode:
In Playback mode, Press
1. Select
menu.
button to enter Setup menu.
button to select the options in
2. Press
the Setup menu.
The Playback Setup has three options:
• Delete
• Slide Show
• Red-eye Reduction
In the Playback mode, press
button,
Note this function will only display in the
horizontal mode.
44
Delete
Using this function will delete the photos/videos stored in the internal memory or
storage card.
The Delete has three options:
• One
• All
• Date Folder
Delete One:
1. Press
press
button to select Delete option,
button to enter the setup interface.
2. Select One options, press
button to save
the setting value and enter function selection
interface.
3. Pres
button to select Yes or Cancel to
return to the menu.
4. Press
button to save the menu option and
return to the Playback Setup menu, press
button to return to the Shooting screen.
45
Delete all:
1. Press
press
button to select Delete option,
button to enter the setup interface.
button to save
2. Select all options, press
the setting value and enter function selection
interface.
3. Pres
button to select Yes or Cancel to
return to the menu.
4. Press
button to save the menu option and
return to the Playback Setup menu, press
button to return to the Shooting screen.
Delete Date Folder:
1. Press
press
button to select Delete option,
button to enter the setup interface.
2. Select Date Folder option, press
button to
enter Date Folder selection interface.
3. Press
button to select the Date Folder
to be deleted, press
/ button to display
the deleted information on the screen.
4. Pres
button to select Yes or Cancel to
return to the menu. Press
button to save
the menu option and return to the Playback
Setup menu, press
button to return to
the Shooting screen.
46
Slide Show
This function displays images in sequence at regular intervals (from the SD
memory card or from the internal memory).
1. Press the Menu button and select the
Slideshow option. Press the
button to
enter the function selection interface.
button to select Start or Cancel
2. Press
to return the menu.
3. Press the
button to start playing.
Only Horizontal mode is used for slide
show playback.
4. Press the
5. Press the
button again to stop playing.
button to select:
•
Continue to Start
•
Return to the Playback screen
The default slideshow interval time is
preset to 3 seconds.
47
Red Eye Removal
Use the Red Eye Removal function to remove red-eye effect in your photos.
1. Press the
button and select the Red Eye
Removal option, press the
button to enter
the setup interface.
button and select Reduction or
2. Press the
Cancel to return to the menu; press the
button to select a photo.
3. After pressing the
will be overwritten.
button, the original file
Red eye reduction does not work for video
files.
If the camera's software does not detect
red eye effect in the image, "red eye is not
detected" will appear on the screen.
48
CONNECTION
Connecting to TV Output with HDMI
Photos and videos can be viewed on a TV using
the HDMI interface. By connecting your DVX to
your TV with an HDMI cable (sold separately), the
camera will automatically enter the Playback
Screen. If the connection is unsuccessful an error
message will display.
If 1080i is supported, the images will display on
the TV when connection is successful. If 1080i is
not supported, the highest resolution supported
by the TV will be selected automatically. The
video camera will turn off automatically after
disconnecting the HDMI cable.
X
Enter the Playback screen:
Press the
button to select the previous/
next photo/video:
•
•
:Photo
:Video
Press the
button to start /stop play.
When the video camera is connected to
the TV successfully, the playback screen
will display on the TV.
49
When the video ( ) file appears on the
Playback screen, press the
button to start/
stop video play.
When playing video, the functions of
and
are the same as playing
video in the video camera (refer to P27).
When playing video, press the
button
to pause first, then press the button to
return to the Single Playback screen.
50
Connecting to a PC via USB
To copy photos and videos in the video camera
to a PC take the following steps.
1. Open the USB/HDMI port cover.
2. Press the yellow tab to release the pop-up
USB interface connector.
1
3. Use the USB cable to connect the video
camera to a PC (1) or connect the USB
connector to a PC directly (2).
X
This video camera supports (Windows 2000,
Windows XP, Windows Vista, Windows 7).
2
x
51
APPENDICES
Specifications: DVX
Design and specifications are subject to change without notice.
Product Category
Digital Camcorder
Effective Image Sensor Pixels
5.03 Megapixel (2592x1944)
Image Sensor
Lens
5.08 Megapixels [1/2.5” (CMOS)]
Focal Length =
5.5 mm
[ 35mm film
equivalent ]
33mm
F number
2.8
Lens Component
4P
Focusing Range 1.5m ~ ∞
Anti-Handshake
Digital Image Stabilization
Digital Zoom
4x Digital Zoom
Number of
Recording
Pixels
Movie
1920×1080pixels: 30fps,1280×720pixels:
60fps,1280×720pixels: 30fps,1440x1080pixel:
30fps,640x480pixel:30fps
Still Image
5MP: 2592x1944 (4:3), 3MP:2560x1440 (16:9)
Still Image in
video
The resolution of still photo captured while
video recording is same as video resolution
Image Compression
File Format
52
Best, Fine, Normal
Movie
MPEG-4 AVC/H.264(MOV), Audio:AAC
Still Image
Exif 2.2 (JPEG)
Shooting Mode
Auto
Detection Features
Face Detection
Red-Eye Removal
Yes
Waterproof
Up to 5m
Shockproof
Up to 1.5m
Dustproof
Equivalent to JIS/IEC (IP6X)
LCD Display
2.5 inch (230,400 pixels)
Auto Adjust Brightness LCD
ISO Sensitivity
Auto (100~800)
Exposure Metering Method
Artificial Intelligence AE [Ai AE(Face
detection AE)], Center-weighted Average,
Spot (Fixed to center of frame)
Exposure Control Method
Program AE
AE range
LV5 ~ LV16
Playback Modes
Movie ,Single Photo,Index ,Date Photo,Slide
Show
Zoom (Approx. 4x), Audio, Histogram Display
FF & REW 2x/4x/8x/16x & each frame
53
White Balance Control
Continuous Shooting
Recording Media
Other Features
Auto (AWB), Daylight, Cloudy, Fluorescent,
Incandescent, Waterproof
Approx.7.3 fps (Large / Fine Mode)
Internal Memory: 27MB
SD Card / SDHC (Up to32 GB support)
Multi-language Support (26 Languages)
Jacks
Internal USB2.0 ,HDMI Jack
Power
Internal Rechargeable Lithium-ion Battery
GB-50A 880 mAH
Approx. battery life
Still: Approx.260shots (based on CIPA
Standards)
Video: Approx.70min (@1080p/ 30fps )
Operation Environment
Temperature: 32 ~ 104 F / 0~40OC, Humidity:
0~90%
Dimensions (W x H x D)
2.2×4.1×0.8in. / 55.0×105.0×20.1mm
Mass
Approx.5.1oz./145g (Body only)
AC adapter, USB extension cable
Supplied Accessories
54
Wrist Strap
Quick Start Guide, Feature Guide, Warranty
Card
Error Messages
Messages
Explanation
Warning! Battery
exhausted
• Battery is depleted, connect the camera to
a power source and wait until fully charged
to resume using
No picture
• There are no pictures or videos in the
memory card or in the internal memory
Pull USB out
• Remove the USB cable or connector after
ensuring you have safely disconnected the
hardware on your system
Connection failed
• Camera is not properly connecting to TV
or computer. USB mode may be incorrect
or USB port may be damaged. Please try
again
File can’t be recognized
• Camera can't recognize such file format
Warning! Don’t power off
when upgrading!
• Please don’t power the video camera off
when upgrading software
Software update failed
• Update for software that controls camera
was not successfully installed
• Software version is incorrect. Please
download latest version
55
Messages
Explanation
Internal memory card full
• The internal memory is full and cannot
store any new files. Copy files to PC and
delete from camera or insert a new
memory card
Memory card full
• Memory card is full and cannot store any
new files. Copy files to PC and delete from
card or insert a new memory card
Write protection of
memory card
• Memory card lock is switched to protection
mode. Take out the memory card and
unlock it
File can’t be edited
• The file has already been edited and can’t
be edited again
Memory card error
• The memory card is not recognized or
failed. Replace with a new memory card or
format this card again
The memory card is not
formatted
• Format the memory card as described on
page 42
Battery exhausted, can’t
update FW
• The firmware cannot be updated without
enough power. Charge the battery fully
before attempting to update FW
56
Troubleshooting
Problem
Possible causes
Solution
Video camera
won’t turn on
• Battery low
• Charge battery
Video camera
turns off suddenly
while in operation
• Battery is discharged
• Charge battery
Photo is blurred
• Camera is not steady
when pictures are
takens
• Suggest using a tripod
Can’t take photos
• Internal memory or
memory card is full
• The memory card is
not formatted
• Insert a new memory
card, or copy files to PC
and delete from memory
card
• Still in Playback mode
• Format the memory card
• Return to the shooting
mode
Can’t record video
• No memory card or
memory card is full
• Still in Playback mode
• Insert a new memory
card, or copy files to PC
and delete from memory
card
• Return to the shooting
mode
57
http://www.ge.com/digitalcameras
© 2012 General Imaging Company
Printed in China