1
Operation Manual
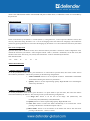
Car vision 5110 GPS Full HD
Car DVR
The technical specification or the product description can be changed without previous notification.
General Information
Thank you for choosing Defender Car Vision 5110 GPS Full HD car digital video recorder. Before using the device,
read attentively this manual to take all the opportunities of the digital video recorder and to extend its useful life. Keep
this manual if any necessity.
This Manual contains the information on technical specifications of the device, control buttons and its software and
safety list neglecting or non-observing of which can cause the device damage, malfunction or failure. The Manual
contains recommendations on using the car digital video recorder. The mentioned information will allow to avoid errors
related to improper operation of the device.
To define the used terms please refer Glossary at the end of the Manual and specialized literature, thematic forums or
support service.
Operation Guidelines
The car digital video recorder is designed and designated for mobile usage. The operation guidelines below are meant
for helping you to use properly the device without any hazard to safety of any person and to keep it in working
condition.
Please read this section attentively and strictly follow its instructions.
General Operation
1.
The device should be kept away from areas with extreme temperature change, direct sunlight or from heat-
radiating devices. Protect the device from moisture and do not place it in a dusty or smoggy environment. Do not allow
any contact with active chemical agents. The allowed temperature of the environment while operating of the device is
from -5 to 40 oC without moisture condensation
2.
Protect the device from any impact, do not place heavy objects on it and do not insert in it the devices or objects
not matching standard sockets. If the device falls it may cause its damage and its malfunctioning.
3.
Charge the device only from compatible chargers (with the output voltage 5V
5% and the current rate at least
0.5A).
4.
Observe laws and obey traffic laws in the country of stay.
5.
GPS (Global Positioning System) is developed and controlled by the government of USA that can make any
amendments to the system operation. So, for example, during the combat operations in Iraq the civil sector of GPS was
off. The manufacturer is not reliable for any amendments and inaccuracies of the GPS module caused by the
amendments of the GPS system.
Power Adaptor Safety Precautions
6.
While charging the device use only standard type power adapter (included). Usage of non-standard or other type
of the power adapter can lead to the damage of drive video recorder and loss of the warranty.
7.
If the power adapter is disconnected from the lighter, you should pull the plug, not the cable.
8.
Do not connect the car power adapter to other devices except ones of this model.
9.
Keep the car adapter out of the reach of children.
LCD Screen Safety Precautions
Liquid crystal display (LCD) is a delicate device requiring delicate handling.
10.
To clean the LCD screen use only soft cloth or special wipes.
11.
Use only special cleaners for display.
12.
Do not touch the screen surface with sharp objects.
13.
Do not press on the screen and do not place any objects on it. It can lead to the damage of the screen and loss of
the warranty.
14.
Do not leave the display under the direct sunlight.
Socket Safety Precautions
15.
Do not apply any force while connecting to the sockets of the external devices. It may damage the contacts.
Keep the sockets free from any foreign objects as well as liquid and dust. It can cause the damage of the socket and the
device in general.
Before connecting check that the jack socket is connected with the proper side. Otherwise turn the jack socket.
Memory Card Safety Precautions
16.
Insert the memory card only by the proper side. Otherwise turn the memory card. Do not force the memory card if
it does not fit the slot, this can cause the damage of both the slot and the memory card.
17.
Keep the memory card socket away from any foreign objects, liquid and dust. It can cause the damage of the
socket and the device in general.
18.
If you fail to insert the card in the socket, check its conformity to the SD/SDHC specification.
19.
Do not remove the memory card when the device gains access to its contents (recording, reading, copying and file
playing back). It can cause the loss of the data or misoperation of the card.
20.
Do not use the memory card under the extreme temperature.
21.
Keep the card away from liquid or erosive materials.
Product Specifications:
22. GPS function
23. Built-in G-sensor
24. Video codec: H.264
25. Still image resolution: 3.0 MP/ 5.0 MP/ 8.0 MP /12.0 MP
26. Video resolution: 1920*1080P / 30 frames per second, 1440x1080 / 30 frames per second, 1280*720P / 30
frames per second
27. HDMI support
28. Display: 2” TFT LCD
29. Wide viewing angle camera lens
30. LED highlight for recording in low light conditions
31. Audio codec: MPEG AAC Audio (mp4a)
32. Battery Specifications: 800 mAh, 3.7 V
33. Support of SDHC memory card up to 32 GB (use the card the speed class of which is at least 6!)
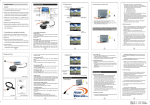
Package Contents
Digital video recorder
Windshield mount with suction cup
Battery Charge:
Battery icon on the device screen:
1.
If the battery icon shows no battery charge, connect the device to the adapter (included). During the charge the red
indicator on the device will flash. The green indicator means the discharge of the battery.
2.
Also you can charge the battery via USB port of the computer.
Warning: If low battery charge the device will switch to energy saving mode. In this mode the buttons can
response with delay or does not response at all. Before using the device check the battery charge.
Warning:
Please insert the memory card before using the DVR!
Micro-SD Memory Card
Insert the card (not included) into SD slot until its clicking position. The device is ready to be used.
To remove SD card, slightly press it, it is partially pulled out now and you may remove it.
If no memory card is in the slot, the message "CARD" will appear in a large white semi-transparent rectangular box
on the screen.
Warning: Check that you insert SD card by the correct side, otherwise you may damage the device and the memory
card.
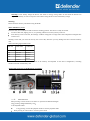
Video Recording Approximate Time:
SD card
1920*1080
1280*720
16G
204 min
408 min
8G
102 min
204 min
4G
51 min
102 min
2G
25 min
50 min
1G
12 min
24 min
Note: the duration of the video to be saved on the memory card depends on the device configuration, recording
conditions and the used memory card.
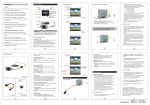
Assignement and Usage of DVR Buttons and inputs:
Menu Button M:
Short pressing: to enter menu/ to exit menu / to open the file deletion dialogue
Long pressing: image rotation by 180
Playback button:
Long pressing: to enter the playback mode/ to exit the playback mode
Short pressing in video mode: to switch to photo mode
Short pressing in photo mode: to release the shutter
Short pressing while playback or video recording: to shoot stop frame
(The video and photo modes are displayed on the screen by the relevant buttons)
Confirmation button. Using this button you can:
switch to submenu
confirm the selected parameter value in menu
confirm the selected answer in dialogue window
in playback mode switch to one of the submodes: full-screen mode, video playback mode or slide show mode.
playback the file
pause the playback
view slide show
stop the slide show
Short pressing of this button while video recording locks the recording file to protect it from deletion (one
more pressing will unlock the file)
REC recording button:
Short pressing in video mode: recording/stop recording
Short pressing in photo mode: to switch to video mode
Long pressing in photo mode: digital zoom
In menu mode: scrolling up (or to the left) the menu items
In dialogue window: to select the answer (or to move to the left)
In playback mode: backward wind of the playing file, scrolling up (or to the left) the menu items
Microphone on button MIC:
Short pressing in video mode: switch the microphone on/off.
Long pressing in photo mode: digital zoom out
In menu mode: scrolling down (or to the right) the menu items
In dialogue window: to select the answer (or to move to the right)
In playback mode: forward wind of the playing file, scrolling down (or to the right) the menu items
Micro-SD memory card slot
Mini USB port
HDMI port
GPS input port
Reboot button
Power on/off button
Long pressing: device power on/off
Short pressing in video and photo modes: to switch between the operation modes of the LED highlight
Display
LED highlight
Camera Lens
On / Off.
To power on press and hold the button for 1 second, to power off - for 3 seconds.
To save the battery you can use the auto power off function from "Setup"
3min/ 5 min. This function will be activated and will power off the device, if within the set time it is not enable by
the processor.
Language Selection
-
-
Power on the device by the button 11 in menu (button 1). Using buttons 4, 5 and 3 open the "SETUP" section, then
move by menu items using the button 4 or 5. To set the language select the menu item "Language" and confirm the
selection by pressing the button 3. Then select the language by the button 4 or 5 and confirm the selection by the button
3.
Date /Time Configuration
Open the menu, shift to "SETUP" section, move down the menu by the button 5 and select "Time Configuration" item,
confirm the selection by the button 3. Then using the buttons 4 and 5 ("forward"/ "backward") set the time zone, date
and time. Each value: time zone, year, month, hour and minutes - must be confirmed by the button 3.
Date and time format:
+04
2012 . 12
. 31
23
: 59
MENU DESCRIPTION
1. VIDEO configuration
To use the possibilities of this section, press the button 1 in video mode to open the menu, then select "Video" section
and confirm by the button 3. This section provides you the following configurations:
1.
Video resolution: Allows to set the required resolution: 1920x1080P/ 1440x1080P/
1280x720P confirming the selection by the button 3
2.
Quality: Allows to set the required image quality: High/ Middle/ Low confirming the
selection by the button 3.
2. PHOTO configuration
To use the possibilities of this section, press the button 1 in photo mode to open the menu, then select the "Photo"
section and confirm by the button 3. This section provides you the following configurations:
Image Size. Allows to set the size of the image: 3M (2048x1536), 5M
(2592x1944), 8M (3200x2400), 12M (4000x3000).
Quality Allows to set the required image quality: High/ Middle/ Low.
Auto start. Allows to release the shutter automatically in 10 seconds after a short
pressing of the button 2. Possible description: Off, On.
Burst Mode. Allows to set the number of the frames that will be shot after short
pressing of the button 2: 1 frame, 3 frames.
2. RECORDING Configuration
To use the possibilities of this section, press the button 1 to open the menu, then select "Recording" section and confirm
by the button 3. This section provides you the following configurations:
Light Frequency. Allows to eliminate the light source twinkling by setting its
frequency: 50 Hz, 60 Hz.
Recording Mode. Allows to select the recording mode that best fits the current
conditions: Auto, Landscape, Portrait, Sport, Night Scene.
ISO. Allows to select the ISO sensitivity: Auto, 100, 200, 400.
Measurement Mode. Allows to select the approach to measure the object brightness:
Central weighted, Average, Spot.
White balance. Allows to reproduce the colour of white objects so as they are white
on the frame: Auto, Sunny, Cloudy, Fluorescent, Tungsten.
Digital Effect. Allows to select the digital effect applied to the image: Off, Black and
White, Sepia, Negative.
Sharpness. Allows to select the image sharpness: High/ Middle/ Low.
Exposure Compensation. Allows to compensate the errors if automatic exposure
measurement: -2.0, -1.7, -1.3, -1.0, -0.7, -0.3, 0, +0.3, +0.7, +1, +1.3, +1.7, +2.0.
3. SETUP Configuration
To use the possibilities of this section, press the button 1 to open the menu, then select "Setup" section and confirm by
the button 3. This section provides you the following configurations:
1.
TV Standard. The digital output (HDMI) is used in this model of the device so this
setup is not important: PAL, NTSC.
2.
Auto Power Off. If you activate this function, the device will be powered off to save
the battery if within the set time it is not used by any process: Off, 1 min, 3 min, 5 min
3.
Time Configuration. Allows to set the system time of the device:
+<Time
Zone> <Year>.<Month>.<Day> <Hour>:<Minutes>.
4.
Screen Clock. Allows to select whether to display the date and the time on the screen:
Off, Date, Time, Date and Time.
Cycle Recording. If this function is on, the DVR will record the video by fragments (files)
of the set duration: Off, 1 min, 3 min, 5 min. If the memory card is full, the DVR will
delete the oldest unprotected file to continue recording. If the cycle recording is on,
the icon with screwed arrow
and the fragment time will be displayed on the
screen.
Motion detection sensor. If this function is on, the device will automatically start recording every time when the
motion in the frame is detected. If within 10 seconds there is no motion in the frame, the recording will be paused until
any motion. When the motion detector is on, the icon
is displayed on the screen. Possible description: Off, On.
Date and Time Stamp. Allows to select the information to be added on the image:
1.
Off
2.
Date
3.
Time
4.
Date and Time
5.
Car - date, time, speed, GPS and accelerometer readings
6.
License Plate - date, time, GPS readings and license plate of the vehicle set by the
"License Plate" option.
5.
License Plate. Allows to enter the license plate of the vehicle to be added on the
image if the relevant option "Date and Time Stamp" is on.
6.
Screen off. If this function is activated, the screen highlight will be off to save the
battery if no user's activity. Off, 1 min, 3 min, 5 min
7.
Microphone. Allows to switch the microphone off. Possible description: On, Off.
8.
Image Rotation. Allows to rotate the image by 180 degrees. Possible description: Off,
180 degrees.
9.
G-sensor. If this function is on, the recording file will be saved to the memory card
when the DVR will reach the threshold acceleration. Off, 2g, 2.5g, 3g, 3.5g, 4g, 4.5g,
5g.
10. G-sensor Calibration. Allows to calibrate the g-sensor by fixing its readings at rest.
Possible description: No, Yes.
11. Highlight. Allows to set the mode of the LED highlight: Off, On, Auto.
12. Button Volume. Allows to set the volume of the signal of pressing the device buttons:
High, Low, Off.
13. USB Mode. Allows to select the mode where the device will operate while connecting
to the USB port of the computer: Card reader, Web camera. No support of the web
camera mode for this model.
14. Language. Allows to select the interface language. Русский, English.
15. Configuration Reset. Allows to reset all the configuration to factory configuration.
Possible description: No, Yes.
16. Formatting. Allows to format the memory card. Possible description: No, Yes.
Warning: all the data on the memory card including protected ones will be deleted.
17. Version. Allows to see the software version of the device, for example: FW
ver:20121025.
4. Menu in Playback Mode (Miniature Mode)
To delete the file. Allows to delete files. Possible description: Cancel, This File, All
Files.
To protect the file. Allows to protect files from deletion. Possible description: To
unlock this file, To lock this file, To lock all files, To unlock all files.
Auto Playback. In the video playback mode it allows to playback the files
consequently one by one. Possible description: Off, On.
Video mode
After powering on, the device is in the video mode. To show this mode the video camera icon
left top corner.
is displayed in the
To start video recording press the button 4 (REC), to stop the recording press the same button.
While video recording the blue indicator on the device body will flash, animated icon
is displayed instead of the
video camera in the left upper corner of the screen, and the duration of the recording is displayed in red in the center of
the bottom line. When the recording is stopped, the blue indicator on the device body will be on and the estimation of
the maximally possible duration of the video recording is displayed in white in the center of the bottom line of the
screen.
Video Recording Using Car Adapter
Connect the device to the car cigarette lighter via car adapter. If the car cigarette lighter is applied voltage, the device
will be on and the video recording will start automatically, the icon
will be displayed on the screen. After the car
cigarette lighter is switched off, the device will save the recorded file and be switched off in 10 seconds.
GPS Function (Global Positioning System)
Connect the GPS module to the DVR and power on the DVR. When the signal is stable and enough to determine the
device location, the icon
will be displayed on the screen. If no signal, the icon
will be displayed on the
screen. Usually if no obstacles for signal receiving (i.e. in the field in clear weather, at night when there are no
electromagnetic disturbances inthe range where the GPS satellites transmit the signal), after powering on the device
needs up to two minutes to switch to the state when it can determine its coordinates.
If while video recording the device can determine its coordinates, it saves them in the log file on the memory card. You
can find special software to play the video recorded by the DVR with the simultaneous display of the motion path and
the spot on the map where the DVR was at the moment of the displayed frame.
LED Highlight On
In low light conditions you can use the LED highlight. Switching between the modes of the LED highlight in video and
photo modes is performed by short pressing the button 11, the icon of the current mode will be displayed on the screen:
- highlight off,
- automatic highlight on,/off,
- highlight on,
Warning: Long pressing of the button 11 will power the device off. Be careful.
Microphone Off
To switch the microphone on or off in video mode press the button 5 shortly. If the microphone is off, the icon
will
be displayed on the screen.
File Locking
To protect files from deletion press the button 3 shortly while video recording to lock the file. On the screen the icon
of the locked file will be displayed. Press the button again to unlock the file. You can also lock and unlock the files in
the playback mode.
Playback mode
While switching to playback mode from video mode the message "VIDEO" is displayed in the left upper corner of the
screen and only video records are shown in the file list. While switching to playback mode from photo mode the
message "PHOTO" is displayed in the left upper corner of the screen and only photos are shown in the file list. The
playback mode is divided into four submodes: miniature mode, full-screen mode, video playback mode, slide show
mode. Press the button 1 shortly in the slide show and full-screen modes to open the file deletion dialogue window.
View of the recorded materials on the TV screen
To view the recorded materials on the TV screen, connect the DVR to TV via HDMI cable. Power on the DVR. Power
on the TV and in its configuration set the input where the DVR is connected as the video signal source.
Reboot Function
If the device misoperates, reboot it pressing the button 10.
Connecting to PC
Connect the DVR to the computer via USB cable. To search for video records on the memory card, use the mask
"*.MOV". For photo search use "*.JPG".
Troubleshooting
Problem:
а) I can't make photo / video.
Check the spare place on the memory card. Format the memory card.
c)
The image is out of focus.
Use clean soft fibreless wipe to clean the camera lens with special optics cleaner and accurately wipe the lenses. We
recommend the following Defender ECO CLN 30591, Defender CLN 30604, Defender CLN 30593, Defender
CLN 30607.
d) If the device stops operating (does not respond) or misoperates, reboot it.
e)
If the device is broken down, disconnect the power supply source, power the device off and refer to the customer
care.
f) In the miniature mode the miniature with flowers can be displayed instead of the miniature display of the stop frame.