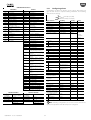
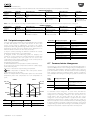
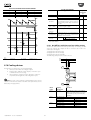
1
FLSTDMAHUE Application for managing air handling units User manual Integrated Control Solutions & Energy Savings AVVERTENZE CAREL bases the development of its products on decades of experience in HVAC, on the continuous investments in technological innovations to products, procedures and strict quality processes with in-circuit and functional testing on 100% of its products, and on the most innovative production technology available on the market. CAREL and its subsidiaries nonetheless cannot guarantee that all the aspects of the product and the software included with the product respond to the requirements of the final application, despite the product being developed according to start-of-the-art techniques. The customer (manufacturer, developer or installer of the final equipment) accepts all liability and risk relating to the configuration of the product in order to reach the expected results in relation to the specific final installation and/or equipment. CAREL may, based on specific agreements, acts as a consultant for the positive commissioning of the final unit/application, however in no case does it accept liability for the correct operation of the final equipment/system. The CAREL product is a state-of-the-art product, whose operation is specified in the technical documentation supplied with the product or can be downloaded, even prior to purchase, from the website www.carel.com. Each CAREL product, in relation to its advanced level of technology, requires setup/configuration/programming/commissioning to be able to operate in the best possible way for the specific application. The failure to complete such operations, which are required/indicated in the user manual, may cause the final product to malfunction; CAREL accepts no liability in such cases. Only qualified personnel may install or carry out technical service on the product. The customer must only use the product in the manner described in the documentation relating to the product. In addition to observing any further warnings described in this manual, the following warnings must be heeded for all CAREL products: • prevent the electronic circuits from getting wet. Rain, humidity and all types of liquids or condensate contain corrosive minerals that may damage the electronic circuits. In any case, the product should be used or stored in environments that comply with the temperature and humidity limits specified in the manual; • do not install the device in particularly hot environments. Too high temperatures may reduce the life of electronic devices, damage them and deform or melt the plastic parts. In any case, the product should be used or stored in environments that comply with the temperature and humidity limits specified in the manual. ; • do not attempt to open the device in any way other than described in the manual; • do not drop, hit or shake the device, as the internal circuits and mechanisms may be irreparably damaged; • do not use corrosive chemicals, solvents or aggressive detergents to clean the device; • do not use the product for applications other than those specified in the technical manual. All of the above suggestions likewise apply to the controllers, serial boards, programming keys or any other accessory in the CAREL product portfolio. CAREL adopts a policy of continual development. Consequently, CAREL reserves the right to make changes and improvements to any product described in this document without prior warning. The technical specifications shown in the manual may be changed without prior warning. The liability of CAREL in relation to its products is specified in the CAREL general contract conditions, available on the website www.carel.com and/or by specific agreements with customers; specifically, to the extent where allowed by applicable legislation, in no case will CAREL, its employees or subsidiaries be liable for any lost earnings or sales, losses of data and information, costs of replacement goods or services, damage to things or people, downtime or any direct, indirect, incidental, actual, punitive, exemplary, special or consequential damage of any kind whatsoever, whether contractual, extra-contractual or due to negligence, or any other liabilities deriving from the installation, use or impossibility to use the product, even if CAREL or its subsidiaries are warned of the possibility of such damage. WARNING Separate as much as possible the probe and digital input cables from the cables carrying inductive loads and power cables to avoid possible electromagnetic disturbance. Never run power cables (including the electrical panel cables) and signal cables in the same conduits. DISPOSAL The products are made from metal parts and plastic parts In reference to European Union directive 2002/96/EC issued on 27 January 2003 and the related national legislation, please note that: 1. WEEE cannot be disposed of as municipal waste and such waste must be collected and disposed of separately; 2. the public or private waste collection systems defined by local legislation must be used. In addition, the equipment can be returned to the distributor at the end of its working life when buying new equipment; 3. the equipment may contain hazardous substances: the improper use or incorrect disposal of such may have negative effects on human health and on the environment; 4. the symbol (crossed-out wheeled bin) shown on the product or on the packaging and on the instruction sheet indicates that the equipment has been introduced onto the market after 13 August 2005 and that it must be disposed of separately; 5. in the event of illegal disposal of electrical and electronic waste, the penalties are specified by local waste disposal legislation. Contents INTRODUCTION............................................................................................................................................................................................................................................................................. 7 Main features .............................................................................................................................................................................................................................................................................. 7 Accessories available for FLSTDMAHUE........................................................................................................................................................................................................................................ 7 2 HARDWARE INSTALLATIO......................................................................................................................................................................................................................................................11 2.1 DIN rail assembly and dimensions......................................................................................................................................................................................................................................11 2.2 Description of the terminals on the pCO Large ...............................................................................................................................................................................................................11 2.3 Installation .................................................................................................................................................................................................................................................................................12 2.4 Connection of the analogue inputs.....................................................................................................................................................................................................................................13 2.5 Connecting the digital inputs ................................................................................................................................................................................................................................................13 2.6 Connecting the analogue outputs .......................................................................................................................................................................................................................................14 2.7 Connecting the digital outputs .............................................................................................................................................................................................................................................14 2.8 Connecting the fan inverter via analogue input ...............................................................................................................................................................................................................15 2.9 Connecting serial devices with Modbus/Belimo® protocol. ........................................................................................................................................................................................15 2.10 Remote terminal with pLAN network..................................................................................................................................................................................................................................15 2.11 Connection diagrams..............................................................................................................................................................................................................................................................15 3 USER INTERFACE ............................................................................................................................................................................................................................................................................20 3.1 Graphic terminal ......................................................................................................................................................................................................................................................................20 3.2 Display and keypad.................................................................................................................................................................................................................................................................20 3.3 Programming mode................................................................................................................................................................................................................................................................20 4 DESCRIPTION OF THE MENU......................................................................................................................................................................................................................................................23 1 1.1 1.2 4.1 A. On/Off Unit ..................................................................................................................................................................................................................................................................23 4.2 B. Setpoint.......................................................................................................................................................................................................................................................................24 4.3 C. Clock/Scheduler.......................................................................................................................................................................................................................................................24 4.4 D. Input/Output .............................................................................................................................................................................................................................................................24 4.5 E. Data logger .................................................................................................................................................................................................................................................................25 4.6 F. Board switch...............................................................................................................................................................................................................................................................25 4.7 G. Service ........................................................................................................................................................................................................................................................................25 Manufacturer ...........................................................................................................................................................................................................................................................26 H. SOFTWARE INSTALLATION ....................................................................................................................................................................................................................................................28 5.1 pCO Manager ...........................................................................................................................................................................................................................................................................28 5.2 SmartKey....................................................................................................................................................................................................................................................................................28 5.3 Setting the terminal address .................................................................................................................................................................................................................................................29 6 SOFTWARE CONFIGURATION...............................................................................................................................................................................................................................................30 4.8 5 ! Important: some of the following operations are often carried out during installation, as the devices are connected in the field and configured.....................................30 Select devices (Ha)..................................................................................................................................................................................................................................................................30 Configure devices (Ha)...........................................................................................................................................................................................................................................................31 Assign inputs/outputs (Hb) ...................................................................................................................................................................................................................................................31 Device control parameters (Hc)...........................................................................................................................................................................................................................................33 pCOe expansion card connection........................................................................................................................................................................................................................................33 Serial probe connection .........................................................................................................................................................................................................................................................33 VFD inverter connection.........................................................................................................................................................................................................................................................34 Belimo actuator connection ..................................................................................................................................................................................................................................................35 Probes from supervisor ..........................................................................................................................................................................................................................................................35 7 COMMISSIONING .......................................................................................................................................................................................................................................................................37 7.1 Loading the configuration......................................................................................................................................................................................................................................................37 7.2 Commissioning ........................................................................................................................................................................................................................................................................37 7.3 Probe calibration......................................................................................................................................................................................................................................................................37 7.4 Setting the control parameters .............................................................................................................................................................................................................................................37 7.5 Setting the hour counters ......................................................................................................................................................................................................................................................37 7.6 Enthalpy management ...........................................................................................................................................................................................................................................................37 7.7 I/O test........................................................................................................................................................................................................................................................................................37 8 FUNCTIONS .....................................................................................................................................................................................................................................................................................38 8.1 On/Off ........................................................................................................................................................................................................................................................................................38 8.2 Set point.....................................................................................................................................................................................................................................................................................38 8.3 Temperature control ...............................................................................................................................................................................................................................................................40 8.4 Humidity control ......................................................................................................................................................................................................................................................................40 8.5 Temperature / humidity control priority.............................................................................................................................................................................................................................41 8.6 Set point compensation .........................................................................................................................................................................................................................................................42 8.7 Summer/winter changeover .................................................................................................................................................................................................................................................42 8.8 Freecooling and freeheating .................................................................................................................................................................................................................................................43 8.9 Heat recovery............................................................................................................................................................................................................................................................................45 8.10 Cascade control........................................................................................................................................................................................................................................................................46 8.11 Supply limits..............................................................................................................................................................................................................................................................................47 8.12 Coils water temperature limits..............................................................................................................................................................................................................................................48 8.13 Pump management ................................................................................................................................................................................................................................................................49 8.14 Cooling devices ........................................................................................................................................................................................................................................................................50 6.1 6.2 6.3 6.4 6.5 6.6 6.7 6.8 6.9 8.15 8.16 8.17 8.18 8.19 8.20 Heating devices ........................................................................................................................................................................................................................................................................50 Cooling devices ........................................................................................................................................................................................................................................................................51 Air quality...................................................................................................................................................................................................................................................................................53 Purging .......................................................................................................................................................................................................................................................................................54 Frost protection ........................................................................................................................................................................................................................................................................54 Auxiliary control........................................................................................................................................................................................................................................................................55 9 PARAMETERS TABLE .................................................................................................................................................................................................................................................................56 10 ALARMS ..........................................................................................................................................................................................................................................................................................85 10.1 Types of alarms ........................................................................................................................................................................................................................................................................85 10.2 Alarm log ...................................................................................................................................................................................................................................................................................85 10.3 Alarm table ................................................................................................................................................................................................................................................................................85 11 pCO Manager ..................................................................................................................................................................................................................................................................................89 11.1 Installation .................................................................................................................................................................................................................................................................................89 11.2 PC – pCO controller connection ..........................................................................................................................................................................................................................................89 11.3 Commissioning ........................................................................................................................................................................................................................................................................89 1 INTRODUCTION • control by inverter of fans at constant pressure or constant speed; • management of fans, including in tandem, with rotation and backup functions; • air quality control with CO2 and VOC (volatile organic compounds) probes; • safety protectors for antifreeze, dirty filters, smoke/fire, no air or water flow, humidifier alarm, inverter alarm, open door alarm; • unit antifreeze and room protection; • up to 4 independent auxiliary control loops, each with its own PI control and control probe (for example to manage a second humidifier); • input/output test to check correctness of wiring during installation; • connection via FieldBus port and corresponding RS485 serial card (accessory) to serial probes, inverters, pCOe expansion card; • connection via BMS port and corresponding RS485 serial card (accessory) to a supervisory system (PlantVisorPro, PlantWatch…), transferring the readings of 4 probes. FLSTDMAHUE is an application program developed by CAREL for the management of air handling units (AHU). It runs on the pCO range of programmable controllers (pCO3 small, medium, large or pCOXS 1+1Mbyte (*)), selected according to the complexity of the unit, and the pGD1 terminal. Its main feature is its adaptability to many types of air handling unit, with different types of probes and actuators, on/off type or modulating. Moreover, the possibility to connect up to two pCOe serial options via RS485 card allows additional probes and outputs to be added, ensuring maximum flexibility. Alternatively, the MP-Bus® card can be used to connect up to 8 Belimo®, actuators each with its probe or digital input; this eliminates a lot of the wiring needed during installation. CAREL temperature, humidity and combined serial probes can be connected, for both rooms and ducts, as well as active differential pressure probes, flow switches and pressure switches to signal alarms following faults on fans or pumps. The supply and return air fans can be controlled by inverter based on static pressure or fixed speed. The control software can manage temperature or humidity as the priority, control an adiabatic or isothermal humidifier, freecooling/freeheating based on enthalpy and humidity recovery using a heat wheel. The commissioning procedure is based on the documented design of the air handling unit being controlled: the inputs and outputs can be assigned dynamically, meaning there is no fixed position for the various types of probes/actuators connected, with the software proposing the first position available for the type of input/output (e.g. a certain input can accept a passive NTC probe or active probe with 0 to 1 V or 4 to 20 mA output). The identification of the type of AHU being controlled is not based on the choice between a certain number of pre-configured units; rather the selection of the devices installed on the AHU (e.g. preheating / cooling / reheating coils, fans, pumps, inverter, heaters, dampers, humidifiers, heat recovery unit) and then setting their parameters. This simplifies configuration, as the user only sees the parameters relating to the components used. Changes can be made subsequently to the configuration without needing to start again from scratch. (*) pCOXS 1+1Mbyte in the 1tool programming environment is called pCO1XSE. 1.2 Accessories available for FLSTDMAHUE Below is a list of devices suitable for use with FLSTDMAHUE. CAREL features passive, active and serial temperature, humidity and differential pressure probes, for room or duct installation, specifically for the air handling unit appliance. See the CAREL price list for the complete list. 1.2.1 Code DPWT011000 DPWT010000 DPWT014000 1.1 Main features In summary: • parameter settings divided by level, user, installer or manufacturer, with password-protected access; • temperature and/or humidity control with differentiated set point in cooling and heating; • automatic cooling/heating changeover; • set point compensation in cooling and heating; • selection of up to four daily time bands, with settings for each operating mode; • holiday and special day function, with reduced set point; • cascaded control of heating / cooling devices so as to maximise energy saving; • operation in comfort, precomfort or economy mode, if time bands are enabled; • management of pumps, including in tandem, for preheating cooling/reheating coils, with rotation, backup, overload alarms and anti-blocking for each pump; • minimum water temperature limit settable for opening the coil valves; • dehumidification by cooling (including with dewpoint control dewpoint) and reheating coil; • bands for activating the preheating and reheating devices can be overlapped to supplement each other; • ON/OFF or modulating control of isothermal or adiabatic humidifiers; • “freecooling” and “freeheating” based on temperature or enthalpy; • heat recovery with cross-flow heat recovery unit, run-around coil or heat wheel, based on temperature or enthalpy; +030220921 - rel. 1.0 - 28.02.2011 Room temperature and humidity sensor Code DPWC112000 DPWC115000 DPWC110000 DPWC114000 DPWC111000 DPPC112000 DPPC110000 DPPC111000 7 TEMPERATURE SENSORS Type NTC 0 to 1 V, 4 to 20 mA Opto RS485 serial Range -10T60°C TEMPERATURE AND HUMIDITY SENSORS Type Range 0 to 10 V, 0 to 10 V NTC, 0 to 10 V -10T60°C, 10 to 0 to 1 V, 4 to 20 mA 90% RH Opto RS485 serial NTC, 0 to 1 V, 4 to 20 mA 0 to 10 V, 0 to 10 V -10T60°C, 10 to 0 to 1 V, 4 to 20 mA 90% RH NTC, 0 to 1 V, 4 to 20 mA 1.2.2 Duct temperature and humidity sensor Code DPDT011000 DPDT010000 DPDT014000 Code DPDC112000 DPDC110000 DPDC111000 DPDC114000 1.2.3 TEMPERATURE SENSORS Type Range NTC -20T70°C 0 to 1 V, 4 to 20 mA Opto RS485 serial -20T60°C Differential air pressure sensors Code SPKT00C5N0 SPKT0065N0 SPKT0075N0 TEMPERATURE AND HUMIDITY SENSORS Type Range 0 to 10 V, 0 to 10 V 0 to 1 V, 4 to 20 mA -10T60°C, 10 to 90% RH NTC, 0 to 1 V, 4 to 20 mA Opto RS485 serial 1.2.6 Range 0 to 0.5 mbar 0 to 10 mbar 0 to 25 mbar Output 4 to 20 mA 4 to 20 mA 4 to 20 mA Differential air pressure switches/flow switches NTC temperature sensors Code NTC*HP* Type 10 kΩ±1%@25 °C, IP67 NTC*WF* NTC*WP* NTC*HF* NTC*HT* NTC*HT* 10 kΩ±1%@25 °C (Fast), IP67 10 kΩ±1%@25 °C, IP68 10 kΩ±1%@25 °C, strap-on, IP67 50 kΩ±1%@25 °C, IP55 50 kΩ±1%@25 °C, stainless steel cap, IP55 1.2.4 1.2.5 Range -50 to 105/50°C (air/fluid) -50 to 105°C (fast) -50 to 105°C -50 to 90°C 0 to 150°C (air) 0 to 150°C (air) Code DCPD000100 DCPD001100 PRESSURE SWITCHES Range 0.5 to 5 mbar 0.2 to 2 mbar Output ON/OFF ON/OFF Code DCFL000100 FLOW SWITCHES Range 1 to 9 m/s Output ON/OFF 1.2.7 Smoke and fire sensors Room air quality sensors Code SFFS000000 SFFF000000 1.2.8 DPWQ* Code DPWQ402000 DPDQ402000 Code DPWQ502000 DPDQ502000 CO2 & VOC SENSORS Range CO2 VOC 0 to 2000 ppm 0 to 100 % 0 to 2000 ppm 0 to 100 % USB /RS485 converter code CVSTDUTLF0/ CVSTDUMOR0 Output 0 to 10 V 0 to 10 V Output 0 to 10 V, 0 to 10 V 0 to 10 V, 0 to 10 V CVSTDUTLFO +030220921 - rel. 1.0 - 28.02.2011 Output ON/OFF ON/OFF The USB/RS485 converter code CVSTDUTLF0 is used to connect a personal computer running the pCO Manager program to the pLAN port (J10) on the pCO controller, via a telephone connector. Alternatively, converter code CVSTDUMOR0 connects to the pLAN port (J11) or the BMS port, fitted with a special serial card. Once the connection has been made, the application program software can be loaded and the parameters set. See chapters “Software installation” and ”Appendix”. DPDQ* CO2 SENSORS Range 0 to 2000 ppm 0 to 2000 ppm Type Smoke detector, 24 Vdc PS Fire detector, 24 Vdc PS 8 CVSTDUMOR0 1.2.12 Belimo MP-BUS card code PCO100MPB0 1.2.9 pCO Manager This card connects the pCO to an MP-Bus network of I/O devices that use the Belimo® standard. Up to 8 actuators can be connected at the same time, over a maximum distance of 30 m. It is installed in the slot marked “field card”. This program, downloadable from http://ksa.carel.com, is used to modify the parameters based on the application, save them and then copy the settings directly to the application. The USB/RS485 converters codes CVSTDUTLF0/CVSTDUMOR0 must be connected between the computer and the RS485 port on the pCO, to terminals J10/J11 respectively. 1.2.13 BMS 485/Modbus card code PCOS004850 This optically-isolated card connects the BMS serial port to an RS485 network, for example to run the commissioning procedure from a personal computer installed with pCO Manager. It is installed in the slot marked “serial card”. Once commissioning has been completed, it can be replaced with one of the cards listed in the table. 1.2.10 Smart key code PCOS00AKY0 The Smart key is an electronic device used to program and service the pCO family controllers. It simplifies the transfer of data between the controllers installed and a personal computer by exploiting the high capacity flash memory for storing software applications, BIOS and variable logs. The pCO is connected directly via the telephone connector using the cable supplied, while to transfer the data to a personal computer, the USB adapter code PCOS00AKC0 is required. The power supply comes either via the USB port on the PC or from the controller, therefore no external power supply is needed. BMS cards Ethernet card BACnet MS/TP 485 card Konnex LON Smart key PCOS00AKC0 1.2.14 pGD1 terminal The pGD1 graphic display is an electronic device that allows graphics management using the icon-based display as well as supporting international fonts. 1.2.11 Optically-isolated fieldbus RS485 card code PCO100FD10 This card is used to connect the Fieldbus serial port on the pCO to an RS485 network. It is installed in the slot marked “field card”, when needing to connect serial probes, CAREL VFD inverters or pCOe expansion cards. +030220921 - rel. 1.0 - 28.02.2011 Code PCO1000WB0 PCO1000BA0 PCOS00KXB0 PCO10000F0 9 1.2.18 Analogue output module (code CONV0/10A0) 1.2.15 VFD inverter CAREL VFD inverters are available in various sizes for controlling fans at constant pressure or fixed speed. See “Connecting the VFD inverter”. This converts the PWM signal for solid state relays (SSR) into a standard 0 to 10 Vdc or 4 to 20 mA signal. For pCOXS 1+1Mbyte models only (output Y3). 1.2.16 pCOe expansion card The expansion card code PCOE004850 is an electronic device, part of the pCO sistema family, designed to increase the number of inputs and outputs available on pCO controllers. 1.2.17 Belimo® actuators The MP- Bus card can be used to control up to 8 Belimo® valve and damper actuators, each where necessary with their probe or digital input, meaning significant savings in wiring required during installation. +030220921 - rel. 1.0 - 28.02.2011 10 2 HARDWARE INSTALLATIO 2.1 DIN rail assembly and dimensions A(mm) pCO3 SMALL 227.5 pCO3 MEDIUM 315 pCO3 LARGE 315 pCOXS 1+1Mbyte 140 pGD1 2.2 Description of the terminals on the pCO Large Key 1 2 3 4 5 6 6a 7 8 9 10 power supply connector yellow power LED and 3 status LEDs additional power supply for terminal universal NTC analogue inputs, 0 to 1 V, 0 to 10 V, 4 to 20 mA passive NTC analogue inputs, PT1000, ON/OFF 0 to 10 V analogue outputs power to optically-isolated analogue output, 24 Vac/Vdc 24 Vac/Vdc digital inputs G(+), G0(-) +Vterm, GND, +5 VREF B1, B2, B3, GND, +VDC and B6, B7, B8, GND B4, BC4, B5, BC5 and B9, BC9, B10, BC10 Y1, Y2, Y3, Y4 and Y5, Y6 VG, VG0 ID1, ID2, ID3, ID4, ID5, ID6, ID7, ID8, IDC1, and ID9, ID10, ID11, ID12, IDC9 and ID17, ID18, IDC17 ID13H,ID13, IDC13, ID14, ID14H and ID15H, ID15, IDC15, ID16, ID16H 11 230 Vac or 24 Vac/Vdc digital inputs reserved connector for the standard pCO series terminals and for downloading the application program relay digital outputs 12 13 14 15 reserved pLAN network connector cover for inserting the BMS card for supervisor and telemaintenance connection cover for inserting the RS485 or MP-Bus card +030220921 - rel. 1.0 - 28.02.2011 11 C1, NO1, NO2, NO3, C1 and C4, NO4, NO5, NO6, C4 and C7, NO7, C7 and NO8, C8, NC8 and C9, N09, N10, NO11, C9 and NO12, C12, NC12 and NO13, C13, NC13 and NO14, C14, NC14, NO15, C15, NC15 and C16, NO16, NO17, NO18, C16 E-, E+, GND Rx-/Tx-, Rx+/Tx+, GND Models and features No. of analogue inputs pCO3SMALL pCO3MEDIUM pCO3LARGE pCOXS 1+1Mbyte pCOe (expansion card) 5 8 10 4 4 No. of digital inputs 8 14 18 6 4 No. of analogue outputs 4 4 6 2 + 1 PWM 1 No. of digital outputs 8 13 18 5 4 • do not secure the cables to the terminals by pressing the screwdriver with excessive force, to avoid damaging the pCO controller; • for applications subject to considerable vibrations (1.5 mm pk-pk 10/55 Hz), secure the cables connected to the pCO around 3 cm from the connectors using clamps; • if the product is installed in industrial environments (application of the EN 61000-6-2 standard) the length of the connections must be less than 30 m; • all the extra low voltage connections (analogue and 24 Vac/Vdc digital inputs, analogue outputs, serial bus connections, power supplies) must have reinforced or double insulation from the mains network; • in residential environments, the connection cable between the pCO controller and the terminal must be shielded; • there is no limit to the number of cables that can be connected to an individual terminal. The only limitation concerns the maximum current crossing each terminal: this must not exceed 8 A; • the maximum cross-section of the cable that connected to a terminal is 2.5 mm2 (12 AWG); • the maximum value of the twisting torque to tighten the screw on the terminal (torque tightening) is 0.6 Nm; • installation must be performed according to the standards and legislation in force in the country where the device is used; • for safety reasons the equipment must be housed inside an electrical panel, so that the only accessible part is the display and the keypad; • in the event of malfunctions, do not attempt to repair the device, but rather contact the CAREL service centre. Anchoring the pCO board The pCO is installed on a DIN rail. To fasten the unit to the DIN rail, press it lightly against the rail. The rear tabs will click into place, locking the unit in place. Removing the unit is just as simple, using a screwdriver through the release slot to lever and lift the tabs. These are kept in the locked position by springs. Power supply Power supply t the pCO3 board (co controller with terminal connected): 2828 to 36 Vdc +10/-20% or 24 Vac +10/-15% 50 / 60 Hz; Maximum power P= 15 W (power supply Vdc), P= 40 VA (Vac). • power supply other than that specified will seriously damage the system; • a Class 2 safety transformer, rating 50 VA, must be used in the installation to supply just one pCO controller (30 VA for PCO1XSE); the power supply to the pCO controller and terminal (or pCO controllers and terminals) should be separated from the power supply to the other electrical devices (contactors and other electromechanical components) inside the electrical panel; • if the power transformer secondary is earthed, check that the earth wire is connected to terminal G0. This applies to all the devices connected to the pCO; • if more than one pCO board is connected in a pLAN network, make sure that the G and G0 references are observed (G0 must be maintained for all boards); • a yellow LED indicates that the pCO board is powered. 2.3 Installation Installation instructions ! Important: Environmental conditions Avoid assembling the pCO board and the terminal in rooms with the following characteristics: • temperature and humidity that do not conform to the rated operating data of the product; • strong vibrations or knocks; • exposure to aggressive and polluting atmospheres(e.g.: sulphur and ammonia fumes, saline mist, smoke) so as to avoid corrosion and/or oxidation; • strong magnetic and/or radio frequency interference (therefore avoid installing the units near transmitting antennae); • exposure of the pCO board to direct sunlight and to the elements in general; • large and rapid fluctuations in the room temperature; • environments where explosives or mixes of flammable gases are present; • exposure to dust (formation of corrosive patina with possible oxidation and reduction of insulation). Positioning inside the panel The position of the controller in the electrical cabinet must be chosen so as to guarantee correct physical separation from the power components (solenoids, contactors, actuators, inverters, ...) and the connected cables. Proximity to such devices/cables may create random malfunctions that are not immediately evident. The structure of the panel must allow the correct flow of cooling air ! Important: Wiring instructions Important: when laying the wiring, "physically " separate the power part from the control part. The proximity of these two sets of wires will, in most cases, cause problems of induced disturbance or, over time, malfunctions or damage to the components. The ideal solution is to house these two circuits in two separate cabinets. Sometimes this is not possible, and therefore the power part and the control part must be installed in two separate areas inside the same panel. For the control signals, it is recommended to use shielded cables with twisted wires. If the control cables have to cross over the power cables, the intersections must be as near as possible to 90 degrees, always avoiding running the control cables parallel to the power cables. CAREL highlights the following warnings: • use cable ends suitable for the corresponding terminals. Loosen each screw and insert the cable ends, then tighten the screws. When the operation is completed, slightly tug the cables to check they are sufficiently tight; • separate as much as possible the sensor signal, digital input and serial line cables from the cables carrying inductive loads and power cables to avoid possible electromagnetic disturbance. Never insert power cables (including the electrical cables) and probe signal cables in the same conduits. Do not install the sensor cables in the immediate vicinity of power devices (contactors, circuit breakers or similar); • reduce the path of the sensor cables as much as possible, and avoid spiral paths that enclose power devices; • avoid touching or nearly touching the electronic components fitted on the boards to avoid electrostatic discharges (extremely damaging) from the operator to the components; +030220921 - rel. 1.0 - 28.02.2011 12 Controller pCO3 pCO terminals +Vdc B1, B2, B3, B6, B7, B8 2.4 Connection of the analogue inputs Connecting active probes with 0 to 10 V output Note: FLSTDMAHUE filters the type of analogue inputs according to the type of unit selected. The analogue inputs on the pCO board can be configured for the more common sensors on the market: NTC, PT1000, 0 to 1 V, 0 to 10 V, 4 to 20 mA. The different types of probes can be selected by setting the inputs on the screens in menu Hb: I/O configuration. See chapter 6. ! Important: pCOXS 1+1Mbyte does not allow direct connection to active probes with 0 to 10 V output. See the pCO sistema manual for the instructions on connecting an external resistor. The inputs must be pre-configured on the screens in menu Hb: I/O configuration. Connecting active temperature and humidity probes pCO terminals GND B1, B2, B3, B6, B7, B8 The pCO controller can be connected to all the CAREL DP* series active temperature and humidity probes configured as 0 to 1 V or as 4 to 20 mA. For the temperature probes use the 4 to 20 mA or NTC configuration, as the 0 to 1 Vdc signal is limited to the range 0 to 1 V and therefore is not always compatible with the standard 10 mV/°C signal of CAREL probes (for negative temperatures and temperatures above 100 °C a probe alarm may be generated). The inputs must be pre-configured on the screens in menu Hb: I/O configuration. GND +Vdc B1, B2, B3, B6, B7, B8 B1, B2, B3, B6, B7, B8 pCOXS 1+1Mbyte GND +24Vdc B1,B2 Probe terminals M +G out H B1,B2 out T 0 to 10 V probe wire reference signal Remote connection of analogue inputs The sizes of the cables for the remote connection of the analogue inputs are shown in the following table: size (mm2) for length up to 50 m 0.5 0.75 0.25 1.5 Type of input NTC PT1000 I (current) V (live) Terminals pCO Probe power supply signal Description Reference Power supply Active humidity output Active temperature output size (mm2) for length up to 100 m 1.0 1.5 0.5 not recommended Note: If the product is installed in industrial environments (application of the EN 61000-6-2 standard) the length of the connections must be less than 30 m. This length shouldn’t be exceeded in any case, to avoid measurement errors. 2.5 Connecting the digital inputs Note: for connection of the serial probes see chapter 6. The pCO controller features digital inputs for connecting safety devices, alarms, device status and remote switches. These inputs are all optically isolated from the other terminals. They can work at 24 Vac, 24 Vdc and some at 230 Vac. Connecting universal NTC temperature probes All analogue inputs are compatible with 2-wire NTC sensors. The inputs must be pre-configured on the screens in menu Hb: I/O configuration. Terminals pCOXS NTC probe pCO 1+1Mbyte wire GND, BC4, BC5, BC9, BC10 GND 1 B1, B2, B3, B4, B5, B6, B7, B8, B9, B10 B1, B2, B3, B4 2 Note: separate the probe signal and digital input cables as much as possible from the inductive load and power cables, to avoid possible electromagnetic disturbance. 24 Vac digital inputs On the pCO3 all inputs can be 24 Vac. The following figure represents one of the most common connection diagrams for the 24 Vac digital inputs. Connecting PT1000 temperature probes ! Important: pCOXS 1+1Mbyte does not allow connection of the PT1000 probe. The pCO controller can be connected to 2-wire PT1000 sensors for all high temperature applications; the operating range is -50 to 200 °C. The inputs must be pre-configured on the screens in menu Hb: I/O configuration. G G0 ID1 ID2 ID3 ID4 ID5 ID6 ID7 ID8 IDC1 G G0 24 Vac Controller probe 1 probe 2 probe 3 probe 4 pCO3 BC4 B4 BC5 B5 BC9 B9 BC10 B10 PT1000 probe wire 1 2 Note: the connection diagrams shown in these figures, which while being the most common and convenient, do not exclude the possibility of powering the digital inputs independently from the power supply to the pCO board. In any case, the inputs only have functional insulation from the rest of the controller. Connecting current pressure probes The pCO can be connected to all CAREL SPKT****C0 series active pressure probes or any pressure probe available on the market with 4 to 20 mA signal. The inputs must be pre-configured on the screens in menu Hb: I/O configuration. +030220921 - rel. 1.0 - 28.02.2011 13 2.6 Connecting the analogue outputs 24 Vdc digital inputs Connecting the 0 to 10 V analogue outputs The pCO controller provides 0 to 10 V optically-isolated analogue outputs, powered externally at 24 Vac/Vdc. The table below shown summarises the distribution of the analogue outputs according to the version available. On the pCO3 all inputs can be 24 Vdc. The following figure represents one of the most common connection diagrams for the 24 Vdc digital inputs. G G0 ID1 ID2 ID3 ID4 ID5 ID6 ID7 ID8 IDC1 Model pCO small pCO medium pCO large pCOXS 1+1Mbyte + 24 Vdc - 2.5.1 Connecting the digital inputs for pCOXS 1+1Mbyte Terminals Y1, Y2, Y3, Y4 Y1, Y2, Y3, Y4 Y1, Y2, Y3, Y4,Y5, Y6 Y1, Y2 reference VG0 VG0 VG0 G0 2.7 Connecting the digital outputs pCOXS 1+1Mbyte features up to 6 digital inputs, not optically-isolated, with voltage-free contacts, for connecting safety devices, alarms, device status, remote switches, etc.; these operate at 24 Vdc (supplied by pCOXS 1+1Mbyte) with guaranteed contact current of 6 mA. The pCO controller features digital outputs with electromechanical relays. For ease of installation, the common terminals of some of the relays have been grouped together. Electromechanical relay digital outputs ID1 ID2 ID3 ID4 ID5 ID6 IDC1 The relays are divided into groups, according to the insulation distance. Inside each group, the relays have just basic insulation and thus must have the same voltage (generally 24 V ac or 110 to 230 Vac). Between the groups there is double insulation and thus the groups can have different voltages. There is also double insulation from the rest of the controller. 230 Vac digital inputs ! Important: pCOXS 1+1Mbyte does not allow 230 Vac digital inputs. There are up to two groups of inputs powered at 230 Vac; each group has two inputs. The groups feature double insulation between them and can refer to different voltages. Within each group the digital inputs are not independent, however: for example the inputs ID13H and ID14H, due to the common terminal, must be powered at the same voltage to avoid dangerous short-circuits and/or the powering of lower-voltage circuits at 230 Vac. In any case, the inputs feature double insulation from the rest of the controller. Model pCO small Type of relay pCO medium Type of relay pCO large Type of relay pCOXS 1+1Mbyte Type of relay input ID13H, ID14H, ID15H, ID16H pCO3 terminals Relay ratings Approval ID13H ID13 IDC13 ID14 ID14H 230 Vac Reference for relays with same insulation Group Group Group Group 1 2 3 4 1 to 7 8 Type A Type A 1 to 7 8 9 to 13 Type A Type A Type A 1 to 7 8 9 to 13 14 to 18 Type A Type A Type A 1 to 3 4 5 Type A Type A Type A SPDT, 2000 VA, 250 Vac, 8 A resistive UL873 2.5 A resistive, 2 A FLA, 12 A LRA, 250 Vac, C300 pilot duty (30000 cycles) EN 2 A resistive, 2 A inductive, 60730-1 cosφ=0.6, 2(2)A (100000 cycles) Remote connection of digital outputs The sizes of the cables for the remote connection of the digital outputs are shown in the following table: AWG Size (mm2) Current (A) 20 0.5 2 15 1.5 6 14 2.5 8 The range of uncertainty of the switching threshold is from 43 to 90 Vac. It is recommended to use a 100 mA fuse in series with the digital inputs. Remote connection of digital inputs ! Important: do not connect other devices to the digital inputs. The sizes of the cables for the remote connection of the digital inputs are shown in the following table: If the product is installed in industrial environments (application of the EN 61000-6-2 standard) the length of the connections must be less than 30 m. size (mm2) for length up to 50 m 0.25 Note: for further details and for the connection diagrams, see the pCO sistema manual (+030220335). size (mm2) for length up to 100 m 0.5 Note: if the product is installed in industrial environments (application of the EN 61000-6-2 standard) the length of the connections must be less than 30 m. This length shouldn’t be exceeded in any case, to avoid measurement errors. +030220921 - rel. 1.0 - 28.02.2011 14 2.8 Connecting the fan inverter via analogue input 2.10 Remote terminal with pLAN network If the pCO boards are connected in a pLAN network, the terminal can be installed up to 50 m away, using a telephone cable, while if using a shielded twisted pair cable, TCONN6J000 and separate power supply, it can be installed up to 500 m away. To connect the inverter for fan control to the serial network, see paragraph 6.7. Alternatively, the fan inverter can be connected even if the MP-Bus card is used to control Belimo® actuators. Connect the modulating analogue output on the pCO (e.g. Y4), the alarm signal digital input (e.g. ID2) and the enabling signal digital output (e.g. NO1). The inputs must be pre-configured on the screens in menu Hb: I/O configuration. The figure illustrates the connection to the Carel VFD-NXL; for other inverters, see the corresponding manual. Note: if the terminal is used in a residential environment the cable must always be shielded. The maximum distance between the pCO and the user terminal is shown in the following table: type of cable telephone AWG24 shielded cable AWG20/22 shielded cable power supply distance 50 m 200 m 500 m power supply taken from pCO (150 mA) taken from pCO (150 mA) separate power supply via TCONN6J000 The maximum distance between two pCO3 controllers with AWG20/22 shielded cable is 500 m. Note: for further details and for the connection diagrams, see the pCO sistema manual (+030220335). 2.11 Connection diagrams The following paragraphs show the functional and wiring diagrams for the air handling unit (AHU) managed by the various pCO boards, according to the corresponding default parameters. Where possible, the symbols used refer to the following standards: • UNI 9511-1; • UNI 9511-3. Note: for further details and for the complete connection diagrams, see the dedicated VFD_NXL manual (+030220720) and the programming manual code +030220725. 2.9 Connecting serial devices with Modbus/Belimo® protocol. See paragraphs 6.6 and 6.8. The serial probes must be installed according to the following diagram, and require the field serial card PCO100FD10 to be inserted in the special slot (“Field-Bus”). The power supply must be 24 Vac. To connect Belimo® devices, use card PCO100MPB0. The following figure shows two alternative connection possibilities. +030220921 - rel. 1.0 - 28.02.2011 15 2.11.1 pCO3 Small p PR3 DI4 AIR OUTPUT FAN2 f1 INV2 f2 DO2, Y4, DI7 F1 T1 AIR INPUT T B5 C1 HUM C2 S1 p PR1 B2 p PR2 DI3 AL1 DI1 T2 T M DO4 AL DI8 PR4 DO3 p FAN1 f1 f2 INV1 B3 P2 On/Off DI2 H1 T3 H% T B1 B4 DO1, Y4 DI7 DO7, Y1 DI6 DI5 V2 M M V1 Y2 DO8 DO5 DO7 DO4 NO5 Preheating coil pump Cooling coil pump Temperature probe Humidity probe Supply fan inverter Return fan inverter Preheating coil Cooling coil Differential pressure switch/probe Humidifier Filters General alarm General alarm Outside damper NO4 Digital outputs Supply fan Return fan Preheating pump 1 Outside air damper Filter alarm (not indicated) Humidifier General alarm DO3 DO DO1 DO2 DO3 DO4 DO5 DO7 DO8 P1 P2 T H INV1 INV2 C1 C2 PR HUM F1, F2 AL AL1 S1 DO2 Analogue outputs Humidifier Preheating valve Cooling valve Supply fan NO3 AO Y1 Y2 Y3 Y4 DO1 Analogue inputs Supply humidity Differential pressure outlet air Frost protection temperature Supply temperature Outside temperature Digital inputs Generic alarm Remote ON/OFF Supply air flow alarm Return air flow alarm Supply air filter alarm Humidifier alarm Supply (return) fan inverter alarm Preheating pump thermal overload alarm Y3 NO2 AI B1 B2 B3 B4 B5 DI DI1 DI2 DI3 DI4 DI5 DI6 DI7 DI8 N C8 NC8 NO8 ID7 J14 ID8 C7 C7 C4 J13 NO7 J12 NO6 C4 C1 C1 ! NO1 GND Rx-/Tx- Rx+Tx+ L J11 J15 service card pCO3 Small L N analog output supply air fan (0 to 10 vdc) analog output cooling valve (0 to 10 vdc) analog output preheat valve (0 to 10 vdc) +030220921 - rel. 1.0 - 28.02.2011 M OUT +V M OUT +V analog output humidifier command (0 to 10 vdc) 16 IDC1 ID6 ID5 ID3 ID4 ID1 ID2 Y4 Y3 Y1 J5 Y2 VG0 VG B5 J4 BC5 B4 J3 BC4 +VDC B3 B1 GND serial card J2 B2 GND J24 +5Vref G J1 G0 ! +Vterm field card AL DO8 2.11.2 pCO3 Medium F2 p AIR OUTPUT FAN2 DI7 H% B8 B2 T2 PR3 P1 DO3 p P2 DO4 T B7 B6 H% B5 B3 On/Off DI2 T4 H2 T H% B4 B1 P2 DO10 AL DO8 AL1 DI1 PR1 DI8 DO1 P1 M M DI14 M V1 V2 Y2 Y3 V3 Y4 P1 P2 T H C1 C2 PR HUM F1, F2 AL AL1 S1 DO4 DO5 DO6 NO5 NO6 DO3 NO4 DO2 NO3 DO1 Analogue outputs Humidifier Preheating valve Cooling valve Reheating valve Digital inputs Generic alarm Remote ON/OFF Supply air flow alarm Return air flow alarm Supply air filter alarm Humidifier alarm Return filter alarm Supply fan thermal overload alarm Return fan thermal overload alarm Dirty heat recovery unit alarm Preheating pump 1 thermal overload alarm Preheating pump 2 thermal overload alarm Reheating pump 1 thermal overload alarm Reheating pump 2 thermal overload alarm NO2 AO Y1 Y2 Y3 Y4 DI DI1 DI2 DI3 DI4 DI5 DI6 DI7 DI8 DI9 DI10 DI11 DI12 DI13 DI14 T P2 DO6 Analogue inputs Supply humidity Outside humidity Return humidity Supply temperature Return temperature Frost protection temperature Saturation temperature Outside temperature Digital outputs Supply fan Return fan Preheating pump 1 Preheating pump 2 Outside air damper Bypass damper Humidifier General alarm Reheating pump 1 Reheating pump 2 FAN1 DO9 DO7, Y1, DI6 DI13 DI5 M H3 T3 DI12 DI11 T5 p C3 T M DO5 AI B1 B2 B3 B4 B5 B6 B7 B8 DO DO1 DO2 DO3 DO4 DO5 DO6 DO7 DO8 DO9 DO10 HUM C2 Preheating pump 1 Cooling pump Temperature probe Humidity probe Preheating coil Cooling coil Differential pressure switch/probe Humidifier Filters General alarm General alarm Outside damper DO9 T C1 S1 DI3 DO8 H1 PR4 p F1 T1 DI9 DO2 REC AIR INPUT PR2 DI4 p N DO10 PR4 DI10 J17 C13 NC13 C12 NO13 J16 NC12 J15 NO12 C9 NO9 NO10 NO11 C9 C8 NO8 J14 NC8 C7 C7 J13 NO7 J12 C4 C4 C1 C1 ! J11 NO1 GND Rx-/Tx- Rx+Tx+ L J18 service card L N analog output reheat valve (0 to 10 vdc) analog output cooling valve (0 to 10 vdc) analog output preheat valve (0 to 10 vdc) +030220921 - rel. 1.0 - 28.02.2011 M OUT +V M OUT +V M OUT +V analog output humidifier command (0 to 10 Vdc) 17 ID14H J8 ID14 IDC13 ID13 ID13H IDC9 ID11 J7 ID12 ID9 ID10 B8 GND B6 J6 B7 IDC1 ID7 ID8 ID6 ID5 ID4 ID3 ID2 ID1 Y4 J5 Y3 Y1 J4 Y2 VG0 VG B5 BC5 B4 J3 BC4 +VDC B3 GND B1 pCO3 Medium serial card J2 B2 GND J24 +5Vref G J1 G0 ! +Vterm field card 2.11.3 pCO3 Large p p F2 DI14 DI13 M H% B5 B3 PR2 DI3 p DO3,DO4,DO5 DI10 Y1, DI6 AL DO8 On/Off DI2 DI8 f1 AL1 DI1 f2 T4 H2 T H% B4 B1 CO2 B7 DO1, Y4 DI11 M V1 V2 Y2 Y3 P1…4 T H C1 C2 PR HUM F1, F2 AL AL1 S1 S2 R DO3 DO9 DO2 DO1 NO3 Analogue outputs Humidifier Preheating valve Cooling valve Supply fan Outside/exhaust air damper Mixing damper Digital inputs Generic alarm Remote ON/OFF Supply air flow alarm Return air flow alarm Supply air filter alarm Humidifier alarm Return air filter alarm Supply fan thermal overload alarm Return fan thermal overload alarm Reheating heater thermal overload alarm Supply fan inverter alarm Return fan inverter alarm Preheating pump 1 thermal overload alarm Preheating pump 2 thermal overload alarm Cooling pump 1 thermal overload alarm Cooling pump 2 thermal overload alarm Dirty heat recovery unit alarm NO2 AO Y1 Y2 Y3 Y4 Y5 Y6 DI DI1 DI2 DI3 DI4 DI5 DI6 DI7 DI8 DI9 DI10 DI11 DI12 DI13 DI14 DI15 DI16 DI17 T P2 M DO6 Analogue inputs Supply humidity Outside humidity Return humidity Supply temperature Return temperature Differential pressure outlet air CO2 probe Outside temperature Frost protection temperature Saturation temperature Digital outputs Supply fan Return fan Reheat heater 1 Reheat heater 2 Reheat heater 3 Bypass damper Humidifier General alarm Preheating pump 1 Preheating pump 2 Cooling pump 1 Cooling pump 2 H3 B10 P4 DO11 DO12 DI16 DI5 AI B1 B2 B3 B4 B5 B6 B7 B8 B9 B10 DO DO1 DO2 DO3 DO4 DO5 DO6 DO7 DO8 DO9 DO10 DO11 DO12 P3 DI15 DO10 T5 N Pumps Temperature probe Humidity probe Preheating coil Cooling coil Differential pressure switch/probe Humidifier Filters General alarm General alarm Outside/exhaust damper Mixing damper Heater DO12 p T B9 P2 P1 DO9 T PR1 B6 DI10 DO8 B2 T3 DO6 B8 T2 DO5 H% S1 p f2 DO2, Y4 DI12 R HUM C2 NO6 T C1 DO4 H1 F1 NO4 T1 M f1 S2 Y6 NO5 Y5 DI9 p REC AIR INPUT PR3 DI4 DO11 AIR OUTPUT PR4 DI7 DO10 PR5 DI17 C13 NC13 NO13 E+ E- J18 GND C12 NC12 NO12 J17 C16 NO18 C9 NO9 NO10 NO11 C9 J21 service card NO17 C16 C15 NC15 J16 NO16 C8 NO15 NC14 C14 J15 NO14 J14 NC8 NO8 C7 C7 J13 NO7 J12 C4 C4 C1 C1 ! J11 NO1 GND Rx-/Tx- Rx+Tx+ L J23 J22 pCO3 Large IDC17 ID14H ID18 ID17 J8 ID14 BC10 IDC13 B10 ID13 B9 BC9 ID13H Y6 Y5 ID12 ID11 ID10 ID9 J7 IDC9 ID16H J20 ID16 IDC15 GND ID15H B7 J6 B6 IDC1 ID7 ID8 ID6 ID5 ID3 ID4 ID2 ID1 Y4 Y3 Y1 J5 Y2 VG0 VG B5 J4 BC5 B4 J3 BC4 +VDC B3 B2 GND B1 GND J2 +5Vref J24 +Vterm G J1 G0 ! ID15 J19 serial card B8 field card L N analog output external air damper (0 to 10 vdc) analog output mixing air damper (0 to 10 vdc) analog output supply air fan (0 to 10 vdc) analog output cooling valve (0 to 10 vdc) analog output preheat valve (0 to 10 vdc) +030220921 - rel. 1.0 - 28.02.2011 18 M OUT +V M OUT +V M OUT +V M OUT +V M OUT +V analog output humidifier command (0 to 10 Vdc) 2.11.4 pCOXS 1+1Mbyte (pCO1XSE) PR2 p AIR OUTPUT FAN2 DO2 M F1 C PR1 DI3 p HUM AIR INPUT T2 H2 T H% B3 B2 H1 T1 H% T B1 B4 FAN1 S1 DO4 T PR3 DI5 p P1 DO1 Y1, DI6 DI4 V1 M Y2 DO3 DO4 DO2 NO3 Heating/cooling coil pump Temperature probe Humidity probe Heating/cooling coil Pressure switch Humidifier Filter General alarm General alarm Outside/exhaust air damper Fan DO5 P1 T H C PR HUM F1 AL AL1 S1 FAN Analogue outputs Humidifier Heating/cooling valve Digital outputs Supply fan Return fan Outside/exhaust damper General alarm DO1 AO Y1 Y2 DO DO1 DO2 DO3 DO4 DO5 NO2 Analogue inputs Supply humidity Return humidity Return temperature Supply temperature Digital inputs Generic alarm Remote ON/OFF Supply air flow alarm Frost protection alarm Supply air filter alarm Humidifier alarm NO1 AI B1 B2 B3 B4 DI DI1 DI2 DI3 DI4 DI5 DI6 N J10 C5 NC5 NO5 J9 C4 J8 NO4 C1 J6 GND TLAN GND Rx-/Tx- Rx+Tx+ L J11 clock card pCOXS 1+1Mbyte IDC1 ID5 ID6 ID4 ID3 ID2 J4 ID1 GND Y3 Y2 Y1 +24VDC +5VREF B4 GND J3 M OUT +V B3 B1 B2 J2 M OUT +V L G0 G J1 SYNC serial card N analog output preheat valve (0 to 10 vdc) analog output humidifier command (0 to 10 vdc) +030220921 - rel. 1.0 - 28.02.2011 19 AL1 DI1 AL DO5 On/Off DI2 3 USER INTERFACE 3.1 Graphic terminal ICON The pGD1 terminal, in the wall or panel-mounted versions, or included with the pCO board (built-in), features the display and the keypad, featuring 6 buttons that, pressed alone or in combination, are used to configure and program the controller. DESCRIPTION At least 1 fan on OK No preheating coil/ reheating/ cooling active OK Humidifier not active / no dehumidification Cooling coil active for cooling Cooling coil active for dehumidification At least 1 preheating or reheating coil active for heating or frost protection Humidifier active BUTTON - Alarm Prg Esc / Up / Down DESCRIPTION • Display the list of active alarms • Reset alarms with manual reset Access the main menu Return to previous screen Frost prevention (see par. 8.16) Heat recovery unit active FC FH Scroll screen displayed or increase / decrease value - Enter OK Note: if the unit is in freecooling or freeheating, the and OK icons are displayed next to the corresponding icon to indicate that no coil or humidifier is active. • Switch from display to programming parameters • Confirm value and return to the list of parameters 3.2 Display and keypad During normal operation, the graphic display shows the time, date and selected unit, two selectable system variables, the active device icon and unit control status. O F F O N Key 1 2 3 4 5 Time/date/unit displayed Variable 1 on display Variable 2 on display Active devices Control status CONTROL STATUS Unit status Off due to alarm Off from BMS (*) Off from time band Off from digital input Off from keypad Software checks in progress Unit on Manual actuator override (see Menu Gg) Comfort (Autocomfort) Comfort mode (from time band) Pre-Comf (Autoprec) Pre-comfort mode (from time band) Economy (Autoecon) Economy mode (from time band) Protect Protection mode Startup Start-up phase Shutdown Shutdown phase Purging Purging phase Manual Manually device override Text on display OFFbyALR OFFbyBMS OFFdaFSC OFFbyDIN OFFbyKEY Wait Unit ON Manual (*) BMS = Building Management System 3.3 Programming mode The parameters can be modified using the front keypad. Access differs according to the level: user parameters (accessible without password), Service (password=PW1) and Manufacturer (password = PW2). Press Prg to access the main menu. Note: • the graphic display can be shared across a pLAN network with a maximum of 8 pCO controllers. See screen F. Board switch; • the variables on the display can be selected on screen Gfc01. +030220921 - rel. 1.0 - 28.02.2011 Freecooling or freeheating active 20 5. press Enter to set the first parameter on the screen: the cursor flashes in front of the value being set; press Up / Down to change the value and confirm by pressing Enter. This moves automatically to the next parameter. MAIN MENU ICONS A. On/Off unit B. Setpoint C. Clock/scheduler D. Input/Output E. F. G. H. Data logger Board switch Service Manufacturer Note: the control remembers the last category of parameters accessed and goes directly to this category when next accesses. Set/display user parameters The user parameters (A…F) are all the parameters accessible without password, and include the following categories: A: ON/OFF Unit: set the ways the unit is switched ON and OFF; B: Setpoint: display the current temperature and humidity set points (B01), set the temperature and humidity set point for cooling and heating modes; C: Clock/scheduler: set the current time and date (C01), the daily time bands (C02) with weekly programming, holiday periods (C03), special days (C04), days when daylight saving starts and ends (C05); D: Input/output: display the inputs and outputs, indicating the position of the terminals based on the markings screen printed on the pCO boards and the values measured by the probes (D01 to D29); E: Data logger: display up to 50 alarms with progressive numbering, activation time and date, supply and return recorded; F: Board switch: the terminal can be shared by up to 8 pCO controllers. 6. press Up/ Down and Enter to set this parameter or Enter to move to the next parameter; 7. once having concluded the settings for the parameters on the screen, press Enter to access the screen, Esc to move to the higher level and continue settings parameters on other screens, following steps 3 to 7. Note: modifiable text values are shown on the display in UPPER CASE. EXAMPLE 1: Setting the current time/date. 1. press Esc one or more times to move to the standard display; 2. press Prg: the display shows the main menu; 3. Press UP/DOWN to move to category C. Clock/scheduler; 4. press Enter to display the first screen: C01; 5. Press Enter to modify the current time using UP/DOWN; 6. Confirm by pressing Enter and move to the minutes; 7. repeat steps 5 and 6 three times to modify the date (day / month / year); 8. press Esc to exit the parameter setting procedure. Browsing 1. press Esc one or more times to move to the standard display; 2. press Prg to enter the main menu tree; 3. select the category of parameters (A…H) with Up / Down; 4. press Enter to enter the first screen: the cursor flashes at the top left: press Down to move to the following screen (e.g. B01 B02); Note: the clock must be enabled on screen Hc20 if the clock card is installed on the pCOXS. EXAMPLE 2: Setting the time bands. 1. press Esc one or more times to move to the standard display; 2. press Prg: the display shows the main menu; 3. Press UP/DOWN to move to category C. Clock/scheduler; 4. press Enter and UP/DOWN to display the second screen C02: “Enable bands” and choose “YES”; 5. choose the day of the week, the time each band starts (F1, F2, F3, F4) and the corresponding operating mode; 6. if necessary copy the settings from one day to another. +030220921 - rel. 1.0 - 28.02.2011 21 Procedure: The setting/display procedure is similar to the one for the user parameters, however password PW2 must be entered to access category H parameters. ! Important: the Manufacturer parameters can only be modified when the controller is OFF. Note: • the manufacturer password PW2 can be changed on screen Hd03; • entering the manufacturer password PW2 also allows access to the parameters protected by service password PW1. Comfort A Precomfort Economy Economy Off F1 F2 F3 F4 t Note: the set point for Comfort, Precomfort and Economy modes can be set on screens B02, B03, B04 respectively. Setting the Service parameters The Service parameters (letter G) concern: 1) parameters modifiable without password: a: Change language; b: Information: application, BIOS and BOOT version; c: Summer/winter: summer/winter changeover mode (keypad, digital input, BMS, auto, water temperature); d: Working hours: read device operating hours; 2) parameters accessible with password PW1 (default =1234); e: BMS configuration: choose the BMS communication protocol (CAREL, LON, Modbus), communication speed (baud rate), network address and activate commissioning service (Ge03); f: Service settings: include device operating hour settings, probe calibration, temperature control and change password (PW1); g: Manual management: procedure for manually activating the devices so as to prepare for commissioning. Procedure: The setting/display procedure is similar to the one for the user parameters, however password PW1 must be entered to access category G parameters. Note: • if no button is pressed, after around 5 min the display automatically returns to standard mode; • the service password PW1 can be changed on screen Gfd03; • once entered, the password remains active for a certain time, after which it needs to be entered again. Setting the Manufacturer parameters The Manufacturer parameters (letter H) are only accessible after entering password PW2 (default =1234), and concern: a. Selection and configuration of the devices on the AHU; b. I/O configuration: configuration of inputs and outputs, in other words assignment of the position of the probes (e.g. supply, return, room temperature), digital inputs (e.g. remote ON/OFF, summer/winter changeover, alarms), digital outputs (e.g. fans, pumps, heaters) and analogue outputs (e.g. fans, dampers, humidifier); c. Factory settings: setting of temperature and humidity control probes, minimum and maximum limits for opening the dampers, fan activation delay, coil activation delay on unit startup, travel times of three position valves, temperature limits for activation of preheating, reheating and cooling coils, delay time for activation of alarms and inverter (VFD) configuration parameters for the supply and return fan. See the chapters on commissioning and description of the functions. +030220921 - rel. 1.0 - 28.02.2011 22 4 DESCRIPTION OF THE MENU Press the Prg button to access the main menu. Select the category of parameters using UP/ DOWN and confirm by pressing Enter. If the password is required, enter each figure using the Up/Down buttons and confirm by pressing Enter. After a certain time, if no button is pressed, the password will need to be entered again. ! Access to these branches requires password PW1 $ "&" ' # (# ! &$) % ## % Access to these branches requires password PW2 * "# ## $ % ! " + , , different operating mode is selected, the unit switches to manual mode. Note: see the “Functions” chapter for the complete description of the On/Off function. 4.1.1 4.1 A. On/Off Unit There are two possible cases: • if time bands are disabled (C.Clock/scheduler C02.Enable scheduler), the unit can only be switched on from the keypad in Comfort mode. The temperature and humidity set points defined for this mode will then be used indefinitely for control. (B.Setpoint B02.Comfort); • if time bands are enabled, the unit will be able to follow the time band settings if “Auto” is selected (A.On/Off Unit A01.Auto). On the display, in the special area, the operating mode will be determined by the time band setting (C02) and preceded by the prefix “Auto”. If a +030220921 - rel. 1.0 - 28.02.2011 Manual mode If time bands are enabled (C.Clock/scheduler C02.Enable scheduler), and the unit is started from the keypad (A01.On/Off Unit), the following operating modes can be selected: 1. Auto: see previous paragraph; 2. Manual mode: the unit is forced to operate in one of the available operating modes (OFF, Economy, Pre-comfort, Comfort), for a time ranging from 30 minutes to 8 hours. Automatic operation can resume after this period by enabling reset (A.On/Off Unit Enable autoresume). Naturally the temperature and humidity set points must have previously been set in the corresponding menu (B02.SetpointComfort; B03.Setpoint Pre-comfort; B04.SetpointEconomy). The display shows the operating mode in the relevant area, e.g. Comfort. 23 4.2 B. Setpoint The first screen B01 displays the current temperature and humidity set points. The temperature set point displayed considers any set point compensation function operating (see the “Functions” chapter). If time bands are enabled (C: Clock/scheduler C02: Enable scheduler), different temperature and humidity set points can be set for Economy, Pre-comfort and Comfort modes (B: Setpoint Comfort, Pre-comf, Economy) according to the season, summer or winter. In total, then, 6 temperature set points and 6 humidity set points can be set (screens B02, B03, B04). If time bands are not enabled, only the set point for comfort mode can be set. Economy mode is used to set a reduced set point (e.g. night-time), for lower energy consumption, and the unit can be switched from Comfort to Economy mode via a digital input, if enabled (screen Ha18); Precomfort mode is half-way between Economy and Comfort. • special days: up to six special days can be selected, defining the operating mode; Note: the “auto” option involves normal operation based on the time band settings. • enable daylight saving, selecting the start and end date and time for the period. A transition time can be set, between 0 and 240 minutes. Clock/Scheduler 4.3 C. The following values can be set: • current time and date; Note: if set point from digital input is enabled (screens Ha18 and Hb24: double set point), the input can be used to switch from Comfort to Economy mode. In that case, screens C02, C03, C04 are not shown when programming the time bands, holidays and special days. 4.4 D. Input/Output Note: after configuring the software (see the corresponding chapter) menu D is used to see what inputs and outputs have been configured. • enable and program the time bands. The time bands are programmed on a weekly basis, with four time bands available for each day of the week, starting from times F1, F2, F3, F4. Each time band can be assigned an operating mode, choosing between OFF, Economy, Pre-Comfort and Comfort. The settings can be copied from one day to another; The first row on the screens in menu D indicates the type, input or output, analogue or digital, to make browsing simpler. Comfort A Precomfort Economy Economy Off F1 Key: F1 to F4 A F2 Start time band 1 to 4 Operating mode F3 F4 t t 1 Type of input 3 Description of the input 2 Terminal number on board 4 Value measured • analogue inputs: temperature, humidity, differential pressure and air quality probes. • digital inputs: status of pressure switches/flow switches connected to the supply and return filters (open/closed), flow switches connected to supply and return air fans, safety thermostats for pumps/fans, heaters, alarms on the inverter connected to the supply/return air fan, dirty heat recovery unit alarm, remote On/Off controls, change season summer/winter; time Note: the set points can be set independently for each operating modes; • holidays: three holiday periods can be set, with start and end sate and operating mode (Economy, Pre-comfort, Comfort). +030220921 - rel. 1.0 - 28.02.2011 24 4.6 F. Board switch The main menu (F.) displays the graph of controllers connected in the pLAN network. To switch from one controller to another, scroll to the “go to unit” field and enter the address of the unit to connect to: as soon as the connection has been established, the address is shown in the “unit address” field and on the graph. • display % air quality request and purge request; • digital outputs: activate/deactivate the supply/return air fan, defrost heater, heat recovery unit, humidifier, general alarm, bypass damper, reheating heaters, pumps; 4.7 G. Service The main menu (G.) provides access to a submenu divided into two parts: the first (a,b,c,d) is not password-protected and can be used to display and set the following: G.a. Change language: select one of the languages loaded in the application program (Italian, English…) and then on the following screen enable language selection when starting; G.b. Information: information relating to the application code (and version), on the first screen available, while the second shows the information concerning the pCO board hardware. Note: the status of the digital input (ON/OFF) also depends on whether its configured as normally open (NO) or normally closed (NC) in menu Hb. • analogue outputs: control signals for modulating actuators, supply/return air fan, dampers, humidifier, valves. See the list of parameters. ! Important: the menu D only shows the inputs/outputs that have been enabled, i.e. position ≠ 0 assigned in menu Hb. See paragraph 6.3. 4.5 E. G.c. Summer/Winter: the season can be selected via: • Keypad: the following screen is used to select the current season: summer or winter; • Digital input: summer/winter changeover depends on a previously configured digital input (Hb24); • BMS: season changeover is managed by the supervisor; • Keypad/BMS: the season changeover control is the most recent between keypad or BMS; • AUTO: if “FIX DAYS” is selected on the following screen, the start summer and start winter dates can be set, while if on the other hand AUTO is selected, as well as the start summer and start winter dates temperature thresholds can be set to change season automatically. See paragraph 8.7; G.d. Working hours: displays the operating hours of the main devices on the AHU (fans, humidifier, pumps, heaters) that may require periodical maintenance. Data logger From the main menu (E.) the logged alarms can be displayed in sequence: the alarm is saved with its number in the log, the time, date, code, description and the supply (TS) and return (TR) temperature measured when the alarm was activated; to cancel the alarms, access the Service menu with password (G.Service f.Service settingsd.User service/Change PW1 Delete data logger). The “Alarm” button, on the other hand, is used to mute the buzzer (if fitted), display currently active alarms and reset them (obviously these remain in the log) and at the end of the list go directly to the data logger. Note: from this point on in the submenu, password PW1 must be entered to browse the screens. G.e. BMS configuration: this section is used to set all the parameters required for connection to a supervisory system, such as the protocol, communication speed and address. The BMS offline alarm can be enabled to signal communication failures during operation, and finally the commissioning service can be activated, requiring connection to a computer running the pCO manager program. Note: • also see the chapter on alarms; • the alarm log cannot be accessed directly by pressing the alarm G.f.a. Working hour set: used to set the operating hour threshold for the main devices on the unit: fans, humidifier, pumps and heaters. When the operating hours are exceeded a “warning” is shown that must be reset by accessing this screen. See the chapter on alarms. button +030220921 - rel. 1.0 - 28.02.2011 25 Ha03: • select the type of fan control: see paragraph 8.14; Ha04: type of fan alarms: see paragraph 8.14; Ha05: select preheating device: • modulating valve: control with 0 to 10 Vdc input: once selected, a minimum value > 0 V and a maximum value <10 V can be set; • floating valve: the floating valve motor travel time needs to be defined (Hc08): 1 to 3200 s; • heaters: see paragraph 8.13; • select probe used for humidification: paragraph 8.4; G.f.b. Probe adjustment: used to set an offset to add too or subtract from the probe reading in question (temperature, humidity, differential pressure, air quality). Once having confirmed the offset automatically updates the value of the value (Cal), pressing corresponding probe (shown to the side). G.f.c. Thermoregulation: this branch includes all the parameters relating to temperature control and that can be modified during installation or service, except for the manufacturer parameters, which are located in branch H.c; • Main mask information: these are the two variables available on the standard display; • Temperature/humidity limits set: these are the minimum and maximum limits for setting the corresponding set points (B.Setpoint B02.Comfort, B03.Pre-comfort, B04.Economy) in Economy, Precomfort and Comfort modes, both summer and winter; • For the explanation of the following screens relating to the control algorithms, see the “Functions” chapter. G.f.d. User service/change PW1: this is used to: • load the unit configuration saved (H.Manufacturer d.Initialization 01.Save configuration) at the end of the software configuration procedure (see chapter 6); • delete the alarm log; • change the Service password (PW1); G.g. Manual management: is used to switch the individual devices on the unit from automatic to manual. For the digital outputs the options are ON (100%) or OFF (0%), while for analogue outputs the possibilities vary from 0 to 100%. This selection bypasses control, but not the alarm thresholds, so as to safeguard unit safety; in general, this operation is used to test the individual actuators during commissioning (see chapter 7). Ha06: select cooling device: • modulating valve; • floating valve: the floating valve motor travel time needs to be defined (Hc08): 1 to 3200 s; • direct expansion: from 1 to 3 steps can be selected. The demand managed by the steps is divided into equal parts based on the number of steps selected. On the cooling cascade screen (Gfc20) set the % of demand managed by freecooling (if enabled) and the remaining % managed by the cooling coil; • type of dehumidification: see paragraph 8.4. Ha07: type of heating/cooling coil: • modulating valve; • floating valve; • steps: similar to direct expansion described for Ha06. Ha08: • select reheating device: see the selection of the preheating device; • select function of reheating coil: 1) compensation: this involves heating the air after having dehumidified it using the cooling (reheating) coil or after having humidified the air using the adiabatic humidifier; 2) integration: in heating cascade control, the reheating coil supplements the preheating coil. The action of the reheating coil and the preheating coil may overlap (Gfc22); 3) compensation +integration: both functions are performed. Ha09: enable coil pumps and water flow control alarms. See paragraph 8.12; Ha10/Ha11/Ha12: cooling / preheating / reheating coil pumps. See paragraph 8.12; Ha13: type of humidifier: see paragraph 8.4. Note: if a device is managed manually, the control status on the display is “manual”. 4.8 H. Manufacturer The main menu (H.) provides access to the manufacturer submenu, after entering the corresponding password PW2. 4.8.1 Ha: Configuration The configuration is the first step in defining the type of air handling unit. Unlike other software that allows selection of a preloaded model that comes closest to the actual one, then making any slight changes required, this application program uses the following identification procedure: 1. hard copy drawing of the air handling unit; 2. choice of the type of actuators installed on the unit in the configuration menu. Ha14: enable and select type of heat recovery unit: see paragraph 8.10. Note: assign the analogue/digital outputs to the actuators in the I/O configuration menu. Also set the maximum and minimum values for the modulating bypass damper. Ha15: air quality and enable purging. See paragraph 8.15. Note: below is a brief description of the menu: the detailed software configuration procedure is described in chap. 6. Ha01: • fan type: supply fan only or supply and return air fans; in the latter case an activation delay can be set for the return fan after the supply fan (Hc06); • coil type: none, cool+pre+reheat, cool, heat, cool + preheat; cool + reheat, heating/cooling, heating/cooling + reheat; • enable humidifier and heat recovery unit; Ha16: frost protection. See paragraph 8.17. Ha17: ON/OFF from digital input and BMS. See paragraph 8.1. Ha18: setpoint from digital input. See paragraph 8.1. Ha19: setpoint offset by analogue input. See paragraph 8.2. Ha20, Ha21, Ha22, Ha23: auxiliary regulation loops. See paragraph 8.18. Ha24: Protocols Protocols can be set: a) for the BMS serial: • Winload: the Winload protocol must be selected in order to activate the Commissioning service, i.e. for setting the parameters from pCO Manager. The RS485/USB converter code CVSTDUMOR0 and RS485 serial interface (PCOS004850) are required; • BMS: select between the boards listed in chapter 1. Note: if the heating/cooling is used, enable the heat / cool output on Hb42 for changeover based on demand and the switching delay set on Hc12; Ha02: • damper type: fresh air only (On/Off or modulating), fresh air+mixing, fresh air+mixing+exhaust, fresh air (modulating) +exhaust; • enable freecooling and freeheating by temperature or enthalpy; • enable air quality control; +030220921 - rel. 1.0 - 28.02.2011 26 b) for the Fbus serial: • Belimo: see paragraph 6.8. • Modbus master: connect the optically-isolated RS485 card (code PCO100FD10). Ha25: Modbus master settings Set the parameters for the Modbus master protocol: • Baudrate or transmission speed: 1200/2400/4800/9600/19200 bit/s; • Stop bits: 1 or 2; • Parity: even or no; • Timeout: 100 to 5000 ms: this is the time after which if communication is interrupted the device offline error is shown: serial probe or VFD (Variable Frequency Drive = inverter). Ha26: Modbus master settings Number of pCOe expansion cards and serial probes. Ha30: enable probes and digital inputs from supervisor See paragraph 6.9. Ha39… Ha56: screens relating to the VFD Carel inverter See the Commissioning chapter. 4.8.2 Hb: I/O configuration See paragraph 6.3. 4.8.3 Hc: Factory settings See the “Software configuration” and “Functions” chapters. +030220921 - rel. 1.0 - 28.02.2011 27 5 SOFTWARE INSTALLATION The following systems can be used to update and install the FLSTDMAHUE application on the pCO controller board: • pCO Manager (with Winload communication protocol); • SmartKey. Support files Following development of the application, 1tool generates various files during compilation; these include two that are required for commissioning: < applicationName>.2CF (descriptive of variables) <applicationName>.2CD (descriptive of categories and access profiles) As well as these files, the <applicationName>.DEV file that contains the pre-defined set of unit parameters can also be managed. When the commissioning procedure is complete, or for configuration or monitoring, the user can generate the following files: <applicationName>.2CW (descriptive of categories, access profiles, monitoring groups) <CommissioningLogFileName>.CSV (commissioning log file, containing the data on the variables recorded during monitoring); For the configuration phase of the commissioning procedure, the following files must be available: .2CF, 2CD and where necessary .DEV, which can be imported and exported. For the monitoring phase, as well as the files mentioned above, the .2CW file with the definition of the working environment may be required. The commissioning log file is an output file only. 5.1 pCO Manager On all CAREL 16 bit pCO sistema controllers (see the pCO sistema manual) the resident software can be updated using a PC. For this purpose, CAREL provides the pCOLoad program and a serial converter with RS485 output (code CVSTDUTLF0) to be connected to the pCO. The special driver also needs to be installed on the PC, also provided by CAREL. The program is included in the installation of the “1Tool” program suite or with the pCO Manager program, downloadable separately from http://ksa.CAREL.com, under “download support software utilities”. The installation, as well as the program, also includes the user manual. The pCO controller can be connected directly to the PC via the RS485 serial port used for the “pLAN” connection or using the BMS serial port with optional RS485 serial card used for the “supervisor” connection. Connection modes Each controller has three serial ports (0, 1 and 2), each with its own default protocol: Default protocol pLAN Serial 1 Serial 2 BMS FieldBus Description Connection to terminal and pLAN network Supervisor connection Field device connection There are two modes for commencing local communication between pCO Manager and the controller: 1) Activate the WinLoad protocol on the required port; 2) On BMS and FieldBus only, irrespective of the protocol set on the pCO, simply connect pCO Manager and from “Connection settings” select SearchDevice = Auto (BMS or FB). In this case it will take around 15-20 seconds to go online. It must be underlined that updating the BOOT Updating the BOOT is generally NOT RECOMMENDED by CAREL; during production CAREL always loads the BOOT required for the correct operation of the unit. Only in very special cases will CAREL ask the user to update the BOOT. The BIOS can only be loaded via the pLAN serial connection. When updating the application and the BIOS, the pCO operating mode switches to low level. In this special mode, the logged data cannot be downloaded to the PC nor can the application be loaded in compressed format. To return the unit to normal communication mode, reset the pCO board. If uploading the BOOT or BIOS files only, the other application files then need to be uploaded again. The consequences of interruption to the upload procedure depend on the instant this occurs. In any case, the upload needs to be repeated. If pCOLoad cannot connect to the pCO, a Smart Key must be used to download the BIOS and any other operating application (e.g.: pCO functional test). This refreshes the pCO memory, allowing connection to pCOLoad. Memory limits The periodical monitoring of the application variables is limited to a maximum of 250 WORDS, freely selectable from the entire memory available to the application. The virtualisation of application variables is limited to a maximum of 50 WORDS, selectable from the entire memory available to the application. There are no address limits for “one-shot” read/write of individual variables: all memory addresses reserved for the application in all types of memory available on the pCO can be used: X memory, T memory, P memory, E memory. Note: for further details on installing and updating the software on the pCO controller, see the online help for the pCO Manager program. Commissioning Tool (1tool) Commissioning tool is configuration and real-time monitoring software used to check the operation of an application installed on a pCO, for commissioning, debugging and maintenance. This tool can be used to set the configuration parameters, set the values of volatile and permanent variables, save the trend in the main values of the unit to a file, manually manage the unit I/Os using a simulation file and monitor/restore the alarms on the unit where the device is installed. The configuration functions available on the commissioning tool allow the designer to decide which variables will be monitored/logged/plotted or monitored by event, to organise the variables into categories, and to choose the set of configuration parameters. +030220921 - rel. 1.0 - 28.02.2011 Port Serial 0 5.2 SmartKey The SMARTKEY programming key is used to emulate the operation of the parallel programming key on pCO models where this is not available (pCOXS, pCO3), with the exception of the BOOT, which is not loaded by the SMARTKEY. Specifically, the key can clone the contents of one pCO and then download the data to another identical pCO via the terminal telephone connector (the pLAN must be disconnected). This function is obviously available for all pCO controllers, even those with parallel key. In addition to this mode, the key can transfer the data logged on a series of pCO devices and 28 Then the pCO controller will start the configuration procedure, opening a screen similar to the following. download them to the PC. From the PC, using the “SMARTKEY PROGRAMMER”, the key can be configured to run certain operations: retrieve logs, program applications, program BIOS, etc. For further details see the online help for the “SMARTKEY PROGRAMMER” and the SMARTKEY instruction sheet. 7. Press again: the configuration screen will be shown, similar to the one below. Note: for further details on installing and updating the software on the pCO controller, see the online help for the pCO Manager program. moves the cursor 8. Configure the terminals as desired. Pressing. from one field to the next, while and change the value of the current field. P:xx represents the address of the selected pCO board (in the example in the figure, this is board 1). 9. To exit the configuration procedure and save the data, . During the select “Ok?”, set “Yes” and confirm by pressing configuration procedure, if the terminal remains inactive (no button is pressed) for more than 30 seconds, the pCO board automatically interrupts the procedure without saving any changes. 5.3 Setting the terminal address The address of the terminal can be set in the range from 0 to 32; addresses between 1 and 32 are used by the pLAN protocol, while address 0 identifies the Local terminal protocol, used for non-graphic point-to-point connections and to configure the pCO controller. The default address is 32. The address of the terminal can only be set after having powered the terminal via the RJ12 connector. To access configuration mode press , , and together for at least 5 seconds; the terminal will display a screen similar to the one shown below, with the cursor flashing in the top left corner: ! Important: if during operation the terminal detects inactivity on the pCO board it is connected to, the display is cancelled and a message similar to the one shown below is displayed. To modify the address of the terminal (“Display address setting”) carry out the following operations in sequence. 1. Press once: the cursor will move to the “Display address setting” field; 2. Select the desired value using and , and confirm by pressing again; 3. If the value selected is different from the value saved, the following screen will be displayed and the new value will be saved to the permanent memory on the display. If the terminal detects inactivity of the entire pLAN network, that is, it does not receive any messages from the network for 10 seconds consecutively, the display is cancelled completely and the following message is shown: If the address field is set to 0, the terminal communicates with the pCO board using the Local terminal protocol and the “I/O Board address” field disappears, as it no longer has any meaning. To modify the list of the terminals (private and shared) associated with a pCO board, carry out the following operations in sequence: 4. Enter configuration mode (see above) pressing , and together for at least 5 seconds. twice: the cursor will move to the “I/O Board address” 5. Press field. 6. Select the address of the pCO board in question and confirm by . pressing +030220921 - rel. 1.0 - 28.02.2011 29 6 SOFTWARE CONFIGURATION ! Important: some of the following operations are often carried out during installation, as the devices are connected in the field and configured. 2) If the design AHU is similar to the default AHU, try adding or removing devices or probes until achieving a complete match; 3) If the design AHU is very different from the unit managed by the default parameters, delete all the configured analogue and digital inputs and outputs. To do this access menu H. Manufacturer b.I/O configuration Hb99. Positions deletes to delete the default configuration and then enter the new configuration; 4) Access menu H. Manufacturer a.Configuration to select: • Ha01: the main devices on the AHU (number of fans, number of heating coils, enable humidifier, enable heat recovery unit; • Ha02: type of dampers, enable freecooling/freeheating (by temperature/ enthalpy), air quality control… 5) Again in menu H. Manufacturer a.Configuration: configure the type of devices: modulating valve, floating valve, heaters, no. of pumps for each coil, type of air quality control and other functions such as purging, type of frost protection, etc. See the table of parameters for the list of devices on the “Ha” screens that are displayed according to the selections made on Ha01 and Ha02. EXAMPLE: the default configuration of the pCO Large includes a heat recovery unit with bypass damper. If the AHU is designed for an application in which neither freecooling nor the possibility of frost forming on the heat recovery unit are envisaged, this device may not exists and therefore can be excluded, thus freeing an output. Simply access the “Configuration” menu (screen Ha14) and disable the bypass damper. The software configuration procedure includes these steps: 1) Select devices (screens Ha01, Ha02); 2) Configure devices (screens Ha03, …, Ha30); 3) Assign inputs/ outputs (menu Hb); 4) Set device control parameters (menu Hc); START Ha Hb Hc END 6.1 Select devices (Ha) Once the application program has been installed and the electrical connections have been completed (see the “Hardware installation” chapter), the operations required for commissioning the controller depend on the type of air handling unit, and involve these steps: 1) Check correspondence between the design AHU - it’s recommended to refer to a complete hard copy drawing - and the AHU managed by the pCO board with the default parameters. See the “Hardware installation” chapter; Note: selecting the devices on screens Ha01 and Ha02 defines the AHU and determines which of the following screens or configuration menus for the inputs and outputs (Hb) are displayed 30 +030220921 - rel. 1.0 - 28.02.2011 ! Important: • a device is only enabled if the position of the corresponding analogue or digital output is not zero; • a probe or digital input is only enabled if the position of the corresponding input ≠0, or is selected from the serial probes (T1…T6, H1…H6, A1…A6), probes on the pCOe expansion card (E1…E8) or supervisor probes (S1…S4). See paragraphs 6.5 and 6.6; • if certain inputs or outputs are not shown on the assignment screens as expected, see the parameters table, which highlights the conditions required for displaying a screen. 6.2 Configure devices (Ha) From screen Ha03 on the selected devices, type of control and corresponding probes are configured. These settings must be coherent both with the electrical connections made and the software loaded on the pCO board during installation. Ha03) fan type: with inverter or on/off control, see paragraph 8.14; Ha04) fan alarms: thermal overload and/or flow; Ha05) preheating device: floating valve, modulating valve, heaters; Ha06) cooling device: floating valve, modulating valve, floating valve, direct expansion steps; Ha07) heat/cool coil; Ha08) reheating device: floating valve, modulating valve, heaters; Ha08) reheating operation for compensation, integration, integration + compensation; Ha09): enable pumps on cooling, preheat and reheating coils; Ha13): type of humidifier: isothermal or adiabatic, ON/OFF or modulating; Ha14): type of heat recovery unit: cross-flow, run-around coil or modulating heat wheel; Ha14): bypass damper fitted; Ha15): air quality control type: P+I or proportional only; Ha15): air quality probe type: CO2, VOC, CO2+VOC; Ha15): enable purging; Ha16): frost protection type: from probe, thermostat, probe+thermostat; Ha17): enable unit ON/OFF from digital input or BMS; Ha18): enable change set point from comfort to economy from digital input; Ha19): enable offset on setpoint from analogue input; Ha19): activate auxiliary control loop; Ha24): select protocol on Fieldbus serial and BMS serial; Ha25): communication speed, parity and timeout for Modbus master protocol; Ha26): number of pCOe expansion cards and number of serial probes connected; Ha29): configure VFD inverter parameters; Ha30): enable probes and digital inputs from supervisor. Ref. Hb01 Hb02 Hb03 Hb04 Hb05 Hb06 Hb07 Hb08 Hb09 Hb10 Hb11 Hb12 Hb13 Hb14 Hb15 Hb16 Hb17 Hb18 Hb19 Hb20 Hb21 Hb22 Hb23 6.3 Assign inputs/outputs (Hb) In the menu H. Manufacturer b.I/O configuration: 1) select the type and position of the analogue and digital inputs and the analogue and digital outputs. For active probes also set the minimum limit attributed to the minimum input value and the maximum limit attributed to the maximum input value; 2) Check the configuration in menu D. Inputs/outputs and the input readings; 3) Test the outputs (He01…) to verify correct wiring and operation of the devices. POSSIBLE OPTIONS pCOXS 1+1Mbyte 1 to 4 pCO3SMALL 1 to 5 pCO3MEDIUM 1 to 8 pCO3LARGE 1 to 10 pCOe1: E1 to E4 pCOe (not PT1000) pCOe2: E5 to E8 Temperature: T1 to T6; A1 to A6 Serial probes Humidity: H1 to H6; A1 to A6 Belimo® M1 to M8 BMS variables S1 to S4 Note: • the controller automatically identifies which terminals are free and automatically proposes the first available positions, according to the type of input (e.g. NTC, PT1000, 0 to 1 V, 0 to 10 V, 4 to 20 mA) based on the hardware features of the pCO board used; • some screens are only shown if the corresponding device has been enabled and configured; +030220921 - rel. 1.0 - 28.02.2011 CONFIGURABLE INPUTS ANALOGUE DIGITAL Description Ref. Description Supply temperature Hb24 Remote On/Off Return temperature Hb24 Summer/winter Outside temperature Hb24 Set point from DI Room temperature Hb25 Generic alarm Supply humidity Hb25 Serious alarm Return humidity Hb25 Frost protection alarm Outside humidity Hb26 Supply filter 1 alarm Room humidity Hb26 Supply filter 2 alarm Supply diff. pressure Hb26 Return filter alarm Return diff. pressure Hb27 Supply flow switch Frost protection temperature Hb27 Return flow switch Saturation temperature Hb28 Humidifier alarm CO2 probe Hb28 Supply inverter alarm VOC probe Hb28 Return inverter alarm Exhaust temperature Hb29 Supply fan 1 thermal overload Cooling or heating/cooling Hb29 Supply fan 2 thermal overload coil temperature Preheating coil temperature Hb29 Return fan 1 thermal overload Reheating coil temperature Hb29 Return fan 2 thermal overload Auxiliary probe 1 Hb30 Cooling pump 1 thermal overload Auxiliary probe 2 Hb30 Preheat pump 1 thermal overload Auxiliary probe 3 Hb30 Reheat pump 1 thermal overload Auxiliary probe 4 Hb31 Cooling pump 2 thermal overload Set point offset from AIN Hb31 Preheat pump 2 thermal overload Hb31 Reheat pump 2 thermal overload Hb32 Cooling pump flow switch Hb32 Preheat pump flow switch Hb32 Reheat pump flow switch Hb33 Dirty heat recovery unit alarm Hb33 Preheat heater overload Hb33 Reheat heater overload Hb34 Dirty filter alarm Hb34 Door contact open Hb34 Smoke-fire alarm 31 POSSIBLE OPTIONS pCOXS 1+1Mbyte 1 to 6 pCO3SMALL 1 to 8 pCO3MEDIUM 1 to 12 pCO3LARGE 1 to 14 pCOe1: E1 to E4 pCOe pCOe1: E5 to E8 Belimo® M1 to M8 BMS variables S1 to S4 CONFIGURABLE OUTPUTS Hb63 Hb64 Hb65 ANALOGUE Description Supply fan Return fan Outside damper Mixing damper Exhaust damper Bypass damper Humidifier Preheating valve Cooling valve or heating/cooling Modulating preheating heater Reheating valve Modulating reheating heater Heat wheel Auxiliary 1 Auxiliary 2 Hb66 Hb67 Auxiliary 3 Auxiliary 4 Ref. Hb51 Hb52 Hb53 Hb54 Hb55 Hb56 Hb57 Hb58 Hb59 Hb60 Hb61 Hb62 Hb40 DIGITAL Description Supply fan 1 Return fan 1 Humidifier Supply fan 2 Return fan 2 Supply fan star delta Return fan star delta Bypass damper Heat wheel/heat recovery unit pump General alarm Hb40 Hb40 Serious alarm Minor alarm Hb41 Hb41 Hb41 Unit status (ON/OFF) Filter alarm Heat recovery unit defrost heater Heat/cool Cooling pump 1 Preheat pump 1 Reheat pump 1 Cooling pump 2 Preheat pump 2 Reheat pump 2 Floating valve opening, cooling-heating/cooling Floating valve opening, preheat Floating valve opening, reheat Floating valve closing, cooling-heating/cooling Floating valve closing, preheat Floating valve closing, reheat Cooling-heating/cooling step 1 Cooling-heating/cooling step 2 Cooling-heating/cooling step 3 Preheat heater 1 Preheat heater 2 Preheat heater 3 Preheat heater 4 Reheat heater 1 Reheat heater 2 Reheat heater 3 Reheat heater 4 Auxiliary loop 1 On/Off Auxiliary loop 2 On/Off Auxiliary loop 3 On/Off Auxiliary loop 4 On/Off Ref. Hb35 Hb35 Hb35 Hb36 Hb36 Hb37 Hb38 Hb39 Hb39 Hb42 Hb43 Hb43 Hb43 Hb44 Hb44 Hb44 Hb45 Hb45 Hb45 Hb46 Hb46 Hb46 Hb47 Hb47 Hb47 Hb48 Hb48 Hb48 Hb48 Hb49 Hb49 Hb49 Hb49 Hb50 Hb50 Hb50 Hb50 POSSIBLE OPTIONS pCOXS 1 to 3 1+1Mbyte (output 3 PWM) pCO3SMALL 1 to 4 pCO3MEDIUM 1 to 4 pCO3LARGE 1 to 6 pCOe1: E1 pCOe pCOe2: E2 Belimo® M1 to M8 +030220921 - rel. 1.0 - 28.02.2011 6.3.1 Configuring alarms Configuration of alarms, the function of the contact, alarm delay and type of alarm must be completed during installation. The following table shows the settings. Normally open (NO) Normally closed (NC) Type of alarm Generic Serious Frost protection Supply filter 1 Supply filter 2 Return filter Supply flow switch Return flow switch Pump 1 thermal overload Cooling coil Preheating Reheating Pump 2 thermal overload Cooling coil Preheating Reheating Coil flow switches Cooling coil Preheating Reheating Fan thermal overloads Supply 1 Supply 2 Return 1 Return 2 Humidifier Supply inverter Return inverter Preheat heater thermal overload Reheat heater thermal overload Dirty heat recovery unit Dirty filter Fire & Smoke Door open General BMS offline Number of warnings (attempts) for pumps Cool/heat-cool coil Preheating Reheating POSSIBLE OPTIONS pCOXS 1 to 5 1+1Mbyte pCO3SMALL 1 to 8 pCO3MEDIUM 1 to 13 pCO3LARGE 1 to 18 pCOe1: E1 to E4 pCOe pCOe1: E5 to E8 Enabling Always Always Ha16 Always Always Ha01-Hc07 Always Ha01-Ha04 Config. Hb25 Hb25 Hb25 Hb26 Hb26 Hb26 Hb27 Hb27 Ha09-Ha10 Ha09-Ha11 Ha09-Ha12 Hb30 Hb30 Hb30 Ha09-Ha10 Ha09-Ha11 Ha09-Ha12 Hb31 Hb31 Hb31 Ha09 Ha09 Ha09 Hb32 Hb32 Hb32 Ha04 Ha01, Ha03 (Backup), Ha04 Ha01, Ha04 Ha01, Ha03 (Backup), Ha04 Ha01 Ha03 Ha01, Ha03, Ha04 Ha05 Hb29 Hb29 Hb28 Hb28 Hb28 Hb33 Ha08 Hb33 Ha01 Hb33 Always Always Always Always Ge02 Hb34 Hb34 Hb34 Hb40 Delay Hc20 Startup and steady operation : Hc07 Hb29 Hb29 Hc18 Ha10 Ha11 Ha12 Note: following configuration, the screens in menu D show the inputs and outputs that have effectively been configured. 32 Note: • the position of the probes connected to pCOe is defined as follows: 6.4 Device control parameters (Hc) Once the devices available and the probes/digital inputs have been selected, the main control parameters are configured on the Hc screens. These include: • selection of temperature and humidity control probes (supply, return, room); • minimum and maximum limits for the dampers; • fan activation delays after opening the dampers (opening time) and damper closing time after the fans stop (closing delay); • delay time for star/delta starting; • floating valve travel times; • fan inverter parameters. See the following paragraphs and the ‘‘Functions’’ chapter for a more detailed description of the control parameters. pCOe pCOe 1 pCOe 2 E1, E2, E3, E4 E5, E6, E7, E8 • E1 to E8 identify both analogue and digital inputs. 6.6 Serial probe connection After having inserted the serial card (PCO100FD10) in the slot marked “field card”, up to 6 serial probes can be connected, and must be enabled on screen Ha26. Note: if a heating/cooling coil is used the heating/cooling digital output can be enabled (screen Hb42) to switch operation according to demand and the switching delay set on Hc12. ! Important: the “Fieldbus” car cannot be installed on the pCOXS, however there is a version with integrated Belimo card (code PCO1MP0CX0). 6.5 pCOe expansion card connection For each serial probe, the following need to be selected using the dipswitches (see the figure): • a unique network address; • communication speed (baud rate), the same as set on screen Ha25; The configuration screens are used to select: • a unique network address; • the type, i.e. temperature or temperature/humidity probe (Ha91); • the default probe parameter settings; • assignment of the function to the serial probe (e.g. supply/return/room temperature /humidity probe). After having inserted the serial card (PCO100FD10) in the slot marked “field card”, up to 2 pCOe expansion cards can be connected, and must be enabled on screen Ha26. Each pCOe card can be connected to: • 4 Carel NTC probes (-50T90 °C; R/T = 10 kΩ at 25°C) or active probes: 0 to 1 Vdc, 0 to 10 Vdc, 4 to 20 mA, selectable via software in groups of two (B1, B2 and B3, B4) • 4 digital inputs; • 1 analogue output; • 4 digital outputs. Setting the parameters and the address The default values (Baud rate = 19200, Stop bits = 2, Timeout = 300 ms, Priority = none) can be displayed and modified if necessary on screen Ha05. For DP probes, on the other hand, set dipswitches 6, 7 and 8 (6 = OFF, 7 = ON, 8 = OFF), while the address Adr = 128 to 133 is set using dipswitches 1 to 5. Note: for further details and for the connection diagrams, see the DP serial probe manual (+030220660). Each expansion card must be set with a unique network address using the dipswitches. The configuration screens are used to select: • the card address; • the functions of the probes. Mask index Ha26 Hb01 to Hb08 Display description Selection pCOe number 1 to 2 pCOe 1 address 1 to 5 pCOe 2 address 1 to 5 Analogue inputs Supply, return, outside, room temperature Supply, return, outside, room humidity position ≠ 0 type: 4 to 20 mA ¦ 0 to 1 V ¦ 0 to 10 V +030220921 - rel. 1.0 - 28.02.2011 33 Mask index Ha24 Ha25 Ha26 Ha31 Ha91 to Ha96 Hb01 to Hb08 Mask index Ha03 Display description Selection Protocols Field port Modbus master Modbus Master settings Baudrate 9600 ¦ 19200 Number of serial probes No, 1 to 6 Press Enter to configure serial probes Ha91 Serial probe no. 1 to 6 Address 128 to 159 Type Temperature ¦ Temperature+humidity Default installation No ¦ Yes Analogue inputs Supply, return, outside, room temperature Supply, return, outside, room humidity position > 0 Min limit, max limit Ha24 Ha29 Ha39 Mask index Ha40/Ha50 Ha46/Ha56 Note: • default installation refers to the default configuration of serial probe parameters shown on the probe instruction sheet; • also set the address, protocol and communication speed using the dipswitches on the serial probe; • the position of the serial probes is defined as follows: Serial probes Temperature Humidity Hc40/Hc50 T1 to T6, A1 to A6 H1 to H6, A1 to A6 with the following meanings: A1 A2 A3 A4 A5 A6 Mask index Ha41/Ha51 Average between all probes Average between 1, 2 Average between 1, 2, 3 Average between 3, 4 Average between 4, 5 or 4, 5, 6 Average between 5, 6 Display description Fan type Fan regulation Selection 4: Inverter ¦ 1: Constant pressure ¦2: Air quality ¦ 3: Fixed speed ¦ Field port Modbus master Press Enter to configure the VFD Enable VFD: Modbus protocol: Yes Display Def Min Max description Supply/return VFD Address 1/2 0 999 Data address 0 0 9999 Data value 0 -32768 32767 Default install N No Yes Supply/return VFD: motor parameters Volt 0 180 690 Cosfi 0.0 0.3 0.99 Frequency 0 30 320 Speed 0 300 20000 Current 0 -999.9 999.9 Current limit 0 0 999.9 Supply/return VFD Volt at 0 Hz 0 0 40 Switch 0 1 16 frequency V/ f curve midpoint Voltage 0 0 100 Frequency 0 0 320 Display description Supply/return VFD Control place Speed reference type 6.7 VFD inverter connection Ha42/Ha52 The inverter is used to manage the fan speed, for constant pressure and fixed speed control modes. After having inserted the serial card (PCO100FD10) in the slot marked “field card”, up to 2 VFD inverters can be connected for the control of supply and return air fans, which must be selected on screen Ha03. Ha43/Ha53, Ha44/Ha54, Ha45/Ha55 Hc41/ Hc51 Note: serial network connection is also useful for ON/OFF or fixed speed fan control, as the inverter parameters can be set directly from the terminal. Mask index Hc42/ Hc52 Rotation type Supply/return VFD Motor control mode Start function Stop function Action when in fault Supply/return VFD V/f ratio UOM V Hz rpm A A % kHz % Hz Selection 1: I/O terminal ¦2:Keypad ¦ 3: Fieldbus 0:Ain1 ¦ 1:Ain2 ¦ 2:Keypad ¦ 3: Fieldbus ¦ 4: Motor potentiometer ¦ 5:PID regulation Clockwise ¦ anticlockwise Frequency ¦ speed Ramp ¦ flying start Ramp ¦ coasting See parameters table Linear ¦ squared¦ programmable ¦ linear with flux optimisation Not used ¦ automatic boost ¦ Not used ¦ used Def Min Max UOM V/f Optimisation Auto restart Display description Supply/return VFD Min/ max frequency 0 0 Acceleration time Deceleration time 1 1 0.1 0.1 Max freq. 3200 3200 Hz s s Note: • the ‘‘control place’’ parameter establishes the source of the signal to the start/stop the fan. The ‘‘speed reference’’ parameter establishes the source of the speed/frequency reference. See the VFD inverter manual; • for on/off fans, the VFD can be configured to set the parameters from the display. +030220921 - rel. 1.0 - 28.02.2011 34 • enter Yes in the Address actuator field; • after a few seconds the message “address setting OK” is displayed to confirm that the address has been set successfully. 6.8 Belimo actuator connection After having inserted the serial card (PCO100FD10) in the slot marked “field card” (for the pCO1XS, code PCO1MP0CX0 is available with integrated Belimo card), up to 8 Belimo actuators (dampers, valves, etc.) can be connected, and must be selected on screen Ha27. The Belimo protocol must be set on screen Ha24. Each Belimo actuator can be connected to: • an NTC probe; • one 0 to 1 V or 0 to 10 V input; • one digital input. The following parameters are selected on the screens for each actuator: • actuator address setting procedure, manual or automatic; • type of probe connected and the minimum/ maximum limits; • function of the probe. In addition, the adaptation procedure needs to be run to align the position. Mask index Display description Selection Ha24 Protocol … Field port Belimo Ha27 Belimo devices Number of actuators 0 to 8 Ha28 Press Enter to configure Belimo actuators Ha60 Ha60 Belimo 1 to Belimo 8 Ha60, Ha63 to Actuator type (read-only) 1: None ¦ 2: Air Ha81 actuator ¦ 3: Valve actuator ¦ 4: Valve actuator 5: None ¦6: Firesmoke damper ¦ 7: None ¦ 8: VAV Smokefire damper ¦ 9: None Addressing mode 0: Manual 1: Auto SN: 00000-00000-000-000 Address actuator 0:No¦ 1:Yes Ha61, Ha64 to Enable external input/probe 0:No¦ 1:Yes Ha82 Type NTC ¦ 0 to 1 V ¦ 0 to 10 V ¦ ON/OFF Min value -999.9 to Max value Max value Min value to 999.9 Ha62, Ha65 to Position or air flow limits Ha83 Minimum 0 to Maximum Maximum Minimum to 100 Gg60 to Gg67 Belimo 1 to Belimo 8 Start adaptation No Start testrun No Adapted angle Yes Alarms reset No 6.8.1 Manual address setting A: select “manual” address setting mode; B: enter Yes in the Address actuator field; C: press the button indicated by the arrow repeatedly (see the figure); D: after a few seconds the message “address setting OK” is displayed to confirm that the address has been set successfully. Note: In the event of errors, to reset the address, repeat steps A and B and then set the ‘‘Address actuator’’ field to No. 6.9 Probes from supervisor The BMS port fitted with the RS485 serial card can be connected to a supervisor (PlantVisorPro, PlantWatchPro) that sends the values of up to 4 probes. The BMS serial protocol must be set (Ha24) to “BMS”, while the BMS configuration (Ge01) must be set by selecting the protocol (e.g. Modbus), communication speed and network address. Supervisor probes must be enabled (Ha30), and the backup probes used after a certain timeout following interruption to communication defined, and finally the functions assigned on the “Hb” screens. The supervisor probes are identified by letters S1 to S4. Note: the values of the probes and digital inputs can be written by the supervisor, however analogue inputs can be set as backup only for the probes (not for the digital inputs); Setting the Belimo actuator address There are two procedures for setting the address: 1) automatic; 2) manual. Automatic address setting • identify the serial number from the barcode (see the figure); • select “automatic” address setting mode; • enter the number from the SN field in screens H60 to Ha81 (actuators 1 to 8); +030220921 - rel. 1.0 - 28.02.2011 35 Mask index Display description Ha24 Protocol pLAN port BMS port Field port Enable BMS probes and digital inputs Backup probe 1 Backup probe 2 Backup probe 3 Backup probe 4 BMS configuration BMS protocol Baud rate Ha30 Ge01 Ge02 Address BMS offline alarm enable Timeout +030220921 - rel. 1.0 - 28.02.2011 Selection pLAN BMS ¦ Winload Modbus master ¦ Belimo No ¦ Yes None, AIN1 to AIN10 None, AIN1 to AIN10 None, AIN1 to AIN10 None, AIN1 to AIN10 Modbus ¦ LON ¦ CAREL 1200 ¦ 2400 ¦ 4800 ¦ 9600 ¦ 19200 0 to 207 No ¦ Yes 0 to 900 s 36 7 COMMISSIONING Commissioning refers to installation of the electrical panel in the field and setting the air handling unit application software parameters, as well as all the operations needed to complete the setup of the devices. The Commissioning procedure is activated on the screen Ge03, after having fitted the BMS RS485 card on the controller and established the connection to a personal computer running the pCO Manager program (see the appendix). 7.1 Loading the configuration If necessary, load the configuration saved following the software configuration procedure, on screen Gfd01. Once the parameters have been loaded, the following operations are possible: 1) verify correspondence of the I/Os to the design AHU; 2) set the PID parameters for temperature and humidity control, air quality and advanced control functions (cascade, supply limits, compensation, etc..). See the “Functions” chapter; 3) set the auxiliary control loops, if featured; 4) set the baud rate and serial address for Fieldbus and BMS serial communication; 5) calibrate the probes; 6) manually calibrate the fans, coil actuators, humidifier, and activate purging. Note: the commissioning service automatically sets the BMS protocol to ‘‘Winload’’. Once the procedure has ended, the protocol automatically returns to “BMS”, allowing reconnection to the supervisor. 7.3 Probe calibration In menus Gfb01 to Gfb08, calibrate the probes if necessary and check the correct reading against a sample probe. See the parameters table. 7.4 Setting the control parameters Note: see the screens in menus Ga, Gb, Gc, Gfc, Ge, Gg and the ‘‘Functions’’ chapter. To set the control parameters see the “Software configuration” and “Functions” chapters. The parameters can be modified from the terminal or a personal computer using the pCO Manager program. See the appendix. 7.2 Commissioning ! Warning: before performing any operation on the pCO board, disconnect power to the device by moving the main switch on the electrical panel to OFF. To configure the parameters using PCO Manager: 1) Disconnect any BMS cards other than the RS485 card (e.g. LON); 2) Connect the BMS RS485 card; 3) Activate the Commissioning service on screen Ge03; 7.5 Setting the hour counters On screens Gfa01 to Gfa06 (see the parameters table) a maximum number of operating hours before maintenance is required can be set for each device. On exceeding the maintenance hours, a “warning” is signalled on the display and recorded in the alarm log, without affecting control. Access screens Gfa01 to Gfa06 again to reset the warning. The purpose is to allow service personnel to be notified to ensure preventive maintenance. 7.6 Enthalpy management Enter the atmospheric pressure for parameter Gfc16 to allow the controller to correctly calculate the values on the psychrometric chart. Mask index Gfc16 4) Connect to the computer via the USB/RS485 connector; Display description Def UOM Min Max mbar 600 1100 Enthalpy management Atmospheric pressure 1090 7.7 I/O test Screens He01 to He50 can be used to test the actuators during installation, see menu Gg01. Modulating fan actuators can be adjusted from 0 to 100% to achieve design air flow-rates. For the digital outputs, 0% corresponds to OFF and 100% to ON. 5) Perform the commissioning procedure using pCO Manager. See the appendix; 6) At the end the operations, stop the Commissioning service. 7) Reconnect the BMS card and restore power. +030220921 - rel. 1.0 - 28.02.2011 37 8 FUNCTIONS FLSTDMAHUE features advanced control functions that can be activated based on the devices installed on the air handling unit: DIGITAL INPUT • Temperature and humidity control; • Freecooling and freeheating; • Heat recovery; • Air quality; • Air cleaning (purging); • Priority to temperature or humidity control; • Set point compensation; • Automatic summer/winter (cooling/heating) changeover; • Temperature and humidity supply limits; • Auxiliary control loops; • Frost protection and room protection. On/Off 8.1.1 ON REGULATION DEVICES OFF BMS-KEYBOARD SCHEDULER Dampers closure delay (Hc03) 8.2 Set point After having selected the main temperature and humidity probes and cooling and heating set points for each operating mode (screens B02, B03, B04), screen B01 displays the temperature and humidity set points. The maximum and minimum limits for the temperature and humidity set points in cooling and heating can be set in the Service menu, on screens Gfc02 and Gfc03. For the temperature set point, an offset from analogue input can be enabled on Ha19, and the effect of the offset seen on B01, i.e. display the current working set point and the affect of the offset on the set points defined on B02, B03, B04. The following inputs can also be enabled, configured on Hb24: 1) change in set point from comfort to economy from digital input , enabled on Ha18 and configured on Hb24 (double set point); 2) remote On/Off, directly configured on Hb24. BMS AND OR DAMPERS CLOSURE FANS OFF Run off time delay (Hc06) KEYBOARD = AUTO KEYBOARD BMS SHUT DOWN Before switching On, the AHU temporarily goes through the Start-up stage, during which the controller checks for any alarms, opens the dampers and when open starts the supply and return air fans. ON status requires the following, with a logical AND relationship: • digital input; • keypad or BMS with keypad override; • scheduler (time bands) • BMS. DIGITAL INPUT SCHEDULER OR The possible operations are described below; additional custom functions can be created using the 1tool programming environment modules. Refer to this for further information. 8.1 KEYBOARD AND Mask index Ha18 Hb24 Display description Selection Setpoint from digital input Double set point 0:No¦ 1:Yes Ha19 Enable setpoint offset by analog input 0:No¦ 1:Yes Mask index B02/B03/ B04 Display Def description Comfort/Precomfort/Econom y temp. summer Comfort/Precomfort/Econom y temp. winter Temperature set limits Summer low 15 Summer high 35 Min Max UOM Lim. Inf. (Gfc02) Lim. Sup. (Gfc02) °C Lim. Inf. (Gfc02) Lim. Sup. (Gfc02) °C 99.9 99.9 °C °C 99.9 99.9 °C °C 100 100 %rH %rH 100 100 %rH %rH Position ≠0 START-UP DAMPERS OPENING SUPPLY FAN ON Opening time (Hc03) RETURN FAN ON Supply-return delay (Hc06) Flow alarms delay (Hc07) B02/B03/ B04 Note: • the keypad (A01) switches the AHU ON if “Comfort”, “Precomfort” or “Economy” has been set; • BMS with keypad override means the possibility to override the selection made on the keypad using a BMS variable; • ON from scheduler requires the keypad to be set to AUTO; • ON from BMS is a further ON signal using a separate variable. See the list of BMS variables. 8.1.2 Gfc02 Gfc03 OFF Before switching Off, the AHU temporarily goes through the Shutdown stage, during which the controller stops the devices and fans and closes the dampers. ON status requires the following, with a logical OR relationship: • digital input; • keypad; • scheduler • BMS. +030220921 - rel. 1.0 - 28.02.2011 38 Winter low Winter high Humidity set limits Summer low Summer high 15 35 Winter low Winter high 30 90 30 90 -99.9 Summer low -99.9 Winter low 0 Summer low 0 Winter low 8.3 Temperature control Mask index 8.3.1 Ha08 Enabling The following need to be enabled: 1) the probe used for control (Hc01); 2) the type of control (proportional, proportional+integral, proportional+integral+derivative), the same for heating and for cooling (Gfc04); 3) the PID control parameters for winter and summer operation and the corresponding neutral zone (Gfc05, Gfc06); 3) the cooling and heating temperature set point limits (paragraph 8.2), if control is on the return/room probe; 4) if necessary, cooling in winter and heating in summer (auto heat/cool, Gfc04); 5) if the reheating coil only operates to supplement the action of the preheating coil (integration) or also to compensate (compensation) for the lowering in temperature due to dehumidification (Ha08). Gfc04 Mask index Gfc02 Gfc05 Gfc06 Gfc23 Gfc24 Gfc26 Req 100% Req_heat Selection Integration ¦ Compensation ¦ Compensation + integration Main regulation probe selection Temperature Return ¦ supply ¦ room Regulation type Proportional ¦ Proportional+integral ¦ PID Auto cool/heat NO ¦ YES Hc01 Note: • the heating and cooling coils have a minimum opening settable by parameter, therefore if the control probe value does not deviate from the set point by more than the neutral zone and the resulting request is not sufficient to reach the minimum opening, the valve won’t open; see the following graphs; • control normally performs heating in winter and cooling in summer. Only if auto cool/heat is set (Gfc04) heating can also be applied in summer and cooling in winter, based on the current set point; • for simplicity the following graphs refer to proportional control only; • see available literature for more complete details on PID control. Display description Reheating output Display description Temperature set limits Summer low Summer high Def Min Max U.M 15 35 99.9 99.9 °C °C Winter low Winter high 15 35 -99.9 Summ er low -99.9 Winter low 99.9 99.9 °C °C 99.9 99 999 999 °C °C s s 0 0 0 0 99.9 99 999 999 °C °C s s 0 0 100 100 % % 0 100 Cooling regulation Differential 2 0 Neutral zone 1 0 Integral time 300 0 Derivative time 0 0 Control hot Differential 2 Neutral zone 1 Integral time 300 Derivative time 0 Minimum cooling valve opening Cooling 0 Minimum opening 0 heating valve Minimum heat/cool valve opening Cooling 0 % Note: the graphs show that the valves do not open inside the neutral zone around the set point, therefore the heating or cooling action is not performed. Req_cool 0% B1 Set Diff_heat NZ_heat NZ_cool 8.4 Humidity control Diff_cool 8.4.1 OUT Hot_Valve_Opening Cool_Valve_Opening Min_op_heat Min_op_cool 100% Key Req_heat Req Diff_cool Set Min_op_co ol NZ_cool 0% Heating request Request Cooling differential Set point Cooling valve minimum opening Neutral zone in cooling 100% Req Req_cool B1 Diff_heat Cooling request Control probe Heating differential Min_op_ heat NZ_heat Heating valve minimum opening Neutral zone in heating Enabling The following must be enabled or selected: 1) the humidifier (Ha01); 2) the type of humidifier (Ha13) and in the event of adiabatic humidifier the supply temperature lower limit (Gfc35); 3) the probe used for humidity control (Hc01); 4) for adiabatic humidifiers, the air preheating probe (Gfc25, Gfc27); 5) the type of control (proportional, proportional+integral, proportional+integral+derivative, on Gfc10); 6) the PID control parameters for humidification and dehumidification and the corresponding neutral zone (Gfc12, Gfc11); 7) the humidity set point limits in summer and winter (paragraph 8.2); 8) humidification in summer or dehumidification in winter according to request (auto hum/dehum, Gfc10); 9) whether the reheating coil acts to supplement the preheating coil (integration) or also to compensate for the reduction in temperature due to dehumidification (Gfc28). Note: • control normally performs humidification in winter and dehumidification in summer. Only if auto hum/dehum is set (Gfc10) humidification is also performed in summer and dehumidification in winter; • the minimum opening in dehumidification mode may be different from that in cooling because represents the minimum passage of water that manufactures dehumidification. +030220921 - rel. 1.0 - 28.02.2011 39 Gfc12 WINTER HUMIDIFICATION SUMMER DEHUMIDIFICATION Req 100% Req_hum Gfc23 Req_dehum Gfc26 Humidification regulation Differential 4 0 Neutral zone 2 0 Integral time 300 0 Derivative time 0 0 Minimum cooling valve opening Dehumidification 0 0 Minimum heat/cool valve opening Dehumidification 0 0 100 100 999 999 % RH % RH s s 100 % 100 % 0% B1 Set NZ_hum NZ_dehum Diff_hum 8.4.2 Diff_dehum Humidification control The control parameters are as follows: Mask index Ha05 Cool_Valve_Opening 100% Min_op_dehum Ha07 Ha13 100% Req 0% Mask index Gfc25 Humidifier 100% Gfc27 0% Key Req Diff_deh um NZ_hum B1 Mask index Ha01 Request Dehumidification differential Neutral zone in humidification Control probe Ha06 Display description Main device enable Humidifier Dehumidification Ha08 Reheating output Ha13 Humidifier Type Hc01 Gfc10 Gfc35 100% Req Set Diff_hum NZ_dehum Min_op_dehum Isothermal (ON/OFF control) ¦ Isothermal (Control model.) ¦ Adiabatic (ON/OFF control) ¦ Adiabatic (Control model.) Main regulation probe selection Humidity Return ¦ supply ¦ room Humidity regulation Regulation type Proportional ¦Proportional+integral ¦ PID Auto hum/dehum No ¦ Yes Adiabatic humidifier - Supply low temperature limit Enable limit No ¦ Yes Def Min Max UOM B02/B03/ B04 Comfort/Precomfort/Economy temp. summer Comfort/Precomfort/Economy temp. winter - 0 100 % RH - 0 100 % RH 0 0 0 0 100 100 999 999 % RH % RH s s Gfc11 Dehumidification regulation Differential 5 Neutral zone 5 Integral time 300 Derivative time 0 +030220921 - rel. 1.0 - 28.02.2011 Temperature probe when humidifying (preheating coil) Temperature probe when humidifying (heat-cool coil) Humidifier type Off coil ¦ Regulation Off coil ¦ Regulation Isothermal ¦ adiabatic Display Def Min Max UOM description Preheating coil settings when humidifying Setpoint 23 -99.9 99.9 °C Differential 2 0 99.9 °C Heat/cool coil settings when humidifying Setpoint 20 -99.9 99.9 °C Differential 2 0 99.9 °C Adiabatic humidifier – Supply low temperature limit Enable limit No No Yes Setpoint 15 0 99.9 °C Differential 2 0 99.9 °C 1. isothermal: air humidification is performed with a negligible variation in the supply air temperature. The controller sends the signal to start steam production and/or modulate output using a 0 to 10 V signal until reaching the humidity set point. Example of humidification from point A (-5 °C, 85 % RH) to point B (20 °C, 50 % RH). Disabled ¦ Enabled 1: Request humidity ¦ 2: Point dew ¦3: Disabled Integration ¦ Compensation ¦ Compensation+ Integration Display description Selection Control is performed in two ways, according to the type of humidifier: Selection Mask index B02/B03/ B04 Gfc35 Humidity set point Humidification differential Neutral zone in dehumidification Cooling valve minimum opening Display description Key x Absolute humidity DBT Dry bulb temperature 2. adiabatic: evaporation of the droplets of atomised water brings about cooling of up to 10 °C if the air is warm and dry to start with. To compensate for this effect and increase humidification efficiency, the preheating coil is activated based on the saturation probe and in any case a minimum air temperature limit is set for the supply probe so as to stop humidification if the air temperature falls too low. Example of humidification from point A (-5 °C, 85 % RH) to point B (20 °C, 50 % RH). 40 A 100% Min_op_dehum 0% Sat_probe (°C) Dew_point Diff_cool Key A Key x 8.4.3 Absolute humidity DBT Dry bulb temperature Dehumidification control Control is performed in two ways, according to the settings: 1) humidity request: based on the humidity control probe reading, the cooling actuator is modulated proportionally to request so as to reach the humidity set point. A Dew_point Dewpoint Sat_probe Cooling actuator opening Saturation probe Min_op Coil minimum opening Mask index Ha06 Display description Dehumidification Selection Mask index Gfc05 Display description Cooling regulation Differential On dew point Def Min Max UOM 2 0 99.9 °C 100% Min_op_dehum 0% Set B1 (% R.H.) NZ_dehum Key A Diff_dehum Cooling actuator opening Set Humidity set point B1 Humidity control probe Min_op_de hum Cooling coil minimum opening NZ_dehum Neutral zone in dehumidification Diff_dehum Dehumidification differential Mask index Display description Selection Ha06 Dehumidification Humidity request Key T_set_R Dewpoint T_set_T Temperature set point For both dehumidification methods, the reheating coil will, based on the supply probe reading, reheat the air to the temperature set point (Gfc28). The control algorithm is proportional only, with its own differential. Mask index Gfc28 2) dew point: the dehumidification request is managed based on the humidity set point and the differential, according to the humidity measured by the control probe. Once the request signal is received, the controller uses the dewpoint calculation starting from the humidity and temperature set point to adjust the cooling actuator, comparing the set point against the value measured by the saturation temperature probe located downstream of the cooling coil or the humidifier, if featured. As soon as the humidity probe detects a dehumidification request, the control calculates the final dewpoint and sets this as the temperature set point (T_set_R) after the cooling coil. Display Def Min description Reheating coil compensation setting Setpoint 24 -99.9 Differential 3 0 Max UOM 99.9 99.9 °C °C 8.5 Temperature / humidity control priority To control temperature and humidity, the coils and the humidifier must be enabled and the types must be set. The following also need to be activated and set: 1) the temperature and humidity control probes; 2) the dehumidification function and mode; 3) the humidifier and control probe; 4) the temperature and humidity set points. Simultaneous requests for: 1) heating and humidification; 2) dehumidification and cooling: are not incompatible as regards activation of the devices, consequently if a priority has been set the controller will try to satisfy both requests. If this involves the same actuator, the latter operates based on the higher of the two requests. To prevent uncomfortable situations being created, the “supply limits” function can be used. On the other hand, in the event of simultaneous requests for: 1) heating and dehumidification; +030220921 - rel. 1.0 - 28.02.2011 41 2) cooling and humidification, control is performed according to the table below, based on the whether the priority is set for temperature or humidity. Temperature request Heating Humidity request Dehumidification Cooling Humidification Preheating coil TEMPERATURE PRIORITY Cooling coil Based on temperature control probe Off Off Based on temperature control probe Reheating coil Humidifier If “integration” cascade control Off Off Waits for temperature set point to be reached Note: in the case of request of cooling and dehumidification the control considers the greater than the two required on the cooling coil. Temperature request Heating Humidity request Dehumidification Cooling Humidification Preheating coil HUMIDITY PRIORITY Cooling coil Waits for humidity set point to be reached Acts on saturated probe set point if humidifier = adiabatic Based on humidity control probe Waits for humidity set point to be reached Reheating coil Humidifier If “compensation” acts on supply Off due to cooling Off Based on humidity control probe 8.6 Set point compensation Mask index Display description Set point compensation adjusts the set point defined by the user with an offset that depends on a probe. This function in some cases ensures energy saving by adapting the set point to the outside temperature, while still guaranteeing suitable values for comfort. A temperature set point of 23 °C for example can be adjusted to 21 °C when the climate is extreme. In other cases, it’s used to: 1) improve comfort, reducing the difference between the outside temperature and the inside or room temperature; 2) integrate another air-conditioning system: for example, if in summer at 7 in the morning the outside temperature is lower than the room temperature, the room probe can be used as the compensation probe and the supply probe as the control probe to lower the set point and exploit freecooling. The following are possible: 1) differentiate between compensation in summer and winter; 2) select the probe used for compensation, between outside, supply, return and room probe; 3) increase or decrease the set point being compensated. Hc01 Main regulation probe selection Temperature Return ¦ supply ¦ room Type of summer set point None ¦ external ¦ room ¦ compensation supply ¦ return Compensation delta 2 °C Compensation start 25 °C Compensation end 32 °C Type of winter set point None ¦ external ¦ room ¦ compensation supply ¦ return Compensation delta -2 °C Compensation start 0 °C Compensation end -8 °C Gfc08 Gfc09 8.7 Summer/winter changeover This changeover can be performed from the keypad, digital input or supervisor (BMS), based on the heating/cooling coil temperature or automatically. Summer/winter changeover switches the control set point from summer to winter. The basic function involves switching from cooling in summer to heating in winter. If “Auto” cool/heat is active (Gfc04) both heating and cooling are possible in summer and winter. Note: compensation is disabled if the control probe and the compensation probe are the same. Below is an example with the compensation probe set as the outside temperature probe that compensates the room temperature set point. SetT_comp SetT_comp SetT Gc02 Gfc04 SetT delta < 0 delta < 0 Start_comp End_comp SetT-delta Season selection from Keypad ¦ Digital input ¦ B.M.S ¦ Keypad /B.M.S. ¦Auto ¦ H2O Temperature Auto ¦ Fix days End_comp Start_comp Key Temperature set point Compensation delta Start compensation +030220921 - rel. 1.0 - 28.02.2011 End_comp End compensation B1 SetT_comp Compensation probe Compensation set point Set season Temperature regulation Auto cool/heat No ¦ Yes For automatic season changeover, on screen Gc01 and Gc02 the season must be selected as “Auto”. Automatic selection allows the changeover to be managed “actively”, in the sense that for one month before and one month after the set date the season changeover can be brought forward or postponed if the outside temperature remains above or below a certain level for a certain set time in hours (both to enter and exit the function, eliminating swings in system operation). This allows a temporary change in season (and corresponding set point) without having to act manually to adapt for days with uncharacteristic outside temperatures for that period. B1 B1 Delta Start_comp Selection delta > 0 delta > 0 SetT Display description SetT+delta SetT+delta SetT-delta Mask index Gc01 WINTER SUMMER Selection 42 8.8.3 Activation by temperature Note: the following graphs consider the outside temperature to be constant. Freecooling and freeheating by temperature are activated when: 1) the outside temperature is closer to the temperature set point than the return temperature, or 2) the outside and return temperature straddle the set point. FREECOOLING (cooling request active) ON ABILITAZIONE/ ENABLE ON ABILITAZIONE/ ENABLE OFF Display description Set season Summer start Winter start Threshold summer Threshold winter Delay change Mask index Gc02 Def Min Max UOM OFF Set diff_temp ExtT 15/05 30/09 25 10 1 01/01 01/01 -99.9 -99.9 0 31/12 31/12 99.9 99.9 999 dd/mm dd/mm °C °C hour Set T RetT ExtT FREEHEATING (heating request active) ON ABILITAZIONE/ ENABLE 8.8 Freecooling and freeheating Note: when the AHU is in freecooling/freeheating mode, the bypass damper on the heat recovery unit is open and consequently heat recovery is disabled. ON ABILITAZIONE/ ENABLE Definition Mask index Gfc15 Note: if the AHU has the fresh air damper only (not the mixing damper) the quantity of fresh air is not controlled. 8.8.4 Mask index Mask index Gfc05 Freeheating Hb39, Hb53 Hb54 Hb55 Fresh air damper Mixing damper Exhaust damper +030220921 - rel. 1.0 - 28.02.2011 ExtT T ExtT RetT Return temperature Outside temperature Temperature Set diff_temp Set point Temperature differential Temperature differentials are needed to determine whether it’s efficient to sue freecooling/freeheating, considering that the higher the deviation between outside and return temperatures, the more efficient the function will be. Enabling Freecooling Set diff_temp Note: for control by enthalpy, the same rules apply for activation, with the values calculated enthalpy based on the temperature and humidity set points and the outside air conditions, displayed on screen D06. In this case the enthalpy activation differential is fixed at 4 kJ/kg. See the following paragraph. The freecooling/freeheating function can only be enabled if the mixing damper is installed and the corresponding output is configured. Ha02 OFF T ON: ExtT-RetT> diff_temp; OFF: ExtT-RetT<0 Key RetT ExtT T In air-conditioning systems the freecooling/freeheating functions are used to cool/heat for free using only a part or all the fresh air intake, when the temperature and relative humidity conditions allow. Freecooling and freeheating are thus considered free sources of energy, activated with priority over cascade control in cooling and heating. Demand is shared between the various cascade control devices. The function has two stages: 1) check whether the outside temperature or enthalpy conditions are favourable compared to the return air conditions; 2) control the opening of the fresh air damper based on the cooling/heating request. Display description Dampers type Set diff_temp RetT 8.8.2 RetT ON: RetT- ExtT> diff_temp; OFF: RetT-ExtT<0 OFF 8.8.1 T diff_temp Display description Def Freecooling/Freeheating dampers setting Temperature 4 differential Min Max UOM 0 99.9 °C Temperature control The control differentials used are those that apply to normal temperature control. Selection 1: Fresh air (On/Off) ¦ 2: Fresh air (Mod) ¦3: Fresh air + Mixing ¦ 4: Fresh air + Mixing + Exhaust ¦ 5: Fresh air (Mod) + Exhaust 1: None ¦ 2: Temperature ¦ 3: Enthalpy 1: None ¦ 2: Temperature ¦ 3: Enthalpy Position ≠ 0 Gfc06 Display Def description Cooling regulation Differential 2 Heating regulation Differential 2 Min Max UOM 0 99.9 °C 0 99.9 °C When the function has been activated, the fresh air damper and mixing damper are controlled proportionally to the cooling/heating request with the percentages defined on Gfc20/ Gfc21. The fresh air damper opens and the mixing damper closes to compensate for the pressure drop. If the fresh air damper and exhaust damper are used, the two control signals are identical. Position ≠ 0 Position ≠ 0 43 Freecooling/ Freeheating 100% FREEHEATING ENTHALPY Max_Mix_Damper ON ON Max_Ext_Damper ABILITAZIONE/ ENABLE OFF Min_Ext_Damper Min_Mix_Damper 0% Free_C/H Min_Request Key Max_Mix_Damper Max_Ext_Damper Min_Mix_Damper Min_Ext_Damper Req_cooling/heating Free_C/H Max_Request Req_Cooling/ Req_Heating Ret_enth OFF Set E Key Ret_enth Ext_enth Mixing damper maximum opening Fresh air damper maximum opening Mixing damper minimum opening Fresh air damper minimum opening Cooling/heating request 8.8.6 Display description Def Min Max UOM Dampers limits setting Fresh air damper - min Fresh air damper - max Mixing damper - min Mixing damper - max - 0 30 0 0 100 100 100 100 % % % % Display description Def Min Max UOM Damper setting Coil start delay 0 0 120 min Return enthalpy Outside enthalpy Set E Enthalpy set point Enthalpy Enthalpy control The enthalpy control set point and supply, return and outside enthalpy values can be seen on screen D06. The control differential is set on screen Gfc15. Mask index D06 Display Def Min Max description Enthalpy Supply 0 99.9 Return 0 99.9 External 0 99.9 Setpoint 0 99.9 Freecooling/ Freeheating dampers settings Enthalpy 5 0 99.9 differential Gfc15 Max_Ext_Damper Min_Ext_Damper Min_Mix_Damper 0% Req_enth Key Max_Mix_Damper Max_Ext_Damper Min_Mix_Damper Min_Ext_Damper Req_enth Note: the following graphs consider the outside enthalpy to be constant. Freecooling and freeheating by enthalpy are activated when: 1) the outside enthalpy is closer to the enthalpy set point than the return enthalpy, or alternatively 2) the outside and return enthalpy straddle the set point. FREECOOLING ENTHALPY Free_C/H Max_Request Mixing damper maximum opening Fresh air damper maximum opening Mixing damper minimum opening Fresh air damper minimum opening Enthalpy request In the case of freecooling by enthalpy, the control request will depend on the deviation from the control set point. Control for freeheating by enthalpy is similar. Req_enth ON ABILITAZIONE/ ENABLE MAX OFF 4 Ext_enth Set E MIN E 4 Ret_enth Ext_enth diff_enth Ret_enth ON: Ret_Enth- Ext_enth> 4; OFF: Ret_Enth-Ext_Enth<0 Set_enth Key Req_enth diff_enth Set_enth +030220921 - rel. 1.0 - 28.02.2011 kJ/kg Freecooling/ Freeheating 100% Activation by enthalpy Set kJ/kg kJ/kg kJ/kg kJ/kg Max_Mix_Damper Free_C/H Min_Request OFF UOM When the function has been activated, the fresh air damper and mixing damper are controlled proportionally to the freecooling/freeheating enthalpy request. The fresh air damper opens and the mixing damper closes to compensate for the pressure drop. If the fresh air damper and exhaust damper are used, the two control signals are identical. Note: • if air quality control is also enabled (see. Ha02), when both functions are active the fresh air damper will open according to the higher request; • in the winter season, freecooling is especially useful for cooling. A typical example a crowded shopping centre or conference centre. To do this, enable “auto” mode on Gfc04 and set the freecooling parameters accordingly. ON ABILITAZIONE/ ENABLE Ext_enth Ret_enth To exploit freecooling/freeheating to the maximum, a delay can be set when starting the unit for activation of the other devices in cascade control. 8.8.5 E 4 Ext_enth ON: Ext_Enth-Ret_enth> 4; OFF: Ext_enth-Ret_Enth<0 The limits for opening the damper are set in the manufacturer parameters menu, Hc02. Mask index Hc03 Set 4 100% Mask index Hc02 ABILITAZIONE/ ENABLE 44 Control request Enthalpy control differential Enthalpy set point E 8.9.4 8.9 Heat recovery 8.9.1 Activation Note: the following graphs consider the outside temperature to be constant. Heat recovery is activated when the return temperature is closer to the temperature set point than the outside temperature. Definition If the AHU is fitted with a heat recovery unit, the heat contained in the exhaust air is recovered and transferred to the primary air so as to preheat or precool it, if the conditions are favourable: consequently freecooling/freeheating and heat recovery are mutually exclusive. When the AHU is in heat recovery mode, the bypass damper on the heat recovery unit is closed. RECOVERY IN COOLING (cooling request active) ON ABILITAZIONE/ ENABLE In cascade control the request is shared between the various devices available. Heat recovery is thus considered a free source of energy free, activated with priority in cascade control in cooling and heating modes. 8.9.2 OFF The heat recovery function can only be enabled if a heat recovery unit is installed and enabled. The bypass damper (Ha01) may not be necessary. Below is a list of possible combinations. Type of heat recovery Bypass damper Cross flow Run-around coil Modulating rotary On/Off rotary No On/Off Modulating YES YES YES YES YES YES YES YES NO YES YES YES Hb63 Hb56 8.9.3 Set ON/OFF DEVICES Display description Heat recovery unit pump (runaround coil) Heat wheel (ON/OFF) Bypass damper (ON/OFF) Position ≠ 0 Position ≠ 0 MODULATING DEVICES Heat wheel Bypass damper (ON/OFF) Position ≠ 0 Position ≠ 0 Ha14 ABILITAZIONE/ ENABLE OFF T diff_recov Enable Position ≠ 0 ExtT delta_recov RetT Set ON: RetT-ExtT-> delta_recov; OFF: RetT-ExtT < delta_recov – diff_recov Key diff_recov RetT ExtT Mask index Gfc31 Recovery differential Return temperature Outside temperature Set delta_recov Set point Recovery delta Display Def Min Max description Heat recovery temperature activation Delta recovery 5 0 99.9 Differential 3 0 99.9 UOM °C °C Note: for heat recovery by enthalpy, only applicable to the wheel, the same rules apply for activation. The enthalpy delta is fixed at 4 kJ/kg and the differential is fixed at 2 kJ/kg. Based on the efficiency of the heat recovery unit, a deviation (delta) must be set between the return and outside temperature. The more efficient the heat recovery unit, the lower the delta. The differential (diff_recov) is used to switch off the devices in advance, so as to reduce energy consumption, above all relating to operation of the heat wheel or pump for the run-around coil heat recovery unit. For heat recovery units consisting of a plate heat exchanger, on the other hand, flow through the heat exchanger increases pressure drop and consequently fan power consumption. Selection 1: None ¦ 2: Plate exchanger ¦3: Runaround coil ¦ 4: Modulating rotary ¦ 5: On/Off rotary 8.9.5 Control Control by temperature depends on the set point and the temperature differentials, based on the percentage of request reserved for the heat recovery unit. See the paragraph “Cascade control”. As regards control by enthalpy, the control differential needs to be set, based on which the heat wheel rotation speed will vary. For runaround coil heat recovery units, the pump will be on or off according to the activation graphs shown in the previous paragraph. Note: with on/off or modulating heat wheels, heat can also be recovered by controlling the enthalpy conditions. The function has two stages: 1) check whether the return temperature or enthalpy conditions are favourable compared to the outside air conditions; 2) the request of summer/winter acts on the speed of the heat wheel or on the modulating bypass damper. +030220921 - rel. 1.0 - 28.02.2011 ExtT ON Types of heat recovery unit Display description Heat recovery type delta RECOVERY IN HEATING (heating request active) Cross-flow heat recovery unit: no dedicated output. Run-around coil heat recovery unit: only one digital output is activated, which starts the pump. If the bypass damper has On/Off operation, activation of the pump will be the reverse to the damper. With modulating dampers, the pump will remain on while heat can be recovered and the bypass damper will modulate the quantity of heat recovered, depending on the request. Modulating heat wheel: an analogue output is managed for modulation of wheel rotation speed and an On/Off output for the bypass damper. The heat recovery request acts directly on the wheel speed, which may have a minimum limit set. The bypass damper will be activated when no heat can be recovered. On/Off heat wheel: an on/off output is managed to control the heat recovery unit. The bypass damper will be activated when no heat can be recovered. Mask index RetT ON: ExtT-RetT> delta_recov; OFF: ExtT-RetT< delta_recov – diff_recov Ha14 Screen index Hb39 T diff Enabling 45 ON Wheel_speed ALARM 100% OFF ON 0% VISUALIZATION diff_enth OFF E Set_enth Key Wheel_speed diff_enth Set_enth E Mask index Gfc31 A Key A Heat wheel speed Enthalpy control differential Enthalpy set point Enthalpy Display Def description Enthalpy regulation Differential 5 B Start B End Below is a graph showing activation of the damper and frost protection heater, based on the defrost probe reading. Min Max UOM 0 99.9 kJ/kg ON B 8.9.6 Heat recovery unit frost protection function OFF The heat recovery unit frost protection function prevents problems due to frost forming on the heat recovery unit. The actions undertaken depend on the type of heat recovery unit: in any case, the bypass damper is fully open. Given that the exhaust air has a defrosting effect: • the run-around coil heat recovery unit pump continues operating; • the heat wheel continues operating. ON A OFF Set B1 diff diff 8.9.7 Activation and control offset To enable the function, define the probe that measures the temperature, enable (optional) a defrost heater and define the activation set point and differential. For modulating heat wheels, the speed during frost protection can also be selected. Mask index Ha14 Hb41 Display description Heat recovery type … Defrost probe Recovery heater Heater heat recovery unit Key A B B1 Selection Hc18 Display description Heat recovery defrost Setpoint Differential Heater offset Wheel min speed Heat recovery Defrost delay Start End Clogged alarm delay Set point offset diff Offset Differential The cooling request and heating request can be shared between freecooling/freeheating and the coil, and between the heat recovery unit and the coil. Mask index Gfc20 Def Min Max UOM -1 4 3 100 -99.9 0 0 0 10 99.9 99.9 100 °C °C °C % 120 60 60 0 0 0 999 999 300 s s s Gfc21 Display Def description Cooling cascade Freecooling 50 Coil 50 Recovery 40 Coil 40 Heating cascade Freeheating 50 Coil 50 Recovery 40 Coil 40 Min Max UOM 0 0 0 0 100 100 100 100 % % % % 0 0 0 0 100 100 100 100 % % % % As regards heating, the heating request can be further shared between the preheating and reheating coils. Once the heat recovery unit frost protection alarm is activated, for example when the frost protection thermostat contact closes, a delay from the start of the signal and a delay from the end of the signal can be set. +030220921 - rel. 1.0 - 28.02.2011 Set 8.10 Cascade control None ¦ External-Return (*) ¦ Exhaust ¦ External No ¦ Yes Position ≠ 0 (*)Arithmetic average between the 2 probes. Mask index Gfc32 Heat recovery unit frost protection heater Bypass damper Defrost probe Note: overlapping operation of the preheating and reheating coils is also possible. Mask index Gfc22 46 Display description Heating cascade Reheating Def Min Max UOM 80 % 0 100 The behaviour is similar in cooling mode (summer). Example 1: partition of request between devices. Device_opening Heating Cooling Req_cool 100% 100% Req_lim_cool 100% 50% 0% 0% NZ_cool Reheat 100% Preheat Free_heat/ Free_cool/ recovery recovery 66% 33% 50% 0% Cool High_limit_temp 100% 0% Key Req_lim_cool NZ_cool Diff_cool 100% Preheat Free_heat/ recovery 0% 66% 50% 33% High_limit_ temp Req Mask index Gfc04 Key Recovery Recovery Req Request Free_heat Freeheating Device activation Preheat Preheating coil valve Device_o pening Reheat + 50% = 50% Additional Reg_temp cooling request Neutral zone in Supply_temp cooling Cooling Diff differential High temperature limit Device_opening 100% Reheat Supply_temp diff Req Example 2: overlapping of preheating and reheating coils. Heating Reg_temp diff_cool Display description Temperature regulation Auto cool/heat Supply limits Control probe temperature Supply probe temperature Supply limit differential Selection No ¦ Yes None ¦ High ¦ Low ¦ High/low Reheating coil valve Mask index Display Def description Temperature supply limits Summer high 40 Winter high 40 Summer low 10 Winter low 10 Differential 3 Integral time 150 Gfc07 8.11 Supply limits 8.11.1 Definition Note: the supply limits function can be activated (Gfc04) only if the control probe is the return probe or room probe . The algorithm is used to correct the action of the main control function to return within acceptable values for the supply temperature. For example, if the fresh air damper opens to satisfy a air quality request, this attenuates the request on the actuators (e.g. heating coil, humidifier) so as to mitigate the effect on the supply temperature and humidity. Without this function, the supply air may cause discomfort (e.g. too hot or too cold) near the air inlets. The function can be activated on either the minimum or maximum temperature or humidity. There are two possible cases: action concordant with or contrasting against control. Min Max UO M -99.9 -99.9 -99.9 -99.9 0 0 99.9 99.9 99.9 99.9 99.9 999 °C °C °C °C °C s 8.11.3 Humidity limits with concordant action Example of operation in humidification mode: when the control set point is reached and humidification ends, an air quality request causes the fresh air damper to open and consequently the supply humidity may decrease. To prevent the humidity measured by the control probe from changing further, when the supply air humidity is less than minimum allowed limit, the humidifier is activated, with proportional or PI control, according to the following graph, where the total request is 50%. 8.11.2 Temperature limits with concordant action Example of operation in heating mode (winter): when the control set point is reached and the heating coil stops heating, an air quality request causes the fresh air damper to open and consequently the air supply temperature decreases. To prevent the temperature measured by the control probe from changing further, when the air supply temperature is less than minimum allowed limit the heating coil is activated, with proportional or PI control, according to the following graph, where the total request is 50%. Req_heat 100% Req_hum 100% 100% diff_hum diff_heat NZ_heat 0% Key Req_lim_ heat NZ_heat Diff_heat Key Req_lim_hum 0% Supply_temp diff Low_limit_temp Set 0% NZ_hum + 50% = 50% Reg_temp Control probe temperature Supply probe temperature Supply limit differential NZ_hum Diff_hum Additional heating request Neutral zone in heating Heating differential +030220921 - rel. 1.0 - 28.02.2011 Supply_temp Diff Reg_hum Low_limit_hum 47 Supply_hum diff Set 50% Reg_temp 0% 0% Req_lim_heat 100% 0% Req_lim_hum 100% Low_limit_hum + 50% Additional Reg_hum humidification request Neutral zone in Supply_hum humidification Humidification Diff differential Low humidity limit = 50% Control probe humidity Supply probe humidity Supply limit differential The behaviour is similar in dehumidification mode. Mask index Gfc07 Req_lim_dehum 100% Req_dehum 100% Selection No ¦ Yes Req_heat 100% 50% 0% Display description Temperature supply limits Enable double action 0% NZ_dehum Reg_hum diff_dehum Supply_hum diff 0% High_limit_hum 0% Key Req_lim_dehum NZ_dehum Diff_dehum High_limit_hum + 50% Dehumidificati Reg_hum on request for limit Neutral zone in Supply_hu dehumidificati m on Dehumidificati Diff on differential High humidity limit Display description Mask index Gfc10 Supply_temp = 50% Req_cool 100% Control probe humidity 0% Supply probe humidity Supply limit differential Diff Mask index Gfc13 High_limit_temp No ¦ Yes None ¦ High ¦ Low ¦ High/low Display Def description Humidity supply limits High limit 100 Low limit 0 Differential 4 Integral time 150 Min Max UOM 0 0 0 0 100 100 100 999 % RH % RH % RH s Supply_temp High_limit_temp Key Req_heat Selection Humidity regulation Auto hum/dehum Supply limits diff diff Heating Reg_temp request Supply limit Supply_temp differential High temperature limit Control probe temperature Supply probe temperature Note: the limiting action acts on the request signal. Therefore, the devices involved depend on the cascade control function described in point 8.10. For example, on an AHU in heating operation with auto mode enabled, in summer may operate with freecooling only: the supply limit is thus applied to avoid letting in outside air that is too cold. 8.12 Coils water temperature limits To avoid opening of valves on the coils when the water temperature has not exceeded a minimum limit, the “Coil temperature limits” function can be enabled, available for every type of coil with its own set point and differential. 8.11.4 Temperature/humidity limits with contrasting action Example of operation in heating mode (winter): the temperature measured by the control probe moves away from the set point (A) and reaches point B; the heating coil is then activated at 60%. If the temperature measured by the supply probe reaches point C, a control function is activated that limits the request signalled to the heating coil to 10% (60%-50%). Req_heat 100% B 60% 0% A diff_heat NZ_heat 100% NZ_heat Diff_heat Heating request for limit Neutral zone in heating Heating differential Hc14 50% Hc16 0% C diff Mask index Hc09 Supply_temp High_limit_temp Set Key Req_lim_heat Hc11 Req_lim_heat Reg_temp 60% Mask index Hc09 - 50% Reg_temp Supply_ temp Diff = 10% Control probe temperature Supply probe temperature Supply limit differential Hc11 Hc14 If double action is enabled, the action of the heating device will be limited until complete deactivation after the differential, when the cooling device will be activated. Hc16 The function is similar in: 1) cooling; 2) humidification; +030220921 - rel. 1.0 - 28.02.2011 48 Display description Selection Enable preheating coil water temperature threshold Enable cooling coil water temperature threshold Enable heat/cool coil water temperature threshold Enable reheating coil water temperature threshold Display description Def 0:No¦ 1:Yes 0:No¦ 1:Yes 0:No¦ 1:Yes 0:No¦ 1:Yes Min Max Enable preheating coil water temperature threshold Threshold 25 -99.9 99.9 Differential 2 0 99.9 Enable cooling coil water temperature threshold Threshold 35 -99.9 99.9 Differential 2 0 9.9 Enable heat/cool coil water temperature threshold Hot threshold 25 -99.9 99.9 Cool threshold 35 -99.9 99.9 Differential 2 0 9.9 Enable reheating coil water temperature threshold UO M °C °C °C °C °C °C °C Threshold 25 -99.9 99.9 °C Differential 2 0 99.9 °C COOL COIL HEAT COIL ON ON OFF Mask index Display description Selection Ha09 Enable water pumps Cooling-Cool/heat Preheating 0:No¦ 1:Yes Reheating 0:No¦ 1:Yes Enable flow feedback 0:No¦ 1:Yes Mask index Display description Def Ha10 Cooling – cool/ heat pumps OFF T diff T diff Set Set HEAT/ COOL COIL ON Ha11 OFF diff_cool Set_cool T diff_heat Set_heat Ha12 Note: when season changeover is enabled based on the water temperature, the heating/cooling coil temperature limit is set on Hb16 and the switching threshold on Gc03. Hc17 Mask index Gc01 Mask index Gc03 0:No¦ 1:Yes Display description Selection Season selection from H2O temperature Display Def description Season threshold Summer 25 Min -99.9 Max 99.9 Max U.M Number of pumps 2 1 2 - Warning limit 3 0 5 - Enable antiblock Yes 0 1 - Preheating pumps Number of pumps 2 1 2 - Warning limit 3 0 5 - Enable antiblock Yes 0 1 - Reheating pumps Number of pumps 2 1 2 - Warning limit 3 0 5 - Enable antiblock Yes 0 1 - 30 1 999 s Pumps Alarm flow delay UOM Min Start 15 1 999 s Pumps rotation time 96 0 999 hour Overwork time 0 0 999 s °C 8.13.1 Rotation between two pumps When one pump has operated for the time defined by “Rotation time”, operation of the pumps is rotated. “Overlapping time” can be used to manage the changeover sequence between pumps: 8.13 Pump management OVERLAPPING TIME >0 =0 <0 Active pump stop Pump ON stops and Pump OFF start delay pump OFF starts delay (*) (*) During the overlapping time no pump is on. Up to two pumps are managed, with rotation and alarms. The corresponding functions concern: 1) automatic rotation between the pumps to equally share the work load and operating hours between pumps. This is activated: • when a certain period of time expires; • when a thermal overload alarm is activated or there is no flow on one of the two pumps; 2) antiblock management, with temporary activation of the pump when the system is not used for long periods; 3) frost protection by starting the pump to circulate fluid. The pumps are enabled as devices and consequently the number needs to be defined. For the explanations of the other parameters, see “Rotation between two pumps” and “Pump alarms”. 8.13.2 Pump alarms There are two types of alarm: • in the event of overload alarms, the alarm is signalled and the pump stops immediately. If a second pump is available operation is rotated; • in the event of flow alarms, a warning signal is sent until the pump stops completely. If a second pump is available operation is rotated. Each pump sends a number of malfunction signals equal to the “Warning limit” before the no flow alarm is activated. This alarm has a delay from when absence of flow is measured, and differs depending on whether the pump is starting or is in steady operation. In the following example the alarm is activated after two warnings. Note: • the number of warnings is reset as soon as water flow is measured and is automatic; • the warning remains active during the attempts to restore pump flow; • as soon as the alarm is activated the warning is automatically reset; • when there is an active warning, the pump stays off for a set time. Only after this time interval can the pump start again, repeating the start-up procedure: the warning is reset only flow is measured and the pump is on; • if the number of attempts to restore flow is 0, the alarm is activated immediately and no attempt is performed to restore flow; • also see the documents on pump module in 1tool. +030220921 - rel. 1.0 - 28.02.2011 49 EXAMPLE ON REQ Stop_Time_by_Warning OFF Stop_Time_by_Warning Stop_Time_by_Warning ON PUMP1 OFF ON NO_FLOW OFF ON WARNING OFF ON ALARM Reset_warning OFF Del_Startup_Flow Del_Run_Flow Del_Startup_Flow t Del_Startup_Flow First_warning Key REQ PUMP1 ALARM Request Pump Alarm Del_Startup_flow Del_Run_Flow Flow alarm delay in start-up Flow alarm delay in steady operation The heaters may be on/off or modulating, for the selection see parameter Ha05. 8.14 Cooling devices The following cooling devices are managed (Ha06): • valves: 0 to 10 V with one analogue output • floating valves, with two relays outputs, one for the open command and one for closing; • direct expansion: stepped control, calling the condenser only without management of the refrigeration cycle. Out Out 10 V 3P Mask index Ha05 St1+St2+St3 0V Key Req_cool P Cooling request Capacity Selection On/Off ¦ Modulating ¦ On/Off binary St1 P 100% Req_cool Display description Heaters type The type of control depends on the number of heaters: 1) Modulating: see the graph in the previous paragraph; 1) ON/OFF; 2) ON/OFF binary (for 2 heaters only): if the heaters are suitably sized (R1 with power P and R2 with power 2P) the controller can deliver capacity in steps from 0 to 3P (figure). St1+St2 2P 0 Second_warning 0 St1 to 3 33% 66% Type Req_cool PREHEATING HEATERS ON/OFF, Modulating, ON/OFF binary ON/OFF BINARY CONTROL FOR 2 HEATERS Out Step 1 to 3 R1+R2 3P R2 2P Note: the total cooling request is divided between the various cascade control devices, based on the PID control parameters, and is affected by the supply limits. R1 P 0 8.15 Heating devices Key P Req_heat The following heating devices are managed (Ha05, Ha08): • valves: 0 to 10 V with one analogue output • floating valves, with two relays outputs, one for the open command and one for closing; • heaters. Power Heating request 66% R1,2 Req_heat Heater 1, 2 If control is modulating and there is one heater, this will be controlled by a digital output plus 1 analogue output for modulation, while if there are from 2 to 4 heaters (with the same power rating) modulation will only be applied to one heater (1 digital output + 1 analogue output) and the remaining heaters will be controlled by digital outputs only. Note: the total heating request is divided between the various cascade control devices, based on the PID control parameters, and is affected by the supply limits. +030220921 - rel. 1.0 - 28.02.2011 33% 50 OUTPUTS FOR MODULATING HEATER CONTROL NO. OF HEATERS DIGITAL OUTPUTS ANALOGUE OUTPUTS 1 1 1 2 2 1 3 3 1 4 4 1 Inverter 100% On-off (double) R1 0% On-off (star – delta) On-off (direct starting) On-off (backup fan) ON R1 OFF R2 OFF ON R3 OFF OFF Req 25% 0% Key Req Request R1 to R4 3 - 1 - L1 L2 L3 Heater 1 to 4 8.16 Cooling devices K1 The following cooling devices are managed (Ha06): • valves: 0 to 10 V with one analogue output • floating valves, with two relays outputs, one for the open command and one for closing; • direct expansion: stepped control, calling the condenser only without management of the refrigeration cycle. M 3~ Note: the total cooling request is divided between the various cascade control devices, based on the PID control parameters, and is affected by the supply limits. K2 K3 Mask index Ha03 Display description Fan type Hb37 Star-delta logic Supply fan line Supply fan star Supply fan delta Return fan line Return fan star Return fan delta Hb37 +030220921 - rel. 1.0 - 28.02.2011 - The fans are started when the unit is powered up. For starting, as well as the fan outputs, the outputs for the 3 contactors also need to be enabled (see the figure) 1) Supply/return air fan line (K1) 2) Supply/return air fan star (K3); 3) Supply/return air fan delta (K2) The switching delay time also needs to be set. R4 50% 2 8.16.1 On/Off fans with direct and star-delta starting ON 75% Air quality Static pressure Two fans installed in parallel to modify the ventilating section. Same control as direct starting with delay set between the two Same as direct starting with setting of contactor digital outputs Fan start-up linked only to unit poweron Outputs envisaged (*) DIG AN 1 1 Pair of fans where one is the backup for 2 the other in the event of faults (flow, thermal overload alarm) On-off (2 2 Speed 1 Unit ON speed) 2 Air quality request (*) if only supply fan fitted. Double the number of outputs with supply and return air fans. ON 100% TYPE OF FAN CONTROL Type of control Selection 51 Selection 1: On-Off(direct start) ¦ 2: On-Off(stardelta) ¦ 3: On-Off (double) ¦ 4: Inverter ¦ 5: On-Off(2 speed) ¦ 6: On-Off (duty standby) ¦ position ≠0 position ≠0 position ≠0 position ≠0 position ≠0 position ≠0 Mask index Hc04 Display Def description Fans Star-Delta timing Star-line Star Star-delta - Min Max 0 0 0 Mask index Gfc17 UOM 99 99 99 Display description Supply inverter Minimum/fixed power Max power Return inverter Minimum/fixed power Max power Supply flow control Setpoint Differential Integral time Derivative time Return flow control Setpoint Differential Integral time Derivative time ms ms ms ON Gfc18 REQ OFF ON K1 Gfc19 OFF ON K3 Def Min Max UOM 30 0 100 % 100 0 100 30 0 100 % % % 100 0 100 % 1500 300 300 10 0 0 0 0 2000 1000 1000 9999 Pa Pa s s 1500 300 300 10 0 0 0 0 2000 1000 1000 9999 Pa Pa s s OFF Supply_fan_inv/ Return_fan_inv/ ON Max_power K2 OFF Min_power d1 t d2 Key REQ K1 K3 d2 Set Fan request Fan line Fan star Star-delta delay K2 d1 d3 Key Supply_pressure/ return pressure Supply_fan_inv/ Return_fan_inv Fan delta Line – star delay Star time Display description Def Min Max UOM Fans timing Stop delay Supply-return 30 0 0 0 999 999 s s 2) Air quality: on unit power-up the fan tries to satisfy the request. Supply_fan_inv/ Return_fan_inv/ Max_power Min_power 0 8.16.3 Fans with inverters Display description Selection Ha03 Fan type 1: Static pressure ¦ 2: Air quality ¦ 3: Fixed speed Mask index Gfc17 1) Static pressure: on unit power-up the fan operates at minimum speed and then tries to reach the differential pressure set point, with the PID parameters set. +030220921 - rel. 1.0 - 28.02.2011 100 %Req_Air_Quality 3) Fixed speed: control is completely disabled and the fan operates at a fixed speed. If the fans are controlled by inverter, three types of control can be selected: Mask index Supply/ return pressure Supply / return fan inverter request Minimum power Maximum power Min_power Max_power 8.16.2 Double On/Off fans This is when there are two fans fitted in parallel, to modify the ventilating section. Activation again depends on unit power-on, however a delay is available between activation of the first and second fan (supply – return). Mask index Hc06 Supply_pressure/ Return_Pressure diff d3 52 Display description Supply inverter Minimum/fixed power Return inverter Minimum/fixed power Def Min Max UOM 30 0 100 30 0 100 % % % Note: if the alarms involve the supply fan (Ha04), the control devices that are stopped are those on the supply. 8.16.4 On/Off fans with backup This configuration features a pair of fans, where one is backup for the other in the event of flow or excess temperature alarms. If activated (Ha04), there are two overload alarms for the supply fans and two for the return fans. The flow alarm, on the other hand, uses one device (pressure switch/flow switch or differential probe) for the supply fans and one device for the return fans. A rotation time can be set between the two fans and backup fan activation can be brought forward/delayed by setting the overlapping time >/<0. Mask Display description Def Min Max UOM index Hc06 Fans timing Stop delay 30 0 999 s Supply-return 0 0 999 s Rotation time 0 0 999 h Overworking time 0 -99 99 s A delay when starting and a delay in steady operation can be set for the flow alarm. The alarm has automatic reset until reaching the set number of attempts and subsequently has manual reset. The flow alarm stops the fan for a certain fixed time before attempting to start it again. In the case of backup fans, the second fan will be activated immediately, if available. Mask index Hc05 Hc07 8.16.5 Two speed fans In this case a two-speed fan can be installed, where the first is activated when the unit starts (supply/return air fan 1) and the second is activated due to an air quality request (supply/return air fan 2). Mask index Display description Hb35 Supply fan Position Logic Supply fan 2 Position Logic Hb36 ≠0 NC, NO Hb27 Hb09 Stop action Supply flow control Position Logic Return flow control Position Logic Mask index Ha02 Ha03 Ha15 Selection Hb13 Hb14 1: None ¦ 2: Supply ¦ 3: Supply + return 1: None ¦ 2: Supply ¦ 3: Supply + return 0: Pressure switch ¦ 1: Transducer 0: Individual ¦ 1: All ≠0 NC, NO 9999 9999 9999 Pa Pa Pa 20 5 0 1 1 0 999 999 5 s s - Display description Selection Dampers type Fresh air+mixing ¦ Fresh air+mixing+exhaust Yes Enable air quality management Fan type Fan regulation Air quality Regulation type Air quality: Probe type CO2 air quality VOC air quality inverter Air quality Proportional ¦ P+I CO2 ¦ CO2+VOC ¦ VOC Position ≠ 0 Position ≠ 0 8.17.3 Control Position Logic Once the type of probe has been selected, the set point and differential need to be defined for each function. For P+I control, also set the integral time. Mask index Gfc30 4 to 20 mA ¦ 0 to 1 V ¦ 0 to 10 V Hc19 Min limit Max limit +030220921 - rel. 1.0 - 28.02.2011 0 0 0 Note: • if both probes (CO2+VOC) are set, the active request will be the higher of the two; • setting fan control to air quality automatically enables the function. With other settings, to enable quality control, set the corresponding parameter on Ha02. 0 to 10 V Hb09 100 100 300 The air quality control function can only be enabled if the mixing damper is fitted or the fan features modulating operation. The type of control can be selected between proportional or proportional+integral. ≠0 NC, NO Supply pressure position Position 4 to 20 mA ¦ 0 to 1 V ¦ Type Min limit Max limit Return pressure position Position Type UOM 8.17.2 Enabling The alarms due to excess temperature or no flow are enabled on screen Ha04. The thermal overload alarm is only signalled via a digital input, connected for example to a suitably calibrated thermostat. The flow alarm can be generated by a pressure switch/flow switch or by a differential pressure probe. Air flow from Max CO2 and/or VOC (Volatile Organic Compound) probes can be used to monitor air quality and if necessary increase the flow-rate of fresh air to increase the concentration of oxygen. 8.16.6 Fan alarms Air flow Min 8.17.1 Definition Selection Display description Fan alarms Overload Flow alarm threshold Supply Return Differential Fans flow alarm Start-up delay Running delay Flow warning retries Def 8.17 Air quality If activated (Ha04), one thermal overload alarm is available for the supply fan and one thermal overload alarm for the return fan. Mask index Ha04 Display description 53 Display Def description Air quality with CO2 Setpoint 1200 Differential 200 Air quality with VOC Setpoint 50 Differential 10 Integral time 300 Min Max UOM 0 0 5000 5000 ppm °C 0 0 9999 100 100 % % s Req 8.18 Purging 100% 8.18.1 Definition Air purging, once enabled, manually forces fresh air into the room for a set time. 8.18.2 Enabling The following are possible: 1) enable the purge function manually only if the mixing damper is installed and the function is enabled; 2) automatically activate the function at start-up (based on the scheduler). 0% CO2/VOC Diff Set Key CO2/VOC CO2/VOC Req Air quality request probe CO2/VOC air quality set point CO2/VOC air quality differential Set Diff Mask index Ha15 Gg02 Based on the request, first the fresh air damper output will be increased and then the fan output (cascade control). % OPEN Req_Damper Req_Fans Display description Selection Enable purging Air quality Start purging Stop purging Resume time Repeat at start-up 0: No ¦ 1: Yes No ¦ Yes No ¦ Yes ---min No ¦ Yes Display description Def Min Max Cleaning time 10 0 300 100% Mask index Hc19 8.18.3 Control 0% During the purge function, the fresh air damper is fully opened to assist the inlet of fresh air and the fan is operated at maximum speed. % Req 50 Set 100 Note: in the status of frost protection the function is disabled. Key Set Req_Fans Req_Damper Req UO M min Air quality set point Fan request Fresh air damper request Air quality request 8.19 Frost protection 8.19.1 Unit frost protection This can be activated by thermostat, probe or thermostat and probe together. If activated by thermostat, the “Frost protection alarm” digital input is configured on Hb25, if activated by probe the frost protection probe analogue input is configured on Hb11; the set point and differential are set on Gfc33. Note: the fan request from 0 to 100 % varies the fan speed between minimum and maximum. The maximum and minimum limits for the mixing and fresh air dampers are set on Hc02. Based on the percentage of the air quality request, the dampers will operate with the following trend. The exhaust damper, if available, follows the trend of the fresh air damper. For ON/OFF dampers, maximum corresponds to ON and minimum to OFF. ON OFF 100% Max_Mix_Damper Max_Ext_Damper Set Key Set diff Min_Ext_Damper Min_Mix_Damper B diff 0% Frost protection set point Frost protection differential B Frost protection probe 100% Req Key Req Min_Mix_Damper Max_Mix_Damper Min_Ext_Damper Max_Ext_Damper Air quality request Mixing damper minimum limit Mixing damper maximum limit Fresh air damper minimum limit Fresh air damper minimum limit Display description Selection Ha16 Frost protection Hb11 Frost temperature position Frost-stat 1: none ¦ 2: by frost-stat ¦ 3: by probe ¦ 4: by probe+frost-stat position ≠0 type: NTC ¦ PT1000 position ≠0 Hb25 Note: opening the fresh air damper involves proportionally closing the mixing damper, respecting the corresponding minimum and maximum limits. If a freecooling/freeheating request is also active, the fresh air damper will open based on the higher of the two. +030220921 - rel. 1.0 - 28.02.2011 Mask index 54 Mask index Display description Def Min Gfc33 Frost temperature position Setpoint 5 -99.9 Differential 3 0 Max UOM 99.9 99.9 °C °C If the frost protection probe measures a temperature less than Set+diff, the controller activates “Frost protection prevention” mode, icon shown on the display: the preheating coil with the capacity is increased gradually. The fresh air damper is closed gradually however only if the mixing damper is installed. The controller exits “frost protection prevention” mode when the temperature exceeds Set+diff. If, on the other hand, the temperature continues falling and the frost protection probe value is less than Set, the frost protection alarm is activated, with automatic reset. The display continues showing the icon. The controller: 1) stops the fans; 2) closes the dampers; 3) activates the preheating coil at 100%; 4) activates the cooling coil at 50%; 5) activates all the pumps. If, as a consequence of these actions, the frost protection probe measures a temperature greater than Set+diff, the controller exits frost protection mode. Note: • unit frost protection is also active when the unit is OFF; • frost protection by thermostat only features the alarm with automatic reset; • for alarms from probe +thermostat, use the thermostat as a safety device and calibrate it to lower temperature than the frost protection set point. 8.20 Auxiliary control Four auxiliary control loops can be enabled, each with its probe, P, PI or PID control and activation. The set points, differentials and integral times can be displayed on screens B11 to B14. Mask index Ha19 Ha20 to Ha23 Other management Hb19 to 22 Gfc36 to 39 8.19.2 Room frost protection The room probe must be enabled on Hb04. The set point is then set on Gfc34. The differential is fixed at 3°C. ON OFF B (°C) 3 Set Key Set Room frost protection set point B Room probe Mask index Hb04 Gfc34 Display description Selection Room temperature Room frost protection enable Position ≠ 0 No ¦ Yes Mask index Display description Def Min Max UOM Gfc34 Setpoint 5 -99.9 99.9 °C If the room temperature is less than the set point and the controller is OFF: a) the display shows frost protection as being active; b) the controller starts operating as if it were ON, based on the control probe reading +030220921 - rel. 1.0 - 28.02.2011 Display description Auxiliary regulation loop Regulation loop 1 Regulation type Output type 55 Selection None, 1 to 4 Direct ¦ inverse Modulating +on/off ¦ on/off ¦ modulating None ¦ on with supply fan ¦ Force with frost protection Regulation probe loop 1 to 4 Position ≠0 Type NTC ¦ PT1000 ¦ 0 to 1 V ¦ 0 to 10 V ¦ 4 to 20 mA Regulation loop 1 to 4 Setpoint Differential Integral time Reset time???? Override for Enable auto-resume B. Setpoint B01 Temperature Humidity External compensation B03 CAREL Address Value description 4 4 No Hour Hour - 0.5 0.5 No 16 16 Yes 0 0 0 °C % RH °C -99.9 0 -99.9 99.9 100 99.9 A I A R R R 93 13 - 0 °C -99.9 99.9 A R 25 Min. temp. set limit in cooling (Gfc02) Min. temp. set limit in heating (Gfc02) Min. humid. set limit in cooling (Gfc03) 0 Max. temp. set limit in cooling (Gfc02) Max. temp. set limit in heating (Gfc02) Max. humid. set limit in cooling (Gfc03) 100 A R/W 94 A R/W 95 I R/W 14 I R/W 15 Max. temp. set limit in cooling (Gfc02) Max. temp. set limit in heating (Gfc02) 100 A R/W 96 A R/W 97 I R/W 16 0: OFF ¦ 1: I COMFORT ¦ 2: PRECOMFORT¦ 3: ECONOMY ¦ 4: AUTO I I 0:No¦ 1:Yes I R/W 0 Type - R/W 12 R R R/W - Comfort temp. Summer 23 °C Comfort temp. Winter Comfort room temp. set point (heating) 23 °C Comfort humid. Summer Comfort room humidity set point (cooling) 50 % RH Comfort humid. Winter Comfort room humidity set point (heating) Precomfort room temp. set point (cooling) 50 % RH 25 °C Pre-comfort temp. Winter Precomfort room temp. set point (heating) 21 °C Pre-comfort humid. Summer % RH % RH 0 100 I R/W 17 Economy temp. Summer Precomfort room humidity set point 55 (cooling) 45 Precomfort room humidity set point (heating) Economy room temp. set point (cooling) 27 Min. temp. set limit in cooling (Gfc02) Min. temp. set limit in heating (Gfc02) 0 °C R/W 98 Economy room temp. set point (heating) 19 °C A R/W 99 Economy humid. Summer Economy room humidity set point (cooling) Economy room humidity set point (heating) Setpoint Differential Integral time Setpoint Differential Integral time Setpoint Differential Integral time Setpoint Differential Integral time 60 % RH Max. temp. set limit in cooling (Gfc02) Max. temp. set limit in heating (Gfc02) 100 A Economy temp. Winter Min. temp. set limit in cooling (Gfc02) Min. temp. set limit in heating (Gfc02) 0 I R/W 18 40 % RH 0 100 I R/W 19 0 0 0 0 0 0 0 0 0 0 0 0 s s s s -3200 -3200 0 -3200 -3200 0 -3200 -3200 0 -3200 -3200 0 3200 3200 999 3200 3200 999 3200 3200 999 3200 3200 999 A A I A A I A A I A A I R/W R/W R/W R/W R/W R/W R/W R/W R/W R/W R/W R/W Pre-comfort temp. Summer Pre-comfort humid. Winter B04 0 Current temperature set point Current humidity set point Enable: Gfc08-Gfc09 Config.: Hb03 Enable: Ha19 Configure: Hb23 Comfort room temp. set point (cooling) AIN Offset B02 Max A. On/Off Unit A01 Unit status Min Description/notes UOM Display description Def. Mask Index 9 PARAMETERS TABLE Economy humid. Winter B11 Regulation loop 1 (see Ha20…Ha23; Gfc36…Gfc39) B12 Regulation loop 2 B13 Regulation loop 3 B14 Regulation loop 4 +030220921 - rel. 1.0 - 28.02.2011 56 148 149 129 150 151 130 152 153 131 154 155 132 00:00 01/01/00 Mo No Mo Mo 23:59 31/12/99 Su Yes Su All hh mm operating mode Enable copy settings Time band F1 start hour Time band F1 start minutes Time band F1 operating mode No 8 30 comfort hour minute - No 0 0 0 Yes 23 59 3 F2 hh mm operating mode Time band F2 start hour Time band F2 start minutes Time band F2 operating mode 12 hour 30 minute precomfort 0 0 0 23 59 3 F3 hh mm operating mode Time band F3 start hour Time band F3 start minutes Time band F3 operating mode 13 hour 30 minute precomfort 0 0 0 23 59 3 F4 hh mm operating mode Time band F4 start hour Time band F4 start minutes Time band F4 operating mode 13 hour 30 minute comfort - 0 0 0 23 59 3 Enable holiday period Period 1 Start dd mm End dd mm Set Enable holidays Holiday period 1 start day Holiday period 1 start month Holiday period 1 end day Holiday period 1 end month Holiday period 1 operating mode No - day month day month - No 01 01 01 01 0 Yes 31 12 31 12 3 Period 2 dd mm dd mm Holiday period 2 start day Holiday period 2 start month Holiday period 2 end day Holiday period 2 end month Holiday period 2 operating mode - day month day month - 01 01 01 01 0 31 12 31 12 3 dd mm dd mm Holiday period 3 start day Holiday period 3 start month Holiday period 3 end day Holiday period 3 end month Holiday period 3 operating mode - day month day month - 01 01 01 01 0 31 12 31 12 3 Special day 1: day Special day 1: month Special day 1 operating mode No - day month - No 01 01 - Yes 31 12 4 No/Yes F1 C03 Start End Set Period 3 Start Fine Set C04 Enable special days SD1 dd mm set +030220921 - rel. 1.0 - 28.02.2011 57 0:No¦1:Yes 0: Mo…6: Su 0: Mo ¦…¦ 6: Su ¦ 7: all 0:No¦1:Yes 0: off ¦ 1: comfort ¦ 2: precomf. ¦ 3: economy 0: off ¦ 1: comfort ¦ 2: precomfort¦ 3: economy 0: off 1: comfort 2: pre-comf. 3: economy 0: off ¦ 1: comfort ¦ 2: precomf. ¦ 3: economy 0:No¦1:yes 0: off ¦ 1: comfort ¦ 2: precomf. ¦ 3: economy 0: off ¦ 1: comfort ¦ 2: precomf. ¦ 3: economy 0: off ¦ 1: comfort ¦ 2: precomf. ¦ 3: economy 0:No¦1:Yes 0: off ¦ 1: comfort ¦ 2: precomf. ¦ 3: economy¦ 4: auto CAREL Address hh:mm dd/mm/yy Mo…Su - R/W Max No Mo Mo Type Min Current time Current date Day of the week Enable time bands Day time band setting Day to copy settings to C. Clock/ Scheduler C01 Hour Date Day C02 Enable scheduler Day Copy to Value description UOM Description/notes Def. Mask Index Display description I I I D I D R/W R/W R R/W R/W R/W 85 25 - I I I I R/W R/W R/W R/W 26 27 28 I I I R/W R/W R/W 29 30 31 I I I R/W R/W R/W 32 33 34 I I I R/W R/W R/W 35 36 37 D I I I I I R/W R/W R/W R/W R/W R/W 86 38 39 40 41 42 I I I I I R/W R/W R/W R/W R/W 43 44 45 46 47 I I I I I R/W R/W R/W R/W R/W 48 49 50 51 52 D I I I R/W R/W R/W R/W 87 53 54 55 - day month - 01 01 0 31 12 4 SD dd 3 mm set Special day 3: day Special day 3: month Special day 3 operating mode - day month - 01 01 0 31 12 4 SD dd 4 mm set Special day 4: day Special day 4: month Special day 4 operating mode - day month - 01 01 0 31 12 4 SD dd 5 mm set Special day 5: day Special day 5: month Special day 5 operating mode - day month - 01 01 0 31 12 4 SD dd 6 mm set Special day 6: day Special day 6: month Special day 6 operating mode - day month - 01 01 0 31 12 4 No 0 last min - No 0 4 Yes 240 - Sunday - Daylight saving start month March month Daylight saving start hour Daylight saving end day 02:00 last hour - Daylight saving end day of the week Sunday - Daylight saving end month March month 03:00 Enable summer time Transition time Star day Daylight saving start day t day of the week Daylight saving start day of the week month hour En day d day of the week month hour Daylight saving end hour D. Input/Output D01 Analog inputs --- = Supply temperature --- = Return temperature --- = Room temperature --- = Supply humidity --- = Return humidity --- = Room humidity D02 --- = Supply pressure --- = Return pressure --- = External temperature --- = External humidity +030220921 - rel. 1.0 - 28.02.2011 0: off ¦ 1: comfort ¦ 2: pre-comf. ¦ 3: economy¦ 4: auto 0: off ¦ 1: comfort ¦ 2: pre-comf. ¦ 3: economy¦ 4: auto 0: off ¦ 1: comfort ¦ 2: pre-comf. ¦ 3: economy¦ 4: auto 0: off ¦ 1: comfort ¦ 2: pre-comf. ¦ 3: economy¦ 4: auto 0: off ¦ 1: comfort ¦ 2: pre-comf. ¦ 3: economy¦ 4: auto 0:No¦1:Yes CAREL Address Max Special day 2: day Special day 2: month Special day 2 operating mode R/W Min SD dd 2 mm set I I I R/W R/W R/W 56 57 58 I I I R/W R/W R/W 59 60 61 I I I R/W R/W R/W 62 63 64 I I I R/W R/W R/W 65 66 67 I I I R/W R/W R/W 68 69 70 D I I R/W R/W R/W 88 - I R/W - I R/W - I I R/W R/W - I R/W - Type UOM C05 Def. C04 Value description Mask Index Display description Description/notes I R/W - hour 0: last ¦ 1: first ¦ 2: second ¦ 3: third ¦ 4: fourth 1 7 1: Monday ¦…¦ 7:Sunday January Decem 1: January ¦…¦ ber 12: December 00:00 23:00 4 0: last ¦ 1: first ¦ 2: second ¦ 3: third ¦ 4: fourth 1 7 1: Monday ¦…¦ 7:Sunday January Decem 1: January ¦…¦ ber 12: December 00:00 23:00 I R/W - - °C -99.9 99.9 A R 10 - °C -99.9 99.9 A R 11 - °C -99.9 99.9 A R 12 - %rH %rH %rH Pa Pa °C 0 0 0 -9999 -9999 -99.9 100 100 100 9999 9999 99.9 I I I I I A R R R R R R 13 14 15 1 2 16 - %rH 0 100 A R 17 58 D08 D09 D10 D11 D12 D13 D14 D15 D16 --- = Supply inverter alarm --- = Return inverter alarm --- = Pre-heaters overload --- = Re-heaters overload --- = Recovery clogged --- = Filter clogged --- = Fire & smoke --- = Open switch Air quality demand Purging demand Resume time +030220921 - rel. 1.0 - 28.02.2011 Enable: Ha01,Ha14 (defrost probe=exhaust), Hb15 - °C °C °C ppm % -99.9 -99.9 -99.9 0 0 99.9 99.9 99.9 9999 100 A A A I A R R R R R 18 19 20 3 21 Enable: Hc11-Hc14; Config: Hb16 Enable: Hc09; Config: Hb17 Enable: Hc16; Config: Hb18 Enable: Ha19; Config: Hb23 Enable: Ha19; Config: Hb19 Enable: Ha19; Config: Hb20 Enable: Ha19; Config: Hb21 Enable: Ha19; Config: Hb22 - °C °C °C °C - -99.9 -99.9 -99.9 -99.9 -3200 -3200 -3200 -3200 99.9 99.9 99.9 99.9 3200 3200 3200 3200 A A A A A A A A R R R R R R R R 22 23 24 25 26 27 28 29 Enable: Ha02 Enable: Ha02 Enable: Ha02 Enable: Ha02 Enable: Ha02 - kJ/kg kJ/kg kJ/kg kJ/kg kJ/kg 0 0 0 0 0 999.9 999.9 999.9 999.9 999.9 A A A A A R R R R R - Enable: Ha17; Config: Hb24 Enable: Gc01; Config: Hb24 Enable: Ha18; Config: Hb24 Config: Hb25; Delay Hc20 Config: Hb40 Enable: Ha01; Config: Hb28 Enable: Ha16; Config: Hb25 Config: Hb26 Config: Hb26 Enable: Ha01; Config: Hb26 Config: Hb27 Enable: Ha01-Ha04; Config: Hb27 0 0 0 0 0 0 0 0 0 0 0 0 - 0 0 0 0 0 0 0 0 0 0 0 0 1 1 1 1 1 1 1 1 1 1 1 1 0:C:closed¦1:O:open 0:C:closed¦1:O:open 0:C:closed¦1:O:open 0:C:closed¦1:O:open 0:C:closed¦1:O:open 0:C:closed¦1:O:open 0:C:closed¦1:O:open 0:C:closed¦1:O:open 0:C:closed¦1:O:open 0:C:closed¦1:O:open 0:C:closed¦1:O:open 0:C:closed¦1:O:open D D D D D D D D D D D D R R R R R R R R R R R R 6 7 8 9 10 11 12 13 14 15 16 17 Enable: Ha09-10; Config: Hb30 Enable: Ha09-11; Config: Hb30 Enable: Ha09-12; Config: Hb30 0 0 0 - 0 0 0 1 1 1 0:C:closed¦1:O:open 0:C:closed¦1:O:open 0:C:closed¦1:O:open D D D R R R 18 19 20 Enable: Ha09-10; Config: Hb31 Enable: Ha09-11; Config: Hb31 Enable: Ha09-12; Config: Hb31 0 0 0 - 0 0 0 1 1 1 0:C:closed¦1:O:open 0:C:closed¦1:O:open 0:C:closed¦1:O:open D D D R R R 21 22 23 Enable: Ha09; Config: Hb32 Enable: Ha09;Config: Hb32 Enable: Ha09; Config: Hb32 0 0 0 - 0 0 0 1 1 1 0:C:closed¦1:O:open 0:C:closed¦1:O:open 0:C:closed¦1:O:open D D D R R R 24 26 25 Enable: Ha04; Config: Hb29; Enable: Ha03 (duty stand-by)-Ha04; Config: Hb29; Enable: Ha01-Ha04; Config: Hb29; Enable:Ha01-Ha03 (duty stand-by)-Ha04; Config: Hb29; Enable: Ha03; Config: Hb28 Enable: Ha01-Ha03; Config: Hb28 Enable: Ha04-Ha05; Config: Hb33 Enable: Ha04-Ha08; Config: Hb33 Enable: Ha01; Config: Hb33 Config: Hb34 Enable: always;Config: Hb34; Enable: always;Config: Hb34; Enable: Ha02; Ha15; Config: Gfc30, Hc19, Hb13, Hb14 Enable: Ha15;Config: Gg02; Hc19; Activate: Gg02 Enable: Ha15;Config: Gg02 0 0 0 0 - 0 0 0 0 1 1 1 1 0:C:closed¦1:O:open 0:C:closed¦1:O:open 0:C:closed¦1:O:open 0:C:closed¦1:O:open D D D D R R R R 27 28 29 30 0 0 0 0 0 0 0 0 - % 0 0 0 0 0 0 0 0 0 1 1 1 1 1 1 1 1 100 0:C:closed¦1:O:open 0:C:closed¦1:O:open 0:C:closed¦1:O:open 0:C:closed¦1:O:open 0:C:closed¦1:O:open 0:C:closed¦1:O:open 0:C:closed¦1:O:open 0:C:closed¦1:O:open D D D D D D D D A R R R R R R R R R 31 32 33 34 35 36 37 38 - 0 - 0 1 0:No¦ 1:Yes D R - 0 min 0 299 I R - Description/notes 59 Value descript ion CAREL Address D07 R/W D06 Type D05 Max D04 Min --- = Frost temperature --- = Off-coil temperature --- = Exhaust temperature --- = CO2 --- = VOC Water coil temperature --- = Cooling- cool/heat --- = Pre - heating --- = Re – heating --- = Set offset --- = Regulation loop 1 --- = Regulation loop 2 --- = Regulation loop 3 --- = Regulation loop 4 Enthalpy Supply Return Room External Setpoint Digital inputs --- = Remote On/Off --- = Summer/Winter --- = Double setpoint --- = Generic alarm --- = Serious alarm --- = Humidifier alarm --- = Frost-stat --- = 1st supply filter --- = 2nd supply filter --- = Return filter --- = Supply flow --- = Return flow Overload pump 1 --- = Cooling-Cool/heat --- = Pre-heating --- = Re-heating Overload pump 2 --- = Cooling-Cool/heat --- = Pre-heating --- = Re-heating Coil flow --- = Cooling-Cool/heat --- = Pre-heating --- = Re-heating Fans overload --- = Supply 1 --- = Supply 2 --- = Return 1 --- = Return 2 UOM D03 Def. Mask Index Display description Digital outputs --- = Supply fan --- = Supply fan 2nd --- = Return fan --- = Return fan 2nd D18 D19 D20 D21 D22 D23 D24 D25 D26 D27 --- = Supply fan line --- = Supply fan star --- = Supply fan delta --- = Return fan line --- = Return fan star --- = Return fan delta --- = Unit status (On/Off) --- = Humidifier --- = Rotary recovery/ Run around coil --- = Recovery heater --- = Global alarm --- = Serious alarm --- = Minor alarm --- = Filter alarm --- = Fresh air damper --- = By-pass damper --- = Re-heater 1 --- = Re-heater 2 --- = Re-heater 3 --- = Re-heater 4 --- = Pre-heater 1 --- = Pre-heater 2 --- = Pre-heater 3 --- = Pre-heater 4 --- = Cooling step 1 --- = Cooling step 2 --- = Cooling step 3 --- = Cool/ heat step 1 --- = Cool/ heat step 2 --- = Cool/ heat step 3 --- = Cool/ Heat Pump 1 --- = Cooling- Cool/heat --- = Pre-heating --- = Re-heating Pump 2 --- = Cooling- Cool/heat --- = Pre-heating --- = Re-heating --- = Cooling floating valve open --- = Cooling floating valve close --- = Cool/heat floating valve open --- = Cool/heat floating valve close --- = Preheating floating valve open --- = Preheating floating valve close --- = Reheating floating valve open --- = Reheating floating valve close --- = Regulation loop 1 --- = Regulation loop 2 --- = Regulation loop 3 --- = Regulation loop 4 +030220921 - rel. 1.0 - 28.02.2011 Config: Hb35 Enable: Ha03 (double); Config: Hb36 Enable: Ha01; Config: Hb35 Enable: Ha01; Ha03 (double); Config: Hb36 Enable: Ha03(Star-delta); Config: Hb37 Enable: Ha03; Config: Hb37 Enable: Ha03; Config: Hb37 Enable: Ha01-Ha03(Star-delta); Config: Hb38 Enable: Ha01-Ha03; Config: Hb38 Enable: Ha01-Ha03; Config: Hb38 Enable: always; Config: Hb41 Enable: Ha01-Ha13; Config: Hb35 Enable: Ha14; Config: Hb39 Enable: Ha14; Config: Hb41 Config: Hb40 Enable: always; Config: Hb40 Enable: always; Config: Hb40 Enable: always; Config: Hb41 Enable: Ha02; Config: Hb39 Enable: Ha14; Config: Hb39 Enable: Ha08; Config: Hb49 Enable: Ha08; Config: Hb49 Enable: Ha08; Config: Hb49 Enable: Ha08; Config: Hb49 Enable: Ha05; Config: Hb48 Enable: Ha05; Config: Hb48 Enable: Ha05; Config; Hb48 Enable: Ha05; Config:Hb48 Enable: Ha06 (Dir. Expans.); Config: Hb47 Enable: Ha06 (Dir. Expans.); Config: Hb47 Enable: Ha06 (Dir. Expans.); Config: Hb47 Enable: Ha01-Ha07(steps);Config:Hb47 Enable: Ha01-Ha07(steps);Config:Hb47 Enable: Ha01-Ha07(steps);Config:Hb47 Enable: Ha01; Config: Hb42 CAREL Address R/W Type Value description Max Min UOM Description/notes Def. Mask Index D17 Display description Off Off - Off Off On On 0:Off¦ 1:On 0:Off¦ 1:On D D R R 39 40 Off Off - Off Off On On 0:Off¦ 1:On 0:Off¦ 1:On D D R R 41 42 Off Off Off Off - Off Off Off Off On On On On 0:Off¦ 1:On 0:Off¦ 1:On 0:Off¦ 1:On 0:Off¦ 1:On D D D D R R R R 43 Off Off Off Off Off Off Off Off Off Off Off Off Off Off Off Off Off Off Off Off Off Off Off Off Off Off Off - Off Off Off Off Off Off Off Off Off Off Off Off Off Off Off Off Off Off Off Off Off Off Off Off Off Off Off On On On On On On On On On On On On On On On On On On On On On On On On On On On 0:Off¦ 1:On 0:Off¦ 1:On 0:Off¦ 1:On 0:Off¦ 1:On 0:Off¦ 1:On 0:Off¦ 1:On 0:Off¦ 1:On 0:Off¦ 1:On 0:Off¦ 1:On 0:Off¦ 1:On 0:Off¦ 1:On 0:Off¦ 1:On 0:Off¦ 1:On 0:Off¦ 1:On 0:Off¦ 1:On 0:Off¦ 1:On 0:Off¦ 1:On 0:Off¦ 1:On 0:Off¦ 1:On 0:Off¦ 1:On 0:Off¦ 1:On 0:Off¦ 1:On 0:Off¦ 1:On 0:Off¦ 1:On 0:Off¦ 1:On 0:Off¦ 1:On 0:Cool¦ 1:Heat D D D D D D D D D D D D D D D D D D D D D D D D D D D R R R R R R R R R R R R R R R R R R R R R R R R R R R 45 46 47 48 49 50 51 52 53 54 55 56 57 58 59 60 61 62 63 64 65 63 64 65 66 Enable: Ha01-Ha09; Config: Hb43 Enable: Ha01-Ha09; Config: Hb43 Enable: Ha01-Ha09;Config: Hb43 Off Off Off - Off Off Off On On On 0:Off¦ 1:On 0:Off¦ 1:On 0:Off¦ 1:On D D D R R R 67 68 69 Enable: Ha01-Ha09; Config: Hb44 Enable: Ha01-Ha09; Config: Hb44 Enable: Ha01-Ha09;Config: Hb44 Enable: Ha01-Ha06; Config: Hb45 Enable: Ha01-Ha07; Config: Hb46 Enable: Ha01-Ha06; Config: Hb45 Enable: Ha01-Ha07; Config: Hb46 Enable: Ha01-Ha05; Config: Hb45 Enable: Ha01-Ha05; Config: Hb46 Enable: Ha01-Ha08; Config: Hb45 Enable: Ha01-Ha08; Config: Hb46 Enable: Ha19; Config: Hb50 Enable: Ha19; Config: Hb50 Enable: Ha19; Config: Hb50 Enable: Ha19; Config: Hb50 Off Off Off Off Off Off Off Off Off Off Off Off Off Off Off - Off Off Off Off Off Off Off Off Off Off Off Off Off Off Off On On On On On On On On On On On On On On On 0:Off¦ 1:On 0:Off¦ 1:On 0:Off¦ 1:On 0:Off¦ 1:On 0:Off¦ 1:On 0:Off¦ 1:On 0:Off¦ 1:On 0:Off¦ 1:On 0:Off¦ 1:On 0:Off¦ 1:On 0:Off¦ 1:On 0:Off¦ 1:On 0:Off¦ 1:On 0:Off¦ 1:On 0:Off¦ 1:On D D D D D D D D D D D D D D D R R R R R R R R R R R R R R R 70 71 72 73 73 74 74 75 76 77 78 79 80 81 82 60 44 D50 D51 D52 Value description CAREL Address D42 R/W D41 Type D40 Max D31 Min D30 UOM D29 Def. Mask Index D28 Enable: Ha03 (inverter); Config: Hb51 Enable: Ha01-Ha03 (inverter); Config:Hb52 Enable: Ha02; Config: Hb55 Enable: Ha02; Config: Hb53 Enable: Ha02; Config: Hb54 Enable; Ha14; Config: Hb56 Enable: Ha14; Config: Hb63 Enable: Ha01-Ha05; Config: Hb60 Enable: Ha01-Ha08; Config: Hb62 Enable: Ha13; Config: Hb57 0 0 0 0 0 0 0 0 0 0 % % % % % % % % % % 0 0 0 0 0 0 0 0 0 0 100 100 100 100 100 100 100 100 100 100 A A A A A A A A A A R R R R R R R R R R 35 36 37 38 40 39 44 43 42 41 Enable: Ha01-Ha06; Config: Hb59 Enable: Ha05; Config: Hb58 Enable: Ha08; Config: Hb61 Enable: Ha19; Config: Hb64 Enable: Ha19; Config: Hb65 Enable: Ha19; Config: Hb66 Enable: Ha19; Config: Hb67 0 0 0 0 0 0 0 % % % % % % % 0 0 0 0 0 0 0 100 100 100 100 100 100 100 A A A A A A A R R R R R R R 45 47 46 48 49 50 51 0 - 0 1 D R - Run Direction Alarms 0 0 0 - 0 0 0 1 1 1 D D D R R R - Speed status 0 - 0 1 D R - Request Feedback Dissipator temperature DC voltage Motor data Speed Voltage Current Torque Power Return VFD Status 0 0 0 0 °C V 0 -99.9 -999 0 100 99.9 999 9999 A A I I W W R R 53 4 5 0 0 0 0 0 V A % % -9999 -9999 -99.9 -9999 -999.9 9999 9999 99.9 9999 999.9 I A A A A W R R R R 54 55 56 57 0 - 0 1 D R - Run Direction Alarms 0 0 0 - 0 0 0 1 1 1 D D D R R R - Speed status 0 - 0 1 D R - Request Feedback Dissipator temperature DC voltage Motor data Speed Voltage Current Torque Power 0 0 0 0 °C V 0 -99 -999 0 100 99 999 9999 A A I I W W R R 59 7 8 0 0 0 0 0 V A % % -9999 -9999 -99.9 -999.9 -999.9 9999 9999 99.9 999.9 999.9 I A A A A R R R R R 60 61 62 63 Display description Analog outputs --- = Supply fan --- = Return fan --- = Exhaust damper --- = Fresh air damper --- = Mixing damper --- = Bypass damper --- = Rotary recovery --- = Preheat heaters --- = Reheat heaters --- = Humidifier Valve --- = Cooling – Cool/heat % --- = Preheating% --- = Reheating % --- = Regulation loop 1 --- = Regulation loop 2 --- = Regulation loop 3 --- = Regulation loop 4 Supply VFD Status +030220921 - rel. 1.0 - 28.02.2011 Description/notes 61 0: not ready¦ 1: ready 0: stop ¦ 1: run 0: ¦1: 0: No alarms¦ 1: active 0: ramping¦ 1: reference reached 0: not ready¦ 1: ready 0: stop ¦ 1: run 0: ¦1: 0: No alarms¦ 1: active 0: ramping¦ 1: reference reached A R/W CAREL Address 9 R/W 0 Type - Value description Max Enable: Ha24-Ha27-Ha28-Ha60…83; Config: 0 Min Belimo 1…8 Request UOM Description/notes Def. Mask Index D60 D62 D64 D66 D68 D70 D72 D74 Display description Actual position 0 % 0 100 A R Actual flow External input 0 0 m3/h % - 0 0 0 100 100 1 A I D R R R 65;67; 69;71; 73;75; 77;79 66;68; 70;72; 74;76; 78;80 - 0 - 0 - I R - 0 0 - - - I I R R - 0 0 0 0 °C % RH °C 0 - 99 - I A A A W W W W - 0 - 0 99 I R/W - 0 - 0 9 I R/W - No - No Yes D R/W - 60 s 0 999 I R - 0 - 0 99 I R - 0 - 1 10 I R/W - Type of pCO controller 0 - 0 99 I R/W - Total flash Ram Built-in type Main cycle Cycle/s 0 0 0 0 0 - 0 0 0 0 0 9999 9999 9 9999 9999 I I I A I R/W R/W R W R - Net alarm D61 Belimo 1…8 D63 information D65 SW version D67 Serial number D69 D71 D73 D75 D81 Serial probe n°1…6 Enable: Ha26; Config: Ha31-Ha91 D82 Temperature D83 Humidity D84 Dew point D85 D86 E. Data logger E01 Alarm Nr.-hour-date Pressing the bell button Code – Description displays the alarm log. For Supply temperature – Return the complete list see chap. temperature Alarms F. Board switch: see chapter “Description of the Menus” G. Service a. Change language Ga01 ENTER to change ESC to confirm Ga02 Disable language mask at startup Display countdown b. Information Gb01 Software code – Version date Manual: Bios: …; Date …; Boot: …; Date …; Gb02 pCO type +030220921 - rel. 1.0 - 28.02.2011 62 0: Close¦ 1: Override open¦ 2: Open 0: Open¦ 1: Close 0: no alarm¦ 1: offline¦ 2: unknown command¦ 3: unpermitted command¦ 4: device error - 0:Italian¦1: English¦2:Spanish 0:No¦ 1:Yes 0: pCO2¦ 1: pCO1 ¦ 2: pCO2¦ 3: pCOC¦ ¦ 4: pCOXS¦ ¦ 5: pCOOEM¦ ¦ 6: -¦ 7: PCO3¦ ¦ 8: Snode¦9: -¦ ¦ 10: pCO5¦ 10: Large¦ 11: Medium ¦ 12: Small ¦ 13: XL N.O. ¦ 17: XL N.C. 0: No¦ 2: pGD0¦ 3: pGD1 I R/W 133 D I I A A I R/W R/W R/W R/W R/W R/W 174 134-5 136-7 156 157 138 99.9 99.9 A A R/W R/W 0 0 0 0 0 0 0 0 0 0 999 999 999 999 999 999 999 999 999 999 I I I I I I I I I I R R R R R R R R R R 146-7 * 150-1 * 154-5 * 156-7 * 158-9 * 160-1 * 162-3 * 164-5 * 166-7 * 168-9 * hour hour hour hour 0 0 0 0 999 999 999 999 I I I I R R R R 170*-1 172*-3 174*-5 176*-7 0 0 0 0 hour hour hour hour 0 0 0 0 999 999 999 999 0 - 0 2 Baud rate 0 bps 0 4 Address BMS offline alarm enable Timeout Press ENTER to ENABLE commissioning service /Connect the BMS port Service settings Working hour set Supply fan Threshold Reset (acts on counter Gd01) Return fan Threshold Reset (acts on counter Gd01) Humidifier Threshold Reset (acts on counter Gd01) Rotary recovery Threshold Reset (acts on counter Gd01) 1 0 0 0 s - 0 0 0 0 207 1 900 1 0 0 hour - 0 0 99000 1 0 0 hour - 0 0 99000 1 0 0 hour - 0 0 99000 1 0 0 hour - 0 0 99000 1 Ge02 Ge03 f. a. Gfa01 Gfa02 +030220921 - rel. 1.0 - 28.02.2011 UOM Min Max Set season Summer start Winter start Threshold summer Threshold winter Delay change Gc03 Season threshold Summer Winter d. Working hours Working hours Gd01 Supply fan Return fan Humidifier Rotary recovery Gd02 Cool pump 1 Cool pump 2 Preheat pump 1 Preheat pump 2 Reheat pump 1 Reheat pump 2 Gd03 Preheating heaters Heater 1 Heater 2 Heater 3 Heater 4 Gd04 Reheating heaters Heater 1 Heater 2 Heater 3 Heater 4 e. BMS Configuration Ge01 BMS protocol Def. Gc02 Description/notes 0 - 0 5 dd/mm dd/mm °C °C hour 0 01/01 01/01 -99.9 -99.9 0 1 31/12 31/12 99.9 99.9 999 °C °C -99.9 -99.9 0 0 0 0 0 0 0 0 0 0 hour hour hour hour hour hour hour hour hour hour 0 0 0 0 0 15/05 30/09 25 10 1 Enable: Gc01=temp.H2O, Hc14, Hb16 25 30 63 Type CAREL Address Summer/winter Season selection from R/W c. Gc01 Value description Mask Index Display description 0:Keyboard¦1: Digital input¦ 2:B.M.S.¦ 3:Keyboard/B.M.S.¦4:Auto¦5: H2O temperature 0:Auto¦1:Fix days I R 178*-9 I R 180*-1 I R 182*-3 I R 184*-5 * =Working hours X 1000 0:CAREL¦1:M I R/W ODBUS¦ 2:LON¦ 0:1200 I R/W ¦1:2400 ¦ 2:4800 ¦3:9600 ¦ 4:19200 I R/W 0:No¦1:Yes I R/W I R 0:No¦1:Yes D R - 0:N=No ¦ 1:Y=Yes 0:N=No ¦ 1:Y=Yes 0:N=No ¦ 1:Y=Yes 0:N=No ¦ 1:Y=Yes I D R/W R/W - I D R/W R/W - I D R/W R/W - I D R/W R/W - Gfb04 Gfb05 +030220921 - rel. 1.0 - 28.02.2011 CAREL Address Gfb03 R/W Gfb02 Type b. Gfb01 Value descripti on Gfa06 Max Gfa05 Min Pumps 1/2 Cooling Threshold Reset (acts on counter Gd02) Preheating Threshold Reset (acts on counter Gd02) Reheating Threshold Reset (acts on counter Gd02) Preheating heaters Threshold heater 1 Reset (acts on counter Gd03) Threshold heater 2 Reset (acts on counter Gd03) Threshold heater 3 Reset (acts on counter Gd03) Reset (acts on counter Gd03) Reset (acts on counter Gd03) Reheating heaters Threshold heater 1 Reset (acts on counter Gd04) Threshold heater 2 Reset (acts on counter Gd04) Threshold heater 3 Reset (acts on counter Gd04) Threshold heater 4 Reset (acts on counter Gd04) Probe adjustment Supply temperature Offset Probe Return temperature Offset Probe Return temperature Offset Probe Supply humidity Offset Probe Return humidity Offset Probe External humidity Offset Probe Supply pressure Offset Probe Return pressure Offset Probe CO2 air quality Offset Probe VOC air quality Offset Probe Frost temperature Offset Probe Off-coil temperature Offset Probe Exhaust temperature Offset Probe UOM Gfa03/4 Description/ notes Def. Mask Index Display description 0 0 hour - 0 0 99000 1 0:N=No ¦ 1:Y=Yes I D R/W R/W - 0 0 hour - 0 0 99000 1 0:N=No ¦ 1:Y=Yes I D R/W R/W - 0 0 hour - 0 0 99000 1 0:N=No ¦ 1:Y=Yes I D R/W R/W - 0 0 0 0 0 0 0 0 hour hour hour hour - 0 0 0 0 0 0 0 0 99000 1 99000 1 99000 1 99000 1 I D I D I D I D R/W R/W R/W R/W R/W R/W R/W R/W - 0 0 0 0 0 0 0 0 hour hour hour hour - 0 0 0 0 0 0 0 0 99000 1 99000 1 99000 1 99000 1 I D I D I D I D R/W R/W R/W R/W R/W R/W R/W R/W - 0 - °C °C -9.9 -99.9 9.9 99.9 A A R/W R 10 0 - °C °C -9.9 -99.9 9.9 99.9 A A R/W R 11 0 - °C °C -9.9 -99.9 9.9 99.9 A A R/W R 16 0 0 % RH % RH -20 0 20 100 I A R/W R 13 0 0 % RH % RH -20 0 20 100 I A R/W R 14 0 0 % RH % RH -20 0 20 100 I I R/W R 17 0 0 Pa Pa -200 -9999 200 9999 I I R/W R 1 0 0 Pa Pa -200 -9999 200 9999 I I R/W R 2 0 0 ppm ppm -99 0 99 9999 I I R/W R 3 0 0 % % -50 0 50 999 I A R/W R - 0 0 °C °C -9.9 -99.9 9.9 99.9 A A R/W R 18 0 0 °C °C -9.9 -99.9 9.9 99.9 A A R/W R 19 0 0 °C °C -9.9 -99.9 9.9 99.9 I A R/W R 20 - 64 0:N=No ¦ 1:Y=Yes 0:N=No ¦ 1:Y=Yes 0:N=No ¦ 1:Y=Yes 0:N=No ¦ 1:Y=Yes 0:N=No ¦ 1:Y=Yes 0:N=No ¦ 1:Y=Yes 0:N=No ¦ 1:Y=Yes 0:N=No ¦ 1:Y=Yes 2nd row Gfc02 Gfc03 Gfc04 Gfc05 Temperature set limits Summer low Summer high Winter low Winter high Humidity set limits Summer low Summer high Winter low Winter high Temperature regulation Regulation type 0 0 °C °C -9.9 -99.9 9.9 99.9 A A R/W R 22 0 0 °C °C -9.9 -99.9 9.9 99.9 A A R/W R 23 0 0 °C °C -9.9 -99.9 9.9 99.9 A A R/W R 24 0 0 °C °C -9.9 -99.9 9.9 99.9 I A R/W R 12 0 0 % RH % RH -99.9 0 99.9 100 A A R/W R - -20 -3200 20 3200 A I R/W R 26;2 7; 28;2 9 I R/W I R/W 0 0 Return temperatu re - 0 14 Return humidity - 0 14 15 35 15 35 °C °C °C °C -99.9 Summer low -99.9 Winter low 99.9 99.9 99.9 99.9 A A A A R/W R/W R/W R/W 106 107 108 109 30 90 30 90 % RH % RH % RH % RH 0 Summer low 0 Winter low 100 100 100 100 I I I I R/W R/W R/W R/W 71 72 73 74 I R/W 75 D I R/W R/W 168 76 A A I I R/W R/W R/W R/W 110 111 77 78 Prop+inte gr Auto cool/heat Supply limits No None - No 1 Yes 4 Cooling regulation Differential Neutral zone Integral time Derivative time 2 1 300 0 °C °C s s 0 0 0 0 99.9 99 999 999 +030220921 - rel. 1.0 - 28.02.2011 Value descripti on CAREL Address Thermoregulation Main mask information 1st row R/W c. Gfc01 Type Gfb08 Max Gfb07 Min Cool water temperature Offset Probe Preheat water temperature Offset Probe Reheat water temperature Offset Probe Room temperature Offset Probe Room humidity Offset Probe Regulation loop probes 1/2/3/4 Offset Probe UOM Gfb06 Description/notes Def. Mask Index Display description 65 0:None 1:Supply temp.¦ 2:Returm temp.¦ 3:Room temp.¦ 4:External temp¦ 5:Temp setpoint¦ 6: Supply humid.¦ 7: Return humid.¦8:Room humid.¦ 9:Ext. humid.¦ 10: Humid. setpoint¦ 11:Supply pressure.¦ 12:Return pressure¦ 13: CO2 quality¦ 14: VOC quality See 1st row 0:Proportional¦ 1:Prop.+Integr.¦ 2:PID 0:No¦1:Yes 1:None¦2:High¦3: Low¦4:High/Lo w UOM Min Max Type R/W CAREL Address 0 0 0 0 99.9 99 999 999 A A I I R/W R/W R/W R/W 112 113 79 80 40 40 10 10 3 150 No °C °C °C °C °C s - -99.9 -99.9 -99.9 -99.9 0 0 No 99.9 99.9 99.9 99.9 99.9 999 Yes A A A A A I D R/W R/W R/W R/W R/W R/W R/W 116 117 114 115 118 81 169 Type of summer setpoint compensation None - - - I R/W 82 Compensation delta Compensation start Compensation end Type of winter setpoint compensation 2 25 32 None °C °C °C - -99.9 -99.9 -99.9 - 99.9 99.9 99.9 - A A A I R/W R/W R/W R/W 121 119 120 83 Compensation delta Compensation start Compensation end Humidity regulation Regulation type -2 0 -8 °C °C °C -99.9 -99.9 -99.9 99.9 99.9 99.9 A A A R/W R/W R/W 124 122 123 R/W 84 Auto hum/dehum Supply limits No - No Yes 0:Proportional ¦ I 1:Proportional+ Integral ¦2:PID 0:No ¦ 1:Yes D 1: none ¦ 2: high I ¦ 3: low ¦ 4: high/low R/W R/W 170 85 5 2 300 0 % RH % RH s s 0 0 0 0 100 100 999 99 I I I I R/W R/W R/W R/W 86 87 88 89 % RH % RH s s 0 0 0 0 100 100 999 99 I I I I R/W R/W R/W R/W 90 91 92 93 % RH % RH % RH s - 0 0 0 0 0 100 100 100 999 1 I I I I 0: Temperature¦ D 1: Humidity R/W R/W R/W R/W R/W 95 94 96 97 171 4 5 °C kJ/kg 0 0 99.9 99.9 A A R/W R/W 125 126 1090 mbar 600 1100 I R/W 98 Gfc06 Heating regulation Differential Neutral zone Integral time Derivative time Temperature supply limits Summer high Winter high Summer low Winter low Differential Integral time Enable double action Gfc07 Gfc08 Gfc09 Gfc10 Gfc11 Gfc12 Gfc13 Gfc14 Gfc15 Gfc16 Value descripti on Def. °C °C s s Mask Index 2 1 300 0 Display description Dehumidification regulation Differential Neutral zone Integral time Derivative time Humidification regulation Differential Neutral zone Integral time Derivative time Humidity supply limits High limit Low limit Differential Integral time Priority Freecooling/Freeheating dampers settings Temperature differential Enthalpy differential Enthalpy management Atmospheric pressure +030220921 - rel. 1.0 - 28.02.2011 Description/notes Enable: Gfc04: Auto cool/heat: yes Supply limits: alto/basso Proport 4 2 300 0 Enable: Hc01 (Humidity probe ≠ supply) 100 0 4 150 0 66 0:No¦1:Yes 0:None ¦ 1:External ¦ 2:Room ¦ 3:Return 0:None ¦ 1:External ¦ 2:Room ¦ 3:Return Gfc21 Gfc22 Gfc23 Gfc24 Gfc25 Gfc26 Gfc27 Gfc28 Gfc29 Gfc30 +030220921 - rel. 1.0 - 28.02.2011 Value description Max power 100 A A R/W R/W 127 128 Max power 100 A A R/W R/W 129 130 2000 1000 9999 9999 I I I I R/W R/W R/W R/W 99 100 101 102 2000 1000 9999 9999 I I I I R/W R/W R/W R/W 103 104 105 106 100 100 100 100 I I I I R/W R/W R/W R/W 107 108 109 110 100 100 100 100 I I I I R/W R/W R/W R/W 111 112 114 115 100 I R/W 116 100 100 100 Yes 100 I I I D I R/W R/W R R R/W 117 118 119 I D R R - 99.9 99.9 A A R/W R/W 131 132 100 100 100 100 Yes I I I I D R/W R/W R/W R R 121 122 123 - 99.9 99.9 A A R/W R/W 133 134 99.9 99.9 100 A A I R/W R/W R/W 135 136 120 I D R R - 5000 5000 I I R/W R/W 124 126 100 100 I I R/W R/W 125 127 Max Min UOM 67 CAREL Address Gfc20 R/W Gfc19 Supply inverter Min/ fixed power 30 % 0 Max power 100 % Min power Return inverter Min/ fixed power 30 % 0 Max power 100 % Min power Supply flow control Setpoint 1500 Pa 0 Differential 300 Pa 0 Integral time 300 s 0 Derivative time 10 s 0 Return flow control Setpoint 1500 Pa 0 Differential 300 Pa 0 Integral time 300 s 0 Derivative time 10 s 0 Cooling cascade Freecooling 50 % 0 Coil 50 % 0 Recovery 40 % 0 Coil 40 % 0 Heating cascade Freeheating 50 % 0 Coil 50 % 0 Recovery 40 % 0 Coil 40 % 0 Heating cascade Enable: Ha08: Reheating operation = supplement Reheating 80 % 0 Minimum cooling valve opening Cooling 0 % 0 Dehumidification 0 % 0 Unit off 0 % 0 Only antiblock No No Minimum preheating valve 0 % 0 opening Unit off 0 % 0 Only antiblock No No Preheating coil settings when humidifying Setpoint 23 °C -99.9 Differential 2 °C 0 Minimum heat/cool valve opening Cooling 0 % 0 Dehumidification 0 % 0 Heating 0 % 0 Unit off 0 % 0 Only antiblock No No Preheating coil settings when humidifying Setpoint 20 °C -99.9 Differential 2 °C 0 Reheating coil compensation setting Setpoint 24 °C -99.9 Differential 3 °C 0 Minimum reheat valve 0 % 0 opening Unit off 0 % 0 Only antiblock No No Air quality with CO2 Setpoint 1200 ppm 0 Differential 200 ppm 0 Air quality with VOC Setpoint 50 % 0 Differential 10 % 0 Type Gfc18 Description/ notes Def. Mask Index Gfc17 Display description 100 Yes 100 Yes 0:No¦1:Yes 0:No¦1:Yes 0:No¦1:Yes 0:No¦1:Yes Gfc37 Gfc38 Gfc39 d. Gfd01 Gfd02 Gfd03 g. Gg01 Gg02 Gg40 Gg50 Gg60 Gc61 Gc62 Gc63 Gc64 Gc65 Gc66 Gc67 +030220921 - rel. 1.0 - 28.02.2011 Value descripti on CAREL Address Gfc36 R/W Gfc35 Type Gfc34 Max Gfc33 Min Heat recovery temperature activation Delta recovery Differential recovery Enthalpy regulation Differential Heat recovery defrost Setpoint Differential Heater offset Wheel min speed Frost settings Setpoint Differential Room frost protection enable Threshold Adiabatic humidifier - Supply low temperature limit Enable limit Setpoint Differential Regulation loop 1 Setpoint Differential Integral time Regulation loop 2 Setpoint Differential Integral time Regulation loop 3 Setpoint Differential Integral time Regulation loop 4 Setpoint Differential Integral time User device /Change PW1 Load configuration Last saving Delete data logger Insert new service password (PW1) Manual management Supply fan Return fan Cooling -Cool/heat coil Preheating coil Reheating coil Humidifier Air quality Start purging Stop purging >> Cleaning active << Purging time Resume time Repeat at start-up Supply VFD Reset alarms Return VFD Reset alarms Belimo1…Belimo8 Start adaptation Start testrun Adapted angle Alarms reset UOM Gfc31 Gfc32 Description/notes Def. Mask Index Display description 5 3 °C °C 0 0 99.9 99.9 A A R/W R/W 137 138 5 kJ/kg 0 99.9 A R/W 139 -1 4 3 100 °C °C °C % -99.9 0 0 0 10 99.9 99.9 100 A A A I R/W R/W R/W R/W 140 141 142 128 5 3 0 5 °C °C °C -99.9 0 0 -99.9 99.9 99.9 1 99.9 A A D A R/W R/W R/W R/W 143 144 172 145 No 15 2 °C °C No 0 0 Yes 99.9 99.9 D A A R/W R/W R/W 173 146 147 0 0 0 s -3200 -3200 0 3200 3200 999 A A I R/W R/W R/W 148 149 129 0 0 0 s -3200 -3200 0 3200 3200 999 A A I R/W R/W R/W 150 151 130 0 0 0 s -3200 -3200 0 3200 3200 999 A A I R/W R/W R/W 152 153 131 0 0 0 s -3200 -3200 0 3200 3200 999 A A I R/W R/W R/W 154 155 132 No --/--/-No 1234 dd/mm/yy ---- No 00/00/00 No 0000 Yes 99/99/99 Yes 9999 0: No¦ 1: Yes 0: No¦ 1: Yes - D D D I R/W R/W R/W R - Auto Auto Auto Auto Auto Auto % % % % % % 0 0 0 0 0 0 101 101 101 101 101 101 0:Auto¦ 1:0%; ¦101=100% 0:Auto¦ 1:0%; ¦101=100% 0:Auto¦ 1:0%; ¦101=100% 0:Auto¦ 1:0%; ¦101=100% 0:Auto¦ 1:0%; ¦101=100% 0:Auto¦ 1:0%; ¦101=100% I I I I I I R/W R/W R/W R/W R/W R/W 139 140 141 142 143 145 No No 0 - No No 0 Yes Yes 1 0: No ¦ 1: Yes 0: No ¦ 1: Yes 0: No ¦ 1: Yes D D D R/W R/W R 175 176 - 0 No min - 0 No 999 Yes 0: No ¦ 1: Yes I D W R - No - No Yes 0: No ¦ 1: Yes D R/W 177 No - No Yes 0: No ¦ 1: Yes D R/W 178 No No Yes No - No No No No Yes Yes Yes Yes D D D D R/W R/W R/W R/W 68 0: No¦1: Yes 0: No¦1: Yes Humidifier Recovery Dampers type Enabled Enabled Fresh air+ mixing - Disabled Disabled Enabled Enabled Freecooling Temperature - 1 3 Freeheating Temperature - 1 3 Enable air quality management Fan type Yes Inverter - 0 1 1 6 Fan Regulation Static pressure - 1 6 Supply+retur n Supply+retur n Pressure switch Individual Modulating valve - 1 3 - 0 3 - 0 1 - 0 1 1 3 1 4 Coil Ha03 Ha04 Fan alarms Overload Air flow Air flow from Ha05 Ha06 Stop action Preheating output Heaters number Heaters type 0 On/Off - Temperature probe when humidifying Cooling output type Off coil - Modulating valve - 1 3 Cooling steps (direct expansion) Dehumidification 1 On regulation probe - 1 1 3 3 +030220921 - rel. 1.0 - 28.02.2011 0: Supply¦ 1: Supply-Return 0: None ¦ 1:Cool+Preheat+Reheat¦ 2: Cooling ¦ 3: Heating ¦ 4: Cooling+Preheating ¦ 5: Cooling+Reheating ¦ 6: Cool/Heat coil ¦ 7: Cool/Heat coil +Reheat 0: Disabled ¦1: Enabled 0: Disabled ¦1: Enabled 1: Fresh air (On/Off) ¦ 2: fresh air (Mod) ¦ 3: Fresh air+Mixing ¦ 4:Fresh air +Mix+Exhaust ¦5: Fresh air(Mod) +Exhaust 1: None ¦ 2: Temperature ¦ 3: Enthalpy 1: None ¦ 2: Temperature ¦ 3: Enthalpy 0: No ¦ 1: Yes 1: On-Off(Direct start) ¦ 2: On-Off(Star-delta) ¦3: On-Off(Double.) 4: Inverter ¦ 5: On-Off(2 speed) ¦ 6: On-Off(Duty stand-by) 1: Static pressure ¦ 2: Air quality ¦ 3: Fixed speed 1: None ¦ 2: Supply ¦ 3: Supply+return 1: None ¦ 2: Supply ¦ 3: Supply+return 0: Pressure switch ¦ 1: Transducer 0: Individual ¦1: All 1: Modulating valve¦ 2: Floating valve ¦ 3: Heaters 1: On/Off ¦ 2: Modulating ¦ 3: On/Off binary (2 heaters) 0: Off coil ¦ 1: Regulation 69 1: Modulating valve ¦ 2: Floating valve ¦ 3: Direct expansion 1: On regulation probe 2: On dew point 3: Disabled CAREL Address Supplyreturn R/W Max Supply Type Min - Value description UOM SupplyReturn Cool+Prehea t+Reheat H. Manufacturer a. Configuration Ha01 Main device enable Fans Ha02 Description/ notes Def. Mask Index Display description D R/W - I R/W - D D I R/W R/W R/W - I R/W - I R/W - D I R/W R/W - I R/W - I R/W - I R/W - D R/W - D I R/W R/W - I I R/W R/W - D R/W - I R/W - I I R/W R/W - Ha10 Ha11 Ha12 Ha13 Ha14 Ha15 Ha16 Ha17 I R/W - I R/W - D R/W - I R/W - I I R/W R/W - I R/W - D R/W - 0:No¦1:Yes 0:No¦1:Yes 0:No¦1:Yes D D D R/W R/W R/W - 0:No¦1:Yes I I D R/W R/W R/W - 0:No¦1:Yes I I D R/W R/W R/W - 0:No¦1:Yes I I D R/W R/W R/W - I R/W - I R/W - D R/W - I R/W - I R/W - I R/W - D R/W - 1: Proportional ¦ 2: P+I 1: CO2 ¦ 2: CO2+VOC ¦ 3: VOC 0:No¦1:Yes 1: none ¦ 2: by frost-stat ¦ 3: by probe ¦ 4: by probe+frost-stat I I D I R/W R/W R/W R/W - 0:No¦1:Yes 0:No¦1:Yes D D R/W R/W - Modulating valve - 1 3 Dehumidification On regulation probe - 1 3 Temperature probe when humidifying Reheating output Off-coil - 0 1 Heaters - 1 3 Heaters number Heaters type 3 On/Off - 1 1 4 3 Reheating working mode Compensation - 1 3 No - 0 1 1: On/Off ¦ 2: Modulating ¦ 3: On/Off binary (2 heaters) 1: Integration ¦ 2: Compensation ¦ 3: Compensation+Integrat. 0:No¦1:Yes No No No - 0 0 0 1 1 1 2 3 Yes - 1 0 0 2 5 1 2 3 Yes - 1 0 0 2 5 1 2 3 Yes - 1 0 0 2 5 1 Adiabatic (modulating control) - 1 4 Heat recovery type Plate exchanger - 1 5 Regulation Temperature - 0 1 Bypass damper On/Off - 1 3 Wheel min speed (Modulating rotary exchanger) Defrost probe 0% % 0 100 External-Return - 0 3 Recovery heater Air quality Regulation type Probe type Enable purging Frost protection No 0 1 1 1 0 2 3 1 Enable water pumps CoolingCool/heat Preheating Reheating Enable flow feedback Cooling – cool/ heat pumps Number of pumps Warning limit Enable antiblock Preheating pumps Number of pumps Warning limit Enable antiblock Reheating pumps Number of pumps Warning limit Enable antiblock Humidifier Type Enable unit On/Off By digit input By BMS +030220921 - rel. 1.0 - 28.02.2011 Cool/heat (Ha01) P+I CO2 Yes By probe - 1: Modulating valve ¦ 2: Floating valve ¦ 3: Steps 1: On regulation probe ¦ 2: On dew point ¦ 3: Disabled 0: Off-coil 1: Regulation 1: Modulating valve ¦ 2: Floating valve ¦ 3: Heaters 1: Isothermic (On/Off control)¦2: Isothermic (Modulating control) ¦ 3:Adiabatic (On/Off control)¦ 4: Adiabatic ( Modulating control) 1: None ¦ 2: Plate exchanger¦ 3: Run around coil ¦ 4: Modulating rotary exchanger¦ 5: On/Off rotary exchanger 0: Temperature ¦ 1: Enthalpy (rotary exchanger) 1: None ¦ 2: On/Off ¦ 3: Modulating 0…100% 0: None ¦ 1: External-return ¦ 2: Exhaust ¦ 3: External 0:No¦1:Yes Type CAREL Address Ha09 R/W Ha08 Value description Enable: Ha01 Max Heat cool output Min Ha07 UOM Description/ notes Def. Mask Index Display description Yes No 70 Ha27 Ha28 Ha29 Ha30 Ha31 Ha39 Ha40 CAREL Address Ha26 R/W Ha25 Type Ha24 Value description Ha23 Max Ha22 Min Ha21 UOM Ha20 Def. Mask Index Ha18 Ha19 Setpoint from digital input Enable setpoint offset by analog input Auxiliary regulation loop Regulation loop 1 Regulation type Output type No No - 0 0 1 1 0:No¦1:Yes 0:No¦1:Yes D D R/W R/W - None - 0 4 0:None, 1…4 I R/W - Direct Modulating+On/Off - 0 0 1 2 I I R/W R/W - Other management None - 0 2 0: direct¦1: inverse 0: modulating+on/off ¦ 1: on/off ¦2: modulating 0: none ¦ 1: on with supply fan ¦ 2: force with frost protection I R/W - Regulation loop 2 Regulation type Output type Direct Modulating+On/Off - 0 0 1 2 I I R/W R/W - Other management None - 0 2 0: direct¦1: inverse 0: modulating+on/off ¦ 1: on/off ¦2: modulating 0: none ¦ 1: on with supply fan ¦ 2: force with frost protection I R/W - Regulation loop 3 Regulation type Output type Direct Modulating+On/Off - 0 0 1 2 I I R/W R/W - Other management None - 0 2 0: direct¦1: inverse 0: modulating+on/off ¦ 1: on/off ¦2: modulating 0: none ¦ 1: on with supply fan ¦ 2: force with frost protection I R/W - Regulation loop 4 Regulation type Output type Direct Modulating+On/Off - 0 0 1 2 I I R/W R/W - Other management None - 0 2 0: direct¦1: inverse 0: modulating+on/off ¦ 1: on/off ¦2: modulating 0: none ¦ 1: on with supply fan ¦ 2: force with frost protection I R/W - Protocol pLAN port pLAN - 0 21 I R/W - BMS port Field port BMS Modbus master - 0 1 4 21 5: pLAN ¦ 21:Modbus Master(*) 1:BMS ¦ 4:Winload 1:Belimo ¦ 21:Modbus master I I R/W R/W - Modbus Master settings Baudrate 19200 Bit/s 0 4 I R/W - 2 None 300 0 3 4 None ms - 1 2 R/W R/W R/W R/W R/W R/W R/W - 0 Display description Description/ notes Stop bit Parity mode Timeout pCOe number pCOe1 address pCOe2 address Number of serial probe Belimo device Number of actuators Press Enter to configure Belimo actuatorsHa60 Press Enter to configure the VFD Enable BMS probes and digital inputs Backup probe 1 Backup probe 2 Backup probe 3 Backup probe 4 Press Enter to configure serial probes Ha91 Enable VFD: (Modbus protocol) Supply VFD Address Data address Data value Default install 100 0 1 1 None 5000 2 5 5 6 I I I I I I I - 0 8 I R/W - No - No Yes 0:No¦1:Yes D R/W - None None None None - None None None None Ain10 Ain10 Ain10 Ain10 0: None; 1: Ain1…10: Ain10 0: None; 1: Ain1…10: Ain10 0: None; 1: Ain1…10: Ain10 0: None; 1: Ain1…10: Ain10 I I I I R/W R/W R/W R/W - No¦ Yes D R/W 0:N=No ¦ 1:Y=Yes I I I D R/W R/W R/W R/W 1 0 0 N - 0:None ¦ 1:Even ¦ 2:Odd 0 0 -32768 No (*) for pCO3 built-in +030220921 - rel. 1.0 - 28.02.2011 0: 1200 ¦ 1: 2400 ¦ 2: 4800 3: 9600 ¦ 4: 19200 71 999 9999 32767 Yes - Ha42 Ha43 Ha44 Ha46 Ha50 Ha51 Ha52 Ha53 Ha54 - 1 3 Speed reference type Ain1 - 0 5 Rotation type Clockwise - 0 Supply VFD Motor control mode Start function Stop function Supply VFD Frequency Ramp Coasting - 0 0 0 Action when in fault: #03;#09;#11;#15 none - none Action when in fault: #53;#54 #55 CAREL Address R/W Type Value description Max I/O terminal 1: I/O terminal ¦ 2:keypad ¦ 3: Fieldbus 0:Ain1 ¦ 1:Ain2 ¦ 2:Keypad ¦ 3: Fieldbus¦ 4: Motor potentiometer ¦5:PID regulation I R/W - I R/W - 1 0:Clockwise ¦ 1: Counterclockwise D R/W - 1 1 1 0:Frequency ¦ 1:Speed 0:Ramp ¦ 1: Flying start 0:Coasting ¦ 1:Ramp I I I R/W R/W R/W - 0 3 0:None ¦ 1:Warning ¦ 2:Fault stop function ¦ 3: Fault coasting I R/W - - 0 3 0:None ¦ 1:Warning ¦ 2:Fault stop function ¦ 3: Fault coasting I R/W - none - 0 3 I R/W - none - 0 4 I R/W - 0 0.0 0 0 0 0 V Hz rpm A A 180 0,30 30 300 -999,9 0 690 0,99 320 20000 999,9 999,9 I I A I A A R/W R/W R/W R/W R/W R/W - 2 0 0 N - 0 0 -32768 N 999 9999 32767 S I I I D R/W R/W R/W R/W - I/O terminal - 1 3 I R/W - Speed reference type Ain1 - 0 5 I R/W - Rotation type Clockwise - 0 1 D R/W - Return VFD Motor control mode Start function Stop function Return VFD Frequency Ramp Coasting - 0 0 0 1 1 1 0:Frequency ¦ 1:Speed 0:Ramp ¦ 1: Flying start 0:Coasting ¦ 1:Ramp I I I R/W R/W R/W - Action when in fault: #03;#09;#11;#15 none - 0 3 0:None ¦ 1:Warning ¦ 2:Fault stop function ¦ 3: Fault coasting I R/W - none - 0 3 0:None ¦ 1:Warning ¦ 2:Fault stop function ¦ 3: Fault coasting I R/W - none - 0 3 0:None ¦ 1:Warning ¦ 2:Fault stop function ¦ 3: Fault coasting I R/W - Supply VFD Supply VFD Supply VFD: motor parameters Volt Cosfi Frequency Speed Current Current limit Return VFD Address Data address Data value Default install Return VFD Control place 0:None ¦ 1:Warning ¦ 2:Fault stop function ¦ 3: Fault coasting 0:None ¦ 1:Warning (below limit)¦ 2:Warning (above limit) ¦ 3: Fault (below limit ¦ 4: Fault (above limit) 0:N=No¦ 1:S=Yes 1: I/O terminal ¦ 2:keypad ¦ 3: Fieldbus 0:Ain1 ¦ 1:Ain2 ¦ 2:Keypad ¦ 3: Fieldbus¦ 4: Motor potentiometer ¦5:PID regulation 0:Clockwise ¦ 1: Counterclockwise Return VFD Action when in fault: #16;#17;#29;#50 Ha55 Min Supply VFD Control place Action when in fault: #16;#17;#29;#50 Ha45 UOM Description/ notes Def. Mask Index Ha41 Display description Return VFD Action when in fault: #53;#54 +030220921 - rel. 1.0 - 28.02.2011 72 #55 Ha56 Ha60 Ha63 Ha66 Ha69 Ha72 Ha75 Ha78 Ha81 Ha61 Ha64 Ha67 Ha70 Ha73 Ha76 Ha79 Ha82 Ha62 Ha65 Ha68 Ha71 Ha74 Ha77 Ha80 Ha83 Ha91 … Ha96 b. Hb01 Hb02 none - 0 4 0 0.0 0 0 0 0 V Hz rpm A A 180 0,30 30 300 -999,9 0 690 0,99 320 20000 999,9 999,9 Return VFD: motor parameters Volt Cosfi Frequency Speed Current Current limit Belimo 1…Belimo 8 Actuator type None - 0 9 Addressing mode SN: 00000-00000-000-000 Address actuator Manual 0 No - 0 0 0 1 9 1 Enable external input/probe Type No NTC - No Yes Min value Max value 0 0 - -999.9 Min Position or air flow limits Minimum Maximum 0 0 % % Serial probe n°1…6 Address Type 128 Temperature 0:None ¦ 1:Warning (below limit)¦ 2:Warning (above limit) ¦ 3: Fault (below limit ¦ 4: Fault (above limit) I CAREL Address R/W Type Value description Max Min UOM Description/ notes Def. Mask Index Display description R/W - I I A I A A R/W R/W R/W R/W R/W R/W - I R/W - D I D R/W R/W R/W - D I R/W R/W - Max 999.9 A A R/W R/W - 0 Lim_min Lim_max 100 A A R/W R/W - - 128 0 159 1 I D R/W R/W - No - No Yes D R/W - -NTC - 0 0 99 4 I I R/W R/W - Min limit Max limit Return temperature Position Type 0 0 °C °C -50 Min limit Max limit 200 A A R/W R/W - -NTC - 0 0 99 4 I I R/W R/W - Min limit Max limit 0 0 °C °C -50 Min limit Max limit 200 A A R/W R/W - Default installation I/O Configuration Analog input Supply temperature Position Type +030220921 - rel. 1.0 - 28.02.2011 Enable addressing 73 0-1: None ¦ 2: Air actuator ¦ 3,4: Valve actuator¦ 5: None ¦ 6: Firesmoke damper ¦ 7: None ¦ 8: VAV actuator¦ 9: None 0: Manual ¦ 1: Auto 0:No¦ 1:Yes 0:No¦1:Yes 0:NTC ¦ 2:0…1V ¦ 3:0…10V ¦ 5: ON/OFF 0:Temperature ¦ 1: Temperature+humidity 0:No¦ 1:Yes 0:NTC ¦ 1:Pt1000 ¦ 2:0…1V ¦ 3:0…10V ¦ 4:4…20mA 0:NTC ¦ 1:Pt1000 ¦ 2:0…1V ¦ 3:0…10V ¦ 4:4…20mA Hb08 Hb09 Hb10 Hb11 99 - Min limit Max limit Room temperature Position Type 0 0 °C °C -50 Min limit Max limit 200 -NTC - 0 - 99 - Min limit Max limit Supply humidity Position Type 0 0 °C °C -50 Min limit Max limit 200 -- - 0 99 Min limit Max limit Return humidity Position Type Min limit Max limit External humidity Position Type Min limit Max limit Room humidity Position Type Min limit Max limit Supply pressure position Position Type Min limit Max limit Return pressure position Position Type Min limit Max limit Frost temperature position Position Type Min limit Max limit +030220921 - rel. 1.0 - 28.02.2011 0:NTC ¦ 1:Pt1000 ¦ 2:0…1V ¦ 3:0…10V ¦ 4:4…20mA 0:NTC ¦ 1:Pt1000 ¦ 2:0…1V ¦ ¦ 3:0…10V ¦ 4:4…20mA 2:0…1V ¦ 3:0…10V ¦ 4:4…20mA -- %U.R. %U.R. 0 Min limit Max limit 100 - 0 99 2:0…1V ¦ 3:0…10V ¦ 4:4…20mA -- %U.R. %U.R. 0 Min limit Max limit 100 - 0 99 2:0…1V ¦ 3:0…10V ¦ 4:4…20mA -- %U.R. %U.R. 0 Min limit Max limit 100 - 0 99 2:0…1V ¦ 3:0…10V ¦ 4:4…20mA -- %U.R. %U.R. 0 Min limit Max limit 100 - 0 99 2:0…1V ¦ 3:0…10V ¦ 4:4…20mA -- Pa Pa 0 Min limit Max limit 100 - 0 99 2:0…1V ¦ 3:0…10V ¦ 4:4…20mA -- Pa Pa 0 Min limit Max limit 100 - 0 99 0:NTC ¦ 1:Pt1000 ¦ 2:0…1V ¦ 3:0…10V ¦ 4:4…20mA 0 0 °C °C -50 Min limit 74 Max limit 200 I I R/W R/W - A A R/W R/W - I I R/W R/W - A A R/W R/W - I I R/W R/W - I I R/W R/W - I I R/W R/W - I I R/W R/W - I I R/W R/W - I I R/W R/W - I I R/W R/W - I I R/W R/W - I I R/W R/W - I I R/W R/W - I I R/W R/W - I I R/W R/W - I I R/W R/W - A A R/W R/W - Type 0 - Value description Max - CAREL Address Hb07 -NTC External temperature Position Type R/W Hb06 Min Hb05 UOM Hb04 Description/ notes Def. Mask Index Hb03 Display description Hb15 Hb16 Hb17 Hb18 Hb19 Hb20 99 0:NTC ¦ 1:Pt1000 ¦ 2:0…1V ¦ 3:0…10V ¦ 4:4…20mA Min limit Max limit CO2 air quality Position Type 0 0 °C °C -50 Min limit Max limit 200 -- - 0 99 Min limit Max limit VOC air quality position Position Type 0 2000 ppm ppm 0 Min limit Max limit 5000 -- - 0 99 Min limit Max limit Exhaust temperature Position Type 0 100 % % 0 Min limit Max limit 100 -- - 0 99 2:0…1V ¦ 3:0…10V ¦ 4:4…20mA 2:0…1V ¦ 3:0…10V ¦ 4:4…20mA 0:NTC ¦ 1:Pt1000 ¦ 2:0…1V ¦ 3:0…10V ¦ 4:4…20mA Min limit Max limit Cooling coil water temperature Position Type 0 100 Ha06, Ha09, Hc11 Min limit Max limit Preheat coil water temperature Position Type 0 100 Ha05, Ha09, Hc09 Min limit Max limit Reheating coil water temperature Position Type -- % % 0 Min limit Max limit 100 - 0 99 0:NTC ¦ 1:Pt1000 ¦ 2:0…1V ¦ 3:0…10V ¦ 4:4…20mA -- % % 0 Min limit Max limit 100 - 0 99 0:NTC ¦ 1:Pt1000 ¦ 2:0…1V ¦ 3:0…10V ¦ 4:4…20mA 0 100 % % 0 Min limit Max limit 100 -- - 0 99 R/W R/W - A A R/W R/W - I A R/W R/W - A A R/W R/W - I A R/W R/W - A A R/W R/W - I A R/W R/W - A A R/W R/W - I A R/W R/W - A A R/W R/W - I A R/W R/W - A A R/W R/W - I A R/W R/W - A A R/W R/W - A A R/W R/W - A A R/W R/W - Ha08, Ha09, Hc16 0:NTC ¦ 1:Pt1000 ¦ 2:0…1V ¦ 3:0…10V ¦ 4:4…20mA Min limit Max limit Regulation probe loop 1 Position Type 0 100 % % 0 Min limit Max limit 100 -- - 0 99 Min limit Max limit Regulation probe loop 2 Position Type 0 100 % % -- - Min limit Max limit 0 100 +030220921 - rel. 1.0 - 28.02.2011 I I Type 0 Value descript ion Max - CAREL Address Hb14 -- R/W Hb13 Min Off-coil temperature Position Type UOM Hb12 Description/ notes Def. Mask Index Display description 0:NTC ¦ 1:Pt1000 ¦ 2:0…1V ¦ 3:0…10V ¦ 4:4…20mA 0 Min limit 0 Max limit 100 99 0:NTC ¦ 1:Pt1000 ¦ 2:0…1V ¦ 3:0…10V ¦ 4:4…20mA % % 0 Min limit 75 Max limit 100 0 99 Min limit Max limit 0 100 % % 0 Min limit Max limit 100 Regulation probe loop 4 Position Type -- - 0 99 Min limit Max limit Temperature setpoint offset Position Type Min limit Max limit Digital inputs Hb24 Remote On-Off Position Logic Summer/winter Position Logic Double setpoint Position Logic Hb25 Generic alarm Position Logic Serious alarm Position Logic Frost-stat Position Logic Hb26 1st Supply air filter Position Logic 2nd Supply air filter Position Logic Return air filter Position Logic Hb27 Supply flow Position Logic Return flow Position Logic +030220921 - rel. 1.0 - 28.02.2011 CAREL Address - R/W Max -- Value description Min Regulation probe loop 3 Position Type Type Hb23 UOM Hb22 Description/ notes Def. Mask Index Hb21 Display description A A R/W R/W - A A R/W R/W - A A R/W R/W - 0:NTC ¦ 1:Pt1000 ¦ 2:0…1V ¦ 3:0…10V ¦ 4:4…20mA 0:NTC ¦ 1:Pt1000 ¦ 2:0…1V ¦ 3:0…10V ¦ 4:4…20mA 0 100 % % 0 Min limit Max limit 100 -- - 0 99 Enable:Ha19 0:NTC ¦ 1:Pt1000 ¦ 2:0…1V ¦ 3:0…10V ¦ 4:4…20mA 0 100 % % 0 Min limit Max limit 100 -NC - 0 - 99 - NC, NO I D R/W R/W - -NC - 0 - 99 - NC, NO I D R/W R/W - -NC - 0 - 99 - NC, NO I D R/W R/W - -NC - 0 - 99 - NC, NO I D R/W R/W - -NC - 0 - 99 - NC, NO I D R/W R/W - -NC - 0 - 99 - NC, NO I D R/W R/W - -NC - 0 - 99 - NC, NO I D R/W R/W - -NC - 0 - 99 - NC, NO I D R/W R/W - -NC - 0 - 99 - NC, NO I D R/W R/W - -NC - 0 - 99 - NC, NO I D R/W R/W - -NC - 0 - 99 - NC, NO I D R/W R/W - Ha18 Enable:Ha16 76 +030220921 - rel. 1.0 - 28.02.2011 Type R/W CAREL Address Hb33 Value description Hb32 Max Hb31 Min Hb30 Supply fan overload 1.Position Logic 2.Position Logic Return fan overload 1.Position Logic 2.Position Logic Cool pump 1 overload Position Logic Preheat pump 1 overload Position Logic Reheat pump 1 overload Position Logic Cool pump 2 overload Position Logic Preheat pump 2 overload Position Logic Reheat pump 2 overload Position Logic Cooling flow alarm Position Logic Preheating flow alarm Position Logic Reheating flow alarm Position Logic Heat recovery clogged Position Logic Preheating heaters overload Position Logic Reheating heaters overload Position Logic UOM Hb29 Humidifier alarm Position Logic Inverter supply fan alarm Position Logic Inverter return fan alarm Position Logic Def. Mask Index Hb28 Display description -NC - 0 - 99 - NC, NO I D R/W R/W - -NC - 0 - 99 - NC, NO I D R/W R/W - -NC - 0 - 99 - NC, NO I D R/W R/W - -NC -NC - 0 0 - 99 99 - I D I D R/W R/W R/W R/W - -NC -NC - 0 0 - 99 99 - NC, NO I D I D R/W R/W R/W R/W - -NC - 0 - 99 - NC, NO I D R/W R/W - -NC - 0 - 99 - NC, NO I D R/W R/W - -NC - 0 - 99 - NC, NO I D R/W R/W - -NC - 0 - 99 - NC, NO I D R/W R/W - -NC - 0 - 99 - NC, NO I D R/W R/W - -NC - 0 - 99 - NC, NO I D R/W R/W - -NC - 0 - 99 - NC, NO I D R/W R/W - -NC - 0 - 99 - NC, NO I D R/W R/W - -NC - 0 - 99 - NC, NO I D R/W R/W - -NC - 0 - 99 - NC, NO I D R/W R/W - -NC - 0 - 99 - NC, NO I D R/W R/W - 0 - 99 - NC, NO I D R/W R/W - Description/no tes -NC - 77 NC, NO NC, NO NC, NO CAREL Address -NC - 0 - 99 - NC, NO I D R/W R/W - -NC - 0 - 99 - NC, NO I D R/W R/W - -NC - 0 - 99 - NC, NO I D R/W R/W - -NC - 0 - 99 - NC, NO I D R/W R/W - -NC - 0 - 99 - NC, NO I D R/W R/W - -NC - 0 - 99 - NC, NO I D R/W R/W - -NC - 0 - 99 - NC, NO I D R/W R/W - -NC - 0 - 99 - NC, NO I D R/W R/W - ------- - 0 0 0 0 0 0 16 16 16 16 16 16 I I I I I I R/W R/W R/W R/W R/W R/W - -NO - 0 - 99 - NC, NO I D R/W R/W - - 0 - 99 - NC, NO I D R/W R/W - - 0 - 99 - NC, NO I D R/W R/W - - 0 - 99 - NC, NO I D R/W R/W - -NO - 0 - 99 - NC, NO I D R/W R/W - -NO - 0 - 99 - NC, NO I D R/W R/W - -NO - 0 - 99 - NC, NO I D R/W R/W - -NO - 0 - 99 - NC, NO I D R/W R/W - -NO - 0 - 99 - NC, NO I D R/W R/W - -NO - 0 - 99 - NC, NO I D R/W R/W - -NO - 0 - 99 - NC, NO I D R/W R/W - Min Max R/W Value description UOM Type Filter clogged Position Logic Door switch Position Logic Fire and smoke alarm Position Logic Digital outputs Hb35 Supply fan Position Logic Return fan Position Logic On/Off humidifier Position Logic Hb36 Supply fan 2nd Position Logic Return fan 2nd Position Logic Hb37 Star – Delta logic Supply fan - Line Supply fan - Star Supply fan - Delta Hb38 Return fan - Line Return fan - Star Return fan - Delta Hb39 Fresh air damper Position Logic Bypass damper Position Logic Run around coil Position Logic Rotary recovery Position Logic Hb40 Global alarm Position Logic Serious alarm Position Logic Minor alarm Position Logic Hb41 Unit status Position Logic Filter alarm Position Logic Recovery heater Position Logic Hb42 Cool/heat Position Logic Description/ notes Def. Mask Index Display description Hb34 +030220921 - rel. 1.0 - 28.02.2011 -NO Ha14: run around coil -NO Ha14: rotary recovery on/off -NO 78 Hb46 Hb47 Hb48 +030220921 - rel. 1.0 - 28.02.2011 CAREL Address Value description UOM -NO - 0 - 99 - NC, NO I D R/W R/W - -NO - 0 - 99 - NC, NO I D R/W R/W - -NO - 0 - 99 - NC, NO I D R/W R/W - -NO - 0 - 99 - NC, NO I D R/W R/W - -NO - 0 - 99 - NC, NO I D R/W R/W - -NO - 0 - 99 - NC, NO I D R/W R/W - -NO - 0 - 99 - NC, NO I D R/W R/W - -NO - 0 - 99 - NC, NO I D R/W R/W - -NO - 0 - 99 - NC, NO I D R/W R/W - -NO - 0 - 99 - NC, NO I D R/W R/W - -NO - 0 - 99 - NC, NO I D R/W R/W - -NO - 0 - 99 - NC, NO I D R/W R/W - -NO - 0 - 99 - NC, NO I D R/W R/W - -NO - 0 - 99 - NC, NO I D R/W R/W - -NO - 0 - 99 - NC, NO I D R/W R/W - -NO - 0 - 99 - NC, NO I D R/W R/W - -NO - 0 - 99 - NC, NO I D R/W R/W - -NO - 0 - 99 - NC, NO I D R/W R/W - -NO - 0 - 99 - NC, NO I D R/W R/W - 79 Min Max R/W Hb45 Type Hb44 Cool – Cool/heat pump 1 Position Logic Preheat pump 1 Position Logic Reheat pump 1 Position Logic Cool – Cool/heat pump 2 Position Logic Preheat pump 2 Position Logic Reheat pump 2 Position Logic Cool - Cool/heat floating valve open Position Logic Preheating floating valve open Position Logic Reheating floating valve open Position Logic Cool - Cool/heat floating valve close Position Logic Preheating floating valve close Position Logic Reheating floating valve close Position Logic Cooling – cool/heat step 1 Position Logic Cooling – cool/heat step 2 Position Logic Cooling – cool/heat step 3 Position Logic Preheating heaters 1 Position Logic 2 Position Logic 3 Position Logic 4 Position Logic Def. Mask Index Hb43 Display description Des cript ion/ note s UOM Min Max Value description Type R/W CAREL Address Reheating heaters 1 Position Logic 2 Position Logic 3 Position Logic 4 Position Logic Hb50 Regulation loop on/off 1 Position Logic 2 Position Logic 3 Position Logic 4 Position Logic Analog output Hb51 Supply fan Position Minimum Maximum Hb52 Return fan position Position Minimum Maximum Hb53 Fresh air damper Position Minimum Maximum Hb54 Mixing damper Position Minimum Maximum Hb55 Exhaust damper Position Minimum Maximum Hb56 Bypass damper Position Minimum Maximum Hb57 Humidifier position Position Minimum Maximum Hb58 Preheating valve position Position Minimum Maximum Hb59 Cooling – Cool/heat valve position Position Minimum Maximum Hb60 Modulating preheating heaters Position Minimum Maximum Description/ notes Def. Mask Index Display description -NO - 0 - 99 - NC, NO I D R/W R/W - -NO - 0 - 99 - NC, NO I D R/W R/W - -NO - 0 - 99 - NC, NO I D R/W R/W - -NO - 0 - 99 - NC, NO I D R/W R/W - -NO -NO -NO -NO - 0 0 0 0 - 99 99 99 99 - I D I D I D I D R/W R/W R/W R/W R/W R/W R/W R/W - -0 0 V V 0 0 Minimum 99 Maximum 10 I A A R/W R/W R/W - -0 0 V V 0 0 Minimum 99 Maximum 10 I A A R/W R/W R/W - -0 0 V V 0 0 Minimum 99 Maximum 10 I A A R/W R/W R/W - -0 0 V V 0 0 Minimum 99 Maximum 10 I A A R/W R/W R/W - -0 0 V V 0 0 Minimum 99 Maximum 10 I A A R/W R/W R/W - -0 0 V V 0 0 Minimum 99 Maximum 10 I A A R/W R/W R/W - -0 0 V V 0 0 Minimum 99 Maximum 10 I A A R/W R/W R/W - -0 0 V V 0 0 Minimum 99 Maximum 10 I A A R/W R/W R/W - -0 0 V V 0 0 Minimum 99 Maximum 10 I A A R/W R/W R/W - -0 0 V V 0 0 Minimum 99 Maximum 10 I A A R/W R/W R/W - Hb49 +030220921 - rel. 1.0 - 28.02.2011 80 NC, NO NC, NO NC, NO NC, NO Min Max Type R/W CAREL Address Value descript. UOM Reheating valve Position Minimum Maximum Hb62 Modulating reheaters position Position Minimum Maximum Hb63 Rotary recovery Position Minimum Maximum Hb64 Regulation loop 1 Position Minimum Maximum Hb65 Regulation loop 2 Position Minimum Maximum Hb66 Regulation loop 3 Position Minimum Maximum Hb67 Regulation loop 4 Position Minimum Maximum Hb99 Positions delete Digital inputs Analog inputs Digital outputs Analog outputs c. Factory settings Hc01 Main regulation probe selection Temperature Humidity Hc02 Dampers limits setting Fresh air damper Min Max Mixing damper Min Max Hc03 Damper settings Coil start delay when freecooling/freeheating active Opening time Closing delay Hc04 Fans Star-Delta timing Star - Line Star Star - Delta Hc05 Flow alarm threshold Supply Return Differential Hc06 Fans timing Stop delay Supply - Return Fan1-Fan2 delay Rotation time Overworking time Hc07 Fans flow alarm Start-up delay Running delay Flow warning retries Description/ notes Def. Mask Index Display description -0 0 V V 0 0 Minimum 99 Maximum 10 I A A R/W R/W R/W - -0 0 V V 0 0 Minimum 99 Maximum 10 I A A R/W R/W R/W - -0 0 V V 0 0 Minimum 99 Maximum 10 I A A R/W R/W R/W - -0 0 V V 0 0 Minimum 99 Maximum 10 I A A R/W R/W R/W - -0 0 V V 0 0 Minimum 99 Maximum 10 I A A R/W R/W R/W - -0 0 V V 0 0 Minimum 99 Maximum 10 I A A R/W R/W R/W - -0 0 V V 0 0 Minimum 99 Maximum 10 I A A R/W R/W R/W - No No No No - 0 0 0 0 1 1 1 1 D D D D R/W R/W R/W R/W - R R - Hb61 +030220921 - rel. 1.0 - 28.02.2011 Return Return 0:No¦ 1:Yes 0:No¦ 1:Yes 0:No¦ 1:Yes 0:No¦ 1:Yes 0:Return ¦ 1:Supply ¦ 2:Room I 0:Return ¦ 1:Supply ¦ 2:Room I % % % 0 0 30 100 100 100 A A A R/W R/W R/W - % % 0 0 100 100 A A R/W R/W - 0 min 0 120 I R/W - 120 120 s s 0 0 9999 9999 I I R/W R/W - 0 0 0 99990 99990 99990 I I I R/W R/W R/W - 0 0 0 9999 9999 9999 I I I R/W R/W R/W - 0 0 0 0 -99 999 999 999 999 99 I I I I I R/W R/W R/W R/W R/W - 1 1 0 999 999 5 I I I R/W R/W R/W - 2000 ms 5000 ms 500 ms Ha04: Air flow from: transducer 100 Pa 100 Pa 300 Pa Ha03: Fan type: On/Off (Backup fan) 30 s 0 s 5 s 0 h 0 s 20 5 0 s s - 81 Hc13 Hc14 Hc15 Hc16 Hc17 Hc18 Hc19 Hc20 Hc40 Hc41 Hc42 Hc50 - A A R/W R/W - I D R/W R/W - A A I R/W R/W R/W - I D R/W R/W - A A A R/W R/W R/W - I D R/W R/W - 99, 9, A A R/W R/W - 1 1 0 -99 999 999 999 99 I I I I R R R/W R/W - s s s 0 0 0 999 999 300 I I I R/W R/W R/W - 300 10 0 No No s min s - 0 0 0 - 9999 300 9999 - I I I D D R/W R/W R/W R/W R/W - 0 0 % kHz 0 1 40 16 A A R/W R/W - 0 0 % Hz 0 0 100 320 A A R/W R/W - R/W - R/W - R/W - 180 No s - 1 No 3200 Yes 0:No¦1:Yes 25 2 °C °C -99, 0 99, 9, 180 No s - 1 No 3200 Yes 35 2 10 °C °C min -99.9 0 0 99.9 9.9 999 180 No s - 1 No 3200 Yes 25 35 2 °C °C °C 0 0 0 99.9 99.9 9.9 180 No s - 0 No 3200 Yes 25 2 °C °C -99, 0 30 15 96 0 s s hour s 120 60 60 Linear V/f Optimisation Not used Auto restart Supply VFD Min frequency Max frequency Acceleration time Deceleration time Return VFD Volt at 0 Hz Switch frequency V/f curve midpoint Voltage Frequency Not used +030220921 - rel. 1.0 - 28.02.2011 0:No¦1:Yes 0:No¦1:Yes 0:No¦1:Yes 0:No¦1:Yes 0:No¦1:Yes Type CAREL Address Hc12 R/W Hc11 R/W R/W Value descript ion Hc10 I I Max Hc09 Min Preheating coil Floating valve running time Enable preheating coil water temperature threshold Threshold Differential Cooling coil Floating valve running time Enable cooling coil water temperature threshold Threshold Differential Delay between cooling/heating change Heat/cool Floating valve running time Enable heat/cool coil water temperature threshold Hot threshold Cool threshold Differential Reheating coil Floating valve running time Enable reheating coil water temperature threshold Threshold Differential Pumps Alarm flow delay Startup Running Pumps rotation time Overwork time Heat recovery Defrost delay Start End Clogged alarm delay Air quality Integral time Cleaning time Generic alarm input delay Disable buzzer Enable clock board Supply VFD Volt at 0 Hz Switch frequency V/f curve midpoint Voltage Frequency Supply VFD V/f ratio UOM Hc08 Description / notes Def. Mask Index Display description 0:Linear ¦ 1:Squared ¦ I 2:Programmable ¦ 3:Linear with flux optimisation 0:Not used ¦ 1:Automatic I boost 0:Not used ¦ 1:used I 0 50 1 1 Hz Hz s s 0 Min frequency 0.1 0.1 Max frequency 320 3200 3200 A A A A R/W R/W R/W R/W - 0 0 % kHz 0 1 40 16 A A R/W R/W - 0 0 % Hz 0 0 100 320 A A R/W R/W - 82 Hc52 V/f Optimisation Not used Auto restart Return VFD Min frequency Not used 0 Hz 0 Max frequency 50 Hz 1 1 s s Min frequency 0.1 0.1 No No - No - Yes - 1234 - 0 9999 Auto Auto Auto Auto - Auto Auto Auto Auto On On On On Auto Auto Auto Auto Auto Auto - Auto Auto Auto Auto Auto Auto Auto Auto Auto - Auto Auto Auto Auto Acceleration time Deceleration time d. Inizialization Hd01 Save configuration Hd02 Default installation Erase user settings and install global default values Hd03 Insert new manufacture password (PW2) e. Input/output test He01 Digital output Supply fan Supply fan 2 Return fan Return fan 2 He02 Digital output Supply fan line Supply fan star Supply fan delta Return fan line Return fan star Return fan delta He03 Digital output Unit status Humidifier Rotary recovery/ run around coil He04 Digital output Global alarm Serious alarm Minor alarm Filter alarm He05 Digital output Fresh air damper Bypass damper Reheater 1 Reheater 2 Reheater 3 Reheater 4 He06 Digital output Pre heater 1 Pre heater 2 Pre heater 3 Pre heater 4 He08 Digital output Pump 1 Cooling – Cool/heat Preheating Reheating He09 Digital output Pump 2 Cooling – Cool/heat Preheating Reheating +030220921 - rel. 1.0 - 28.02.2011 0:Linear ¦ 1:Squared ¦ 2:Programmable ¦ 3:Linear with flux optimisation 0:Not used ¦ 1:Automatic boost 0:Not used ¦ 1:used I R/W - I R/W - I R/W - Type CAREL Address Linear R/W Return VFD V/f ratio Value description Max Min UOM Description/ notes Def. Mask Index Hc51 Display description Max frequency 320 A R/W - A R/W - 3200 3200 A A R/W R/W - D I R/W R/W - I R/W - 0:Auto ¦ 1:Off ¦ 2:On 0:Auto ¦ 1:Off ¦ 2:On 0:Auto ¦ 1:Off ¦ 2:On 0:Auto ¦ 1:Off ¦ 2:On I I I I R/W R/W R/W R/W - On On On On On On 0:Auto ¦ 1:Off ¦ 2:On 0:Auto ¦ 1:Off ¦ 2:On 0:Auto ¦ 1:Off ¦ 2:On 0:Auto ¦ 1:Off ¦ 2:On 0:Auto ¦ 1:Off ¦ 2:On 0:Auto ¦ 1:Off ¦ 2:On I I I I I I R/W R/W R/W R/W R/W R/W - Auto Auto Auto On On On 0:Auto ¦ 1:Off ¦ 2:On 0:Auto ¦ 1:Off ¦ 2:On 0:Auto ¦ 1:Off ¦ 2:On I I I R/W R/W R/W - - Auto Auto Auto Auto On On On On 0:Auto ¦ 1:Off ¦ 2:On 0:Auto ¦ 1:Off ¦ 2:On 0:Auto ¦ 1:Off ¦ 2:On 0:Auto ¦ 1:Off ¦ 2:On I I I I R/W R/W R/W R/W - Auto Auto Auto Auto Auto Auto - Auto Auto Auto Auto Auto Auto On On On On On On 0:Auto ¦ 1:Off ¦ 2:On 0:Auto ¦ 1:Off ¦ 2:On 0:Auto ¦ 1:Off ¦ 2:On 0:Auto ¦ 1:Off ¦ 2:On 0:Auto ¦ 1:Off ¦ 2:On 0:Auto ¦ 1:Off ¦ 2:On I I I I I I R/W R/W R/W R/W R/W R/W - Auto Auto Auto Auto - Auto Auto Auto Auto On On On On 0:Auto ¦ 1:Off ¦ 2:On 0:Auto ¦ 1:Off ¦ 2:On 0:Auto ¦ 1:Off ¦ 2:On 0:Auto ¦ 1:Off ¦ 2:On I I I I R/W R/W R/W R/W - Auto Auto Auto - Auto Auto Auto On On On 0:Auto ¦ 1:Off ¦ 2:On 0:Auto ¦ 1:Off ¦ 2:On 0:Auto ¦ 1:Off ¦ 2:On I I I R/W R/W R/W - Auto Auto Auto - Auto Auto Auto On On On 0:Auto ¦ 1:Off ¦ 2:On 0:Auto ¦ 1:Off ¦ 2:On 0:Auto ¦ 1:Off ¦ 2:On I I I R/W R/W R/W - 83 0:No¦1:Yes 0:No¦1:Yes He50 +030220921 - rel. 1.0 - 28.02.2011 Auto - Auto On 0:Auto ¦ 1:Off ¦ 2:On I R/W - Auto - Auto On 0:Auto ¦ 1:Off ¦ 2:On I R/W - Auto Auto Auto Auto - Auto Auto Auto Auto On On On On 0:Auto ¦ 1:Off ¦ 2:On 0:Auto ¦ 1:Off ¦ 2:On 0:Auto ¦ 1:Off ¦ 2:On 0:Auto ¦ 1:Off ¦ 2:On I I I I R/W R/W R/W R/W - Auto Auto Auto Auto - Auto Auto Auto Auto On On On On 0:Auto ¦ 1:Off ¦ 2:On 0:Auto ¦ 1:Off ¦ 2:On 0:Auto ¦ 1:Off ¦ 2:On 0:Auto ¦ 1:Off ¦ 2:On I I I I R/W R/W R/W R/W - Auto Auto Auto Auto Auto - 0 0 0 0 0 100 100 100 100 100 0:Auto ¦ 1:0% ¦ 101:100% 0:Auto ¦ 1:0% ¦ 101:100% 0:Auto ¦ 1:0% ¦ 101:100% 0:Auto ¦ 1:0% ¦ 101:100% 0:Auto ¦ 1:0% ¦ 101:100% I I I I I R/W R/W R/W R/W R/W - Auto Auto Auto Auto - 0 0 0 0 101 101 101 101 0:Auto ¦ 1:0% ¦ 101:100% 0:Auto ¦ 1:0% ¦ 101:100% 0:Auto ¦ 1:0% ¦ 101:100% 0:Auto ¦ 1:0% ¦ 101:100% I I I I R/W R/W R/W R/W - Auto Auto Auto - 0 0 0 101 101 101 0:Auto ¦ 1:0% ¦ 101:100% 0:Auto ¦ 1:0% ¦ 101:100% 0:Auto ¦ 1:0% ¦ 101:100% I I I R/W R/W R/W - Auto Auto Auto Auto - 0 0 0 0 101 101 101 101 0:Auto ¦ 1:0% ¦ 101:100% 0:Auto ¦ 1:0% ¦ 101:100% 0:Auto ¦ 1:0% ¦ 101:100% 0:Auto ¦ 1:0% ¦ 101:100% I I I I R/W R/W R/W R/W - 0 Stop % - 0 Stop 100 Run 0: Stop ¦ 1: Run A D R/W R/W - 0 Stop % - 0 Stop 100 Run 0: Stop ¦ 1: Run A D R/W R/W - 84 Type CAREL Address He40 R/W He15 Value description He14 Max He13 Min He12 UOM He11 Digital output Cooling – Cool/heat floating valve open Cooling – Cool/heat floating valve close Preheating floating valve open Preheating floating valve close Reheating floating valve open Reheating floating valve closed Digital output Regulation loop 1 Regulation loop 2 Regulation loop 3 Regulation loop 4 Analog output Supply fan Return fan Exhaust damper Fresh air damper Mixing damper Analog output Bypass damper Rotary recovery Preheat heater Reheat heater Analog output Valve Cooling – Cool/heat Preheating Reheating Analog output Regulation loop 1 Regulation loop 2 Regulation loop 3 Regulation loop 4 Supply VFD Require Force VFD Return VFD Require Force VFD Description/ notes Def. Mask Index He10 Display description 10 ALARMS Alarm button Enter Alarm log The screen displays the alarm code, description and readings of the supply and return probes at the moment the alarm was activated. 10.1 Types of alarms For configuration of the alarms see paragraph 6.1.1. Input alarms: generic (shuts down the unit), serious (stops the unit immediately). Output alarms: general (minor+serious), minor (see table of alarms), serious (see table of alarms) and filters (supply 1 +supply 2 +return +filters). There are three types of alarms: • with manual reset; • with automatic reset: the alarm is resets and the unit restarts automatically when the alarm condition has been resolved; • with semiautomatic reset: reset is automatic but the alarm signal remains active. When an alarm occurs, the bell button flashes with a red light and the buzzer sounds. To mute the buzzer, press the bell button, while to reset the alarms press and hold the bell button for 3 s. Key 1 Supply probe 10.2 Alarm log 2 Return probe The 50 most recent alarms are saved in a FIFO alarm log. The last alarm activated is added to the bottom of the alarm log. To access the log, from the standard display: 10.3 Alarm table Code Description Type of reset A01 A02 A03 A04 Supply temperature probe Return temperature probe Outside temperature sensor Humidity probe supply Automatic Automatic Automatic Automatic A05 Return humidity probe Automatic A06 Outside humidity probe Automatic A07 A08 A09 A10 A11 A12 Supply pressure probe Return pressure probe fault Frost protection temperature probe Saturated temperature probe Air quality probe (CO2) Air quality probe (VOC) Automatic Automatic Automatic Automatic Automatic Automatic A13 Exhaust temperature probe Automatic A14 A15 A16 A17 A18 A19 A20 A21 A22 A23 A24 B01 B02 B03 Cooling or heat/cool coil temperature probe Preheating coil temperature probe fault Reheating coil temperature probe fault Auxiliary probe 1 Auxiliary probe 2 Auxiliary probe 3 Auxiliary probe 4 Room temperature probe fault Room humidity probe Analogue input probe offset Control probe fault Dirty heat recovery unit alarm Reheating heaters thermal overload alarm Preheating heaters thermal overload alarm Automatic Automatic Automatic Automatic Automatic Automatic Automatic Automatic Automatic Automatic Automatic Automatic Manual Manual +030220921 - rel. 1.0 - 28.02.2011 Effect on control Stop temperature limit function, stop reheating if Sreg=return Stop set point compensation function and heat recovery Stop set point compensation function and heat recovery Stop humidity limit function Stop heat recovery by enthalpy, freecooling by enthalpy, if return probe= Sreg stop unit Stop freecooling/ freeheating and heat recovery by enthalpy functions Stop individual fan or unit as per parameter Ha04 Stop individual fan or unit as per parameter Ha04 Shutdown unit Fan at MAX and outside damper open at MAX Fan at MAX and outside damper open at MAX Stop heat recovery function if frost protection control on exhaust probe Deactivate coil Deactivate coil Deactivate coil Stop auxiliary control loop 1 Stop auxiliary control loop 2 Stop auxiliary control loop 3 Stop auxiliary control loop 4 Stop room protection Eliminate offset Shutdown unit Stop heat recovery function Shutdown unit Shutdown unit 85 Serious alarm (G)/Minor (L) Serious Serious Minor Serious Serious Minor Serious Serious Serious Minor Minor Minor Minor Minor Minor Minor Minor Minor Minor Minor Minor Minor Minor Serious Minor Serious Serious B04 B05 B06 B07 E11 E12 E13 E21 E22 E23 Cooling coil inlet limit alarm Preheat coil inlet limit alarm Reheat coil inlet limit alarm Heat / cool coil inlet limit alarm pCOe 1 offline Incorrect probe 1, 2 configuration on pCOe 1 Incorrect probe 3, 4 configuration on pCOe 1 pCOe 2 offline Incorrect probe 1, 2 configuration on pCOe 2 Incorrect probe 3, 4 configuration on pCOe 2 Automatic Automatic Automatic Automatic Semiautomatic Automatic Automatic Semiautomatic Automatic Automatic F01 Supply 1 flow alarm Manual F02 Return 1 flow alarm Manual F03 Supply 2 flow alarm Manual F04 Return 2 flow alarm Manual F05 Supply fan 1 overload Manual F06 Return fan 1 overload Manual Ha04 global individual Ha04 global individual F07 Supply inverter alarm Manual F08 Return inverter alarm Manual F09 Supply fan 2 overload Manual F10 Return fan 2 overload Manual F11 F12 F13 F14 G01 G02 G03 G04 G05 H01 M11 M12 M13 M21 M22 M23 M31 M32 M33 M41 M42 Supply 1 flow warning Supply 2 flow warning Return 1 flow warning Return 2 flow warning Clock fault Extended memory fault Frost protection alarm AIN Frost protection alarm DIN Low room temperature protection Humidifier alarm Belimo 1 Offline Belimo 1 probe fault Belimo 1 Fire/Smoke Belimo 2 Offline Belimo 2 probe fault Belimo 2 Fire/Smoke Belimo 3 Offline Belimo 3 probe fault Belimo 3 Fire/Smoke Belimo 4 Offline Belimo 4 probe fault Automatic Automatic Automatic Automatic Manual Manual Automatic Automatic Automatic Manual Semiautomatic Semiautomatic Manual Semiautomatic Semiautomatic Manual Semiautomatic Semiautomatic Manual Semiautomatic Semiautomatic +030220921 - rel. 1.0 - 28.02.2011 Deactivate coil (after 10 min) Deactivate coil (after 10 min) Deactivate coil (after 10 min) Deactivate coil (after 10 min) Shutdown unit Immediately stop unit Immediately stop unit Shutdown unit Immediately stop unit Immediately stop unit Ha04 effect global total shutdown individual stop supply fan and control devices Ha04 effect global total shutdown individual stop return fan Ha04 effect global total shutdown individual stop supply fan and control devices Ha04 effect global total shutdown individual stop return fan Stop all control devices on supply 86 effect total shutdown stop return fan Serious Serious Serious Serious Serious Serious Serious Serious Serious Serious Serious Serious Serious Serious Serious Serious effect total shutdown Serious stop supply fan and control devices Ha04 effect Serious global total shutdown individual stop return fan Stop all control devices on supply Serious Ha04 effect Serious global total shutdown individual stop return fan Perform number of attempts set on Hc07 Minor Perform number of attempts set on Hc07 Minor Perform number of attempts set on Hc07 Minor Perform number of attempts set on Hc07 Minor Stop time bands, maintains last operating mode Minor Deactivate load default parameters Ha96 Minor Stop fans, close dampers, activate preheating coil at Minor 100%, and cooling coil at 50%, all pumps on Minor Control operates as if it were ON Minor Stop humidification function Serious Immediately stop unit Serious Depends on probe function Minor Immediately stop unit Serious Immediately stop unit Serious Depends on probe function Minor Immediately stop unit Serious Immediately stop unit Serious Depends on probe function Minor Immediately stop unit Serious Immediately stop unit Serious Depends on probe function Minor Code Description on display Type of reset Effect on control Serious alarm (G)/Minor (L) M43 M51 Belimo 4 Fire/Smoke Belimo 5 Offline Manual Semiautomatic Immediately stop unit Immediately stop unit Serious Serious M52 M53 M61 M62 M63 M71 M72 M73 M81 M82 M83 O01 P01 P02 P03 P04 P05 P06 P07 P08 P09 P10 P11 P12 P13 P14 P15 P16 P17 P18 S11 S12 S13 S21 S22 S23 S31 S32 S33 S41 S42 S43 S51 S52 S53 S61 S62 S63 T01 T02 T03 T04 T05 T06 T07 T08 T09 T10 T11 T12 Belimo 5 probe fault Belimo 5 Fire/Smoke Belimo 6 Offline Belimo 6 probe fault Belimo 6 Fire/Smoke Belimo 7 Offline Belimo 7 probe fault Belimo 7 Fire/Smoke Belimo 8 Offline Belimo 8 probe fault Belimo 8 Fire/Smoke BMS offline alarm Cooling pump 1 flow warning Cooling pump 2 flow warning Cooling pump 1 flow alarm Cooling pump 2 flow alarm Cooling pump 1 thermal overload alarm Cooling pump 2 thermal overload alarm Preheating pump 1 flow warning Preheating pump 2 flow warning Preheating pump 1 flow alarm Preheating pump 2 flow alarm Preheating pump 1 thermal overload alarm Preheating pump 2 thermal overload alarm Reheating pump 1 flow warning Reheating pump 2 flow warning Reheating pump 1 flow alarm Reheating pump 2 flow alarm Reheating pump 1 thermal overload alarm Reheating pump 2 thermal overload alarm Serial humidity probe 1 fault Serial probe 1 offline Serial temperature probe 1 fault Serial humidity probe 2 fault Serial probe 2 offline Serial temperature probe 2 fault Serial humidity probe 3 fault Serial probe 3 offline Serial temperature probe 3 fault Serial humidity probe 4 fault Serial probe 4 offline Serial temperature probe 4 fault Serial humidity probe 5 fault Serial probe 5 offline Serial temperature probe 5 fault Serial humidity probe 6 fault Serial probe 6 offline Serial temperature probe 6 fault Humidifier maintenance warning Supply fan 1 maintenance warning Return fan 1 maintenance warning Cooling pump 1 maintenance warning Cooling pump 2 maintenance warning Preheating pump 1 maintenance warning Preheating pump 2 maintenance warning Preheating pump 1 maintenance warning Preheating pump 2 maintenance warning Reheat heater 1 warning Reheat heater 2 warning Reheat heater 3 warning Semiautomatic Manual Semiautomatic Semiautomatic Manual Semiautomatic Semiautomatic Manual Semiautomatic Semiautomatic Manual Automatic Automatic Automatic Manual Manual Manual Manual Automatic Automatic Manual Manual Manual Manual Automatic Automatic Manual Manual Manual Manual Semiautomatic Semiautomatic Semiautomatic Semiautomatic Semiautomatic Semiautomatic Semiautomatic Semiautomatic Semiautomatic Semiautomatic Semiautomatic Semiautomatic Semiautomatic Semiautomatic Semiautomatic Semiautomatic Semiautomatic Semiautomatic Manual Manual Manual Manual Manual Manual Manual Manual Manual Manual Manual Manual Depends on probe function Immediately stop unit Immediately stop unit Depends on probe function Immediately stop unit Immediately stop unit Depends on probe function Immediately stop unit Immediately stop unit Depends on probe function Immediately stop unit Replace BMS probes with backup probes Perform number of attempts set on Ha10 Perform number of attempts set on Ha10 Depends on the no. of pumps Depends on the no. of pumps Depends on the no. of pumps Depends on the no. of pumps Perform number of attempts set on Ha10 Perform number of attempts set on Ha10 Depends on the no. of pumps Depends on the no. of pumps Depends on the no. of pumps Depends on the no. of pumps Perform number of attempts set on Ha10 Perform number of attempts set on Ha10 Depends on the no. of pumps Depends on the no. of pumps Depends on the no. of pumps Depends on the no. of pumps Minor Serious Serious Minor Serious Serious Minor Serious Serious Minor Serious Serious Minor Minor Serious Serious Serious Serious Minor Minor Serious Serious Serious Serious Minor Minor Serious Serious Serious Serious Minor Minor Minor Minor Minor Minor Minor Minor Minor Minor Minor Minor Minor Minor Minor Minor Minor Minor Minor Minor Minor Minor Minor Minor Minor Minor Minor Minor Minor Minor +030220921 - rel. 1.0 - 28.02.2011 Reset service hours (Gf*) Reset service hours (Gf*) Reset service hours (Gf*) Reset service hours (Gf*) Reset service hours (Gf*) Reset service hours (Gf*) Reset service hours (Gf*) Reset service hours (Gf*) Reset service hours (Gf*) Reset service hours (Gf*) Reset service hours (Gf*) Reset service hours (Gf*) 87 Code Description on display Type of reset T13 T14 T15 T16 T17 T18 T19 T20 U01 U02 U03 U04 U05 U06 U07 U08 V11 Heat wheel warning Warning supply fan 2 maintenance Warning return fan 2 maintenance Reheat heater 4 warning Preheat heater 1 warning Preheat heater 2 warning Preheat heater 3 warning Preheat heater 4 warning Generic alarm from digital input Serious alarm from digital input Supply filter 1 alarm Supply filter 2 alarm Return filter alarm Smoke/fire alarm Open door alarm Dirty filter alarm Supply VFD offline Manual Manual Manual Manual Manual Manual Manual Manual Automatic Manual Automatic Automatic Automatic Manual Manual Automatic Semiautomatic V12 Supply VFD alarms 1-2-3-5 Semiautomatic V13 V14 V15 V16 V21 V22 V23 V24 V25 V26 Z01 Z02 Supply VFD alarms 9-11-13-14-15 Supply VFD alarms 16-17-22-25-29 Supply VFD alarms 34-40-41-50-51 Supply VFD alarms 52-53-54-55 Return VFD offline Return VFD alarms 1-2-3-5 Return VFD alarms 9-11-13-14-15 Return VFD alarms 16-17-22-25-29 Return VFD alarms 34-40-41-50-51 Return VFD alarms 52-53-54-55 No active alarms Alarms reset Semiautomatic Semiautomatic Semiautomatic Semiautomatic Semiautomatic Semiautomatic Semiautomatic Semiautomatic Semiautomatic Semiautomatic +030220921 - rel. 1.0 - 28.02.2011 Effect on control Reset service hours (Gf*) Reset service hours (Gf*) Reset service hours (Gf*) Reset service hours (Gf*) Reset service hours (Gf*) Reset service hours (Gf*) Reset service hours (Gf*) Reset service hours (Gf*) Stop unit Stop unit Immediately stop unit Immediately stop unit Immediately stop unit Ha04 global individu al effect total shutdown stop supply fan and control devices Immediately stop unit Ha04 global individual 88 effect total shutdown stop return fan Serious alarm (G)/Minor (L) Minor Minor Minor Minor Minor Minor Minor Minor Minor Serious Minor Minor Minor Serious Serious Minor Serious Serious/Minor Serious/Minor Serious/Minor Serious/Minor Serious/Minor Serious Serious/Minor Serious/Minor Serious/Minor Serious/Minor Serious/Minor 11 pCO Manager 11.1 Installation 11.3 Commissioning On the http://ksa.carel.com website, under the pCO sistema section, select pCO_manager. After having accepted the general license conditions for free use of the software, a dialogue box is displayed for downloading the pCO_manager.zip file. Use the mouse to select “commissioning” at the bottom left. A new work area will be displayed. Select the directory where the “.2cf” files are located. 11.2 PC – pCO controller connection The computer’s USB port must be connected via cable to the USB/RS485 converter and this must be connected via a telephone cable to the pLAN port on the pCO. When opening the pCO_manager program, a screen is shown with the connection settings at the top right. Choose: 1) local connection; 2) baudrate: Auto; 3) search device: Auto (pLAN). As regards the port number, follow the instructions in the wizard for automatic recognition (e.g. COM4) Select the configure device function to show all the application variables. These can be selected based on the categories shown below Power down the controller and then power up again, click the button to make the connection; once connected the “ONLINE” icon will flash in the bottom left corner. 11.3.1 Setting a parameter Select the directory where the application files are located and select “Upload” to load the application to the pCO controller. +030220921 - rel. 1.0 - 28.02.2011 Choose the category of parameters and then the desired parameter: this will be highlighted in blue (e.g. recovery.recovery_type). 89 To set the parameter: 1) double click the “read” column. A dialogue box is displayed for entering the new value of the parameter. 2) choose the new value (e.g. 3) and then click OK. The new value will be shown in the “written” column. To write the parameter to the pCO controller, press the right mouse button and then select “write selected”. The value will be shown in the “written” column as confirmation. At the end, select “Save” to generate the “.2cw” project file. +030220921 - rel. 1.0 - 28.02.2011 90 CAREL INDUSTRIES - HQs Via dell’Industria, 11 - 35020 Brugine - Padova (Italy) Tel. (+39) 049.9716611 Fax (+39) 049.9716600 www.carel.com - e-mail: [email protected] cod. +030220921 Rel. 1.0 28/02/2011 Agency