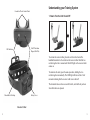
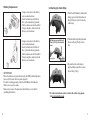
1
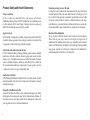
Owner’s Manual
by Dogtra Company
22912 Lockness Avenue, Torrance, CA 90501 U.S.A.
Tel : 310-534-0101 / Fax : 310-534-9111
Toll free : 1-888-811-9111 / Email : [email protected]
Website : www.iqpetcollar.com
Copyright © 2013 Dogtra Company All Rights Reserved (1)
1
2
by Dogtra
Portable Remote Controlled Dog Training Collars
Owner’s Manual
Please read this manual before operating your system,
and keep it for future reference.
1
Product Safety and Health Statements
Proper e-collar use
iQ Pet e-collars are intended for the sole purpose of behavior
PRGL¿FDWLRQRIGRJV7KH\DUH127LQWHQGHGIRUXVHRQKXPDQVRUXVH
on other animals. iQ Pet and Dogtra Company does not assume any
liability for the improper use of an iQ Pet e-collar.
Aggressive dogs
iQ Pet highly recommends consulting a dog training professional that
specializes in dog aggression when using an e-collar to correct dogs that
are aggressive towards other dogs, animals or people.
Interference with other electronic devices
L43HW¶VLQGXVWU\OHDGLQJWHFKQRORJ\¿OWHULQJV\VWHPHQVXUHVPLQLPDO
interference with other electronic devices (garage door openers, mobile
SKRQHVHWF2XUGLJLWDOPLFURSURFHVVRURIIHUVWKRXVDQGVRIXQLTXH
codes to eliminate frequency match-up with other iQ Pet e-collars. iQ
Pet recommends consulting your physician if you are going to use the
e-collar and you have any type of medical devices.
Duration your dog can wear the unit
Leaving the receiver/collar in the same location on the dog’s neck for an
extended period of time can cause skin irritation. If the dog is to wear
the e-collar for long periods, occasionally reposition the receiver/collar
so that the contact points are moved to a different location on the dog’s
neck. Make sure you check for skin irritation each time you use the unit.
If your dog exhibits signs of skin irritation, consult with a veterinarian.
5HDFWLRQWRWKHVWLPXODWLRQ
Every dog has a different tolerance and reaction to the stimulation.
Please look at your dog’s reaction to find just the right level of
stimulation. The stimulation level may vary depending on the situation
DQGOHYHORIGLVWUDFWLRQV1RUPDOO\DGLVWUDFWHGGRJFKDVLQJDQRWKHU
dog, person, squirrel, etc.) will require a higher level of stimulation to
control compared to when there is no distraction.
Inadvertent activation
,IWKH3XOVDWLQJ1LFNEXWWRQLVKHOGGRZQIRUVHFRQGVRUPRUHWKHXQLW
will automatically shut down. It reactivates when the button is released
and depressed again.
3URSHU¿WRIWKH5HFHLYHU&ROODU
$ORRVH¿WFDQDOORZWKHFROODUWRPRYHDURXQGRQWKHGRJ¶VQHFN:KHQ
this happens, the contact points may rub the skin and cause irritation. If
the unit is too loose, the contact points will not make proper contact and
your dog will not receive consistent stimulation.
2
3
Table of Contents
At a Glance ..................................................................................... 5
At a Glance
Included in Package
Main Features of the iQ CLiQ ...................................................... 6
2YHUYLHZ 7
Understanding Your Training System .......................................... 9
+RZWR7XUQWKH8QLW2QDQG2II 9
Handheld Transmitter
2. How the Buttons Work ........................................................ 10
Receiver/Collar
Detachable Strap
Owner's Manual
3. How to Fit the Collar on the Dog ........................................ 11
4. Finding the Right Stimulation Level ................................... 12
5. Maximizing the Distance ..................................................... 12
6. Checking the Status Using the LED Indicator ................... 13
7. Battery Replacement ............................................................ 14
3V Coin Batteries (4)
2ZQHU¶V0DQXDO
Optional Accessories
To purchase optional accessories, please visit www.iqpetcollar.com or
call our customer service at 1-888-811-9111.
8. Attaching the Collar Strap ................................................... 15
9. Expanding the iQ CLiQ into a 2-Dog System..................... 16
General Training Tips .................................................................... 17
Troubleshooting Guide .................................................................. 20
Warranty and Repair Information ................................................. 22
4
5
Main Features of the iQ CLiQ
([SDQGDEOHWR'RJ6\VWHP
&OLFNHU
5HSODFHDEOH&RLQ/LWKLXP%DWWHULHV,QFOXGHG
Overview
Antenna
LED Indicator
Stimulation
Intensity Dial
2Q2II$FWLYDWLRQ
Magnet (Red Dot)
)XOO\:DWHUSURRI5HFHLYHU&ROODU
Dog 1
Stimulation
:DWHU5HVLVWDQW+DQGKHOG7UDQVPLWWHU
<DUG5DQJH
Dog 2
Stimulation
/HYHOVRI6WLPXODWLRQ
1LFNDQG3XOVDWLQJ1LFN6WLPXODWLRQ
Clicker
&RQGXFWLYH3ODVWLF&RQWDFW3RLQWV
Battery Cover
5HGXFHG6L]H5HFHLYHU&ROODU
'HWDFKDEOH&ROODU6WUDS
6
+DQGKHOG7UDQVPLWWHU
7
Understanding your Training System
Conductive Plastic Contact Points
1. How to Turn the Unit On and Off
2Q2II$FWLYDWLRQ
Magnet (Red Dot)
LED Indicator
To activate the receiver/collar, place the red dot on the back of the
handheld transmitter to the red dot on the receiver/collar. Hold the two
red dots together for a moment until the LED light on the receiver/collar
comes on.
To deactivate the unit, repeat the same procedure, holding the two
red dots together momentarily. The LED light will turn red for a brief
moment indicating that the receiver/collar is now shut off.
The transmitter does not have an on/off switch, and it will only activate
when the buttons are pressed.
Battery Cover
Detachable Collar Strap
5HFHLYHU&ROODU
8
9
2. How the Buttons Work
3. How to Fit the Collar on the Dog
Stimulation is sent to the receiver/collar by pressing one of the buttons
on the handheld transmitter.
The number on the button controls the corresponding receiver/collar.
7KHFROODUVKRXOGEH¿WWHGVRWKDWWKH&RQGXFWLYH3ODVWLF&RQWDFW3RLQWV
SUHVV¿UPO\DJDLQVWWKHGRJ¶VVNLQ:KHQSURSHUO\¿WWHG\RXVKRXOGEH
DEOHWR¿WD¿QJHURUWZRVQXJO\LQEHWZHHQWKHFRQWDFWSRLQWVDQG\RXU
GRJ¶VVNLQ:KHQSURSHUO\¿WWHGWKHUHFHLYHUFROODUVKRXOGQRWPRYHRQ
the dog. The best location for the receiver/collar box is off to either side
of the dog’s windpipe.
%XWWRQ'RJ6WLPXODWLRQ%XWWRQ
When the Dog 1 Stimulation Button
is pressed, the corresponding receiver/
collar will receive a momentary burst of
stimulation. Holding down this button
will send a pulsating stimulation for
up to 5 seconds. The stimulation will
automatically shut off when the button is
depressed for more than 5 seconds.
A loose fit can allow the receiver/collar to move around on the dog’s
neck. When this happens, the contact points may rub the skin and cause
LUULWDWLRQ,IWKHFROODULVWRRWLJKWWKHGRJPD\KDYHGLI¿FXOW\EUHDWKLQJ
%XWWRQ'RJ6WLPXODWLRQ%XWWRQ
When the iQ CLiQ has been expanded to a 2-dog system, the Dog 2
Stimulation Button will send a momentary burst of stimulation to the
corresponding receiver/collar. Holding down the stimulation button will
send a pulsating stimulation for up to 5 seconds. The stimulation will
automatically shut off when the button is depressed for more than 5
seconds.
When a button is pressed, the LED will illuminate on the handheld
transmitter and the corresponding receiver/collar.
10
11
4. Finding the Right Stimulation Level
6. Checking the Status Using the LED Indicator
Stimulation level is controlled by the
stimulation intensity dial: (0) being the
lowest level and (100) being the highest
level. Setting adjustment depends on your
dog’s temperament and threshold for
stimulation. Always start at the lowest level
and work your way up. An appropriate
level is when the dog responds to the
stimulation with a mild negative reaction
such as jerking or tensing of the neck
muscles. When the dog’s attitude changes,
especially during times of increased excitement or distraction, you may
need to adjust the intensity level upwards.
5. Maximizing the Distance
The iQ CLiQ has a 100 Yard range. Depending on the way you hold
your transmitter, the range may vary. Hold the transmitter away from
your body to get the greatest range. Avoid touching the antenna as the
range may substantially decrease.
:KHQWKHUHFHLYHULVRQDQGUHDG\WRRSHUDWHWKH/('ÀDVKHVHYHU\
seconds. The LED will glow steadily on both the handheld transmitter
and the receiver/collar while any buttons are pressed.
The LED color indicates the battery life level.
*UHHQ 6XI¿FLHQWFKDUJH5HG 5HSODFHEDWWHU\
The LED on the handheld transmitter and receiver/collar also indicates
WKHUHPDLQLQJEDWWHU\OLIHZLWKDJUHHQ/('PHDQLQJVXI¿FLHQWFKDUJH
and a red LED meaning the battery needs to be replaced.
If the LED does not illuminate when a handheld transmitter button is
pressed, the unit may need battery replacement.
Maximum Range
12
Typical Range
Minimum Range
13
7. Battery Replacement
8. Attaching the Collar Strap
- Using a coin, unscrew the battery
cover counterclockwise.
- Insert two batteries with both of
the (+) plus sides facing upwards.
- Check to make sure that the rubber
2ULQJLVLQSODFHDQGVFUHZLQWKH
battery cover clockwise.
- Using a coin, unscrew the battery
cover counterclockwise.
- Insert two batteries with both of
the (+) plus sides facing upwards.
- Check to make sure that the rubber
2ULQJLVLQSODFHDQGVFUHZLQWKH
battery cover clockwise.
* ATTENTION
- When the batteries are placed incorrectly, the LED indicator light may
turn on, but the unit will not operate properly.
- The unit is working properly when the LED Battery life indicator
blinks once every 4 seconds.
- Make sure to remove the protective plastic battery covers before
installing the batteries.
14
1. With the LED indicator and red dot
facing up, insert the left portion of
the iQ CLiQ receiver box into the
collar strap.
Pull the strap around the body
RIWKHL4&/L4LQWKHGLUHFWLRQ
shown.
Hold strap here
3XOOWKHFROODUVWUDS¿UPO\DURXQG
the rest of the iQ CLiQ receiver
box.
Hold strap here
3. Be sure that the collar strap is
wrapped fully around the receiver
box of the iQ CLiQ.
* For video instructions on how to attach the collar strap, please
visit ZZZLTSHWFROODUFRP
15
9. Expanding the iQ CLiQ into a 2-Dog System
General Training Tips
1. To turn the iQ CLiQ into a 2-dog system, start with the handheld
transmitter with the stimulation set to level 0. Hold down buttons
1 and 2 simultaneously for 5 seconds. You should now see that the
LED indicator is blinking rapidly.
*HWWLQJVWDUWHGZLWK\RXUL4&/L4
Your dog must know some very basic obedience commands before
EHJLQQLQJWUDLQLQJZLWKWKHL4&/L4$GRJOHDUQVE\¿UVWEHLQJVKRZQ
a command, followed by lots of repetition over an extended period. As
WKHGRJEHFRPHVSUR¿FLHQWDWWKHVHFRPPDQGVWKHWUDLQHUFDQLQWURGXFH
distractions and different locations to strengthen them. Throw in the
correct amount of positive and negative reinforcement and you should
end up with a well-mannered dog.
2. With the receiver/collar turned off, take the handheld transmitter and
hold the two red on/off dots together for 5 seconds. The LED indicator
should now be blinking rapidly.
3. While both the handheld transmitter and receiver/collar LED
indicators are rapidly blinking, press button 2 to code that button to
the receiver/collar you desire. The LED Indicators on both the
handheld transmitter and receiver/collar will blink rapidly for 15
seconds or until they have been coded together.
4. When the iQ CLiQ has been coded with an additional receiver/collar,
EXWWRQZLOOIXQFWLRQDVWKH1LFNDQG3XOVDWLQJ1LFNVWLPXODWLRQRQ
WKH¿UVWUHFHLYHUFROODU%XWWRQZLOOIXQFWLRQDVWKH1LFNDQG
3XOVDWLQJ1LFNVWLPXODWLRQRQWKHQHZO\FRGHGVHFRQGUHFHLYHUFROODU
5. To go back to a 1-dog system, repeat steps 1 and 2. While both the
handheld transmitter and receiver/collar LED indicators are rapidly
blinking, press button 1 on the handheld transmitter.
6. When done correctly, both buttons 1 and 2 will now only operate
the one receiver/collar you have coded. To check that the handheld
transmitter is coded to the receiver/collar, press a button on the
handheld transmitter, and the corresponding receiver/collar LED
indicator will blink.
16
Obedience training on the leash
Your dog must fully understand the obedience commands (sit, stay,
here, heel and kennel) before using the e-collar for reinforcement of
these commands. A leash attached to a standard collar is used to "teach"
the dog the basic obedience commands (here, heel, sit, and stay). A tug
on the leash/collar is used to reinforce the command. When the dog
FRPSOLHVZLWKWKHFRPPDQGXVHSRVLWLYHUHLQIRUFHPHQWSUDLVH2QFHWKH
dog understands these commands, the e-collar can be used to reinforce
them.
7UDLQLQJZLWKWKH&OLFNHU
1. Why a clicker?
Since its introduction to dog training in the early 90s, the clicker
has become a go-to tool among pro trainers and pet owners alike.
Its utility as a training aid has been proven across a wide range of
GLVFLSOLQHVLQFOXGLQJIRUPDOREHGLHQFHDQGEHKDYLRUPRGL¿FDWLRQ
3RVLWLYHUHLQIRUFHPHQWDQGPDUNHUWUDLQLQJ
Positive reinforcement strengthens correct behaviors by rewarding
them. Rewarding your dog for a job well done is an important part
of every sound training method, and as with effective punishment,
17
good timing is critical. However, timing a reward with precision can
be challenging, especially when delivering a toy or treat from your
pocket.
The clicker, which makes a noise that is perfectly consistent and
distinct, eliminates this problem by marking the exact moment
your dog does something correctly. Clicking right as the behavior
is occurring tells your dog that what he is doing in that moment
has earned him a reward. You may then deliver the reward shortly
afterward (a two second interval is best), even if the dog has moved
on to some other behavior.
3. Getting started with your clicker
To teach your dog what the click means, practice clicking and then
treating. Repeat until your dog clearly recognizes the sound and
responds with a look of anticipation.
&DSWXULQJDQGVKDSLQJ
You may select any behavior your dog does on his own and put it on
cue, by clicking and rewarding when you see it. Take picking up a toy
or lying down. By clicking and rewarding, you mark the behavior as
something worth offering. Repeat until your dog offers it frequently
enough that you can cue it ahead of time. Your dog will associate the
cue with the selected behavior, after which you only click and reward
it when performed on cue.
To shape new skills, begin by clicking and rewarding the closest
behavior you are able to observe or elicit. As your dog offers it more
reliably, gradually raise the bar, only clicking and rewarding those
examples that come closest to the mark.
%HJLQQLQJHOHFWULFFROODUWUDLQLQJ
When you feel your dog understands the obedience commands on the
leash we can now start with the electric collar training. With the dog
on the leash wearing the electric collar continue with your obedience
GULOOV/LJKWVWLPXODWLRQ1LFNRU3XOVDWLQJ1LFNLVJRLQJWREHDSSOLHG
as a command is given; the stimulation is removed as the dog complies.
Through repetition, a dog learns to turn off the light stimulation by
performing the command. E-collar training is another form of negative
reinforcement, similar to the leash and standard collar training. When the
dog complies with the command, we use praise/positive reinforcement.
7KH¿QDOVWHSLVWKHDYRLGDQFHSKDVHLQZKLFKWKHGRJOHDUQVWKDWKHFDQ
avoid the stimulation altogether by performing your commands. When
these training procedures are complete, the electric collar is used as a
reminder when the dog does not comply with your commands at home
or in the field. Keep your initial training sessions short and positive.
Dogs have a short attention span, especially young dogs.
+RZPXFKVWLPXODWLRQWRXVH
Always start with low levels of stimulation and work your way up
depending on the disposition of your dog and any given situation. By
using only enough stimulation to get your point across, you will have
a more controllable environment and a dog that is under less stress.
Animals (and humans) perform better in a less stressful environment.
)RUPRUHWUDLQLQJLQIRUPDWLRQSOHDVHYLVLWRXUZHEVLWHDW
ZZZLTSHWFROODUFRP.
Your dog should enjoy working to earn clicks, and doing so should
develop his mind more fully.
18
19
Troubleshooting Guide
+RZGR,UHSODFHWKHEDWWHULHVDQGSURSHUO\PDLQWDLQWKHL4
&/L4"
- If the iQ CLiQ does not turn on, the batteries may need to be replaced.
- With an average usage of 10 hours a day, the batteries will need to be
replaced every 2 weeks.
7RFOHDQWKHL4&/L4UHFHLYHUFROODU¿UVWPDNHVXUHWKHEDWWHU\FRYHU
is fully sealed, then rinse the receiver/collar with soap and water. Dry
the unit with a towel thoroughly before using. To clean the handheld
transmitter, wipe down the outer casing with a damp cloth.
- When the battery is low on the iQ CLiQ handheld transmitter, the
LED indicator light will go from green to red when any of the buttons
are pressed. When the battery is low on the receiver/collar, the LED
LQGLFDWRUZLOOVWHDGLO\EOLQNUHGHYHU\VHFRQGV:LWKVXI¿FLHQW
battery life remaining, the LED indicator on the receiver/collar will
blink green, every 4 seconds.
- During storage, remove the batteries from both the handheld transmitter
and the receiver/collar. When traveling, try to store your units in room
or slightly warmer temperatures. Do not transport the unit exposed in
extreme climates.
2. My dog is not reacting to the collar.
- Make sure the receiver/collar is turned on. Place the two red dots
together to activate the receiver/collar.
- Be sure the collar strap is tight enough so both contact points are
touching the dog’s skin.
- The unit may not be making proper contact with your dog’s skin
because the coat is too thick and or long. The iQ CLiQ does not have
an option for longer contact points so you may need to trim the hair on
your dog’s neck, so both contact points are touching the skin.
- The intensity level may be too low for your dog. Keep increasing the
stimulation until the dog responds usually by neck movement, head
20
shaking, looking over his shoulder, etc. The response may be very
subtle.
7KH/('LQGLFDWRUOLJKWFRPHVRQEXW,GRQRWIHHODQ\
VWLPXODWLRQ
- Your tolerance may be higher than your dog’s. You may need to try the
unit on your wrist where sensitivity is higher and/or increase the
stimulation level. Be sure both contact points are touching your skin.
- The battery may be low, check the LED light for battery life.
- If you have done all of the above, your unit may need to be serviced.
Please contact Customer Service at [email protected] or
1-888-811-9111.
7KHWUDQVPLWWHUKDVQRUDQJHRUVWLPXODWLRQLVOHVVZKHQWKHGRJ
is farther away.
- Make sure you are not touching the antenna as that may substantially
decrease the range.
7KHUDQJHLQGLFDWHGRQWKHXQLW¶VER[LVIRUÀDWWHUUDLQOLQHRIVLJKW
Hills, trees, buildings or moisture will affect the range of your unit. For
best range, hold the transmitter vertically above your head, and/or try
moving to higher ground.
- Any electrical conductors can affect the range, such as cars, chain-link
dog runs, metal buildings, and radio towers. For best results, operate
away from these structures.
5. My dog has skin irritation
- This may be due to an extended use of the contact points. If your dog
H[KLELWVVLJQVRIVNLQLUULWDWLRQFRQVXOWZLWKDYHWHULQDULDQ2QFHWKH
dog’s skin returns to a normal condition, continue to use the collar
and check your dog’s neck each time you use the unit. If you suspect
your unit is malfunctioning please refer to the “Troubleshooting
Guide” before sending your unit in for service. If you have any
questions or concerns, you may direct your inquiries to
[email protected] or call 1-888-811-9111.
21
Warranty and Repair Information
<HDU&RPSUHKHQVLYH:DUUDQW\
L43HWSURYLGHVWKHRULJLQDOSXUFKDVHUZLWKD<($5:$55$17<IRUDOOSURGXFWVLQWKH
L43HW6HULHV7KHZDUUDQW\EHJLQVIURPWKHGDWHRISXUFKDVH)RUWKH¿UVW\HDUFRYHUDJH
is for Parts, Labor, and Accessories. After the first year, the cost of Parts, Accessories,
Labor fees, and Shipping fees incurred are the customer’s responsibility. Labor fees will be
variable depending on the extent of the work required.
To Qualify for the iQ Pet Warranty
All products must be registered and/or a proof of purchase is required to initiate repair
work under warranty. To register your iQ Pet product, log onto our website at www.
iqpetcollar.comFOLFNRQWKHZDUUDQW\UHJLVWUDWLRQOLQNDQG¿OORXWWKHUHTXLUHGLQIRUPDWLRQ
Registration must be completed within 30 days of purchase. If you do not have access to
a computer, you can call our toll free number at 1-888-811-9111, and one of our customer
service representatives will register the product for you. If you were unable to register your
product within 30 days of purchase, we will accept all products for repair with a proof
of purchase. We strongly recommend keeping the original receipt. If your product is not
registered and a proof of purchase is not available at the time of service, iQ Pet will estimate
the age of the unit by the serial number. Serial number estimates can differ from the actual
purchase date. A serial number estimate is the only method of determining an approximate
date of purchase without product registration or a proof of purchase.
1RW&RYHUHG8QGHU:DUUDQW\
L43HW'2(6127RIIHUZDUUDQW\IRUSURGXFWVWKDWKDYHEHHQERXJKWVHFRQGKDQGRUDVD
resold product.
L43HW'2(6127UHSODFHGHIHFWLYHXQLWVRUSURYLGHUHIXQGVIRUSURGXFWVSXUFKDVHGIURP
us after 30 days from the date of purchase.
L43HW'2(6127FRYHUWKHFRVWRIVKLSSLQJRXWVLGHRIWKH&RQWLQHQWDO8QLWHG6WDWHV
Issues of replacement and refunds on units purchased less than 30 days from an authorized
dealer must be addressed to the dealer directly. If the products purchased from an authorized
dealer are after 30 days from the date of purchase, please send the units to iQ Pet for service
and repair.
L43HW'2(6127FRYHUWKHFRVWRIUHSDLUVDQGUHSODFHPHQWVGXHWRPLVXVHE\WKHRZQHU
or dog, improper maintenance, and/or lost units. Any water damage on the Water Resistant
Handheld Transmitters will not be covered. All replacement costs for either the transmitter
22
or receiver will be the owner’s responsibility.
The warranty is void if the unit has been altered or an unauthorized person has damaged the
unit while attempting repair work.
The removal of serial numbers from any iQ Pet products will void the warranty.
iQ Pet reserves the right to retain and discard any parts or accessories that have been found
damaged upon replacement and repair.
3URFHGXUHIRU5HSDLU:RUN
,IWKHXQLWLVPDOIXQFWLRQLQJSOHDVHUHIHUWRWKH³7URXEOH6KRRWLQJ*XLGH´LQWKH2ZQHU¶V
Manual and call customer service at 1-888-811-9111, for technical support, before sending
it to iQ Pet for Service.
The cost of shipping products under warranty back to iQ Pet is the customer’s responsibility.
iQ Pet is not responsible for units damaged or lost in transition to iQ Pet. iQ Pet is not
responsible for loss of training time or inconvenience while the unit is in for repair work. iQ
Pet does not provide loaner units or any form of compensation during the repair period.
A copy of the sales receipt showing the purchase date may be required before warranty
work is initiated.
Please include a brief explanation outlining the problem and include your name, address,
city/state/zip code, daytime phone number, evening phone number, and email address.
2U\RXFDQYLVLWRXUZHEVLWHDWwww.iqpetcollar.com for a service request form. If the
repair costs are not covered under warranty, we will call you for payment information and
authorization. For any questions concerning your iQ Pet products, call us toll free at 1-8880)$0303DFL¿F6WDQGDUG7LPHRUHPDLOXVDWrepair@iqpetcollar.
comIRUVSHFL¿FUHSDLULQTXLULHV
Send repair units to:
L43HW5HSDLUV
/RFNQHVV$YHQXH
7RUUDQFH&$
86$
23
E\'RJWUD&RPSDQ\
22912 Lockness Avenue,
Torrance, CA 90501
U.S.A.
Tel: 310-534-0101
Fax: 310-534-9111
Toll free: 1-888-811-9111
Email: [email protected]
Website: www.iqpetcollar.com
FCC ID : SWN-CLIQ
)&&&203/,$1&(
This device complies with Part 15 of the FCC Rules.
2SHUDWLRQLVVXEMHFWWRWKHIROORZLQJWZRFRQGLWLRQV
(1)This device may not cause harmful interference, and
(2)This device must accept any interference received,
including interference that may cause undesired operation.
24