1
Océ User manual
Océ PRISMAaccess
Océ PRISMAaccess Operator Console
Océ-Technologies B.V.
Copyright
©
2007, Océ
All rights reserved. No part of this work may be reproduced, copied, adapted, or
transmitted in any form or by any means without written permission from Océ.
Océ makes no representation or warranties with respect to the contents hereof and
specifically disclaims any implied warranties of merchantability or fitness for any
particular purpose.
Further, Océ reserves the right to revise this publication and to make changes from
time to time in the content hereof without obligation to notify any person of such
revision or changes.
Edition 4.1
US
Trademarks
Trademarks
Océ, Océ PRISMAaccess and Web Submission® are registered trademarks of
Océ-Technologies B.V..
Adobe®, Acrobat®, Reader® and Distiller® are registered trademarks of Adobe®
Systems Incorporated.
PostScript® 3™ is a registered trademark of Adobe® Systems Incorporated.
Microsoft®, Windows® , Windows NT®, Windows 98®, Windows 2000®, Windows
XP®, Windows Server 2003® are either registered trademarks or trademarks of
Microsoft® Corporation in the United States and/or other countries.
Xerox®, DigiPath®, DocuSP® and DocuTech® are registered trademarks of the
Xerox® Corporation in the U.S. and/or other countries.
Fiery®, Command WorkStation® and EFI® are registered trademarks of Electronics
for Imaging (EFI®), Inc.
Products in this publication are referred to by their general trade names. In most, if
not all cases, these designations are claimed as trademarks or registered trademarks
of their respective companies.
3
Trademarks
4
Table of Contents
Table of Contents
Chapter 1
About using help . . . . . . . . . . . . . . . . . . . . . . . . . . . . . . . . . . . . . . . . . . . . . . . . . . . 9
What Is This Help. . . . . . . . . . . . . . . . . . . . . . . . . . . . . . . . . . . . . . . . . . . 10
Annotating a topic . . . . . . . . . . . . . . . . . . . . . . . . . . . . . . . . . . . . . . . . . . 11
Chapter 2
Introduction . . . . . . . . . . . . . . . . . . . . . . . . . . . . . . . . . . . . . . . . . . . . . . . . . . . . . .
Introduction . . . . . . . . . . . . . . . . . . . . . . . . . . . . . . . . . . . . . . . . . . . . . . .
Licenses. . . . . . . . . . . . . . . . . . . . . . . . . . . . . . . . . . . . . . . . . . . . . . . . . .
Icons . . . . . . . . . . . . . . . . . . . . . . . . . . . . . . . . . . . . . . . . . . . . . . . . . . . .
Original file types . . . . . . . . . . . . . . . . . . . . . . . . . . . . . . . . . . . . . . . . . . .
13
14
16
17
20
Chapter 3
Controlling jobs . . . . . . . . . . . . . . . . . . . . . . . . . . . . . . . . . . . . . . . . . . . . . . . . . . .
Controlling print jobs . . . . . . . . . . . . . . . . . . . . . . . . . . . . . . . . . . . . . . . .
Changing the sorting order . . . . . . . . . . . . . . . . . . . . . . . . . . . . . . . . . . .
Configuring columns . . . . . . . . . . . . . . . . . . . . . . . . . . . . . . . . . . . . . . . .
Jobs with multiple files . . . . . . . . . . . . . . . . . . . . . . . . . . . . . . . . . . . . . . .
Displaying unprocessed jobs . . . . . . . . . . . . . . . . . . . . . . . . . . . . . . . . . .
Displaying ready jobs. . . . . . . . . . . . . . . . . . . . . . . . . . . . . . . . . . . . . . . .
Moving a print job. . . . . . . . . . . . . . . . . . . . . . . . . . . . . . . . . . . . . . . . . . .
21
22
23
24
25
27
28
29
Chapter 4
Processing job ticket . . . . . . . . . . . . . . . . . . . . . . . . . . . . . . . . . . . . . . . . . . . . . .
View the job ticket . . . . . . . . . . . . . . . . . . . . . . . . . . . . . . . . . . . . . . . . . .
Change the job ticket . . . . . . . . . . . . . . . . . . . . . . . . . . . . . . . . . . . . . . . .
Print the job ticket . . . . . . . . . . . . . . . . . . . . . . . . . . . . . . . . . . . . . . . . . .
31
32
33
34
Chapter 5
Processing jobs. . . . . . . . . . . . . . . . . . . . . . . . . . . . . . . . . . . . . . . . . . . . . . . . . . .
Print a test job . . . . . . . . . . . . . . . . . . . . . . . . . . . . . . . . . . . . . . . . . . . . .
Deleting a print job . . . . . . . . . . . . . . . . . . . . . . . . . . . . . . . . . . . . . . . . . .
Mark a job as ready . . . . . . . . . . . . . . . . . . . . . . . . . . . . . . . . . . . . . . . . .
Marking a job as not ready. . . . . . . . . . . . . . . . . . . . . . . . . . . . . . . . . . . .
35
36
37
38
39
Chapter 6
Extended job control. . . . . . . . . . . . . . . . . . . . . . . . . . . . . . . . . . . . . . . . . . . . . . .
Creating a new job . . . . . . . . . . . . . . . . . . . . . . . . . . . . . . . . . . . . . . . . . .
Save a document . . . . . . . . . . . . . . . . . . . . . . . . . . . . . . . . . . . . . . . . . . .
Attach a document to a job . . . . . . . . . . . . . . . . . . . . . . . . . . . . . . . . . . .
41
42
43
44
5
Table of Contents
Automatically attach a scanned original to a job (optional) . . . . . . . . . . .
Delete the attached document . . . . . . . . . . . . . . . . . . . . . . . . . . . . . . . . .
Import a job . . . . . . . . . . . . . . . . . . . . . . . . . . . . . . . . . . . . . . . . . . . . . . .
Export a job . . . . . . . . . . . . . . . . . . . . . . . . . . . . . . . . . . . . . . . . . . . . . . .
Revert to original document . . . . . . . . . . . . . . . . . . . . . . . . . . . . . . . . . . .
Start Océ PRISMAprepare . . . . . . . . . . . . . . . . . . . . . . . . . . . . . . . . . . . .
45
46
47
48
49
50
Chapter 7
Informing users . . . . . . . . . . . . . . . . . . . . . . . . . . . . . . . . . . . . . . . . . . . . . . . . . . . 51
Send an e-mail message manually . . . . . . . . . . . . . . . . . . . . . . . . . . . . . 52
Chapter 8
Configuring . . . . . . . . . . . . . . . . . . . . . . . . . . . . . . . . . . . . . . . . . . . . . . . . . . . . . .
Add a category . . . . . . . . . . . . . . . . . . . . . . . . . . . . . . . . . . . . . . . . . . . . .
Delete a category . . . . . . . . . . . . . . . . . . . . . . . . . . . . . . . . . . . . . . . . . . .
Rename a category . . . . . . . . . . . . . . . . . . . . . . . . . . . . . . . . . . . . . . . . .
Configure printer options . . . . . . . . . . . . . . . . . . . . . . . . . . . . . . . . . . . . .
Configure job received options. . . . . . . . . . . . . . . . . . . . . . . . . . . . . . . . .
Configure job confirmation options. . . . . . . . . . . . . . . . . . . . . . . . . . . . . .
Configure job ready options . . . . . . . . . . . . . . . . . . . . . . . . . . . . . . . . . . .
Configuring the client banner . . . . . . . . . . . . . . . . . . . . . . . . . . . . . . . . . .
Configure screen saver of Operator console . . . . . . . . . . . . . . . . . . . . . .
53
54
55
56
57
58
60
61
63
64
Chapter 9
Print a document . . . . . . . . . . . . . . . . . . . . . . . . . . . . . . . . . . . . . . . . . . . . . . . . . .
Introduction . . . . . . . . . . . . . . . . . . . . . . . . . . . . . . . . . . . . . . . . . . . . . . .
Buttons . . . . . . . . . . . . . . . . . . . . . . . . . . . . . . . . . . . . . . . . . . . . . . . . . . .
Select a printer . . . . . . . . . . . . . . . . . . . . . . . . . . . . . . . . . . . . . . . . . . . . .
Select a printer . . . . . . . . . . . . . . . . . . . . . . . . . . . . . . . . . . . . . . . . . .
Split and merge . . . . . . . . . . . . . . . . . . . . . . . . . . . . . . . . . . . . . . . . . .
Optimize . . . . . . . . . . . . . . . . . . . . . . . . . . . . . . . . . . . . . . . . . . . . . . . . . .
Specify the extended print settings . . . . . . . . . . . . . . . . . . . . . . . . . . .
Specify the Media settings . . . . . . . . . . . . . . . . . . . . . . . . . . . . . . . . .
Specify the Imposition settings . . . . . . . . . . . . . . . . . . . . . . . . . . . . . .
Specify the Finishing settings . . . . . . . . . . . . . . . . . . . . . . . . . . . . . . .
Specify the Image settings . . . . . . . . . . . . . . . . . . . . . . . . . . . . . . . . .
Page programmed settings vs. printer capabilities . . . . . . . . . . . . . . . . .
Page programmed settings vs. printer capabilities . . . . . . . . . . . . . . .
Map media types . . . . . . . . . . . . . . . . . . . . . . . . . . . . . . . . . . . . . . . . .
Changing / Map Assigned Trays in Tray-based Printers. . . . . . . . . . .
Changing / Map Assigned Media Definitions in Media-based Printers
Define the print settings. . . . . . . . . . . . . . . . . . . . . . . . . . . . . . . . . . . .
Print on the Océ CS170/CS220 . . . . . . . . . . . . . . . . . . . . . . . . . . . . .
Print on the Océ CS230 . . . . . . . . . . . . . . . . . . . . . . . . . . . . . . . . . . .
Print on the Océ CS230/CS520 . . . . . . . . . . . . . . . . . . . . . . . . . . . . .
65
66
67
68
68
69
70
70
71
72
74
77
78
78
79
80
81
82
83
84
85
6
Table of Contents
Print on the Océ CS650 . . . . . . . . . . . . . . . . . . . . . . . . . . . . . . . . . . .
Print on the Océ 31x5 . . . . . . . . . . . . . . . . . . . . . . . . . . . . . . . . . . . . .
Print on the Océ CPS700 . . . . . . . . . . . . . . . . . . . . . . . . . . . . . . . . . .
Print on the Océ CPS700_910c . . . . . . . . . . . . . . . . . . . . . . . . . . . . .
Print on the Océ CPS800/CPS900 . . . . . . . . . . . . . . . . . . . . . . . . . . .
Print on the Océ CPS900 . . . . . . . . . . . . . . . . . . . . . . . . . . . . . . . . . .
Print on the Xerox server DocuSP v1.32 . . . . . . . . . . . . . . . . . . . . . .
Print on the Océ VarioPrint 2105 . . . . . . . . . . . . . . . . . . . . . . . . . . . .
Print on the Océ PRISMAproduction R3.0.4 . . . . . . . . . . . . . . . . . . . .
Print on the Océ VarioPrint 2090 . . . . . . . . . . . . . . . . . . . . . . . . . . . .
Print on the Océ VarioPrint 2100/2110 . . . . . . . . . . . . . . . . . . . . . . . .
86
87
88
89
90
91
92
93
94
95
96
7
Table of Contents
8
Chapter 1
About using help
9
What Is This Help
What Is This Help
Reminders:
You can click on the '?' on the title bar, drag it to any field in the dialog box to display
the information relevant to the field.
You can also press F1 on a highlighted option to display a brief 'What is this'
explanation.
10
Chapter 1 About using help
Annotating a topic
Annotating a topic
1. Open the topic you want to annotate.
2. Click on the 'Options' button and select 'Annotation'.
A dialog box opens and invites you to enter your note.
3. Type in the text then click on 'Save'.
A green paper clip appears next to the topic title. Later on, you will be able to click
on the paper clip to display the corresponding note.
11
Annotating a topic
12
Chapter 1 About using help
Chapter 2
Introduction
13
Introduction
Introduction
The Océ PRISMAaccess Web Submission allows users to send their print jobs to the
print room. A user must fill in the job ticket before the job can be submitted. This job
ticket allows a user to define job settings like covers, cutting and delivery date. The
print jobs will be converted to PDF files and stored on the Océ PRISMAaccess
server.
The Océ PRISMAaccess Operator Console allows you to control print jobs stored on
the Océ PRISMAaccess server. You can change the displayed columns and add new
categories to move print jobs to.
Before you print the job, you can generate a preview to ensure that the job will be
printed correctly. You can also change the job order, for example when you want to
make a booklet.
When you select a print job, the job ticket will be displayed. When the printer is
supported, the job ticket settings will be automatically filled in within the printer
driver dialog. These supported settings will be indicated by a small pencil icon in the
job ticket. You can specify the other settings in the printer driver manually.
You can configure the Océ PRISMAaccess Operator Console to send an e-mail
message to the user, when you have received and finished a print job. You can change
the content of the message and the subject field, for example 'We have received your
order....'
It is possible to compose a special client banner, which will be displayed when the
Océ PRISMAaccess Web Submission is used. You can use this banner to promote
new features, for example 'Now available: Full color A3 prints. Check the home page
for details'.
A user can create a print job and submit the job to the Océ PRISMAaccess Operator
Console. The job can consist of one or more files. A file can be one of the following
types:
■ Digital file
This is an existing digital file, PDF or non-PDF.
■ Paper original
This is a paper document; no digital file is available.
■ Other digital source
This is a digital file which cannot yet be added to the job. For example, a digital
source on a CD.
The Océ PRISMAaccess Operator Console allows you to import Océ
PRISMAaccess print jobs. A print job on a disk is a job ticket and a corresponding
attached file.
14
Chapter 2 Introduction
Introduction
You can also export Océ PRISMAaccess print jobs to a disk. A print job on a disk is
a PDF file and a corresponding job ticket file.
When you just want to save the attached document, use the 'Rename category' option
from the 'File' menu.
The integrated Océ PRISMAprepare offers an easy way to prepare and print your
document. A clear difference is made between defining a document physical layout,
and the production of the document. This makes it possible to store the document
with the Océ PRISMAprepare settings, independent from printer capabilities.
15
Licenses
Licenses
Introduction
When you receive Océ PRISMAaccess, a license file is included.
The license file
During the installation of Océ PRISMAaccess this license file is installed on the
server. The license file contains the license codes for the specific applications.
The 'licenses' tab in System Administration gives you an overview of the available
licenses:
- Océ PRISMAaccess license
- Océ PRISMAprepare license
You may need the license serial number when you contact an Océ consultant or
system engineer.
Update licenses
In order to get more licenses for Océ PRISMAaccess, you will have to contact Océ.
You will receive a new license file that contains the current licenses and the new
licenses. Use the 'New license file...' button to browse to the new license file. With
this button you can also update the current license information.
1. Click the 'New license file...' button.
2. Use the 'Browse...' button to select the new license file.
3. Click 'OK.'
The 'Licenses' dialog will show the new license information. Any old license
information is now updated.
Note: The license file can be stored in any directory.
16
Chapter 2 Introduction
Icons
Icons
The first column of the print jobs list contains icons that indicate the job status. The
job ticket also contains icons. The following tables contain the available icons.
17
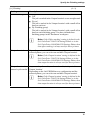
Icons
[1]
[1] Job icons
Icon
Functional name
Description
Error
While loading the job, an error occurred
Loading &
Non-printable
The job is loading and cannot be printed yet
because no PDF document is attached.
New &
Non-printable
This is a new job that cannot be printed yet
because no PDF document is attached.
Opened &
Non-printable
This is a new job that has been opened, but
cannot be printed yet because no PDF
document is attached.
Loading
The job is loading and can be printed when the
job is loaded completely.
New
This is a new job that can be printed.
New & Opened
This is a new job that has been opened and can
be printed.
Ticket received
A job ticket was received for this job.
Printed
This job was printed at least one time.
Ready
This job was marked 'Ready'.
Océ
PRISMAprepare
settings
This job contains Océ PRISMAprepare
settings.
Locked
Job job is currently locked.
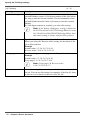
[2]
[2] Job ticket icons
Icon
Functional name
Description
Document
A PDF document is attached to the job.
Empty
Currently no document is attached to the job.
Non-PDF
A non-PDF document is attached to the job.
Other digital
source
The original is digital but has not been added
(yet) to the job.
Paper original
The original is a paper document and is not
attached to the job.
Job ticket
The selected print job has a job ticket.
Old job ticket
The selected print job was created using an
older version of the job ticket.
When the job ticket icon is red/brown, this indicates that the print job was created
18
Chapter 2 Introduction
Icons
using an older version of the job ticket. Since the 'Job ticket editor' allows you to
change the job ticket, the job ticket could have been changed after creation of the job.
This means that:
Items that have been removed from the job ticket cannot be displayed anymore and
are not visible.
New added items in the job ticket will be displayed. For print jobs created with the
old job ticket, the default values will be displayed.
Note: When a job has not been marked ready, the gray square before the icon will
not be checked. When the job has been marked ready, the gray square will be
checked.
19
Original file types
Original file types
The user can submit a print job with the Océ PRISMAaccess Web Submission. A
print job can contain digital documents, paper originals and files from another digital
source.
■ Digital file
The file types that can be added by the user are configured by the System
Administrator. For each allowed file type the Océ PRISMAaccess Operator
Console must have the application available that can open that file type.
The operator must convert non-PDF files to PDF on page 26 in the Océ
PRISMAaccess Operator Console. Conversion of non-PDF files can be done
with the 'Convert' button.
■ Paper original
The user submits a job ticket without an attached file to the Océ PRISMAaccess
Operator Console. The user then sends the paper original to the print room, for
example via internal mail.
When configured, the operator can use the 'Scanning' option of the Océ
VarioPrint 2050-70, the Océ 31x5 or the Océ DS60. This 'Scanning' option
automatically attaches the scanned paper original to the Océ PRISMAaccess job.
■ Other digital source
The user submits a job ticket without an attached file to the Océ PRISMAaccess
Operator Console. This option can be used when the digital file cannot be added
to the job yet. For example, a digital file on a CD.
Note: Option 'Paper original' is also used for copy jobs. For accounting reasons
such copy jobs can be added to a print job.
20
Chapter 2 Introduction
Chapter 3
Controlling jobs
21
Controlling print jobs
Controlling print jobs
The main window contains two sections. The left section contains all print jobs of
the selected category.
In the right section, the corresponding job ticket is displayed.
[3]
[3] Main window
Item
Description
Sorting order
You can change the order in which the print jobs are
displayed by clicking a column. This allows you to print, for
example, all jobs from the same user.
It's also possible to change the order of the columns in the left
section by dragging the column header to a new position.
Column header
You can change the columns that are displayed. Use 'Column
header options' from the 'Options' menu to add or remove
columns.
Print job category
The drop-down list box allows you to change the category of
print jobs displayed.
By default, there are two category of print jobs: 'Unprocessed
jobs' and 'Ready jobs'. You can add categories manually.
Status bar
The status bar shows the total amount of jobs per selected
category. The icon in the status bar appears when a new job
arrives in the 'Unprocessed jobs' category.
Note: The first column contains icons that indicate the job status.
22
Chapter 3 Controlling jobs
Changing the sorting order
Changing the sorting order
Print jobs are displayed in the left section of the Operator console. You cannot move
or delete the first two columns.
By default, the following columns are displayed:
[4]
[4] Columns
Item
Description
Icon
Displays the print job status
Original document Displays the original document type
Job number
Displays the name of the user
Last name
Displays the name of the user
Date
Displays the required delivery date
Size
Displays the page size of the print job
Copies
Displays the number of copies
Pages to produce
Displays the number of pages of the document
You can change the order in which the print jobs are displayed by clicking the
column header. Click the column header to apply ascending sorting or descending
sorting.
For example, you can group all jobs with the same page size. Now, you can print
these jobs without having to change the paper size in the printer.
23
Configuring columns
Configuring columns
You can change the columns that are displayed.
You can add or remove columns using the 'Column header options' from the
'Options' menu. This option also allows you to change the order of columns by
clicking the 'Move up' or 'Move down' button.
You can change the order of the columns in the left section by dragging the column
header to the new position.
Note: You can select all available job ticket items as column header. When you add
an item that is not visible in the job ticket, the default value will be displayed in the
column. When the print job was created before the job ticket definition was changed,
the original value will be displayed in the column.
24
Chapter 3 Controlling jobs
Jobs with multiple files
Jobs with multiple files
Introduction
A user can submit any combination of one or more digital files, paper originals or
other digital files on page 20 in one job.
When the operator selects a job with multiple files the job ticket view changes.
Above the job ticket a new dialog appears. In this dialog the files of the job are
shown.
The options in the new panel are:
- Move file up/down
- Attach file, for other digital sources
- Redistill file
- Convert file
- Merge files
The operator must convert any non-PDF file to PDF. All files are then merged into
one PDF document. The user receives an e-mail notification that the job is ready to
preview in the Océ PRISMAaccess Web Submission Orders overview. The user only
receives an e-mail notification if the option 'Request confirmation' is checked in the
job ticket. The user can confirm or reject the merged document. The job is printed
when the user confirms the job. If the user rejects the job then a reason for rejection
must be given. The rejection message is shown to the operator in the Océ
PRISMAaccess Operator Console. Based on the message the job can be modified or
deleted.
Question: What is a redistill of a file?
Answer: When you redistill a PDF file you print it to Postscript and then convert that
Postscript back into PDF.
A scenario for use of redistill can be:
PDF files can contain forms (buttons, check boxes). Those forms have names.
A user submits 2 PDF files to the Océ PRISMAaccess Operator Console. One PDF
file contains a button with name “O1”. The second PDF file contains a check box
with the same name “O1”. The operator merges those 2 files. The result is a PDF file
that contains 2 buttons, instead of one button and one check box. This is because the
elements have the same name and when the files are merged the first found element
is used.
The solution is to redistill the PDF files before you merge them. The forms are
transformed in images during redistill. Now the files can be merged. The PDF file
will now correctly contain the button with name "O1" and the check box with name
"O1".
25
Jobs with multiple files
Move file up or down
1. Right-click a file.
2. Move the file up or down.
The user defines the order of the files in the Océ PRISMAaccess Web Submission.
However, the operator can change the order of the files in specific cases. This order
is reflected in the merged document.
Attach a file
1. Click button 'Attach'.
With this option you can attach a file from another digital source.
2. Browse to the file that you want to attach to the job.
3. Click 'OK.'
Redistill a file
1. Select a file.
2. Click button 'Redistill.'
The file is redistilled.
Convert a file
1. Select a non-PDF file.
The associated application for this file is started.
Note: Every non-PDF file must be converted to a PDF file.
2. Click 'Print' in the application.
3. Select 'Adobe PDF' as printer.
The file is converted to PDF file.
Merge the files
1. Click button 'Merge.'
Note: When all files are PDF files the 'Merge' button is enabled.
2. All the PDF files are merged into a single document.
Note: The merge can be started when some files are still unavailable. In the merged
document a blank page is inserted with text "Original document to be replaced in
Océ PRISMAprepare".
26
Chapter 3 Controlling jobs
Displaying unprocessed jobs
Displaying unprocessed jobs
There are two states of print jobs, unprocessed jobs and ready jobs. Jobs sent by users
will initially appear in the unprocessed jobs section as 'Not ready'. These are the jobs
you can begin working on.
The drop-down list box allows you to change the category of print jobs displayed.
You can mark a job as 'Ready' by selecting the job and clicking the 'Mark job ready'
button. By default, the job will then be moved to the 'Ready jobs' category.
27
Displaying ready jobs
Displaying ready jobs
When you have completed a print job you click the 'Mark job ready' button. The job
will then be marked as 'Ready', indicated by the gray square before the icon that will
be checked. By default the job will then be moved to the 'Ready jobs' category. You
can change this by deselecting the 'Move jobs to the Ready jobs' option from the 'Job
ready options' dialog.
You can sort the print jobs by clicking the first column. This also allows you to
distinguish the ready jobs from the not ready jobs.
Jobs in the 'Ready jobs' category will be deleted after several days. You can configure
the exact period in the 'System Administration' application.
28
Chapter 3 Controlling jobs
Moving a print job
Moving a print job
By default, the Operator Console contains two categories, 'Unprocessed jobs' and
'Ready' jobs.
You can add new categories, using the 'New category' from the 'File' menu.
The 'Move to...' option from the 'Edit' menu allows you to move a print job into a
specific category.
29
Moving a print job
30
Chapter 3 Controlling jobs
Chapter 4
Processing job ticket
31
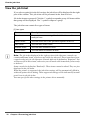
View the job ticket
View the job ticket
If you select a print job in the left section, the job ticket will be displayed in the right
part of the window. This job ticket will be presented in the form of a tree.
Job ticket items are grouped. Click the '+' symbol to expand a group. All items within
that group will be displayed. The '-' symbol collapses a group.
The job ticket can contain five types of items:
[5]
[5] Item types
Item
Description
Text items
You can enter a text string. Can be defined as one line or
multiple lines.
Choice items
You can select one of the presented options in the list.
Date items
You can enter a date value.
Number items
You can enter a numeric value.
Yes/no items
You can enable or disable an item.
Note: The job ticket displayed in the right section of the Operator console can
contain additional items, which are not visible for any user. These items have been
created exclusively for the Operator Console and can be defined as 'Required'. You
will have to fill in these items, otherwise you will not be able to mark the job as ready
or delete it.
Items can also be defined as 'Read only'. These items cannot be edited. They are just
displayed in the job ticket.
When the printer is supported, the job ticket settings will be automatically filled in
within the printer driver dialog. These supported settings will be indicated by a small
pencil icon in the job ticket.
You can specify the other settings in the printer driver manually.
32
Chapter 4 Processing job ticket
Change the job ticket
Change the job ticket
When an item has not been defined as 'Read only' you can change its content. A user
could, for example, have entered 'Number of copies: 4', but has changed his mind.
You can then change the 'Number of copies' item and handle the job according to the
new job ticket.
The job ticket can contain additional items which are only visible in the Operator
Console. The operator job ticket can, for example, contain an item called 'Processed
by:' which allows you to enter your name or initials.
Note: When the Item was defined as 'Read only', it cannot be edited, but is just
displayed in the job ticket
33
Print the job ticket
Print the job ticket
Introduction
The Operator Console allows you to print a job ticket to paper. You can use this
option to collect all job tickets and keep track of the print jobs you have processed.
Before you print the job ticket you can define the printer you want to use.
Print the job ticket
Select 'Print job ticket' from the 'File' menu.
The job ticket is printed.
Note: The 'Job received options' from the 'Options' menu allows you to specify to
print the job ticket automatically when the print job is received. When you select the
option 'Print ticket automatically', the specified job ticket printer will be used to print
the job ticket each time a new print job is received.
34
Chapter 4 Processing job ticket
Chapter 5
Processing jobs
35
Print a test job
Print a test job
Introduction
Before you process the job, you can print a test job.
Print a test job
Click option 'Print test job' in the 'File' menu.
One copy of the selected job is printed.
Note: You can add the column 'Test printed on...'. This column will display the
printer you used to print the test job.
36
Chapter 5 Processing jobs
Deleting a print job
Deleting a print job
Jobs in the 'Ready jobs' category will be removed from the Océ PRISMAaccess
server after a number of days. This can be defined in 'System Administration'.
The Operator console allows you to manually delete print jobs. By clicking the
'Delete' button you can delete a print job manually, even if the job has not been
marked as ready.
Note: When a job ticket item is defined as 'Required', you will have to fill in this
item, otherwise you will not be able to delete the job.
37
Mark a job as ready
Mark a job as ready
Introduction
When you have completed a print job you can mark the job as 'Ready'. A marked job
is indicated by the gray square before the icon that will be checked.
By default the job will then be moved to the 'Ready jobs' category. You can change
this by deselecting the 'Move jobs to the Ready jobs' option from the 'Job ready
options' dialog.
Note: Jobs in the 'Ready jobs' category will be deleted automatically after a number
of days. The exact period can be configured using 'System Administration'.
Mark a job as ready
1. Select the completed print job.
2. Click 'File' - 'Mark job ready'.
Note: When a job ticket item is defined as 'Required', you must fill in this item.
Otherwise you will not be able to mark the jobs as ready.
38
Chapter 5 Processing jobs
Marking a job as not ready
Marking a job as not ready
When you have marked a job as 'Ready' this is indicated by the gray square before
the icon that will be checked.
If the job has not been printed successfully or has not been handled correctly, you
may want to process the job again. To mark the job as 'Not ready', you select the print
job and click 'Not ready' (or select 'Mark job not ready' in the 'Edit' menu).
The gray square before the icon that will not be checked anymore, and by default,
the job will be moved to the unprocessed jobs.
39
Marking a job as not ready
40
Chapter 5 Processing jobs
Chapter 6
Extended job control
41
Creating a new job
Creating a new job
You can create a new print job and add the job to the Operator console. When you
click the 'New job...' option in the 'File' menu, a 'New job...' dialog appears. This
dialog contains the following sections:
[6]
[6] New job dialog
Section
Description
Original document Select one of the following from the drop-down list:
■ Digital document
Select this option when you are adding an an existing
digital document, PDF or non-PDF.
■ Paper original
Select this option when there is no digital document
available that you want to attach to the print job.
■ Other digital source
Select this option when the source is a digital document
but can not be added (yet) to the job (for example a digital
source on a CD).
Filename
When you want to add a file to the job, use the Browse button
to select the file from your file system.
Note: This option is only available when you
select 'Digital document'.
Job ticket
You can fill in the job ticket here. If you do not change the job
ticket, the default values of the job ticket will be added.
When the item is defined as 'Remember', the values will be displayed in the default
ticket, the next time you create a new job.
42
Chapter 6 Extended job control
Save a document
Save a document
Introduction
You can save any document to a disk.
Save a document
1. Click 'File' - 'Save document'.
2. Select 'PDF file as...' or 'Non-PDF file as...' depending on the file type.
A dialog will appear that allows you to save the document to a selected folder.
3. Enter a file name and click 'Save'.
The file is saved to disk without the job ticket.
Note: If you want to save the complete print job (PDF file and job ticket), use the
'Export job...' option from the 'File' menu.
43
Attach a document to a job
Attach a document to a job
Introduction
The 'Attach document...' option allows you to attach an external PDF document to
an existing job. This allows you to use the Booklet maker and specify Océ
PRISMAprepare settings.
Attach a document to a job
When the job has a Non-PDF document attached you can use the 'Attach
document...' option to attach a PDF document to the selected job.
44
Chapter 6 Extended job control
Automatically attach a scanned original to a job (optional)
Automatically attach a scanned original to a job (optional)
Introduction
You can use the 'Scanning' option to automatically attach a scanned original to an
Océ PRISMAaccess job. This option is available if you use Océ PRISMAaccess with
the Océ VarioPrint 2050-70, the Océ 31x5 or the Océ DS60.
Note: The Océ PRISMAaccess Scan profile has to be configured correctly on the
Océ VarioPrint 2050-70, the Océ 31x5 or the Océ DS60.
Before you begin
Use this procedure if one or more originals are defined as 'Paper original'.
To be able to attach a scanned original to an Océ PRISMAaccess job you need the
Océ PRISMAaccess 'Job number'. The 'Job number' is available in the Operator
console. The 'Job number' is also available on the printed job ticket.
Automatically attach a scanned original to a job
1. Use the Océ PRISMAaccess Scan profile to scan the scanned original on the Océ
VarioPrint 2050-70, the Océ 31x5 or the Océ DS60.
A dialog appears on the Océ VarioPrint 2050-70, the Océ 31x5 or the Océ DS60.
2. Enter the 'Job number' in this dialog.
3. The scanned document will be attached to this Océ PRISMAaccess job in the
Operator console.
Result
Scan documents that cannot be attached
When a scanned document cannot be attached to the job, this is indicated by an icon
in the lower right side of the status bar of the Operator Console. This problem can
occur when you enter a 'Job number' that does not exist.
Double-click the icon in the Status bar to open a dialog that lists the documents that
could not be attached automatically.
Click the 'View' button or double-click the document to view the document.
Use the 'Attach a document to a job' procedure to attach the document to the correct
job.
Note: Scan documents that could not be attached are located in the
'C:\Storage\FailedScanlink' folder.
45
Delete the attached document
Delete the attached document
Introduction
The operator can delete an attached file from a job.
Delete the attached document
Select the 'Delete Attached document' option.
Note: It is not possible to delete an 'original' file which was submitted via the Océ
PRISMAaccess Web Submission. Only files that are attached by the operator can be
deleted again.
46
Chapter 6 Extended job control
Import a job
Import a job
You can import Océ PRISMAaccess print jobs. A print job on a disk is a PDF file
and a corresponding job ticket file.
To import an existing print job, click 'Import job...' from the 'File' menu. The dialog
allows you to browse to the folder where the print jobs are stored. When a PDF file
with a corresponding job ticket is found, you can select it. Click 'OK' to import the
job. It will be added to the 'Unprocessed jobs' category.
The 'Delete job after import' option allows you to delete the print job from your file
system after importing the job.
The 'Job ticket editor' allows you to change the job ticket. Therefore, an imported
print job can have an older version of the job ticket. When the job is imported after
the job ticket was changed, the new job ticket will be used.
Items that have been removed from the job ticket cannot be displayed anymore and
are not visible.
New added items in the job ticket will be displayed. For print jobs created with an
old job ticket, the default values for any new items will be displayed.
When an item is removed from the job ticket, you may still be able to add that
column to the print jobs list. When you select the print job created with an older
version of the job ticket, you can still view the content of the item in the print jobs
list.
47
Export a job
Export a job
Introduction
You can export Océ PRISMAaccess print jobs to a disk. A print job on a disk is a job
ticket and a corresponding attached file. When you just want to save the attached
PDF or non-PDF document, use the 'Save document as... ' option from the 'File'
menu.
The 'Delete job after export' option allows you to delete the print job from Océ
PRISMAaccess after exporting the job.
Export a job
1. Click 'Export job...' from the 'File' menu.
2. The dialog allows you to browse to a folder.
3. Click 'OK' to export the job.
The job ticket and the corresponding document will be saved to the defined folder.
48
Chapter 6 Extended job control
Revert to original document
Revert to original document
Introduction
Océ PRISMAaccess allows you to manipulate attached documents or attach new
documents to a job.
Revert to original document
The 'Revert to original document' option allows you return to the original PDF
document.
The original document can be defined as:
- The PDF document submitted by the user with the Océ PRISMAaccess Web
Submission.
- The PDF document attached by the operator in case of a 'Paper original' or 'Other
digital source' job.
Note: You can only revert when the original document is a PDF file. When you use
this option you will lose the changes you have made to the attached document.
49
Start Océ PRISMAprepare
Start Océ PRISMAprepare
Introduction
Océ PRISMAprepare offers an easy way to prepare and print your document.
The integrated Booklet maker allows you to create booklets with automatic creep
compensation. Use the 'Spine caption' option to add text to the spine of a book. You
can add 3 lines of text to tab media (front and back side) with the 'Tab caption editor'.
You can define the font, font size and font color for the tab texts.
The 'Media catalog' offers easy access to specific media types. You can also add page
numbers to your documents.
When you print your document you can define imposition and finishing settings for
your print job.
Note: Océ PRISMAprepare only accepts PDF files.
Start Océ PRISMAprepare
Click the 'Océ PRISMAprepare' button on the toolbar.
Or
Click 'Océ PRISMAprepare' on the 'File' menu.
50
Chapter 6 Extended job control
Chapter 7
Informing users
51
Send an e-mail message manually
Send an e-mail message manually
Introduction
The Operator console can be configured to send an E-mail message automatically.
You can also send an e-mail message manually. The e-mail address within the
selected print job will be used as the destination address.
Send an e-mail message
1. Click 'File' - 'Send E-mail'.
2. Define the subject and the content of the message.
You can use the 'Add received' button or the 'Add ready' button to include an
available default e-mail message.
3. Select whether you want to attach the PDF document and/or the job ticket.
4. Click the 'OK' button to send the message.
Note: When, for example, you have created a booklet using a plug-in, you can use
this option to send it to the owner by e-mail. By attaching the created booklet, the
owner can check the document first before you print it.
Send an e-mail for preview
1. Click the 'e-mail' button.
The
2. Define the subject.
A link to the job is automatically added to the message. The user can click this link
to preview the job. In the Océ PRISMAaccess Web Submission the user can then
'Confirm' or 'Reject' the job.
3. Click the 'OK' button to send the message.
Note: When a confirmation e-mail is sent to the user, the 'Confirmed' field in the job
ticket is set to 'None'. In this way, there can be multiple confirmation rounds between
the user and the operator.
52
Chapter 7 Informing users
Chapter 8
Configuring
53
Add a category
Add a category
Introduction
By default, the Operator Console contains two categories, 'Unprocessed jobs' and
'Ready jobs'. You can add new categories.
Add a category
1. Click 'File' - 'New category'.
2. Define the 'Category name'.
3. Click 'OK'.
You can move print jobs to this new category, in order to group related print jobs.
54
Chapter 8 Configuring
Delete a category
Delete a category
Delete a category
To delete a newly created category select the category from the drop-down list and
click 'Delete category' from the 'Edit' menu.
When the category contains print jobs, you will not be able to delete the category. To
delete the category, empty it first by moving the print jobs to another category or
deleting the print jobs in that category.
Note: You cannot delete or rename the two default categories 'Unprocessed jobs'
and 'Ready jobs'.
55
Rename a category
Rename a category
Introduction
You can rename a newly created category.
Rename a category
1. Click 'Edit' - 'Rename category'.
2. Rename the category.
3. Click 'OK'.
Note: You cannot rename or delete the two default categories 'Unprocessed jobs'
and 'Ready jobs'.
56
Chapter 8 Configuring
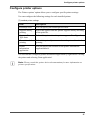
Configure printer options
Configure printer options
The 'Printer options' option allows you to configure specific printer settings.
You can configure the following settings for each installed printer:
[7]
[7] Installed printer settings
Item
Description
Postscript level
You can specify the Postscript level here.
Supports binary
printing
Select this option when the printer supports binary encoding
of the print file.
Supports True
Type fonts
Select this option when the printer supports True Type fonts.
Show driver before Select this option if you want to show the printer driver before
printing
printing.
Printer
information
application
You can specify the location of the printer information
application here.
You can start the configured printer information application by right-mouse clicking
the printer and selecting 'Start application'.
Note: Please consult the printer driver documentation for more information on
printer specifications.
57
Configure job received options
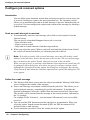
Configure job received options
Introduction
You can define some automatic actions that are being executed as soon as a new job
is received. Sending an e-mail is the most important one. The Operator console
allows you to automatically send an E-mail message to the user when the print job
is received. You can configure the subject and content of the message by entering a
default message.
Send an e-mail when job is received
1. To automatically send an e-mail message select 'Job received options' from the
'Options' menu.
You can specify what should happen when a job is received:
- Don't send an e-mail.
- Always send an e-mail
- Only send an e-mail when the client has requested one
2. When you select the option 'Wait to send an E-mail until the job has been clicked',
the e-mail will not be sent before you click the print job in the list.
Note: To be able to send a 'Job received' message, users must fill in their e-mail
address in the job ticket. If users do not want to receive the 'Job received' message,
they can deselect the option 'E-mail when job received' in the job ticket.
When you specify never to send an e-mail and the client requests an e-mail you will
be prompted with a dialog box. Also when you specify to always send an e-mail
although the client deselected the option, the dialog box will appear. By selecting
'Only send an E-mail when the client has requested one' option, this dialog box will
never appear.
Define the e-mail message
1. The 'Subject' field allows you to enter the subject text and the 'Message' field allows
you to configure the content of the message.
2. Your e-mail message can contain variables from the job ticket. This allows you to
send a dynamic message, containing job-specific information. To include this
dynamic information, select the variable from the items list and click 'Insert item'.
The variable will be inserted into the message at the current position, indicated by
the '%' symbols.
For example 'Hello %Owner% , your document %Document% was successfully
received.'
3. You can send the PDF document and the job ticket as an attachment. When you
select the option 'Attach current document (PDF)' the PDF document will be
included in the e-mail message.
4. To also attach the job ticket, select the 'Attach job ticket' option.
58
Chapter 8 Configuring
Configure job received options
Extra options when a job is received
When a new job is received you can specify to print the job ticket automatically or
play a sound.
59
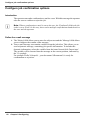
Configure job confirmation options
Configure job confirmation options
Introduction
The operator can send a confirmation e-mail to a user. With this message the operator
asks the user to confirm or reject the job.
Note: When a confirmation e-mail is sent to the user, the 'Confirmed' field in the job
ticket is set to 'None'. In this way, there can be multiple confirmation rounds between
the user and the operator.
Define the e-mail message
1. The 'Subject' field allows you to enter the subject text and the 'Message' field allows
you to configure the content of the message.
2. Your e-mail message can contain variables from the job ticket. This allows you to
send a dynamic message, containing job-specific information. To include this
dynamic information, select the variable from the items list and click 'Insert item'.
The variable will be inserted into the message at the current position, indicated by
the '%' symbols.
For example 'Hello %Owner% , your document %Document% is ready for
confirmation or rejection.'
60
Chapter 8 Configuring
Configure job ready options
Configure job ready options
Introduction
You can define some automatic actions that are being executed as soon as a job is
marked ready. Sending an e-mail is the most important one. When you have finished
a print job, you may want to inform the user. The Operator Console allows you to
automatically send an e-mail message when you mark a job as 'Ready'. You can
configure the subject and content of the message by entering a default message.
Send an e-mail when job is ready
1. To automatically send an e-mail message select 'Job ready options' from the 'Options'
menu.
You can specify what should happen when a job is marked as 'Ready':
- Don't send an e-mail.
- Always send an e-mail
- Only send an e-mail when the client has requested one
2. When you want to be able to view the e-mail message before sending you select the
option 'Show E-mail before sending'. This allows you to change the default message
for that specific print job.
Note: To be able to send a 'Job ready' message, users must fill in their e-mail
address in the job ticket. If users do not want to receive the 'Job ready' message, they
can deselect the option 'E-mail when job ready' in the job ticket. In that case no
e-mail message will be sent.
When you specify never to send an e-mail and the client requests an e-mail you will
be prompted with a dialog box. Also when you specify to always send an e-mail,
although the client deselected the option, the dialog box will appear. By selecting
'Only send an E-mail when the client has requested one' option, this dialog box will
never appear.
61
Configure job ready options
Define the e-mail message
1. The 'Subject' message field allows you to enter the subject text and the 'Message'
field allows you to configure the content of the message.
2. Your e-mail message can contain variables from the job ticket. This allows you to
send a dynamic message, containing job-specific information. To include this
dynamic information, select the variable from the items list and click 'Insert item'.
The variable will be inserted into the message at the current position, indicated by
the '%' symbol.
For example 'Hello %Owner% , your document %Document% was processed
successfully by the print room.'
3. You can send the PDF document and the job ticket as an attachment. When you
select the option 'Attach current document (PDF)' the PDF document will be
included in the e-mail message.
4. To also attach the job ticket, select the 'Attach job ticket' option. Please note that
attaching the PDF document is only possible when the 'Client Preview license'
option is enabled on the Océ PRISMAaccess station. When this option is not
enabled, no PDF file will be attached.
Move the job to the 'Ready jobs' dialog
When you want the move the job to the 'Ready jobs' automatically when you mark
the job as ready, you select the 'Move jobs to the Ready jobs' option.
62
Chapter 8 Configuring
Configuring the client banner
Configuring the client banner
Introduction
The Operator Console allows you to keep users informed on new services from your
print room. This information will be displayed above the order form in the Océ
PRISMAaccess Web Submission dialog. You can use this banner to promote new
features, for example 'Now available: Full color A3 prints. Check the home page for
details'.
Add or change the client banner
1. Select 'Set client banner' from the 'Options' menu.
2. Enter the text that will be displayed in the Océ PRISMAaccess Web Submission.
63
Configure screen saver of Operator console
Configure screen saver of Operator console
Introduction
The Operator Console contains a screen saver that shows the number of new print
jobs.
When the Operator Console is not used for a certain period, the screen saver will
start. The screen saver will indicate the number of new jobs within the Operator
Console, with a maximum of 10.
By default, the screen saver will be installed and configured on the Operator
Console. When the screen saver has not been enabled you can configure it.
Configure the screen saver
1.
2.
3.
4.
64
Browse to the 'Control panel' via the 'Start' menu.
Select 'Display' and select the 'Screen saver' tab.
Select the Océ PRISMAaccess screen saver as your default screen saver.
Click 'OK'.
Chapter 8 Configuring
Chapter 9
Print a document
65
Introduction
Introduction
Introduction
During the 'Print' phase you route your document and optimize it for the printing
process.
First you select the printer that you will use for the printing process. In case of color
split, you specify the 'Split and merge' settings. You define your job name and you
can add an operator note. The end result of this phase is a print job that is submitted
to the selected printer.
Supported printers
Océ PRISMAaccess fully supports the Océ VarioPrint 2100/2110 and the Océ
VarioPrint 6160/6200/6250.
Certain Océ PRISMAaccess settings can be lost for other printers.
For some printers you must set the programmed settings to the capabilities of the
selected printer on page 78.
Optimize
You can optimize the printing process by specifying the extended print settings:
'Media'
- Print one media at a time.
- Rename media for easy recognition of job partitions.
■ 'Imposition'
- Use 'same up' if the printer allows you to use a larger sheet size.
- Use 'oversized' printing for full bleed prints or custom sizes.
- Add trim and fold marks.
■ 'Finishing'
- Optimize the output stack for subsequent finishing.
- Define the output stack options for off-line finishing.
- Select a specific printer output location.
■ 'Image'
- Specify the printer resolution.
- Select color conversion for black & white mapping.
■
66
Chapter 9 Print a document
Buttons
Buttons
Introduction
The 'Print' dialog contains buttons that allow you to restore the default settings,
restore the settings last used, save the settings and submit or cancel your print job.
Buttons
[8]
[8] Buttons
Button
Description
'Defaults'
Click this button to restore the default print settings.
'Last used'
Click this button to restore the print settings last used.
'Save'
Click this button to save the specified print settings.
Note: If your document has not been saved before you
print, this setting is disabled.
'Print'
Click this button to print the job.
The 'Print' dialog is then closed.
'Test print'
Click this button to make one test print of the job.
The 'Print' dialog remains open.
'Cancel'
Click this button to cancel printing and close the 'Print' dialog.
67
Select a printer
Select a printer
Select a printer
Introduction
The 'Print' dialog contains a section for basic print settings and a section for extended
print settings. This topic shows you how to select the printer and configure the
printer related settings.
Select a printer
1. Click 'File' - 'Print' to open the 'Print' dialog.
2. Select the 'Printer' that you want to send your document to.
3. Specify the 'Job name'.
Note: By default, the PDF file name is used.
4. Specify the 'Number of sets'.
5. The 'Destination' setting allows you to select:
- 'Scheduled jobs' or 'Waiting jobs' (in case of the Océ VarioPrint 6160/6200/6250).
- 'Mailbox' or 'Scheduled jobs' (in case of the Océ VarioPrint 2100/2110)
Note: If the 'Destination' setting is defined in the Océ VarioPrint 2100/2110 Settings
Editor or in the Océ VarioPrint 6160/6200/6250 Settings Editor, then that
destination setting is always used for these printers. The Settings Editor is located
on the controller.
6. Specify the 'Operator note'.
Note: This 'Operator note' will be displayed on the Océ VarioPrint 6160/6200/6250
operator panel (in the 'Properties' of a job). It will also appear on the Job ticket when
you push the 'Ticket' button on the Océ VarioPrint 6160/6200/6250.
7. Select the 'Print range' ('All' or 'Selected sheets').
68
Chapter 9 Print a document
Split and merge
Split and merge
Introduction
The 'Print' dialog contains a section for basic print settings and a section for extended
print settings. This topic shows you how to specify the split and merge settings for
your job.
Split and merge
■
■
■
'None'
The document is printed on one printer.
'Split'
This setting will only print the marked (color) sheets.
If one side of a sheet is a color page, then the complete sheet is printed on a color
printer.
'Merge'
This setting will print your document and insert the marked (color) sheets at the
right place in the document.
When you select the 'Split' or 'Merge' option, you can select:
■ 'Use separate paper trays'
Select this option to allocate a separate paper tray for each type of insert sheet.
So, if you have five different insert sheets in your document, you need at least six
paper trays. One paper tray for the normal paper and five paper trays for the insert
pages.
If you do not select this option, the different insert sheets must be put in one paper
tray.
So, if you have two different insert sheets, then put the insert sheets cyclic (1-2,
1-2, ...) in one paper tray.
69
Specify the extended print settings
Optimize
Specify the extended print settings
Introduction
Click 'File' - 'Print...' to open the 'Print' dialog. The 'Print' dialog contains a section
for basic print settings and a section for extended print settings. This topic gives you
an overview of the extended print settings
Specify the extended print settings
The extended print settings section contains the following tabs:
Media
■ Imposition
■ Finishing
■ Image
■
70
Chapter 9 Print a document
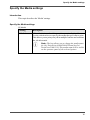
Specify the Media settings
Specify the Media settings
Introduction
This topic describes the 'Media' settings.
Specify the Media settings
[9]
[9] 'Media'
Setting
Description
'Media'
All media that is used within your document is displayed here.
Use the selection-box to specify the media that you want to print.
This allows you to print your job in multiple batches and combine
the job afterwards.
Note: The box allows you to change the media name
for Océ VarioPrint 6160/6200/6250 and for Océ
VarioPrint 2100/2110. This media name will be visible
on the operator panel of the selected printer.
71
Specify the Imposition settings
Specify the Imposition settings
Introduction
This topic describes the 'Imposition' settings.
Specify the 'Imposition' settings:
[10]
[10] 'Imposition'
(1 – 2)
Setting
Description
'Sheet size'
You can change the sheet size of your document here. This sheet
size will be used for the whole document. Select 'Custom' if you
want to create a custom sized sheet size.
Note: The 'Sheet size' option is disabled if your
document contains different media sizes.
The 'Portrait' and 'Landscape' settings allow you to specify the
sheet orientation.
'Same-up'
Select how many images you want to print on one side of the
sheet.
'1': One image.
'Maximum': Océ PRISMAaccess calculates the maximum
number of images that fit on one side of the sheet.
'Custom': Define the number of images yourself with the
'Horizontal' and 'Vertical' settings.
Use 'Binding edge outside' option to rotate the right-handed
image on the sheet 180 degrees.
For example, use this option when prepunched paper is used with
the punched holes on both ends of the paper.
Note: You can only select this setting if 'Same-up' is '
2'.
'Gutter'
Use this setting to specify the distance between the images on the
sheet.
'Bleed area'
With a 'Bleed area' you can print to the edge of the paper. Use this
option if your job has a colored background.
The 'Bleed area' refers to the area that is trimmed off when your
job is printed and cut to the finished size. This bleed area should
not contain text or other important information. The bleed area is
3 mm.
72
Chapter 9 Print a document
Specify the Imposition settings
[10] 'Imposition'
(2 – 2)
Setting
Description
'Horizontal
position'
Use this setting to move the image(s) horizontally to one side of
the sheet.
Note: If you want to shift the cover of a 'Booklet' to the
right, you need a negative horizontal shift. This is
because a cover is actually the back side of a sheet.
'Vertical
position'
Use this setting to move the image(s) vertically to one side of the
sheet.
Trim and fold
marks
Use this setting to add trim and fold marks to your document.
These marks indicate where to trim and/or fold the printed sheets.
'Creep
Use 'Creep compensation' to make sure that the margins on all
compensation' pages are equal after the booklet is folded and trimmed.
The 'Creep compensation' factor is calculated from the
'Thickness' of the paper (see Configure the Media catalog).
For example:
You have 30 sheets, which you fold to make a booklet. The sheets
in the middle of the booklet stick out compared with the cover of
the booklet. When you trim the sheets that stick out, the distance
between the page content and the sheet edges is changed.
This means that the page content creeps towards the edge of the
sheets due to the trim action.
Creep compensation also compensates for the change of distance
between the page content and the spine of the booklet.
With the 'Gain' option you can increase or decrease the calculated
'Creep compensation' factor.
73
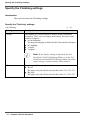
Specify the Finishing settings
Specify the Finishing settings
Introduction
This topic describes the 'Finishing' settings.
Specify the 'Finishing' settings:
[11]
[11] 'Finishing'
(1 – 3)
Setting
Description
'Staple'
The stapling of your document is defined in the 'Document'
workspace. Here, you can change that setting. You can set the
number of staples:
■ 'As in document'
You keep the stapling as defined in the 'Document' workspace.
■ 'No stapling'
■ '1 staple'
■ '2 staples'
Note: If the 'Staple' setting is defined in the Océ
VarioPrint 2100/2110 Settings Editor or in the Océ
VarioPrint 6160/6200/6250 Settings Editor, then that
staple setting is always used for these printers.
'Sort'
74
You can specify the sorting method:
■ 'By set'
The pages of a job will be sorted in the order 123, 123, 123.
■ 'By page'
The pages of a job will be sorted in the order 111, 222, 333.
Chapter 9 Print a document
Specify the Finishing settings
[11] 'Finishing'
(2 – 3)
Setting
Description
'Offset stacking'
You can select:
■ 'Off'
The job is stacked in the 'Output location' as one straight stack.
■ 'By set'
The job is stacked in the 'Output location' with a small offset
between each set.
■ 'By Finishing group'
The job is stacked in the 'Output location' with a small offset
between each finishing group. You have defined these
finishing groups in the 'Document' workspace.
Note: If the 'Offset stacking' setting is defined in the
Océ VarioPrint 2100/2110 Settings Editor or in the
Océ VarioPrint 6160/6200/6250 Settings Editor, then
that offset stacking is always used for these printers.
'Output location'
Depending on the Océ PRISMAaccess configuration and the
selected printer, you can select an available 'Output location'.
Note: If the 'Output location' setting is defined in the
Océ VarioPrint 2100/2110 Settings Editor or in the
Océ VarioPrint 6160/6200/6250 Settings Editor, then
that output location is always used for these printers.
'Output location for Any unused cyclic media, such as tab media, is deposited in an
unused cyclic media' 'Output location'.
Depending on the Océ PRISMAaccess configuration and the
selected printer, you can select an available 'Output location'.
Note: If the 'Output location' setting is defined in the
Océ VarioPrint 2100/2110 Settings Editor or in the
Océ VarioPrint 6160/6200/6250 Settings Editor, then
that output location is always used for these printers.
75
Specify the Finishing settings
[11] 'Finishing'
(3 – 3)
Setting
Description
'Rotate 180 degrees'
The 'Output location' of a job can be an 'External finisher'. Some
external finishers require a 180 degree rotation of the jobs before
the jobs go into the external finisher. The documentation of the
external finisher describes how a job must go into the external
finisher.
If a 180 degree rotation is required, you select this setting.
Note: If the 'Rotate 180 degrees' setting is defined in
the Océ VarioPrint 2100/2110 Settings Editor or in the
Océ VarioPrint 6160/6200/6250 Settings Editor, then
that rotate setting is always used for these printers.
'Reverse order'
By default, the first sheet of the job is delivered first.
When you select the 'Reverse order' setting, the last sheet of the
job is delivered first.
Example
Normal order: 1-2 3-4 5-6 7-8 9-10
'Reverse order': 10-9-8-7-6-5-4-3-2-1
'Swap pages'
Use this setting to turn the pages in the 'Output location'.
Example
Normal order: 1-2 3-4 5-6 7-8 9-10
'Swap pages': 2-1 4-3 6-5 8-7 10-9
Note: 'Swap pages' & 'Reverse order':
9-10-7-8-5-6-3-4-1-2
'First sheet to end'
76
Select this setting if you want to move the first sheet to the end of
the job. You can use this setting, for example, if the first A3 sheet
is used as a cover sheet for the rest of the A4 job.
Chapter 9 Print a document
Specify the Image settings
Specify the Image settings
Introduction
This topic describes the Image settings.
Specify the Image settings
[12]
[12] Image
Setting
Description
'Resolution'
You can select the print qualities for your print job.
Note: The print quality that you can select depends on
the printer.
'Color
management'
You can select whether the color to grayscales conversion is done
by the printer or by the application.
77
Page programmed settings vs. printer capabilities
Page programmed settings vs. printer
capabilities
Page programmed settings vs. printer capabilities
Introduction
You can send documents with page programmed settings to any printer. However,
some printers cannot process all programmed settings. In such a case a printer
window appears. With the printer window you can set the programmed settings to
the capabilities of the selected printer.
For some printers certain page programmed settings can be lost because the printer
has not all the desired capabilities.
Match the programmed settings to the printer capabilities
1. Map the media types. on page 79
2. Define the print settings on page 82
78
Chapter 9 Print a document
Map media types
Map media types
Introduction
Océ PRISMAaccess supports tray-oriented and media-type-oriented printers.
In the 'map media' area of the printer window, the media types used in the document
can be mapped on trays or media types which are supported by the printer.
The map media area
The 'map media' area contains 2 columns:
[13]
[13] Map media columns
Column
Description
Media in
document
Displays the media used in the document.
Use this
Displays the media or tray that is assigned.
A marked sheet is defined as a separate media type. When various marked sheets
have the same media properties, then these sheets are defined as the same media
type.
For example, there are five marked sheets. Three marked sheets have paper size A4
and the paper color is red. These three sheets are defined as the same media type. The
other two marked sheets have paper size A3 and A5. Each of these sheets is defined
as a separate media type.
In the column 'Media in document', icons provide feedback about warnings and
errors which are related to media types. The following icons are used:
[14]
[14] Feedback icons
Icon
Description
[1]
Media property cannot be processed by the printer.
[2]
Media property is not completely recognized by the printer.
79
Changing / Map Assigned Trays in Tray-based Printers
Changing / Map Assigned Trays in Tray-based Printers
Introduction
This procedure shows you how to change the assigned trays in the tray-based printers
like the Océ VarioPrint 2050-70 (Océ 31x5).
You can select the trays in the 'Use this' column in the 'map media' area.
Change / map assigned trays in the tray-based printers
1. Click the 'Print job' button.
The Print dialog appears.
2. Select a tray-based printer.
3. Click the 'Print' button.
The printer window opens.
4. Select a tray in the 'Use this' column for each media type.
5. Click the 'OK' button.
80
Chapter 9 Print a document
Changing / Map Assigned Media Definitions in Media-based Printers
Changing / Map Assigned Media Definitions in Media-based
Printers
Introduction
This procedure shows you how to change the assigned media definitions for
media-based printers, like the Océ VarioPrint 2105 or Océ CPS700 / CPS900.
You can change the assigned media definitions in the 'use this' column in the 'map
media' area.
When you select 'Other' as the media type, the 'media type' window opens.
Change / map assigned media definitions in media-based printers
1. Click the 'Print job' button.
The Print dialog appears.
2. Select a media-based printer.
3. Click the 'Print' button.
The printer window opens.
4. Select 'Other...' in the 'use this' column.
The 'media type' window opens.
5. Define the settings of the media type.
Click the 'OK' button.
81
Define the print settings
Define the print settings
Introduction
You can define the 'Print settings' of the document.
Define the printer driver settings
1. Click 'Properties' in the 'Print settings' area of the printer module.
The printer driver opens.
2. You can change the print options in the printer driver. For example, the number of
copies.
Note: The settings in the printer driver that interfere with the page program settings
can result in unpredictable print results.
82
Chapter 9 Print a document
Print on the Océ CS170/CS220
Print on the Océ CS170/CS220
Introduction
The Océ CS170/CS220 is a tray-based printer. The Océ CS170/CS220 driver allows
you to print the marked color pages on the Océ CS170/CS220 (Fiery X3e 31C-M
PS).
Print on the Océ CS170/CS220
1. Click the 'Print job' button.
The Print dialog appears.
2. Select the Océ CS170/CS220 printer.
3. Click the 'Print' button.
The Océ CS170/CS220 media type window opens.
4. Select the media type that you want to print.
5. Click the 'OK' button.
83
Print on the Océ CS230
Print on the Océ CS230
Introduction
The Océ CS230 is a tray-based printer. The Océ CS230 driver allows you to print the
marked color pages on the Océ CS230. The Océ CS230 uses controller 'Generic
35C-1 PS'.
Print on the Océ CS230
1. Click the 'Print job' button.
The Print dialog appears.
2. Select the Océ CS230 printer.
3. Click the 'Print' button.
The Océ CS230 media type window opens.
4. Select the media type that you want to print.
5. Click the 'OK' button.
84
Chapter 9 Print a document
Print on the Océ CS230/CS520
Print on the Océ CS230/CS520
Introduction
The Océ CS230/CS520 is a media-based printer. The Océ CS230/CS520 driver
allows you to print the marked color pages on the Océ CS230/CS520.
Note: The Océ CS230/CS520 printers use the Fiery controller 'X3e TY 35C-KM PS
v1.0' and Fiery controller 'S300 50C-K v1.1'.
Print on the Océ CS230/CS520
1. Click the 'Print job' button.
The Print dialog appears.
2. Select the Océ CS230/CS520 printer.
3. Click the 'Print' button.
The Océ CS230/CS520 media type window opens.
4. Select the media type that you want to print.
5. Click the 'OK' button.
85
Print on the Océ CS650
Print on the Océ CS650
Introduction
The Océ CS650 is a media-based printer. You can change the assigned media
definitions in the Océ CS650. You can change them in the 'Use this' column in the
'map media' area.
When you select 'Other' as the media type, the Océ CS650 media type window
opens.
In this window you can define:
'Size'
■ 'Weight'
■ 'Material'
■ 'Punched'
■
Print on the Océ CS650
1. Click the 'Print job' button.
The Print dialog appears.
2. Select the Océ CS650 printer.
3. Click the 'Print' button.
The printer window opens.
4. Select 'Other...' in the 'Use this' column.
The Océ CS650 media type window opens.
5. Define the settings of the media type.
Click the 'OK' button.
86
Chapter 9 Print a document
Print on the Océ 31x5
Print on the Océ 31x5
Introduction
The Océ 31x5 is a tray-based printer. The Océ 31x5 driver allows you assign each
used media type to a tray of the printer.
You can select the trays in the 'Use this' column in the 'map media' area.
Printing on the Océ 31x5
1. Click the 'Print job' button.
The Print dialog appears.
2. Select the Océ 31x5 printer.
3. Click the 'Print' button.
The Océ 31x5 media type window opens.
4. Select a tray in the 'Use this' column for each media type.
5. Click the 'OK' button.
87
Print on the Océ CPS700
Print on the Océ CPS700
Introduction
The Océ CPS700 is a media-based printer. You can change the assigned media
definitions in the Océ CPS700. You can change them in the 'Use this' column in the
'map media' area.
When you select 'Other' as the media type, the Océ CPS700 media type window
opens.
In this window you can define:
'Type'
■ 'Size'
■ 'Weight'
■
Note: The 'Color' option is fixed to 'White'. The option 'Special front' is disabled.
Print on the Océ CPS700
1. Click the 'Print job' button.
The Print dialog appears.
2. Select the Océ CPS700 printer.
3. Click the 'Print' button.
The printer window opens.
4. Select 'Other...' in the 'Use this' column.
The Océ CPS700 media type window opens.
5. Define the settings of the media type.
Click the 'OK' button.
88
Chapter 9 Print a document
Print on the Océ CPS700_910c
Print on the Océ CPS700_910c
Introduction
The Océ CPS700_910c is a media-based printer. You can change the assigned media
definitions in the Océ CPS700_910c. You can change them in the 'Use this' column
in the 'map media' area.
When you select 'Other' as the media type, the Océ CPS700_910c media type
window opens.
In this window you can define:
■ 'Type'
■ 'Size'
■ 'Weight'
Note: The 'Color' option is fixed to 'White'. The 'Special front' option is disabled.
Print on the Océ CPS700_910c
1. Click the 'Print job' button.
The Print dialog appears.
2. Select the Océ CPS700_910c printer.
3. Click the 'Print' button.
The printer window opens.
4. Select 'Other...' in the 'Use this' column.
The Océ CPS700_910c media type window opens.
5. Define the settings of the media type.
Click the 'OK' button.
89
Print on the Océ CPS800/CPS900
Print on the Océ CPS800/CPS900
Introduction
The Océ CPS800/CPS900 is a media-based printer. You can change the assigned
media definitions in the Océ CPS800/CPS900. You can change them in the 'Use this'
column in the 'map media' area.
When you select 'Other' as the media type, the Océ CPS800/CPS900 media type
window opens.
In this window you can define:
■ 'Size'
■ 'Material'
■ 'Type'
■ 'Weight'
Note: This procedure is valid for the Océ CPS800 R1 and Océ CPS800/CPS900 R2
with the EFI controller Océ 1000C v1.2 or higher or the EFI controller Océ 960C
v1.2 and higher.
Print on the Océ CPS800/CPS900
1. Click the 'Print job' button.
The Print dialog appears.
2. Select the Océ CPS800/CPS900 printer.
3. Click the 'Print' button.
The printer window opens.
4. Select 'Other...' in the 'Use this' column.
The Océ CPS800/CPS900 media type window opens.
5. Define the settings of the media type.
Click the 'OK' button.
90
Chapter 9 Print a document
Print on the Océ CPS900
Print on the Océ CPS900
Introduction
The Océ CPS900 is a media-based printer. You can change the assigned media
definitions in the Océ CPS900. You can change them in the 'Use this' column in the
'map media' area.
When you select 'Other' as the media type, the Océ CPS900 media type window
opens.
In this window you can define:
■ 'Material'
■ 'Type'
■ 'Size'
■ 'Weight'
Note: The 'Color' option is fixed to 'White'. The 'Special front' option is disabled.
Note: This procedure is valid for the Océ CPS900 R1 with the controller Océ 1000C
1.1 and the controller Océ 960C 1.1.
Print on the Océ CPS900
1. Click the 'Print job' button.
The Print dialog appears.
2. Select the Océ CPS900 printer.
3. Click the 'Print' button.
The printer window opens.
4. Select 'Other...' in the 'Use this' column.
The Océ CPS900 media type window opens.
5. Define the settings of the media type.
Click the 'OK' button.
91
Print on the Xerox server DocuSP v1.32
Print on the Xerox server DocuSP v1.32
Introduction
The Xerox server DocuSP v1.32 is media-based. The Xerox server DocuSP v1.32
supports the DocuTech 6180 and the DocuTech 6135 printers. You can change the
assigned media definitions in the Xerox server DocuSP v1.32. You can change them
in the 'Use this' column in the 'map media' area.
When you select 'Other' as the media type, the Xerox server DocuSP v1.32 media
type window opens.
In this window you can define:
'Size'
■ 'Color'
■ 'Type'
■ 'Weight'
■
Print on the Xerox server DocuSP v1.32
1. Click the 'Print job' button.
2.
3.
4.
5.
92
The Print dialog appears.
Select the Xerox server DocuSP v1.32.
Click the 'Print' button.
The printer window opens.
Select 'Other...' in the 'Use this' column.
The Xerox server DocuSP v1.32 media type window opens.
Define the settings of the media type.
Click the 'OK' button.
Chapter 9 Print a document
Print on the Océ VarioPrint 2105
Print on the Océ VarioPrint 2105
Introduction
The Océ VarioPrint 2105 is a media-based printer. You can change the assigned
media definitions in the Océ VarioPrint 2105. You can change them in the 'Use this'
column in the 'map media' area.
When you select 'Other' as the media type, the Océ VarioPrint 2105 media type
window opens.
In this window you can define:
■ 'Type'
■ 'Size'
■ 'Weight'
■ 'Color'
■ 'Special front'
Print on the Océ VarioPrint 2105
1. Click the 'Print job' button.
2.
3.
4.
5.
The Print dialog appears.
Select the Océ VarioPrint 2105 printer.
Click the 'Print' button.
The printer window opens.
Select 'Other...' in the 'Use this' column.
The Océ VarioPrint 2105 media type window opens.
Define the settings of the media type.
Click the 'OK' button.
93
Print on the Océ PRISMAproduction R3.0.4
Print on the Océ PRISMAproduction R3.0.4
Introduction
The Océ PRISMAproduction controller is media-based. You can change the
assigned media definitions in the Océ PRISMAproduction controller. You can
change them in the 'Use this' column in the 'map media' area.
If you select 'Other' as the media type, the Océ PRISMAproduction media type
window opens.
Print on the Océ PRISMAproduction
1. Click the 'Print job' button.
The Print dialog appears.
2. Select the Océ PRISMAproduction controller.
3. Click the 'Print' button.
The printer window opens.
4. Select 'Other...' in the 'Use this' column.
The Océ PRISMAproduction media type window opens.
5. Define the settings of the media type.
Click the 'OK' button.
94
Chapter 9 Print a document
Print on the Océ VarioPrint 2090
Print on the Océ VarioPrint 2090
Introduction
The Océ VarioPrint 2090 is a media-based printer. You can change the assigned
media definitions in the Océ VarioPrint 2090. You can change them in the 'Use this'
column in the 'map media' area.
When you select 'Other' as the media type, the Océ VarioPrint 2090 media type
window opens.
In this window you can define:
■ 'Type'
■ 'Size'
Print on the Océ VarioPrint 2090
1. Click the 'Print job' button.
The Print dialog appears.
2. Select the Océ VarioPrint 2090 printer.
3. Click the 'Print' button.
The printer window opens.
4. Select 'Other...' in the 'Use this' column.
The Océ VarioPrint 2090 media type window opens.
5. Define the settings of the media type.
Click the 'OK' button.
95
Print on the Océ VarioPrint 2100/2110
Print on the Océ VarioPrint 2100/2110
Introduction
The Océ VarioPrint 2100/2110 is a media-based printer. You can change the assigned
media definitions in the Océ VarioPrint 2100/2110. You can change them in the 'Use
this' column in the 'map media' area.
When you select 'Other' as the media type, the Océ VarioPrint 2100/2110 media type
window opens.
In this window you can define:
'Type'
■ 'Size'
■ 'Width'
■ 'Height'
■ 'Unit size'
■ 'Weight'
■ 'Color'
■ 'Special front'
■
Print on the Océ VarioPrint 2100/2110
1. Click the 'Print job' button.
The Print dialog appears.
2. Select the Océ VarioPrint 2100/2110 printer.
3. Click the 'Print' button.
The printer window opens.
4. Select 'Other...' in the 'Use this' column.
The Océ VarioPrint 2100/2110 media type window opens.
5. Define the settings of the media type.
Click the 'OK' button.
96
Chapter 9 Print a document
Index
Index
A
Assigned media
change . . . . . . . . . . . . . . . . . . . . . . . . . . . . .
map . . . . . . . . . . . . . . . . . . . . . . . . . . . . . . . .
Assigned trays
change . . . . . . . . . . . . . . . . . . . . . . . . . . . . .
map . . . . . . . . . . . . . . . . . . . . . . . . . . . . . . . .
Attach file
Other digital sources . . . . . . . . . . . . . . . . . .
I
81
81
Icons . . . . . . . . . . . . . . . . . . . . . . . . . . . . . . . . . . 17
Import
Print jobs . . . . . . . . . . . . . . . . . . . . . . . . . . . 47
80
80
J
Job
26
B
Buttons . . . . . . . . . . . . . . . . . . . . . . . . . . . . . . . . 67
C
Category
Add . . . . . . . . . . . . . . . . . . . . . . . . . . . . . . . .
Delete . . . . . . . . . . . . . . . . . . . . . . . . . . . . . .
Rename . . . . . . . . . . . . . . . . . . . . . . . . . . . .
Color sheets . . . . . . . . . . . . . . . . . . . . . . . . . . . .
Columns
Configure . . . . . . . . . . . . . . . . . . . . . . . . . . .
Convert file
To PDF . . . . . . . . . . . . . . . . . . . . . . . . . . . . .
54
55
56
69
33
34
32
L
Last used . . . . . . . . . . . . . . . . . . . . . . . . . . . . . . . 67
26
67
82
82
68
20
E
E-mail
Preview job notification . . . . . . . . . . . . . . . .
Send . . . . . . . . . . . . . . . . . . . . . . . . . . . . . . .
Export
Print jobs . . . . . . . . . . . . . . . . . . . . . . . . . . .
Extended print settings . . . . . . . . . . . . . . . . . . . .
25
60
68
68
61
58
24
D
Defaults . . . . . . . . . . . . . . . . . . . . . . . . . . . . . . .
Define
Print settings . . . . . . . . . . . . . . . . . . . . . . . . .
Define print settings . . . . . . . . . . . . . . . . . . . . . .
Destination . . . . . . . . . . . . . . . . . . . . . . . . . . . . .
Digital file . . . . . . . . . . . . . . . . . . . . . . . . . . . . .
Multiple files . . . . . . . . . . . . . . . . . . . . . . . .
Job confirmation options . . . . . . . . . . . . . . . . . .
Job name . . . . . . . . . . . . . . . . . . . . . . . . . . . . . . .
Job queue . . . . . . . . . . . . . . . . . . . . . . . . . . . . . .
Job ready options . . . . . . . . . . . . . . . . . . . . . . . .
Job received options . . . . . . . . . . . . . . . . . . . . . .
Job ticket
Change . . . . . . . . . . . . . . . . . . . . . . . . . . . . .
Print . . . . . . . . . . . . . . . . . . . . . . . . . . . . . . .
View . . . . . . . . . . . . . . . . . . . . . . . . . . . . . . .
52
52
48
70
M
Mailbox . . . . . . . . . . . . . . . . . . . . . . . . . . . . . . . .
Map
media types . . . . . . . . . . . . . . . . . . . . . . . . . .
Mark
Not ready . . . . . . . . . . . . . . . . . . . . . . . . . . .
Media catalog . . . . . . . . . . . . . . . . . . . . . . . . . . .
Media definitions . . . . . . . . . . . . . . . . . . . . . . . .
Media-based printers . . . . . . . . . . . . . . . . . . . . .
Memory . . . . . . . . . . . . . . . . . . . . . . . . . . . . . . .
Merge . . . . . . . . . . . . . . . . . . . . . . . . . . . . . . . . .
Merge files . . . . . . . . . . . . . . . . . . . . . . . . . . . . .
Move . . . . . . . . . . . . . . . . . . . . . . . . . . . . . . . . . .
Move file
Down . . . . . . . . . . . . . . . . . . . . . . . . . . . . . .
Up . . . . . . . . . . . . . . . . . . . . . . . . . . . . . . . . .
Move job
Print jobs . . . . . . . . . . . . . . . . . . . . . . . . . . .
Multiple files . . . . . . . . . . . . . . . . . . . . . . . . . . .
68
79
39
50
81
81
68
69
26
29
26
26
29
25
97
Index
N
R
New job
Create . . . . . . . . . . . . . . . . . . . . . . . . . . . . . . 42
Number of sets . . . . . . . . . . . . . . . . . . . . . . . . . . 68
Ready jobs
Display . . . . . . . . . . . . . . . . . . . . . . . . . . . . . 28
Redistill file . . . . . . . . . . . . . . . . . . . . . . . . . . . . . 26
O
S
Océ 31x5
Map media . . . . . . . . . . . . . . . . . . . . . . . . . . 87
Océ CPS700
Map media . . . . . . . . . . . . . . . . . . . . . . . . . . 88
Océ CPS700_910c
Map media . . . . . . . . . . . . . . . . . . . . . . . . . . 89
Océ CPS800/CPS900
Map media . . . . . . . . . . . . . . . . . . . . . . . . . . 90
Océ CPS900
Map media . . . . . . . . . . . . . . . . . . . . . . . . . . 91
Océ CS170/CS220
Map media . . . . . . . . . . . . . . . . . . . . . . . . . . 83
Océ CS230
Map media . . . . . . . . . . . . . . . . . . . . . . . . . . 84
Océ CS230/CS520
Map media . . . . . . . . . . . . . . . . . . . . . . . . . . 85
Océ CS650
Media definitions . . . . . . . . . . . . . . . . . . . . . 86
Océ PRISMAproduction
Map media . . . . . . . . . . . . . . . . . . . . . . . . . . 94
Océ VarioPrint 2100/2110
Map media . . . . . . . . . . . . . . . . . . . . . . . . . . 96
Océ VarioPrint 2105
Map media . . . . . . . . . . . . . . . . . . . . . . . . . . 93
Océ VP2090
Map media . . . . . . . . . . . . . . . . . . . . . . . . . . 95
Operator note . . . . . . . . . . . . . . . . . . . . . . . . . . . 68
Other digital source . . . . . . . . . . . . . . . . . . . . . . . 20
Save . . . . . . . . . . . . . . . . . . . . . . . . . . . . . . . . . . . 67
Scheduled jobs . . . . . . . . . . . . . . . . . . . . . . . . . . 68
Sorting order . . . . . . . . . . . . . . . . . . . . . . . . . . . . 23
Split . . . . . . . . . . . . . . . . . . . . . . . . . . . . . . . . . . . 69
Supported printers . . . . . . . . . . . . . . . . . . . . . . . . 66
T
Test print . . . . . . . . . . . . . . . . . . . . . . . . . . . . . . . 67
Tray-based printers . . . . . . . . . . . . . . . . . . . . . . . 80
U
Unprocessed jobs
Display . . . . . . . . . . . . . . . . . . . . . . . . . . . . . 27
Use separate paper trays . . . . . . . . . . . . . . . . . . . 69
W
Waiting jobs . . . . . . . . . . . . . . . . . . . . . . . . . . . . . 68
X
Xerox server DocuSP v1.32
Map media . . . . . . . . . . . . . . . . . . . . . . . . . . 92
Z
Z000001 . . . . . . . . . . . . . . . . . . . . . . . . . . . . . . . 50
P
Paper original . . . . . . . . . . . . . . . . . . . . . . . . . . . 20
Paper trays . . . . . . . . . . . . . . . . . . . . . . . . . . . . . . 69
Print . . . . . . . . . . . . . . . . . . . . . . . . . . . . . . . .67, 68
Print dialog . . . . . . . . . . . . . . . . . . . . . . . . . . . . . 66
Print jobs
Control . . . . . . . . . . . . . . . . . . . . . . . . . . . . . 22
Create . . . . . . . . . . . . . . . . . . . . . . . . . . . . . . 42
Delete . . . . . . . . . . . . . . . . . . . . . . . . . . . . . . 37
Print range . . . . . . . . . . . . . . . . . . . . . . . . . . . . . . 68
Printer capabilities . . . . . . . . . . . . . . . . . . . . . . . 78
Printer options . . . . . . . . . . . . . . . . . . . . . . . . . . . 57
98
Index
99
Index
100